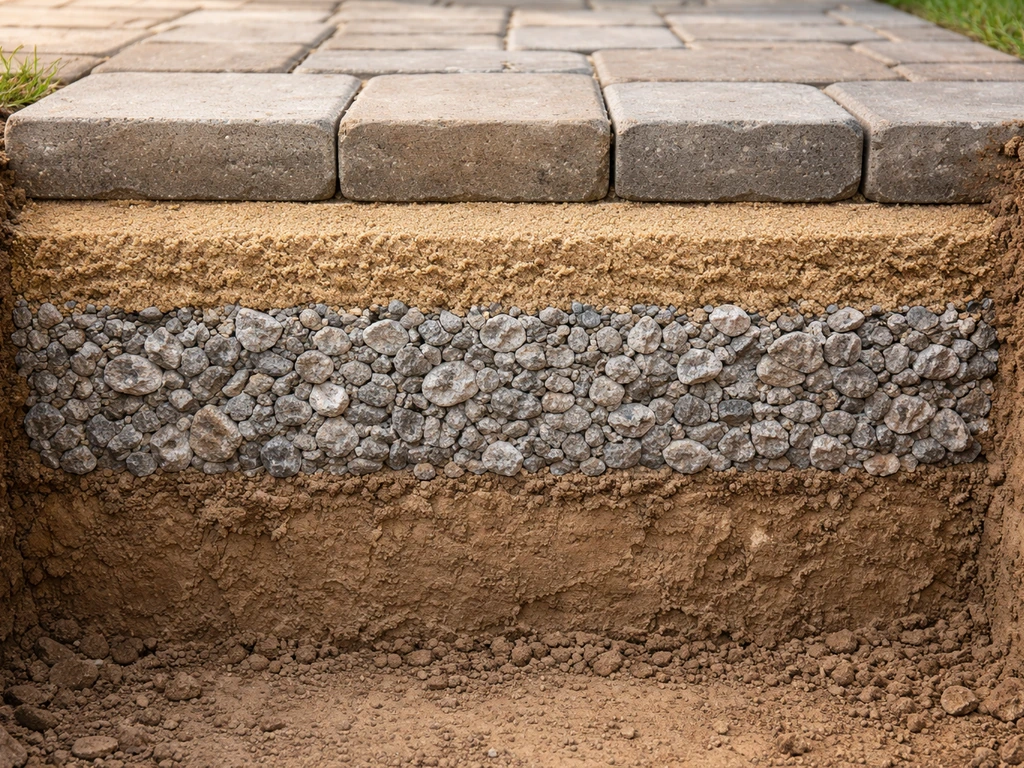
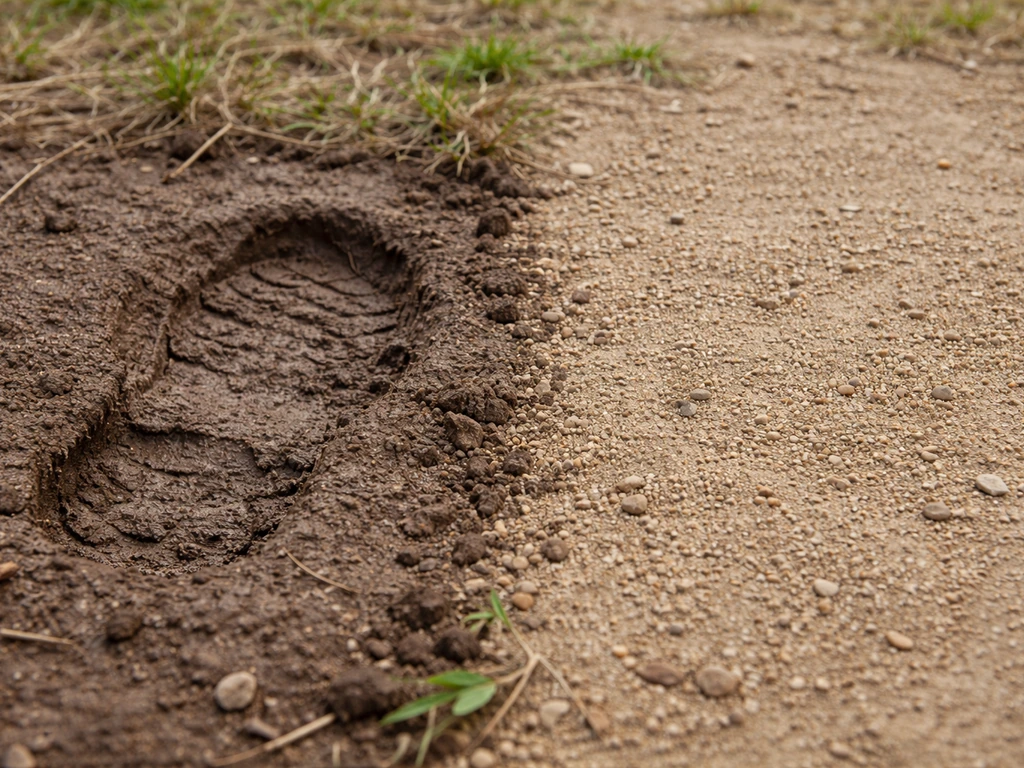
For most DIY paver patios, you need to dig down 7 to 9 inches below your desired finished surface. That breaks down as 4 to 6 inches of compacted gravel base, 1 inch of bedding sand, and the thickness of your pavers (usually 2 3/8 inches for standard concrete pavers). If you're pouring a concrete slab instead, plan on 8 to 12 inches of total excavation depending on your frost depth and soil conditions. Those numbers are your starting point, but your exact depth depends on a few variables I'll walk you through below.
How Deep to Dig a Patio: Depth Guide for Pavers and Slabs
Nolan Lennox
11 May 2026
Why getting the depth right actually matters

Digging too shallow is one of the most common and expensive mistakes in a DIY patio project. If your base is too thin, pavers shift and settle. If you don't account for drainage slope during excavation, water pools toward your house instead of away from it. And if you ignore the finished surface height from the start, you end up with a patio that sits too high or too low relative to your door threshold, lawn, or existing steps. These aren't cosmetic problems, they're structural ones that mean tearing up your work and starting over.
The finished height drives every depth decision. You need to know exactly where you want the top of your patio to sit before you put a shovel in the ground. That target elevation tells you how deep to dig, how much base material to use, and how to pitch the surface so water runs away from your house at the right rate. Get it right at this stage and everything downstream gets easier.
Set your finished elevation before you dig anything
Your first job isn't digging, it's measuring. Start by identifying a fixed reference point: the bottom of a door threshold, the top of an existing step, or the edge of your foundation. From that point, decide how high or low you want your patio surface to sit. Ideally, your finished patio should sit roughly 1 to 2 inches below a door threshold so water can't wick toward the house, and at least 1 inch below any foundation siding or flashing.
Once you have that target elevation, drive stakes around the perimeter of your patio area and run string lines at the finished surface height. Use a line level to confirm the strings are level, then adjust them to build in your drainage slope. The standard slope for a patio is 1/8 to 1/4 inch of drop per foot of run, pitched away from the house. For a 12-foot-wide patio, that means the far edge of your string sits 1.5 to 3 inches lower than the house end. That slope goes into your excavation, not just the surface, so you'll be digging on an angle across the whole area.
These string lines become your master reference. Every depth measurement you take during excavation is measured down from these strings, not from some arbitrary point at ground level. Keep them up and in good shape throughout the dig.
How to calculate your exact excavation depth
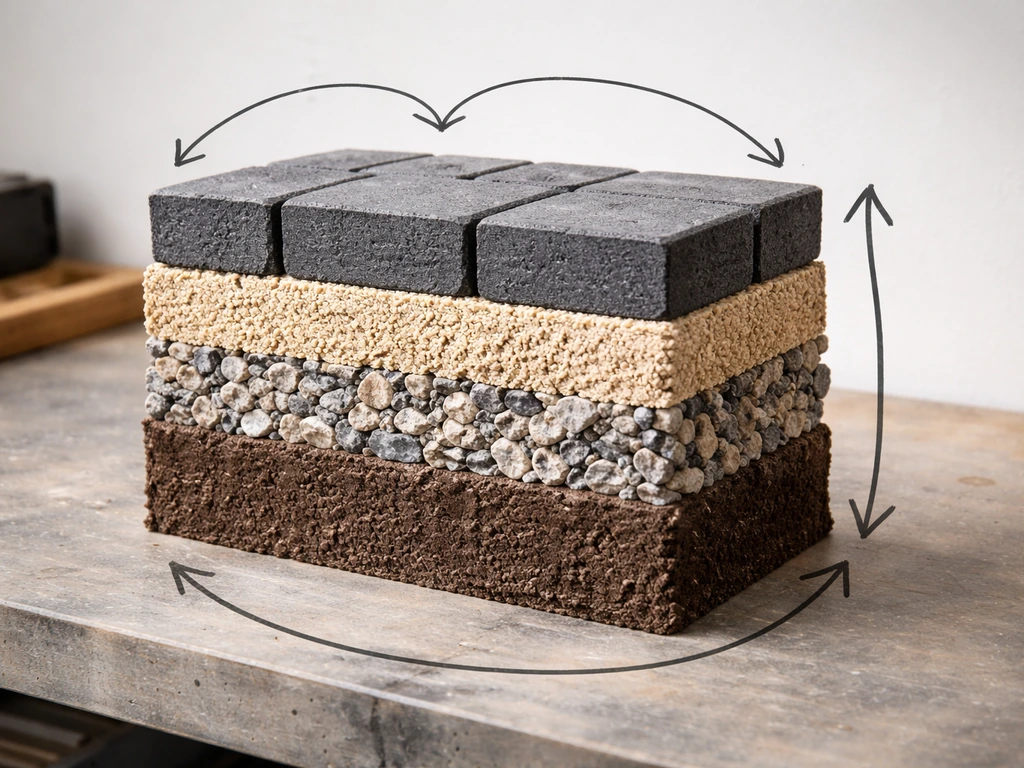
The math is simple once you know your layers. Work backward from the finished surface and add up the thickness of every layer that sits below it. That total is how deep you need to dig from your finished surface string line.
For a paver patio, the formula looks like this: excavation depth = paver thickness + bedding sand thickness + compacted base thickness. Standard 2 3/8-inch concrete pavers plus 1 inch of bedding sand plus 4 to 6 inches of compacted gravel base gives you 7 3/8 to 9 3/8 inches of total excavation below finished grade. If you want to avoid concrete, stick with a paver patio build-up instead of pouring a cement slab. Round up to a clean 8 or 9 inches and you're in good shape. One useful shortcut from Mutual Materials: the top of your compacted base should sit exactly 3 inches below your finished paver elevation (accounting for the 1-inch sand bed plus 2 3/8-inch paver thickness with the standard paver size).
For a poured concrete slab patio, the math changes. A 4-inch slab needs at least 4 inches of compacted gravel sub-base, putting you at 8 inches minimum. Add a couple of inches of buffer in soft or poorly draining soils and you're looking at 10 to 12 inches. If you're in a freeze-thaw climate, that sub-base thickness may need to go deeper still, which I'll cover in the soil and frost section.
Typical dig depths by patio type
| Patio Type | Base Thickness | Setting Layer | Surface Thickness | Total Excavation Depth |
|---|---|---|---|---|
| Concrete pavers (pedestrian) | 4–6 in. compacted gravel | 1 in. bedding sand | 2 3/8 in. (standard paver) | 7–9 in. |
| Natural stone (flagstone) | 4–6 in. compacted gravel | 1 in. bedding sand | 1.5–2 in. (varies) | 6.5–9 in. |
| Poured concrete slab (4 in.) | 4–6 in. compacted gravel | None (poured directly) | 4 in. slab | 8–10 in. |
| Poured concrete slab (cold climates) | 6–8 in. compacted gravel | None | 4 in. slab | 10–12 in. |
| Turfstone / grid pavers | 6 in. compacted base | 1 in. screeded sand | Varies by unit | 7–9 in. minimum |
These are starting ranges, not guarantees. Your site conditions can push you deeper, and that's normal. A neighbor's patio at 7 inches might need to be your patio at 10 inches if your soil drains poorly or your winters are harsh. The table above gives you a solid baseline to build from.
When soil, drainage, or frost push you deeper
Soft or clay-heavy soil
If you dig down and the soil feels spongy, compresses underfoot, or holds a lot of moisture, you're in soft or expansive soil. This type of ground can't support a thin base layer without settling. Add 2 to 4 extra inches of compacted gravel base to compensate. In extreme cases, you may need to dig out 6 to 8 inches of soft material and replace it entirely with compacted crushed stone before you even start your base buildup. When you push a screwdriver into the subgrade and it sinks more than an inch with light pressure, plan for a deeper excavation.
Poor drainage
A site where water sits after rain needs either a thicker gravel base to improve drainage or, in bad cases, a perforated drain pipe at the bottom of your excavation. Good drainage is actually one of the best defenses against frost heave because it removes the moisture that freezes into ice lenses under your patio. If your site stays wet, don't try to fix it with minimal base depth. Dig deeper, add more stone, and slope everything aggressively toward an outlet.
Freeze-thaw climates and frost depth
Frost heave is what happens when frozen ground expands and pushes your patio up from below. It's the main reason patios in cold climates need a thicker base than patios in mild ones. The goal is to get your base down below or near the local frost depth with materials (compacted gravel) that don't hold water and freeze. In Minnesota and similar climates, frost can penetrate 4 feet deep. You're not going to dig a 4-foot-deep patio, so the practical approach is maximizing your compacted granular base depth (non-frost-susceptible material) and ensuring good drainage to limit the water available to freeze. Most cold-climate paver patio guides recommend 6 to 8 inches of compacted base minimum. For slab work in cold areas, check your local building code for minimum footing depth requirements, because some jurisdictions require specific depths by zone. Before you start building patio without permit, it helps to review your local building code and inspection requirements, since minimum depths can be zone-specific check your local building code.
Step-by-step digging and base prep checklist
- Mark your patio perimeter with stakes and string lines at your target finished elevation. Use spray paint or marking chalk to outline the dig area on the ground, including a few extra inches on each side for maneuvering.
- Call 811 (or your country's equivalent) to have underground utilities marked before you break ground. This is non-negotiable.
- Set your string lines with the drainage slope built in: 1/8 to 1/4 inch of drop per foot, running away from the house. Double-check with a line level.
- Begin digging. Measure your total excavation depth from the string lines downward (not from the existing ground surface). Dig consistently, checking depth at multiple points across the area as you go.
- Remove all sod, roots, and organic material from the bottom of the excavation. Organic matter compresses and causes settling. If you hit soft subgrade, keep digging and replace it with compacted gravel.
- Once excavation is complete, compact the native subgrade soil with a plate compactor before adding any base material. This is a step a lot of DIYers skip and regret later.
- Add base material (compacted gravel or crushed stone) in layers no more than 3 to 4 inches thick, compacting each layer before adding the next. Do not dump all your gravel in at once and compact it in one pass.
- Check your base depth and slope at multiple points across the area using a tape measure from your string lines. Your compacted base top should be exactly paver thickness plus 1 inch (for bedding sand) below your finished surface string.
- Spread bedding sand to a nominal 1-inch uncompacted depth, screed it flat, and do not compact it before placing pavers. The weight of the pavers and a final compaction pass will settle it into place.
- After paver installation and final compaction, verify finished surface elevation against your string lines. Finished paver surfaces should sit 1/8 to 1/4 inch above edge restraints to account for minor future settlement.
Mistakes that will haunt your patio for years
- Measuring excavation depth from the existing ground surface instead of from your finished elevation string line. Your yard isn't flat, so this almost always gives you inconsistent depth.
- Skipping the drainage slope during excavation and planning to 'fix it at the surface layer.' Slope has to be built into the base, not patched on top.
- Using too little base material to save time or money. The four to six inch minimum is a minimum. Thin bases fail. A few extra bags of gravel now cost a fraction of relaying a sunken patio later.
- Compacting base material in one thick lift instead of multiple thin layers. Thick lifts don't compact uniformly, which creates soft spots that settle unevenly.
- Leaving organic debris at the bottom of the excavation. Grass, roots, and topsoil compress over time. Clear them out completely.
- Not compacting the native subgrade before adding base material. Loose subgrade under a compacted base will still settle.
- Forgetting to account for bedding sand depth in your excavation math. Many DIYers calculate for the base and paver thickness and forget the inch of sand, leaving their finished surface sitting an inch too high.
- Ignoring local frost depth in cold climates and installing the minimum base depth that works fine in warmer regions.
If you're on a site with really challenging soil or significant slope, the excavation work itself becomes a bigger project. The process of actually moving that dirt is covered in more depth in a related guide on how to excavate for a patio, and if you're weighing whether you can skip some of this work, the guides on building a patio without digging and whether you can build a patio without gravel are worth reading before you decide on your approach.
The bottom line is this: a properly dug patio base is what makes everything else work. A good alternative is learning how to make a patio without digging by using surface-friendly options like proper leveling and base materials that skip full excavation properly dug patio base. If you want to build a patio without gravel, look for alternatives like stabilized sub-bases or soil-amending layers that still provide a firm, draining base. Get the depth, the slope, and the compaction right at excavation stage and your surface material almost doesn't matter. Cut corners underground and no amount of careful paver laying or beautiful stone will save you from a patio that sinks, shifts, or floods. Measure twice, dig once, and compact everything. You'll be walking on that patio in five years without touching it again.
FAQ
Do I measure patio depth from the ground surface or from the finished surface string line?
Use the finished-surface string line as your measuring reference. The total “dig depth” is the distance from that finished elevation down to the bottom of the compacted base after you account for pavers, bedding sand, and base. If you measure from existing grade, you can easily end up too shallow, especially if you also change the surface height for door thresholds or steps.
What’s the “finished height” target if I have a door threshold and a step at the same time?
Pick the most restrictive reference point, usually the bottom of the door threshold, then check compatibility with adjacent steps. If the step landing ties in at a different elevation than the door, you may need to adjust the patio level to keep water-shedding clearances while also matching your step tread heights. Don’t set the patio height from lawn grass height, grass will settle and wick.
How do I handle patio depth when the patio is sloped or the ground is not level before excavation?
Maintain a consistent finished elevation plan using your string lines, then cut and fill to meet that plan rather than trying to dig a “flat-bottom” at a fixed depth. On a sloped site, you typically excavate deeper in low areas and shallower in high areas so the base thickness and the drainage slope both work together.
Is it okay to reduce gravel base thickness if I use thicker pavers?
Usually no. Thicker pavers do not replace the role of a compacted base in preventing settlement and pumping of fines. If you reduce the granular base, the patio is more likely to move under foot traffic, especially at joints and edges. If you want to change materials, adjust the base and sand system first, then select paver thickness.
How thick should the bedding sand layer be, and what happens if I make it thicker?
Keep bedding sand close to the planned thickness (commonly about 1 inch). Too much sand acts like a cushion that can compress and allow pavers to settle or rock. Also, avoid loose sand at the edges, that’s where differential settlement starts.
Should I compact the gravel base in lifts, and what’s the practical way to do it?
Compact in layers (lifts) instead of dumping everything at once. Each lift should be thin enough to achieve proper compaction with your compactor, then you add the next layer to reach the target base depth. If you compact only the final depth, the bottom can remain soft even when the top feels firm.
What if my subgrade feels spongy, but I’m close to the required depth already?
Treat soft subgrade as a decision point, not a depth measurement problem. If light pressure causes sinking or your screwdriver penetrates more than expected, remove and replace at least the affected top material, then rebuild with properly compacted crushed stone before you add base layers.
How much extra depth should I add for drainage problems or standing water after rain?
If water remains on the site, plan for either a thicker, better-draining granular base, or an added drainage solution like a perforated drain pipe system at the bottom of excavation (site dependent). The key is reducing the saturated water available for freezing and movement. Simply increasing slope without improving water management can still leave you with wet soil under the base.
When should I consider increasing base depth for freeze-thaw, beyond the typical ranges?
Increase base depth when you have persistent moisture, heavier frost-susceptible soils, or observed heaving in similar areas. Your target is to get granular, non-frost-susceptible material sufficiently deep and to keep water from sitting in the base. In cold regions, local code and frost-protection requirements can also drive the minimum depth for slab work.
Do I need a permit or local-code check even if I’m just building a paver patio?
Sometimes yes. While many small patios are low-risk, minimum construction requirements, excavation depth, and drainage expectations can be jurisdiction-specific. If you are within a setback area, near footings, or in a zone that expects frost-protected construction, check with your local building department before proceeding.
Can I “dig the same depth as the neighbor” if the project looks similar?
Not always. Even if the patio footprint and materials match, differences in soil type, drainage, sun exposure, and frost severity can change the needed excavation. Use the neighbor’s patio as a rough reference only, then verify with your own soil assessment and water behavior tests.
What’s a quick way to sanity-check my excavation depth before I lay sand and pavers?
Dry-fit using measurements: confirm the depth from your finished string to the planned top of compacted base, then verify paver thickness and sand thickness totals against the finished elevation. Also check edge conditions at doors, steps, and any existing elevations, because these are where small depth errors create big clearance issues.
Next Article
DIY Patio Step by Step: Build a Patio From Start to Finish
DIY patio step by step guide: plan layout, excavation, geotextile base, compacting, edging, surface install, finishing a