Building a patio deck off the ground means framing a raised wooden or composite platform that sits on posts and footings, with real airflow underneath, rather than sitting flush on soil or a concrete slab. That distinction matters because your foundation, moisture strategy, and local permit requirements all change depending on whether you're building a true elevated deck (12 inches or more off grade) or a low-profile near-grade platform (3 to 6 inches off the soil). If your goal is to replace a deck with a patio, plan for similar water management so the new structure stays stable and usable year-round moisture strategy. Pick the right approach upfront and the rest of the build flows logically. Get this wrong and you'll fight rot, heaving, and structural problems for years.
How to Build a Patio Deck Off the Ground DIY Guide

Decide: Truly Elevated vs. Ground-Level Patio Deck
"Off the ground" is one of those phrases that means different things depending on who you ask. To a code inspector, it might mean anything above grade. To a DIYer, it usually means a raised platform with visible posts, not just boards laid over gravel. Before you buy a single board, you need to nail down which version you're actually building, because the foundation, ventilation, and structural details are genuinely different.
A truly elevated deck sits 18 inches or more above grade, with posts anchored to concrete footings, enough crawl space for airflow, and in many cases a ledger board bolted to the house. Once you break 30 inches of vertical height above the ground below, the IRC (International Residential Code, Section R312) requires guardrails at least 36 inches tall on any open sides. That benchmark is a useful planning anchor: if your deck surface will be more than 30 inches off the ground, plan for railings from day one.
A near-grade patio deck is a low platform, typically 3 to 12 inches above the soil. It looks like a raised deck but behaves more like a floating platform: usually no ledger attachment, often no permit (though always check locally), and the moisture challenge is far more intense because airflow under the boards is limited. This is the floating deck approach, and it suits flat yards, garden-level spaces, and spots where you just want a clean wood surface without digging deep.
Here's how to decide which one you need. If your yard slopes away from the house and you're trying to create a level outdoor living area, you'll likely end up with a genuinely elevated structure on at least one side. If your grade is mostly flat and you just want a platform off the dirt, near-grade is simpler and often cheaper. Also factor in frost: in climates where the ground freezes, footings must extend below the frost line regardless of deck height, or your whole structure will heave seasonally. Low-profile floating decks in frost zones use specialized adjustable pedestals or gravel pads that allow movement without cracking the frame.
Permits, Measurements, and Layout Planning
Most municipalities require a building permit for any attached deck or any freestanding deck above a certain size, commonly 200 square feet, though local rules vary widely. Call your building department before you dig a single hole. In most U.S. jurisdictions, deck construction falls under IRC Section R507, which sets prescriptive requirements for footing depth, joist spans, ledger connections, and fasteners. If your deck is attached to the house, a permit is almost always required and you'll need to show a basic plan. Skipping this step can create real problems when you sell the house.
For measurements, start by deciding your deck footprint. A comfortable outdoor dining space for four people needs at least 12 by 12 feet (144 square feet). Add 4 feet in each direction if you want lounge seating too. Sketch the shape on paper, then transfer it to the yard using stakes and mason's line. Use the 3-4-5 triangle method to get perfect 90-degree corners: measure 3 feet along one string, 4 feet along the perpendicular, and adjust until the diagonal reads exactly 5 feet.
If you're attaching the deck to the house, the ledger position is your starting reference for everything. The finished deck surface should sit about 1 inch below the interior floor level and at least 2 inches below the door threshold so water runs away from the house. Mark that ledger height on the house wall and work outward. For a freestanding deck, pick the highest corner of your intended footprint, set that as your reference elevation, and make sure all other corners match using a line level or laser level.
Locate your footing positions based on your beam and joist span design (more on that in the framing section). Mark each footing center with a stake. Double-check everything: measure diagonals to confirm the rectangle is square before you break ground.
Choosing Materials and Your Build System
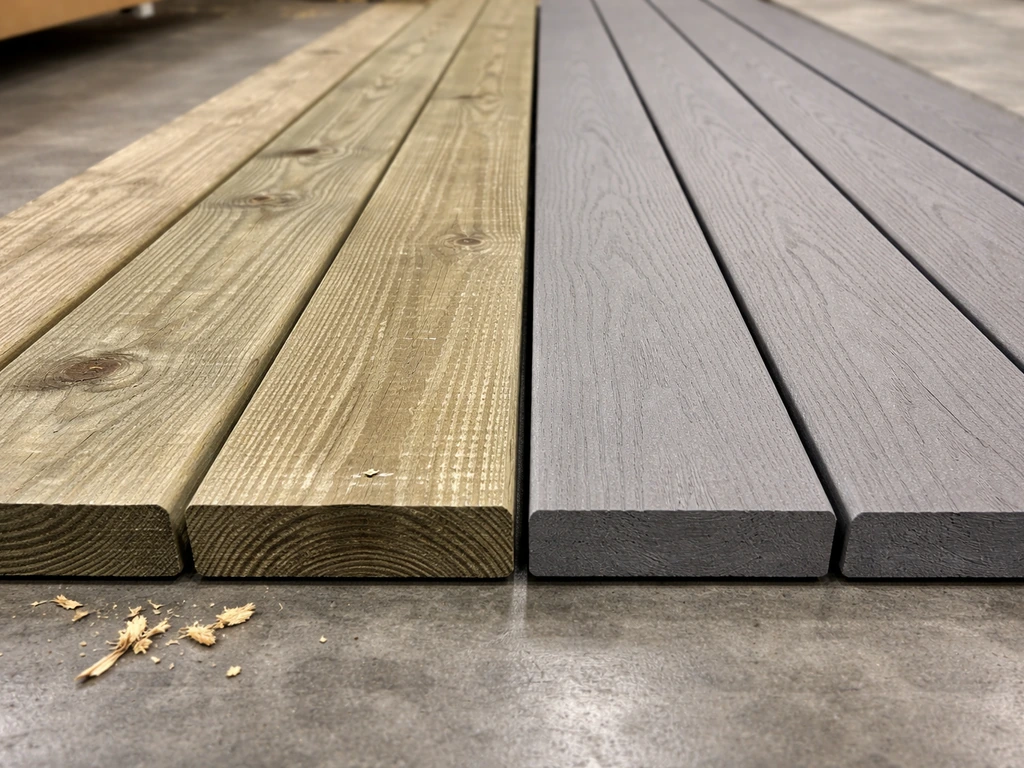
The two main decking surface choices are pressure-treated wood and composite boards, and the right pick depends on your budget, how much maintenance you're willing to do, and aesthetics.
| Material | Upfront Cost | Maintenance | Lifespan | Best For |
|---|---|---|---|---|
| Pressure-Treated Pine | Low ($2–$4/linear ft) | Annual sealing/staining | 15–25 years with care | Budget builds, structural framing |
| Cedar or Redwood | Moderate ($4–$7/linear ft) | Periodic sealing | 20–30 years | Natural look, better rot resistance |
| Composite (mid-grade) | High ($6–$12/linear ft) | Minimal (wash annually) | 25–30 years | Low maintenance, high traffic |
| Composite (premium capped) | Very high ($12–$20/linear ft) | Almost none | 30+ years | Best durability and appearance |
For the structural frame (posts, beams, joists) always use pressure-treated lumber regardless of what you choose for the surface boards. Ground-contact rated PT lumber (marked UC4B or UC4C) is required anywhere wood is within 6 inches of soil. Standard above-ground PT (UC3B) works for joists and beams that have ventilation and clearance.
For fasteners, use hot-dipped galvanized or stainless steel screws and structural connectors throughout. Modern PT lumber contains copper-based preservatives that corrode standard zinc-coated fasteners surprisingly fast. Spend the extra few dollars per pound on proper hardware and you won't be replacing corroded joist hangers in five years. For decking boards, hidden clip fasteners give a cleaner look and eliminate surface screws that can catch bare feet, but standard face-screwing with deck screws works fine and is much easier for beginners.
The structural system for most residential decks follows a straightforward hierarchy: concrete footings support posts, posts support beams, beams support joists, and joists support the decking boards. Common joist spacing is 16 inches on center for most wood decking and 12 inches on center for composite boards (check your composite manufacturer's requirements, as some specify tighter spacing). Post sizes are typically 4x4 for heights under 8 feet and 6x6 for anything taller or where local codes require it.
Site Prep and Foundations: Piers, Footings, and Ground-Level Pads
This is where an elevated deck and a near-grade platform diverge most sharply. Get the foundation right and the rest of the build is straightforward. If you want to build a deck over an existing patio, start by evaluating the patio surface and drainage so your deck structure has a solid, properly ventilated base can you build a deck over an existing patio. Get it wrong and you'll have a deck that moves, rotts, or fails inspection.
For an Elevated Deck with Posts
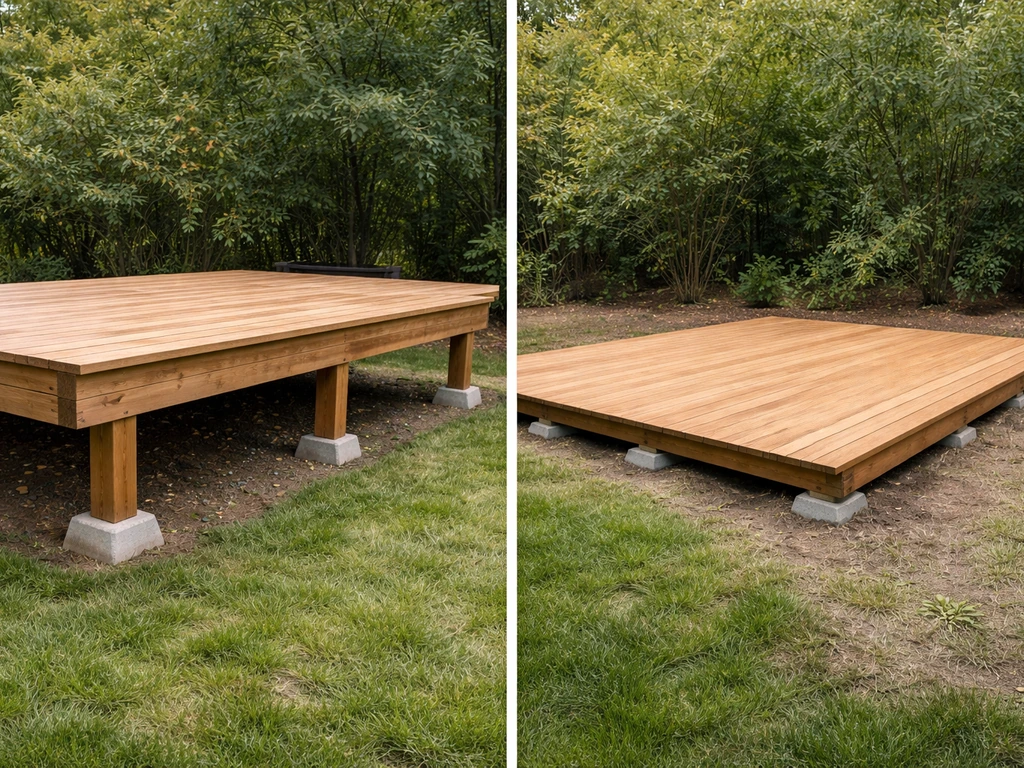
Dig footing holes to your local frost depth (USDA frost depth maps are available online; common depths range from 12 inches in the Deep South to 48 inches in northern states). Use a power auger if you have more than four holes to dig. The hole diameter should be at least 12 inches, or whatever your local building department specifies based on load. Pour a concrete tube form (like a Sonotube) in each hole, fill with concrete mix, and set a post anchor bracket in the wet concrete while it's still workable. Let footings cure for at least 48 hours before loading them. Do not set wood posts directly in the concrete, use metal standoff post bases that keep the wood above the concrete surface so moisture can't wick up into the end grain.
For a Near-Grade Floating Deck
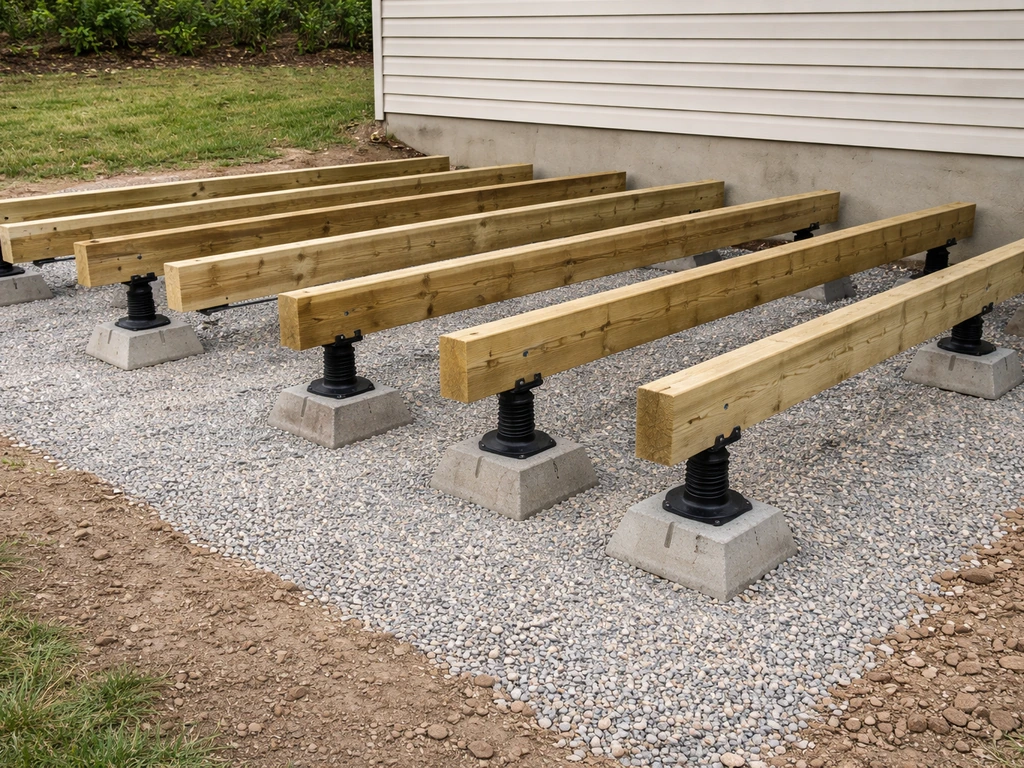
A near-grade deck can use precast concrete deck blocks (the pyramid-shaped ones you set directly on the ground), gravel pads, or adjustable screw-jack pedestals. The simplest approach: excavate 4 to 6 inches of soil at each support location, fill with compacted gravel, and set a precast block on top. The gravel pad allows drainage and discourages frost heaving. For a cleaner, adjustable solution in frost-prone areas, screw-jack pedestal systems let you re-level the deck seasonally without digging. Whatever support method you use, kill the vegetation under the entire deck footprint first: lay landscape fabric or heavy black poly, then cover with 3 to 4 inches of pea gravel. This stops weeds and helps with drainage rather than trapping moisture directly against the framing.
If you're building against a house, slope the ground under the deck slightly away from the foundation (about 1 inch per foot) before laying any base material. Water that pools against a house foundation is expensive trouble.
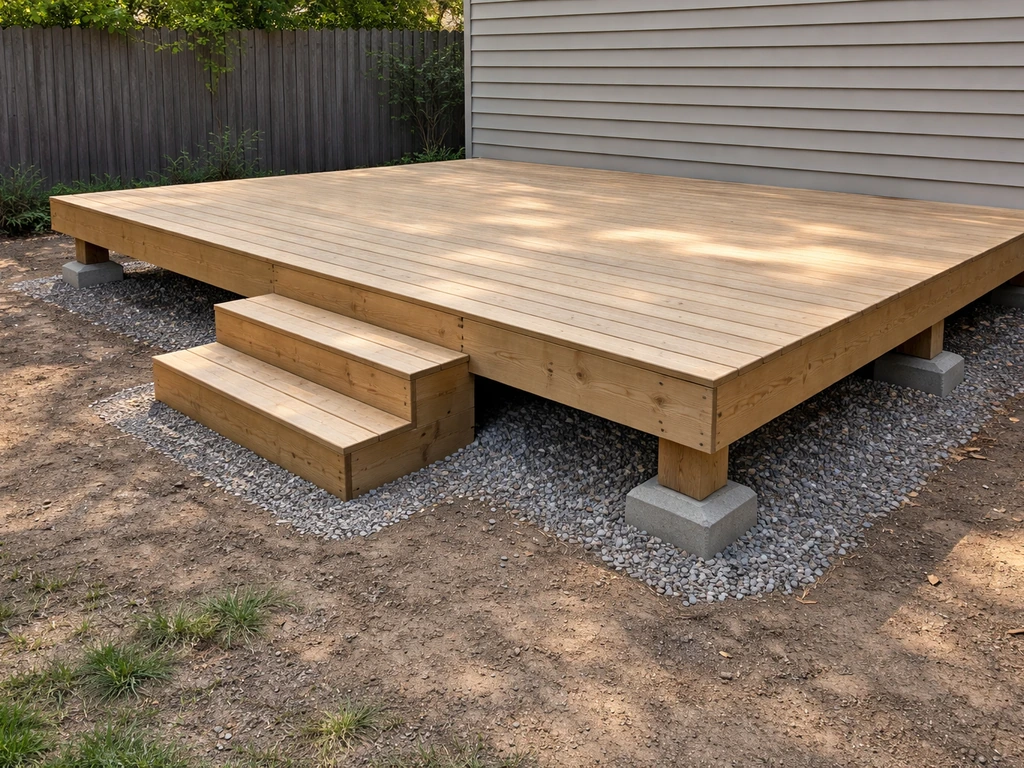
Frame Construction: Posts, Beams, Joists, and Getting It Level
With footings cured and post anchors set, you can start framing. Set your posts first, cut to height, and brace them plumb temporarily. Then install your beams, which are typically doubled 2x10s or 2x12s for spans of 8 to 12 feet. Use structural screws or through-bolts (not nails alone) to connect doubled beam members, and use post caps to attach the beams to the posts rather than toenailing. Getting the beam tops perfectly level at this stage is critical because every joist, board, and finished surface depends on it. Use a long level or a laser level across the beam tops and adjust post heights as needed.
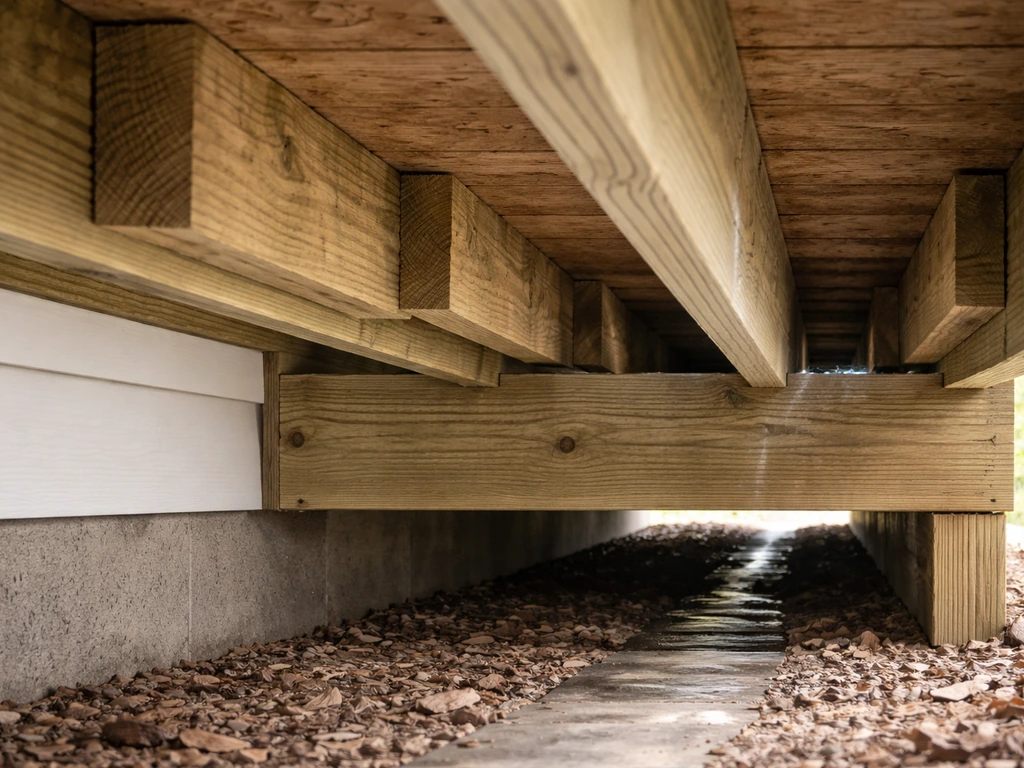
If you're attaching to the house, the ledger board goes up before the beams. Remove any siding in the ledger area down to the sheathing, cut the ledger from the same dimensional lumber as your joists (usually 2x10 or 2x12), and bolt it to the house rim joist with 1/2-inch lag screws or through-bolts spaced per your local code requirements. Stagger fasteners top and bottom to avoid splitting the ledger. Never nail a ledger board: this connection carries real load and nails alone fail.
Install the outer rim joist (the perimeter frame) next, connecting it to the beam ends and the ledger at the corners. Then hang your interior joists using galvanized joist hangers, spacing them 16 inches on center (or 12 inches for composite decking). Make sure each joist is crowned (bowed slightly upward) and install them all with the crown facing up so the deck surface doesn't develop dips over time. Add blocking between joists every 8 feet on longer spans to prevent twisting and add lateral stiffness.
Check the frame for square one final time by measuring diagonals: they should match within 1/4 inch. Then check for level across the whole frame. Fix any issues now because they're nearly impossible to correct once the boards are down.
Moisture Control and Longevity Details
Wood and moisture are enemies, and a deck lives outside in all weather. The good news is that a few smart details during construction add decades to the structure's life without much extra cost.
- Airflow under the deck: For elevated decks, leave the sides open or use lattice with 50% or more open area to allow air movement. Trapped humid air under a deck with no ventilation is a rot factory. For near-grade decks where full airflow isn't possible, the gravel ground cover and treated lumber become even more important.
- Flashing at the ledger: Install metal Z-flashing (galvanized or aluminum) behind the ledger, lapping over the top edge and tucking under the siding above. This is the single most important water management detail on an attached deck. Water that gets behind an unflashed ledger rots the house rim joist silently over years.
- Joist tape: Run self-adhesive flashing tape (like Zip System tape or Trex Protect) along the top edge of every joist and beam before laying decking boards. This protects the most vulnerable area: the top of the joist where water sits in the groove between boards.
- Board spacing: Leave a 1/8- to 3/16-inch gap between decking boards for drainage and airflow. This gap usually occurs naturally as dry PT lumber swells slightly after installation, so install kiln-dried PT boards tight and let them gap as they acclimate, or use a 16d nail as a spacer with wet boards.
- Seal cut ends: Any time you cut a pressure-treated board, brush end-cut sealer on the cut face immediately. End grain is the fastest entry point for moisture.
- Post bases above grade: As mentioned, metal standoff post bases that elevate the post bottom 1 inch above the concrete footing surface prevent moisture wicking dramatically better than posts buried in concrete.
If you're building a near-grade deck where the underside of the framing is close to the soil, go with ground-contact rated PT lumber for all framing members, not just posts. The extra cost is small compared to replacing rotted joists in five years.
Decking Installation, Edges, Steps, and Final Safety Checks
Start your first decking board along the house wall or the most visible straight edge of the deck. Snap a chalk line parallel to the rim joist as a reference and lay your first board against it. From there, work outward board by board. To get decking properly secured and level on top of a patio, plan the support and fastening method before you install the boards decking on top of a patio. Face-screw with two deck screws per joist crossing (pre-drill to avoid splitting near ends), or follow the clip manufacturer's instructions for hidden fasteners. Keep the spacing consistent using a spacer tool or a set of 16d nails as gauges.
Let the boards run long past the rim joist as you work, then snap a chalk line at the finished edge and trim all boards at once with a circular saw. This gives a perfectly straight edge far more reliably than trying to cut each board to length individually. Install a fascia board over the rim joist on all visible sides: this hides the framing, gives a finished look, and protects the rim joist end grain.
Steps and Stairs
If your deck is elevated enough to need steps, the IRC requires a maximum riser height of 7-3/4 inches and a minimum tread depth of 10 inches for exterior stairs. A simple set of steps for a deck that's 24 inches off grade needs three or four risers. Cut your stringer from 2x12 PT lumber, leaving at least 3-1/2 inches of solid wood at each notch (don't over-cut the notch depth or you'll weaken the stringer). Anchor the bottom of the stringer to a concrete pad or a gravel-packed footing block, not directly to soil. At least two stringers for a 36-inch wide staircase, three for anything wider.
Railings and Guards
If your deck surface is more than 30 inches above the grade below at any open side, you are required by the IRC (Section R312) to install guardrails at least 36 inches tall. Balusters must be spaced so a 4-inch sphere cannot pass through (roughly 4 inches on center or less). If you're building below the 30-inch threshold, railings are not required by code, though you can certainly add them for aesthetics or safety. Post installation method matters here: surface-mounted post bases with through-bolts to the rim joist are more secure than face-mounted brackets and will pass inspection more consistently.
Final Checks Before You Call It Done
- Walk the entire deck and check for any boards that spring up at the ends or have high spots: add screws where needed.
- Check all structural connections: joist hangers fully nailed, post caps bolted, ledger lags tight.
- Verify all fasteners are countersunk or flush, with no proud screw heads that will catch bare feet.
- If required, schedule your framing inspection before you close in any elements, and your final inspection after the surface and railings are complete.
- Apply a penetrating sealer or stain to any exposed pressure-treated wood, cedar, or redwood surfaces once the lumber has dried for 60 to 90 days after installation. Composite boards generally need no sealer.
One last thought: if you've been considering converting an existing concrete patio area or building over an existing slab, the approach differs significantly from what's described here (that's essentially a deck-over-patio build, which has its own foundation and moisture considerations). The method above is specifically for building a new raised frame from the ground up, which gives you the most control over drainage, airflow, and long-term durability. Take it one phase at a time, don't skip the moisture details, and you'll end up with a structure that's solid enough to outlast the lumber warranty.
FAQ
How do I know whether my project is truly “off the ground,” or just boards on a patio surface?
If the deck boards are sitting on a framed system that is fixed to posts, beams, and footings, it counts as “off the ground.” If your boards are laid over compacted gravel, sand, or directly on the patio surface without a framed air space and post-based foundation, you are closer to a near-grade platform or a deck-over-patio situation, which changes both drainage and permitting decisions.
My deck is raised, do I still need ground-contact rated lumber everywhere?
A safe rule is to treat any area that’s within about 12 inches of soil or where water can splash as ground-wetted. Even if your deck is “elevated,” splashed rain can keep ledger ends, rim joists, and certain fastener lines damp. Use ground-contact rated pressure-treated lumber wherever wood could routinely get wet, not just wherever it touches soil.
If I’m close to the 30-inch guardrail threshold, how exactly should I measure the height?
Code requirements often depend on total height and whether the deck is “open sides.” If you are near the 30-inch threshold, measure from finished ground at the lowest adjacent grade to the finished deck surface, not from the highest corner. When measurements are close, it is usually worth designing for guards anyway to avoid a rework after an inspection.
Can I build this deck using older footings, deck blocks, or piers I already have?
Don’t reuse footings or base blocks that have settled, shifted, or developed cracks. For freestanding systems, verify that support points are solid and level before framing, then re-check square after the frame is erected. In practice, deck movement usually comes from uneven settlement at a few supports, not from deck boards.
What’s the best way to prepare the soil under a near-grade deck so it doesn’t rot the framing?
Yes, but you generally want a consistent drainage plan under the entire footprint. For near-grade decks, you can improve performance by excavating to remove topsoil, adding compacted gravel, then covering with landscape fabric or heavy sheeting plus a gravel layer for drainage. Avoid trapping organic material or directly packing dirt against treated lumber, because trapped moisture can still drive rot even with ground-contact lumber.
Why does the article recommend standoff post bases instead of setting the wood post directly in concrete?
Use posts with metal post bases or standoff connectors, then keep the wood ends above concrete. A common failure is “post-in-concrete,” where end grain wicks moisture and corroded anchors weaken over time. Also keep the concrete surface clean and level at the base so the post sits fully supported.
My deck is small. Is a building permit always optional for low-profile patios?
Don’t assume your permit threshold is universal. If you are building attached to a house, using a ledger, or adding stairs, many jurisdictions require review even for small footprints. Call your building department with a rough size, height, and whether it’s attached or freestanding, and ask whether you need engineered drawings.
If I switch from wood to composite decking, what structural changes might I need?
Composite boards are sometimes more forgiving on the surface, but the structure still has to meet the manufacturer’s joist spacing, span tables, and fastening rules. If you change from wood to composite mid-plan, you may need tighter joist spacing and clips at specific locations to avoid squeaks, uneven support, or voids that can trap moisture under the board ends.
How do I prevent water from collecting at the ledger and around door thresholds?
Start by tightening the framing, then handle transitions. If the deck is attached to a house, protect the ledger area with proper flashing and make sure the deck surface sits at least a little lower than interior thresholds so water doesn’t migrate under doors or siding. Also confirm you have ventilation clearance at all framing interfaces so the underside can dry after rain.
Which fastening method is more reliable for a first-time DIYer, hidden clips or face screws?
Before purchasing materials, choose whether you will use hidden clips or face screws, then plan for matching board pattern and spacing around posts and edges. Hidden clips can reduce visible fasteners, but they often require careful alignment and sometimes tighter tolerances at the start and rim line. If you are a first-time builder, face-screwing with pre-drilling is typically more forgiving, but ensure you use the correct deck screws for exterior use.
In frost climates, will pedestal or gravel-pad systems eliminate heaving problems completely?
Adjustable pedestal systems and gravel pads can work, but you must still provide rigid lateral stability. Add blocking as recommended and ensure beams are level and securely connected to posts. If only height is adjustable but the frame can rack, the deck can develop diagonals or squeaks that get worse after freeze-thaw cycles.
What are the most common mistakes when building deck stairs off uneven ground?
When stairs are required, make sure the landing and stringer sit on solid support. A common mistake is anchoring the stringer to unstable soil or a thin patio layer that shifts, causing the stair to settle and pull away from the deck. Plan for a pad or footing block at the bottom, and consider a small landing if your run is long or narrow.
How to Redo a Patio Step-by-Step DIY Guide
Step-by-step DIY guide on how to redo a patio, from base prep and drainage to pavers, gravel, composite, or wood install