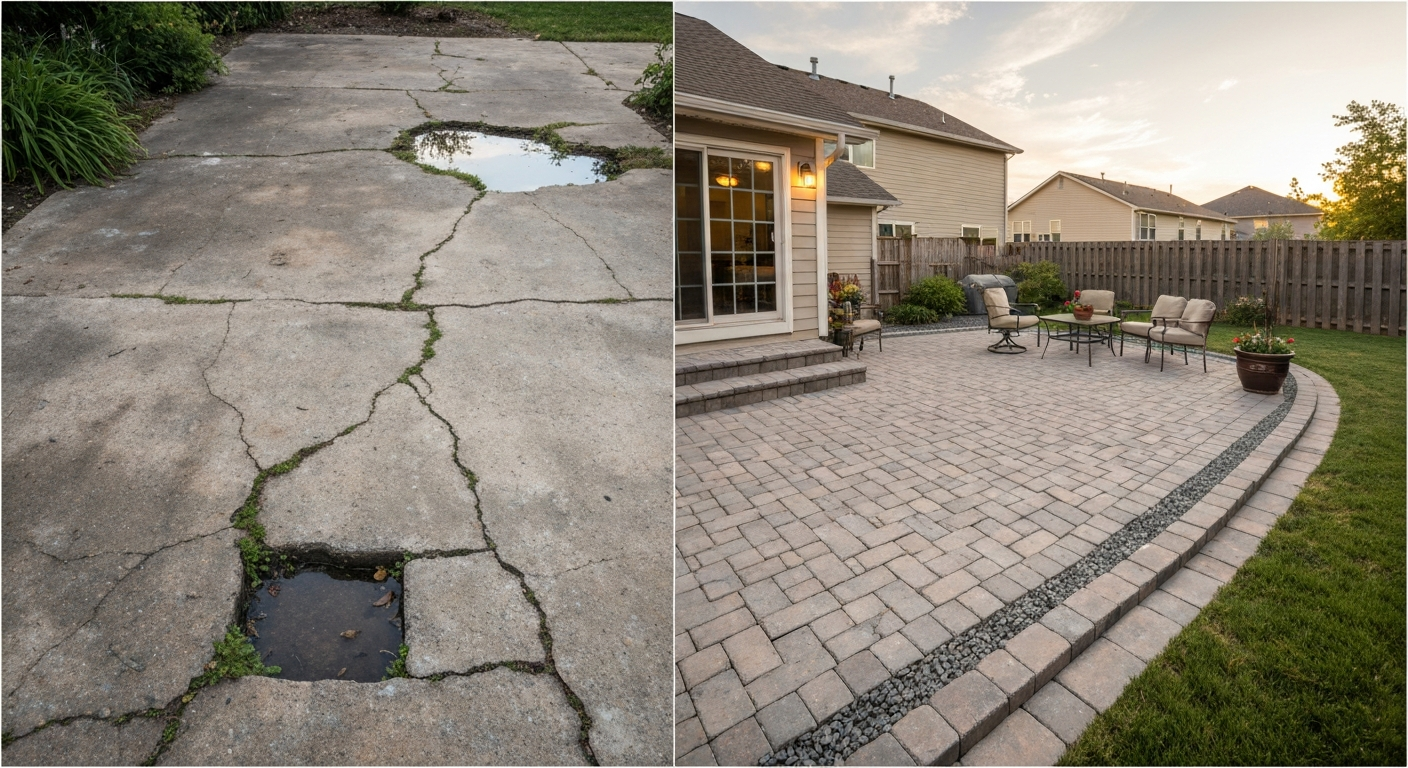
Building a rock patio yourself is absolutely doable over a weekend or two, and the result lasts decades if you nail the base and drainage. The basic sequence is: mark your footprint, excavate 7 to 9 inches deep, compact a 4 to 6 inch crushed stone base, add a 1 inch sand setting layer, install edging, set your rocks, then fill the joints and clean up. Get that order right and you'll have a patio that doesn't heave, sink, or migrate.
How to Build a Rock Patio: Step-by-Step DIY Guide

Nolan Lennox
29 Apr 2026
Planning and measuring your rock patio
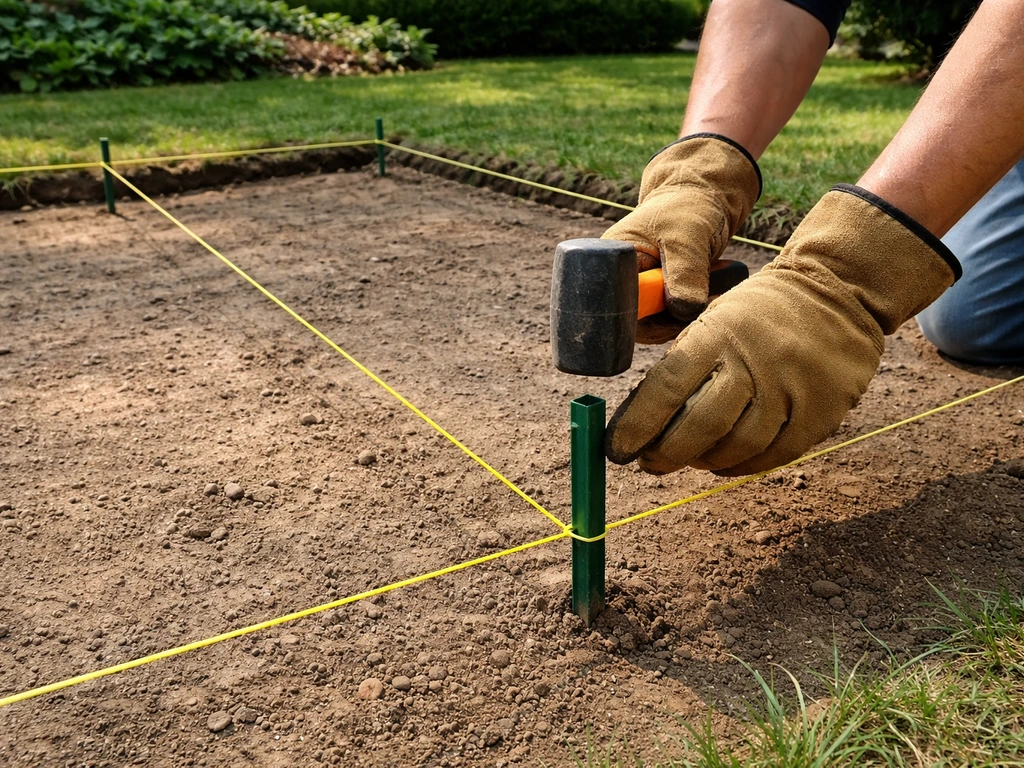
Start with stakes and string before you touch a shovel. Drive landscape stakes at each corner of your planned patio and run string between them so you can actually see the footprint on the ground. Walk around it with a lawn chair and a table to check that it's big enough for how you'll use it. A common mistake is planning a 10x10 patio and realizing once you set furniture on it that you've built yourself a closet. Allow at least 3 feet of clearance around chairs and tables so people can move comfortably.
Once you're happy with the shape, measure the total square footage (length times width for a rectangle; break irregular shapes into sections and add them up). Write that number down because you'll use it to calculate materials. For flagstone and similar flat rocks, plan on roughly 40 to 50 square feet of coverage per ton for random or chopped stone. A 200 square foot patio will need roughly 4 to 5 tons of stone, so budget accordingly before you fall in love with a specific material at the quarry.
Also decide now whether your patio is attached to the house or free-standing. If it's next to the house, every calculation you make for slope and drainage ties back to that foundation wall. You need the patio surface sloping away from the house, not toward it. More on that in a moment.
Choosing rock type, thickness, and layout style
The rock you pick determines how you set it, how thick it needs to be, and how the finished surface looks and feels underfoot. The most popular options for DIY rock patios are flagstone (sandstone, limestone, bluestone, or slate), fieldstone, and flat stepping stone varieties. Each has its own personality and price point.
| Rock Type | Typical Thickness (Dry-Set) | Typical Thickness (Mortar-Set) | Best For | Rough Cost |
|---|---|---|---|---|
| Flagstone (sandstone/limestone) | 1.5" to 2" | 1" to 1.5" | Rustic, natural look; irregular joints | $$ |
| Bluestone | 1.5" to 2" minimum | 1" to 1.5" | Clean, formal look; tight joints | $$$ |
| Fieldstone / River rock | 2"+ flat face | N/A (rarely mortared) | Casual, natural garden feel | $ |
| Slate | 1.5" to 2" | 1" to 1.5" | Smooth surface; modern look | $$$ |
| Pea gravel / Small rocks | 2" depth (loose) | N/A | Low-maintenance fill; casual patios | $ |
Thickness matters more than most beginners realize. For dry-set projects (rocks laid on a sand and gravel base without mortar), you need at least 1.5 to 2 inches of thickness. Thinner stone, say 1 inch bluestone, is tempting because it's cheaper per square foot, but it'll crack and break over time when it's only supported by sand below. Mortar-set installations can get away with 1 to 1.5 inches because the mortar gives continuous support, but that's a more involved build.
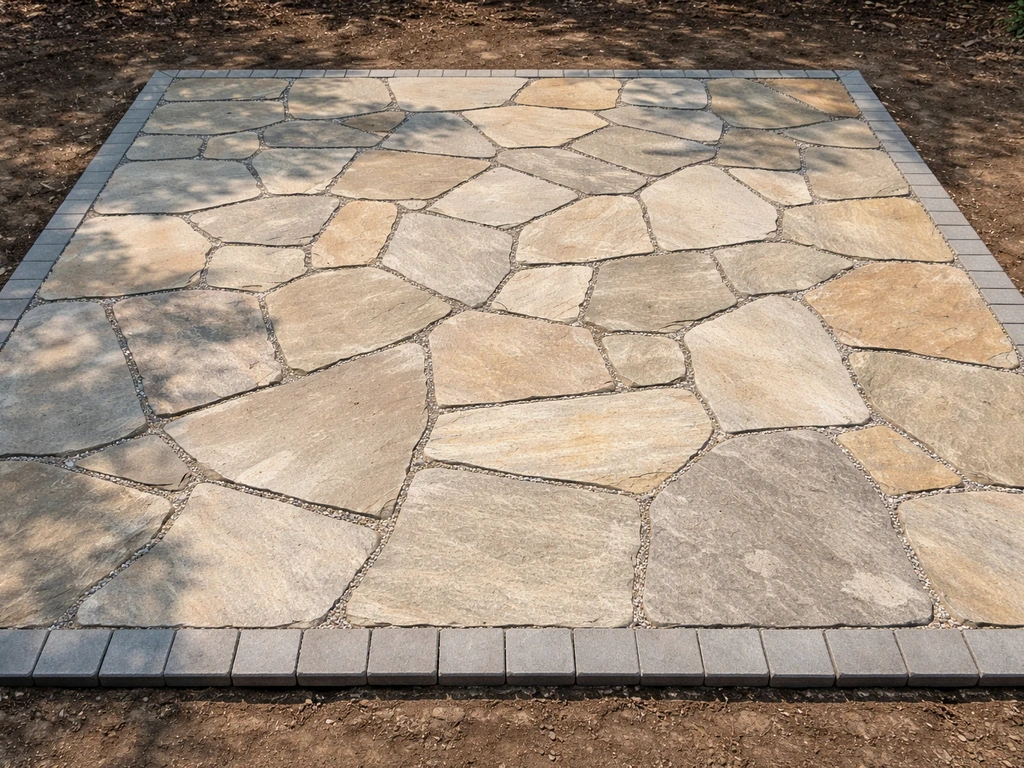
For layout style, you have two main choices: random/irregular (flagstones fit together puzzle-style) or a more structured pattern with consistent spacing. Random layouts look great but take longer because you're constantly auditioning stones. Structured patterns with consistent grout lines are faster to set but require more cutting. Before you commit any stone to its final position, do a full dry run by laying out the entire area first, fitting stones together and marking any that need trimming. This saves enormous frustration later. If you're leaning toward a smaller, loose-fill version, the approach used for a pea gravel patio is a related but simpler method worth comparing.
Site prep: grading, base layers, and drainage
This phase is the least glamorous part of the job and the one that determines whether your patio lasts 5 years or 30. Don't rush it.
Excavation depth and slope
Excavate the entire footprint down 7 to 9 inches below your intended finished surface. That accounts for a 4 to 6 inch compacted gravel base, a 1 inch sand setting layer, and your stone thickness (1.5 to 2 inches). If you have expansive clay soil or a region with hard freezes, err toward the deeper end.
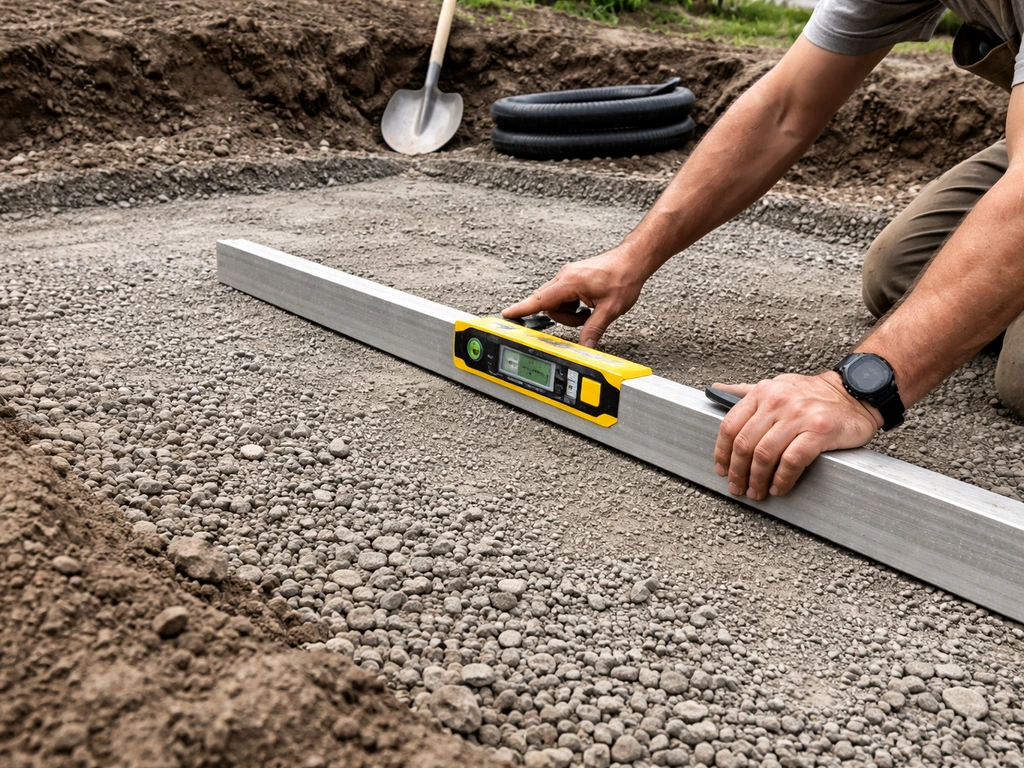
Slope is non-negotiable. The surface needs to fall away from the house (or toward your intended drainage exit) at 1/8 to 1/4 inch per foot. For impervious outdoor surfaces like patio slabs, walkways, and driveways within about 10 feet of a home, BASC guidance recommends sloping the surface away from the house at least 0.25 inch per foot (about a 2% grade). That's a very gentle grade, barely visible to the eye, but it keeps rainwater from pooling on the surface and from running toward your foundation. Establish this slope during excavation, not after. Use a builder's level and a tape measure to check the grade of your excavated floor before you add any base material. If the bottom of your hole already has the right slope, your base layers will follow it naturally.
Base layers and compaction
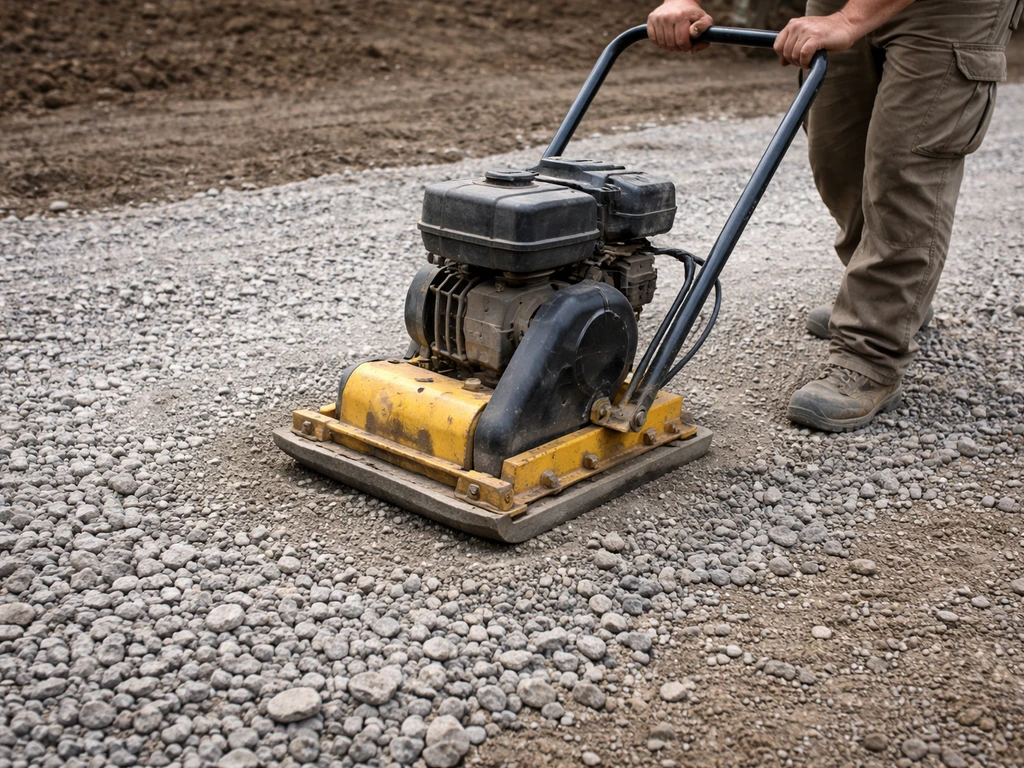
After excavation, lay down a 4 to 6 inch layer of crushed stone (also called crusher run or road base). This is your structural foundation. Compact it with a plate compactor, which you can rent for around $75 to $100 a day. Compact in 2 to 3 inch lifts if you're putting down more than 4 inches total because trying to compact 6 inches all at once won't get you the density you need. JLC Online advises laying crusher run stone in 3- or 4-inch lifts and compacting each lift to an ASTM 95% compaction standard crusher run stone in 3- or 4-inch lifts and compact each lift to an ASTM 95% compaction standard. Bases thicker than 6 inches become progressively harder to compact properly, so don't go overboard thinking more is always better.
Over the compacted gravel base, spread a 1 inch layer of coarse sand (bedding sand). Screed it flat using a board dragged across two screed rails set to your target height. Before you lay a single stone, check the slope of the sand bed with a level and tape measure across several points. This is your last easy chance to correct any grade issues.
A note on drainage: if your yard has poor drainage or you're building in a low spot, consider laying perforated drain pipe along the low edge of the excavation before adding base material. It's much easier to deal with drainage problems now than to lift a finished patio later.
Installing edging, base stabilization, and proper rock setting
Edging first or last?
There's some debate on timing, but for a DIY rock patio the most practical approach is to install your edging after the base is compacted and before you start setting stones. For a closely related approach, see how to make a sand patio and plan your base, slope, and edging so the surface stays stable. This gives you a defined frame to work within and prevents your base material from migrating at the edges. Aluminum or steel edging works best for most rock patio styles. Anchor it with 3/8 inch by 10 inch spiral steel spikes driven at regular intervals, roughly every 12 inches for straight runs and closer together on curves. Don't skimp on spikes. Edging that isn't fully anchored will spring outward over time, and once that happens your whole perimeter starts to migrate. Dig a small trench at the edge of your patio footprint, set the edging against the compacted base, and backfill against it to keep it stable while you work.
Setting the rocks
With your base prepped, your edging anchored, and your sand bed screeded and checked for slope, you're ready to set stones. Start from a straight edge (a house wall, a step, or a defined border) and work outward. Set each stone by pressing it firmly into the sand and checking it with a level. The goal is a consistent surface with no stones rocking or tipping, which means adding or removing sand under each piece as needed.
For irregular flagstone, keep your joint widths consistent, ideally between 1 and 2 inches. Avoid long, continuous straight lines running across the patio because those become crack pathways. Stagger your joints like you would with brickwork. If a stone needs trimming to fit, score it with a chisel and brick hammer along the cut line, then tap firmly to break it. A hand-held angle grinder with a diamond blade is faster and cleaner if you have access to one.
As you work across the patio, periodically lay a long straightedge or level across multiple stones to check that you're not building up any high spots or dips. Adjusting is easy when a stone is freshly set; it's a lot harder after you've built a dozen more stones around it.
Finishing details: leveling, jointing, and cleanup
Once all the stones are set, walk the entire patio and press on every stone. Any that rock or tip need to come up so you can adjust the sand underneath. A rocking stone is also a cracking stone, so be thorough here.
Filling the joints
For dry-laid flagstone, polymeric sand is the best joint filler available to DIYers. It's a polymer-modified sand that sweeps into joints and then hardens when activated with water, locking everything in place and resisting ants, weeds, and erosion. Products like QUIKRETE HardScapes Polymeric Jointing Sand work in joints up to 2 inches wide, which covers most flagstone applications. The process is straightforward: pour the dry polymeric sand over the surface, sweep it into every joint with a stiff push broom, then run a plate compactor over the entire patio (place a rubber pad or piece of plywood under the compactor to protect the stone surface). Repeat the sweeping and compacting cycle until joints are completely full, then gently mist the surface with water according to the product instructions to activate the polymer. Keep foot traffic off for 24 hours.
If you prefer a more organic look with wider joints, you can fill gaps with decomposed granite, fine gravel, or even plant low-growing ground cover like creeping thyme between stones. These approaches skip the compaction step but require more maintenance over time as material settles or plants spread. For any patio that gets heavy foot traffic or furniture, polymeric sand is worth the extra few dollars per bag.
Final cleanup and inspection
Sweep off any excess sand or stone dust from the surface. Check your edging one more time and drive in any spikes that have worked loose during compaction. Backfill around the outside edge of the edging with soil and tamp it down so the edging is fully supported on both sides. Then step back, walk the patio slowly, and look for any stones that sit noticeably higher or lower than their neighbors. Small adjustments now take 5 minutes; the same fix in 6 months means lifting finished work.
A few days after the polymeric sand has cured, you may notice some joint settling, especially after the first rain. Just sweep in a bit more polymeric sand and lightly mist again. This is completely normal and not a sign that anything went wrong.
What to tackle next
If this project feels like a bigger lift than you expected, consider starting smaller. A flat rock patio using uniform stepping stones is a simplified version of the same process and a great first build. If you're wondering how to build a flat rock patio, start by mastering the same base prep and leveling steps before you set the stones. Alternatively, if you want something even more beginner-friendly with less cutting and fitting, a pea gravel or pebble patio uses the same base preparation but skips the stone-setting puzzle entirely. A pea gravel or pebble patio uses the same grading and base prep ideas, but the surface is installed with loose aggregate instead of individual stone setting. Both are genuinely satisfying builds that use the same foundational skills you'd practice here, and they make excellent additions alongside a larger rock patio.
For most homeowners, the full rock patio build runs 1 to 2 weekends depending on size and your experience with a plate compactor. The base work is the hardest part physically. Once that's done and your slope is right, the stone setting is slow but meditative, and the finished result genuinely looks like something a professional built.
FAQ
Can I build a rock patio on uneven ground without fully excavating the whole area?
Yes, but only if you keep the same slope and base thickness. For a deck or elevated slab, you must still build a compacted crushed-stone layer and prevent water from pooling or running under the patio edge. Also confirm your slab can handle the extra load (stone and base add significant weight), and use a drainage plan that discharges away from the foundation or structural components.
What’s the biggest mistake DIYers make when setting the slope?
Avoid relying on “spot digging” or backfilling low areas with sand. Your slope needs to be consistent across the entire footprint, and the structural base (crushed stone) must be uniformly compacted. If you create localized soft spots, joints will settle unevenly and some stones will rock or crack later.
Will polymeric sand work in any joint width, even if my gaps vary a lot?
Polymeric sand is designed to lock joints, but it does best when joints are within its intended width and the stones are stable. If joints are much wider than the product allows, it can wash out or fail to harden. In that case, use a different filler approach for wider joints (or adjust the layout to keep joint widths consistent).
How do I prevent a mess or residue from polymeric joint sand?
After installation, polymeric sand can create haze or residue if you overapply or let it get wet before activation. Use the recommended misting method, remove excess sand from the surface before compacting, and don’t hose it aggressively. If residue appears, wait for cure and then brush again, rather than trying to scrub immediately.
Do I need to protect the patio surface when compacting after filling the joints?
You usually should not use a plate compactor directly on the stones with no protection. Put a rubber pad or a sacrificial layer like plywood between the compactor and the surface to reduce chipping and to prevent stones from shifting.
What should I do differently if the patio is attached to the house?
If you’re building close to the house, keep the patio surface sloped away from the foundation and plan drainage so runoff exits at a lower point or drains into an appropriate system. Don’t connect patio drainage directly to foundation drainage unless your local requirements allow it. Consider adding a perforated drain at the low edge before the base if your yard stays wet.
What’s the best way to fix a stone that rocks after the patio is finished?
For dry-set flagstone, aim for firm contact with no rocking, and ensure each piece sits at the same final elevation. If you have a stone that moves after initial tamping, lift it promptly, add or remove bedding sand, then reset it. Recheck with a long straightedge after every section, not just near the edges.
How do I stop my patio edging from shifting over time?
Edge support matters. If edging springs outward, the base can migrate and joints will open. Use fully anchored metal edging and backfill against it after installation, tamping the soil firmly so the edging is supported on both sides.
Can I reuse excavated soil as backfill and still get a long-lasting rock patio?
Yes, you can, but be cautious. Removing a layer of soil and reusing it as backfill often leads to uneven settling. It’s better to use proper base material (crushed stone for the structural layer) and compact in lifts, then use the specified coarse sand bedding for leveling the stone surface.
Do rock patios last differently in areas with hard freezes or expansive clay?
In cold climates, build the deeper end of the excavation range and prioritize a well-drained base. Ensure water has a clear path to exit, and avoid materials that hold water at the surface. If you expect hard freezes or expansive clay, consider addressing drainage early with a low-edge drain rather than waiting for symptoms after installation.
Next Article
How to Update Patio: Complete DIY Guide to Repair or Rebuild
How to update patio: DIY guide to assess, choose materials, and follow step-by-step repairs or full rebuilds with costs.