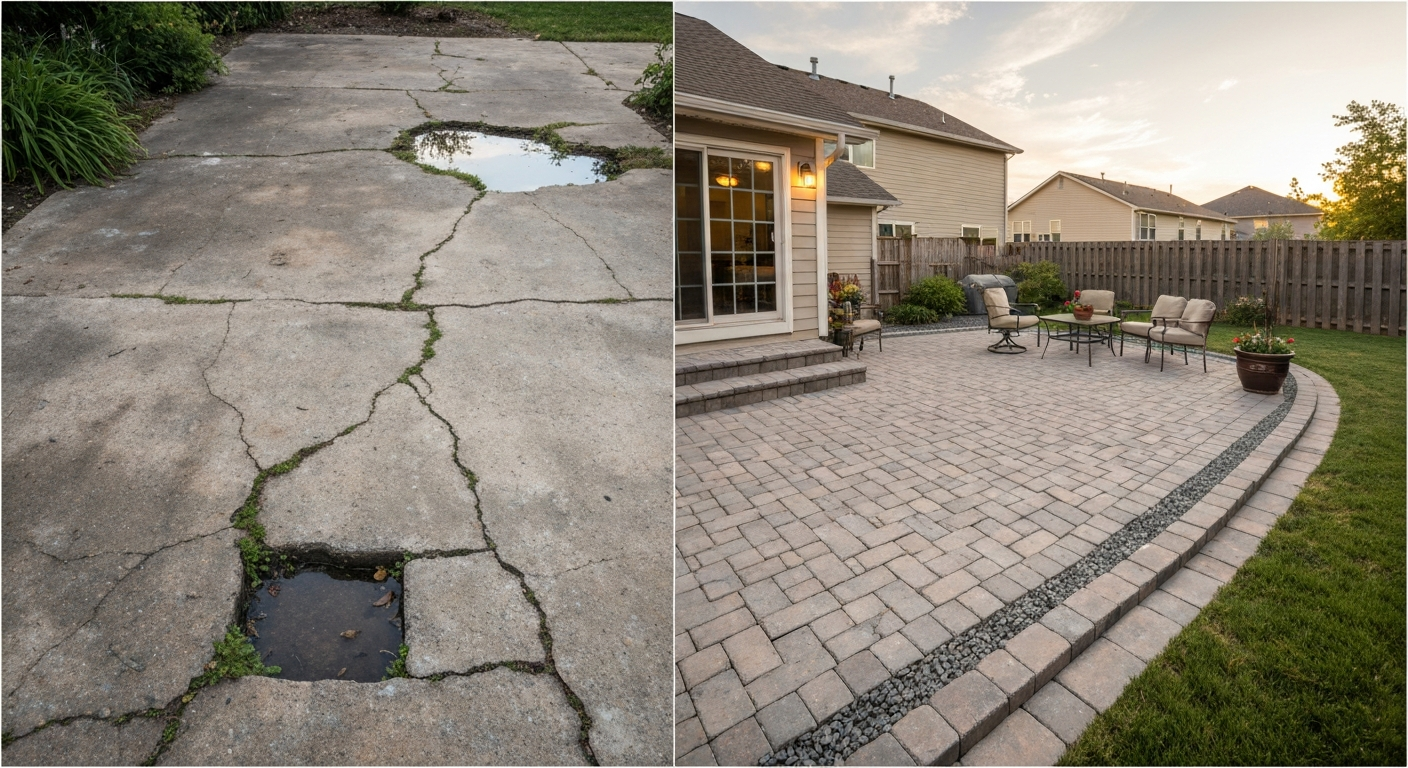
Building a patio yourself is completely doable, even if you've never done it before. The basic workflow is this: pick your material, measure and mark your space, excavate and compact a solid base, install your surface, then finish the edges and handle drainage. Most DIYers can finish a straightforward patio in a weekend or two depending on size. If you're wondering how to put in a patio, the key is planning the footprint and drainage before you dig. The sections below walk you through every step in the order you actually need to do them.
How to Do a Patio: Step-by-Step DIY Guide

Nolan Lennox
29 Apr 2026
Choosing the right patio type and material
The material you pick shapes everything else: your base requirements, your tool list, your budget, and how much maintenance you'll deal with years from now. Here's an honest look at the four most practical DIY options.
| Material | Cost (approx. per sq ft) | DIY Difficulty | Durability | Maintenance |
|---|---|---|---|---|
| Gravel/crushed stone | $1–$3 | Easy | Good with edging | Occasional raking, top-ups |
| Brick/concrete pavers | $6–$15 | Moderate | Excellent (decades+) | Joint sand refresh, occasional sealing |
| Composite decking | $15–$30 | Moderate–Hard | 25–30 years | Low; annual cleaning |
| Natural wood decking | $8–$20 | Moderate–Hard | 10–20 years (treated) | Annual sealing/staining |
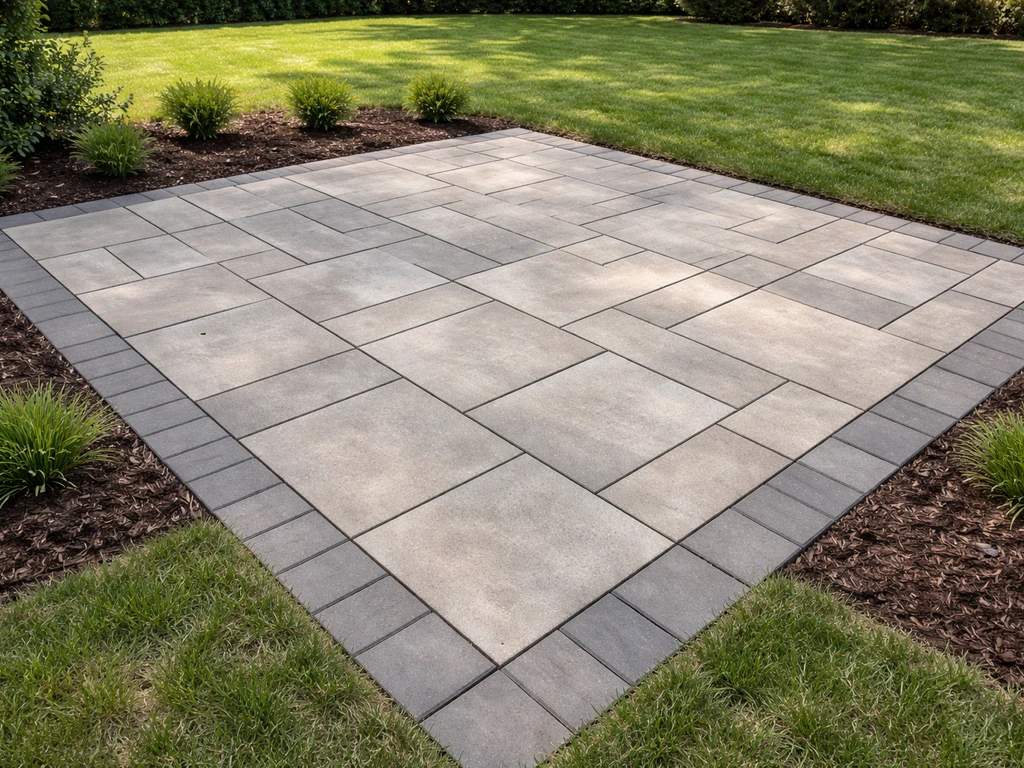
Gravel is the fastest build and cheapest entry point, but it shifts underfoot and needs edging to stay put. Brick and concrete pavers are the sweet spot for most DIYers: they look great, drain well when installed with the right slope, and are very forgiving because you can pull up and relay individual pieces if something goes wrong. Composite decking is ideal when your yard has a slope you don't want to grade out, since a framed deck sits above grade. Wood is cheaper upfront but requires more maintenance to avoid rot. My personal recommendation for a first-time ground-level patio: go with concrete pavers. The technique is learnable, the materials are widely available, and the result looks professional.
Planning, measuring, and layout basics
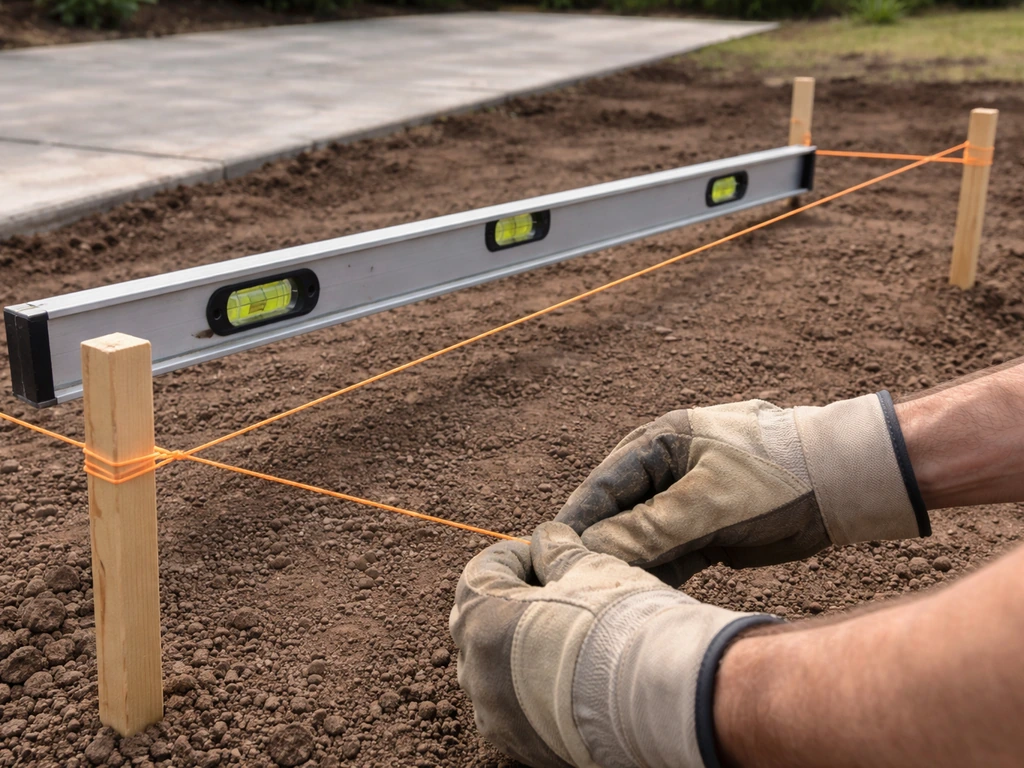
Before you move a single shovelful of dirt, spend time on paper. Sketch your patio footprint and note where the house wall is, where water currently flows in a heavy rain, and what's underground (call 811 before you dig). A standard patio runs at least 10x10 feet for a couple of chairs and a small table; 12x16 or larger is more comfortable for a dining set. Measure and mark the actual corners with stakes and string lines so you can see the real footprint before committing.
Use a line level or a long 4-foot spirit level on your string lines to confirm you understand the existing grade. This is where you figure out how much you'll need to cut or fill. Mark your finished surface height on the house or a reference stake so every measurement during the build traces back to one consistent benchmark. For pavers specifically, remember that after compaction your finished surface will sit roughly 1/8 to 1/4 inch above the surrounding grade, so factor that into your layout height.
- Call 811 at least 3 business days before digging to mark underground utilities
- Use stakes and mason's string to lay out the exact perimeter
- Set a single height benchmark on the house wall or a fixed stake
- Measure the diagonal (corner to corner) and confirm both diagonals match to ensure a square layout
- Sketch your material pattern (running bond, herringbone, basketweave) before ordering materials to reduce cuts
Site prep, grading, and drainage for longevity
Drainage is where most DIY patios fail. A flat patio will puddle, and water sitting against your house foundation is a serious problem. The rule is simple: slope everything away from the structure at 1 to 2 percent. That works out to about 1/8 to 1/4 inch of drop per foot of horizontal distance. So a 12-foot-wide patio should be 1.5 to 3 inches lower at the outer edge than at the house. Some sources reference a 1:60 to 1:80 fall as a practical guideline for hardscape surfaces, which lands in that same range.
Once you've set your slope in the string lines, clear all vegetation, roots, and organic material from the footprint. Organic matter decomposes and causes settling, so don't leave it under a patio. If your yard has heavy clay soil or poor natural drainage, lay a geotextile fabric over the subgrade before adding base material. This separates the base stone from the soil so fines don't migrate up and compromise the base over time. For areas where water collects at the edges or behind a retaining wall, plan a French drain during this phase, not after, because it's very difficult to add one retroactively.
Building the base: excavation, subbase, and compaction
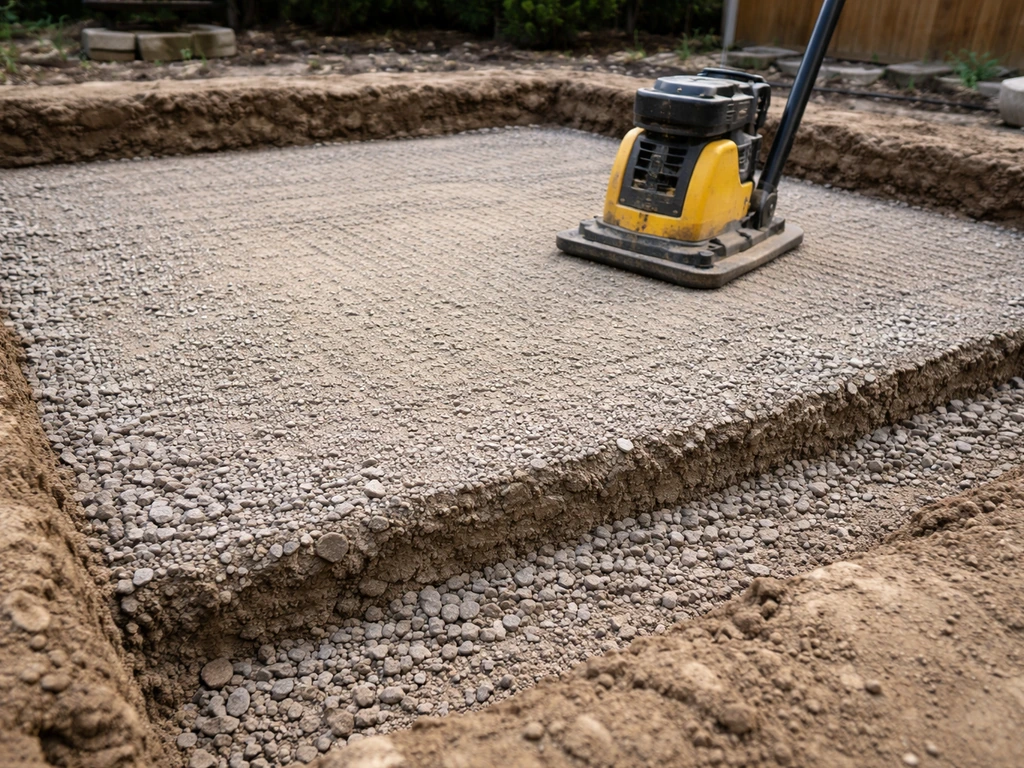
The base is the most important part of the whole project and the step most beginners underestimate. A perfectly laid paver surface on a bad base will rock, sink, and shift within a couple of seasons.
How deep to dig
For a ground-level pedestrian patio, excavate to accommodate your base stone, bedding layer, and surface material. A typical breakdown for pavers: 4 to 6 inches of compacted crushed stone base, 1 inch of bedding sand, plus the thickness of your paver (usually 2.375 to 3.125 inches). That puts your total excavation at roughly 8 to 10 inches in most regions. In freeze-thaw climates, lean toward the deeper end. On clay-heavy soil, you may need a thicker base, because clay holds water and expands when it freezes.
Compaction requirements
Compact your subgrade soil before adding any base material. The technical target for pedestrian paving is 95% standard Proctor density (ASTM D698). For a DIY build you won't run a Proctor test, but what this means practically is: rent a plate compactor, make multiple passes, and don't skip this step. Add your crushed stone in 2 to 3 inch lifts, compact each lift before adding the next, and verify your slope is maintained throughout. A hand tamper can work for very small areas, but a plate compactor rents for about $60 to $90 per day and is absolutely worth it.
The bedding sand layer
For pavers, screed a layer of coarse bedding sand to a consistent 1-inch depth (never thicker than 1 inch, per ICPI guidance). Use two screed rails set at the right elevation and a straight board to pull the sand flat and level. Don't walk on the screeded sand before laying pavers, and protect it from rain saturation, which can cause uneven settling when the pavers are placed.
Installation steps by material
Gravel patio
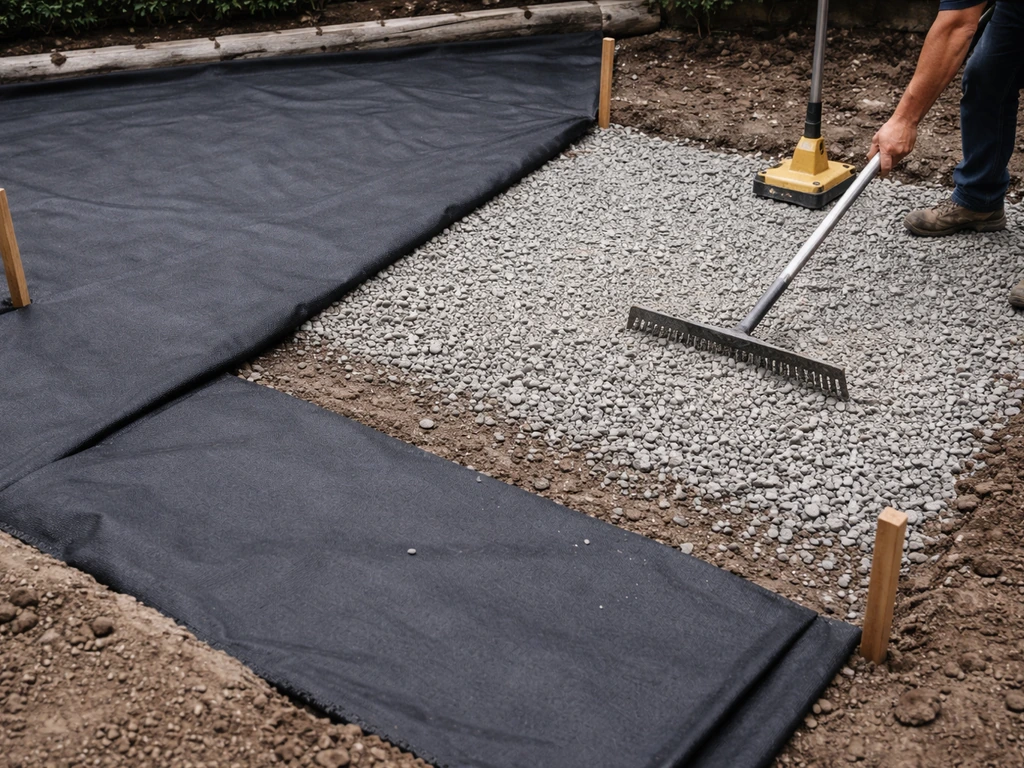
- Excavate 4–6 inches, remove all vegetation, and compact the subgrade
- Lay geotextile landscape fabric over the entire area to suppress weeds
- Add 3–4 inches of compacted crushed stone (3/4 inch clean stone works well)
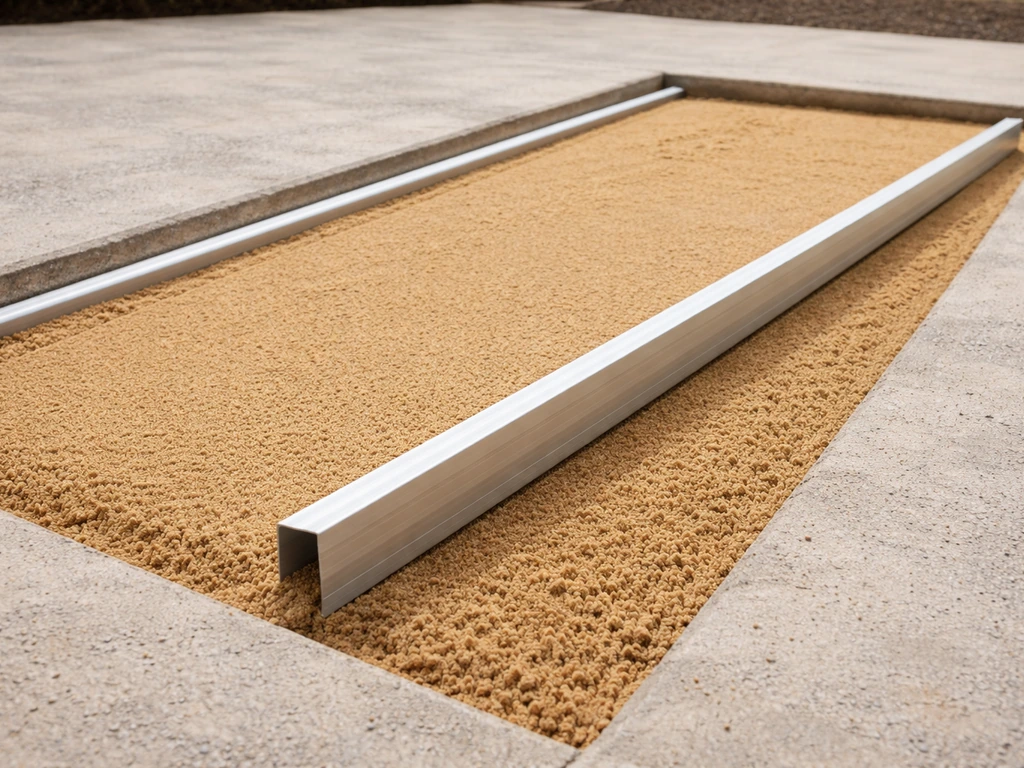
- Install edging (steel, aluminum, or plastic landscape edging) around the full perimeter and stake it firmly
- Top with 1–2 inches of decorative gravel (pea gravel or decomposed granite) and rake level
- Confirm slope away from house before calling it done
Brick and concrete pavers
- Complete excavation, subbase compaction, and bedding sand screed as described above
- Install edge restraints along all sides before laying any pavers
- Start laying pavers from a fixed corner, working outward in your chosen pattern
- Keep joints tight and consistent (typically 1/16 to 1/8 inch); use spacers if needed
- Cut border pieces with a wet saw or angle grinder with a diamond blade
- Once the field is laid, run the plate compactor over the surface (use a rubber pad attachment to protect pavers)
- Spread polymeric joint sand over the surface, sweep it into the joints, then compact again to consolidate the sand
- Mist lightly with water to activate polymeric sand per manufacturer instructions
- Check your finished surface with a long straightedge and verify slope with a level
Composite decking
Composite decking requires a framed structure, which adds complexity but is ideal for sloped or uneven ground. Build a pressure-treated frame with joists spaced no more than 16 inches on center (check your specific brand's installation guide since some require tighter spacing). Joists must be level across the entire frame. Leave adequate ground clearance beneath the frame so air can circulate and the underside can dry out, which prevents moisture buildup and extends the life of both the frame and the decking. Follow the manufacturer's hidden fastener or face-screw system exactly, maintain the specified board gap for drainage (typically 3/16 to 1/4 inch), and never exceed the manufacturer's joist spacing limits.
Pressure-treated wood decking
The framing process is the same as composite. Use only ground-contact rated lumber for any member that's close to soil. Space deck boards to allow drainage and airflow, and pre-drill near board ends to prevent splitting. Leave a consistent 1/8-inch gap between boards to allow for seasonal expansion. Seal cut ends of pressure-treated lumber with a wood preservative before installation. Plan to apply a penetrating water sealer to the surface every one to two years to maintain protection against rot and UV damage.
Edging, finishing, sealing, and maintenance
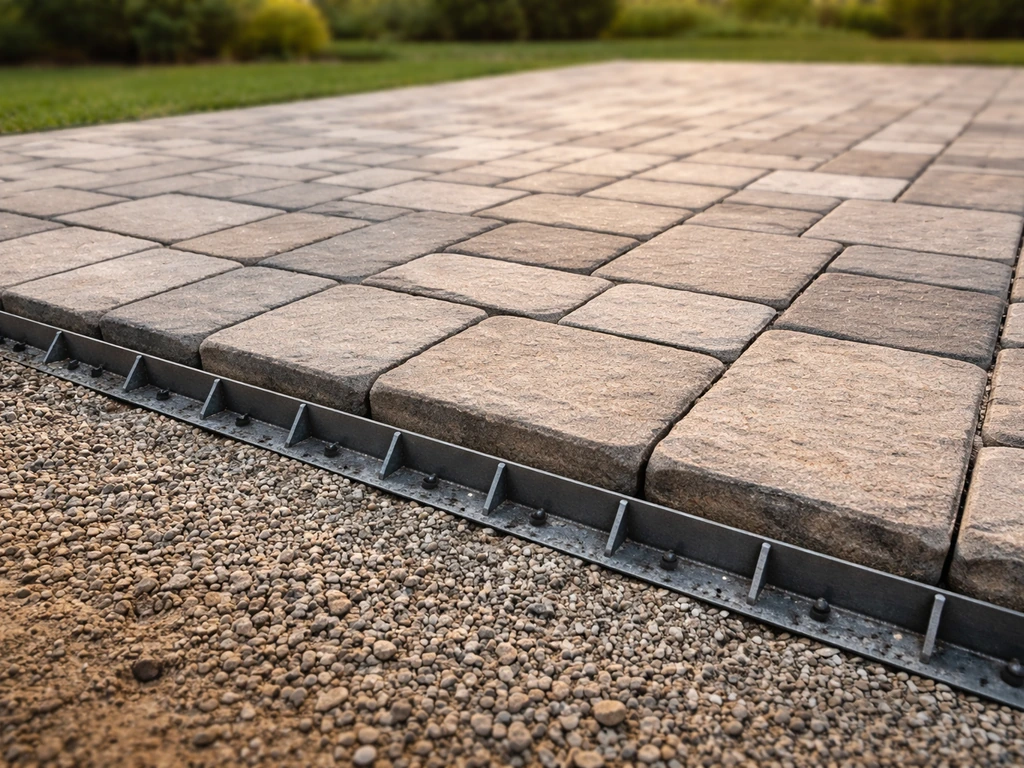
Edge restraints are non-negotiable for paver and gravel patios. Without them, the surface migrates outward over time. Use spiked aluminum or steel edging for pavers (plastic edging is cheaper but bends under load), drive the spikes every 12 inches, and make sure the restraint is flush with or just below the paver top surface so it's invisible in the finished look.
Once everything is installed and you've done a final check of slope and levelness, consider sealing concrete pavers. Sealing isn't mandatory, but it locks in the joint sand, enhances color, and makes cleaning easier. Use a breathable penetrating sealer rather than a film-forming sealer, which can trap moisture and peel. Reapply every 3 to 5 years. For natural stone, use a product rated specifically for that stone type.
Ongoing maintenance for pavers is straightforward: sweep out and replace joint sand every few years as it compacts and washes away, pull any weeds that establish in joints early before roots disturb the base, and re-level any individual pavers that shift by pulling them up, adjusting the sand, and resetting them. When installing polymeric paver sand, Techniseal recommends activating the sand with water as a dedicated step in the process. For wood or composite decks, rinse annually with a garden hose and a soft brush, inspect fasteners and framing for any early signs of movement, and reseal wood surfaces on schedule.
Tools, materials, budget, and common DIY mistakes
Core tool and material checklist
- Spade shovel and square-edged shovel for excavation
- Wheelbarrow for moving base material
- Plate compactor (rent: $60–$90/day) — don't skip this
- Long 4-foot level and line level
- Mason's string and stakes
- Tape measure and marking paint or chalk
- Screed rails and a straight 2x4 screed board (for paver sand)
- Rubber mallet (for setting pavers)
- Wet saw or angle grinder with diamond blade (for cutting pavers)
- Broom for sweeping in joint sand
- Garden hose with spray nozzle
- Safety glasses and work gloves
Budgeting the project
A 10x10 gravel patio can come in under $200 in materials if you do all the labor. A 12x16 concrete paver patio in a mid-range paver will typically run $800 to $1,800 in materials alone (pavers, base stone, sand, edging, polymeric sand). Composite decking for a similar-sized ground-level structure starts around $2,500 to $4,000 in materials. The biggest budget lever at every level is labor, which you're eliminating by doing it yourself. Rent the plate compactor rather than buying one, and buy slightly more material than your calculation to account for cuts and breakage, typically 10% extra for pavers.
Common mistakes to avoid
- Skipping slope: a flat patio will puddle. Set your 1–2% slope in the string lines before you dig, not after
- Insufficient base depth: 4 inches of base is the minimum; 6 is better, especially on clay or in freeze-thaw areas
- No edge restraints: pavers and gravel will spread outward within a season without them
- Screeding sand too thick: bedding sand must be 1 inch maximum. Thicker sand compresses unevenly and causes rocking pavers
- Skipping compaction between lifts: each layer of base stone must be compacted before adding the next
- Laying pavers on wet or rain-saturated sand: wait for dry conditions so the screed layer stays consistent
- Not dry-fitting a section first: lay a small test area to check your pattern and spacing before committing to the whole field
- Forgetting to account for material thickness in excavation depth: measure your actual paver thickness, don't assume
- Ignoring local codes for decks: deck structures over a certain height or size typically require a permit; check before you build
Your immediate next steps
Here's exactly what to do today to get this project moving. First, call 811 to schedule your utility locate if you haven't already. Then go outside with a tape measure, stakes, and string and mark your patio footprint so you can stand in the space and confirm the size feels right. Check how water drains across that area in a normal rain and identify your low point.
Sketch your layout and material choice on paper, then use that sketch to build a materials list and get a quote from your local landscape supply yard. Order 10% more than your calculated square footage. Rent your plate compactor for the day you plan to do excavation and base work. If you're building a deck structure rather than a ground-level paver patio, check with your local building department about permit requirements before ordering lumber.
The rest of the process follows the sequence above, and the most important single thing you can do is get that slope right from the start. If you're also figuring out how to pitch a patio to your household, this slope planning is one of the easiest value points to explain slope right from the start.
FAQ
Can I make a patio perfectly level if I still want good drainage?
Yes, but only if you can keep the correct fall and edge restraint. For a “mostly level” patio, you still need a 1 to 2 percent slope away from the house, and you need to plan your lowest corner so water has somewhere to go. If you cannot drain away from the foundation (for example, the only low point is toward the house), you may need a different layout, additional drainage, or a raised deck.
Do I need a plastic liner or membrane under a patio?
Not always. If you’re installing pavers over a properly compacted base with geotextile where appropriate, you typically do not need plastic under the patio. Plastic can trap moisture and cause movement, especially in freeze-thaw areas. The usual choice is geotextile fabric when soil is clay-heavy or drainage is poor, because it separates fines from the base while still allowing water to pass.
Is it really necessary to compact the base, and what if I don’t have a plate compactor?
For most DIY paver patios, compacting is the difference between a stable surface and a patio that rocks. A hand tamper is often only acceptable for tiny areas, but for anything larger, rent a plate compactor and compact in layers (2 to 3 inches of stone at a time). If you skip layered compaction, the top may look solid while the base still settles later.
How much extra material should I order for a DIY paver patio?
You can buy pavers by square footage, but account for layout cuts, breaker losses, and pattern waste. A common rule is 10% extra for pavers and similar materials, and closer to 15% if you have many curves or a complex pattern. Also remember to factor edging length and any steps or transitions, which require more material than you might estimate from surface area alone.
How do I handle the patio height where it meets a door or existing walkway?
Yes, if you want the patio to stay accessible and look intentional. Use a flush transition approach, such as setting pavers to match a doorway threshold height and leaving room for the bedding and surface thickness. Plan the landing height before you dig, because changing it after base installation can force you to raise or lower the entire area.
What’s the correct joint spacing for pavers, and how do I prevent joints from getting messed up?
Avoid wide joints with irregular spacing. Many paver problems come from joints that are too big or too small for the specific system, especially with polymeric sand. Use the intended joint spacing for your paver type, keep bedding sand to the target thickness, and do not overfill or underfill joints, because that affects locking and stability.
Are deeper excavation and thicker base layers more important in freeze-thaw climates?
If you live where temperatures swing and freeze-thaw occurs, choose the deeper base and follow a conservative excavation depth. Also ensure your drainage path is clear and your slope is correct, because trapped water plus freezing is what causes heaving. Consider leaning deeper (within the article’s typical 8 to 10 inch range) and using a proper base thickness for clay soils.
What are the most common reasons pavers shift or heave, and what’s the quickest fix?
Compacted crushed stone plus correct slope is the best prevention. After installation, remove leaves and debris that hold water, re-sweep and top up joint sand as needed, and pull weeds early before roots disturb edges and joints. If pavers shift, the fix usually starts by lifting affected sections, correcting the sand and slope, and resetting them with edging support in place.
How do I apply polymeric sand correctly so it locks pavers without ruining them?
Polymeric sand can fail if the patio is dusty, wet at the wrong time, or rinsed too aggressively. Follow the weather and curing guidance for your specific product, keep the surface clean before sweeping it in, and do a controlled application of water (not a heavy wash). If you expect a rainstorm soon, delay installation or protect the area so the sand can set properly.
What if I realize I need drainage after the pavers are already laid?
Yes, but it’s much harder to do cleanly after the patio is built. That’s why planning for drainage during excavation matters. If a French drain is needed for low spots, route it before you place base stone, set the outlet direction, and ensure the drain discharge path is away from the house. Retrofitting later often means removing pavers and reworking sections of base.
Should I seal pavers immediately after installation, or is there a waiting period?
You can seal some paver types to improve cleaning and color, but do it at the right time and use breathable penetrating sealer. Sealing is not mandatory, and if your joint sand is not stable or has not cured properly, sealing can trap moisture. Also plan for reapplication every few years based on exposure and weather.
What’s a common layout mistake that causes budget overruns or a messy patio look?
For DIYers, the biggest mistake is choosing a pattern or layout that creates too many small cuts, because that drives waste and weakens edges if the layout gets chopped up. Keep the patio footprint simple, use square or consistent dimensions, and do a test layout dry before committing. If you must do complex shapes, increase your material buffer and plan edging carefully along curves.
Next Article
How to Update Patio: Complete DIY Guide to Repair or Rebuild
How to update patio: DIY guide to assess, choose materials, and follow step-by-step repairs or full rebuilds with costs.