To edge a patio, you dig a shallow trench around the perimeter, set your edging material on the compacted base (not on bedding sand), spike or stake it in place so the top sits just below the finished patio surface, then backfill and compact the outside edge tight. Done right, it locks your pavers or gravel in place permanently and gives you that clean, sharp line that makes the whole project look finished.
How to Edge a Patio: Step-by-Step DIY Guide

Nolan Lennox
19 May 2026
What patio edging is (and why skipping it wrecks your patio)
Patio edging is a physical restraint installed around the outer perimeter of your patio to hold everything in place. For paver patios, it acts as a rigid barrier that resists lateral forces: every time someone walks across the surface, load spreads outward and the pavers want to creep toward the edges. Without restraint, that outward pressure slowly pushes the perimeter stones apart, joint sand escapes, and eventually the whole edge looks ragged and starts to fail. It's one of the three most common reasons paver patios fall apart, right alongside a bad base and poor drainage.
Beyond structural containment, edging does the everyday stuff most people think of first: it stops grass from creeping onto your patio, prevents gravel or mulch from migrating into the lawn, and gives you a defined visual boundary between hardscape and landscape. On a gravel or decomposed granite patio especially, edging is the only thing keeping your surface material from disappearing into the yard over a couple of seasons. The good news is that you only need a solid edge restraint when the patio perimeter meets open ground. Where a patio butts up against a house foundation, retaining wall, or steps, the fixed structure does the restraining job for you and you can skip the restraint on those sides.
Tools and materials you'll need
Edging material options
Choosing your edging material up front matters because different options have different strength ratings and installation requirements. Here's a quick comparison to help you decide:
| Material | Best For | Durability | Avg. Cost (per linear ft) | Notes |
|---|---|---|---|---|
| Aluminum | Pavers, concrete, gravel | Excellent — won't rust or crack | $1.50–$3.00 | Lightweight, flexible enough for curves, pro-level hold |
| Steel | Straight runs, heavy-traffic areas | Excellent — very rigid | $2.00–$4.00 | Best for straight lines; harder to bend for curves |
| Rigid plastic / PVC | Budget builds, light-use patios | Moderate — can become brittle in cold | $0.50–$1.50 | Avoid in freeze-thaw climates if not properly backfilled |
| Concrete/poured | Permanent borders, formal installs | Excellent — very strong | $3.00–$6.00+ | Labor-intensive; great for raised or elevated edges |
| Pressure-treated wood | Natural-look patios, gravel areas | Good with proper treatment | $1.00–$2.50 | Needs staking; more detail in wood-edging installs |
| Brick or natural stone | Decorative border, paver patios | Excellent if mortared | $3.00–$8.00 | Doubles as a design feature; requires more excavation |
For most DIY paver patios, aluminum or rigid plastic edging is the practical go-to. Aluminum holds up in all climates, bends easily around curves, and disappears below the paver surface once installed. Plastic is cheaper and totally fine for light-use areas, but avoid relying on lightweight plastic in spots with heavy foot traffic or hard freeze-thaw cycles since it can become brittle and crack. Wood edging is a great fit for gravel or mulch-bordered patios and has its own installation nuances worth exploring separately. Wood edging can work well for gravel or mulch-bordered patios, but you still want a straight, solid setup so it doesn’t shift over time.
Tools checklist
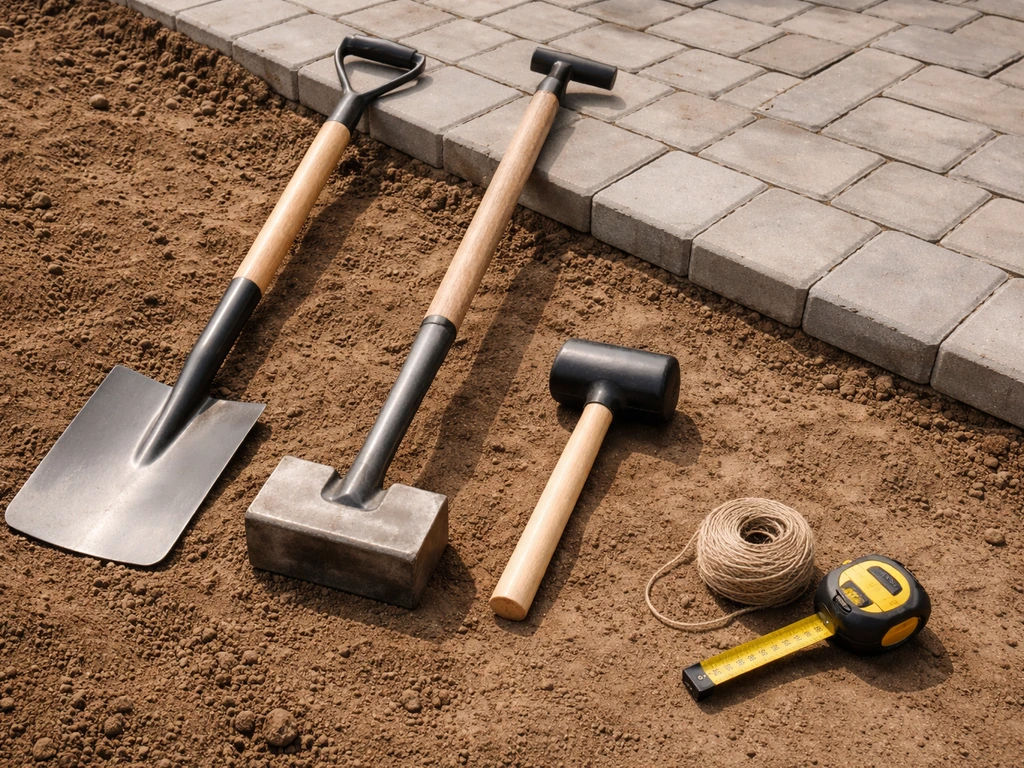
- Spade or flat-bladed edging shovel (for cutting the perimeter trench)
- Hand tamper or plate compactor (for compacting base inside and outside the trench)
- Rubber mallet (for tapping edging into position)
- Hammer or spike driver (for driving landscape spikes through edging holes)
- 10-inch landscape spikes or manufacturer-specified spikes
- String line and stakes (for setting straight runs)
- Garden hose or marking spray paint (for laying out curves)
- Tape measure and level
- Mason's line and batter boards (for establishing slope and finished elevation)
- Wheelbarrow and hand rake (for backfilling)
- Safety glasses and work gloves
Planning the layout before you dig anything
Rushing straight to digging is how you end up with a wavy edge. Take 20 minutes to map the line first and you'll save yourself hours of rework. Once you finish outlining your patio edge, you can follow the same steps to get a straight, clean edge map the line first. Start by establishing your string line. For straight runs, drive stakes at each corner and pull a taut mason line at the exact finished patio elevation. For curves, lay a garden hose on the ground, adjust it until the curve looks right from multiple angles, then mark the line with spray paint or a series of small stakes. Stand back and look at it from the house, from the lawn, and from the side before committing.
Once the line is set, check your slope. Every patio needs to drain away from the house at a minimum of 1/8 inch per foot, and 1/4 inch per foot is better and easier to achieve by eye. Use batter boards (two stakes with a crosspiece) to hold string lines at your finished elevation, then use a tape measure to verify that your slope drops consistently from the house side to the outer edge. Getting this right before you install edging means water won't pool at the boundary where it can undermine your base over time. A proper paver base “layers” approach also calls for excavation depth that accounts for subgrade prep plus bedding sand and aggregate base CDA Performance Construction.
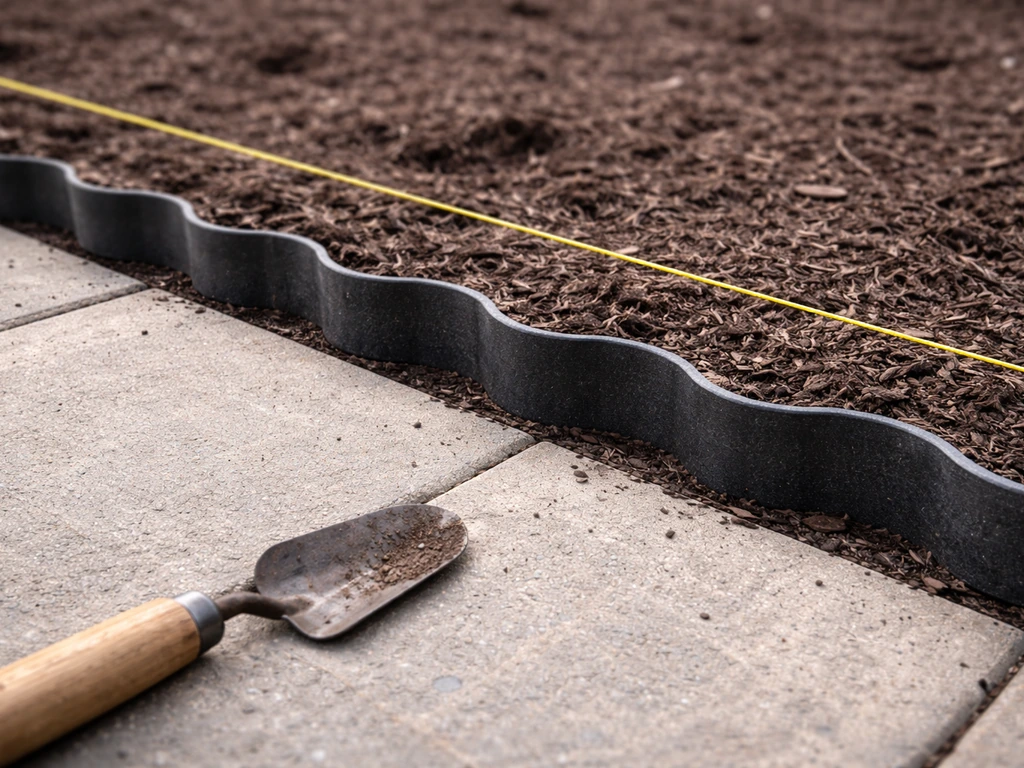
Also think about transitions. Where does your patio edge meet the lawn? A mowing strip (flat edging set flush with grade) lets a mower wheel ride on it so you never need a string trimmer. Where it meets a gravel bed or mulch area, the edging just needs to stand tall enough to keep materials from spilling over. Where it meets a step or wall, you can usually end your edging run right there and let the fixed structure take over.
Step-by-step: how to install patio edging
- Mark the perimeter line using your string, hose, or spray paint. Double-check that it's the right distance from any fixed structures and that the line flows smoothly without kinks.
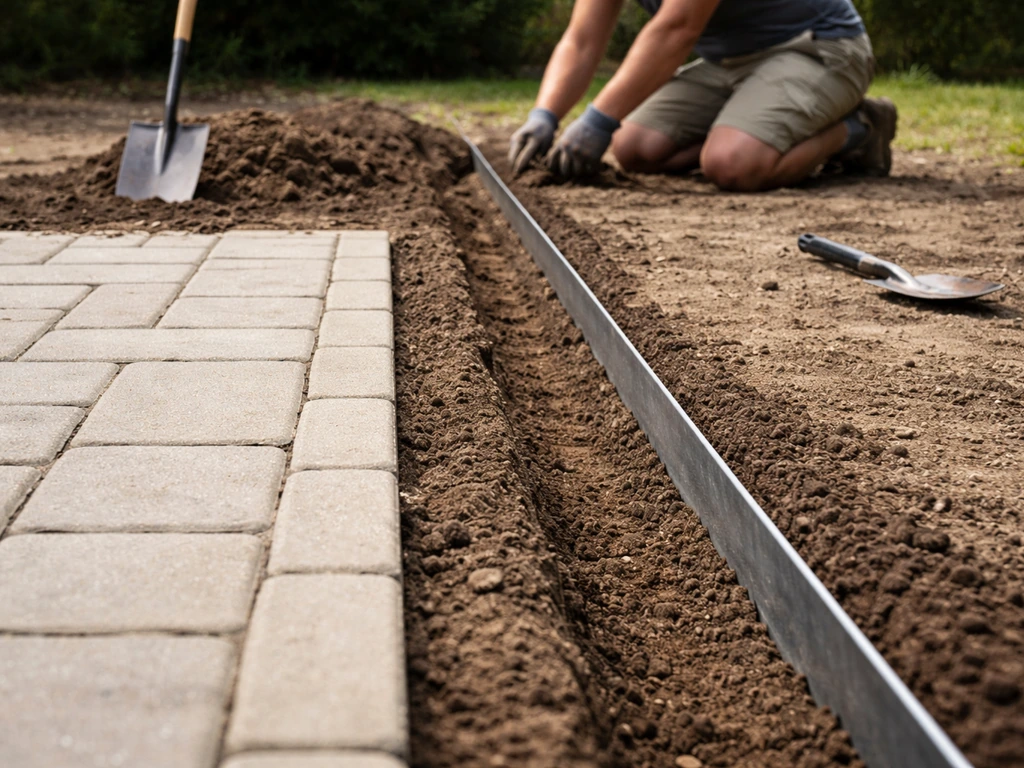
- Cut the trench. Use a flat spade to cut straight down along your marked line to a depth of about 4–6 inches (enough to accommodate the base layer plus the edging height). The trench only needs to be about 4–6 inches wide.
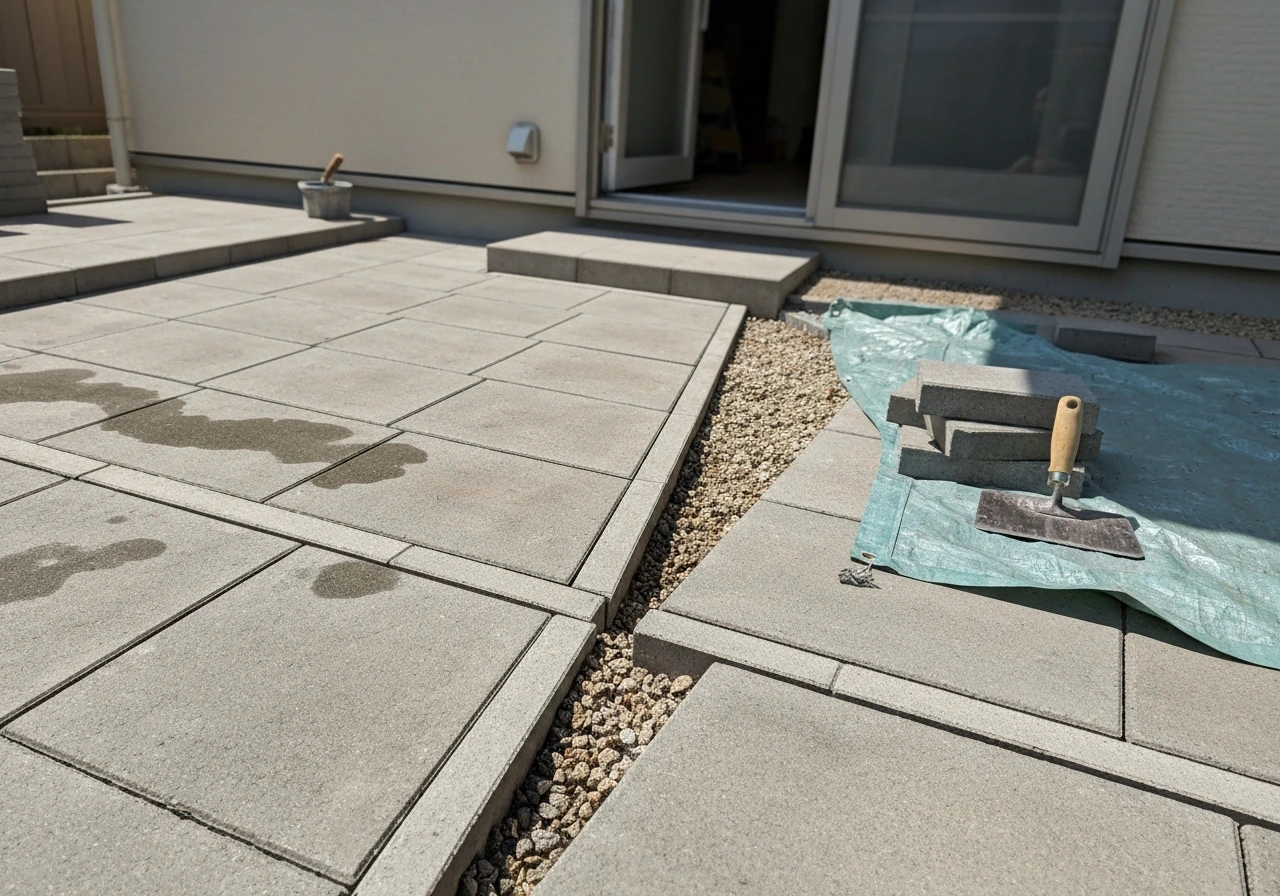
- Check the existing base. If you're edging an existing patio, dig right alongside the outer pavers and confirm the compacted aggregate base extends to the patio perimeter. Your edging must sit on this compacted base, not on bedding sand. If the base is soft, compact it with a hand tamper before continuing.
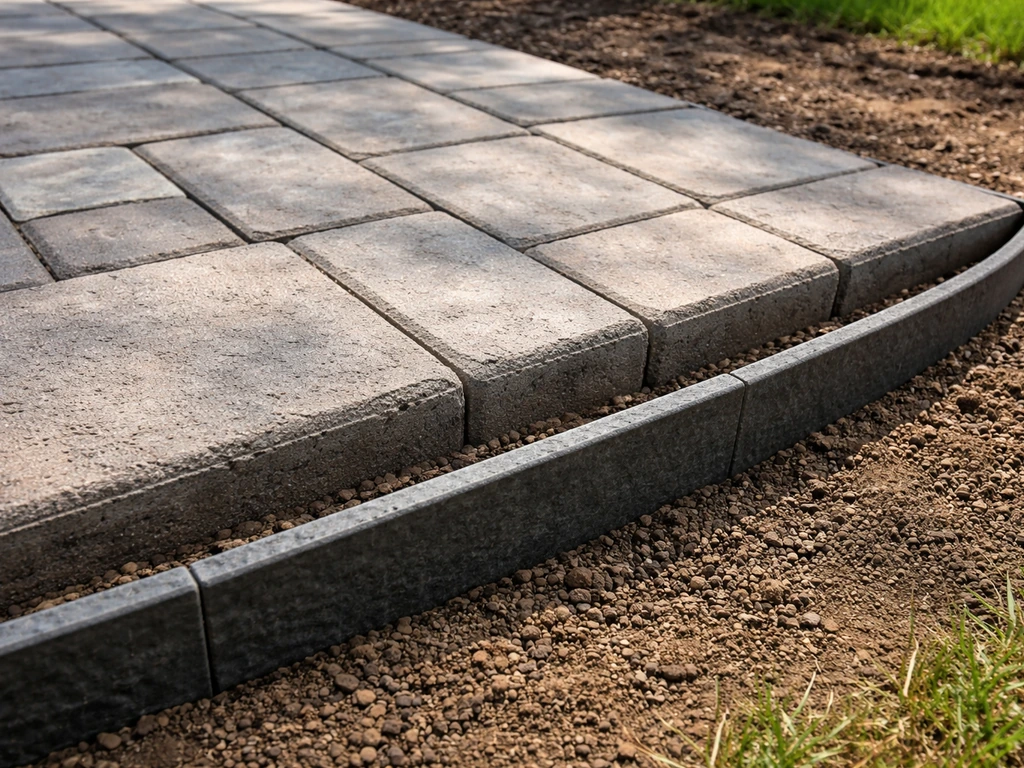
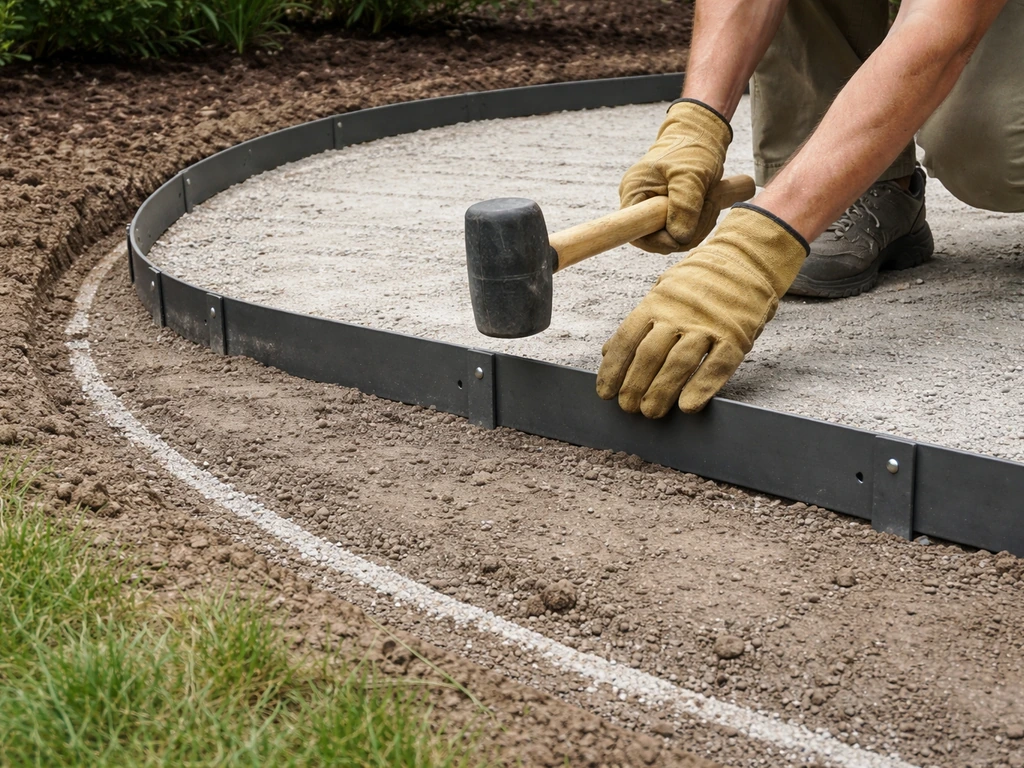
- Set the edging depth and elevation. Place your edging section in the trench. The top of the edging should sit about 1/2 inch below the finished paver surface so it stays hidden. Confirm this with a straightedge or level laid across the pavers and over the edging. Adjust the trench depth as needed.
- Check alignment. With sections in place (but not yet spiked), step back and look along the run. Curved sections should flow smoothly. Straight sections should align with your string line. Nudge as needed before driving any spikes.
- Drive the spikes. Tap 10-inch landscape spikes through the pre-drilled holes in the edging using a hammer or spike driver. Drive them until the spike head is about 1/4 inch above the edging collar — fully flush isn't necessary and can distort the edging. For typical residential foot-traffic patios, space spikes every 12 inches on straight runs and every 6–8 inches on curves for extra hold.
- Handle corners and connections. For 90-degree corners, cut a section of edging at 45 degrees on each side and overlap them, or use a pre-formed corner piece. Butt-join straight sections tightly. Overlapping by an inch is fine; a gap is not.
- Backfill the outside of the trench. Pack soil firmly against the outside face of the edging using your hands or a tamper, working in 2-inch layers. The goal is to lock the edging in place so it can't tip outward under pressure. Don't leave air pockets.
- Compact the backfill. Run a hand tamper along the outside edge, or use the back of your spade to tamp down firmly. This is the step most DIYers skip, and it's the reason edges tip over a year later.
- Sweep joint sand (for paver patios). Once edging is set and backfilled, sweep polymeric or regular joint sand across the patio surface and into joints. This is easier now that the perimeter is contained. Compact the pavers one more time with a plate compactor (put a piece of carpet or rubber mat under the plate to avoid scratching the paver surface).
If you're edging a newly built patio rather than an existing one, the process is essentially the same except you install the edging before you lay the bedding sand and pavers. Set the edging on your compacted aggregate base, spike it, backfill the outside, then screed your bedding sand (typically 3/4 to 1-1/2 inches thick) inside the contained perimeter and lay your pavers inward from there. Once your edging is set, follow the same careful layout and leveling steps so the border stays straight and drains correctly.
Common mistakes and how to fix them
Wavy or uneven lines
This almost always comes from not using a string line or from rushing the alignment check before spiking. If you've already spiked and the line is wavy, pull the spikes, lift the edging, re-establish the string, and reset. It's annoying but not hard. Preventing it is much easier: just take the time to verify alignment every 6–8 feet before each spike goes in.
Edging that tilts outward over time
If your edging is tipping away from the patio after a season or two, the backfill wasn't compacted enough or the spikes were too short. Pull the edging, re-compact the base and trench bottom, use longer spikes (or add more of them), and re-backfill in compacted layers. Also make sure you're spiking into compacted aggregate, not into loose soil.
Edging set on bedding sand instead of base

This is the big one. If edging is sitting on bedding sand, it has no real anchor. Sand shifts, the edging moves, and your pavers follow. The fix is to remove the edging, remove the bedding sand from that perimeter strip, expose the compacted base, and reset the edging directly on the base. It takes a couple of hours but there's no shortcut that works long-term.
Gaps between edging and pavers
Small gaps let joint sand escape and eventually let grass and weeds creep in. If you see gaps forming, top up with fresh joint sand and compact again. For persistent gaps, check whether the edging has tilted or whether a paver has settled slightly. Address the root cause (usually inadequate base compaction under that paver) before refilling.
Drainage pooling at the edge
Water collecting right at the patio perimeter is a sign your slope wasn't established before installation or the edging was set too high and is acting as a dam. If the edging top is above the finished paver surface, that's your problem: lower it to at least flush, or ideally 1/2 inch below. If the slope itself is wrong, you may need to pull that section, re-grade the base, and re-compact before resetting the edging. This is worth fixing promptly because standing water at the edge undermines base compaction season after season.
Crumbling or cracking edges on older patios
If you're dealing with an existing patio where the outer pavers themselves are chipped or crumbling (not just the edging), the problem is usually that they were never restrained and have shifted under lateral pressure over the years. Remove the damaged perimeter pavers, re-compact the base, install proper edging on the base, reset the pavers, and refill with joint sand. If the base itself is soft or has settled, add and compact fresh aggregate before resetting anything.
Keeping your edges sharp long-term
Good edging is largely maintenance-free if it was installed correctly, but a quick once-over each spring will catch small problems before they become expensive ones. Walk the perimeter and look for sections that have tipped, lifted, or separated from adjacent pavers. If a section has shifted even slightly, it's much easier to reset it now than after a full season of use has compacted soil around the problem.
Refresh joint sand every year or two. Polymeric sand in the perimeter joints is your best defense against weeds and sand loss at the edge. After sweeping in fresh sand, lightly mist the area to activate the polymer binder and let it cure before traffic resumes. Regular sand works too but needs replacing more often.
Keep the soil or mulch level on the outside of the edging slightly below the edging top so water drains away rather than pooling at the boundary. If soil builds up against the outside over time (it always does), scrape it back in the spring. This also discourages grass from bridging over the top of the edging, which is the most common way grass reclaims ground from a hardscape edge.
If you used plastic edging and notice it becoming brittle or cracking (usually after 5–10 years in cold climates), replace it section by section with aluminum rather than trying to patch it. Plastic degradation in freeze-thaw conditions is a known limitation, especially if the edging wasn't backfilled tightly enough to protect it from UV exposure and temperature swings. Aluminum is a one-time install that outlasts most patios.
Finally, keep up with trimming at the edge. Even with great edging, grass will eventually try to grow over it. A manual or powered edger run along the perimeter two or three times per season keeps that line crisp and is genuinely satisfying to look at. It takes about ten minutes and makes the whole patio look like it was just finished.
FAQ
How do I know the edging height is correct at the end of the job?
If your patio uses pavers, your top should typically finish at the same level as (or slightly below) the finished paver surface so water cannot pond against the restraint. A practical check is to set a straightedge across several pavers near the edge and confirm the edging top is not higher than the paver tops by more than a small amount.
Can I edge a high-traffic patio without using heavy-duty edging materials?
Yes, but only if you install restraint that can handle the load and you properly compact the base. For heavy-use patios, rigid edging materials (like aluminum) are more reliable than lightweight options, and you still need the same trench, base compaction, and outside backfill tight to the edging.
What is the easiest way to verify slope when I cannot easily eyeball 1/8 inch per foot?
Measure the change in elevation across the patio width and translate it to a slope target before you dig. For example, if the patio is 8 feet wide, the minimum 1/8 inch per foot equals about 1 inch of drop from house to outer edge. If you are close, recheck after compacting because compaction can slightly change grade.
What should I use instead of a string line to keep the edge straight and level?
If you do not have a string line, use batter boards or a laser level to mark a consistent finished elevation. The key is having a reference at multiple points along the run, especially on curves, so you do not end up with an edge that varies in height and creates water pockets.
How far apart should spikes or stakes be placed along the perimeter?
For aluminum or rigid plastic edging, a good rule is to place more spikes near curves and at every transition, and not rely on spacing that only works for straight runs. If the edging can be moved by hand after installation, you need more spikes, or the backfill and compaction are not tight enough.
What happens if the edging is set too low under the pavers?
If the top of the edging is below the paver surface, you can still have a problem if the edging is set too low while pavers are not supported at the perimeter. The safer approach is to dry-fit a small section, confirm the paver bedding height and edge elevation match your drain plan, then install once you see that the border pavers lock in cleanly.
Can I stop edging right at a wall or steps, or do I need to wrap around them?
You can run edging up to a fixed structure, but leave a controlled transition for movement. For example, trim the edging so it ends tight to the wall or steps and do not bury it in a way that forces bending, then inspect after the first season so gaps do not open at the joint.
My patio edge moved after installation. Is it okay to top up sand instead of resetting the edging?
Do not pour bedding sand into a void under the edging as a shortcut. Bedding sand is not an anchor, it can shift and let the edging tip. If an existing section is loose, remove edging, re-expose the compacted base, then reset on compacted aggregate and re-backfill in layers.
How can I tell whether gaps at the edge are just sand loss or a base problem?
Small gaps are often joint-sand related, but persistent gaps usually point to a slight tilt, a settled paver, or insufficient base compaction under the perimeter stones. Before refilling sand, check for rocking pavers at the edge and correct any movement so the gaps do not return.
What is the best way to keep weeds from coming through at the patio perimeter?
If you see weeds, focus on what type of joint sand you used and whether it was activated. If using polymeric sand, sweep it in, then lightly mist to activate and let it cure before traffic. If weeds keep returning in the same spots, inspect for undermined edges and reset any shifted sections instead of repeatedly topping sand.
Can I redo the edging on just one damaged section of an existing patio?
You can do it, but be careful not to disturb the base with repeated digging. Plan your reset to minimize excavation length, lift only the affected perimeter pavers, remove and replace the perimeter restraint on compacted base, then re-lay and re-sand the joints, compacting any new aggregate before you reset adjacent pavers.
If water is pooling at the edge, should I adjust the edging or change the patio base grade?
Generally, align the edging so it sits on compacted base and is not acting like a dam. If you have to modify grade, re-grade the base first, compact it, then reset the edging and re-lay pavers. Correcting drainage after the pavers are installed usually requires lifting that perimeter anyway.
Does edging work differently for a gravel or decomposed granite patio?
For a gravel or decomposed granite patio, edging is your main containment, so the restraint height and anchoring matter more than on pavers. If you used wood edging, make sure it is straight, supported consistently, and backfilled and compacted so it cannot shift outward as the material settles.
What should I do if plastic edging is cracking in winter and my edge looks uneven?
In freeze-thaw areas, lighter edging materials can fail when they crack or lose support from insufficient backfill compaction. The most reliable fix is to replace degraded sections with aluminum and ensure outside backfill is compacted tightly in layers to reduce movement.
How can I edge the patio so mowing stays easy without creating drainage problems?
Yes. It is possible to avoid a rough boundary by adding a mowing strip detail. Use a flat edging line so a mower can ride the surface, but keep the mowing strip slightly below the edging top so water still drains away from the patio boundary.
Next Article
How to Upgrade Patio: DIY Diagnosis, Prep, Materials, Steps
Learn how to upgrade a patio with DIY diagnosis, drainage prep, material choices, and step-by-step refresh, replace, or