Redoing a patio means something different depending on what you're starting with. Sometimes it's a quick refresh: re-sand the joints, relay a few sunken pavers, maybe reseal. Following that refresh path, you can use the same steps to replace a patio section-by-section when only certain areas have failed. Other times the whole thing needs to come out, the base rebuilt from scratch, and a new surface laid.
How to Redo a Patio Step-by-Step DIY Guide

Nolan Lennox
17 May 2026
Getting that call right at the start saves you a ton of wasted effort and money. The short version: if your patio has chronic drainage problems, widespread sinking, or a base that's clearly failed, you're doing a full replacement. If it's just surface wear or a few problem spots, a targeted refresh will do it. If you're wondering how to update patio surfaces without overhauling the entire base, focus on whether you need a targeted refresh or a full replacement. Once you decide whether you need a refresh or a full redo, the next step is figuring out how to upgrade patio surfaces in a way that fixes the root problem.
Decide What 'Redo' Actually Means for Your Patio
Before you rent equipment or order materials, you need to figure out your scope. There are basically three levels of work here, and mixing them up is the most common mistake I see homeowners make.
- Refresh only: Re-sand joints, re-level individual pavers, clean and reseal the surface, add edging where it's pulled away. This works when the base is solid and only a handful of pavers have shifted.
- Partial redo: Lift a section, fix the base underneath, relay that section, and blend it in. Good for isolated sinking or drainage problems that are localized to one area.
- Full replacement: The whole surface comes out, the base is rebuilt or corrected, and everything goes back down new. Necessary when drainage problems are widespread, the base is contaminated or never installed correctly, or the surface material has reached end of life.
The signs that push you toward full replacement are pretty clear: standing water that doesn't drain after rain, multiple sections sinking or tilting, cracks running across large areas, or any moisture wicking toward the house foundation. Poor drainage is almost always a base problem, and water pooling on a patio surface is a warning that the trouble runs deeper than the top layer. A resurfacing job costs roughly $3–$10 per square foot, while full replacement with pavers runs $4–$20 per square foot depending on material, so the scope decision has real financial stakes. If you're on the fence, the assessment section below will help you make the call with confidence.
Assess Your Patio Before You Touch Anything
Spend 30 minutes doing a proper site assessment and you'll avoid nasty surprises mid-project. If you want to revamp patio space that lasts, start by understanding what is causing drainage and base issues before you choose resurfacing or replacement site assessment. Here's what to check.
Check the base and compaction

Lift a few pavers from different areas of the patio. The base underneath should be hard-packed crushed stone, not soft dirt, muddy gravel, or sand that crumbles and shifts when you press it. If pavers come up easily by hand, or the material below them is soft and unstable, that base wasn't built right from the start. A poorly constructed base is the number one cause of paver patio failure, and no amount of surface work will fix what's broken underneath.
Test drainage and slope
A properly built patio slopes away from the house at a minimum of 1/8 inch per foot. You can verify this with a string line and a line level. Run the string from a point near the house out to the far edge, measure the drop, and do the math. If your 12-foot patio has less than 1.5 inches of fall across its length, water is going to sit or run toward the foundation. If you see algae staining, erosion channels, or mud deposits on the surface, those are direct symptoms of drainage that isn't working.
Look for weeds and base contamination
Weeds growing through joints are a nuisance, but weeds or grass growing from underneath the pavers mean the base layer was never properly separated from the native soil. When soil migrates up into the gravel base, it weakens the whole structure over time. If you find this, plan for geotextile fabric as part of your rebuild. There's no shortcut fix for a contaminated base: the pavers come up, the bad material gets removed, geotextile goes down on the excavated soil, and the base is built fresh.
Level check and edge condition
Walk the whole patio and note any lips, rocking pavers, or obviously sunken areas. Also check the edge restraints. Edging that has pulled away, shifted outward, or never existed is one of the primary reasons pavers creep and spread over time. Make notes on where problems concentrate, as this helps you decide between a partial redo and full replacement.
Planning the Project: Layout, Measurements, Permits, and DIY Reality
Measure and sketch your layout
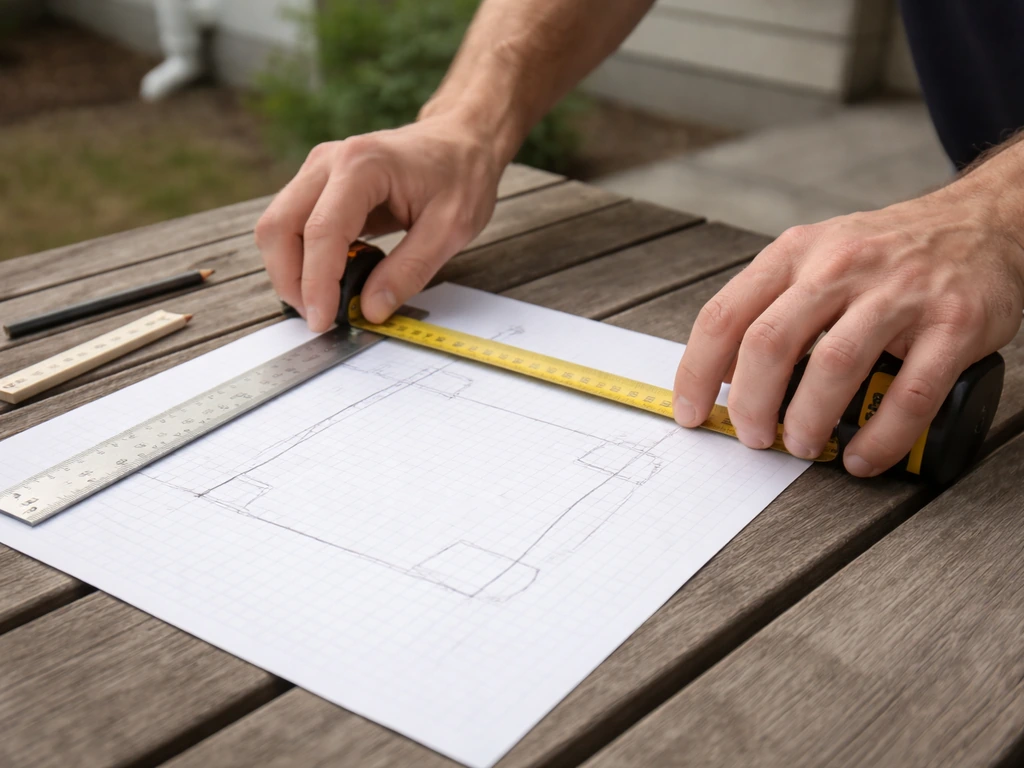
Measure the area carefully and sketch it on paper. Note any obstacles: downspouts, doors, steps, garden beds. A rectangular or square patio is the easiest to DIY. Complex curves or cuts around irregular features add significant time and require a wet saw or angle grinder with a diamond blade. Calculate your square footage and add 10% for waste and breakage when ordering materials.
Permits: when you need one
Permits for patios vary significantly by municipality, but there are patterns. If you're pouring new concrete, most jurisdictions require an impervious coverage worksheet and often a building permit. Patios built within drainage easements or utility easements typically can't be permitted at all. Some areas count permeable pavers differently from solid concrete in their lot coverage calculations, which can work in your favor if you're close to the coverage limit. The safest move: call your local building department before you start. It's a five-minute conversation that can save you a fine or a forced teardown later.
Be honest about DIY feasibility
A paver or gravel patio up to about 200–300 square feet is genuinely manageable as a solo DIY project over a weekend or two if you're reasonably fit and comfortable with manual labor. Plate compactors and sod cutters can be rented from any big box store for around $75–$150 per day. Where things get tricky: if you need to move significant amounts of soil, cut many pavers to fit, or work on a sloped site that requires retaining, that's where a helper or a professional becomes worth the cost. Concrete pours almost always warrant hiring out unless you have real experience, since timing and finishing are skills that take practice.
Choosing Your Material: What Works, What It Costs, and What to Expect
Material choice affects not just cost but also how much base prep you need, how long the project takes, and how the finished patio performs. Here's an honest comparison across the options most DIYers are working with.
| Material | Typical DIY Cost (per sq ft) | Durability | Base Required | Best For |
|---|---|---|---|---|
| Concrete pavers / brick | $4–$12 materials | 30+ years with good base | 4" compacted gravel + 1" sand bed | Classic look, high durability, repairable |
| Natural brick | $6–$15 materials | Decades if maintained | 4" compacted gravel + 1" sand bed | Traditional aesthetics, good resale appeal |
| Gravel / crushed stone | $1–$3 materials | Ongoing maintenance | Geotextile + 4"+ compacted base | Low budget, good drainage, informal spaces |
| Concrete (poured) | $3–$8 materials DIY | 20–30 years | 4" compacted gravel sub-base | Clean modern look, minimal joints |
| Composite / wood decking | $8–$20 materials | 25–30 years (composite); 10–15 years (wood) | Framed structure or sleepers on concrete/gravel | Elevated or ground-level deck-style patios |
Concrete pavers and brick
This is the most popular DIY patio material for good reason. Pavers are forgiving: if one cracks or sinks years later, you pull it out and fix just that spot. Installed brick paver patios typically run $12–$20 per square foot with labor, but doing it yourself cuts that roughly in half. They need a proper base (more on that below) and polymeric sand in the joints, but the process is learnable and the results are excellent. Brick has a similar installation process but tends to cost a bit more per unit.
Gravel and crushed stone
Gravel is the fastest and cheapest option and actually drains beautifully, which eliminates one of the biggest headaches with other materials. The tradeoff is ongoing maintenance: you'll top it up over time, and it's not great for furniture placement. Use geotextile fabric under the gravel to prevent weeds and keep the stone from sinking into the soil. This is a strong choice for informal spaces, side yards, or anyone who wants functional outdoor area on a minimal budget.
Composite and wood
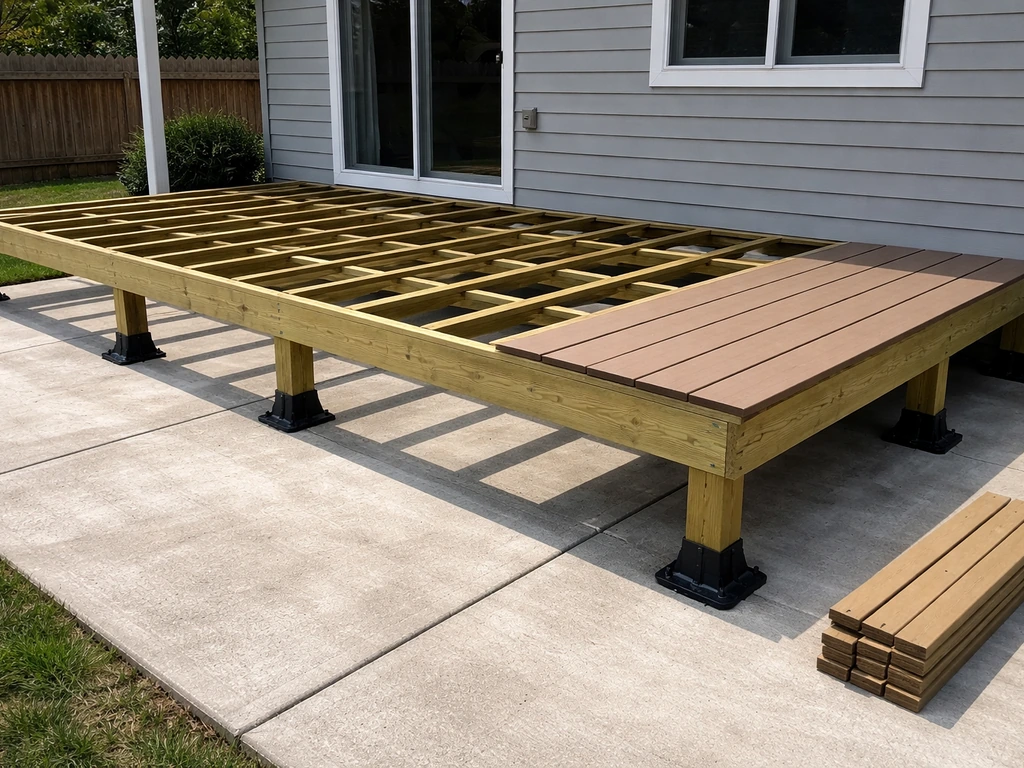
Composite decking materials like TimberTech can last 25–30 years with minimal maintenance and often come with fade and stain warranties that long. Natural wood is cheaper upfront but needs annual sealing and replacement sooner. Both require a framed structure or properly spaced sleepers rather than a traditional gravel base. If your patio space is better served by a deck-style surface, this is the route, but the framing work adds complexity beyond standard paver installation.
Teardown and Base Preparation: The Work That Actually Matters
More patios fail because of a bad base than any other single reason. This section is worth reading carefully even if it feels like the unglamorous part.
Removing the existing surface
For pavers or brick, use a flat pry bar to lift units and stack them. Many will be reusable if they're in decent shape. For concrete, you'll need a rotary hammer or jackhammer (available as a day rental) to break it up, then haul the debris. Budget for a dumpster rental if the area is large. For wood or composite, demo is usually straightforward: unscrew decking boards, then disassemble the frame.
Excavation depth
For a paver or brick patio, you need to excavate deep enough to fit: the paver thickness (typically 2. 375 to 3. This Old House specifies a base-and-bedding approach that adds a 3-inch layer of base material and then a 1-inch layer of coarse paver sand or chip stone as the bedding before installing pavers [a 1-inch sand bedding layer](https://www. thisoldhouse.
com/patios/reviews/paver-patio). 5 inches depending on the unit), a 1-inch sand bedding layer, and 4 inches of compacted gravel base. That puts your total excavation at roughly 7. 5 to 9 inches below your finished surface grade.
Mark that depth with spray paint or stakes around the perimeter and keep checking as you dig. A sod cutter rental makes the first layer much faster than hand digging.
Install geotextile fabric
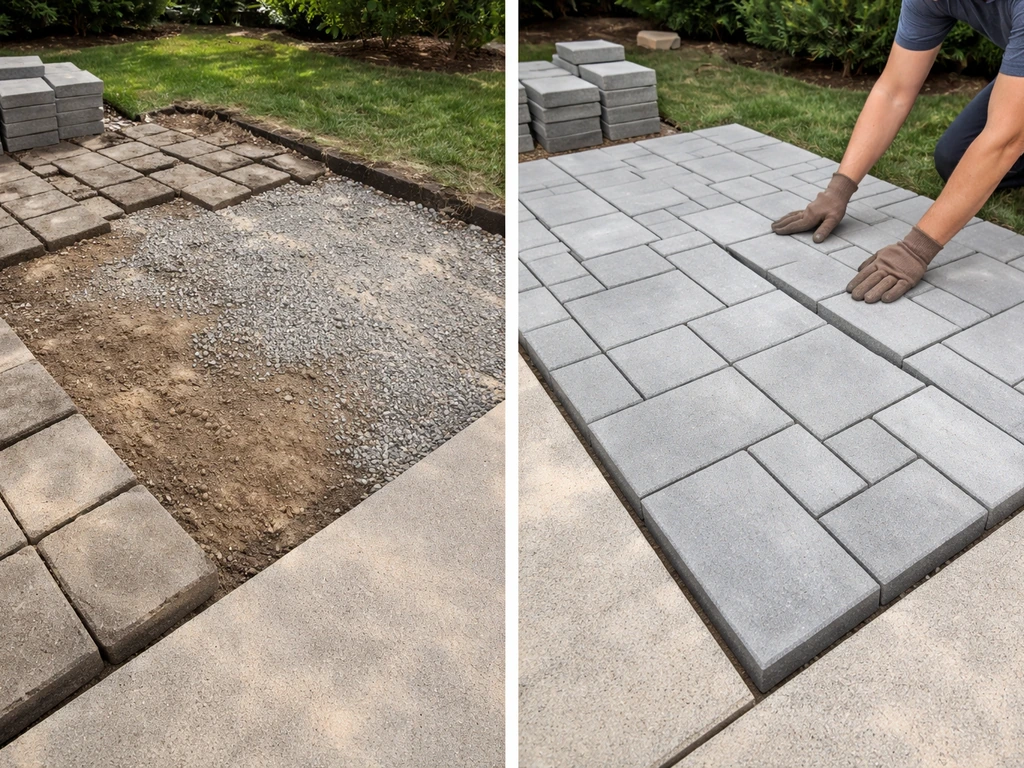
Once you've excavated to the right depth, lay geotextile fabric directly on the native soil before any base material goes down. This is a permanent separation barrier that stops soil from migrating up into your gravel base over time. It's especially critical in clay soils. Overlap seams by at least 12 inches and run the fabric up the sides of the excavation a bit. It costs almost nothing and prevents one of the most common causes of long-term patio failure.
Building and compacting the base
Add your compactable gravel base (typically 3/4-inch crushed stone or 'road base') in layers no thicker than 2–3 inches at a time, then compact each layer with a plate compactor before adding more. Compaction reduces the material depth, so don't try to compact 4 inches all at once and expect it to work. Keep adding and compacting until you reach your target of 4 inches of compacted base. Check your slope continuously as you build up: you're targeting that 1/8 inch per foot minimum drop away from the house. Use a string line stretched across the area as a consistent reference.
Sand bedding layer
Spread 1 inch of coarse bedding sand (also called concrete sand or chip stone) over the compacted base. Screed it flat using a straight 2x4 pulled across temporary screed rails set to your target depth. You're not compacting this layer. The sand allows for minor adjustments as you set each paver, and it bonds with polymeric sand later to create a stable bed. Don't walk on the screeded sand before laying pavers.
Installing the New Surface: Setting, Leveling, Jointing, and Finishing
Set your edge restraints first
Before laying a single paver, install your edge restraints on at least two sides of the patio (typically the sides not bounded by the house or a wall). Use plastic or aluminum paver edging spiked into the base at intervals of 2 feet for patio applications. This locks the perimeter and prevents the whole field from creeping outward over time. Skipping or under-fastening edging is one of the three primary reasons paver patios fail.
Lay the pavers
Start from a fixed straight edge (the house wall or a chalk line you've snapped on the sand) and work outward. Set each paver by pressing it straight down into the sand, not sliding it, which disturbs the screeded surface. Use spacers or manufacturer-specified joint width between units. Check every few rows with a long straightedge or an 8-foot level to catch any high or low spots early. Knock high pavers down with a rubber mallet; if one is low, pull it, add a little sand, and reset.
Cut pavers to fit
Cuts along the perimeter and around obstacles are done with a wet saw (rentable) or an angle grinder with a diamond blade. Measure twice, cut once. Always wear eye protection and hearing protection when cutting masonry. For simple straight cuts on a small number of units, a rented splitter works fine and is faster than a wet saw.
Compact the pavers in
Once all pavers are laid, run the plate compactor over the entire surface to seat them firmly into the sand bed. Put a rubber pad or piece of carpet under the compactor plate to avoid surface scarring on decorative pavers. This step is what locks everything in place and brings the surface to its final level.
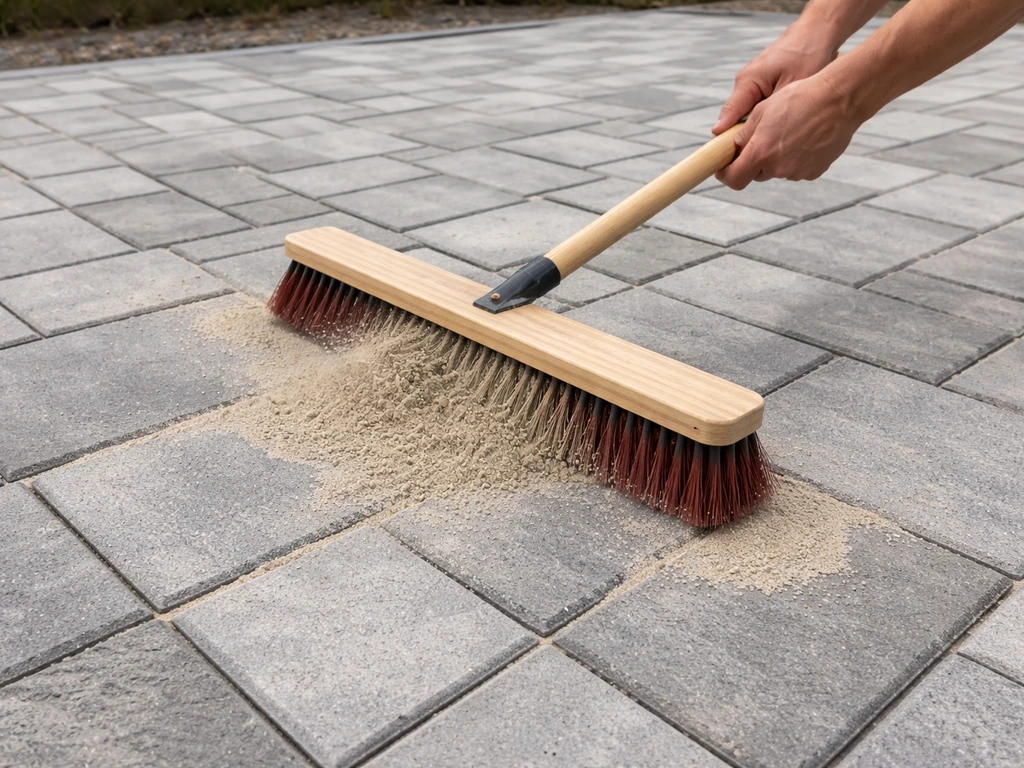
Fill joints with polymeric sand
Sweep polymeric sand over the surface and work it into the joints with a push broom. Polymeric sand needs to reach a minimum joint depth of about 1. 5 inches to perform properly. Blow off excess with a leaf blower on low, then lightly mist the surface with water per the manufacturer's directions to activate the binders.
Hanover Pavers' Polymeric Sand Installation Guidelines emphasize installing polymeric sand according to the manufacturer’s directions and meeting the required joint-filling and activation steps manufacturer's directions.
This is critical: too much water washes the binders out of the joints; too little and the sand won't set. Let it cure for 24–48 hours before heavy use. Polymeric sand stabilizes the joints, reduces weed infiltration, and cuts down on joint erosion from rain.
Final slope and drainage check
Before calling the job done, run a hose on the surface and watch where the water goes. It should sheet off away from the house with no pooling. If you see standing water anywhere, identify why (a low spot, a blocked channel, inadequate slope) and correct it now, not after you've moved all your furniture out.
Finishing Touches, Maintenance, and How to Make It Last This Time
Sealing the surface
Sealing a paver patio isn't mandatory, but it's genuinely useful. A good paver sealer reduces water penetration, stabilizes joint sand, slows efflorescence (the white haze that forms on new pavers), and makes the surface easier to clean. The process takes about 2–3 days: clean and let dry thoroughly, refill any joints if needed, then apply sealer in two thin coats. Use a fan-tip on a pressure washer for cleaning rather than a pinpoint tip, which can damage joints and scar surfaces. Plan to reseal every 3–5 years depending on traffic and weather exposure.
Routine maintenance that actually prevents problems
- Inspect and top up joint sand every spring. If you see gaps or sand loss, sweep in fresh polymeric sand before weeds establish in the joints.
- Check edge restraints annually and hammer in any spikes that have worked loose. A shifted edge leads to spreading pavers.
- Clear debris from the surface and especially from any drainage channels or gaps at the perimeter after storms. Blocked drainage is what starts the cycle of base erosion.
- Deal with any rocking or sinking paver immediately. Pulling one paver and adding sand under it takes ten minutes; letting it go means more shifting neighbors and a bigger repair later.
- If you have composite or wood: clean annually with a manufacturer-approved cleaner, inspect fasteners, and check for any warping or moisture damage at the ends of boards where water tends to accumulate.
The three things that prevent future failure
Every patio problem I've seen traces back to one of three things: a base that was too thin or never properly compacted, drainage that runs toward the house instead of away from it, or edging that wasn't secured. Once you have the right base, drainage, and edging, you can confidently move on to how to update patio surfaces without repeating past mistakes paver patio. Get those three right and your new patio will genuinely last decades. Geotextile fabric on the native soil, 4 inches of compacted gravel in layers, a consistent 1/8-inch-per-foot slope away from the house, and edge restraints spiked every 2 feet are the non-negotiables. Everything else is finishing work.
If you're still figuring out exactly how much work your situation calls for, it's worth thinking about whether you're doing a true replacement or something closer to a renovation or upgrade of what's already there. The scope of 'redoing' a patio can range from a focused weekend fix to a multi-day full rebuild, and matching the effort to the actual problem is what makes the project worth doing.
If you're wondering how to rebuild a patio, start by defining the real scope of what needs to be corrected, then follow through with proper base, slope, and finishing steps. If you're wondering how to revamp patio without overhauling everything, start by matching the fix to the signs you found. If you decide you need a true patio upgrade, follow the steps for assessing the base, fixing drainage, and rebuilding or resurfacing based on what you find upgrade patio.
FAQ
How do I tell whether I should resand and re-level pavers versus doing a full patio replacement?
If the pavers lift easily, the base below feels soft or shifts, or you find algae staining and mud deposits that indicate water moving under the surface, plan for replacement. Resanding and spot re-leveling can work only when the base is firm and the only issue is joint loss, minor settlement, or a few isolated sunken units.
Can I redo a patio without removing all the pavers?
Sometimes, but only if the existing base is solid and the patio meets slope requirements. If you need to raise or re-grade for drainage, you usually have to excavate and rebuild the bedding and base, otherwise you end up with a patio that sits too high, blocks door thresholds, or keeps shedding water incorrectly.
What’s the minimum slope I should design for if my patio drains poorly now?
Aim for at least 1/8 inch of drop per foot away from the house. When checking your current layout, measure the total fall across the entire patio length, not just a few spots, because a localized dip can cause standing water even if one edge slopes correctly.
Do I really need geotextile fabric under a paver patio redo?
For pavers, geotextile is a strong requirement when you see weeds growing from underneath or when your soil is clay or prone to soil migration. It also helps when you’re rebuilding because it separates native soil from the gravel base so the base doesn’t slowly degrade over time.
What should I do if there’s standing water after I finish laying pavers?
First identify the low spot and confirm where the water is actually pooling by running a hose and watching runoff paths. Then correct before you add joint sand and sealer, by lifting and resetting the affected pavers (or rebuilding the base locally if the dip is structural). Don’t rely on polymeric sand or sealing to fix drainage problems.
How deep should I excavate for a paver patio when redoing it over existing ground?
Use the same build-up logic: patio depth typically includes paver thickness, about 1 inch of bedding sand, and about 4 inches of compacted gravel base, which totals roughly 7.5 to 9 inches below finished grade. If your existing patio was poorly built and too shallow, you generally cannot achieve the right build-up without excavating and rebuilding.
How thick should each gravel base layer be when compacting?
Compact in layers no thicker than about 2 to 3 inches at a time. Trying to compact thicker layers usually leaves a soft core, which becomes the failure point later, even if the surface looks level initially.
What’s the safest way to compact pavers after installing them?
Run the plate compactor to seat units after laying, but protect the surface with a rubber pad or a piece of carpet under the plate, especially for decorative pavers. Also compact carefully near edges and restraints, because loosening or shifting edging at this stage can undo your perimeter control.
How much polymeric sand should I use and how deep do joints need to be?
Fill joints to reach the manufacturer’s target, and ensure polymeric sand reaches at least about 1.5 inches of joint depth for proper performance. If the joints are shallow, topping up after seating and blowing out excess can help, but only if you can reach the required depth without washing binders out.
Why can polymeric sand fail even when I used it correctly?
Two common issues are washing binders out by over-watering and under-wetting so the sand never binds. Follow the misting and cure timing instructions closely, and avoid heavy foot traffic for 24 to 48 hours, because premature movement can break joint stability before it cures.
Should I use a pressure washer to clean before sealing or doing the final joint work?
For final cleaning before sealing, use a fan-tip and avoid high-pressure pinpoint settings, since concentrated jets can dig out joints and scar pavers. Also clean and allow thorough drying before applying sealer so you don’t trap moisture in the surface.
Is sealing mandatory for a redo, and when is it a bad idea?
Sealing isn’t strictly required, but it can reduce water penetration, stabilize joint sand, and slow efflorescence. It’s a bad idea if you cannot follow drying, cure, and cleaning steps, because sealing over moisture or unsettled joints can lead to hazing or premature joint breakdown.
What personal protective equipment should I plan for if I’m cutting lots of pavers?
Wear eye protection and hearing protection when cutting masonry, and plan for dust control. Wet cutting reduces dust but still creates splash risks, so protect eyes and wear appropriate clothing that won’t snag the blade area.
How do I figure out the number of pavers or boards I need for a redo?
Measure the patio and calculate square footage, then add about 10% for waste and breakage. Waste goes up with complex curves, perimeter cuts around obstacles, and any redesign that requires many small infill pieces, so the buffer matters even for small patios.
When do I need help or a pro for a patio redo?
Get help if you’re moving significant soil, working on a slope that needs retaining, doing many custom cuts, or managing heavy demolition like concrete removal. Concrete work almost always benefits from professional skill because timing and finishing determine whether the slab holds up, cracks, and stays properly graded.
Next Article
Can You Build a Deck Over an Existing Patio? DIY Guide
Learn if you can build a deck over a patio and how to assess structure, moisture, clearance, framing, and costs.