You can build a raised patio on a slope by cutting into the high side of the ground, forming a retaining edge or wall to hold the soil back, building up a compacted sub-base to the correct level, and then laying your chosen surface with a slight drainage fall away from the house. The key is getting those three things right in sequence: measure and understand your slope first, choose a retaining strategy that suits the drop, then build up from the ground with the correct base thicknesses. Rush any of those steps and you end up with a wonky, waterlogged patio that shifts over winter.
How to Build a Raised Patio on a Slope in the UK

Nolan Lennox
27 Jun 2026
Before you start: measure the slope and check drainage
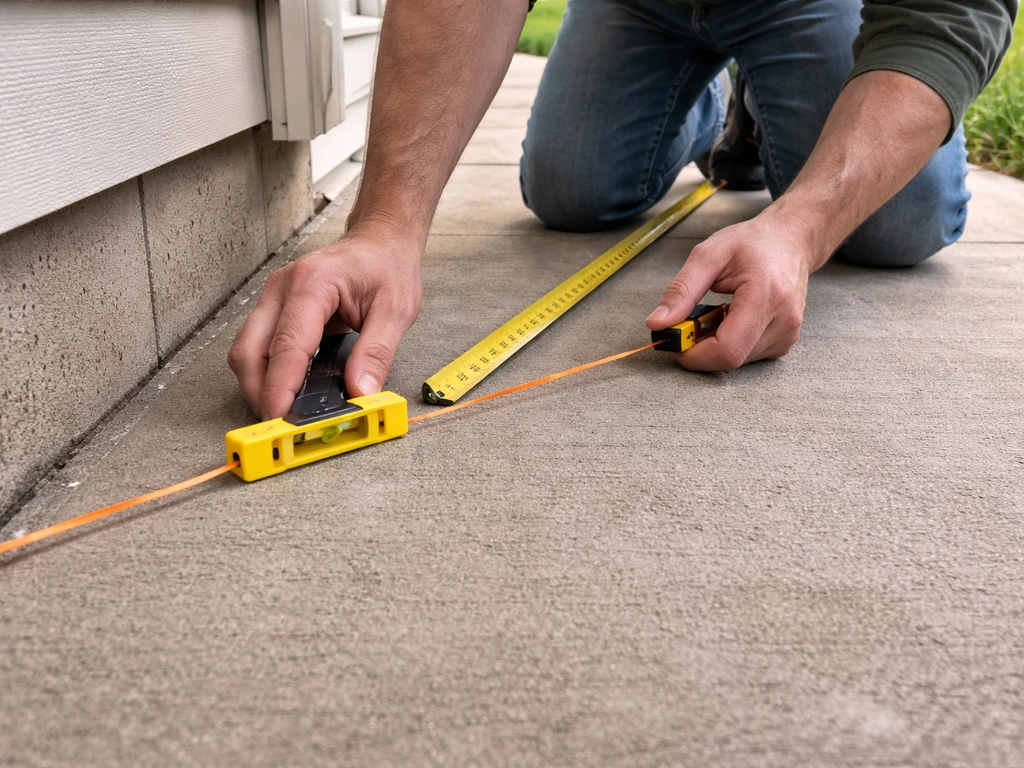
Before you buy a single bag of ballast, spend an hour understanding your slope. A slope that looks gentle can still mean a 300mm height difference across a 3m patio, which completely changes how you approach the build. Grab a long spirit level (or a string line and line level), a tape measure, and some timber pegs. Push a peg into the ground at the highest corner of your planned patio area and another at the lowest corner. Run a string line between them, pull it perfectly level, and measure the vertical drop from the string to the ground at the low end. That number is your total fall.
Once you know the drop, think about where the water currently goes. Walk out during heavy rain if you can, or look for waterlogged patches and erosion channels. A raised patio will intercept that natural drainage path, so you need a plan to redirect it. The standard UK guidance is to build a minimum fall of 1:80 into your finished patio surface, which works out at roughly 12.
5mm of drop per metre. That keeps water moving toward a drain or soakaway rather than sitting on the surface or tracking back toward the house. Homebuilding. co.
uk’s expert guidance also recommends giving patios a slight, gradual slope so runoff flows toward a drain and away from the patio surface or the house a slight gradual slope so runoff flows toward a drain.
Also check the soil. Dig a test hole about 450mm deep at the lowest corner of your planned patio. Sandy or well-draining soil is great. Heavy clay that holds water and moves with frost is a warning sign that you need a deeper compacted base and possibly drainage aggregate beneath it. Note whether there are any tree roots within a few metres, and if there is a house wall nearby, confirm the finished patio level will sit at least 150mm below the damp proof course (DPC). This is non-negotiable in the UK.
Design choices for a raised patio on a slope
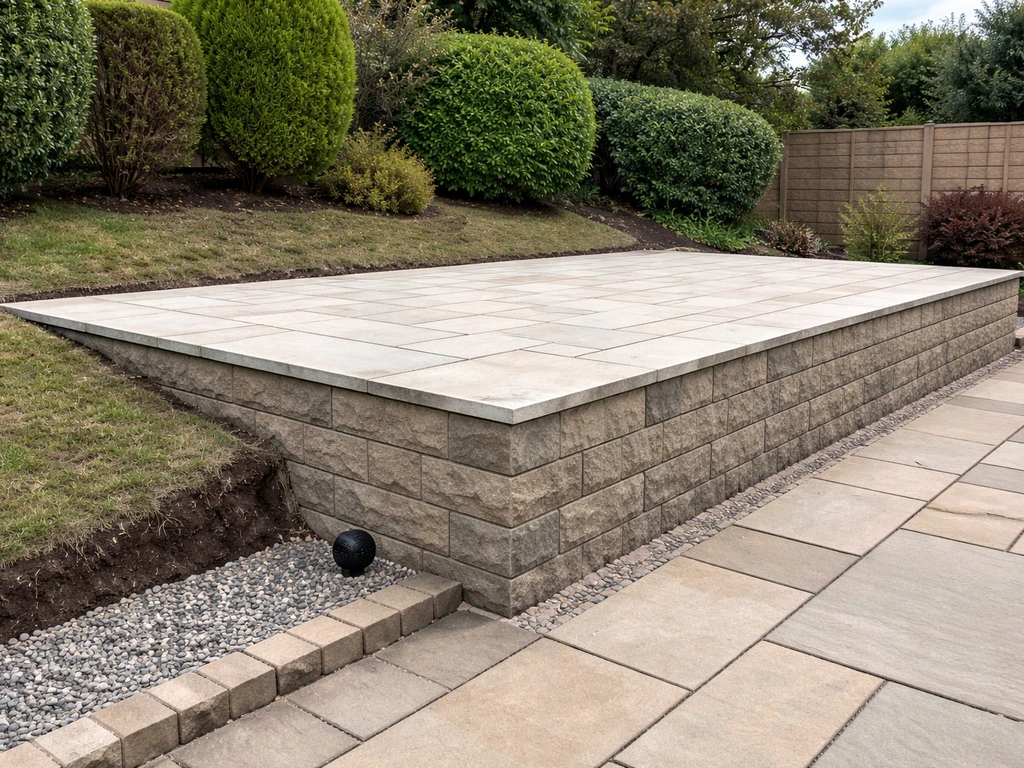
The design really depends on how much of a drop you are dealing with. For small drops up to around 200 to 300mm, a simple compacted sub-base build-up with a solid edging restraint on the low side is often all you need. After that, you can lay gravel correctly on the slope so the patio drains well and stays in place compacted sub-base build-up. For drops of 300mm to around 600mm, a single course of block or brick retaining wall on the low edge is the right move. Beyond 600mm, you are looking at a proper retaining wall with footings, and depending on the height, it might need engineering input.
The classic UK approach for a garden slope is to cut and fill. You dig into the high side to reduce the amount of fill you need on the low side, then use that excavated material elsewhere or skip it. This keeps costs down and means you are building on undisturbed ground where possible rather than on a deep pile of loose fill. The low side retaining edge holds back whatever fill or base material you do bring in.
Think also about steps and access. If you are raising the patio significantly above the lawn or lower garden, you need at least one comfortable step run. Standard UK step risers for garden use are around 150 to 175mm tall, with a going (the flat tread depth) of at least 280mm. Plan these into your layout from the start rather than bolting them on at the end, as they affect where your retaining wall sits and how wide the patio needs to be.
Terraced versus single-level raised patio
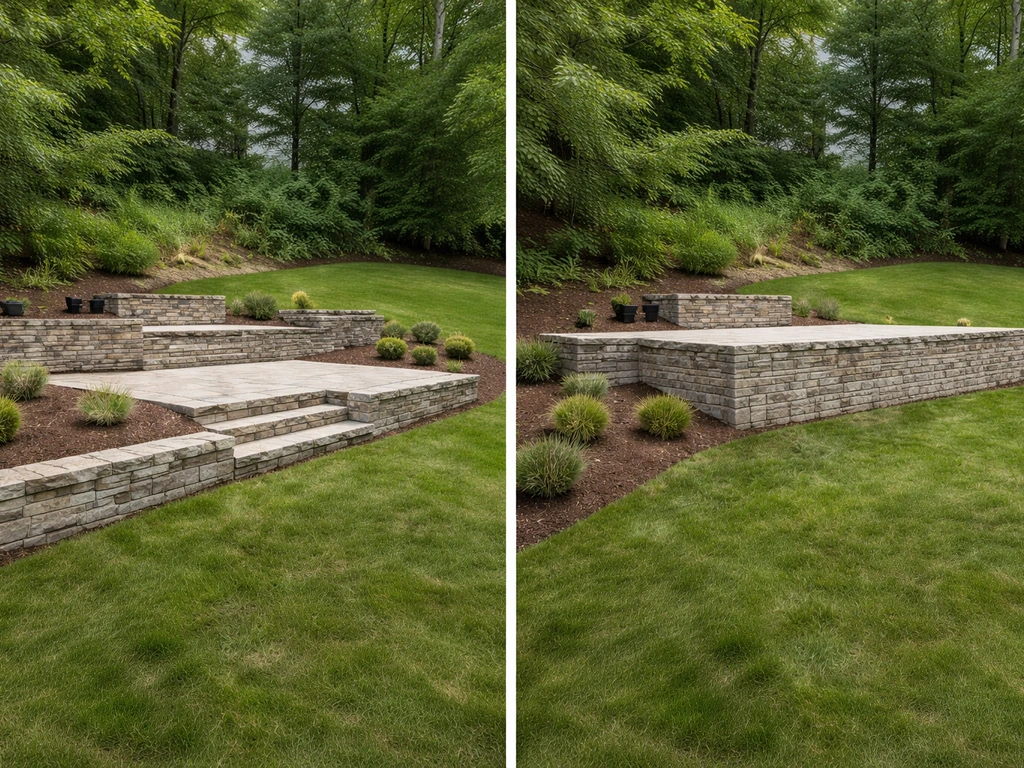
If your garden drops steeply over a long run, a single raised patio can look and feel uncomfortably elevated at the low end. A terraced approach with two or three level platforms connected by steps often works better, both practically and visually. Each terrace only needs to retain a modest height, which keeps the retaining walls manageable and far cheaper than one large wall. If you are interested in a full hillside build, that is a bigger project with its own planning considerations.
Materials and tools for UK DIY raised patios
Choosing the right materials for the UK climate matters more than most DIY guides admit. Freeze-thaw cycles, persistent damp, and shaded north-facing gardens will all punish the wrong choices over time. Here is a practical comparison of the main surface options:
| Material | Cost (approx per m²) | Durability in UK climate | DIY friendliness | Maintenance |
|---|---|---|---|---|
| Concrete paving slabs | £15 to £35 | Excellent if sealed | Very good | Low |
| Natural stone (sandstone/slate) | £30 to £80+ | Good, needs sealing | Moderate | Medium |
| Porcelain tiles | £40 to £90+ | Excellent, frost-resistant | Trickier (needs wet saw) | Very low |
| Brick/block paving | £20 to £50 | Very good | Good | Low |
| Composite decking boards | £40 to £80 | Good if ventilated | Good | Low to medium |
| Pressure-treated timber decking | £20 to £45 | Moderate (check treatment grade) | Good | Medium |
For the retaining edge or wall, standard concrete blocks (100mm solid dense blocks) are the workhorse choice for DIY builds. They are cheap, widely available from any UK builders merchant, easy to cut with an angle grinder, and strong enough for single-course retaining walls up to around 450mm. Brick is neater if it needs to look good, but costs more and takes longer to lay. For a quick, budget-conscious retaining edge on a modest drop, pressure-treated 150mm x 75mm timber edging board spiked into the ground with steel road pins is perfectly adequate and takes about an hour to install.
Tools you will actually need
- Long spirit level (1.2m minimum) and a shorter 600mm level
- String line and line level pins
- Tape measure and builders square
- Spade, mattock, and a wheelbarrow
- Plate compactor (hire from any tool hire shop for around £60 to £80 per day)
- Bolster chisel and lump hammer for cutting slabs/blocks
- Angle grinder with a diamond blade (hire or buy, essential for porcelain or clean cuts)
- Pointing trowel and float
- Rubber mallet
- Safety gear: gloves, knee pads, safety glasses, and steel-toe boots
Base build-up and footings on sloped ground
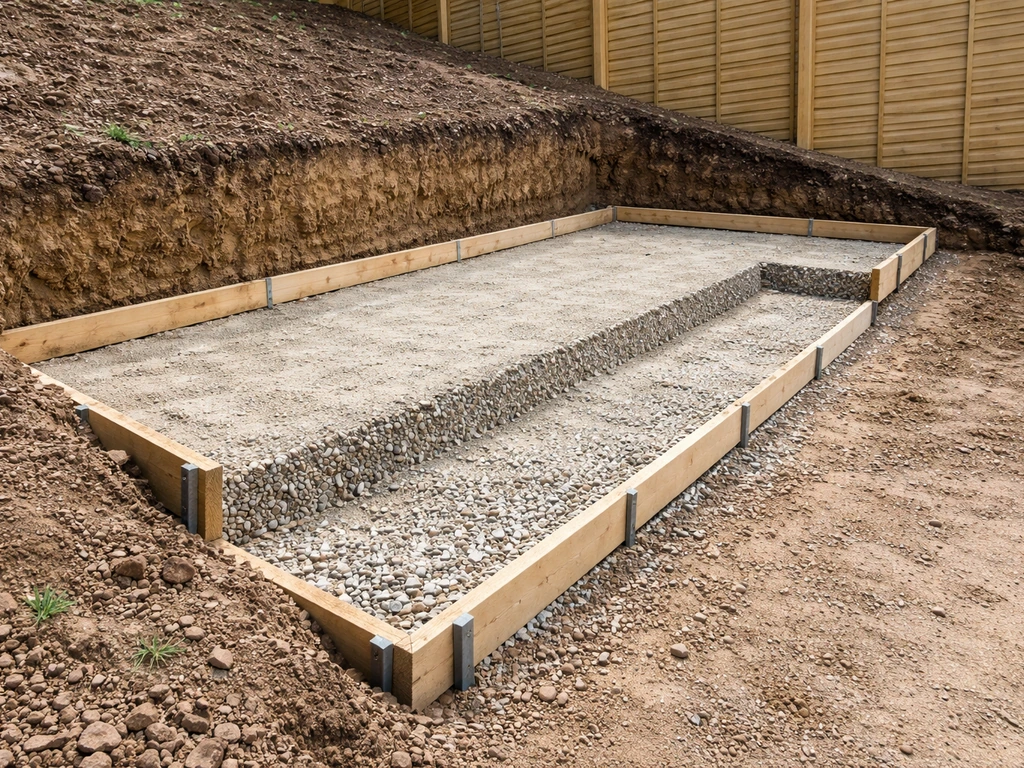
Getting the base right is the single biggest factor in whether your patio lasts five years or twenty. On sloped ground the temptation is to just dump fill in the low spots and compact it. That almost always leads to settlement and cracking. You want your patio surface sitting on a properly engineered base that starts from stable, undisturbed ground.
The standard UK base build-up for a patio on firm ground is: 150mm of compacted Type 1 MOT hardcore (or similar crushed limestone), followed by a sand laying course of 40 to 50mm for slabs, or a mortar bed if you are laying on concrete. On clay soils or ground prone to movement, increase the hardcore layer to 200mm and consider laying a geotextile membrane underneath it to prevent the clay migrating up and contaminating the base over time.
Where your patio is significantly raised on the low side, you need to think about footings for any retaining wall. For a block or brick retaining wall up to about 600mm tall, a concrete strip footing is the right approach. Dig a trench to at least 300mm below finished ground level on the garden side, pour a 150mm deep concrete foundation (a standard C20 mix works fine for this), let it cure for 48 hours, and then build your wall up from that. The wall should ideally lean very slightly back into the retained earth for stability.
Leave drainage gaps (known as weep holes) in the base course of any retaining wall. Every third or fourth perpendicular joint in the bottom course should be left unmortared. This allows water that collects behind the wall to escape forward rather than building up hydrostatic pressure, which is one of the most common reasons DIY retaining walls fail over time.
Step-by-step construction sequence
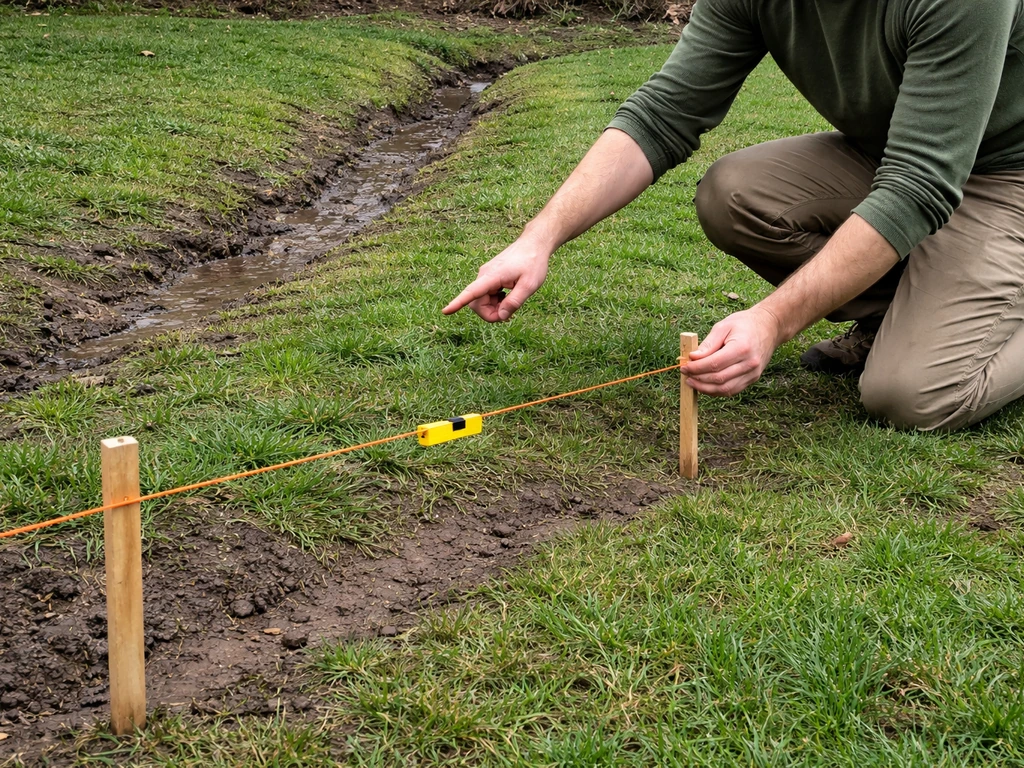
- Mark out the patio area using string lines and pegs. Include your drainage fall in the string line height: set the string at the finished patio level on the house side and drop it by 12.5mm per metre away from the house.
- Strip the topsoil across the whole area to a depth of around 150 to 200mm (more if you are building up the low side significantly). Remove all vegetation roots and set aside good topsoil for elsewhere in the garden.
- Cut into the high side of the slope to reduce the required fill depth on the low side. Use the excavated material to start building up the low areas where possible, but only use compactable material like subsoil or hardcore, never topsoil.
- Dig and pour the footing trench for your retaining wall or edging on the low side. Allow 48 hours curing time before building on it.
- Build the retaining wall or install the edging system. Include weep holes at the base. If building a block or brick wall, use a full mortar bed for each course and check for plumb and level constantly.
- Once the retaining edge is solid, lay your geotextile membrane across the whole base area, overlapping joins by at least 300mm.
- Bring in and spread Type 1 MOT hardcore in layers no deeper than 75mm at a time. Compact each layer thoroughly with the plate compactor before adding the next. Keep checking levels against your string lines.
- Once you reach the correct sub-base level (roughly 90 to 100mm below your finished patio height for standard slabs on a sand bed), compact the final layer carefully and rake it level.
- Lay the sand laying course (40 to 50mm) and screed it flat using a straight timber plank or screed rail, maintaining your drainage fall throughout. Do not compact the sand at this stage.
- Lay your paving slabs or blocks from a corner, working outward. Bed each one firmly with a rubber mallet, checking levels constantly. Cut edge pieces as you go.
- Grout or point all joints once the surface is complete and has had time to settle (at least 24 hours for a mortar-bedded surface). Use a brush-in polymeric jointing compound for a sand-laid patio or a wet mortar pointing mix for mortar-bedded slabs.
- Install any step strings, risers, and treads now if you did not build them into the retaining wall structure. Bed each step on a full mortar bed and check each tread is level across its width with a very slight forward fall (around 5mm) to shed water.
- Backfill the area behind the retaining wall with gravel or aggregate rather than soil. This improves drainage behind the wall and reduces soil pressure. Top with topsoil only above the gravel layer.
Leveling, falls, edging, and water management
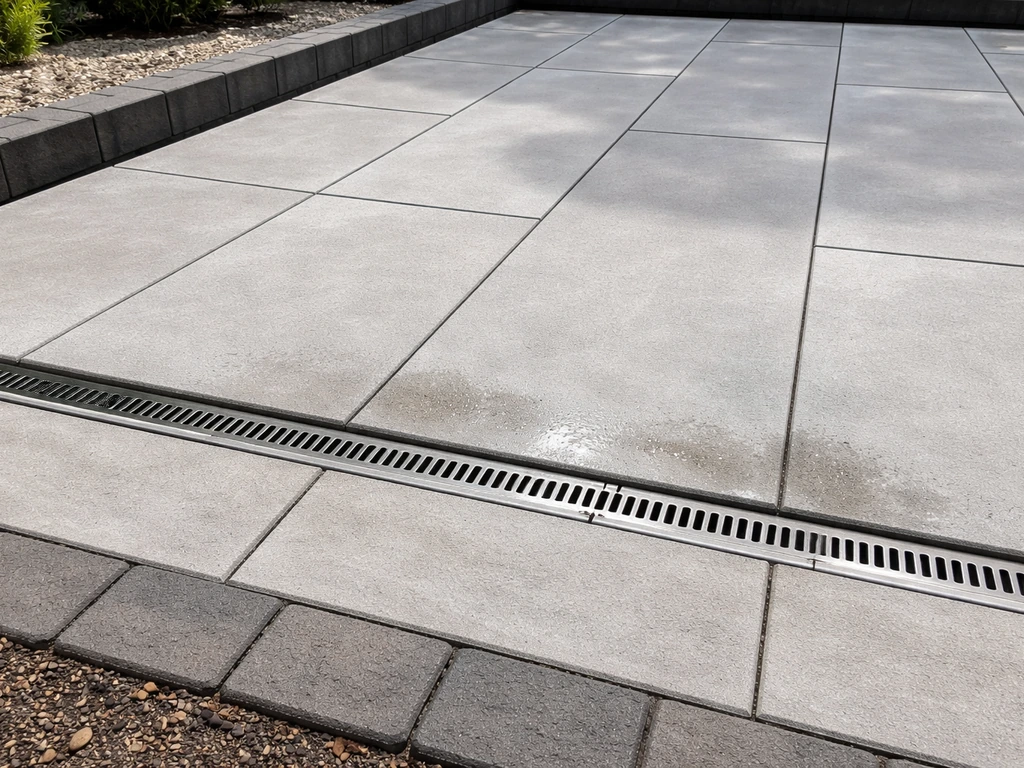
Getting the fall right is where many DIY patios go wrong, usually in one of two ways: either the patio is totally flat (so water pools), or the fall is so aggressive it feels uncomfortable underfoot. The sweet spot for a UK garden patio is 1:80, which is about 12.5mm of drop per metre. A practical way to check this as you lay is to set your string line at the correct finished height on the high side, drop it 12.5mm for every metre of patio width, and use that as your laying guide throughout. blank" rel="noopener noreferrer">Some builders use 15mm over 1.5m as a quick comfort check, which is close enough to the 1:80 standard.
All that water being shed off the patio surface has to go somewhere, and you need to decide where before you start building. Options include a channel drain at the low edge feeding into an existing drain, a soakaway (a pit filled with rubble or a dedicated plastic soakaway crate, dug at least 5m from the house), or a lawn area that can absorb light runoff. If your slope already directs a lot of water through the garden, a soakaway may not be enough on its own. On clay soil in particular, a channel drain connected to a proper drain or surface water run-off point is worth the extra cost.
Edging is not just decorative. A solid restraint edge on the low and side edges of your patio stops the paving from creeping outward over time. For a sand-laid patio, this is critical. Use concrete haunching (a collar of concrete trowelled against the outside edge of the perimeter slabs or blocks) or a proprietary metal or plastic patio edging system. Bedding the perimeter slabs on a full mortar bed rather than sand also helps lock the edge in place. For any patio that runs against a house wall, make sure the finished surface includes a small gap or flexible filler against the wall rather than being mortared hard against it, to allow for slight movement.
Dealing with damp and near-ground moisture
The UK climate means any raised patio will be exposed to persistent damp, especially in shaded gardens or anywhere with clay soil underneath. A few things make a real difference here. First, the geotextile membrane in the base prevents moisture wicking up through the hardcore. Second, sealing natural stone and sandstone slabs with a quality impregnating sealer (not a surface coating that can flake) prevents the slab face from absorbing water and flaking in a frost.
Porcelain needs no sealing. Composite decking is naturally moisture-resistant but needs adequate air circulation underneath, which is why a well-ventilated framed substructure matters so much. Third, make sure the space under any raised section that uses a deck frame is not sealed in completely at the sides, as this traps moisture and causes the joists and posts to rot far faster.
Costs, permits, and a practical checklist
What does it cost in the UK?
A basic DIY raised patio of around 20m² on a modest slope, using concrete paving slabs with a block retaining edge, will typically cost between £600 and £1,200 in materials in 2026. That covers hardcore, sand, slabs, blocks, mortar, geotextile, and drainage. Natural stone or porcelain pushes that to £1,500 to £2,500 for the same area. Hiring a plate compactor for a couple of days adds around £120 to £160. If you hit problems like unexpected rock or very deep clay requiring extra hardcore, budget 20% contingency on top.
Do you need planning permission?
In England and Wales, most garden patio builds fall under permitted development and do not require planning permission. However, there are exceptions worth checking. If the patio is within the curtilage of a listed building, if you are in a conservation area, or if your house title deeds have restrictive covenants, you may need consent. A retaining wall over 1 metre high adjacent to a highway, or over 2 metres elsewhere, generally needs planning permission. It is always worth a quick call to your local planning authority (LPA) before starting, especially if your retaining wall is substantial. Building regulations may also apply if you are doing any drainage work that connects to the public sewer.
Your pre-build checklist
- Measure the total fall across your patio area and note the height difference
- Check the DPC height on any adjacent house wall and confirm your finished patio will be at least 150mm below it
- Dig a test hole to 450mm and identify your soil type
- Decide your retaining strategy: edge board, single block/brick wall, or terraced multi-level
- Confirm where drainage water will run to (channel drain, soakaway, or lawn)
- Check permitted development rules with your local council, especially if the retaining wall is over 600mm tall
- Order materials: Type 1 hardcore, sharp sand, geotextile membrane, paving choice, blocks/edging, mortar/postcrete, jointing compound
- Hire a plate compactor for excavation and compaction days
- Set string lines for finished levels before any digging starts
- Gather safety gear before starting physical work
The most important thing you can do today is go outside, push in a few pegs, run a string line, and find out exactly how much drop you are dealing with. That single measurement tells you which retaining approach you need, how much hardcore to order, and whether this is a weekend project or a bigger undertaking. Everything else flows from that number. Once you know your slope, you know your build.
FAQ
Can I build a raised patio on a slope using gravel instead of slabs?
Yes, but you still need a consistent finished fall and restraint. A gravel surface can move on slopes unless you use edging that prevents creep and you compact the sub-base in lifts. Plan for a geotextile plus thicker hardcore than you would for slabs, and expect periodic topping up after heavy winters.
Where should I put the drainage if my slope sends water toward a boundary or trees?
If the low side is near a neighbour boundary or trees, keep backfill and drainage systems from becoming part of their land or causing saturation. Use a land drains or properly routed channel, and avoid discharging directly toward fences, bases of trees, or soakaway pits within close proximity to roots and structures.
How do I stop slabs from rocking or cracking on a sloped raised patio?
For stone or blockwork, aim for a stable base, not just level slabs. If you lay on bedding sand, maintain full support under every unit, then tap and adjust. For any slightly uneven areas, remove and re-lay rather than trying to “shim” after the slabs are set, as shims often wash out on sloping sites.
What should I do if the ground under the patio settles after compaction?
You generally shouldn’t rely on compacting fill alone. On clay or disturbed ground, either improve the sub-base depth (for example, thicker Type 1) or include geotextile and consider drainage aggregate. If you see ongoing sinkage after a few wet weeks, stop and investigate, because settling will telegraph through the paving.
Do I need an expansion gap where the patio meets my house wall?
Keep a clear movement gap wherever you meet a wall, then use flexible jointing or a suitable perimeter seal. Mortaring paving hard to masonry traps moisture and restricts movement, which can lead to cracks at the wall line during freeze thaw.
Weep holes are installed, but my retaining wall still looks unstable. What’s the usual cause?
If you’re using a retaining wall, weep holes are only part of the job. Also backfill behind the wall with free-draining material and ensure the wall has correct batter (slight lean back) for stability. Skipping proper backfill is a common cause of bowing even when weep holes are present.
How do I know if a soakaway will actually work on clay soil in the UK?
A soakaway can fail on clay because the water does not infiltrate quickly enough, especially in prolonged wet. In that case, consider a connected drainage channel to an existing system, and if you do soakaway work, confirm depth, distance from the house, and that it can accept the expected flow.
What’s the best way to identify where water runs on my slope before building?
You should measure during or right after a heavy rain to spot true flow paths, because dry ground can look fine. Mark where runoff concentrates and where water sits, then decide whether to intercept at the patio edge or redirect to a drain line before you excavate.
When should I switch from a single raised patio to a terraced design?
If the drop is around 200 to 600mm, you can sometimes manage with one retaining strategy, but terracing becomes smarter when long runs look overly high or when retaining walls become expensive. As a rule of thumb, if one wall would be tall enough that you feel you need multiple courses for height, compare cost and access by splitting into two terraces with steps.
Can I build the raised patio higher on one side by changing the patio layout?
Yes, but check levels from the house outward and ensure the slope does not end up “fighting” your patio fall. You may need to reduce cut on one side, then re-compact and maintain the 1:80 finished fall so water still drains correctly after the redesign.
Are the base and drainage rules the same if I choose porcelain or block paving?
Some materials need different base thickness and bedding. Porcelain pavers often require a tighter, more level base and can be unforgiving if the sub-base varies, while block paving tolerates minor irregularities better. Confirm you are using the correct base and fixing method for your specific product system, especially for porcelain.
Do I always need planning permission for a retaining wall on a slope?
Planning is usually based on height and location, not just your patio area. If you expect a retaining wall near a boundary, check whether it exceeds relevant thresholds for your location, and also consider drainage connections because works that affect disposal of surface water may trigger building regulations.
What’s the safest way to design steps on a raised patio when the ground slopes?
If you need steps, it helps to plan the step runs as part of the retaining and base geometry, not as an afterthought. Use consistent riser heights, ensure the treads have solid support, and avoid narrow goings because they feel unsafe when wet and when you’re walking from a raised patio down a slope.
Next Article
Which Way Should a Patio Slope? DIY Drainage Guide
DIY patio slope guide: direction, inches per foot, measuring steps, base build, drainage destinations, fixes for pooling