A patio should slope away from your house at a rate of 1/4 inch per foot (about 2%). That means for every foot of patio you build out from the wall, the surface drops a quarter inch. On a 10-foot-deep patio, the far edge should sit 2.5 inches lower than the edge against the house. That single rule handles the vast majority of drainage problems homeowners run into.
Which Way Should a Patio Slope? DIY Drainage Guide

Nolan Lennox
24 Jun 2026
How Much Slope Your Patio Actually Needs
The minimum that most US building codes accept is 2% (the 2024 International Building Code, Section 1804.4, requires impervious surfaces within 10 feet of the foundation to slope at least 2% away from the building). In practical terms, 2% equals 1/4 inch per foot, or 1 inch for every 4 feet of run. That's your target. Some sources list 1/8 inch per foot (about 1%) as a bare minimum for concrete, but honestly, 1% leaves almost no margin for error during construction. Go with 1/4 inch per foot and you'll stay on the right side of both code and common sense.
In the UK, the standard guidance from trade bodies like the HTA and resources like Pavingexpert puts the recommended fall at 1:60, which works out to about 16 mm per metre. Some smoother or fine-textured paving materials can get away with 1:80 (12. HTA’s recommended minimum falls by paving type show example values of 1:60 for coarse-textured paving units and 1:80 for drainage channels 1:80 (12. 5 mm per metre). 5 mm per metre), but for a typical DIY patio with pavers or slabs, 1:60 is the reliable default. The logic is the same on both sides of the Atlantic: enough slope that a rainstorm sheets off the surface rather than sitting and soaking in.
Here's how to translate that into a real number before you break ground. Measure the depth of your patio (the distance from the house wall out to the far edge). Multiply that depth in feet by 0. You can also measure the patio slope more directly with a level or string line, then confirm the drop per foot before you set pavers how to measure patio slope. 25 to get the total drop in inches. So a 12-foot patio needs a 3-inch drop from house to outer edge. Write that number down, because you'll use it when you set your string lines.
| Patio Depth | Required Drop (US 1/4" per ft) | Equivalent UK Fall (1:60) |
|---|---|---|
| 6 ft (1.8 m) | 1.5 inches (38 mm) | 30 mm |
| 8 ft (2.4 m) | 2 inches (51 mm) | 40 mm |
| 10 ft (3 m) | 2.5 inches (63 mm) | 50 mm |
| 12 ft (3.7 m) | 3 inches (76 mm) | 61 mm |
| 15 ft (4.6 m) | 3.75 inches (95 mm) | 76 mm |
Which Direction to Slope: Away from the House (and Here's What That Actually Means)
The default answer is: slope away from the house wall and toward your yard. Water should drain off the outer edge of the patio and into grass, a border, or a drainage outlet, not back toward the foundation. This protects your footings, your damp-proof course, and your basement or crawl space from chronic moisture. That direction is correct for the overwhelming majority of patios.
The complication shows up when your yard doesn't cooperate. If the ground beyond your patio slopes back toward the house, or your neighbor's fence sits right at the outer edge, simply running water off the far edge solves nothing. If you’re building a patio on a hillside, you’ll need to plan the drainage path carefully so water doesn’t run toward the house or pool on the surface build a patio on a hillside. In those cases you have a few options: route the slope sideways toward a channel drain or gully at one side, create a gentle cross-fall that leads water to a corner outlet, or install a trench drain at the outer edge of the patio to intercept the water before it has anywhere bad to go.
If your patio wraps around the side of the house, think about where each section's water ends up. A side patio can often slope toward the front or back yard rather than toward a fence or wall. Raised patios present a specific version of this problem: the fall might technically be 'away from the house' but land on a slope that feeds back toward the footings from below. In that case, the correct call is usually to direct water toward the outer edge of the raised structure and manage it at ground level with a soakaway, French drain, or swale. If you're tackling a raised build, the approaches covered in guides on building a patio on a hillside become directly relevant here. If you are building a raised patio on a slope in the UK, focus on the underlying grade, drainage outlets, and any leveling or retaining work needed to manage runoff safely building a patio on a hillside.
Check the Site Before You Commit to a Direction
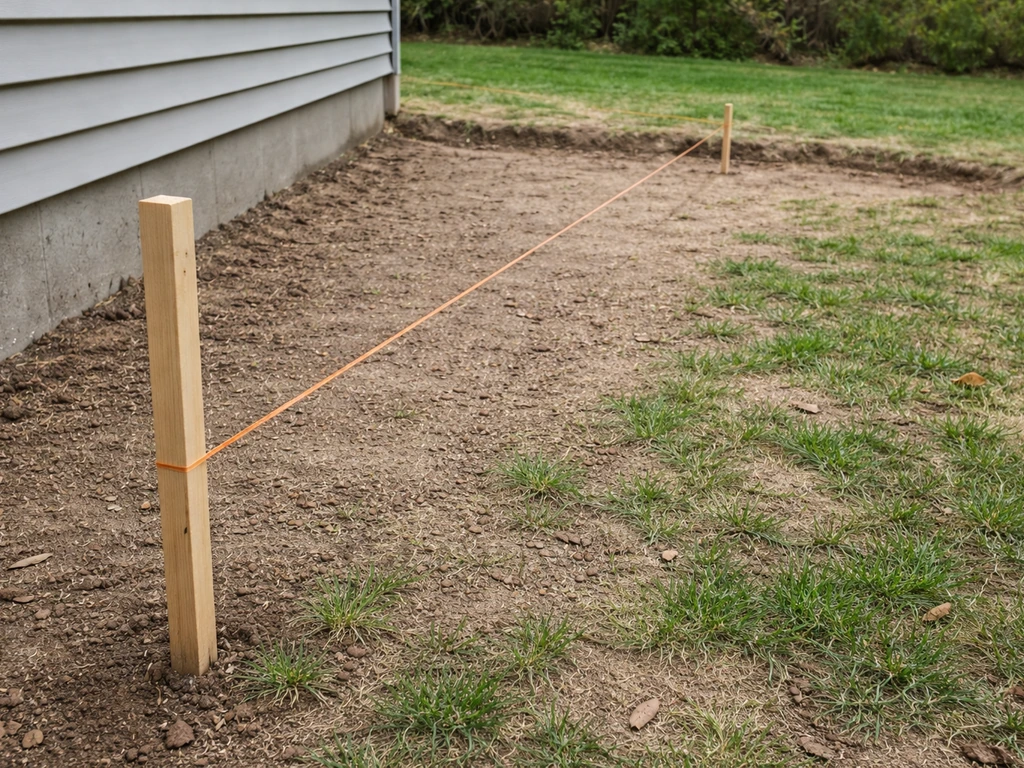
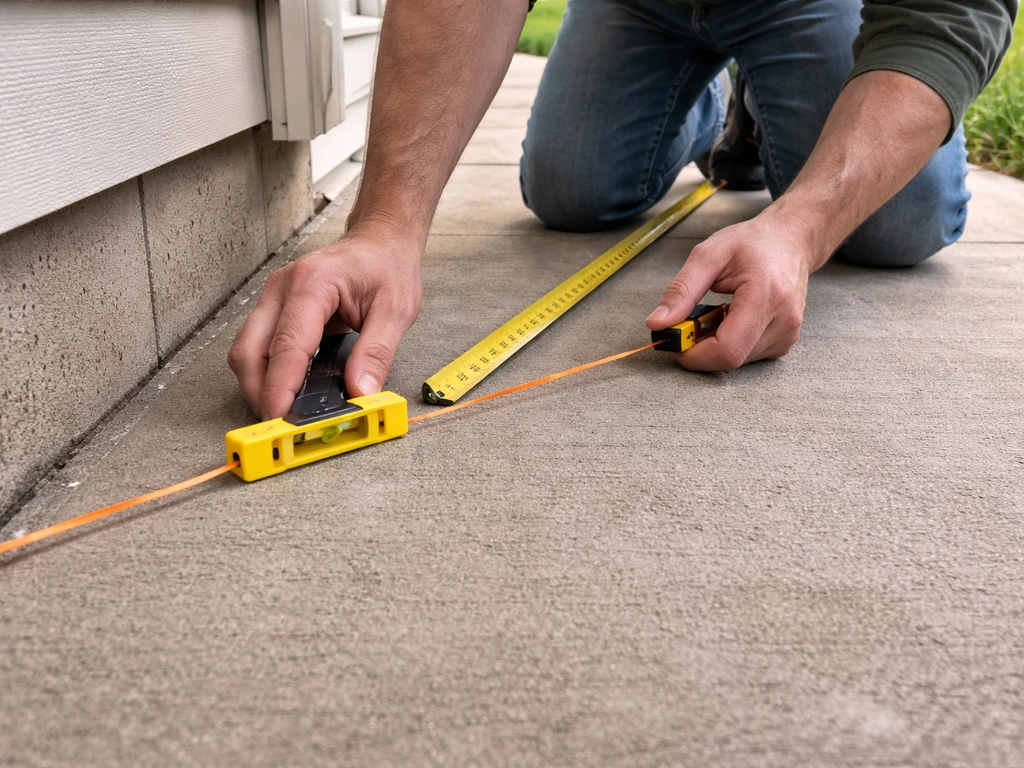
Before you start digging, spend 20 minutes reading your existing grades. Drive a stake into the ground at the house wall and another at the planned outer edge of the patio. Run a string line between them and use a line level (or a spirit level laid on top of a long straight piece of timber) to get the string perfectly level. Then measure down from the string to the ground at several points along the run. That tells you the existing profile of the ground, where high spots are, and whether your planned slope direction actually makes sense given what's already there.
What you're looking for: does the ground naturally fall away from the house, or does it slope toward it? If the ground already falls away at roughly 2%, your job is easier because the subgrade is working with you. If the ground is flat or falls toward the house, you'll need to cut and fill to create the right grade in the subbase before you lay anything on top. Don't skip this step. Trying to compensate for bad ground grades in your sand bed or mortar layer is one of the most common and costly mistakes in patio work.
Also check the base of the house wall for air bricks, vents, or damp-proof course level. Your finished patio surface should sit at least 150 mm (about 6 inches) below the damp-proof course in UK builds, and at least two brick courses below in most US framing contexts. If you're tight on that gap, you may need to factor it into how you set your high-side elevation, not just your slope.
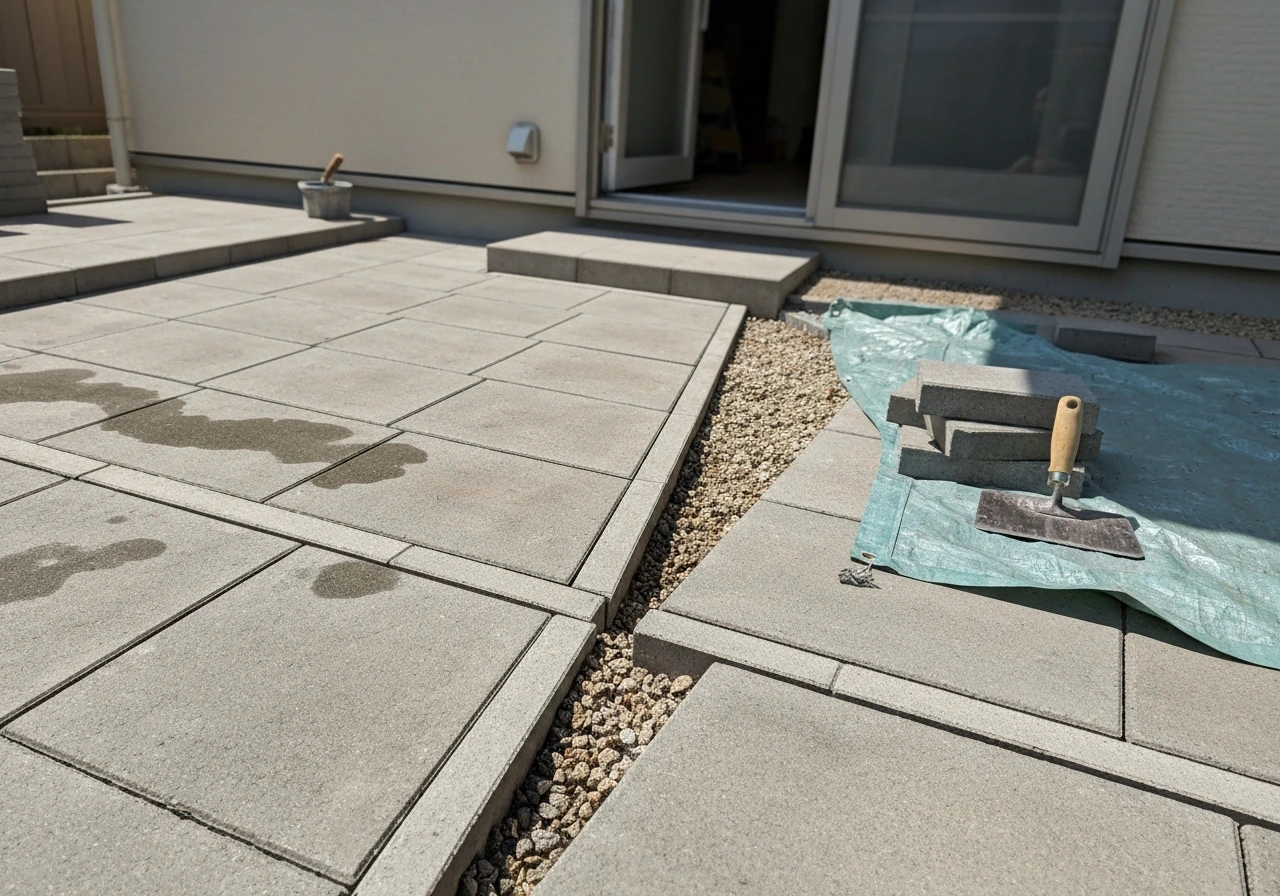
Getting the Subgrade and Base Right (This Is Where Drainage Actually Starts)
Here's something a lot of DIY guides gloss over: the slope in your surface paving only works if the layers underneath are graded the same way. If your compacted base is flat but you try to tilt the pavers on top, you'll end up with inconsistent bedding thickness, cracked or rocking pavers, and drainage that fails within a season or two. The grade starts at the ground and has to be consistent all the way up.
Start by excavating to the right depth. For a domestic patio with pavers or slabs, you're typically looking at 100 mm of compacted MOT Type 1 (or equivalent crushed stone base in the US) plus your bedding layer and slab thickness. For most block paving, the bedding layer after compaction is 25 to 40 mm of sharp sand. Add the slab thickness on top and that gives you your total dig depth. Important: dig the excavation to the same slope as your finished surface. If your finished patio drops 2.5 inches from house to outer edge, your excavation floor should drop the same amount. Same for the compacted base surface.
Use a geotextile membrane on the excavated ground before you place your base material, especially if you're working on clay, silty, or soft soil. Geotextiles act as separators, preventing the crushed stone base from mixing down into soft subgrade over time. This is the difference between a base that stays stable for 15 years and one that develops soft spots and settlement after the first wet winter. For most DIY patios on average soil, a standard non-woven geotextile (typically described as Class 2 separation fabric) is fine. If your soil is particularly soft or waterlogged, step up to a heavier-duty Class 1 rated fabric.
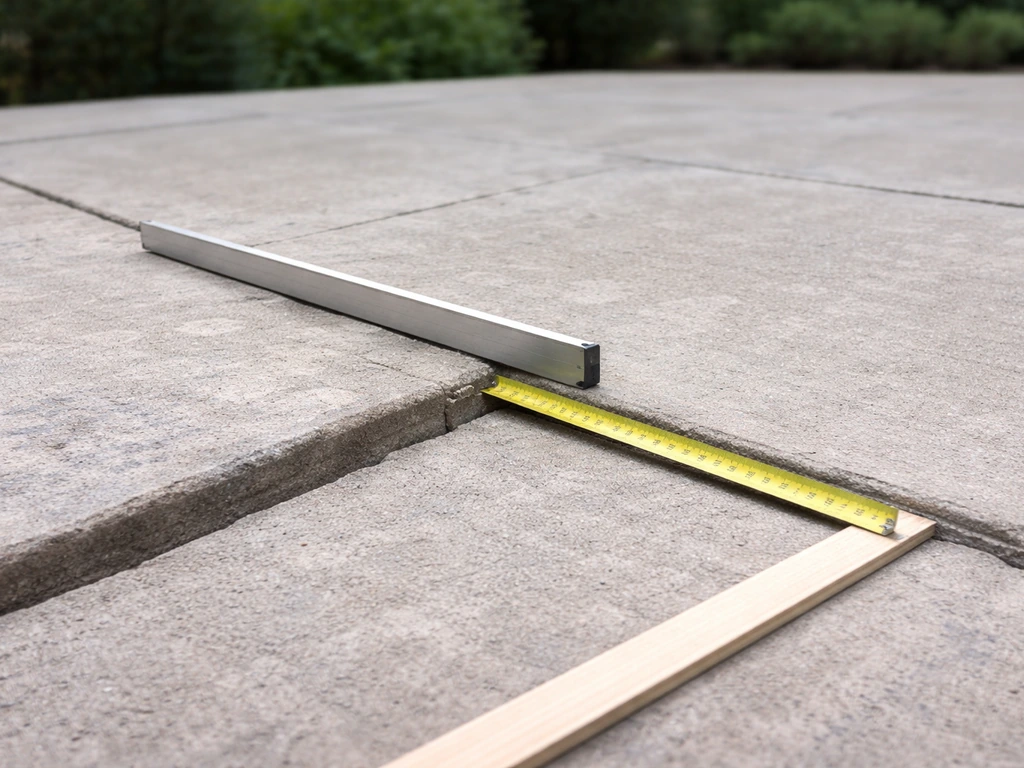
Once the base material is spread and compacted in layers (no more than 100 mm loose depth per pass if you're using a plate compactor), check the surface with your string line again to confirm the slope is consistent across the whole area, not just along one edge. Fill any low spots and recompact before you move on. The bedding sand or mortar cannot correct mistakes in the base, so get the base right before you worry about the surface.
Setting the Slope When You Lay Pavers or Form Concrete
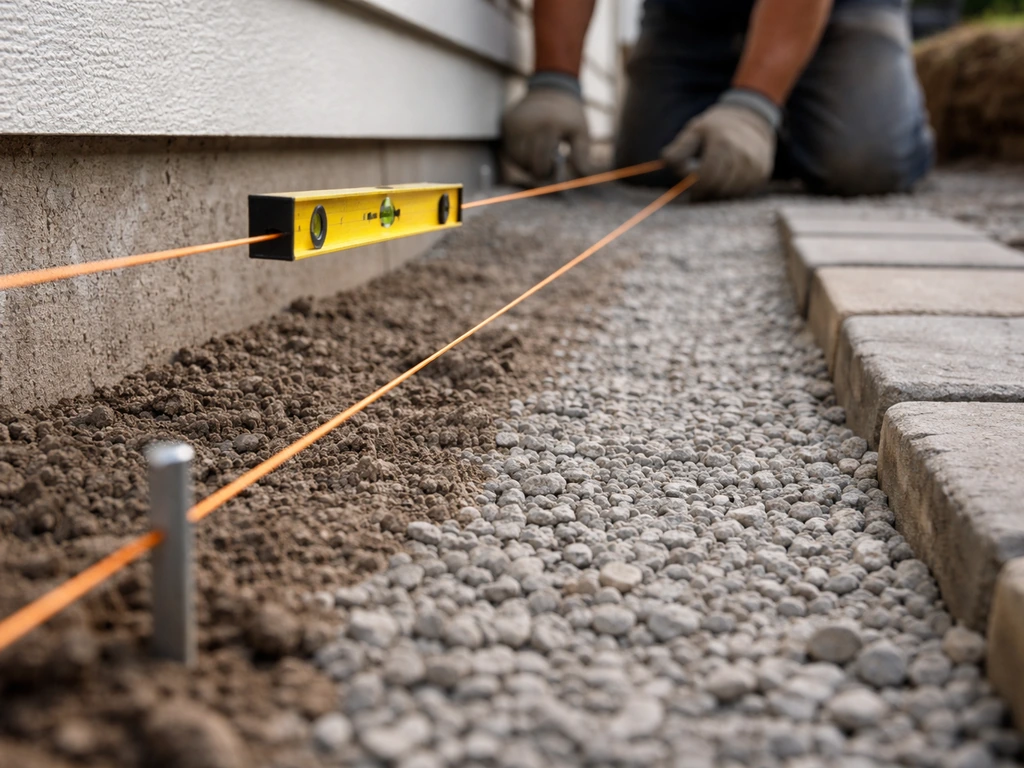
String lines are your best friend here. Set up two lines running parallel to the house, one at the high side (near the wall) and one at the outer edge. Use a line level or spirit level to make the strings accurately level along their own lengths, then use your calculated drop measurement to set the outer string lower than the inner one. For a 10-foot patio at 1/4 inch per foot, the outer string should be 2.5 inches lower than the inner string at the same point of measurement.
To avoid sagging strings throwing off your grade, keep span lengths reasonable and support the line at intermediate stakes if your patio is wide. Check the string tension regularly, especially in warm weather when lines can stretch and sag. A sagging line in the middle will give you a patio that drains to the center instead of the edge, which is exactly what you don't want. The Pavingexpert setting-out method also warns against using a sagging line, since it can throw off your finished drainage by making the patio drain to the wrong place A sagging line in the middle will give you a patio that drains to the center.
For screeding the bedding layer: set your screed rails or screed pipes at the correct slope using your string lines as reference. Screed across the area, remove the rails, fill the channels, and tamp lightly. Then set pavers working away from the house, checking regularly with a long spirit level laid across three or four pavers to confirm the slope is consistent and there are no high or low spots developing. If you're pouring a concrete slab, set your forms to the correct slope using the same string-line method, pour, and screed toward the low end. Strike off the concrete along your screed board using the forms as guides.
A good habit: every metre or so along the run, hold a 1.5-metre spirit level on the surface and check the bubble is showing roughly the right pitch. Some spirit levels have a 1% or 2% graduation marked on the vial, which makes this quick. If you're using a laser level, set the laser to the slope angle and scan across the surface as you go. Either method catches errors early, before you've laid another three rows of pavers in the wrong direction.
Where Does the Water Actually Go?
Sloping the patio is only half the job. You need a place for the water to go when it reaches the low edge, and that destination needs to be planned before you start building, not decided after the fact.
The simplest option: the water sheets off the outer edge onto a lawn or planted border. This works well when the ground beyond the patio also falls away from the house and the soil can absorb the runoff without getting waterlogged. If the lawn dips or the soil is heavy clay, this approach creates a boggy strip along the patio edge that kills grass and eventually undermines the base.
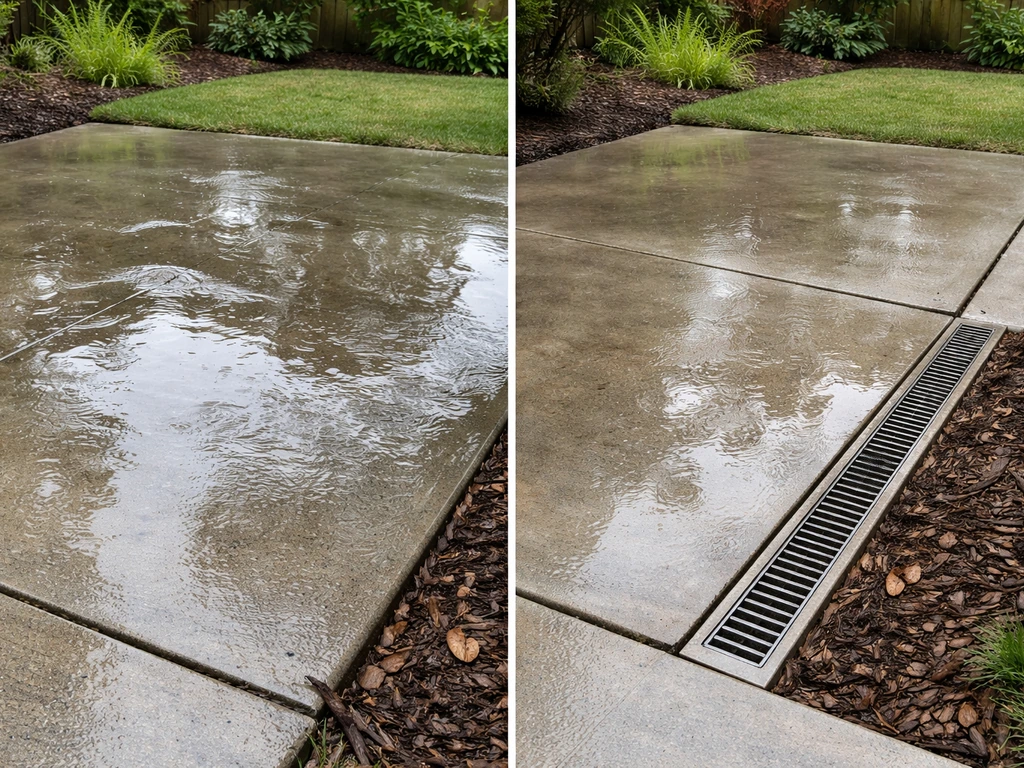
For more controlled drainage, a channel drain (trench drain) at the outer edge of the patio is one of the most reliable solutions. Water runs across the patio and drops into the channel, which then routes it away to a proper outfall. Channel drains work especially well when space is tight or when the ground beyond the patio is uneven or already saturated. Install the channel drain so it slopes toward its outlet at about 1% grade, starting from the outlet point and working backward so the drain rises slightly along its length.
Other practical destinations for that collected water:
- A soakaway (UK) or dry well (US): a gravel-filled pit dug at least 5 metres from the building (UK Approved Document H requirement) into which drainage water can percolate. Works well in free-draining soil, less so in clay.
- A French drain: a perforated pipe in a gravel-filled trench running across or along the lower edge of the patio to intercept and redirect water. Good for clay sites or where you need to move water a longer distance.
- A rain garden or swale: a shallow planted depression that collects and slowly absorbs runoff. Low cost, good for larger areas, and helps reduce the load on drainage systems.
- Tie-in to an existing surface-water drain: where your local authority permits it, connecting channel drain outflow to an existing surface-water gully or drainage run. Check local rules before doing this, as foul drains must never be used for surface water.
One thing worth doing early: look at where your roof downspouts discharge. If a downspout empties onto or near your patio, that water is going to overwhelm even a well-graded surface during heavy rain. Extend downspouts beyond the patio edge or connect them to underground drainage before you finish the build. Ignoring this is how a perfectly graded patio still ends up with pooling problems.
Mistakes That Cause Pooling (and How to Fix Them)
The most common error: the patio is installed completely flat or at a barely perceptible slope. It looks fine on day one, but after the first decent rain you've got a paddling pool outside the back door. If this is you, fixing it depends on the patio type. With loose pavers or block paving, you can lift sections, re-grade the bedding, and relay. With concrete, you're looking at either a surface grinder to tilt the top layer, a concrete overlay with a built-in slope, or in bad cases, breaking out and re-pouring.
Second most common: the slope runs toward the house instead of away. This often happens when someone eyeballs the grade or when the surrounding ground level was raised after the patio was built (new soil, added planters, a raised lawn). The fix for a modest lean toward the house is usually adding a channel drain at the base of the house wall to intercept the water before it reaches the foundation. For anything more serious, re-grading the base is the proper solution.
A low spot in the middle of the patio (a dip that collects water) is usually a base failure: a soft spot in the subgrade caused by insufficient compaction, inadequate base depth, or no geotextile allowing the base to migrate into soft soil. For pavers, lift the affected area, excavate, compact properly, add base material, and relay. Don't try to pack sand under existing pavers to fill a dip, it won't hold.
Too steep is also a real problem, though less common in DIY builds. A slope above about 3% starts to feel uncomfortable underfoot, especially when the surface is wet. If your patio ends up too steep because the surrounding grade forced your hand, consider breaking the area into two levels with a single step, or installing a cross-fall that splits the run and keeps each section within a comfortable range.
Finally, watch for slope inconsistency, where the grade varies across the width of the patio and water channels into one strip rather than shedding evenly. This happens when string lines weren't set on both sides of the patio or when the base wasn't checked at enough points during compaction. The fix is preventative: check your slope at multiple cross-sections as you build, not just along one edge. If you're planning a patio on a slope or hillside from the start, getting the measuring right from day one is the whole game. If you are building a gravel patio on a slope, focus on getting the subgrade and base grade consistent so the water still sheds to the low side without pooling.
FAQ
Which way should a patio slope if it runs along a wall and part of it is level at the edges?
Slope every paved plane away from the foundation, even if one side of the patio looks “flat” where it meets a wall. For long side patios, that usually means setting a gentle cross-fall so water moves toward the nearest outer edge, not toward an intermediate joint or the foundation line.
If my yard slopes toward the house, does that mean I can’t slope the patio away from it?
You still slope the patio away from the house, but you also need a destination that is lower and safe, like a channel drain, trench to an outfall, or a properly located soakaway or swale. Don’t rely on grass absorption if the ground beyond is already acting like a runoff reservoir.
How do I handle a raised patio where water technically falls “away” but lands on a slope that sends it back toward the foundation?
Treat the raised structure like a separate drainage system. Aim water to the outer edge of the raised area, then discharge or disperse it at ground level with a French drain, soakaway, or swale sized for the local soil, so it doesn’t crawl back under retaining edges.
Is 1/8 inch per foot ever acceptable if I’m short on elevation?
It’s often workable only if your patio is very small, the base will be built accurately, and you can still maintain consistent drainage without any “bulges” or low spots. If you are already fighting tight height constraints, 1/4 inch per foot gives more margin for construction tolerances.
What’s the best way to confirm the patio slope after I lay the base but before installing pavers?
Re-check using multiple cross-sections, not just one string line run. Measure the drop from the high string to the low edge at several points across the width, then correct before bedding sand goes in, because sand cannot compensate for a mis-graded base.
Can I fix a slight slope problem by tilting only the pavers or the sand bed?
No, because the bedding layer thickness will vary as the tilt changes, leading to rocking units, cracking, and fast drainage failure. If the slope is off due to the base, you generally need to re-grade or re-pack the base and relay.
What should I do if the patio slopes correctly at the wall but dips in the middle after compaction?
A mid-panel dip usually indicates settlement risk, not just an aesthetic issue. Lift the affected area, check for inadequate compaction or missing separation fabric on soft soil, rebuild the base to consistent thickness, then relay so the dip does not return after the next wet cycle.
How close can a downspout discharge be to the patio before it becomes a problem?
If a downspout empties onto the patio surface or onto the patio edge, treat it as an override of your drainage plan. Direct it at least beyond the patio edge (or into an underground drainage route) so the downspout flow doesn’t overwhelm the intended sheet drainage or channel drain capacity.
If my patio is on a slope, should I choose the fall direction based on where it feels easier to grade?
Choose fall direction based on safe outflow, not ease. On hillsides, water can gain momentum and run sideways along the slope, so you may need a cross-fall plus edge drainage (channel or trench) to prevent runoff from traveling toward the house side.
What are common signs during construction that my slope is becoming inconsistent across the width?
Look for a “water-catching” strip after rain, uneven gaps between pavers, or a long bubble-variations pattern when you check with a level across multiple spans. These indicate string setup or base checks were only done on one line, so the fix is additional measurements and base corrections before bedding.
Next Article
How to Upgrade Patio: DIY Diagnosis, Prep, Materials, Steps
Learn how to upgrade a patio with DIY diagnosis, drainage prep, material choices, and step-by-step refresh, replace, or