Building a step on a patio comes down to four things done right: accurate measurements, a compacted gravel base that won't shift, a well-supported step structure, and a safe tread surface. Get those four right and your step will look good and stay put for years. Rush any of them and you'll be re-doing it inside two winters.
How to Build a Step on a Patio: DIY Guide
Nolan Lennox
30 Apr 2026
Planning and measuring before you dig anything
The most important number is your total rise: the vertical distance from the patio surface (or the ground) up to your door threshold or upper landing. Measure this accurately with a tape measure and a level. Once you have that number, divide it by your intended riser height to figure out how many steps you need. Under the International Residential Code, each riser should be no more than 7-3/4 inches tall, and tread depth should be no less than 10 inches. ADA guidelines are slightly tighter, calling for risers between 4 and 7 inches and treads at least 11 inches deep. For a comfortable residential step, I usually aim for a 6- to 7-inch rise and an 11- to 12-inch tread depth.
Here's a quick example: if your door sits 14 inches above the patio, two steps at 7 inches each gets you there cleanly. One step at 14 inches is too tall and would be a trip hazard. Three steps at roughly 4.7 inches each would work but feels low. Do the math before you buy materials. A quick sketch on paper with your rise, run, and number of steps saves a lot of guesswork at the hardware store.
Also think about how the step connects to your existing patio. Is it sitting on top of the patio surface, or integrating into it? A step that sits on top of your pavers needs to account for that extra height, while a step built into the patio edge (a cutout or a natural grade change) will have a different footing requirement. Walk around the area, note any slope or drainage direction, and make sure water will run away from the step, not pool under it.
Picking your step style, materials, and tools
For most DIYers, the choice is between a single-step platform (one riser, one tread) and a stacked multi-step structure. A single step is faster, cheaper, and easier to keep level. Multiple steps require more precise compaction and alignment between each tier, but the construction method is essentially the same repeated. Decide this upfront because it changes how much base material and how many step units you'll order.
On materials, you've got a few good options. Concrete retaining-wall blocks (like Allan Block or similar) are the most forgiving and budget-friendly for beginners. Brick gives a classic look and is easy to cut with an angle grinder or masonry saw. Natural stone like bluestone or flagstone looks great but costs more and requires more skill to level. Precast concrete step units are the fastest to install but limit your design options. If your existing patio is pavers, matching the same paver brand and color for the tread is a smart move visually.
| Material | Approx. Cost | DIY Difficulty | Best For |
|---|---|---|---|
| Concrete retaining-wall blocks | Low ($1-4/block) | Easy | First-timers, budget builds |
| Clay or concrete brick | Low-moderate ($0.50-2/brick) | Easy-moderate | Matching existing brick patio |
| Natural stone (bluestone, flagstone) | High ($5-15/sq ft) | Moderate-hard | Premium look, experienced DIYers |
| Precast concrete step unit | Moderate ($50-200/unit) | Very easy | Single step, fastest install |
| Poured concrete with form | Moderate (materials + rental) | Moderate | Permanent, custom shape |
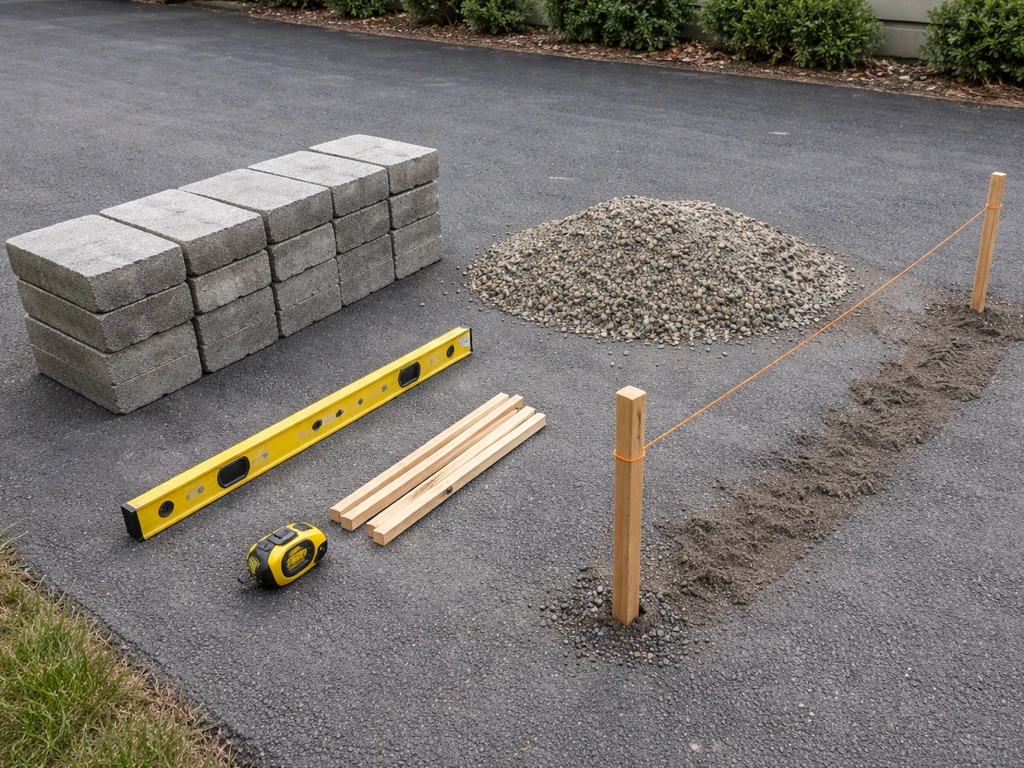
For tools, you'll need: a tape measure and level (a 4-foot level is ideal), a rubber mallet, a hand tamper or plate compactor (rent one if you need to compact a large area), a masonry chisel and hammer or angle grinder for cutting units, a trowel if you're using mortar, and safety glasses and gloves. If you're building a poured concrete step, add form lumber, stakes, and a concrete mixer or wheelbarrow to the list.
Site prep: the base is everything
This is where most DIY steps fail. People skip proper base prep because you can't see it once the step is built, but a weak base is why steps crack, tilt, and separate from the patio. If you also need a patio walkway, the same planning, leveling, and base-prep steps will help you build a smooth, long-lasting path how to make a patio walkway. Don't skip it.
Start by marking out your footprint and excavating the area. For a dry-laid block or paver step, dig down at least 6 to 8 inches below the finished base of your bottom riser. For a poured concrete step or a mortared brick step, go 8 to 12 inches to allow for a thicker gravel layer and any concrete footings. Remove all sod and organic material. Roots and soil will compress and rot over time, so get them out completely.
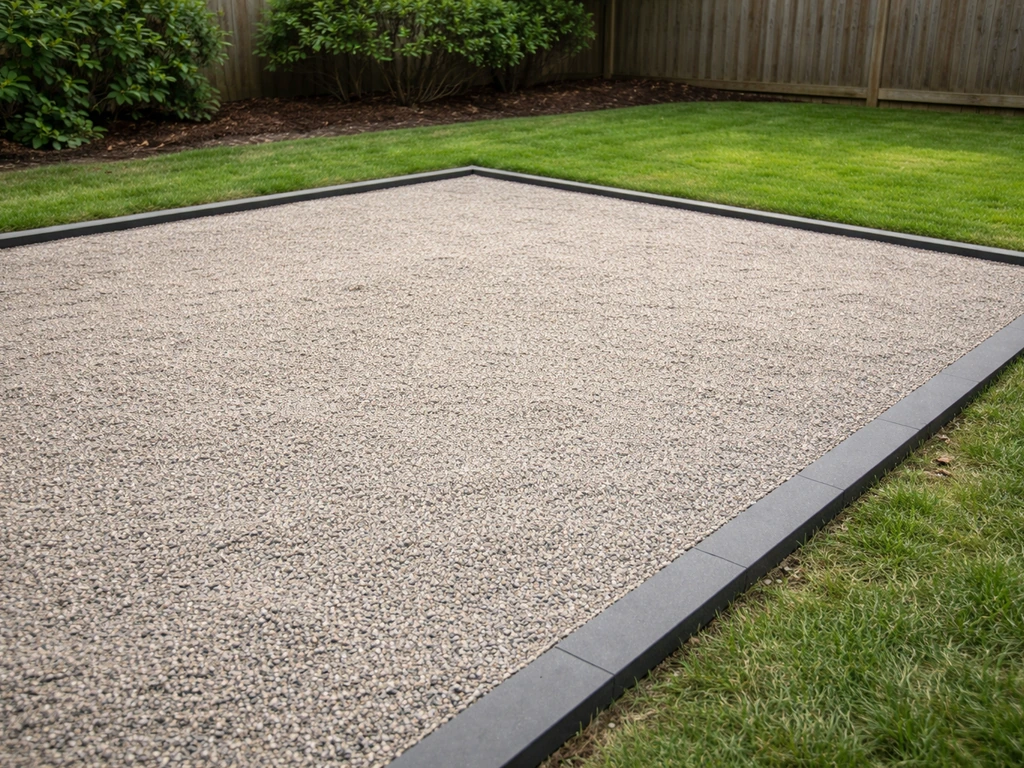
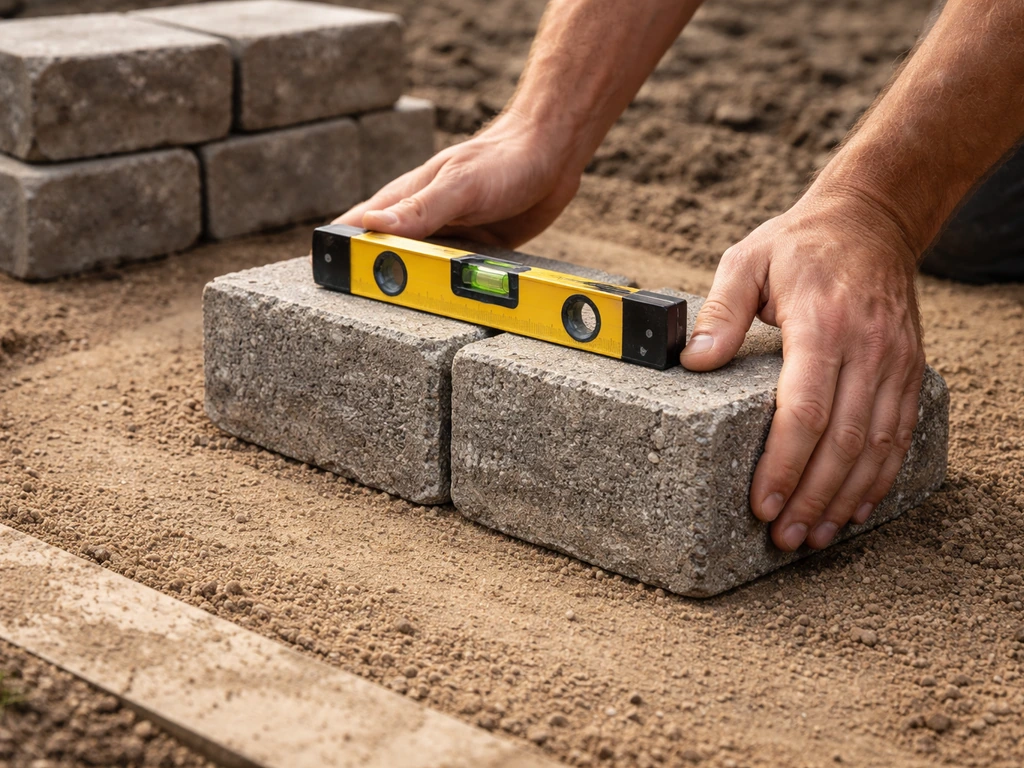
Fill the excavated area with compactable gravel (crusher run or Class II base rock works great) in 2-inch lifts, compacting each layer with a plate compactor or hand tamper before adding the next. Your finished gravel base should be 4 to 6 inches deep for a simple block step, or deeper if you're in a freeze-thaw climate. A 1-inch sand layer on top of the gravel gives you a smooth, adjustable setting bed for block or pavers. Make sure this base slopes slightly (about 1/8 inch per foot) away from the house or patio for drainage. Water sitting under your step is the enemy.
Check your base level from front to back and side to side before placing any step units. Even a small tilt at the base level will compound as you stack up. Take your time here. A well-set base takes maybe an extra 30 minutes and saves hours of correction later.
Building the step structure
Stacked block or brick method (most common for DIY)
For a single-step platform using concrete retaining wall blocks or CMUs (concrete masonry units), set your first course directly on the leveled sand bed. Check it with a level in both directions and tap it into place with a rubber mallet. Your first course forms the riser face and the outer edge of the tread support. Backfill behind the first course with compacted gravel or additional blocks to create a solid base for the tread units on top.
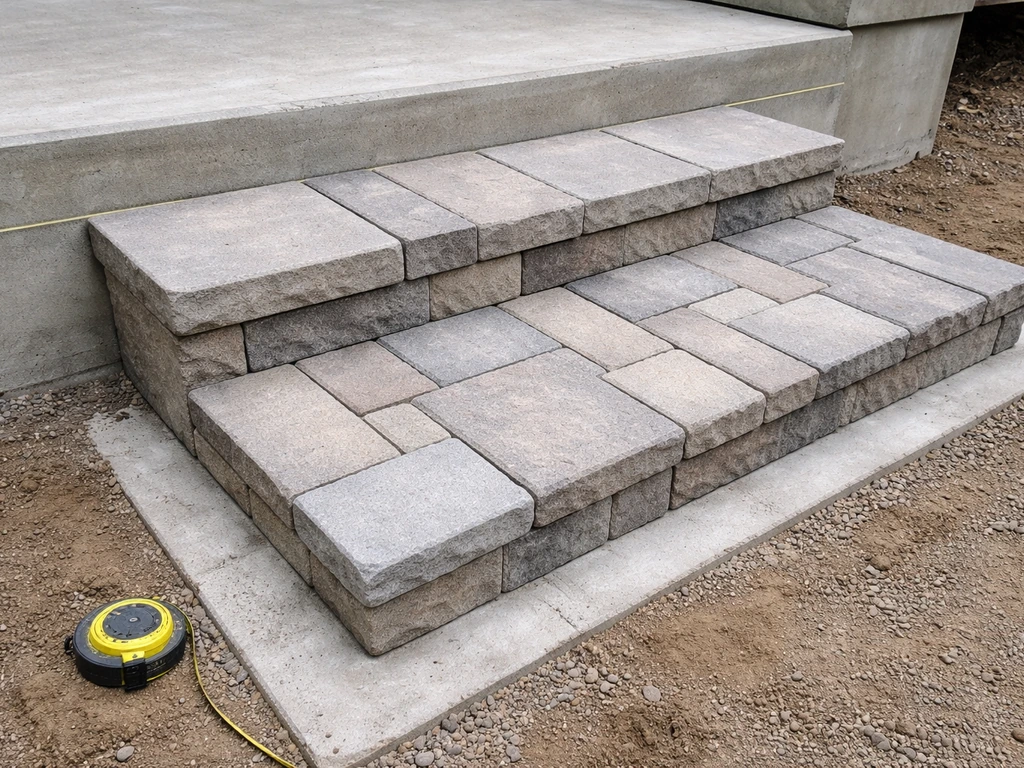
For a multi-step structure, think of it as a staircase pyramid: each tier steps back by the tread depth. Set your bottom riser course first, compact backfill behind it, then set your second riser course on top of that compacted fill, offset back by your tread measurement. Continue up. Keep checking level as you go. If you're using block adhesive or construction adhesive between courses (recommended for anything more than one step), apply it in a zigzag bead across the top of each block before placing the next course.
Poured concrete step method
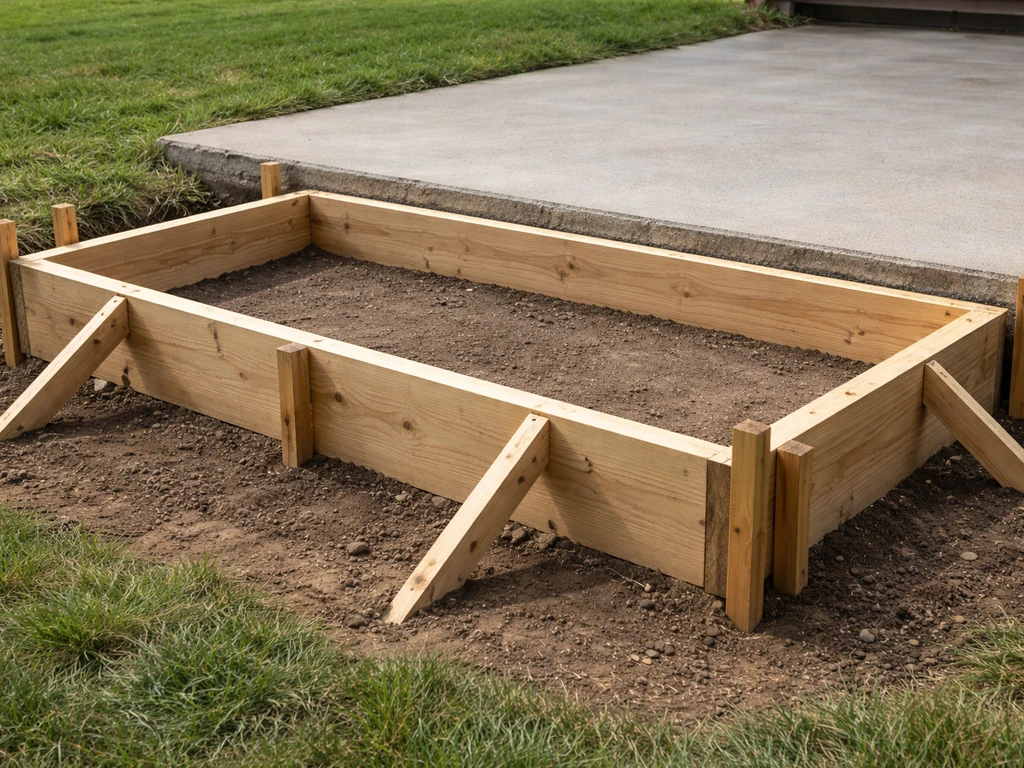
If you want a poured concrete step, build your form from 2x8 or 2x10 lumber supported by stakes driven into the ground. The form must be square, level at the top, and braced so it doesn't bow outward when you pour. Use form release agent or old motor oil on the inside faces so the wood strips cleanly when you pull it. Pour concrete in and consolidate it by tapping the sides of the form and working the concrete with a rod or shovel. Screed the tread surface level with the top of the form, then finish with a float. Let it cure before pulling the form (typically 24 to 48 hours minimum, a full week before putting weight on it).
Anchoring the step to your existing patio
One of the most common problems is a step that looks perfect on install but slowly separates from the patio edge over time. If your patio is poured concrete, you can drill into the slab and epoxy-set rebar pins into the back of your step footing to tie them together. If your patio is pavers, the step base should share the same compacted gravel base as the patio, and the step blocks should sit flush against the patio edge without any gap. If there's a gap, fill it with compacted gravel or mortar before finishing the surface.
Surface finish and safety details
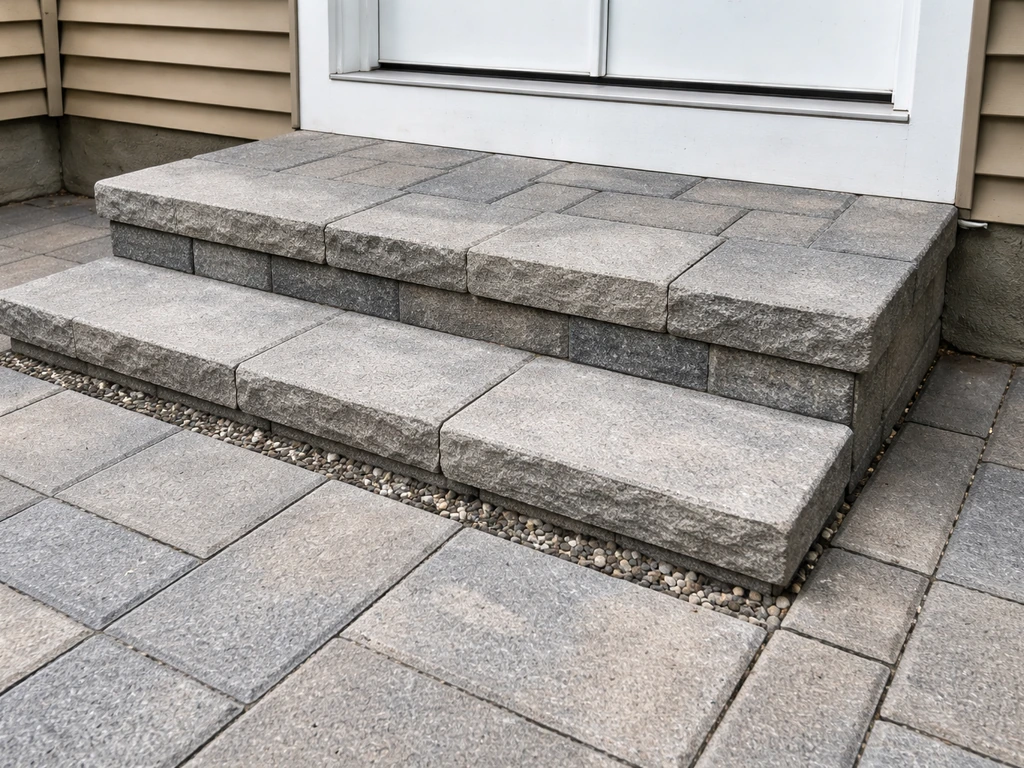
The tread is what people actually walk on, so it needs to be both durable and non-slip. If you used retaining wall blocks as your structure, the tread caps (flat cap blocks) should overhang the riser face by about 1 to 1-1/2 inches. This overhang creates a visual line and a shadow that helps people see the step edge. Set caps in a full bed of mortar or construction adhesive so they don't rock or shift.
For non-slip finish, you have a few good options. Textured concrete or block surfaces handle most conditions. If you're pouring concrete or applying a surface sealer, add silica sand or a dedicated non-slip additive to the final coat. Some people use bullnose pavers or ridged tread units specifically designed for step edges. Broom-finishing poured concrete (dragging a stiff broom across the wet surface) is the simplest way to add grip. Avoid smooth-faced tile or polished stone as a tread surface outdoors; it becomes dangerously slippery when wet.
Edging matters too. Side cheek walls (small walls on either side of the step) look professional and prevent soil from eroding in from the sides. They can be built from the same block as the step or poured alongside a concrete step. At minimum, backfill the sides tightly and compact them so the step doesn't look like it's floating in loose dirt.
Dry-fit first, then build: layout and common mistakes
Before you set anything permanently, dry-fit your entire step. Lay out all your blocks, caps, and tread units without adhesive or mortar to confirm everything fits, your measurements are right, and the height lines up exactly with the patio or door threshold. This is the step most beginners skip because it feels like wasted time. It isn't. It's the single best thing you can do to avoid a partially-built step that doesn't work.
Here are the mistakes I see most often on DIY patio steps, and how to avoid them:
- Wrong rise or run: Measure your total rise before buying materials, not after. Calculate the number of steps and confirm each riser height is consistent before building.
- Skipping base compaction: Loose gravel shifts and the step tilts. Compact every layer, every time.
- No drainage slope: A flat or back-pitched base traps water and causes frost heave. Always slope the base away from the structure.
- Misalignment with the patio level: The top tread must sit flush with or just barely below the patio surface it connects to. A lip in either direction is a trip hazard.
- Uneven risers: If your riser heights vary from step to step, people will stumble. Keep them identical throughout.
- No adhesive on cap blocks: Cap blocks that aren't adhered will shift and eventually fall off, especially in freeze-thaw climates. Glue them down.
- Weak connection to the patio edge: A freestanding step that isn't tied to the patio will migrate over time. Share the base or pin it mechanically.
If you're working on a more complex multi-step project, the layout and planning principles here connect closely to the full process covered in a dedicated guide on how to build box steps for a patio, which goes deeper on framing and structural support for larger stair runs. If you want the cleanest results, follow a clear how to put a step in a patio process from planning through base prep and installation.
Cleanup, curing, and keeping your step in good shape
If you used mortar or poured concrete, give it real cure time before you use the step. Light foot traffic is okay after 24 to 48 hours, but avoid heavy loads for at least 7 days, and full strength takes around 28 days. Keep freshly poured concrete or mortar damp for the first few days if weather is hot and dry; rapid drying weakens the mix. In cold weather, cover the step with burlap or plastic sheeting overnight if temperatures drop below 40°F.
For dry-laid block or paver steps (no mortar), you can use them right away, but spend a few minutes cleaning up excess sand from the tread surface and sweeping joint sand into any gaps between units. Polymeric joint sand, which you dampen and it hardens, is a smart upgrade over regular sand because it resists weeds and stays in place much better.
Maintenance is minimal if the base was done right. Once a year, check the step for any rocking, settling, or gaps opening at the patio connection point. Catching a small shift early (when you can tap a cap block back into place or re-tamp a corner) is far easier than waiting until you have a full re-build on your hands. If you applied a concrete sealer to the tread, plan to reapply every 2 to 3 years depending on traffic and your climate. Sealing protects against freeze-thaw spalling and keeps the surface looking clean.
Clean the step surface with a stiff brush and mild detergent in spring to remove any winter salt or grime buildup. Avoid wire brushes on pavers or brick, which can scratch the surface. A pressure washer on a low setting works well for concrete or block, just don't point it directly at mortar joints at high pressure or you'll wash them out.
Build this step right once and it genuinely takes care of itself. The whole project, including base prep, is typically a solid weekend of work for a single step, or a full two-day project for a two- or three-step run. Take your time on the measuring and base, move steadily through the build, and you'll have a step that looks like it was always meant to be there. Follow these patio step by step instructions to plan your rise, set a solid base, and build a safe, level step. If you want the full process from start to finish, this diy patio step by step approach covers planning, building, curing, and safety.
FAQ
Can I build a step on a patio if the patio surface is sloped or uneven?
Yes, but only if you build the step to account for the patio and door height differences. Measure from the patio surface up to the door threshold or landing you need to match, then confirm the final tread height does not exceed your door clearance when the door swings. If the patio edge is sloped, choose a location where the step’s tread will remain level, or you will create a rocking step.
How do I know the gravel base depth is enough, and should I vary it for my climate?
For most paver or block steps, plan to compact the base in lifts and stop when the gravel reaches the correct depth under the setting bed, then add the sand layer. If the sand layer becomes thicker than planned, it can squeeze out and cause settling. If you are in freeze-thaw areas, slightly increase gravel depth and avoid relying on sand alone for structural support.
What should I double-check before installing the second or third step in a multi-step run?
A good rule is to keep the step edge height and tread depth consistent across the run. Small variations of even a fraction of an inch can feel worse than the math says because your foot strike changes every step. Before you set units permanently, re-check rise and run at both ends of the staircase and confirm the top landing aligns with the door threshold line.
What if water pools where the step meets the patio edge?
If you cannot get a reliable drainage slope (about 1/8 inch per foot away from the house or patio), your step is at higher risk for loosening and freeze-thaw damage. Fix it by regrading the base and adjusting excavation depth, not by adding more sand on top. If you truly cannot regrade, consider adding a better drainage plan like a small swale or drain line before building.
How do I prevent cracking or separation where the step touches an existing concrete patio?
Do not skip control of movement joints. For poured concrete steps tied to other concrete, leave expansion space at interfaces and use appropriate bonding methods, not rigid bridging everywhere. For block or paver steps, keep consistent joint sand and avoid filling joints with gravel that can wash out, because differential movement will widen gaps over time.
Can I use different paver types or thicknesses for the step tread?
You can, but matching is not only visual. If you use different thickness pavers for the tread than the step units beneath, the overhang and height at the tread edge can end up off by more than you can adjust with sand. Confirm tread unit thickness and overhang allowances before purchasing, then dry-fit to verify total rise and step edge alignment.
What is the best way to add traction if my step becomes slippery when wet?
If your tread surface feels too slippery, fix it by changing the surface finish. For concrete, broom-finish or add a non-slip additive to the final coat instead of trying to “coat” smooth surfaces. For pavers, choose textured or purpose-made ridged step edges, and avoid polished stone because wet conditions reduce traction dramatically.
Do I really need tread cap overhang on a block step, and how critical is it?
If you are building with retaining-wall blocks or a similar modular system, overhang matters because it changes how visible the step edge is and how your foot clears the riser face. Keep the cap blocks set correctly on mortar or adhesive so they do not rock, and make sure the overhang is uniform from left to right.
How should I handle cutting blocks or pavers so the step stays level and stable?
If you need to cut blocks or pavers to fit, cut so the edges land on stable supporting points, not in the middle of spans that would rock. Dry-fit every piece, label them as you go, and avoid stacking wedge-shaped adjustments. If cuts create small gaps, address the fit with re-leveling of the base rather than widening joints beyond what you planned.
Is polymeric joint sand worth it for patio steps, and how do I apply it without making a mess?
For dry-laid systems, use polymeric joint sand for the joints that can be exposed to weather, since it resists washout and limits weed growth. Before using polymeric sand, remove excess setting sand from the tread surface so it does not contaminate joints, then follow the dampening steps carefully because over-wetting can weaken the joint.
What is the easiest way to catch a base-level problem before it becomes permanent?
Use a straightedge or the level to check for rocking at multiple points after the first course is set, then again after each added tier. If you find a slight tilt, correct it at the base sand or gravel level before the next course is placed, because correcting later usually means disassembling and rebuilding sections.
What are my options if my patio is concrete and I cannot drill into it?
If the patio is poured concrete and you want long-term stability, tying the step in reduces separation. The important part is how you create the connection, drill method, and placement so you do not undermine the step footing. If you cannot drill into the slab safely, you may need a different strategy, like ensuring shared base material and eliminating gaps at the interface.
How soon can I walk on it and use the doorway after installing a poured concrete or mortared step?
Not usually. Light foot traffic is one thing, but you still should avoid loads like moving furniture across fresh mortar or concrete, and you should keep off the step surface during the period when it is losing moisture. If you must use the area, build a temporary protective path and keep weight off the step edge.
Next Article
How to Build a Gravel Patio Step by Step
Step-by-step DIY guide to build a gravel patio: planning, sub-base prep, weed control, edging, and compacting.