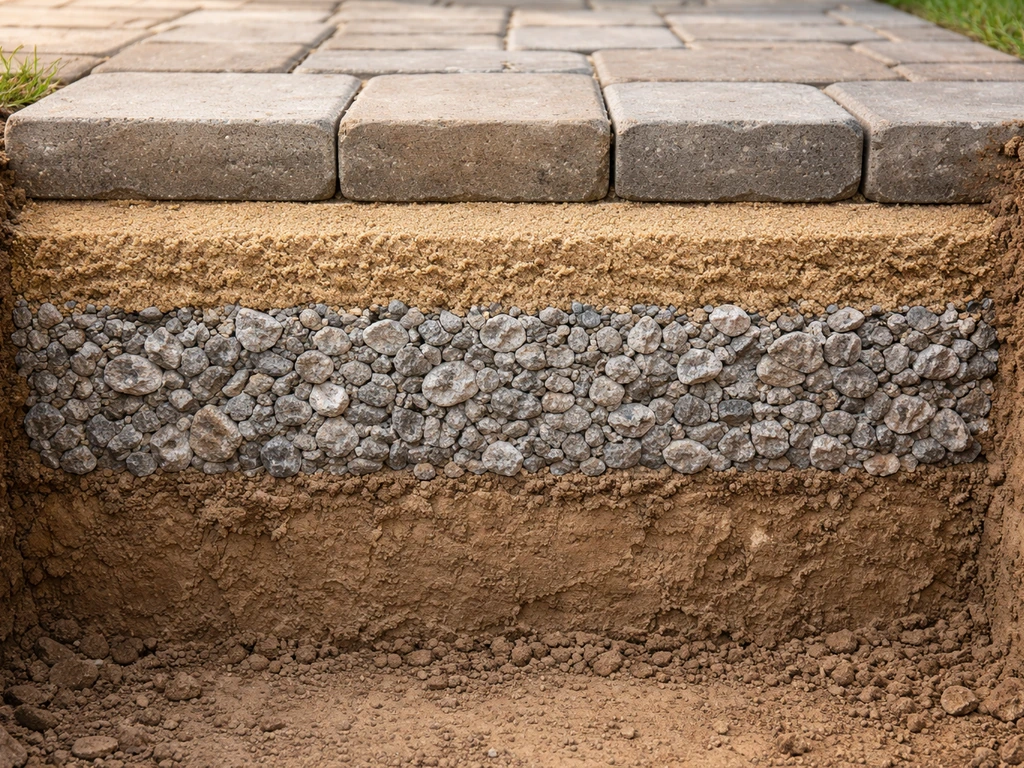
To excavate for a paver patio, you need to dig down roughly 7 to 9 inches below your finished paver surface: about 4 inches for a compacted gravel base, 1 inch for bedding sand, and another 2 to 2.5 inches for the pavers themselves. You also need to build in a slope of at least 1/4 inch per foot away from any structure for drainage. Get those two things right from the start and the rest of the job falls into place. Get them wrong and you're re-digging in two years.
How to Excavate for a Patio Paver Base Step by Step

Nolan Lennox
16 May 2026
Planning your layout and marking grades before you dig
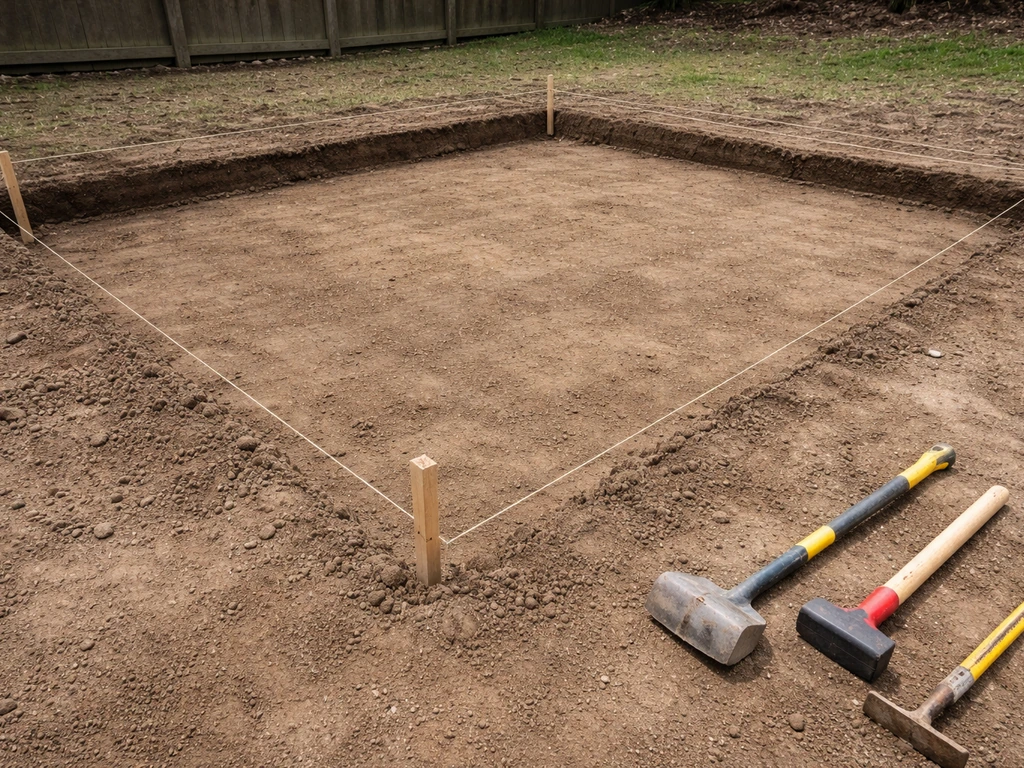
Before a single shovel goes in the ground, you need to know exactly where your patio sits, how big it is, and where the finished surface will be at every corner. This is the step most DIYers rush, and it's the one that costs them the most time later.
Start by marking the perimeter of your patio with stakes and string. Use batter boards set back a foot or two beyond each corner so you can pull the string tight without them moving when you dig. Square everything up using the 3-4-5 triangle method: measure 3 feet along one string, 4 feet along the adjacent string, and the diagonal between those two points should be exactly 5 feet if your corners are square. This matters more than people expect, especially for rectangular paver patterns that will telegraph any skew.
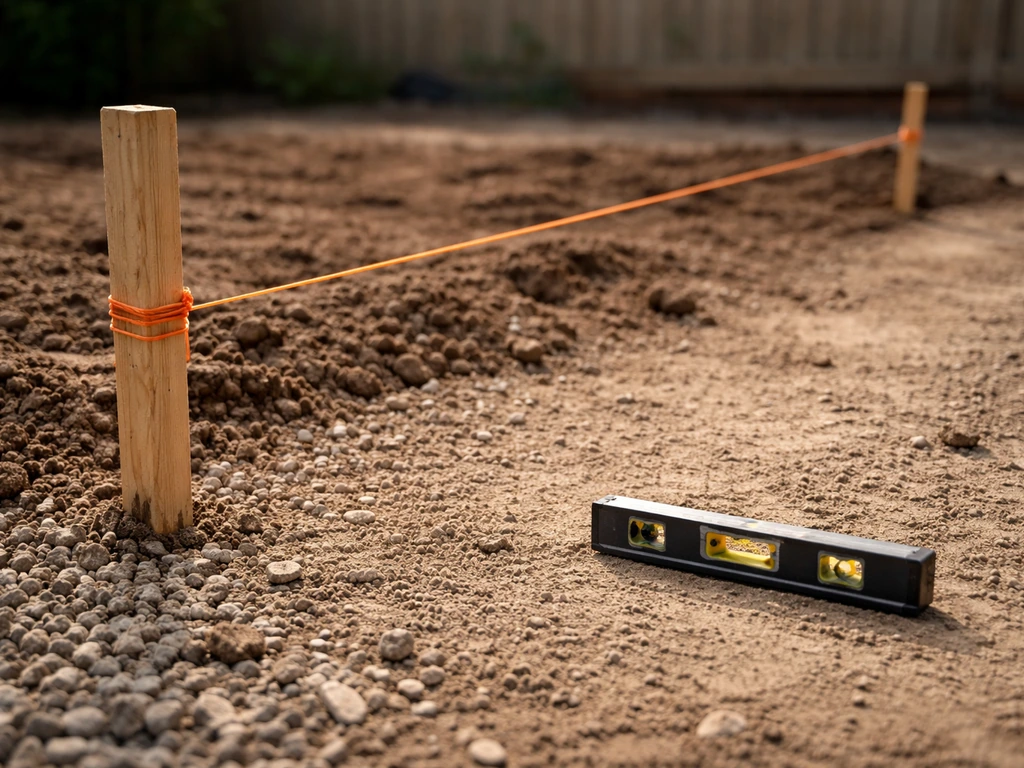
Once your perimeter is squared, set your finished-grade string lines. These represent the top of the pavers when the job is done. From here, every measurement you make goes downward. The slope needs to run away from your house at a minimum of 1/8 inch per foot, but I'd recommend shooting for 1/4 inch per foot to give yourself a real margin.
To put that in practical terms: if your patio is 12 feet wide running away from the house, the far edge of your string line should sit 3 inches lower than the edge nearest the foundation. For a 1% slope check, you need 1/2 inch of fall over every 4 feet. A line level or a cheap digital level on a long straight board works fine for setting this.
Laser levels make it even easier and rent for about $30 a day if you don't own one.
Mark your slope direction clearly on your stakes so you don't lose track while you're digging. It sounds obvious, but when you're three hours into removing soil and covered in dirt, it's easy to second-guess which way things need to fall.
Choosing the right excavation depth for paver patios
The depth question comes up constantly, and the honest answer is that it depends on your paver thickness and your soil conditions, but there's a reliable baseline for most residential pedestrian patios.
| Layer | Typical Thickness | Notes |
|---|---|---|
| Pavers | 2 3/8 in (standard) | Varies by product; check your specific paver spec |
| Bedding sand | 1 in (screeded) | Do not compact before pavers are placed |
| Compacted gravel base | 4 in minimum | May increase to 6+ in on clay or soft soils |
| Total excavation depth | 7 to 9 in below finished grade | Measure down from your finished-grade string lines |
For most suburban backyards with decent soil, 7 to 8 inches of excavation below your finished-grade string line is the sweet spot. If your soil is soft, clay-heavy, or holds water, push the gravel base to 6 inches and plan your total excavation around 9 inches. The gravel base is doing the structural work, so this is not the place to cut corners to save a little digging effort.
A related topic worth thinking through before you dig: if you're wondering whether you could skip the gravel layer entirely, there are limited scenarios where that's possible, but for paver patios it's genuinely not recommended. A related topic worth thinking through before you dig: if you're wondering whether you could skip the gravel layer entirely, there are limited scenarios where that's possible, but for paver patios it's genuinely not recommended How to dig patio.
If you want to minimize excavation, the related approach of how to make a patio without digging can help you choose an alternative layout and base strategy. If you want to build a patio without gravel, you need to plan for much more stable subgrade and stronger constraints on soil and drainage than typical paver installs. The base is what prevents individual pavers from sinking unevenly over time.
Removing soil and excavating to the right elevations
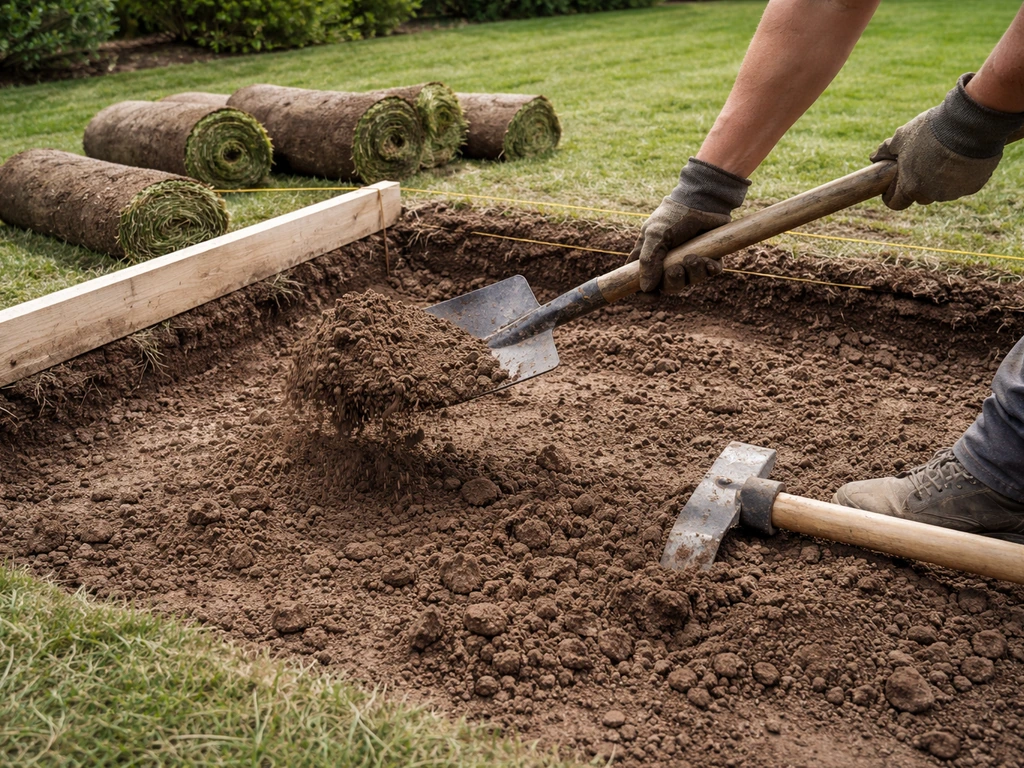
Now you actually dig. For most patios under 200 square feet, a flat spade and a mattock will get you there. Anything larger and renting a sod cutter for the top layer, then a mini excavator or at least a roto-tiller, will save your back and your weekend.
- Strip the sod first. Cut it into manageable sections and roll it up. Sod is heavy, so rent a dumpster or find a use for it (patching another area, compost) rather than letting it pile up on site.
- Excavate to rough depth plus an inch or two of buffer. It's much easier to remove a little extra soil later than to realize you've compacted everything and still need to go deeper.
- Use your finished-grade string lines and a tape measure constantly. Drop a tape from the string to the bottom of your excavation at multiple points across the area to confirm you're hitting consistent depth.
- Cut the walls of your excavation vertically and cleanly at the perimeter string lines. This gives you a clean edge to set your edge restraints against later.
- Rake the bottom of the excavation flat as you go. Remove roots, rocks, and debris. A root left under a base layer can decompose and cause a soft spot that shows up as a sunken paver two seasons later.
- Check your slope at the subgrade level. You're going to maintain that same slope all the way through every layer, so confirm it's present at the bottom of your excavation before moving on.
Hauling soil out is the part nobody talks about enough. A cubic yard of native soil weighs around 2,000 to 2,700 pounds depending on moisture content. For a 12x16 foot patio excavated 8 inches deep, you're moving roughly 4 to 5 cubic yards of material. That's a serious amount of dirt, so plan your disposal before you start digging.
Subgrade preparation and compacting the soil
The subgrade is the native soil at the bottom of your excavation. How you treat it determines whether your patio stays level for 20 years or starts shifting in 3. This step gets skipped or rushed more than any other, and it's where most DIY patio failures actually begin.
Once you've reached your target depth, compact the subgrade using a plate compactor (also called a plate vibrator or wacker plate). You can rent one for around $75 to $100 per day. Make at least two passes in perpendicular directions across the entire excavation. What you're aiming for is a firm, unyielding surface. If you press your heel into it and your foot sinks, the soil needs more compaction or it's too wet to compact effectively. Let it dry out a day before trying again.
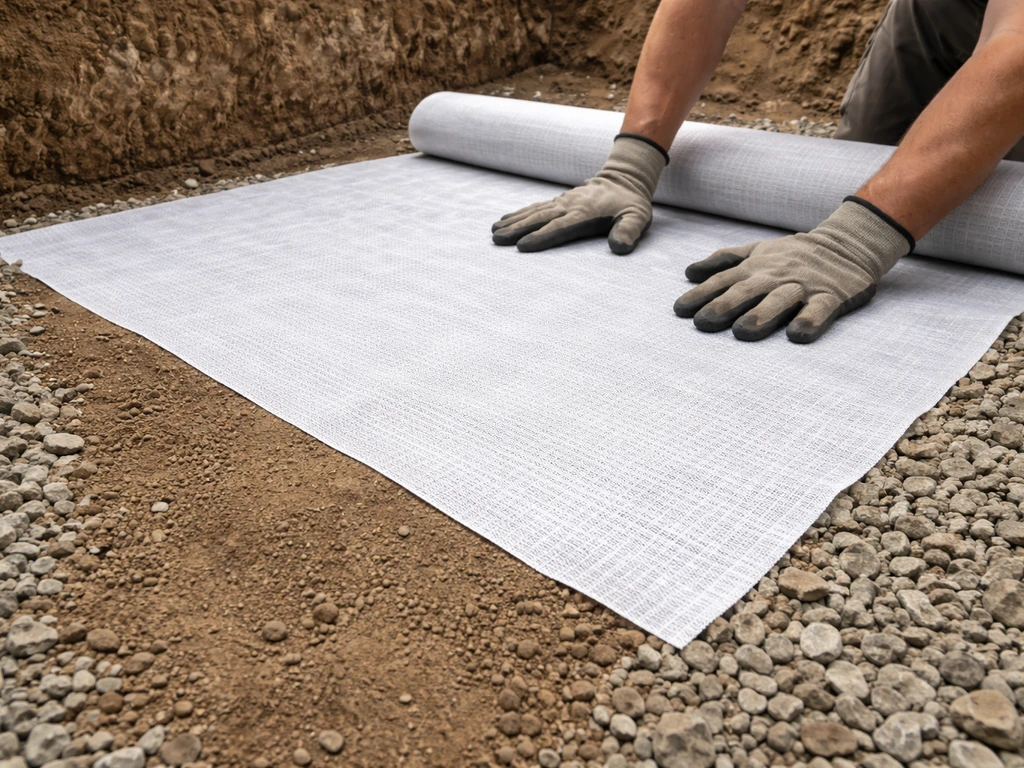
Clay soil is the trickiest situation. Clay holds water, expands when wet, contracts when dry, and does not compact the same way granular soils do. If you're dealing with heavy clay, you have two practical options: add a geotextile fabric layer on top of the subgrade before your base goes in, or increase your gravel base depth to 6 inches or more. The geotextile acts as a separator, preventing clay particles from migrating up into the gravel base and undermining it over time. Woven geotextile fabric is the right choice here, not the lightweight landscaping fabric sold for weed control. It's worth the extra $50 or $60 for a roll.
After compaction, probe the subgrade at a few spots with a rebar stake. If it drives in easily with light taps, you need more compaction or possibly more base material to bridge a soft area. Professional installations target 95% of standard Proctor density for the subgrade, which isn't something you can measure without lab equipment, but two firm passes with a plate compactor on dry, granular soil will generally get you close enough for a residential patio.
Base support after excavation: gravel, geotextile, and what comes next
Once your subgrade is compacted and you've confirmed your slope is correct at the bottom of the excavation, it's time to build up the base layers. This is technically the next phase of the build rather than excavation itself, but the decisions you make here are directly tied to how well you dug.
Start with 3/4-inch minus crushed stone (also called crusher run or road base depending on your region). Add it in lifts of no more than 4 inches, raking each lift smooth and compacting it before adding more. Dumping all your gravel in at once and compacting it in one pass does not produce the same result. Each lift needs its own compaction pass, with the plate compactor running in perpendicular directions.
Your finished gravel base should mirror the slope you established at the subgrade level. Set string lines again above the gravel layer to check this before moving on to bedding sand. A long level or a screed rail pulled across the surface will reveal high and low spots you need to correct. Unilock recommends screed-checking the gravel surface against your finished-grade string lines to confirm the slope is consistently 1.5 to 2 percent before any sand goes down.
If you're on clay or unusually wet ground, lay your geotextile on top of the compacted subgrade before the first gravel lift goes in. This is also when some builders add geogrid reinforcement for deeper bases, typically every 6 inches of base depth, though for a standard residential pedestrian patio on average soil a geotextile separator is usually enough.
After the gravel base is compacted and checked, the 1-inch bedding sand layer goes on top. Screed it smooth using pipes as guides set at the correct height below your finished-grade string. Do not compact the sand before laying pavers. The sand compacts when the pavers are vibrated into place and that's exactly how it's designed to work.
Common mistakes and how to fix them fast
Even experienced DIYers run into problems during excavation. Here are the ones I see most often and what to do about each.
- Uneven excavation depth: If your bottom is wavy or inconsistent, your base will be uneven and your finished patio will show it. Fix it before adding any base material. A long screed board dragged across the bottom of the excavation reveals the problem. Fill low spots with base gravel and compact, don't just rely on extra sand to compensate.
- Slope is wrong or missing: Compacted soil that has the wrong slope baked in is frustrating to fix, but it's fixable. Bring the high side down with more excavation or build the low side up with compacted base material during your gravel layers. Catch it at the subgrade level, not after the gravel is in.
- Soil too wet to compact: Don't fight it. Let the area dry for a day or two. Compacting wet soil, especially clay, just locks in a spongy, unstable base. If drainage is the underlying problem (water sitting in the excavation), address it before proceeding or the issue will never go away.
- Not digging deep enough: This is the most common mistake by far. People measure their paver thickness, add a couple of inches, and dig that. They forget the 4-inch gravel base. Always measure down from your finished-grade string lines and account for every layer.
- Skipping compaction of the subgrade: Adding gravel on top of loose, uncompacted native soil is like building on a soft mattress. The whole system will settle unevenly. Rent the plate compactor. It's not optional.
- Roots and organic material left in the excavation: Organic matter decomposes, leaving voids. Pull every root you can reach before compacting. If there's a large stump nearby, the decomposing roots can undermine the base years later, so factor that into your patio placement when you plan.
If you finish excavating and realize your slope is running the wrong direction (toward the house instead of away from it), stop before you compact. It's much easier to re-establish your grade string lines and recut the slope at the subgrade level than to try to correct it with base material later. Unilock is blunt about this in their installation guidance: finished pavement must slope away from the home by at least 2 percent (about 1/4 inch per foot) and getting that direction wrong is one of the most expensive mistakes to fix after the fact.
Once your excavation is done, subgrade is compacted, and base layers are built and checked, you're genuinely ready to move into paver installation. The excavation phase is unglamorous work, but it's the whole foundation of how long your patio lasts and how well it drains. Before you build, check local rules, because a patio may require a permit depending on your location and the scope of the project building patio without permit. You can also build a patio without cement by using a paver base and proper drainage so the surface locks together without mortar foundation of how long your patio lasts. Nail the depth, nail the slope, compact everything properly, and the paving itself goes smoothly.
FAQ
How do I confirm the correct depth when my patio design includes edging or a border?
Measure depth from the finished-grade string line to the bottom of the lowest layer that will be under the pavers and edging, not just the paver face. If you add thick border stones, steps, or leveling rings, they change the finished height, so recalc the depth before digging rather than adjusting the base later.
What should I do if I hit rock, roots, or a utility line while excavating?
Stop and reassess immediately. Keep at least the required clearance from utilities and relocate the patio layout if needed. For roots or minor obstructions, remove them down to stable material and compact any disturbed area. Don’t fill voids with topsoil, use base rock that can be compacted in lifts.
Is it better to dig more depth than needed and “make up” the difference with extra bedding sand or paver thickness?
Avoid using bedding sand or pavers to correct excavation errors. Extra thickness should be addressed in the gravel base, because sand is meant to level the final surface and compacting more sand changes its behavior. If you overshoot depth, add compactable crushed stone in lifts, then re-check slope and height.
How dry does subgrade need to be before compaction?
It should compact firmly when you run the plate compactor, and a heel test should show little to no sinking. If soil clumps or sticks to the plate, it is often too wet. Wait for it to dry or remove a thin soft layer, then re-compact, because wetter clay or silts will not reliably lock in.
Do I need geotextile fabric for every patio, or only for certain soils?
Geotextile is most useful when soil can migrate into the gravel base, especially with heavy clay, high fines, or pumping conditions. If your subgrade is stable granular soil and you control drainage, you may skip it. If you do use it, use woven separator fabric, lay it smooth without overlaps that can create channels, and keep it from tearing during gravel placement.
When should I choose geogrid reinforcement instead of just a geotextile separator?
Use geogrid when you are increasing structural capacity beyond a typical residential base thickness, such as deeper base builds, poor subgrade, or higher loads. If your design stays within standard pedestrian patio conditions and you have stable subgrade or adequate base thickness, reinforcement is often optional. Don’t add geogrid and still underbuild the base thickness.
Can I compact the crushed stone and sand with different equipment than a plate compactor?
For the subgrade and gravel lifts, a plate compactor is the right tool because it provides controlled impact over the whole area. Sand should not be compacted before pavers, and it’s typically leveled and left ready for paver vibratory setting. If you use other tools, you must still achieve firm, non-yielding ground at each stage.
How many times should I compact the gravel base and what lift thickness is safe?
Compact in lifts, keep each lift to about 4 inches or less, and compact each lift before adding the next. Run perpendicular passes so you don’t create weak lanes. If you rush by dumping all stone at once, you can end up with loose layers under a firm-looking surface.
What’s the best way to re-check slope after the gravel is installed?
Use the same finished-grade string references, but check at the gravel level before bedding sand goes down. Verify with a long straight board or screed rail against the string lines, correct high spots by removing stone, and correct low spots by adding and re-compacting, then re-check again.
How can I avoid creating humps or dips that will show up after pavers are set?
Maintain consistent screeding and remove oversize stones during leveling. When you check with a long board, mark problem areas and fix them before sand goes in. If you only correct after bedding sand is added, you risk disrupting the sand depth uniformity and creating localized settlement.
What do I do if I realize my slope direction is wrong before I compact anything?
Stop and immediately reset your string lines. Re-establish the slope at the subgrade level, then rebuild downward from there. Fixing slope direction after gravel is compacted is harder and often requires removing and redoing base material rather than trying to “patch” with sand.
How do I handle patio excavation near a driveway or walkway that has existing grades?
You need to align finished paver heights and transitions, include slope consistency across the tie-in, and plan for edge support where grades meet. Re-check grade at multiple connection points, not just the main patio run, because adjacent surfaces can control how water flows onto or away from your patio.
Do local permits and utility checks affect how I excavate?
Yes. Before digging, confirm whether permits apply and whether you need a locate request for utilities. If utilities or drainage rules constrain depth or placement, it can change your excavation plan, so verify these items before setting strings and starting soil removal.
Next Article
How Deep to Dig a Patio: Depth Guide for Pavers and Slabs
Get exact patio excavation depths for pavers and slabs, with example calculations and slope checks for proper base prep.