Building a patio in Bloxburg comes down to three things: picking a spot on your lot, laying floor tiles in Build Mode, and dressing it up with trim, stairs, and decor. You do not need any gamepasses to get a solid, good-looking patio done, though Advanced Placing (200 Robux) and Transform Plus (600 Robux) will give you more placement freedom if you want to go further. Here is exactly how to do it, start to finish. If you want the same kind of patio layout tips for how to make a patio in Minecraft, you can apply the same steps for choosing a spot, sizing it, and picking a surface style.
How to Make a Patio in Bloxburg Step by Step

Nolan Lennox
16 May 2026
Confirm the basics and pick your patio style
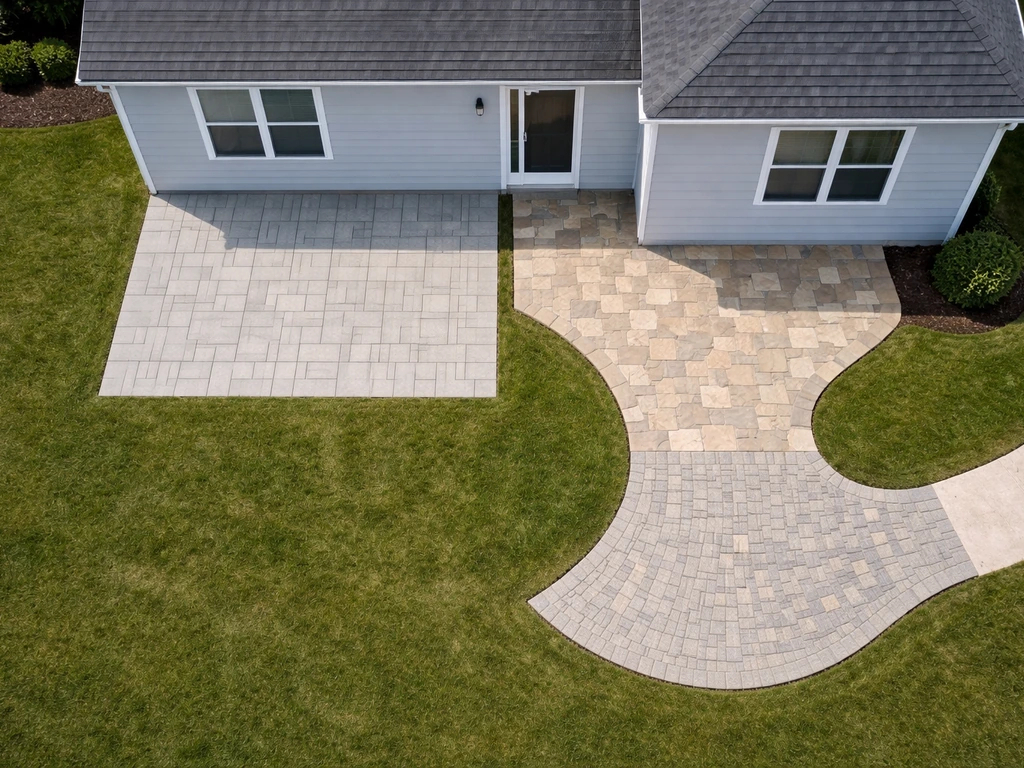
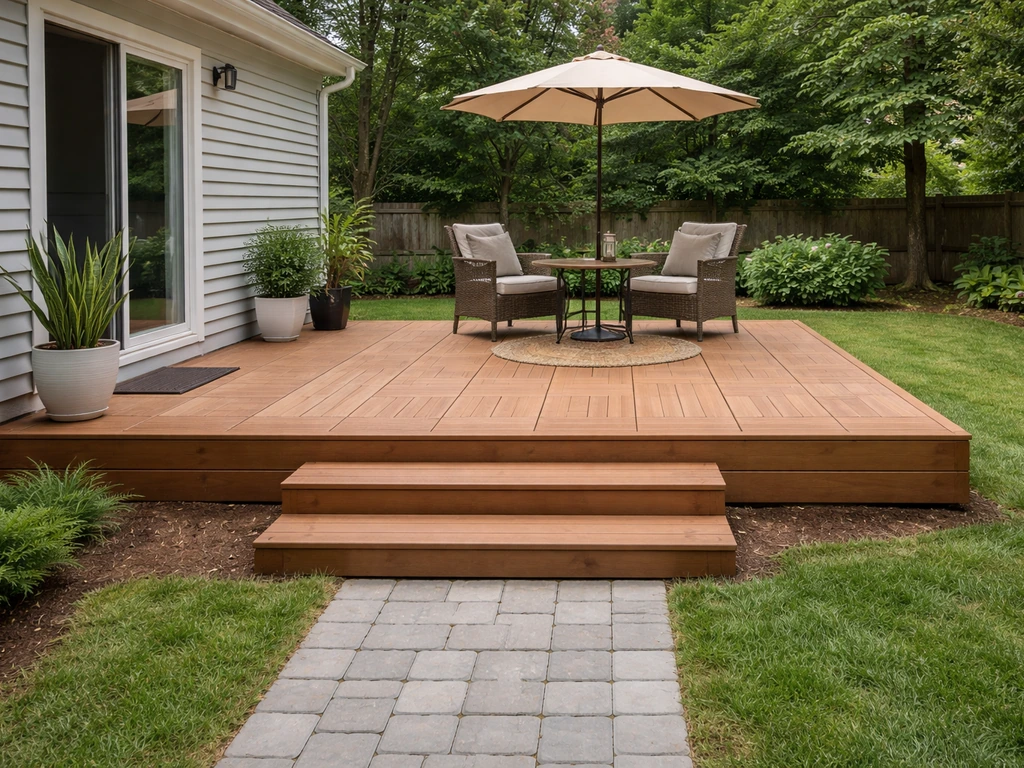
Before you open Build Mode, spend two minutes deciding where the patio goes and what shape you want. Most players put patios at the back or side of the house, directly off a door or sliding glass area. A simple rectangle between 6x8 and 10x12 tiles works for most lot sizes and keeps costs manageable. Think about whether you want it flush with the ground (easiest) or slightly raised with a step or two down from a door (more realistic but requires stairs).
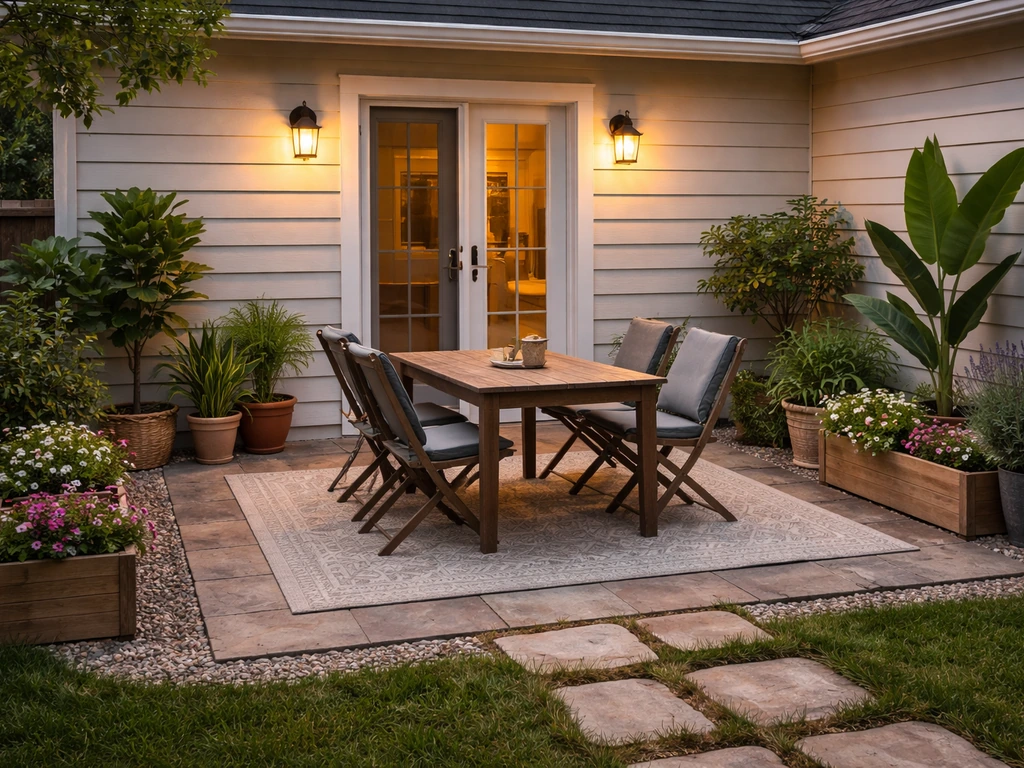
Style-wise, you have a few directions to pick from. A clean modern patio uses flat uniform floor tiles with minimal trim. A cozy rustic patio leans into wood-look floors and a Patio Canopy overhead. A decorative path-style patio uses alternating floor colors or carpet pieces to break up the surface. Knowing this before you start means you will not be tearing things down halfway through, which is the number one time-waster in Bloxburg building.
How to build a patio step by step in Bloxburg
This walkthrough assumes you are building a ground-floor patio. Open Build Mode from the menu when you are on your lot. Here is the order to follow:
- Enter Build Mode and navigate to the Floors category. Pick a floor tile that matches your style (concrete, wood, tile, or stone textures are all available).
- Click and drag to lay your floor tiles in the shape you planned. A rectangle is the simplest starting point. Keep an eye on the grid to stay even.
- Use Page Up or Page Down if you need to align height levels, especially if the patio is going just outside a raised door. This moves your active building reference up or down a floor.
- Once the floor is down, go to the Walls category and place short walls or half-walls around the perimeter if you want a border or railing effect. Wall Trim pieces from the Wall Trim category work great for a finished edge without full walls.
- If you want the patio to step down from the house, go to the Stairs category and select a stair variant that matches your floor material. Place it at the edge where the patio meets the yard.
- Add decor last: outdoor furniture, a Patio Canopy overhead, potted plants, or string lights. Placing decor before you finalize the floor and border often leads to items clipping or needing to be repositioned.
- Use the hotkey C to copy a tile or object you want to repeat across the patio (like border trim pieces) rather than placing each one individually. R rotates items if something is facing the wrong direction.
- Save frequently using the save function in Build Mode, especially after finishing the floor layout. Losing progress to a glitch mid-build is a real frustration.
One practical tip from experience: build your floor tiles slightly wider than your wall border so there are no visible gaps at the edges. It looks cleaner and avoids that annoying thin gap line that shows up when walls and floors do not quite meet.
Building a patio without a gamepass

No gamepasses at all? You can still build a very respectable patio. Here is what you are working with and what you are giving up.
Without Advanced Placing (200 Robux), you lose custom placement mode for structural items, meaning everything snaps to the default grid. This is actually fine for a ground-level patio because you are mostly placing floor tiles and basic walls, which snap cleanly anyway. You just cannot rotate or nudge items off-grid, so keep your design square and grid-aligned. Without Transform Plus (600 Robux), you cannot use the advanced Transform Tool to move and resize objects freely, so avoid designs that require irregular or overlapping shapes.
blank" rel="noopener noreferrer">Without Multiple Floors (300 Robux), you are limited to the ground floor only. Without the Multiple Floors gamepass, players are limited to the ground floor only blank" rel="noopener noreferrer">Multiple Floors (300 Robux). In Sims FreePlay, upgrading your floor options is often the first step if you want to build a patio on a second level Multiple Floors in Sims FreePlay. This means a raised deck-style patio that sits above ground level is off the table. However, a ground-level patio with a one or two step drop using stairs is completely achievable without this pass. Use the Stairs category to add a step-down transition from your door to the patio surface.
The most effective no-gamepass patio strategy is to keep the shape simple and lean on decor and color variety to make it look intentional rather than plain. Use floor tiles in two alternating colors to create a checkerboard or border pattern. Add carpet pieces from the Carpets category inside the patio zone to create a visual rug effect in the seating area. These are cheap in-game and look great. Canopy items, outdoor chairs, and potted plants do a lot of heavy lifting without requiring any special passes.
Budget materials and surface ideas
Bloxburg uses in-game money (not Robux) for most building pieces, and patio surfaces vary in cost. Sticking to basic floor tiles rather than premium textured options keeps your in-game budget in check. Here is a quick breakdown of surface approaches:
| Surface Type | Best For | Budget Level | Notes |
|---|---|---|---|
| Basic concrete floor tiles | Modern, minimal patios | Low | Cheap and clean, works well in almost any style |
| Wood-look floor tiles | Rustic or warm outdoor feel | Medium | Popular choice, gives a deck aesthetic |
| Stone/tile floor tiles | Mediterranean or classic look | Medium | Slightly more expensive in-game, worth it for contrast |
| Alternating two-color tiles | Pattern or checkerboard effect | Low | Two cheap tiles alternated, no extra cost |
| Carpet pieces (from Carpets category) | Seating area accent | Very Low | Good for defining zones within a larger patio |
| Patio Canopy overhead | Shade structure, pergola feel | Medium | Adds huge visual value for the in-game cost |
If you want the patio to feel like it has different zones (a dining area and a lounge area, for example), use two different floor materials side by side rather than just changing furniture placement. It reads much more intentional and costs almost nothing extra.
Common mistakes and how to fix them fast
These are the issues that come up most often when building a Bloxburg patio, and how to deal with them without losing your mind.
- Floors not aligning with the door height: This is the most common issue for raised patio builds. If your door is above ground level and your patio floor tiles sit at ground level, use Page Up/Down to shift your placement reference before laying tiles. Stairs are your bridge between the two levels.
- Gaps between floor tiles and walls: Always place floor tiles first, then walls. If walls go down first, floor tiles sometimes do not extend fully to the wall edge. Removing and re-placing floor tiles after the walls are up usually fixes this.
- Stairs facing the wrong direction: Hit R to rotate before placing. Placing a stair and then trying to rotate it after is trickier and sometimes causes misalignment with the patio floor.
- Build Mode UI getting stuck or placement buttons not responding: This is a known Bloxburg glitch. If your placement panel freezes mid-build, exit Build Mode completely, re-enter it, and the UI typically resets. Do not try to force-place items when the UI is frozen or you can end up with objects in the wrong location.
- Patio looks flat and boring: This is a design issue, not a building bug. Add a wall border at least on one or two sides, throw a Patio Canopy above the seating area, and use the C hotkey to copy decorative trim pieces around the perimeter quickly.
- Uneven edge where patio meets the yard: If you see a harsh cutoff line, add a thin wall trim piece or a one-tile border in a contrasting floor color around the perimeter. It frames the space and hides any ragged edges.
- Running out of in-game money mid-build: Plan your surface area before you start and estimate tile count. It is better to build a smaller complete patio than a large half-finished one. You can always expand later.
One last thing worth knowing: if you enjoy this kind of virtual building, the patio-building skills in Bloxburg translate surprisingly well to other games with building systems. Some of the layout thinking here overlaps with how you approach building patios in Sims 4 or similar games, and the instinct to plan before placing tiles is just as valuable there. If you are actually trying to replicate the same idea in Sims FreePlay, use these same layout principles and then follow the in-game building steps for patios build patios in Sims 4 or similar games. If you are also wondering how to change a patio floor in Sims Freeplay, the same idea applies: pick a simple pattern first, then swap the surface material once you know your layout. In Sims Freeplay, deleting a patio follows the same idea as removing other placed structures: find it in build mode and remove it tile by tile or with the right selection tools Sims 4. For a Sims 4 patio, you will follow a very similar process: choose the placement, pick a simple layout, and then decorate to make it blend with the house building patios in Sims 4. But Bloxburg has its own quirks, and working within the grid and the gamepass limitations is actually good practice for learning to make clean builds with constraints, which is when creative problem solving really kicks in.
FAQ
Can I build a patio that matches uneven ground or a raised entrance in Bloxburg?
Yes. Keep the patio design within a clean rectangle or L-shape that stays grid-aligned, then add steps from the door down to the patio surface using the Stairs category. If your entrance is wider than a few tiles, align the stair run to the floor tile edges so you do not get awkward half-tile landings.
What patio size should I use so the floor and wall borders line up cleanly?
You generally want to size the patio so at least one edge lines up with how your house exterior walls are placed (grid alignment). If you size it to an in-between width, the floor and wall border mismatch becomes noticeable even when you try to cover gaps with decor.
My patio edges have visible gaps, how do I fix that without redoing everything?
If you see thin gaps, the fix is to rebuild the floor area so the floor tiles extend slightly under or beyond your planned border, then re-place the wall trim last. Avoid changing the border first, because trim placement can make the gap show up more at corners.
What is the best build order for a patio so I do not have to redo work?
For the cleanest look, place the patio pieces after the floor, not before. Place your floor tiles first, then add trim and border walls, then finish with stairs (if any) and finally decor. Reversing the order often forces you to re-check edges after you move or replace floor sections.
How can I add zones (dining vs lounge) without making the patio look messy?
Use carpet pieces inside the seating zone and keep furniture on the “main” floor material. This makes the carpet read like a rug rather than a patch, and it avoids the common mistake of alternating too many materials that makes the patio feel cluttered.
What floor pattern looks best for a patio floor in Bloxburg?
If you want an intentional border or pattern, pick one primary floor color and one accent color, then keep the pattern consistent for the entire rectangle. A checkerboard works well, but random alternation usually looks accidental unless you use it as a frame around the seating area.
What patio designs should I avoid if I do not want to buy Advanced Placing or Transform Plus?
If you are using no gamepasses, avoid designs that rely on overlapping or irregular shapes. Stick to square or simple rectangles and choose a style that uses materials and trim rather than custom angles, since off-grid rotation and nudging are not available to fine-tune placement.
Can I add a patio canopy without changing the whole layout or breaking the walkway?
Yes, but keep it ground-level if you are not using Multiple Floors. Even a small canopy can change the whole vibe, just ensure the canopy does not block your door-to-patio path. Place seating and planters around the walkway first so you do not trap yourself behind decor.
How do I keep my patio from looking too expensive or overly cluttered?
A common performance mistake is building the patio larger than it needs to be, then covering most of the surface with clutter. Instead, aim for a patio that reaches the main seating and walking path, then leave a small “breathing” area. You will spend less in-game money and it will look more professional.
If I want to change my patio floor material later, what should I swap first?
If you want to replace the patio floor later, keep the layout stable first. Delete or swap in Build Mode only after you are happy with the shape, then re-apply trim and any rug-like carpet pieces. This prevents losing decorative accents when you change the underlying tiles.
Next Article
How to Make a Patio in Sims 4: Step-by-Step Guide
Step-by-step guide to build a Sims 4 patio deck, plan placement, add borders, steps, fix snapping issues, and decorate