You can absolutely build a patio directly on grass, and the process comes down to four things done in the right order: kill or remove the grass, build a compacted gravel base, install a weed barrier with proper edging, and then lay your surface material. Skip or rush any of those steps and you'll be dealing with a sinking, weedy mess within a season. Do them right and you'll have a stable, low-maintenance outdoor space that lasts for years.
How to Make a Patio on Grass: DIY Step-by-Step Guide

Nolan Lennox
6 May 2026
Decide patio size, layout, and drainage before you touch the grass
The planning stage is where most DIYers underinvest their time, and it's also where mistakes are cheapest to fix. Before you start killing turf or ordering materials, you need three things locked down: the footprint, the shape, and the drainage direction.
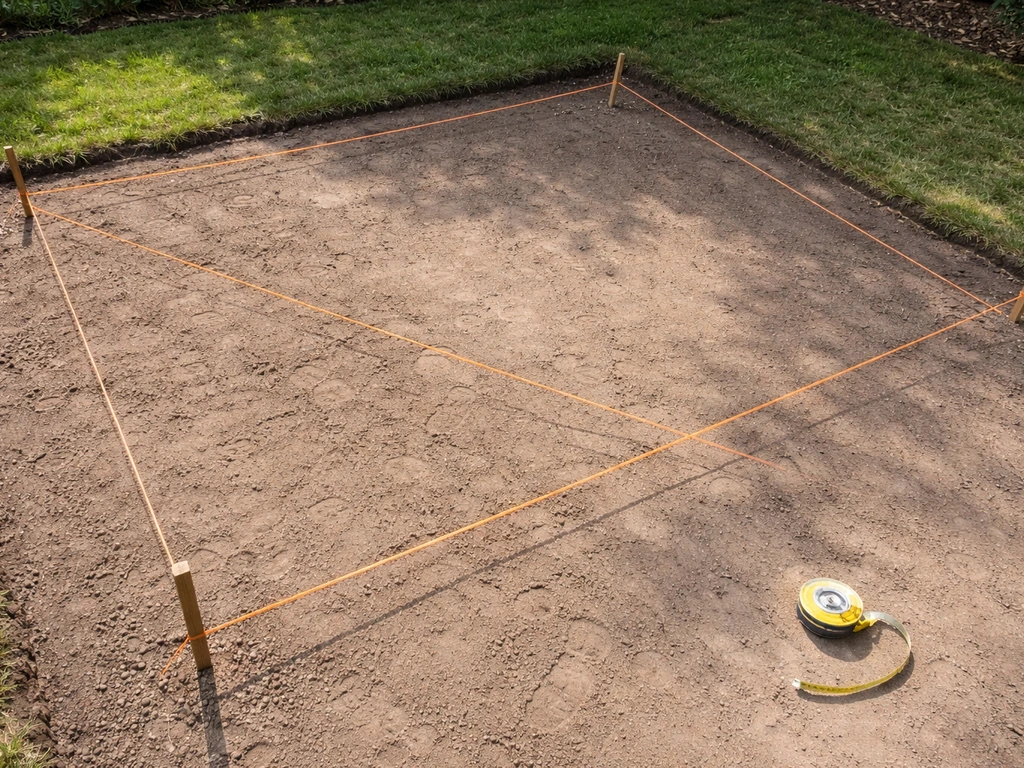
For size, a common rule of thumb is to allow at least 10x10 feet for a small seating area with two chairs and a side table, and 12x14 feet or larger if you're fitting a full dining set. Measure your furniture with some extra breathing room, then mark that footprint on the ground with spray paint or stakes and string so you can actually see it before committing. Smaller patios (think 6x8 or 8x8) are totally workable and much faster to build, which is worth remembering if this is your first project.
Drainage is non-negotiable. Your patio needs to slope away from your house (or any structure) at 1/8 inch to 1/4 inch per foot. That's roughly a 1% to 2% grade, which looks almost flat to the eye but moves water off the surface effectively. You'll build this slope into your base layer, so decide the high and low edges of the patio now. If your yard already slopes naturally away from the house, you're in luck. If it slopes toward the house, you'll need to account for that in your base grading.
Also check what's underground. blank" rel="noopener noreferrer">Call 811 (in the US) to have utilities marked before digging anything. If you're near a septic system, pause and investigate whether you're near a leach field, because building over one requires a completely different approach. Because building over a leach field can affect how wastewater is treated, it is important to check regulations and follow a professional design rather than using a standard patio base approach. With those basics confirmed, you're ready to move to the ground.
Prep the lawn: remove grass or smother it
You have two main approaches to dealing with the grass: physically removing it, or killing it in place before covering. Both work, but they suit different situations.
Physical removal (the fast way)
Cut the grass short, then use a sod cutter (rentable for around $100–$150/day) or a sharp flat spade to strip the turf in sections. You want to remove about 4 to 6 inches of depth total to make room for your base layers, so even after stripping sod you'll still be excavating some soil. For small patios, a spade and mattock are enough. For anything larger than about 10x12 feet, the sod cutter saves your back considerably. Haul the removed sod to a compost pile or dispose of it, and use a hand tamper or plate compactor to firm up the exposed soil before moving to your base layers.
Kill-and-cover (the slower but easier way)
If you're not in a hurry, you can smother the grass using a method called occultation, which just means covering it with an opaque tarp or layers of cardboard to block sunlight. A black poly tarp works well. Solarization (using clear plastic to heat and cook the vegetation) is a variation, but it requires sustained heat and works best in peak summer. Research from UMN Extension puts solarization at roughly 2 to 3 weeks to kill existing vegetation, while occultation with a solid black tarp takes about 4 to 6 weeks. After that time, the grass and any shallow weed roots will be dead and decomposing, making excavation much easier. This method is ideal if you want to minimize physical labor or if the area has particularly thick, established turf.
Either way, once the grass is handled, use a level and a long straightedge to check your excavated area for high and low spots. You want a reasonably uniform depth across the whole footprint before you start building up layers.
Base and sub-base layers: the part that actually holds everything up
This is the most important phase of the whole project. A patio laid on a weak or poorly compacted base will settle unevenly, develop rocking pavers, and collect puddles. The good news is that building a solid base isn't complicated, it just requires patience and the right materials.
The standard layer stack
For a typical DIY paver patio on a residential grass area, the layer stack from bottom to top looks like this: native soil (compacted), crushed stone sub-base, bedding sand, then pavers. Here's what each layer is doing and how thick it needs to be.
| Layer | Material | Typical Thickness | Purpose |
|---|---|---|---|
| Native soil | Existing ground | N/A (compact in place) | Foundation — must be firm and graded for drainage |
| Sub-base | Crushed gravel/road base (3/4" crushed) | 4–6 inches compacted | Distributes load, provides drainage, prevents frost heave |
| Bedding sand | Coarse concrete sand | 1 inch (25 mm) | Levels and sets pavers; not for compensating uneven base |
| Surface | Pavers, brick, flagstone, etc. | 2–3.5 inches typical | The finished walkable surface |
A few things worth emphasizing here. The sub-base gravel does the real structural work. Four inches is a minimum for foot traffic on stable soil; go 6 inches if your ground is soft or you have clay-heavy soil that drains poorly. Add the gravel in 2-inch lifts, compacting each one with a plate compactor before adding more. A plate compactor is another inexpensive rental (around $80–$120/day) and is genuinely worth it for anything beyond a very small patio.
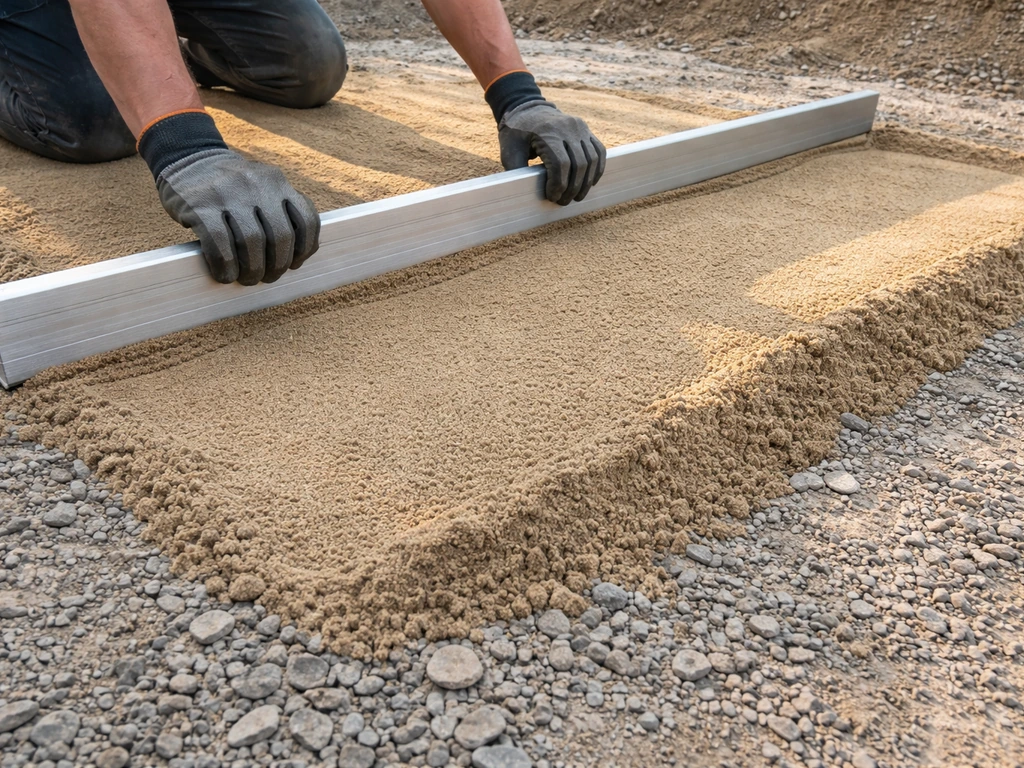
The bedding sand layer is exactly 1 inch (25 mm) thick, no more. This is a setting layer, not a leveling layer. If your compacted base is uneven, fix the base, don't try to compensate with extra sand. Bedding sand that's too thick or inconsistent in depth will allow pavers to rock and shift. Use two 1-inch diameter pipes or conduit as screed rails to pull a straight board across and achieve a perfectly flat, consistent sand surface.
For small patios, the math scales down simply: you still need the same layer depths, just over a smaller area. A 6x8 patio needs the same 4–6 inch gravel base as a 14x16, because the layers are about load bearing and drainage, not square footage.
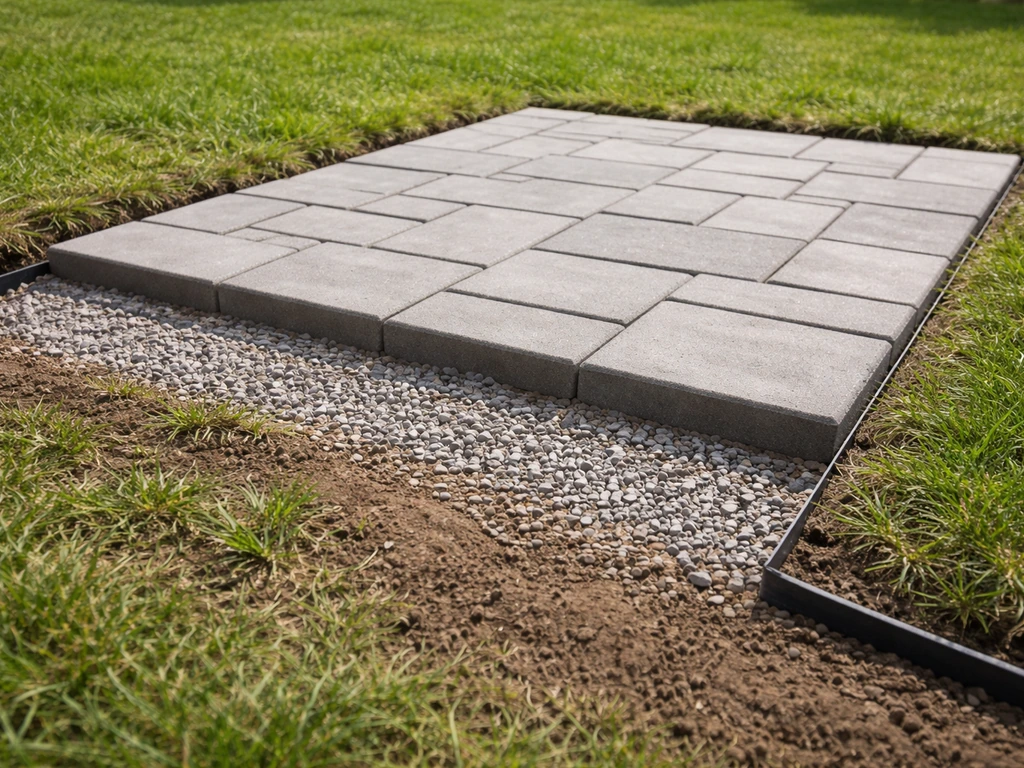
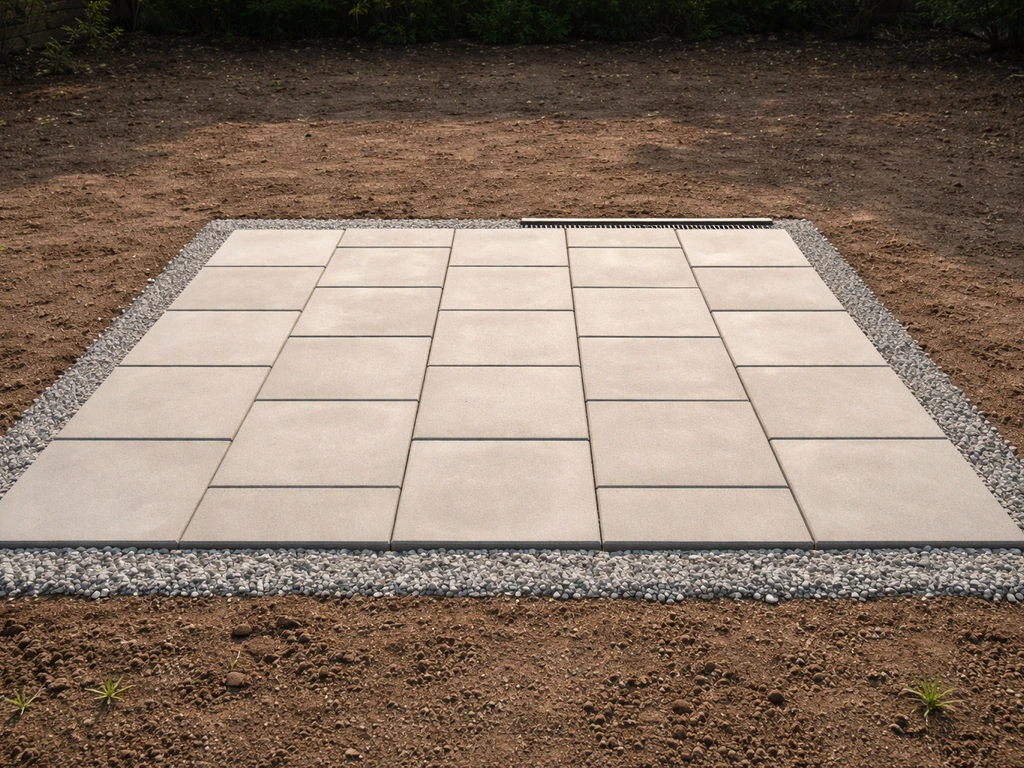
Weed barrier, edging, and keeping the edges tight
Weed control and edge restraints are two details that beginners often underestimate, and both will haunt you later if skipped.
Weed barrier placement
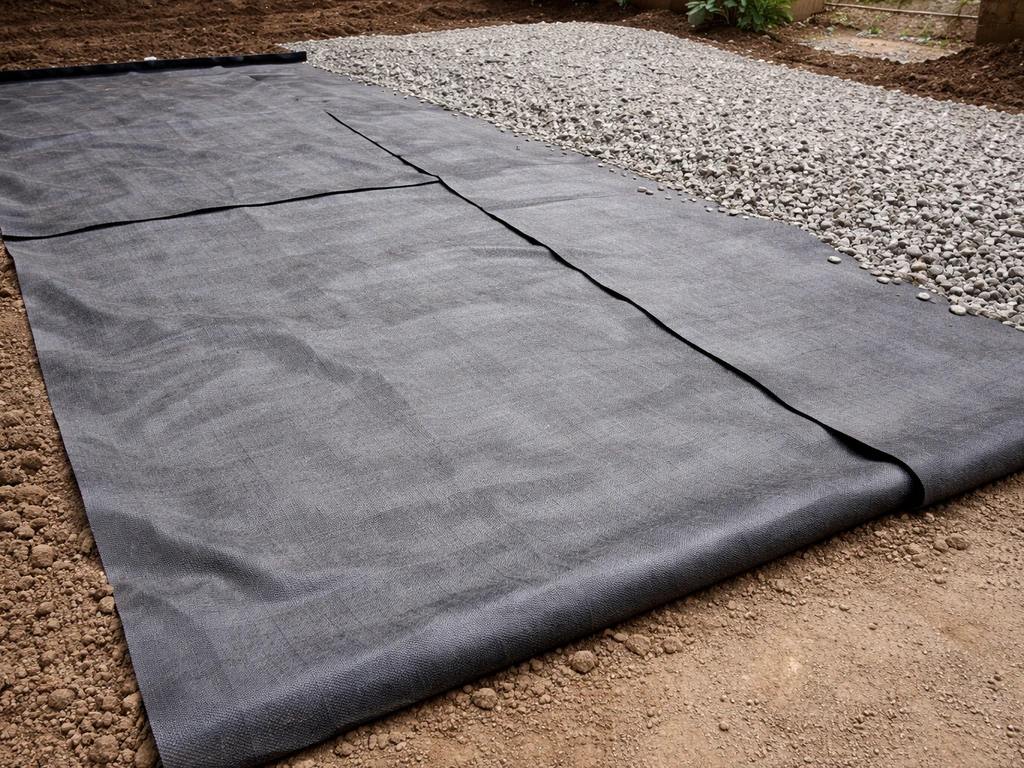
Lay a geotextile landscape fabric over your compacted native soil before you add the gravel sub-base. This fabric serves two functions: it prevents fine soil particles from working their way up into your gravel (which would weaken the base over time), and it blocks weed regrowth from below. Overlap seams by at least 6 inches and run the fabric up the sides of your excavation slightly. Don't put the fabric between the bedding sand and the pavers, that spot is for the pavers to sit directly on sand. The fabric belongs at the bottom, between soil and gravel.
Edge restraints: don't skip these
Edge restraints hold your entire patio together. Without them, the outermost pavers gradually migrate outward, the bedding sand escapes from the edges, and settlement follows. Use plastic paver edging (sold in long strips, secured with 10-inch spikes into the ground) or concrete edging around the full perimeter. The restraint needs at least 1 inch of vertical contact against the side of the paver to do its job properly. Install edging after you've laid all your pavers but before you compact the surface and sweep in joint sand. Overlap corners and cut as needed to keep everything snug.
At the boundary between your patio and the remaining lawn, a clean edge also prevents grass from creeping in over the surface. A metal or composite edging strip at the perimeter looks tidy and keeps turf where it belongs.
Choosing your material and build method
The surface material you choose shapes the whole project: how much it costs, how hard it is to install, and how it looks and holds up over time. If you want a patio over grass, your build method choices affect how you prep the lawn and what base layers you need. Here's an honest comparison of the most common DIY-friendly options for a patio on grass.
| Material | Avg. Cost (materials) | DIY Difficulty | Durability | Best For |
|---|---|---|---|---|
| Pea gravel / decomposed granite | $1–$3/sq ft | Very easy | Moderate (shifts, replenish over time) | Budget builds, temporary or casual spaces |
| Concrete pavers | $3–$8/sq ft | Moderate | Excellent (20+ years) | Most popular all-around DIY choice |
| Brick | $4–$8/sq ft | Moderate | Excellent (decades) | Classic look, especially for smaller patios |
| Flagstone (irregular) | $4–$10/sq ft | Moderate-hard (cutting/fitting) | Excellent | Natural aesthetic, larger budgets |
| Rubber or composite stepping tiles | $2–$6/sq ft | Very easy | Good for light use | Small areas, temporary setups, renters |
Concrete pavers are what I'd recommend for most first-time builders. They're uniform in thickness (typically 2-3/8 inches to 3-1/8 inches), which makes leveling and setting much more predictable than irregularly shaped stone. They interlock well, come in a variety of styles, and the installation process is well-documented. Brick is a close second for smaller patios and has a charm that's hard to match, but requires a bit more cutting precision. Gravel is the easiest and cheapest option but doesn't give you a solid, furniture-friendly surface.
If budget is the primary driver, a gravel patio with defined edging is a legitimate solution for casual use. For something more permanent and polished, concrete pavers are the sweet spot between cost, durability, and DIY-friendliness. If you want to explore the most budget-conscious approaches, there's a lot more to dig into on cheap patio builds specifically, and if you're renting or just want something you can disassemble later, a temporary patio setup using tiles or gravel is worth considering separately.
Step-by-step: building your patio on grass
Here's the full sequence for building a concrete paver patio on an existing grassy area. This works for any size, including small patios. With that approach in mind, the steps for how to build a patio deck over grass start the same way: plan the size and drainage, then prep the lawn and base. I'll note where things simplify for a smaller footprint. For help with a temporary setup, follow the same grass-removal and base-layer steps but scale the build and materials to match your timeline small patios.
- Mark your layout: Use stakes and string line to mark the exact perimeter of your patio. Check for square using the 3-4-5 triangle method (measure 3 feet along one edge, 4 feet along the perpendicular edge — the diagonal between those endpoints should be exactly 5 feet if you're square). Spray paint the outline on the grass.
- Kill or strip the grass: Remove sod to a total depth of 6–8 inches below your intended finished surface height. That depth accounts for 4–6 inches of gravel base, 1 inch of bedding sand, and the paver thickness. For small patios (under 8x10), a spade and a strong afternoon will handle it.
- Grade and compact the subgrade: Check that the excavated base slopes away from the house at 1/8" to 1/4" per foot. Use a hand tamper or plate compactor to firm the native soil. Address any soft or spongy spots by digging them out and filling with compactable gravel.
- Lay the geotextile fabric: Roll out landscape fabric across the entire excavated area, overlapping seams by 6 inches. Run the edges slightly up the sides of the excavation.
- Add and compact the gravel sub-base: Pour in 3/4-inch crushed stone in 2-inch lifts, compacting each layer. Target 4–6 inches of compacted depth. Re-check your slope after compaction using a level and tape measure. This is the most physically demanding step — a plate compactor makes it much faster.
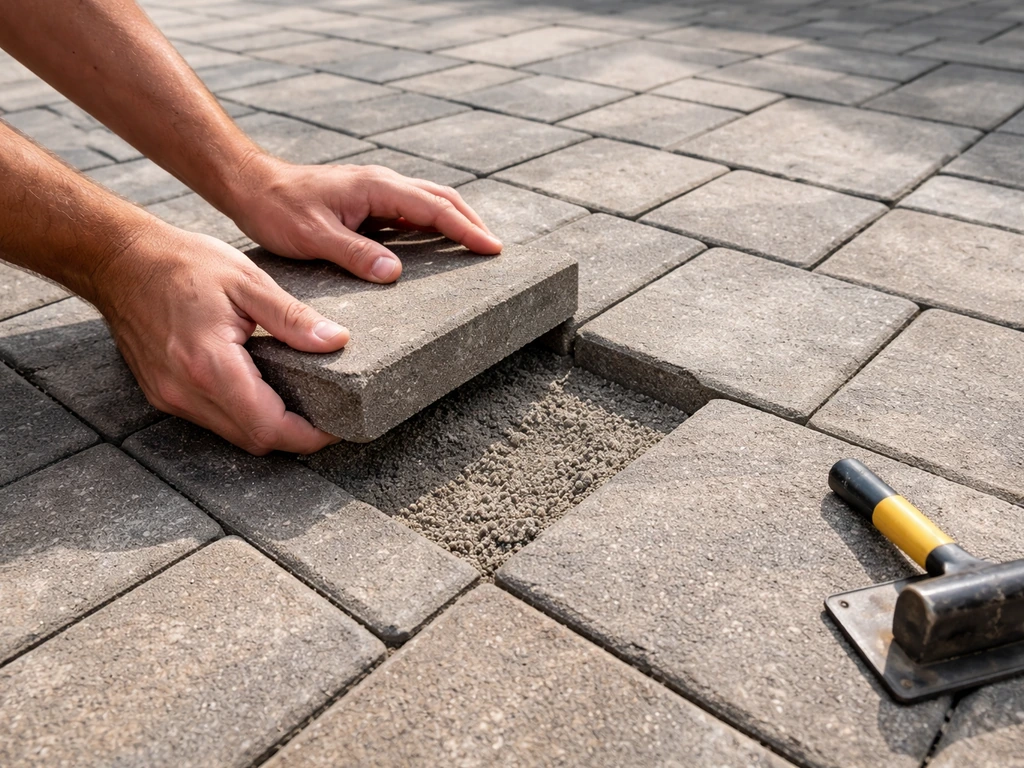
- Set screed rails and spread bedding sand: Lay two 1-inch diameter pipes or conduit across the compacted gravel, parallel to each other and spaced about 6 feet apart. Pour coarse concrete sand between them and use a straight 2x4 pulled across the rails to screed a perfectly flat, 1-inch-deep sand layer. Remove the rails and fill those voids with sand by hand, leveling gently.
- Lay pavers from a corner: Start at a corner or a straight edge and work outward in a pyramid or row-by-row pattern. Keep joints tight (most pavers have built-in spacer lugs). Use a string line stretched across the surface to keep rows straight. Check level frequently — a slight rocking paver means the sand beneath isn't quite even; lift it, add or remove a little sand, and reset.
- Cut border pavers: Mark cuts with a pencil and straight edge, then use an angle grinder with a diamond blade or a rented paver splitter for clean cuts. For small patios, you may have very few cuts — plan your layout to minimize them if possible.
- Install edge restraints: Once all full pavers are laid, spike plastic or metal paver edging around the entire perimeter, pressing it tight against the paver edges. Secure with 10-inch spikes driven into the ground every 12 inches.
- Compact the surface and sweep in joint sand: Run the plate compactor over the entire paved surface (put a rubber mat under it or use a compactor pad to protect the pavers). Then pour polymeric sand over the surface and sweep it into all the joints. Compact again lightly, then sweep in a second application of sand. Mist the surface with water to activate the polymeric binders — this locks the sand in place and resists weeds and insect intrusion.
For a small patio (say, 6x8 or 8x10), the whole project from excavation to finished surface can realistically be done in a single weekend. A larger patio (12x16 and up) typically takes two weekends: one for prep and base, one for laying and finishing.
Finishing up: leveling fixes, sealing, and troubleshooting
Leveling and jointing after installation
After your first compaction pass, walk the entire surface and press on each paver. Any that rock or feel soft underfoot need to be pulled up individually, the sand adjusted beneath them, and reset. This is tedious but normal, especially for first-time builders. The bedding sand settles slightly after compaction, so a few low spots are expected. Use a long, straight 2x4 across several pavers to identify any lips or unevenness between units.
For jointing, polymeric sand is worth the extra cost over regular sand. It binds when wet, which means it resists washout, suppresses weed germination in the joints, and deters ants. Apply it in two passes as described in the installation steps, and make sure the surface is dry before you apply it and before the final misting.
Sealing the surface
Sealing concrete pavers isn't strictly required, but it extends their life, enhances color, and makes cleaning easier. Wait at least 60 to 90 days after installation before sealing, to allow the polymeric sand to fully cure and any minor settling to occur. Use a penetrating or film-forming paver sealer applied with a roller or low-pressure sprayer on a dry day. Reapply every 2–4 years depending on traffic and weather exposure. Flagstone and natural stone may need a different sealer product, so check the manufacturer's recommendation for your specific material.
Common problems and how to fix them
- Sunken or rocking pavers: Almost always caused by inadequate base compaction or too-thick bedding sand. Pull up affected pavers, recompact the gravel, re-screed sand to 1 inch, and reset.
- Weeds growing through joints: Polymeric sand is your best preventive. For existing growth, pull weeds by hand and refill joints. Avoid herbicides that could stain the pavers.
- Water pooling on the surface: The drainage slope wasn't built into the base. This is the hardest problem to fix after the fact — in severe cases you may need to lift a section and re-grade. Prevention is much easier: check your slope at every stage during construction.
- Edge pavers shifting outward: Edge restraints weren't installed or are failing. Add new restraint material and re-spike into undisturbed ground. Make sure spikes go into the gravel base, not just loose soil.
- Sand washing out from joints after rain: Regular sand in joints (not polymeric) is the cause. Sweep in polymeric sand and activate with water, it will stay put much better.
- Patio surface heaving in winter (frost): Insufficient base depth for your climate. In freeze-thaw zones, increase your gravel base to 6–8 inches minimum. Well-draining base gravel is critical because saturated gravel heaves; dry, well-compacted gravel does not.
The most satisfying part of this project is that once it's done right, it genuinely requires almost no upkeep. A quick sweep, the occasional weed pulled from a joint, and a resealing every few years is about all it asks for. Get the base right, lock in your edges, and use polymeric sand in the joints, and you'll be enjoying that patio for a very long time.
FAQ
Can I make a patio on grass without removing all the sod?
You can reduce removal, but you still need to eliminate the grass layer and create room for the base. If you leave thick turf patches, they can decompose unevenly and cause settling or dips. For occultation, make sure the tarp covers the entire footprint plus a margin, and wait until the grass is fully dead before excavating.
How deep should I dig if my patio will have pavers, but I’m unsure about my soil condition?
Start with the recommended 4 to 6 inches of compacted gravel sub-base, plus enough excavation so the top of the pavers ends where you want it after bedding sand (exactly 1 inch). If you have soft or clay-heavy soil, plan for the deeper 6-inch gravel minimum and do more compaction passes.
What’s the easiest way to confirm my drainage slope before I build the base?
Mark the planned height at the house-side and at the far edge, then measure the difference with a level, not just eyeballing. Aim for 1/8 to 1/4 inch per foot away from structures, and remember to keep the slope consistent across the whole footprint, especially for L-shaped patios.
Do I need geotextile fabric if I’m using a thick gravel base?
Yes, it still helps even with thicker gravel. The fabric prevents soil fines from migrating up into the gravel, which otherwise can gradually weaken the base. Use full coverage on the excavated soil, overlap seams at least 6 inches, and keep the fabric out of the bedding-sand to paver contact area.
Can I use gravel instead of bedding sand under pavers?
Avoid it. Bedding sand is the intended setting layer, it helps lock pavers into a stable plane. Gravel under pavers tends to shift and creates rocking points. If your base is uneven, correct the base, do not compensate with extra sand.
How do I stop weeds if I still want the patio to be DIY and affordable?
The most effective combination is correct grass removal or occultation timing, geotextile under the gravel, and using polymeric sand in joints. Also check that edging restraints are tight to the pavers and that there are no gaps at perimeter transitions where weeds can enter.
What happens if I skip edge restraints or install them incorrectly?
You can get outward migration of the outer pavers and loss of joint sand, which then leads to spreading weeds and uneven settlement. Make sure the restraint has at least about 1 inch of vertical contact against the side of the pavers, and install it around the full perimeter so corners are fully supported.
How much compaction is enough during the gravel sub-base build-up?
Compaction should be done after each 2-inch gravel lift, then you should verify the area feels firm and does not “pump” underfoot. If pavers later rock or feel soft, it usually means a section of base was under-compacted or a low spot was missed before bedding sand was placed.
Should I compact after laying bedding sand?
No, bedding sand should be set to a flat grade using screed rails, and then pavers are placed without further heavy compaction of the sand layer. Use controlled setting steps, then compact the pavers themselves with appropriate vibration settings if your paver instructions allow it, and recheck for rocking units afterward.
Can I build a patio on grass that’s used for a hot tub or heavy items?
Plan for a stronger build than a typical seating patio. Heavy loads usually require deeper base and often additional reinforcement steps to reduce long-term settlement, even with good compaction. If you’re placing a hot tub, consider professional input on structural design and drainage details.
How long should I wait before sealing pavers, and does polymeric sand affect timing?
Wait at least 60 to 90 days after installation before sealing so everything has time to stabilize. Polymeric sand should be fully cured first, and you should only apply it when the surface is dry. If you seal too early, moisture can be trapped and may reduce sand performance.
What should I do if my pavers settle slightly after installation?
Check for localized low spots or rocking pavers with a straight 2x4 across multiple units. Pull the affected pavers, add or remove sand as needed, and reset them. If the issue is widespread, it usually indicates a base compaction or grading problem, and you may need to rework larger sections rather than just “top up” sand.
Is it better to build on grass during winter, or is timing important?
Timing matters because wet or freezing conditions make excavation and compaction less reliable. If the base or sub-base is saturated, compaction may not achieve the required firmness. Choose a stretch of weather when the ground is workable, and allow dry conditions for polymeric sand application and misting.
What’s the fastest mistake to avoid when planning a patio on grass?
Rushing the footprint and drainage decisions. If you lock in size, shape, and slope early, you can excavate to a clear grade and cut pavers efficiently. Once you start stacking layers, changes are costly because you cannot “fix” drainage with thicker bedding sand or extra joint filler.
Next Article
How to Make a Cheap Patio on Grass: DIY Steps
DIY steps to build a cheap patio on grass with gravel or pavers, smart base prep, drainage, edging, and weed control.