You can build a solid patio pond for $50 to $300 depending on size, and the key to keeping it cheap without ending up with a leaky, green swamp is simple: use a proper EPDM rubber liner with geotextile underlay, add a basic air pump with airstone for aeration, and keep the design small enough that a modest submersible pump handles filtration. That's the core formula. Everything else is optional upgrades. If you're trying to learn how to make a quick patio pond, focus on a simple layout and basic aeration first.
How to Make a Patio Pond Cheap: DIY Budget Guide

Nolan Lennox
30 Jun 2026
Cheap patio pond design basics
Before you spend anything, you need to make a few real decisions about size, shape, and placement. If you follow these planning steps, you can focus your budget on the biggest wins and learn how to make a backyard patio cheap. These choices drive nearly every other cost in the project.
Size is the biggest lever on cost. If you mean a patio makeover beyond the pond, you can use the same budget logic for redoing a patio surface redo a patio for cheap. A small patio pond in the 50 to 150 gallon range is the sweet spot for a cheap build. It requires less liner material, a smaller pump, and far less water treatment. If you want goldfish, 100 to 150 gallons works well. If you're dreaming about koi, understand that one adult koi needs roughly 250 gallons of water minimum just for basic health and stability, so koi at a beginner budget is a stretch. Stick to goldfish or a plant-only pond on your first build.
For shape, go simple. A rectangle, oval, or kidney shape is far easier to line cleanly than something with sharp corners or complex curves. Complex shapes create extra liner folds that are harder to seal and more prone to puncture. If you're placing the pond on an existing patio surface rather than digging into soil, a preformed container (like a half wine barrel, stock tank, or large planter) eliminates liner work entirely and can cost less than $80.
Placement matters more than most people expect. Pick a spot that gets 4 to 6 hours of sunlight daily if you want plants. Full sun all day fuels algae, and full shade stunts water plants. Avoid spots directly under deciduous trees since falling leaves decompose in the water and spike nutrient levels, which feeds algae. Also think about power access: you'll need an outdoor outlet within reasonable reach of a pump cord.
Low-cost pond liners and containment options
This is where most budget builds either succeed or fail. Your containment choice determines whether you'll be patching leaks six months from now or enjoying a clean pond.
| Option | Typical Cost | Durability | Best For | Main Risk |
|---|---|---|---|---|
| EPDM rubber liner (45 mil) | $0.75–$1.25/sq ft | 20+ years | In-ground or raised dug ponds | Puncture without underlay |
| EPDM rubber liner (60 mil) | $1.50–$2.00/sq ft | 25+ years | Rocky or rough subgrades | Higher upfront cost |
| PVC liner | $0.30–$0.75/sq ft | 5–10 years | Tight budgets, temporary builds | UV degradation, shorter life |
| Preformed rigid shell | $40–$120 each | 10–15 years | Above-ground or partial-dig | Limited size/shape options |
| Stock tank / galvanized tub | $60–$150 | 10–20 years | True above-ground patio ponds | Needs drainage hole sealed |
| Half wine barrel with liner | $30–$60 | 5–10 years (liner) | Decorative above-ground builds | Wood rot over time |
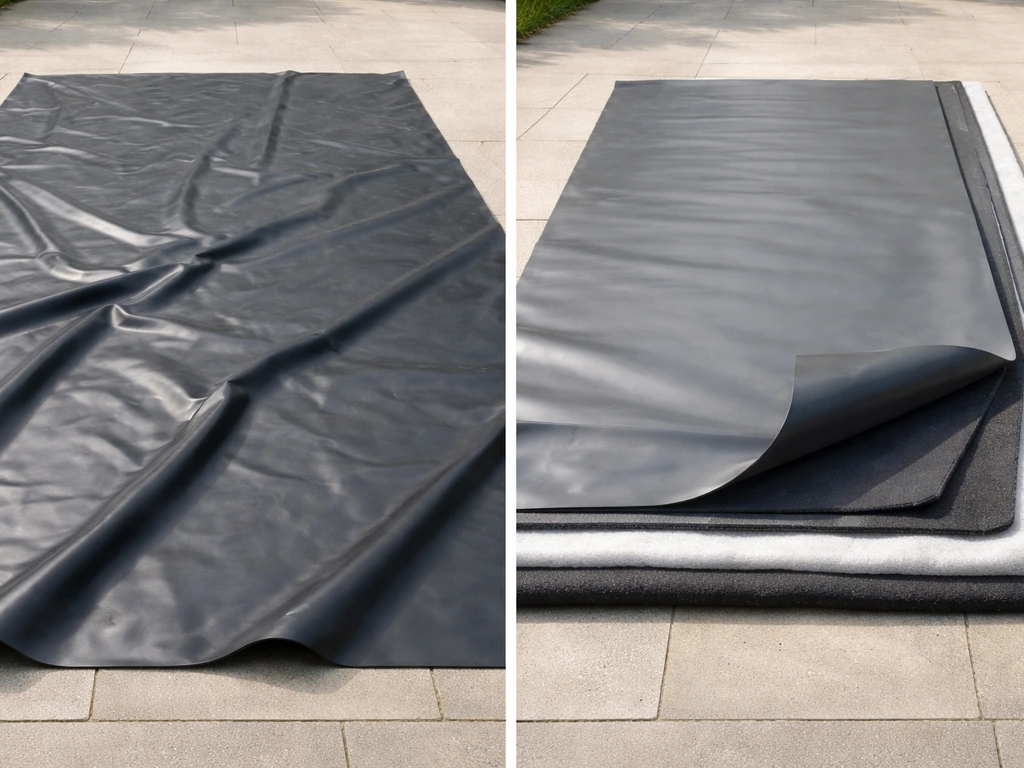
For a dug in-ground pond, 45 mil EPDM is the best budget choice. It runs about $0.75 to $1.25 per square foot for the liner material alone, flexes well into irregular shapes, and lasts decades if installed correctly. HomeAdvisor reports a wide range of pond liner prices, including a low-end cost-per-square-foot figure for general liner products that helps set expectations for a budget build. The 60 mil version offers about 30% better puncture resistance, which is worth the extra money if your subgrade is rocky or if you plan to place heavy stones directly on the liner. PVC is cheaper upfront but UV exposure breaks it down within a few years, and replacement costs quickly wipe out any savings.
For above-ground patio ponds, a stock tank, large rubber trough, or rigid preformed shell skips liner installation entirely. These are genuinely the cheapest reliable option when you don't want to dig. A 100-gallon galvanized stock tank from a farm supply store costs around $60 to $100 and needs nothing but a pump and some plants to function well.
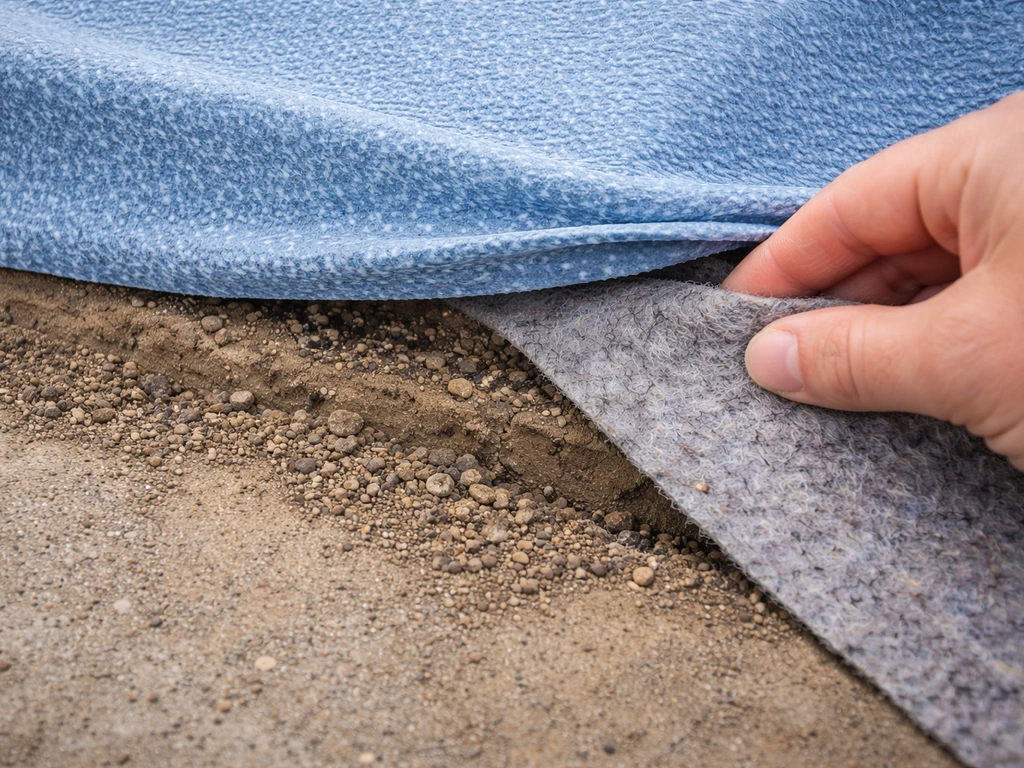
Whatever liner you choose, do not skip the geotextile underlay. This is a non-woven fabric that sits between the liner and the soil, and it is the single most important cheap insurance you can buy. A sharp stone or root hidden in the subgrade will eventually work its way into your liner. Underlay fabric typically costs around $0.10 to $0.30 per square foot and can prevent the most common cause of early liner failure. In areas where you'll place heavy or jagged rocks on top of the liner, lay a second strip of the same fabric above the liner as a rock pad.
Budget-friendly filtration, aeration, and water clarity
You need two things to keep a small pond clear: water movement and biological filtration. Everything else is nice to have but not essential at this budget.
Aeration is the cheapest and most important starting point. A basic aquarium-style air pump with an airstone costs $10 to $25 at Walmart or any pet store, and it does a solid job oxygenating a pond up to about 150 to 250 gallons. The airstone diffuses tiny bubbles through the water column, raises dissolved oxygen, and discourages the stagnant conditions that algae loves. For a patio pond, this is often all you need mechanically if you combine it with plants.
For biological filtration, a small submersible pump with a foam pre-filter is the budget workhorse. These run $20 to $50 for a unit rated for 100 to 300 gallons per hour, which is plenty for a small pond. The foam acts as both mechanical filtration (trapping debris) and a home for beneficial bacteria that process ammonia from fish waste into less harmful nitrate. This nitrogen cycle takes about 4 to 6 weeks to fully establish in a new pond, so expect some green or cloudy water during that window. It is completely normal.
If you want to DIY your filtration even further, a simple sponge filter setup works in small ponds the same way it works in aquariums. Run airline tubing from an air pump to a sponge filter submerged in the pond. Beneficial bacteria colonize the sponge, and the rising air bubbles draw water through it passively. Total cost is under $15.
What you can skip at this budget: UV clarifiers, pressurized bead filters, and protein skimmers. These are valuable in larger koi ponds but overkill for a small, plant-rich patio pond. If you have good plant coverage and a basic pump/airstone combo, your water will be clear without them.
One honest caution about floating plants: duckweed looks charming but spreads aggressively and can block light and oxygen exchange. Stick to hardy water lilies, hornwort, or marginal plants like iris and rushes for algae competition without the headaches. Hornwort in particular is a fast-growing oxygenator that directly competes with algae for nutrients.
Materials and tools list for a DIY build
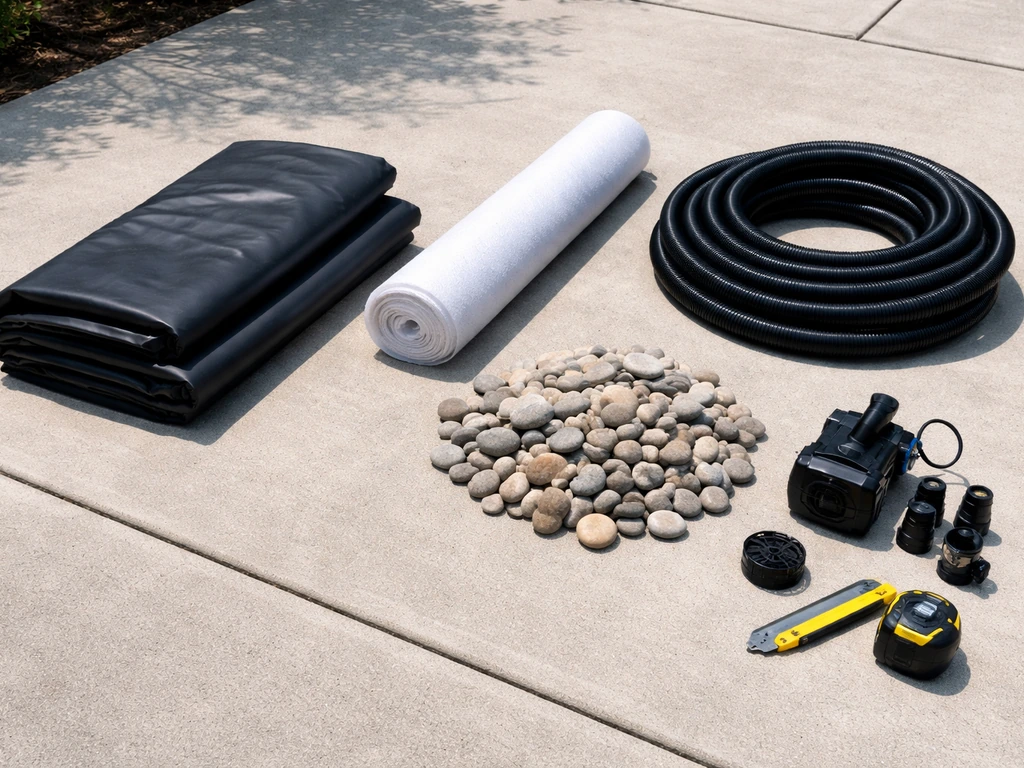
Here's what you'll need for a basic in-ground patio pond around 50 to 100 gallons. Prices are approximate.
| Item | Approximate Cost | Notes |
|---|---|---|
| EPDM liner (45 mil) | $20–$60 | Size depends on pond dimensions plus 2 ft overhang all around |
| Geotextile underlay fabric | $5–$15 | Same size as liner or slightly larger |
| Small submersible pump | $20–$50 | 100–300 GPH rating for small ponds |
| Air pump + airstone kit | $10–$25 | Basic aquarium-style unit works fine |
| Airline tubing | $3–$5 | Connects pump to airstone |
| River rocks / edging stones | $10–$30 | To hold liner edges and finish perimeter |
| Water plants (1–3 varieties) | $10–$30 | Local nursery or online; hornwort is cheap |
| Dechlorinator (water conditioner) | $5–$10 | Essential if adding fish |
| Shovel | $0 (own it) | For digging; rent if needed |
| Utility knife | $5–$10 | For trimming liner overhang |
| Garden hose | $0 (own it) | To fill pond |
| Level | $0–$15 | Ensures even water line around perimeter |
Total estimated materials for a basic in-ground build: $90 to $250. If you go the above-ground stock tank route, swap the liner and underlay for the tank itself and your total drops closer to $100 to $175 all-in.
Step-by-step build process and common DIY mistakes
- Mark out your pond shape on the ground with spray paint or a garden hose. Keep it simple.
- Dig to your target depth. For a plant-only pond, 18 to 24 inches works well. For goldfish, aim for at least 24 inches so the water doesn't heat or freeze to dangerous extremes.
- Remove every rock, root, and sharp object from the excavated walls and floor. Run your hands along the surface. This step is tedious but it is the single best thing you can do to prevent liner puncture.
- Cut and lay your geotextile underlay across the entire excavated surface, pressing it into the contours. Let it overlap the edges.
- Drape the EPDM liner loosely across the hole before filling. Do not stretch it tight. The weight of the water will pull it down into shape naturally, and stretching it first creates tension that leads to tearing.
- Begin filling slowly with a garden hose. As water weight pulls the liner down, smooth out major wrinkles by hand. Some small folds are unavoidable and fine.
- Once filled, let the pond sit for 24 hours and mark the water level. A drop of more than an inch or two suggests a leak at the liner edge or an underlay fold that is wicking water out. Check the perimeter first.
- Trim the liner overhang to leave about 12 inches beyond the pond edge. Do not cut it shorter. You need that overlap to tuck under edging stones or fold back under the lawn edge.
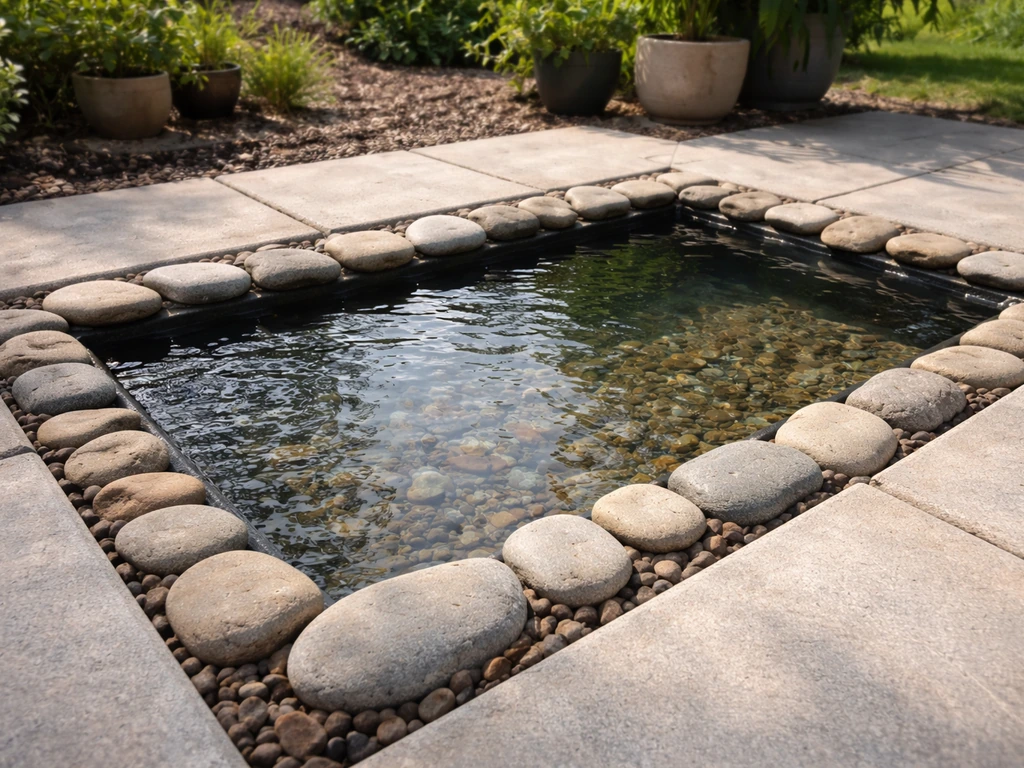
- Place edging stones or river rock around the perimeter on top of the liner edges to hold them down and hide the liner. Use 4 to 6 inches of rock depth for stability.
- Install your pump and airstone, run cords to your outdoor outlet, and add dechlorinated water if needed before adding any fish or sensitive plants.
Mistakes that cause leaks and cloudy water
- Skipping underlay: The most common reason for early liner failure. Even a smooth-looking subgrade hides sharp particles.
- Cutting the liner edges too short: Once that overhang is gone, there's no safe way to anchor the liner without patching. Always leave more than you think you need.
- Stretching the liner before filling: Let the water shape it. Filling against a pre-stretched liner creates tears at stress points.
- Backfilling or placing rocks before the pond is full: Rocks push the liner into awkward positions that can crack or puncture it. Fill first, then edge.
- Not cycling the pond before adding fish: Ammonia from fish waste will spike in an uncycled pond and kill fish within days. Run the pump with no fish for 4 to 6 weeks, or use a bacterial starter product.
- Planting too many aggressive floaters: They block surface oxygen exchange and can cause fish kills.
- Leaving liner edges exposed to sunlight: UV breaks down rubber over time. Cover all exposed liner edges with stone, soil, or wood within a few weeks of installation.
Finishing touches: edging, plants, and fish (if desired)
The edging makes or breaks how a cheap pond looks. River rock is the most affordable and forgiving option. A 4 to 6 inch depth of river rock around the perimeter anchors the liner edges, protects them from UV, and transitions cleanly from pond to patio. Home Depot’s small water gardening kit instructions also advise covering the liner with rocks or bricks once the basin is filled, and leaving an excess liner strip to protect PVC liner from UV exposure cover the liner with rocks or bricks and protect PVC from UV. You can source river rock from landscape supply yards by the bag or bucket, and small amounts often cost $5 to $20. Salvaged flat stones, broken patio pavers, or even chunks of leftover brick work just as well if you have them on hand.
For plants on a budget, hornwort is your best friend. It's a fast-growing submerged oxygenator that actively competes with algae for nutrients, and it usually sells for $3 to $8 per bunch at aquarium or pond supply stores. Add one or two marginal plants in pots on a shelf inside the pond. Water iris, cattails, and rushes are inexpensive, native-friendly, and visually striking. A hardy water lily rounds out the look and provides surface shade that further suppresses algae. Expect to spend $15 to $40 total on plants.
Fish are optional and add ongoing cost and responsibility. Goldfish are the realistic choice for a budget patio pond. A common or comet goldfish costs $1 to $5 and does fine in 100 gallons with proper filtration. Avoid koi entirely at this scale. One adult koi needs 250 gallons minimum, and even a juvenile koi will quickly outgrow a small pond. If you do add fish, cycle your pond first (4 to 6 weeks), test water parameters before stocking, and add dechlorinator every time you top off with tap water. A test kit costs about $15 and is worth every cent.
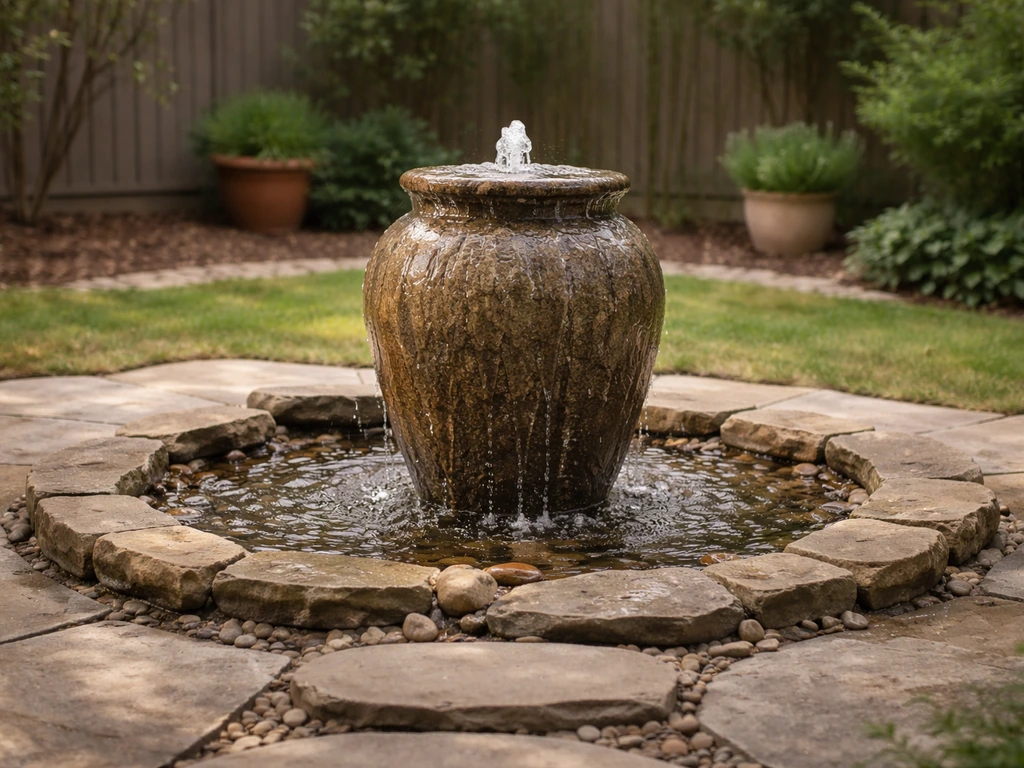
For decorative extras without spending much: a single large flat stone placed as a 'stepping' feature at one edge, a bamboo pour spout that trickles into the water (these run $15 to $30 online), or a clay pot planted with a marginal grass at the corner all look intentional and polished without adding real cost.
Maintenance plan to keep costs down over time
The cheapest maintenance strategy is prevention. A well-planted, properly aerated small pond requires maybe 15 to 20 minutes of attention per week in the warmer months and almost nothing in winter.
Weekly tasks (spring through fall)
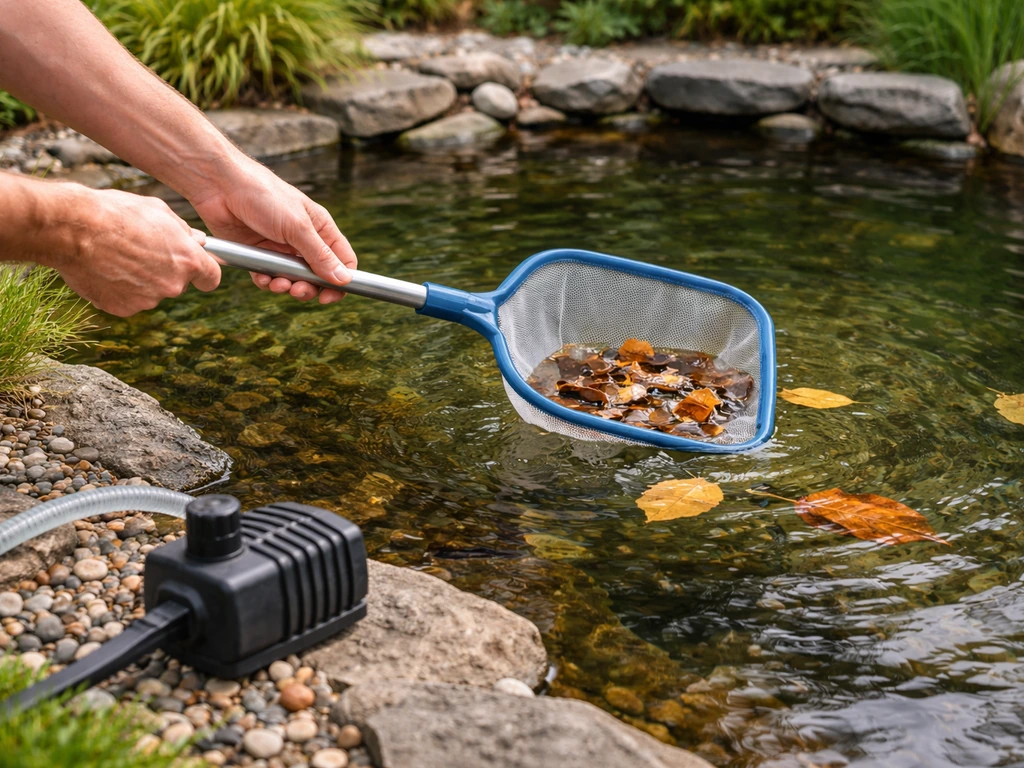
- Remove floating debris (leaves, seed pods) with a fine net before it sinks and decomposes
- Check pump flow rate — reduced flow means the foam pre-filter needs rinsing
- Top off water lost to evaporation using dechlorinated tap water
- Quickly scan the waterline for unexpected drops that could signal a liner leak
Monthly tasks
- Rinse foam pre-filter in a bucket of pond water (not tap water, which kills beneficial bacteria)
- Trim back overgrown plants to prevent them from shading out the entire pond surface
- Test water if you have fish, especially ammonia and nitrite levels
Seasonal and annual care
In fall, net the pond or remove leaves aggressively before they sink. In cold climates, cut back marginal plants and move tender tropical plants indoors. If temperatures drop below freezing, either move fish indoors or ensure a small area of the water surface stays unfrozen with a floating pond de-icer (around $20 to $30). In early spring, do a partial water change of about 25% to flush accumulated nitrates before plants kick back into growth. Pumps and airstones typically need replacing every 2 to 4 years. Budget $20 to $50 for pump replacement when the time comes, and you'll avoid the emergency scramble of dealing with dead equipment during fish season.
Cost estimate, sourcing tips, and when to upgrade
| Build Type | Estimated Total Cost | What's Included |
|---|---|---|
| Above-ground stock tank pond (100 gal) | $100–$175 | Tank, pump, airstone, basic plants, dechlorinator |
| Small in-ground EPDM pond (50–100 gal) | $150–$250 | Liner, underlay, pump, airstone, edging stone, plants |
| Mid-size in-ground pond (150–300 gal) | $250–$450 | Larger liner, better pump, more plants, optional UV clarifier |
To keep costs at the low end, source strategically. Facebook Marketplace and Craigslist regularly have used pond pumps, preformed shells, and even full pond kits for 50 to 80% off retail. Farm supply stores like Tractor Supply sell stock tanks and rubber troughs far cheaper than garden centers. For EPDM liner, buy it by the roll from a roofing supply house rather than from a pond specialty store, since it's the same material at a lower markup. Geotextile underlay fabric is also cheaper at landscape supply depots than at pond retailers. For plants, check local aquarium club swaps, Facebook plant groups, or end-of-season clearance at nurseries.
Knowing when to spend a bit more is just as important as knowing where to cut. Do not cheap out on underlay fabric. The $10 to $20 you save by skipping it is dwarfed by the cost of draining a pond, finding a leak, and replacing or patching a liner. Similarly, do not go with PVC liner if you plan to keep the pond for more than three or four years. EPDM costs more upfront but lasts two to three times longer. If your budget is truly tight, build smaller and do it right rather than building bigger with corner-cut materials.
If you're already thinking about adding a waterfall, a pump-fed spout, or a more elaborate water feature down the line, those ideas connect naturally to the same pond foundation you're building here. If you want to add a true patio water feature later, you can build on the same pump, plumbing, and waterproofing basics using this guide to how to make a patio water feature. And if cost is the central concern across your whole outdoor project, the same budget-first thinking that guides a cheap patio pond applies just as well to the patio surface surrounding it.
FAQ
How do I size a cheap patio pond so I do not outgrow the pump and filtration?
Start with your daily goal (plants only, or goldfish). If you want any fish, size for 100 to 150 gallons and choose a pump with enough flow to turn the water volume several times per day. Also account for head height if the outlet or filter sits above the pond, since that reduces flow and can lead to cloudy water even when the pump looks “rated” correctly.
Can I skip geotextile underlay if my patio pond is on a smooth patio surface?
Avoid skipping it. Even when the surface looks smooth, grit and sharp fragments can work into the liner over time, especially if you later move stones or rinse dirt off the pond. If you are using rocks for the edging, use underlay and consider a simple rock pad (extra fabric layer) wherever jagged stones touch the liner.
What is the cheapest way to prevent a liner from puncturing when I add river rocks or stepping stones?
Do not place heavy stones directly where the liner will flex, and keep the pond floor flatter than you think you need. Set stones on a thin, even layer of sand or fine gravel over the liner, then cover that with underlay if you are changing materials. Reposition anything that rocks on contact before filling, since stones that shift later are a common leak cause.
How long can a new cheap pond stay cloudy or green before I should worry?
During the 4 to 6 week nitrogen-cycle window, cloudy water is normal, especially if you start with fish or add lots of organic material. You should only troubleshoot filtration if symptoms persist well beyond the cycle, for example, no improvement after feeding less and confirming the pump/airstone run continuously.
What is the safest way to add goldfish to a budget pond without crashing water quality?
Cycle first, meaning run the pump and aeration for 4 to 6 weeks, then test water and stock gradually. Add dechlorinator for every top-off with tap water, and feed lightly for the first week. If you notice repeated cloudiness or strong odor, reduce feeding and avoid adding more fish until test results stabilize.
Do I need a waterfall or UV clarifier for a cheap patio pond to stay clear?
Usually no. For small, plant-forward ponds, aeration plus biological filtration is the core. UV clarifiers can help with recurring algae problems, but they cost more and can be unnecessary if you have enough plant coverage, gentle water movement, and a properly sized pump.
How do I choose between a dug-in EPDM build and an above-ground stock tank if my goal is “cheap”?
If you do not want excavation or liner cutting, an above-ground stock tank is often the lowest hassle and lowest risk. If you want the pond to look integrated with the patio and are okay doing prep, a dug-in EPDM liner can be cheaper long term because it can last for decades when installed over proper underlay.
How can I reduce algae in a cheap patio pond without buying extra equipment?
Manage sunlight, plant competition, and debris. Aim for 4 to 6 hours of sun, add fast nutrient competitors like hornwort, and keep leaves and sediment from accumulating. If the water is still turning green, run the aeration longer each day and remove excess gunk from the pre-filter before bacteria get overwhelmed.
What should I do if my pump and airstone lines freeze in winter?
Plan for power interruption and protected tubing. In freezing climates, keep a small area unfrozen with a floating pond de-icer and cut back feed and handling. If you keep fish, move tropical plants indoors and trim marginal plants after growth slows, so they do not become rotting nutrient sources.
How often should I replace the pump, airstone, or tubing in a budget patio pond?
Expect wear on the mechanical parts, especially air systems. Pumps and airstones typically need replacement every 2 to 4 years depending on run time and water conditions. To avoid downtime, keep a spare airstone (cheap) and clean the pump intake regularly so the pump does not run harder than necessary.
Where is the biggest “hidden cost” in a cheap patio pond build?
Leaks and poor planning are the main budget killers. The cost of draining, finding punctures, and redoing liners far exceeds any savings from skipping underlay or choosing a weaker liner. If you are unsure about liner material or placement, make the pond smaller rather than using sharper-edged materials or overly complex shapes.
Is it okay to use duckweed in a budget patio pond?
It is usually a bad choice for cheap maintenance. Duckweed spreads quickly, can block light and oxygen exchange, and may force you to net and thin it constantly. If you want easy coverage, prefer water lilies for shade, plus submerged oxygenators like hornwort and a couple of marginal plants for balance.
What is a realistic weekly maintenance routine for a cheap patio pond?
In warm months, plan on 15 to 20 minutes weekly. Net leaves early, check that the air pump is bubbling properly, and rinse or clean any foam pre-filter elements based on how much debris you see. In spring, do a partial water change about 25% to reduce accumulated nitrates before plant growth accelerates.
Next Article
How to Make a Patio Water Feature Step by Step
Step-by-step DIY guide to build a patio fountain, from planning and materials to plumbing, leak testing, and winterizing