Styling a patio comes down to three things done in order: pick a clear style direction, plan how the space is zoned, and then layer in furniture, color, lighting, and greenery so everything feels intentional rather than thrown together. You don't need a designer or a big budget. You need a plan, a few good decisions made early, and a willingness to move things around until they look right.
How to Style a Patio Step by Step for a Finished Look

Nolan Lennox
14 May 2026
Start with a style direction before you buy anything
The biggest mistake people make is buying pieces they like individually without a unifying direction. Then they wonder why the space feels scattered. Nailing a style direction first means every purchase decision has a filter to run through.
Three styles work especially well for DIY patio projects and are easy to execute without professional help: modern minimalist, coastal retreat, and rustic farmhouse. Modern minimalist leans on clean lines, neutral tones, and very little visual clutter. Coastal retreat uses light, refreshing colors like blue, aqua, white, and soft greens, paired with natural materials like wicker and rattan. Rustic farmhouse mixes warm wood tones with classic furniture silhouettes and a relaxed, lived-in feel. A newer hybrid worth considering is coastal farmhouse, which blends beachy colors and a relaxed vibe with more structured shapes like Adirondack profiles. Boho is another option if you love layering patterns, colorful cushions, and throw pillows for an eclectic, maximalist look.
To lock in your direction, pull three to five photos that represent what you want. Look for common threads: are the tones warm or cool? Are the lines clean or organic? Is the furniture heavy and substantial or light and airy? That common thread is your style direction. Write it down in one sentence, something like: 'Coastal retreat with wicker furniture, white and aqua textiles, and warm Edison lighting.' That sentence becomes your decision filter for every purchase that follows.
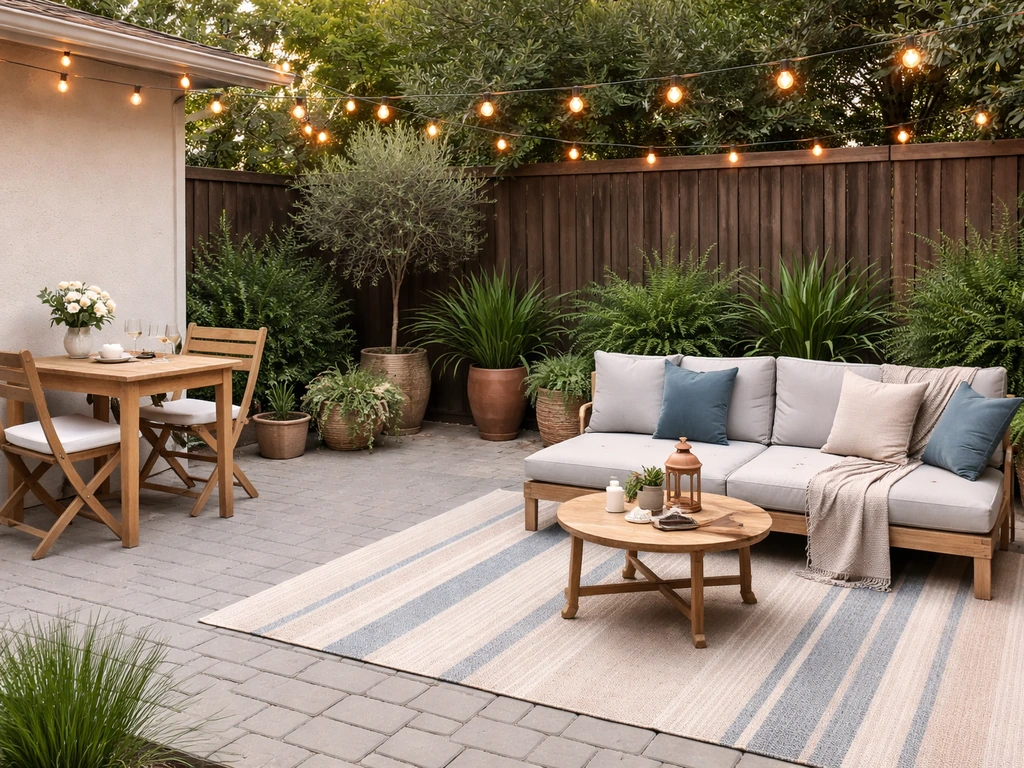
Zone the space before you place a single piece of furniture
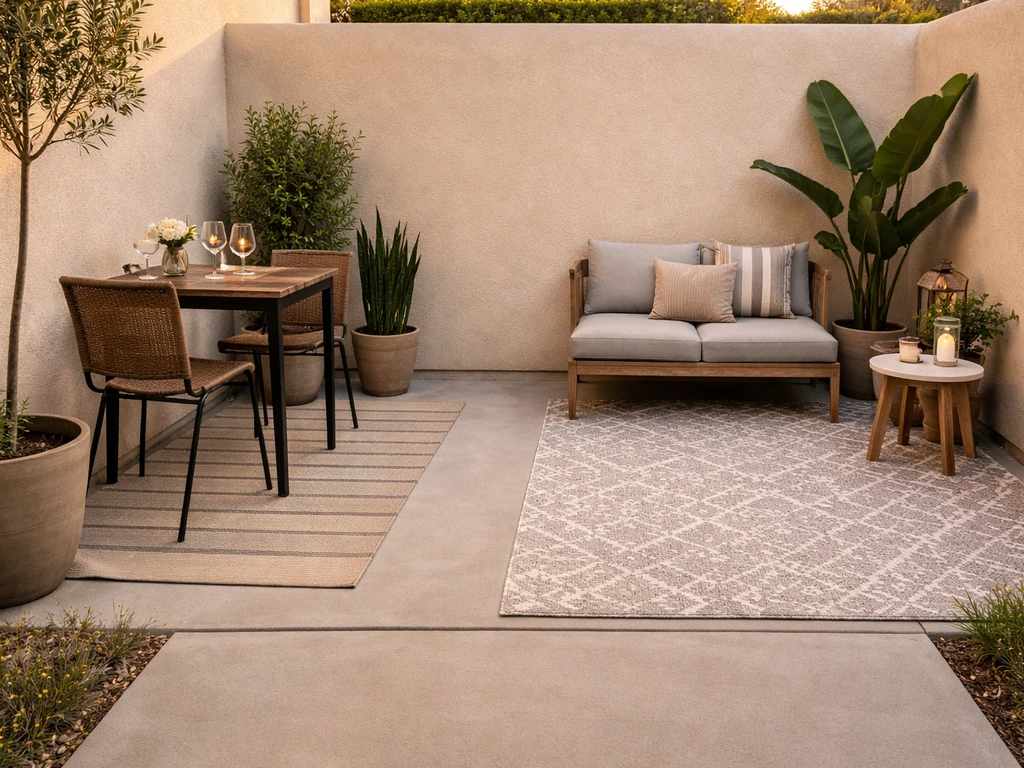
Even a small patio benefits from defined zones. Zones give the space purpose and make it feel designed rather than accidental. The most common zones are: a dining area (table, chairs), a lounge or seating area (sofa, chairs, coffee table), and a pathway or transition zone that connects entry points to the space without cutting through the functional areas.
For spacing, leave at least 60 inches of clearance between furniture groupings and any entry or exit point so people aren't squeezing past chairs to get in and out. Between seat backs and walls or edges, aim for at least 18 inches of clearance, or 36 inches if anyone using the space needs wheelchair access. These aren't arbitrary numbers. Getting them wrong means your styled patio is also an annoying patio to actually use.
Sketch your zone layout on paper before moving any furniture. Mark where the door is, where the sun hits hardest in the afternoon, and where you want shade. Put the dining zone closest to the kitchen door for convenience. Put the lounge zone where it gets the best view or the best afternoon shade. Keep pathways along edges so they don't interrupt the zones. Once you have a sketch you like, tape it out on the actual surface with painter's tape before committing to heavy furniture placement.
How zoning changes by patio surface
Your surface material affects how you zone. On a solid surface like concrete or brick pavers, zoning is straightforward: use an outdoor rug to visually anchor each zone and you're done. On a gravel patio, furniture leg stability becomes a real issue since legs sink into loose aggregate. A gravel grid system installed under the surface solves this by stabilizing the aggregate and giving furniture legs something firm to rest on.
If you're styling a gravel patio without a grid, focus heavier furniture on any solid edges or stepping stone areas and keep lightweight pieces on the gravel. On a wood or composite deck, you have the most flexibility for furniture arrangement but need to be careful about heavy planters and water pooling under rugs.
Choosing furniture and surfaces that actually fit
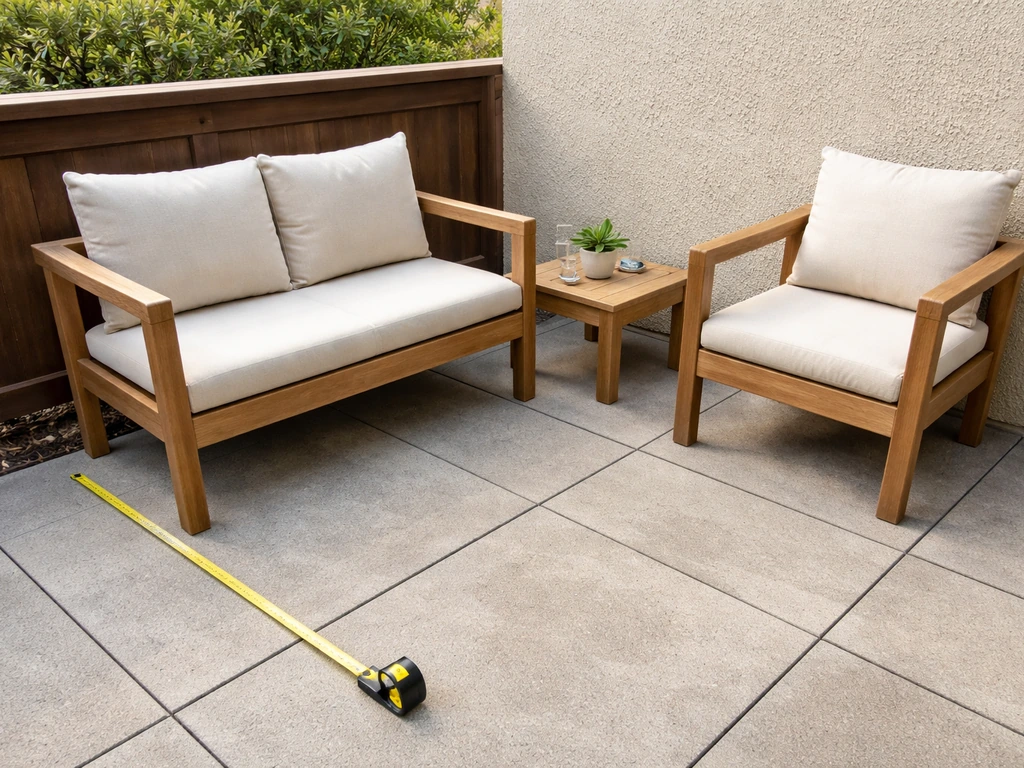
Furniture scale is where most people go wrong. A loveseat and two chairs meant for an indoor living room will dwarf a 10x12 patio and leave you with no walking room. Before you shop, measure your zones from the tape layout you did earlier and write down the maximum footprint each furniture piece can have.
For material durability, teak is one of the best performers for outdoor furniture because its natural oil content and tight grain structure resist moisture and weather without constant maintenance. It does weather to a silver-gray over time if left untreated, which some people love and others hate. If you want to keep the warm honey color, apply a teak sealer once a year. For a lower-cost option, powder-coated aluminum frames with Sunbrella-type cushions are hard to beat. Sunbrella fabrics are 100% solution-dyed acrylic, which means the color runs all the way through the fiber rather than sitting on the surface, making them genuinely fade-proof, water-resistant, and stain-resistant. That matters a lot after two or three summers.
| Material | Durability | Maintenance | Best For | Rough Cost Range |
|---|---|---|---|---|
| Teak | Excellent | Low to medium (seal annually to preserve color) | High-traffic dining and seating areas | $$$ (higher upfront, long lifespan) |
| Powder-coated aluminum | Very good | Low (wipe clean) | Modern or coastal styles, any climate | $$ (mid-range, lightweight) |
| Wicker/rattan (resin) | Good | Low | Coastal and boho styles | $ to $$ (wide price range) |
| Solid teak alternatives (eucalyptus) | Good | Medium (oil annually) | Farmhouse and rustic styles | $$ (more affordable than teak) |
| Wrought iron | Excellent | Medium (watch for rust chips) | Traditional and farmhouse styles | $$ to $$$ |
For outdoor rugs, size matters more than pattern. A dining area rug should be large enough that chairs stay on the rug even when pulled out. A standard patio dining set typically needs an 8x10 or 9x12 rug, with the goal of having at least 24 inches of rug extending beyond each side of the table so chairs land on the rug when someone sits back.
For a lounge zone, leave about 18 inches of open hard surface around the rug border so it doesn't feel like the rug is eating the whole space. To keep outdoor rugs from blowing away or shifting, use a waterproof non-slip rug pad underneath and add rug gripper tape around the edges. On a very windy site, furniture weight alone often isn't enough.
Color, materials, and textures that make it feel cohesive
Once your style direction is set, color is how you make the space feel pulled together rather than random. Pick a base color (usually a neutral like white, charcoal, natural wood, or concrete gray), one accent color, and one texture material. That's a complete palette for most patios. For a coastal look: white base, aqua or navy accent, wicker texture. For modern minimalist: charcoal or concrete gray base, a single warm wood accent, smooth powder-coated metal. For rustic farmhouse: natural wood base, terracotta or sage accent, woven or linen textures.
Repeat each element at least twice or three times across the space so the eye has something to follow. If your cushions are navy, bring navy in again with a throw or a planter pot. If you have a rattan chair, add a rattan lantern or woven basket. This repetition is what makes spaces look styled rather than decorated.
Outdoor textiles, cushions, and rugs take a beating, so the material you choose for each actually affects how your color palette holds up over time. Solution-dyed acrylics (like Sunbrella) hold color better than cheaper dyed fabrics that fade in two seasons. On a brick or warm-toned paver surface, cool-toned textiles like blue or gray create a nice contrast. On concrete, warmer tones like terracotta, sage, or warm white soften what can feel like a cold base. On wood or composite decking, almost any palette works, but very dark textiles can emphasize heat on a sunny deck.
Lighting for day-to-night appeal

Lighting is the upgrade that makes a styled patio feel truly finished, and it's one of the highest-return DIY moves you can make. The target color temperature for outdoor ambiance is 2700K to 3000K, which is a warm, soft white. Anything cooler than that looks clinical and harsh. Don't mix color temperatures across your fixtures because the contrast looks jarring once it's dark.
String lights are the single easiest win. Hang them about 8 to 10 feet above the ground for comfortable overhead clearance, and space bulbs roughly 3 to 4 feet apart for a balanced glow without dark gaps. They run on either a low-voltage transformer (12V, stepping down household current) or solar panels with built-in batteries. Solar is simpler to install with no wiring, but low-voltage transformer setups tend to be more reliable in cloudy climates where solar panels don't always charge fully.
For pathway lighting between zones or along edges, space fixtures about 6 to 8 feet apart for a consistent pool of light without harsh bright spots. Use fully shielded, low-to-the-ground fixtures that direct light downward rather than outward. Unshielded fixtures create glare and light spill that actually makes the space harder to see in rather than easier. Solar pathway lights are a solid budget option here; space them 3 to 4 feet apart for adequate coverage.
For a layered lighting effect, combine three levels: overhead (string lights or a pendant if you have a covered structure), task or accent (wall sconces or lanterns near seating), and ground-level (path lights or uplighting on planters). You don't need all three, but two levels makes a big difference over a single overhead source.
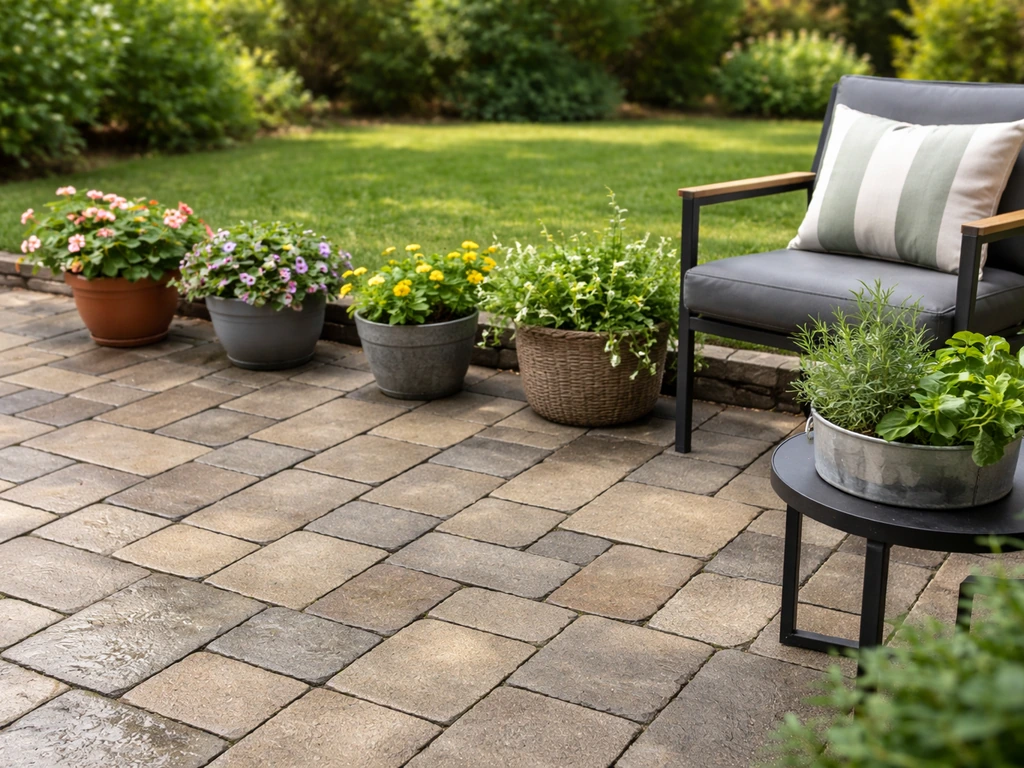
Greenery, planters, rugs, and accessories that work outdoors
Plants do more heavy lifting in a styled patio than almost any other element. They add scale, soften hard edges, bring color, and make the space feel alive. The key is using planters that are sized correctly and placed with intention rather than scattered randomly.
For planter sizing, choose a pot at least 2 inches wider than the plant's current container to give roots room to grow. For larger perennials or shrubs that will anchor a corner of the space, go with at least a 5-gallon container so there's enough soil volume to retain moisture between watering. Smaller accent plants in 1-gallon pots work well grouped in threes on a side table or step.
Use planters to define zones and create visual anchors. A pair of tall planters flanking an entry or the edge of the dining zone acts like a natural boundary without blocking sight lines. Trailing plants like sweet potato vine or creeping jenny soften planter edges and add a lush, layered look. For a low-maintenance approach, ornamental grasses and succulents handle heat and occasional missed watering better than most flowering plants.
Beyond plants, outdoor rugs and accessories do the work of tying zones together visually. A outdoor rug under the lounge zone anchors the seating arrangement the same way a rug does in an indoor living room. Throw pillows in your accent color are the fastest way to connect furniture pieces to your overall palette. Lanterns, candle holders, and decorative trays on coffee tables add the finishing layer. Keep accessories to odd numbers (one, three, or five groupings) for a more natural, curated look.
If your patio is more of a work in progress or you're dealing with an unattractive surface you haven't addressed yet, some of these same moves, like large planters, a bold outdoor rug, and a pergola or shade sail overhead, can do a lot to shift focus away from the surface itself. Covering or transforming an ugly base is a related challenge that often goes hand in hand with styling.
Covering or transforming an ugly base is usually the first step in how to make an ugly patio pretty. If you're wondering how to cover an ugly patio, focus on zoning, anchoring rugs, and using planters or a shade sail to pull attention away from the surface Covering or transforming an ugly base is a related challenge that often goes hand in hand with styling. .
Budget-friendly moves and an action checklist to get it done
You don't have to do everything at once or spend a lot to get a styled result. The highest-impact, lowest-cost moves in order are: an outdoor rug to anchor a zone ($50 to $150 for a quality 8x10), string lights for evening ambiance ($30 to $80 for a 50-foot run), and two or three large planters with plants ($60 to $120 total). Those three things alone can transform a bare patio into something that looks intentional.
For context on what full surface work costs if you're starting from scratch: a gravel patio is the most affordable base, since gravel is lower cost and easier to DIY than paved options (one ton of gravel covers roughly 80 to 100 square feet at 3-inch depth). Poured concrete runs around $11 per square foot installed. Brick pavers come in at roughly $14 to $28 per square foot installed, and full paver installs can reach $10 to $50 per square foot depending on complexity. Styling on top of an existing surface costs far less since you're working with what you have.
Your patio styling action checklist
- Write your one-sentence style direction and keep it as your shopping filter.
- Measure your patio and sketch zone layout on paper, marking the door, sun path, and desired zones.
- Tape out furniture zones on the actual surface with painter's tape and walk through the layout before buying.
- Choose furniture pieces that fit the zone footprints and match your style direction. Check clearances: 60 inches from entry points, 18 to 36 inches behind seat backs.
- Select an outdoor rug for each zone: 8x10 or 9x12 for dining, sized to keep chairs on the rug when pulled out.
- Buy a non-slip waterproof rug pad and rug gripper tape to keep rugs from shifting.
- Choose a three-part color palette: one base, one accent, one texture material. Repeat each at least twice across the space.
- Select outdoor cushions in solution-dyed acrylic fabric for longevity and color retention.
- Install string lights at 8 to 10 feet height with bulbs 3 to 4 feet apart. Target 2700K to 3000K warm white.
- Add pathway or accent lighting using shielded, downward-facing fixtures spaced 6 to 8 feet apart.
- Place large planters (5-gallon minimum for anchoring plants) at zone boundaries and entry points.
- Add throw pillows, lanterns, and small accessories in odd-number groupings to finish each zone.
- Step back and photograph the space. Adjust anything that looks cluttered or out of place before calling it done.
The goal of all of this isn't perfection, it's cohesion. If you’re wondering how to make a patio look nice fast, focus first on cohesion, then add defined zones and a repeated palette styled patio. A space that has a clear style direction, defined zones, and a repeated color palette will always look more finished than one loaded with expensive pieces that don't relate to each other. Start with the checklist items that have the biggest visual impact for the least money, get those in place, and add layers from there. Most patios can look genuinely styled in a single weekend once you have the plan.
FAQ
How do I choose between modern minimalist, coastal, rustic farmhouse, and boho if I like bits of each?
Pick one “anchor” style first (the one that matches your furniture shapes and dominant tones), then borrow only one secondary feature from a second style (like coastal colors or boho patterns). If you mix two anchors, the patio usually starts to look busy even when the colors are nice.
What if my patio gets low sun or mostly shade, how should I adjust the styling plan?
Use lighter textiles and brighter planters in shaded areas because contrast will disappear faster. For plants, prioritize shade-tolerant options, and when placing lighting, rely more on wall or lantern/task lighting since string lights alone can look dim under heavy shade.
How can I style a very small patio without it feeling crowded?
Stick to one seating zone plus a narrow “landing” spot near the door (a bistro set or a compact loveseat). Choose an outdoor rug that fits the seating footprint, not the whole patio, and keep accessories minimal (odd-number groupings, but only one or two focal points).
Do I need an outdoor rug if I already have patio pavers or concrete?
You usually need the rug for visual zoning, not for comfort. If your patio surface is already highly patterned or uneven, go for a simpler rug with a non-slip pad so it anchors each zone without fighting the ground’s texture.
What size outdoor rug should I buy if my dining table is rectangular but seating includes benches?
Measure from the furthest chair or bench extension point, then size the rug so at least 24 inches of rug remains beyond both sides the seating swings into. For bench seating, add extra allowance on the side where people pull chairs out or shift positions to stay on the rug.
How do I prevent patio furniture from sliding on an outdoor rug?
Use a waterproof non-slip rug pad, then add rug gripper tape around the rug edges. For lightweight chairs, place felt or rubber feet only on the furniture contact points, and consider slightly heavier chair bases if sliding persists after wind gusts.
What’s the best way to coordinate colors if my cushions, furniture, or pavers already have strong tones?
Treat the existing strong element as your base. For example, if your pavers are warm, choose cooler textiles as accents and repeat that accent color at least twice (cushion plus planter or throw plus lantern) so the palette still feels intentional.
Should I match metal finishes (black, bronze, stainless) across the patio?
Match finishes when they are your primary visual elements, but you can safely mix if you repeat one finish consistently two or three times. A common approach is to choose one dominant metal for frames and lighting, and allow a second metal only in small accessories like trays or candle holders.
How do I avoid glare and harsh spots with outdoor lighting?
Use fully shielded fixtures and direct light downward. Place pathway lights slightly farther apart if you see bright pools, and avoid pointing lights toward reflective surfaces like glossy cushions or light-colored furniture backs.
Can I use solar lighting, and when are they likely to disappoint?
Solar usually works best when the patio gets strong direct sun most of the day. If your space is shaded, use low-voltage wired lighting for reliability, and consider solar only for accent points where perfect brightness is less important.
How do I style around a hot spot in the afternoon, like near a grill or south-facing wall?
Create a clear “heat-friendly” zone with materials that tolerate sun and reduce glare, like solution-dyed cushions and light-colored rugs. Place heavier furniture near the heat source for stability, and use planters or a shade sail to soften the harshest angle.
What’s the easiest way to anchor plants without making planters look random?
Use planter placement to define boundaries: a pair flanking an entry or the end of a dining zone works like built-in architecture. For the rest, group smaller planters in threes on a side table or along one edge, and keep at least one taller anchor plant per grouping.
How often should I reseal or maintain teak if I want to preserve its warm color?
Plan on applying teak sealer about once per year if you want to maintain the honey tone. If you are in full sun, you may need earlier touch-ups, and if you don’t seal, expect it to drift toward a silver-gray finish over time.
What if my furniture scale is wrong after I place everything, can I fix it without buying new pieces?
Yes, by re-zoning and re-anchoring. Swap to a larger outdoor rug to visually “pull” the group together, reposition seating closer to the rug center, and add a tall planter or lantern to balance the height. If you lack walkway clearance, remove one piece from the seating set rather than trying to squeeze it in.
What are the fastest, lowest-cost upgrades if my patio already has furniture?
Start with cohesion moves: add or replace the outdoor rug for zoning, introduce string or lantern lighting for warmth, and add two large planters with anchored greenery. These changes alter the whole look even when your existing furniture stays put.
Next Article
How to Make a Patio Look Nice: Step by Step DIY Plan
Step-by-step DIY plan to make your patio look nice fast, with cleaning, repairs, paver upgrades, and a garden style make