You can build a stable gravel patio on a slope by cutting the ground level (or terracing it), laying a compacted gravel base over geotextile fabric, and locking everything in with firm edging or a small retaining wall on the downhill side. Done right, it handles rain without washing out or migrating. Skip any of those three steps and you'll be raking gravel back uphill every spring.
How to Build a Gravel Patio on a Slope: DIY Guide

Nolan Lennox
28 Jun 2026
I've built several of these on ground that ranged from a gentle 5% lean to a chunky 15% drop, and the process is pretty consistent once you understand what's actually fighting you: gravity pulling gravel downhill, water channeling underneath it, and freeze-thaw or heavy rain undermining the base. Everything in this guide is aimed at defeating those three problems.
Assess slope, drainage, and patio layout
Before you touch a shovel, walk the site after a rain and watch where water actually goes. That tells you more than any measurement. You want the finished patio to drain away from the house at a minimum of 1/4 inch per foot (about 2%) across its full length. That's the widely used standard for outdoor surfaces, and it's enough to move water without being visibly tilted. Some sources allow 1/8 inch per foot as a minimum, but in my experience that's too flat once the surface settles a bit after the first winter.
To measure your existing slope, drive two stakes into the ground at the uphill and downhill ends of your planned patio. Run a string line between them and level it with a line level (a $3 bubble tool that clips onto the string). Measure the vertical drop from the leveled string down to the ground at the downhill stake, then divide that number by the horizontal distance between the stakes. Multiply by 100 and you have your percent slope. A 3-inch drop over 10 feet is 2.5%, for example, which is very workable.
Once you know your slope, decide on your approach. For slopes under about 5-6%, you can often grade the whole area flat (or close to it) by cutting the high side and building up the low side slightly, then relying on the patio's own built-in drainage pitch. For steeper slopes, terracing is almost always the better call: cut a level pad into the hillside, use the removed soil to backfill elsewhere, and put a modest retaining edge or wall on the downhill side. If you’re wondering how to build a patio on a hillside, this approach to grading, drainage, and containment is the same core process that keeps the surface from washing out. Trying to fight a 15% slope with just edging is how you end up with a lumpy mess two seasons later. Also think about where the water leaving your patio will go. You don't want it pooling at a fence line or flowing toward a neighbor's yard. Plan a path for runoff, whether that's into a lawn, a planted border, or a swale, before you start digging.
For layout, mark your patio corners with stakes and string. On a slope, square is harder to eyeball than on flat ground, so use the 3-4-5 triangle method to check your corners are 90 degrees: measure 3 feet along one side, 4 feet along the adjacent side, and if the diagonal between those two points is exactly 5 feet, your corner is square. Keep the shape simple on a first build. A rectangle is much easier to edge and drain than an L-shape or curve on uneven ground.
Permits, site rules, and safety checks before you dig
Call 811 (in the US) before any digging. Seriously, just do it. It's free, it's the law in most states, and utility lines are buried at surprisingly shallow depths in residential yards. You call, they come out and mark the lines, and you avoid cutting through a gas or electric line. In the UK the equivalent is contacting your utility providers directly or using a cable avoidance tool if you're doing this professionally.
For a simple gravel patio, most municipalities don't require a building permit. Gravel is permeable, which actually works in your favor in many areas: in the UK, for instance, you generally don't need planning permission for permeable surfacing like gravel on a front garden as long as rainwater drains to a lawn or border naturally. But the moment you add a retaining wall, the rules change. Many jurisdictions require a permit for retaining walls over a certain height, often 3 or 4 feet, and some require one for any wall on a slope that affects drainage. Portland, Oregon, for example, has specific permitting rules for residential retaining walls that include drainage requirements. Portland’s residential permitting guidance also includes permit conditions for retaining walls that relate to drainage requirements on slopes Portland’s residential permitting guidance includes drainage requirements. Check with your local building department before you build anything structural.
A few more safety points worth taking seriously: if you're cutting into a slope, the excavation can become unstable. You're unlikely to be digging deep enough for full OSHA trenching rules to apply (those kick in at 5 feet), but a wall of saturated soil can collapse at much shallower depths, especially on a hill. Keep excavations as shallow as possible, don't undercut the hillside, and never stand in an unshored vertical-walled cut. Also note where your excavated spoil is going. Don't pile it directly uphill of where you're working.
Excavation and grading on uneven ground
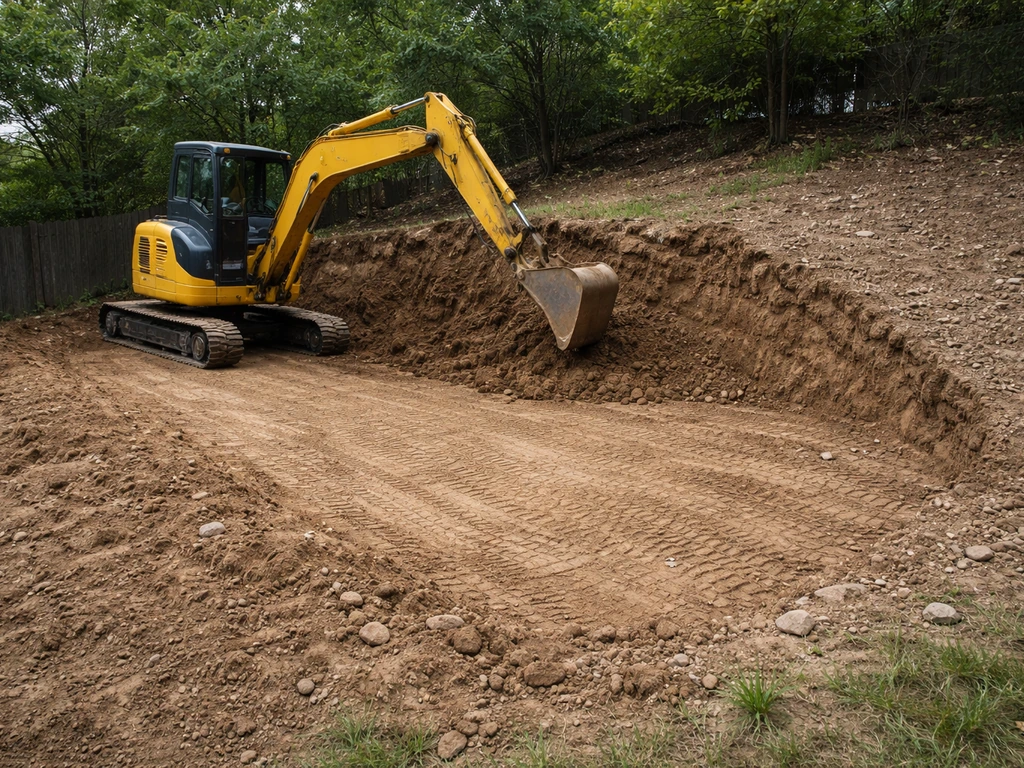
The goal of excavation here is to create a level (or gently pitched) pad to work from. On a slope that means you'll be digging more on the uphill side and barely touching the downhill side, or in steeper cases, cutting the whole area into a proper terrace.
Start by removing all vegetation, roots, and organic material from the entire patio footprint. Grass and organic matter compress and decompose over time, which causes settling. This is the step most beginners skip or rush, and it's the reason their patio looks sunken two years later. Strip everything down to mineral soil.
Next, set a reference grade. Use your stakes and string lines to represent the finished surface elevation of your patio (accounting for your base layers below). On a slope, you'll likely need to set the string level across the whole area, then measure down from it at multiple points to figure out how much soil to remove at each spot. A laser level makes this significantly easier if you can borrow or rent one. A line level works fine too, just slower.
Excavate to a depth that accounts for your full base stack plus about 2-3 inches of surface gravel. For a gravel patio, that typically means removing 6-8 inches of soil from your finished grade reference. On the uphill side of a terrace cut, you may need to go 12 inches or more deep into the slope. As you dig, keep the floor of your excavation sloped slightly away from the house (that 1/4 inch per foot pitch), since you want every layer to drain in the same direction.
Once excavated, compact the exposed subgrade with a plate compactor (rented for around $60-80 per day). If the soil is very loose or sandy, wet it slightly before compacting. If you've cut into clay-heavy soil, be extra diligent here because clay holds water and can heave. On steep cuts, you may also want to cut a shallow drainage channel (a few inches wide and deep) along the uphill edge of the excavation so groundwater seeping from the hillside has somewhere to go rather than collecting under your base.
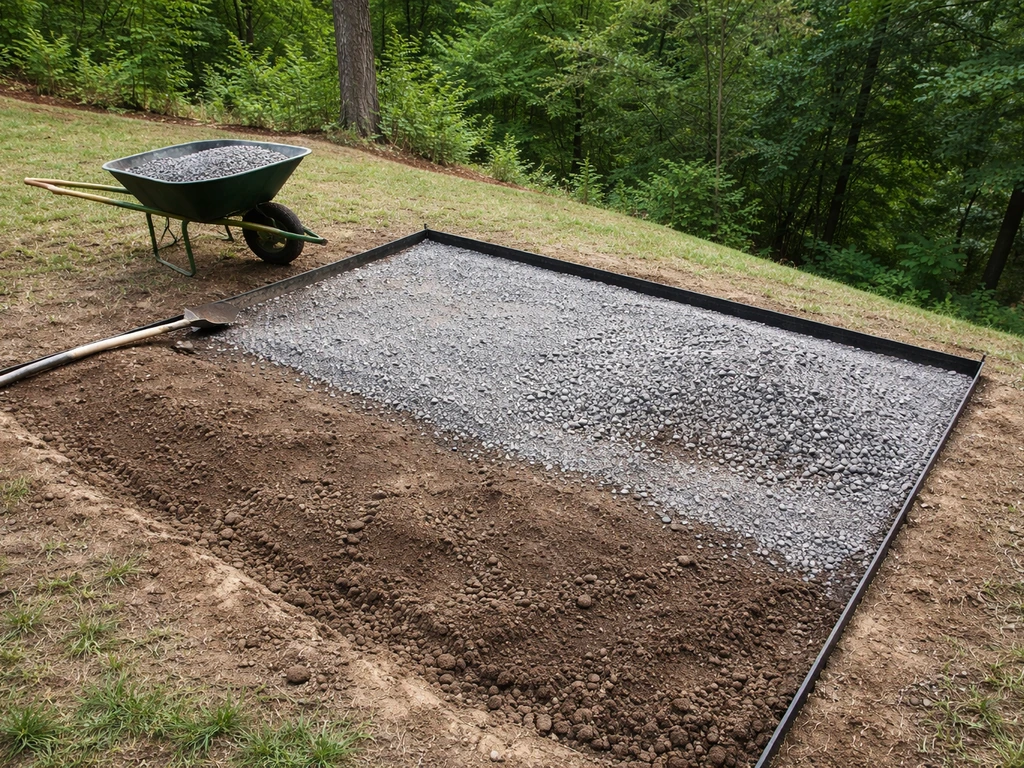
Base layers, geotextile, and drainage strategy
The base is what separates a patio that lasts from one that fails after the first heavy rain. On a slope, you have two things working against your base: water trying to get in from above and water trying to seep in laterally from the hillside. Your layer stack has to deal with both.
Here's the layer order from bottom to top:
- Compacted native subgrade (the ground you've excavated and compacted)
- Geotextile landscape fabric (non-woven, 4 oz or heavier)
- 4 inches of compacted crushed stone base (3/4-inch clean crushed stone or road base/crusher run)
- 1 inch of coarse bedding grit or decomposed granite (optional but worth it for stability)
- 2-3 inches of surface gravel
The geotextile fabric goes directly on the compacted subgrade, lapped up the sides of the excavation and over the edging, before any gravel goes in. Its job is to separate the soil from the gravel above so fines don't migrate upward and contaminate your base (a phenomenon called mud pumping, where wet soil gets pushed up through stone under foot traffic or vibration). On a slope, overlap any seams by at least 12 inches and orient them so the uphill piece overlaps the downhill piece, like shingles on a roof. Pin the fabric to the sides of the excavation with landscape staples so it doesn't shift while you're dumping and spreading stone.
For the crushed stone base, crushed stone with fines (road base or crusher run) compacts better than clean crushed stone on its own, but clean crushed stone drains better. On a slope with good drainage, clean 3/4-inch crushed stone works well. If you're worried about water sitting in the base, use clean stone. Spread it in two roughly equal lifts (2 inches at a time) and compact each lift before adding the next. This matters more on a slope because loose stone shifts when the compactor runs over it.
If hillside groundwater is a real issue at your site, consider installing a 4-inch perforated drain pipe (wrapped in filter sock) in a gravel-filled trench along the uphill edge of the excavation before laying your base. The pipe runs along the high side and daylights at one end, directing intercepted groundwater away from the patio area entirely. This is especially worth doing if you see water seeping from the cut hillside during or after digging. Building America guidance notes that any drain pipe outlet should terminate onto a sloped grade that moves water away from the structure, not back toward it.
Stabilization on a slope: edging, retaining, and geogrid
This is the step that makes or breaks a gravel patio on a slope. Without proper containment on the downhill edge, gravel will migrate. Period. Foot traffic, rain, and gravity are relentless, and even a 2% slope is enough to slowly move loose stone over time.
Edging options for mild slopes
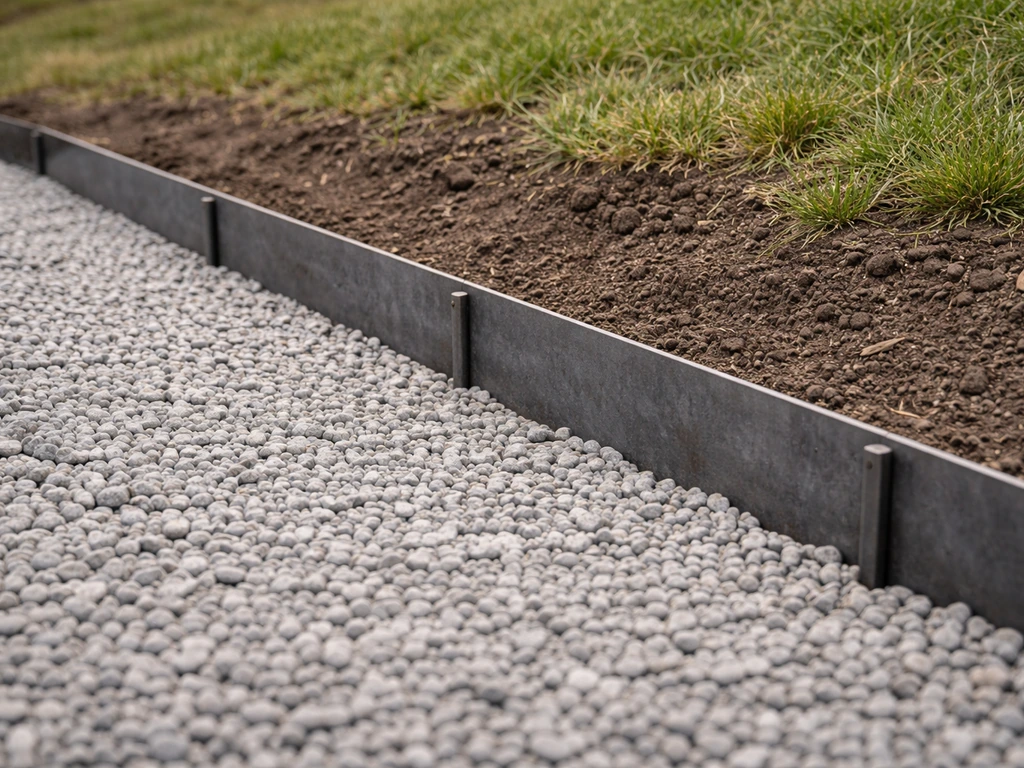
For slopes under about 5%, heavy-duty steel or aluminum landscape edging staked firmly into the ground every 2 feet is often enough on the sides of the patio. The downhill edge needs more: either a deeper-set edging board, a row of large landscape timbers (4x6 or 6x6) staked with rebar, or a dry-stacked stone border at least 4-6 inches tall above the gravel surface. The key is that the downhill edge extends well below the surface, into the compacted base, so it can't be pushed out by the weight of the gravel behind it.
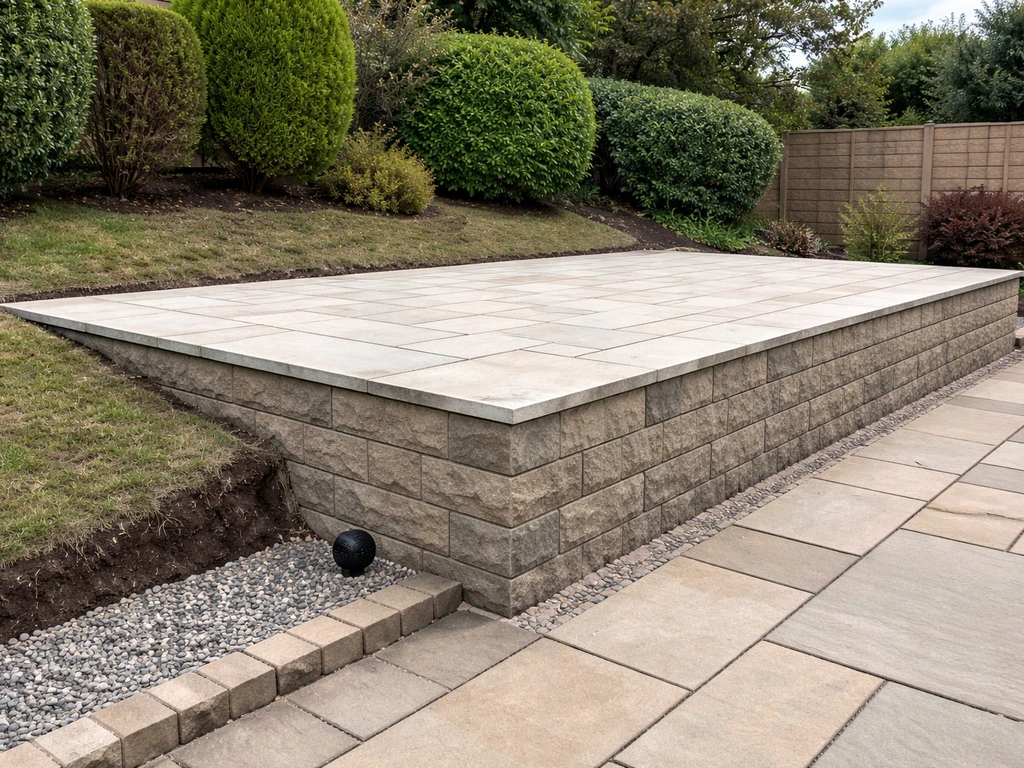
Retaining walls for steeper grades
On slopes over 5-8%, you really want a proper retaining edge at the low side of the patio. This can be dry-stacked concrete block, natural stone, or treated timber. The wall doesn't need to be tall if you've properly terraced: often 12-18 inches is plenty. Make sure to include drainage behind any wall. Leave weep holes (gaps between blocks at the base course) or install a short length of perforated pipe behind the base of the wall so water pressure doesn't build up and eventually push the wall over. If you need a wall taller than 3 feet to make the terrace work, consult a professional or check permit requirements in your area, as walls that height involve soil pressure calculations that go beyond typical DIY territory.
When to use geogrid
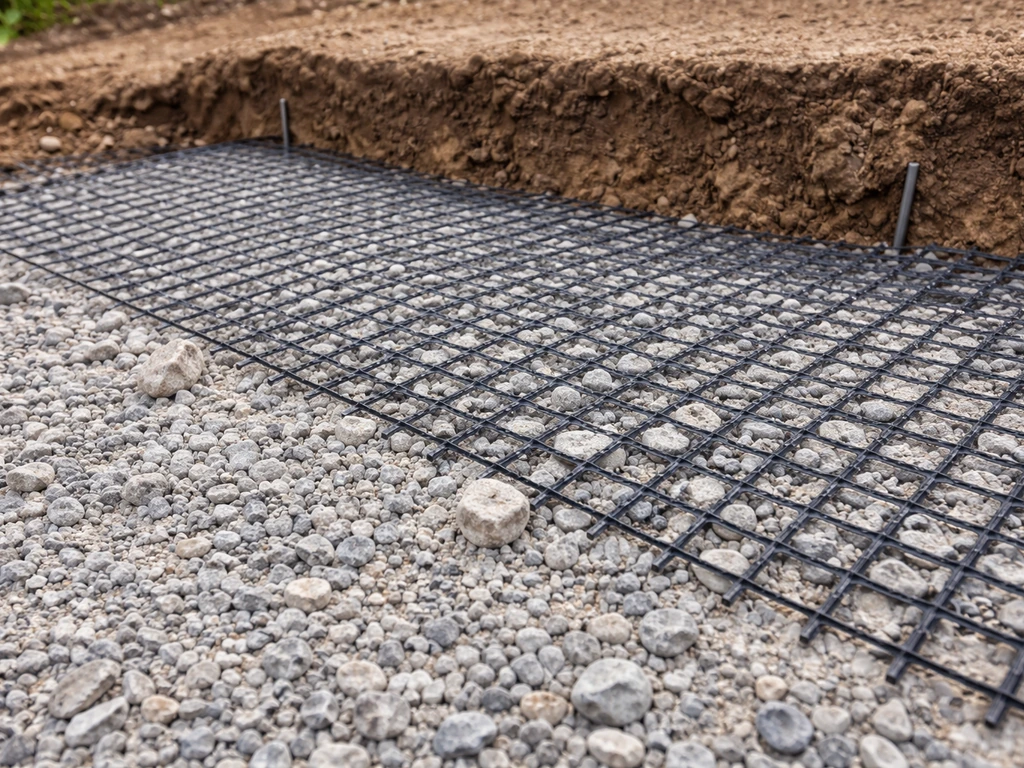
Geogrid is a plastic mesh material that you lay horizontally within your gravel base to lock stone particles together and distribute load. It's most useful when your slope is steep enough that even a compacted base feels like it wants to creep, or when you're working with looser soil underneath. On a residential patio, a single layer of geogrid between your subgrade fabric and the first lift of base stone is usually enough. You can buy it by the roll at most landscape suppliers for around $0.50-1.00 per square foot. Lay it with the long dimension running across the slope (perpendicular to the direction gravel would migrate) and overlap any seams by 12 inches.
At the uphill edge of the patio, where the slope transitions into your cut, pin or bury the top of the geotextile and geogrid into the hillside by at least 6-8 inches. This anchors everything and prevents water sheeting down the hillside from peeling up your base layers. Backfill and tamp that transition firmly.
Gravel selection, layering, and compaction
Not all gravel is equal for a slope application. Angular, crushed stone locks together under compaction and foot traffic. Round pea gravel, while attractive, rolls and shifts and is basically the worst choice for a sloped surface. I've seen patios built with pea gravel on a gentle slope turn into a skating rink after one winter.
| Gravel Type | Best Use on Slope | Stability | Cost (approx.) | Notes |
|---|---|---|---|---|
| Crushed limestone (3/4 in) | Surface or base layer | Excellent | $30-50/ton | Compacts well, affordable, common |
| Decomposed granite (DG) | Surface/bedding layer | Very good (when compacted) | $35-55/ton | Fines bind together; can get dusty when dry |
| Pea gravel | Not recommended on slopes | Poor | $30-50/ton | Round stones migrate; avoid on any grade |
| River rock (1-2 in) | Decorative accent only | Poor-moderate | $45-70/ton | Too large and round for stable walking surface |
| Road base / crusher run | Base layer only | Excellent | $20-35/ton | Compacts into near-solid layer; doesn't drain as well |
| Angular washed gravel (1/4-3/4 in) | Surface layer | Good | $35-55/ton | Good drainage, decent stability, pleasant underfoot |
For the surface layer, 3/4-inch crushed limestone or angular washed gravel in the 1/4-3/8 inch range are both solid choices. The smaller the stone, the more comfortable it is underfoot and the better it compacts, but the faster it can wash in a heavy downpour. I tend to use 3/8-inch angular gravel for the surface on slopes because it's small enough to feel stable underfoot but angular enough to stay put.
Spread your surface gravel in a single 2-3 inch layer over the compacted base. Rake it to a consistent depth and maintain that 1/4-inch-per-foot pitch you set with your base. Run the plate compactor over the entire surface at least twice, changing direction on the second pass. After compaction, the surface gravel layer will be denser and slightly lower than before you compacted, so you may need to add a thin top-off layer of an inch or so to hit your finished grade. Check your drainage pitch again with a level after compacting, as compaction can shift the grade slightly.
Finishing details, cleanup, and keeping it looking good
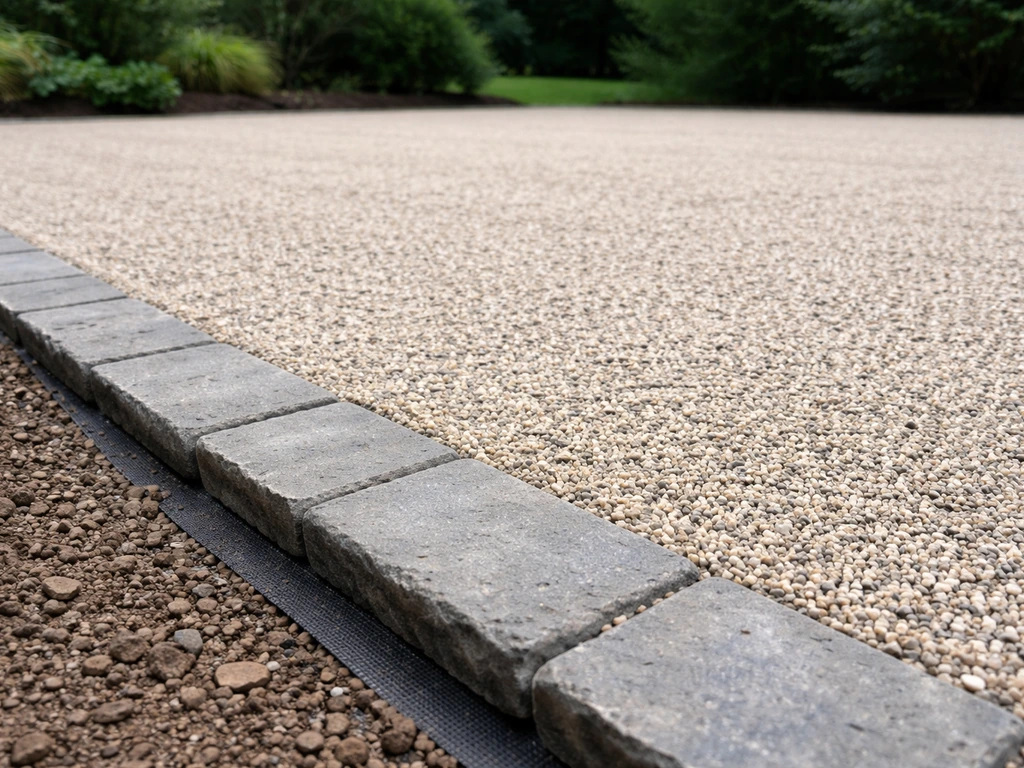
Once the gravel is compacted and at the right grade, do a final walkover and look for any low spots where water might pool, any edges where gravel is sitting above the top of the edging (fix those by raking back), and any visible fabric showing through at the surface. A little gravel there is fine and expected.
Trim the geotextile fabric that's lapped over the top of edging down to just below the top of the edging, so it's hidden. Backfill any gap between the outside of the edging and the surrounding soil, and tamp it down. On the uphill side, make sure the soil-to-patio transition sheds water onto the patio surface (and from there away from the house) rather than pooling at the junction. A slight mound or berm of soil directed away from the edge, or just a tidy slope away from the patio perimeter, handles this cleanly.
Troubleshooting common slope failures
- Gravel migrating downhill: This is an edging problem. Add taller or deeper-set containment at the low edge, and check whether the surface slope is steeper than 2%. Anything over 3% will slowly move gravel under normal use.
- Rutting or voids: Usually caused by insufficient base compaction or organic material left in the subgrade. Dig out the problem area, re-compact, and refill.
- Mud pumping through gravel: Soil is working up through the base, meaning the geotextile failed, was missing, or wasn't overlapped properly. You'll need to pull back the surface gravel, add or repair the fabric, and relay.
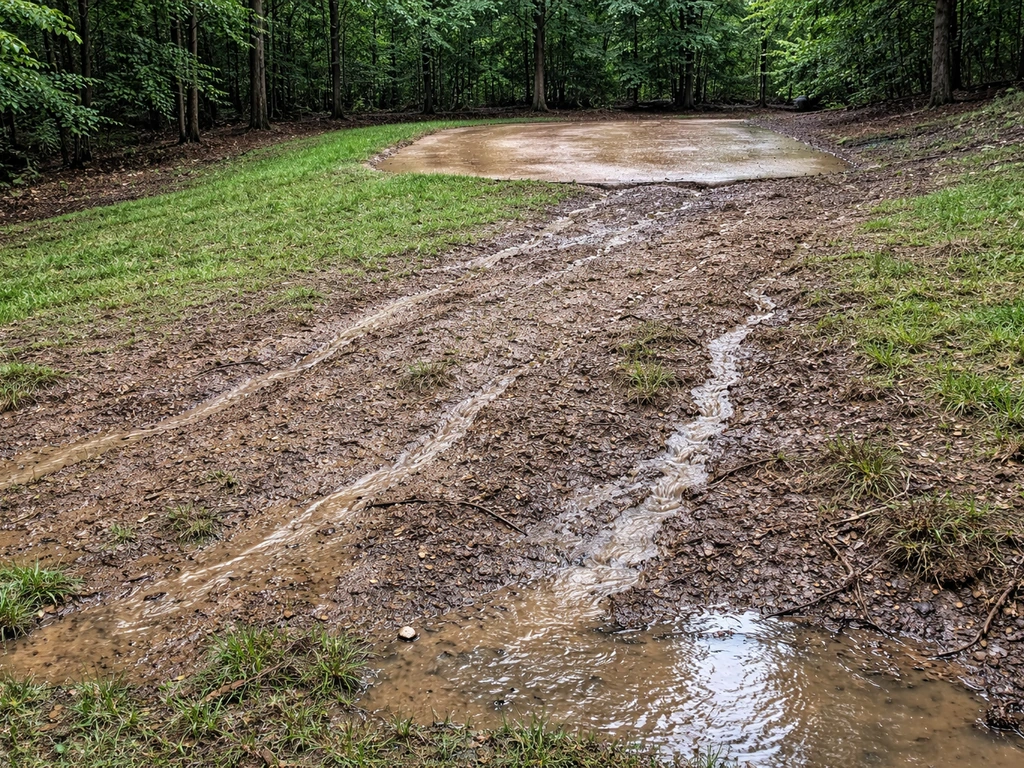
- Washout channels forming: Water is concentrating and running across the patio rather than sheeting off evenly. Recheck your grade pitch and look for high spots that funnel water into a channel. Sometimes a small check dam of stone at the low edge can slow runoff velocity.
- Soggy or soft spots after rain: The base isn't draining properly. This can mean clay under the base is holding water, or the drainage pitch of the base layer is not consistent. In severe cases, a perforated drain pipe under the base is the fix.
Seasonal maintenance checklist
- Each spring: Rake the gravel surface level and check your drainage pitch with a level. Winter freeze-thaw cycles can shift gravel on slopes more than on flat ground.
- After heavy rain: Walk the perimeter and look for any migration at the downhill edge, erosion at the uphill transition, or new washout channels.
- Every 2-3 years: Top-dress with a fresh inch of surface gravel to compensate for compaction and any minor migration. Budget about 1/2-3/4 ton per 200 square feet.
- Check edging annually: Make sure stakes haven't heaved, boards haven't rotted (if timber), and blocks haven't shifted. Reset anything that's moved.
- Weeds: Geotextile fabric reduces but doesn't eliminate weeds. Spot-treat with a targeted herbicide or pull by hand. Avoid thick layers of organic mulch on the surface as it defeats the drainage advantage of gravel.
A gravel patio on a slope is genuinely one of the more rewarding DIY patio builds once it's done. It drains better than pavers, costs less than concrete, and the angular stone surface actually has more grip on a slope than a smooth surface would. The keys are: measure your slope before you design, don't skip the base layers, and lock that downhill edge in so nothing moves. Get those three things right and the first rainstorm after you finish will be satisfying to watch instead of stressful.
If you're working with a more severe hillside rather than a gentle slope, you may want to look at how a raised patio structure or more substantial hillside terracing approach compares to the cut-and-fill method covered here. If you're comparing options, this also answers the practical question of how to build a raised patio on a slope in the UK raised patio on a slope uk. And if you're still working out the exact pitch to target for your specific drainage needs, nailing down how to measure patio slope precisely before you dig will save you a lot of rework.
FAQ
How do I confirm my patio still drains correctly after compaction and settlement?
If you have a “barely noticeable” slope but you cannot verify pitch after compaction, prioritize re-checking grade with a level and string before adding the final 1 to 2 inches of surface gravel. Even a small settlement can reduce your drainage pitch, creating shallow puddling that later undermines edges.
Can I use gravel mixed with fines instead of clean crushed stone on a slope?
Yes, but do it only if you have angular stone that you can still compact in lifts, and keep the same drainage pitch. Avoid mixing in fines that mud up, and plan for a slightly thicker base layer (often an extra 1 to 2 inches) if your subgrade is clayier than expected, then re-compact each lift thoroughly.
Will geotextile keep water from getting into the gravel base?
Don’t rely on geotextile alone as the “waterproofing.” Geotextile separates and limits pumping, but it won’t stop lateral groundwater. If you see seepage from the cut hillside, add the uphill drain pipe strategy described in the guide (a perforated pipe in a trench with filter sock) or you risk base saturation.
What’s the most common mistake with edging on the downhill side?
Landscapers often overbuild the downhill edge by making it too shallow. For the low side, set the edging or wall so it extends into the compacted base well below the gravel surface, then backfill and tamp behind it to remove voids that can trap moving water and push stone out later.
What gravel shape or type should I avoid on a slope, and why?
Prefer angular, crushed stone for the base and an angular crushed limestone or angular gravel for the surface. If you only have smooth/rounded material available, consider switching to a slightly smaller gradation for the surface, but expect faster movement unless containment is strong.
Is it a problem if my patio isn’t perfectly square on a slope?
If your patio corners are slightly out of square, drainage and edging can still work, but you’ll waste stone and make it harder to install straight edging lines. Use the 3-4-5 check at each corner before excavating, because moving forms after base placement often breaks fabric overlaps.
Do I always need a permit for a gravel patio on a slope?
In many cases, you can skip a permit for an unreinforced gravel surface, but structural elements like retaining walls are the trigger. If your project includes a wall, terracing changes to supporting soil, or any drainage-altering work, verify locally even if your municipality usually allows permeable surfacing.
Where should the outlet from an uphill drain pipe go so it doesn’t create new problems?
For trenches and drainage, use pipe and outlet locations that move water away from the house, and make sure the outlet grade is not back toward the structure. Also keep the drain pipe outlet separated from areas where it will erode slopes or discharge onto neighbors.
Can I build this during rainy weather or right after heavy rain?
Yes, but timing matters. Avoid building when the ground is saturated or actively thawing, because subgrade compaction and geotextile anchoring are less reliable. If you must work during wet periods, let the site drain, then compact the subgrade only when it can achieve firm contact without rutting.
What should I do if I find a low spot or soft area during installation?
You should fill and tamp holes or low spots immediately after the first compaction pass of the base. If you discover a low spot after surface compaction, remove a small section back to base level, correct the grade, then re-compact. Topping off over a low spot often leads to a permanent depression.
When should I add geogrid, and when can I skip it?
Geogrid is most useful when the subgrade is loose or when you cannot get enough stability from compaction and containment. It usually is not necessary on very gentle slopes with firm soil and a well-anchored downhill edge, and it can waste money if you are already building the correct base stack.
Next Article
How to Build a Raised Patio on a Slope in the UK
Step-by-step UK DIY guide to build a raised patio on a slope with drainage, retaining structure, level base and finishin