You can build stable, good-looking curved patio steps with standard pavers, brick, or stone by planning your riser and tread dimensions first, laying out the arc with a stake-and-string compass, building a compacted gravel base under each step, and locking the curve in place with flexible edge restraints. The tricky part is that curved geometry creates wedge-shaped joints and varying tread widths, so you need a methodical layout before you place a single paver. Get that right and the rest is straightforward weekend work.
How to Build Curved Patio Steps: DIY Guide and Tools

Nolan Lennox
23 Jun 2026
Choose your curved step design and nail down the dimensions first

Before you touch a shovel, figure out how many steps you need and how big each one should be. Measure the total vertical rise from your patio surface to the door threshold or upper landing. Then divide that number by your target riser height. A riser between 5.
5 and 7 inches works well for outdoor steps and keeps things comfortable and safe. Round the result to a whole number of steps, then divide the total rise by that number to get your exact unit rise. For example, if your total rise is 21 inches and you target 7-inch risers, you get exactly 3 steps at 7 inches each.
That math matters because the International Residential Code requires that the tallest riser within a flight not exceed the shortest by more than 3/8 inch. A small rounding error compounded across three or four steps creates a trip hazard, so always recalculate the actual unit rise after you land on a whole number.
For tread depth, aim for at least 11 inches of usable walking surface. That is the number most residential and accessibility guidelines agree on, and it feels comfortable underfoot on exterior steps. For a curved design specifically, measure tread depth at the midpoint of the arc, not at the inner or outer edge, since the curve makes those measurements misleading. Each tread should also be wide enough to feel generous. Most curved patio steps look best when they are noticeably wider than a standard straight staircase, so consider 4 to 6 feet of arc width as a minimum starting point.
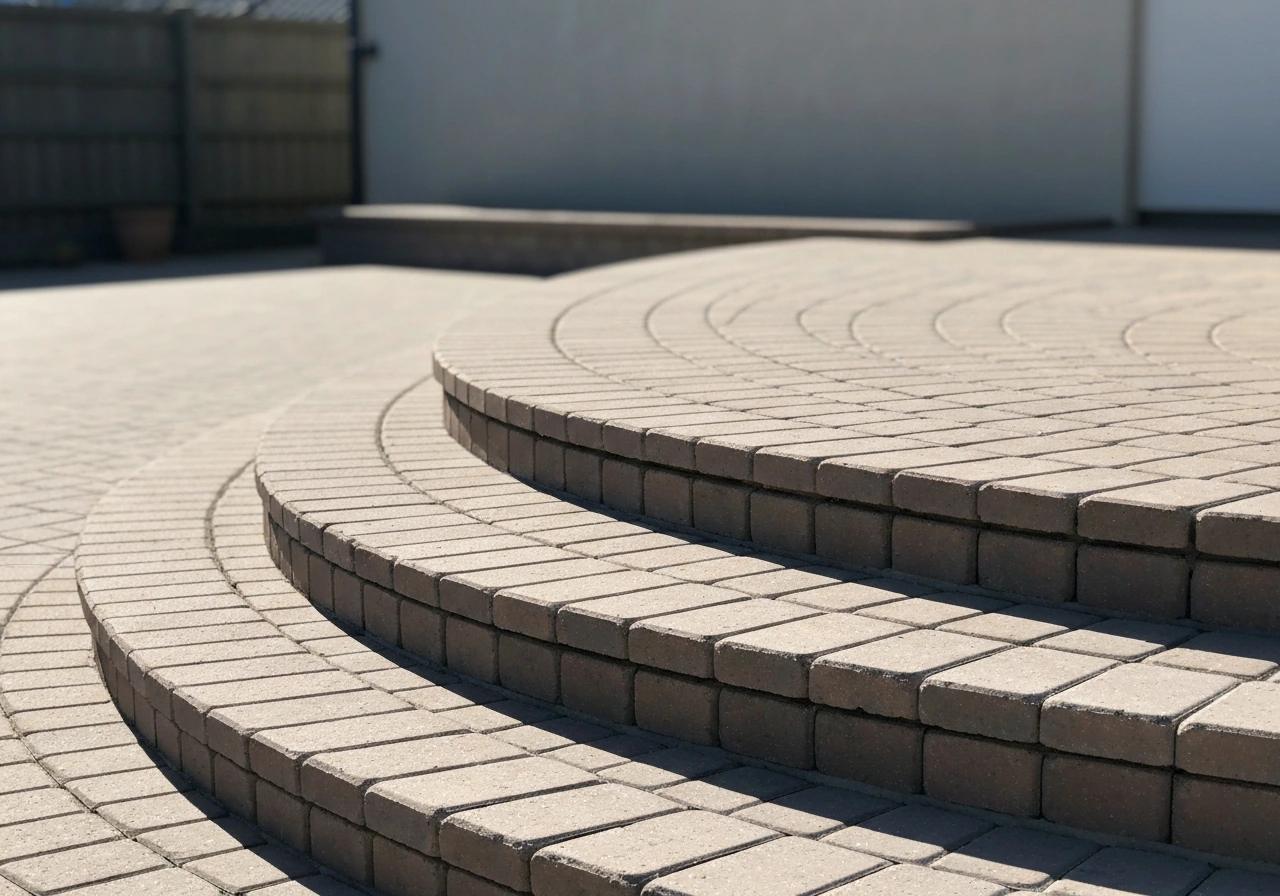
Curved steps come in a few common shapes. A simple single-radius arc, like a half-circle or a gentle quarter-circle sweep, is the easiest for a DIYer to build and lay out. Semi-circular steps that fan outward from a landing are popular because they look grand but are actually straightforward to form with a single pivot point. If you want something more complex, like an S-curve or a multi-radius design, save that for your second or third project. Start with one consistent radius and you will save yourself a lot of headaches.
How to lay out the arc accurately using string lines and templates
The most reliable way to mark a clean arc on the ground is the stake-and-string compass method. Drive a landscape spike or stake into the ground at the center point of your circle (usually directly in front of the door or the centerline of your upper landing). Tie a mason's line to the stake and measure out to your desired radius. Pull the line taut and walk the arc, marking the ground with powdered chalk or marking spray as you go. You can repeat this for each step's front edge by lengthening the radius by one tread depth per step.
If the center point falls in an inconvenient location (inside a wall, for example), you can use the three-point method instead. Mark three points on your intended arc, then use geometry or a large piece of cardboard as a template to find the center mathematically. For most homeowners, the stake-and-string approach is easier and accurate enough for paver work where tolerances are measured in fractions of an inch rather than millimeters.
Once you have your arcs chalked on the ground, verify everything looks right by eye before you excavate. Step back, take a photo, and check that the curve flows naturally from the patio edge or landing. Small adjustments to the radius at this stage cost nothing. Adjustments after you have poured gravel cost an afternoon. Also mark your riser lines across the arc to show where each step face will land. These lines run perpendicular to the centerline of the staircase, not perpendicular to the radius, which is a subtle but important distinction for keeping treads even.
Tools, materials, and how to keep costs reasonable
You do not need a truck full of specialty gear for this project, but a few key tools make a real difference. For layout, you need stakes, mason's line, a line level, and marking chalk or spray paint. For excavation, a flat-blade spade and a tamper or plate compactor (rent one for around $60 to $80 per day) handle most situations. For cutting pavers, a wet-cut circular saw or angle grinder gets the job done. A rubber mallet, a 4-foot level, a tape measure, and a pencil round out your basic kit.
| Material | Approximate Cost | Ease of Use | Best For |
|---|---|---|---|
| Concrete pavers (tumbled) | $3–$6 per sq ft | Beginner-friendly | Clean, modern curved steps with minimal cutting |
| Brick | $4–$8 per sq ft | Moderate | Traditional look, good for tight radii |
| Natural flagstone | $6–$15 per sq ft | Moderate to hard | Rustic look, more freeform curves |
| Segmental retaining wall blocks | $2–$5 per block | Beginner-friendly | Sturdy risers, stack easily, sold with curved options |
| Cast concrete steps (precast) | $80–$300 per step | Easy to install | No cutting needed but limits custom radius |
For most DIYers building a curved step for the first time, tumbled concrete pavers for the treads and segmental retaining wall blocks for the risers are the most forgiving combination. For more DIY guidance on building and leveling a wood patio step run, follow the same layout and base-prep principles diy wood patio steps. The blocks come in standard sizes designed to stack and interlock, many manufacturers sell curved-friendly units, and they require minimal cutting compared to flagstone. If you want a more natural look, dry-laid fieldstone or flagstone treads over block risers gives you the best of both worlds without requiring mortar expertise.
For base material, you need crushed angular gravel (commonly called crusher run, Class II base, or road base depending on your region) for the subbase layer, coarse washed concrete sand for the bedding layer, and polymeric sand for filling joints. Budget roughly $1.50 to $2.50 per square foot for base materials on top of your paver costs. If you are on a tight budget, the biggest saving is buying pavers from a local manufacturer's second (blemished) stock or buying overstock from a landscape supplier.
Site prep and building a base that actually holds the curve
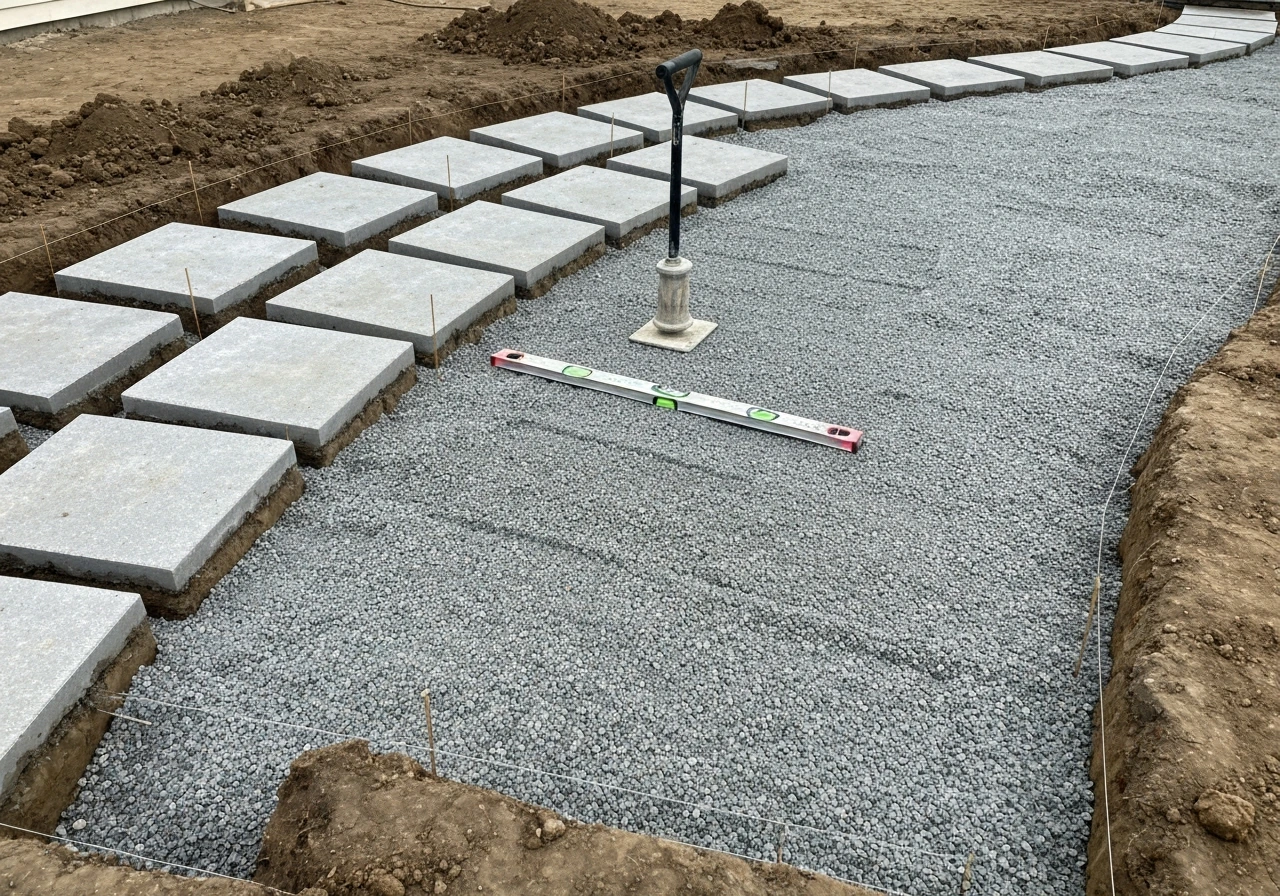
Curved steps fail for one reason more than any other: inadequate base preparation. I have seen beautifully laid steps start rocking within a single winter because the builder skimped on excavation depth or compaction. Do not let that be you.
Start by excavating each step pad to a depth of at least 6 to 8 inches below your finished tread surface. That gives you room for 4 to 6 inches of compacted gravel base plus 1 inch of bedding sand, with a little buffer. In cold climates where frost heave is a concern, go deeper or consider a granular base that drains well enough to limit ice formation. On clay-heavy soil, lay a sheet of geotextile fabric directly on the subgrade before you pour your first gravel lift. This prevents the clay from migrating up into your base over years of freeze-thaw cycles, which is one of the most common causes of long-term step movement.
Add your gravel in two lifts of 3 inches each, compacting thoroughly between lifts with a plate compactor or hand tamper. Pay special attention to the edges of the arc, since the compactor tends to miss corners. Compact in overlapping passes and work from the outside toward the center. Each step needs its own compacted pad, and each pad should be level side-to-side but slope very slightly (about 1/8 inch per foot) toward the front edge for drainage. Letting water pool on steps or between the steps and your house is how you get mold, ice, and eventually structural problems.
Once the gravel base is compacted, screed a 1-inch layer of coarse sand over each pad. Use two screed rails set to your desired height and drag a straight board across them. Do not compact the sand after screeding. The pavers will do that when you set them and compact them in place.
Building the curved risers and setting the treads
Start with the risers
Build your risers first, working from the bottom step up. For a mortarless system, set your riser blocks directly on the compacted gravel base (not on the bedding sand). Dry-stack them along your chalked arc line, checking frequently with a level. For added stability, especially on the bottom riser which takes the most traffic impact, run a bead of construction adhesive (a product like PL Premium or Loctite PL 500) between courses. This is not full mortar work, it is just a dab at key points to prevent blocks from walking out of position over time.
If you want a fully mortared system for a more permanent, rigid result, set each riser block in a mortar bed using a 3:1 sand-to-Portland cement mix. Mortared risers will not move, but if you ever need to repair one, you are committed to some demolition work. For most residential patio steps, a dry-laid system with adhesive at the front face of each riser is plenty stable and still repairable if something shifts years later.
Set the tread pavers
With risers in place, set your tread pavers on the screeded sand bed, working from the front edge of each tread back toward the riser. The front paver should overhang the riser face by about 1 to 1.5 inches to create a nosing. This not only looks clean but gives your foot a natural cue for where to step. Set pavers by hand, press them into the sand firmly, and tap them level with a rubber mallet. Check level front-to-back and side-to-side as you go. The slight drainage slope you built into the sand bed will naturally pitch the treads forward, which is exactly what you want.
Once all treads on a step are set, run a plate compactor over them (with a rubber pad or piece of carpet under the compactor plate to protect the paver surface). This seats the pavers firmly into the sand and eliminates any wobble. Do this before you move to the next step up.
Cutting, fitting, and keeping joints consistent around the curve
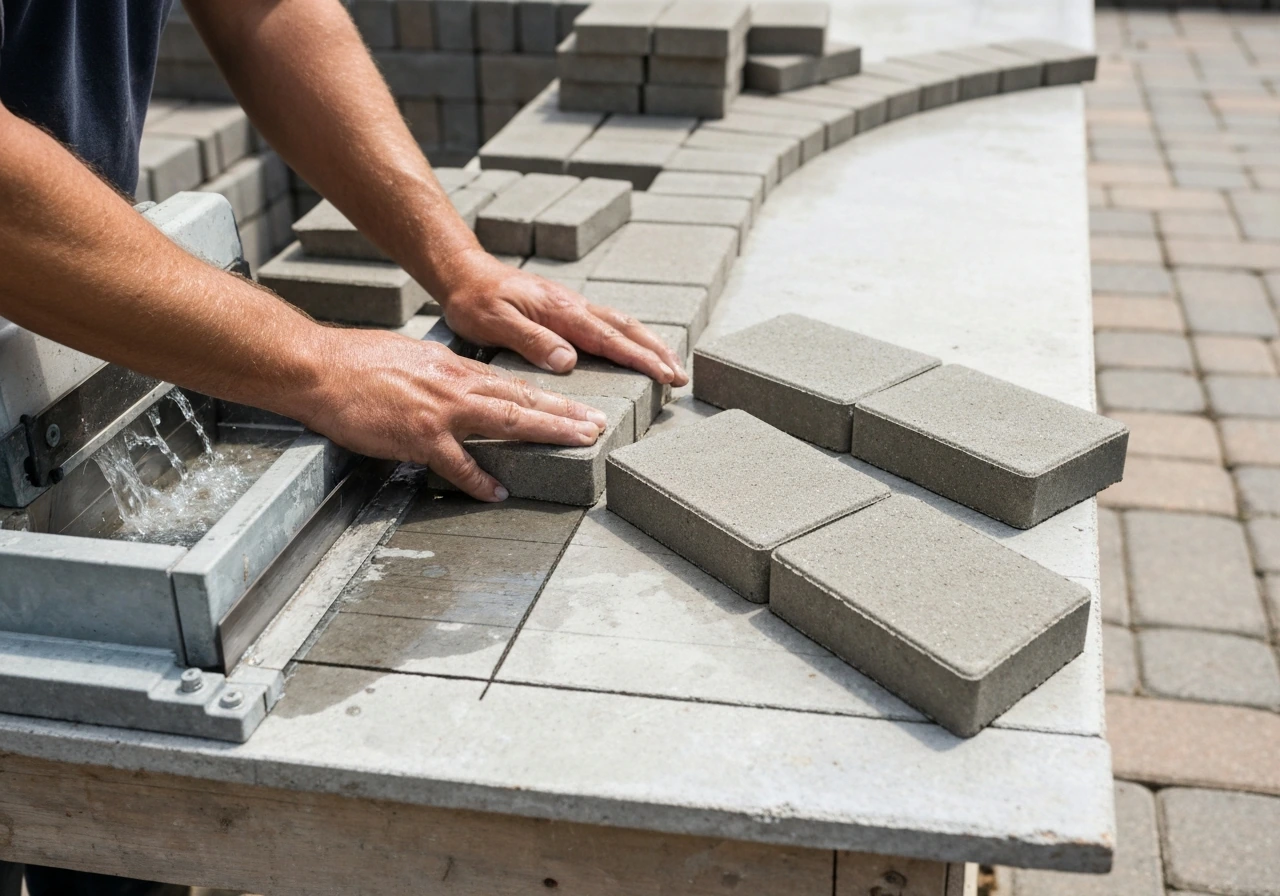
This is the part that separates a sharp-looking curved step from a sloppy one. Because your tread surface is curved, rectangular pavers placed in straight rows will leave wedge-shaped gaps, wider at the outer edge of the arc and narrower at the inner edge. You have two options: cut the pavers to wedge shapes that follow the curve, or use the natural fan pattern and accept slightly tapered joints.
For a clean, professional result, cut pavers. Use a wet-cut circular saw with a diamond blade or an angle grinder. For wedge cuts on curved treads, the angle grinder technique works well: mark your cut line on the paver face, make a series of parallel relief cuts about a half-inch apart from the edge to your cut line, then snap off the small tabs and clean up with the grinder. This gives you a curved edge without a tile saw. Always wear eye protection, hearing protection, and a dust mask, and work outdoors or in a very well-ventilated space.
Keep joint widths between 1/8 and 3/8 inch across the curve. Joints that are too tight will not fill properly with polymeric sand. Joints that are too wide look sloppy and allow more water infiltration. Use paver spacers or pieces of plywood cut to your target joint width as consistent guides while you set each paver. On a tight radius (say, less than 3 feet), you may need to cut almost every tread paver to get consistent joints. On a gentle radius (6 feet or more), you can often get away with cutting just the outer and inner row.
For the curved front edge of each tread (the nosing), you can use a wet saw to cut a smooth arc from a rectangular paver, or use manufactured bullnose or coping pavers that already have a rounded finished edge. The manufactured option costs a little more but saves significant cutting time and gives a cleaner result. Many paver manufacturers sell bullnose units specifically designed to be used as step nosing.
Edge restraints: do not skip these on a curve
Edge restraints are non-negotiable for any paver installation, and they are especially critical on curves where the geometry itself creates lateral forces that want to push your pavers outward. Standard rigid plastic edge restraint can bow on tight curves, creating gaps in the restraint line where pavers can creep. For curved steps, use a flexible aluminum edge restraint designed for curves, or use a segmental plastic restraint with closely spaced spikes that can flex smoothly around your arc. Spike or stake the restraint into the base at 6-inch intervals on curves, not the 12-inch spacing you might use on a straight run.
On the inner (concave) edge of the tread, the curve is tighter and restraint is even more important. If your steps butt up against a house foundation or an existing patio structure, that structure acts as a natural restraint. If not, install restraint on both the inner and outer edges of each curved tread.
Finishing details: nosing, drainage, joint sand, and curing
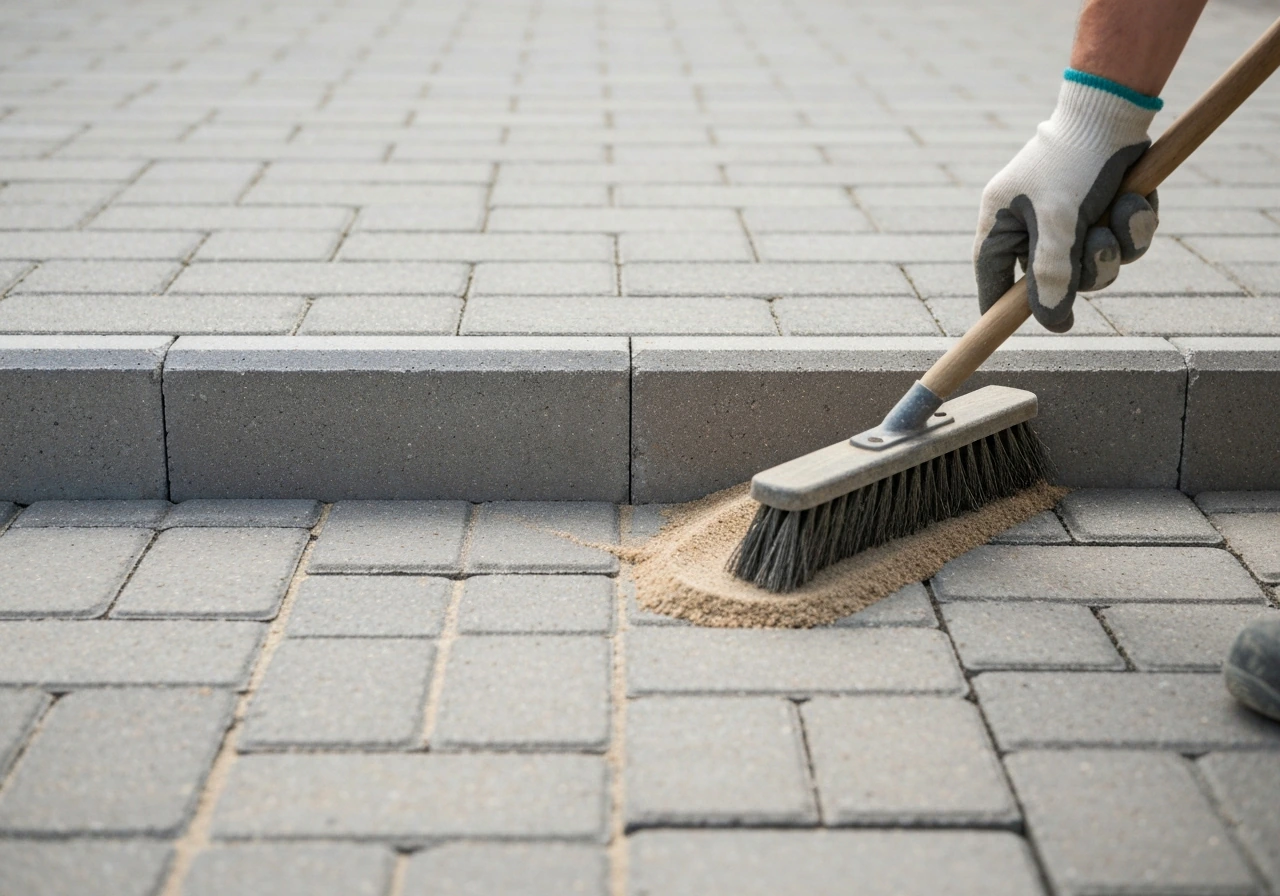
Once all your pavers are set and compacted, sweep polymeric sand into the joints. Work it in with a stiff push broom, then repeat until joints are filled to about 1/8 inch below the paver surface. Blow off or sweep away all excess sand from the paver surface before activating, because any sand left on top will haze and bond to your pavers. Lightly mist the joints with water to activate the polymer binder. Follow the specific product directions here, since cure times and water requirements vary by brand. Most products need 24 to 48 hours to fully set before foot traffic.
For slip resistance on the step nosings (the front edge of each tread), you have a few practical options. Textured pavers or tumbled pavers naturally provide more grip than smooth-faced units. For extra traction, especially on steps that get shaded and stay damp, apply an anti-slip strip or insert along each nosing. Aluminum-backed anti-slip grit strips rated for exterior use are available at most home improvement stores and can be cut to match your curved nosing. They make a real difference in wet conditions and are worth the modest cost.
Check your drainage one more time after everything is set. Pour a bucket of water on the top tread and watch where it goes. It should sheet off the front edge and away from the house, not pool in the middle of the tread or run back toward the foundation. If water pools, you may need to add a thin layer of sand under one side to adjust the pitch before the polymeric sand fully cures.
Common problems and how to fix them
Uneven risers after setting
If you finish the steps and notice one riser looks taller than the others, measure each one carefully. A variation of more than 3/8 inch between the tallest and shortest riser is a safety issue and should be corrected before you call the project done. Under U. S.
stairway safety requirements, risers must be uniform, with spiral stairway regulatory examples showing allowable riser heights ranging from about 6 1/2 inches to 10 1/2 inches [29 CFR §1917. 121](https://www. law. cornell.
edu/cfr/text/29/1917. 121). The fix depends on how you built them. For dry-laid block risers, you can often lift the offending block, add or remove a thin layer of gravel beneath it, and reset.
For mortared risers, you will need to chip out the mortar, rebed the block, and re-mortar. Catching this before polymeric sand goes in makes everything easier.
Pavers sinking or tilting after a season
Sinking almost always traces back to base failure, usually inadequate compaction, insufficient depth, or water getting into the base and washing out fines. If a section of tread sinks, lift those pavers, dig down to see what is happening in the base, and address the root cause before relaying. Add depth, improve drainage, or add geotextile if needed. Relaying pavers without fixing the base just means you will be doing it again in another season.
The curve drifting or gaps opening between pavers
If the outer edge of a tread starts to spread outward or gaps appear in the curve, your edge restraint has either failed or was never adequate. Reset the loose pavers, add a new flexible aluminum restraint, and re-spike at 6-inch intervals. If the original restraint was just undersized rigid plastic, replace it entirely rather than trying to patch it. Once polymeric sand is in place and cured, re-sweeping a small section and reapplying sand is straightforward.
Frost heave lifting individual pavers or whole sections
In freeze-thaw climates, heaving is usually a drainage problem. Water is getting into the base, freezing, and expanding. The long-term fix is better drainage: a perimeter drainage pipe at the base level wrapped in geotextile fabric, improving the slope so surface water clears the step area quickly, or deepening the gravel base below the frost line.
CMHA technical resources also note that a stone and geotextile pipe assembly placed along the pavement perimeter can remove excess water in the subgrade or base to improve long-term performance perimeter drainage pipe at the base level wrapped in geotextile fabric. In the short term, reset heaved pavers after the ground thaws and watch to see if they move again.
Repeated movement in the same spot tells you there is a persistent drainage or base problem that needs a more thorough repair.
Grade changes or settling at the top step
Sometimes the ground near a foundation settles slightly over years, changing the effective rise of your top step. If the top riser ends up noticeably different from the rest, you can adjust by adding a thin mortar or concrete topper to the top tread surface (if the step is too tall) or by adding a thin additional paver layer to bring the tread up (if the step is too short). Neither fix is invisible, but both are safer than leaving a non-uniform step in place.
Where this project sits among other patio step builds
Curved steps are more involved than standard straight patio steps, mostly because of the layout and cutting work. If you are planning a patio staircase, patio steps plans can help you map risers, treads, and curvature before you start cutting and setting materials. If you have not built straight steps before, it is worth understanding the basic riser-tread relationship and standard base preparation first, since those fundamentals are the same regardless of shape.
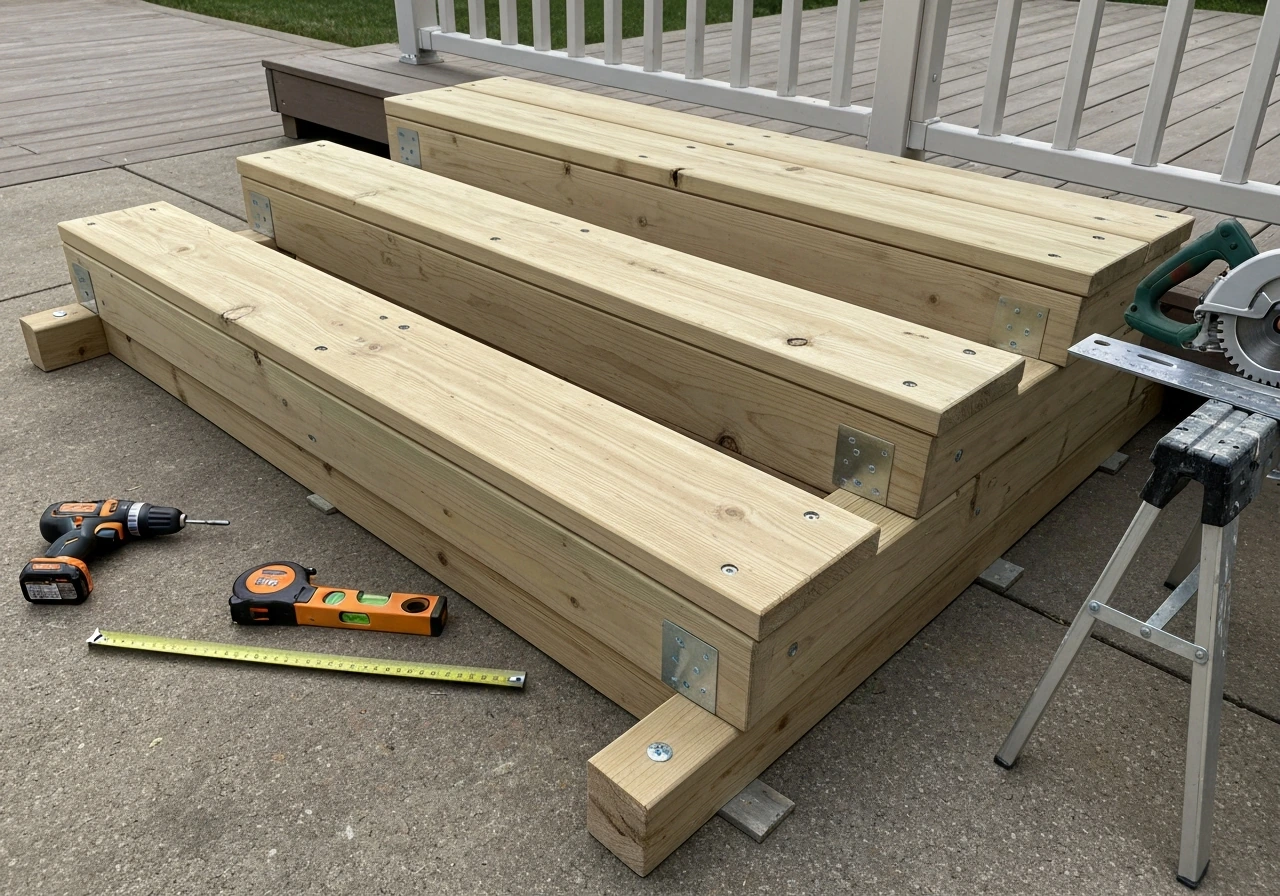
A semi-circular step design, which fans out symmetrically from a center point, is probably the most popular curved variation and offers a good starting point if you want an impressive look without a complex multi-radius layout. DIY wood patio steps are a separate skill set entirely and come with their own considerations around rot resistance, hardware, and fastening, so if you are weighing wood against pavers for this project, pavers are generally the lower-maintenance choice for exterior use.
With the right dimensions planned out, a solid gravel base, proper edge restraints, and careful joint management, curved patio steps are absolutely achievable for a patient DIYer on a weekend or two. The curve is really just a layout challenge. Once you have your arc marked and your base built, you are just setting pavers, the same skill that goes into any paver patio, just in a more interesting shape. If you want the full background on the materials and workflow for a patio project, start by reviewing a complete guide to building a paver patio.
FAQ
How do I confirm my tread depth is correct on a tight curve?
For curved steps, the safest approach is to treat the curve as a series of short straight runs. Cut or choose tread widths so the 11-inch usable depth is measured at the midpoint of the arc (not the inside or outside edge). If you cannot maintain that at the midpoint, reduce the number of steps and re-run the riser math, rather than forcing a tread shape that makes the walking surface feel too shallow on the tighter portion of the curve.
Can I adjust the curve using shims or extra sand after the base is compacted?
Yes, but only if you have a consistently thick and well-compacted base. The key is to keep the top tread plane level side-to-side while maintaining the small forward drainage pitch. Don’t rely on shims on top of sand, if the base is uneven, you will get rocking and joint breakdown later.
Is it okay to use regular sand instead of polymeric sand for the joints?
Not reliably. If a paver system is built on crusher run plus bedding sand and the joints are filled correctly, using polymeric sand is what locks the surface together. Standard fine sand can wash out faster, especially on curves where water can channel along wedge-shaped gaps.
What’s the right timing to activate polymeric sand, and what should I avoid?
Polymeric sand should be activated only after the joints are fully filled and surface debris is removed. If you mist too early, before you’ve swept clean and compacted pavers, it can harden on the tops and reduce bond quality in the joints. If rain is expected within the product’s activation window, delay activation or protect the installation.
If my curved treads are leaving uneven wedge gaps, should I cut wedges or change the layout?
For wedge gaps on a curve, either cut wedges or accept a slight taper if your radius is gentle and joints can stay within the 1/8 to 3/8 inch target. If your joints will repeatedly land outside that range, stop and redesign the radius or adjust paver selection. Cutting wedges is usually cheaper than redoing multiple steps after the curve looks wrong.
How do I choose edge restraints for a small-radius curved step?
Do not stretch standard rigid edge restraints around tight radii. Use a restraint that is designed to flex for curves, or install segmental restraints with closely spaced spikes so the line stays straight enough to prevent outward creep. If your edge is already bowed or has gaps, fix it before polymeric sand goes in, because once sand sets, moving pavers is much harder.
What should I watch for if my curved steps have to connect to an existing patio or foundation?
Yes, but plan for it during layout. After you chalk the arcs, confirm the riser lines land perpendicular to the centerline of the stair. Also check that the bottom step has enough width to receive traffic without creating a thin, hard-to-cut tread at the top or inside edge.
What’s the best way to fix one riser that ends up too tall after pavers are set?
It depends on the cause. If a single riser is off by more than the 3/8 inch tolerance, you should correct it before finishing joint work. For dry-laid blocks, the typical fix is removing that riser block and adjusting gravel thickness beneath it, then resetting and re-checking level. For mortared risers, replacement usually requires chipping out and rebedding, so it is more disruptive.
If water pools in the middle of a tread, how do I correct it?
You can, but only if you add depth and drainage where the water is going, not just relevel the surface. Water pooling often means the pitch is off or the base is not compacted uniformly. A practical method is the bucket test after everything is set, then correct with targeted adjustment under the affected side before polymeric sand fully cures.
What should I do if the outer edge of a curved tread starts spreading outward?
If you see outward spreading or widening joints, treat it as an edge-control failure. Remove and reset the affected pavers, replace or upgrade the restraint system, and re-stake at tighter spacing on curves (6-inch intervals). Don’t just sweep in more polymeric sand, since it cannot compensate for missing lateral restraint.
What changes should I make for curved patio steps in freeze-thaw climates?
In freeze-thaw areas, prefer designs that drain quickly away from the foundation and avoid standing water at the step surface. The long-term fix usually includes deeper or improved drainage base and, in difficult soils, a geotextile barrier over clay-prone subgrade. After heave, reset pavers only temporarily, if movement repeats in the same spot, you likely need a more thorough drainage repair.
Next Article
DIY Wood Patio Steps: How to Build Safe, Durable Steps
Step-by-step guide to build safe, durable DIY wood patio steps with stringers, secure treads, leveling, drainage, and se