Building patio edging comes down to five things done right: choosing the right material for your patio surface, digging a proper trench with a solid compacted base, setting and anchoring the edging so it can't shift, backfilling firmly, and adding the finishing details that make it look intentional. Do those five things and your edging will stay crisp for years. Skip any one of them and you'll be re-doing it after the first hard winter. Live edge wood patios use the same core steps for planning layout, building a stable base, and installing edging that resists shifting over time how to make a live edge wood patio.
How to Build Patio Edging: Step-by-Step DIY Guide

Nolan Lennox
29 Jun 2026
Choosing the right patio edging style and materials
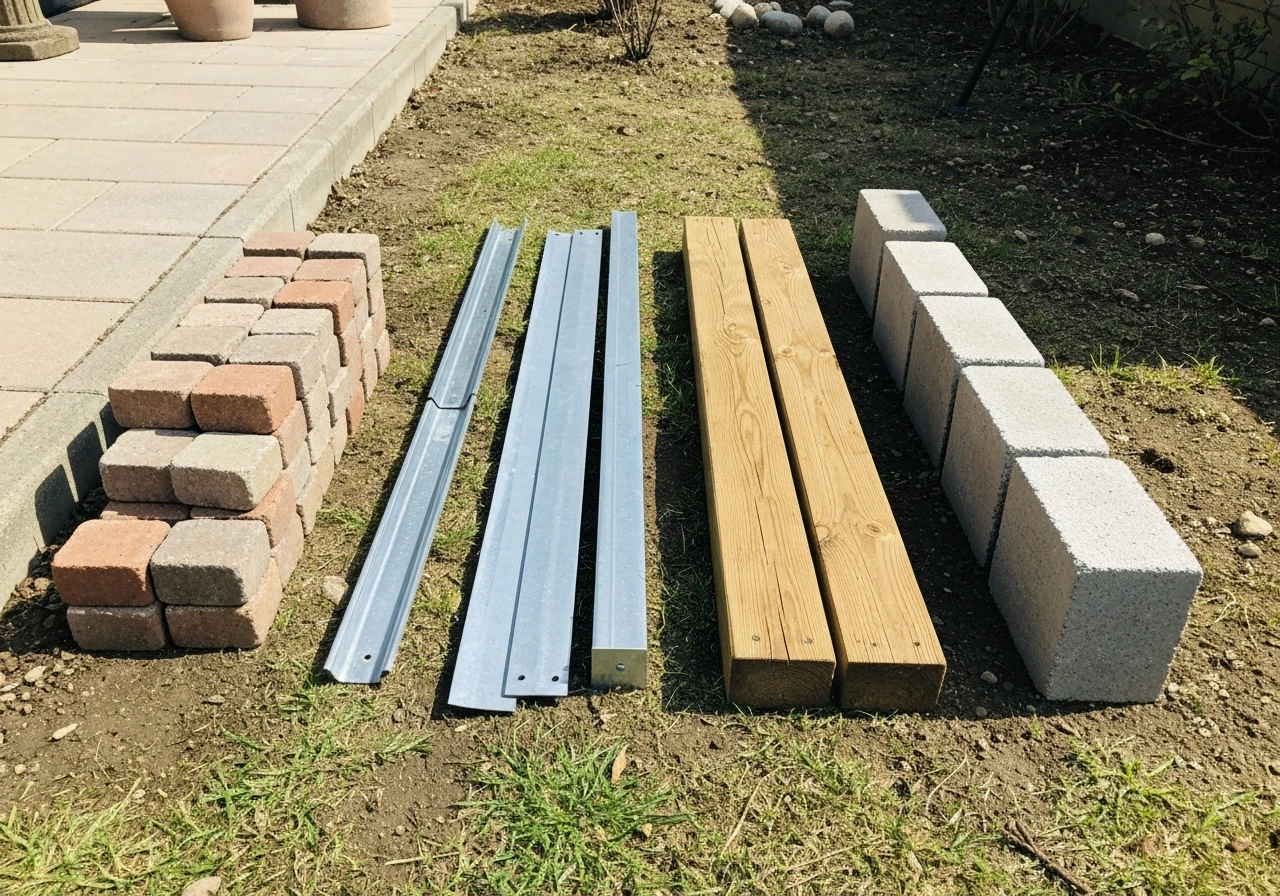
Before you dig a single inch, decide what you're building with. The edging material needs to match your patio surface, your yard's drainage conditions, your climate, and honestly, your budget. There's no universally 'best' option, but there is usually a best option for your situation.
| Material | Best For | Typical Cost (DIY) | Durability | Freeze-Thaw Risk |
|---|---|---|---|---|
| Brick | Pavers, gravel, lawn borders | Low-moderate | High if mortared or well-based | Moderate (can heave without good base) |
| Natural stone | Flagstone, gravel, garden beds | Moderate-high | Very high | Low to moderate |
| Metal (steel/aluminum) | Pavers, gravel, curved layouts | Moderate | Very high (steel); good (aluminum) | Low (re-drive after heave) |
| Landscape timber/wood | Gravel, mulch beds, informal patios | Low | Moderate (treated wood lasts longer) | Higher (frost heave loosens over time) |
| Concrete (poured or precast) | Pavers, formal patios | Moderate-high | Very high | Low if expansion joints included |
Here's my honest take after using all of these: metal edging (either steel or aluminum) is the most forgiving for DIYers working with curves and pavers because it bends easily, drives in with spikes, and holds shape well over time. Brick and stone give you the best look but demand the most prep work to stay level. Timber is cheap and fast but genuinely does heave in freeze-thaw climates, so plan to re-set it every few seasons if you live somewhere with hard winters. Poured concrete edging is the most permanent option, but it's also the most work and needs expansion joints every 16 feet or so to prevent cracking.
One more thing to keep in mind: your edging material should match or complement your patio surface material, not fight it. Brick edging around concrete pavers looks sharp. Metal edging around flagstone looks utilitarian but works fine if it's mostly hidden. Timber around a formal brick patio just looks out of place. If you're also thinking about how to border a patio with a purely decorative treatment, that's a slightly different conversation, but the structural requirements here still apply.
Planning layout: lines, curves, and elevation
Good edging starts with a good layout. Spend time here, because once you've dug your trench and set your first pieces, changing direction gets expensive. For straight runs, use two stakes and a mason's line pulled tight. For curves, a garden hose laid on the ground is your best friend: lay it out, step back, look at it from multiple angles, adjust until it flows naturally, then spray paint along the hose to mark the line. Avoid doing this on a windy day.
Elevation matters just as much as the line itself. Decide upfront whether your edging will sit flush with the patio surface, slightly proud of it (useful for keeping gravel or mulch contained), or recessed below grade on the grass side (good for mowing clearance). A typical approach for pavers is to set the edging so the top of the restraint sits level with or just below the finished paver surface. For edging that borders a lawn, you want the top no higher than about half an inch above grade on the lawn side, so you can mow over it cleanly. Mark your intended height on your stakes with a piece of tape or a pencil line before you dig.
Also think about where the edging terminates. Where does it meet the house foundation? A fence post? A garden bed? Plan those transition points now. Butting edging into a foundation without a soft stop can cause cracking as materials expand and contract, so leave a small gap or use a flexible material at connection points.
Base prep and trenching: drainage, stability, and weed control
This is where most DIY edging fails. People dig a shallow trench, drop in their edging, backfill with the dirt they dug out, and wonder why it's crooked two years later. The trench depth and base material are what actually hold everything in place.
How deep to dig
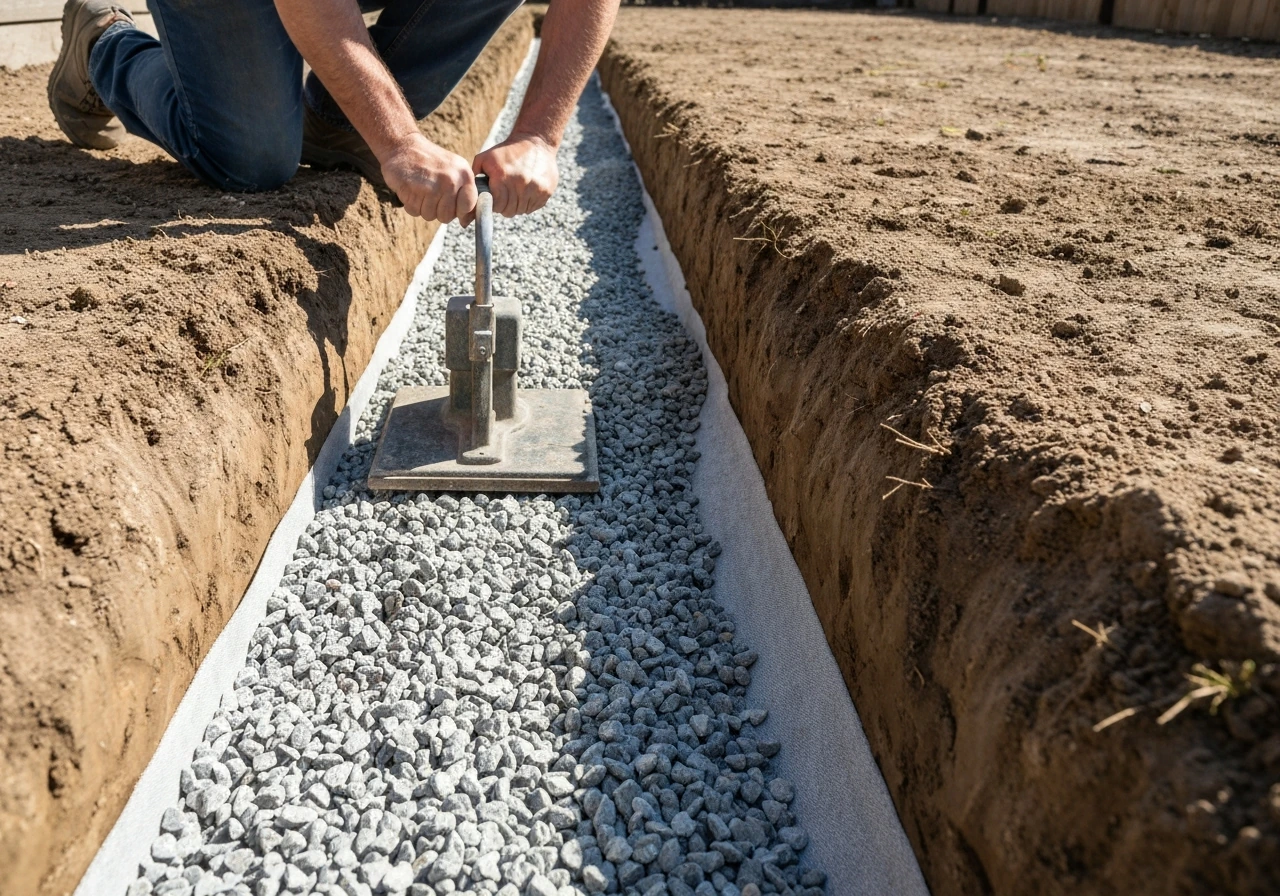
For most residential patio edging, you're digging a trench about 6 to 8 inches deep. That depth gives you room for a 4 to 6 inch compacted gravel base (the standard for well-drained areas), a 1 inch bedding sand layer if you're setting brick or stone, and then the edging material itself. If you're in clay soil or a particularly wet area, go 8 to 12 inches deep and use more gravel. The base depth matters more than people realize: the compacted gravel is what resists settlement and keeps water from pooling under the edging.
One important warning: if you're adding edging to a patio that already has pavers installed, be careful not to dig so deep alongside the paver field that you undermine the base those pavers are sitting on. A trench that goes deeper than the paver base right next to the edge can cause the outside row of pavers to sag. Keep your trench narrow and only go as deep as needed.
What to put in the trench
- Compact the subgrade first. If you've got clay, use a plate compactor or hand tamper to firm it up before adding anything. Don't skip this step.
- Add compactable gravel (road base, crusher run, or dense-grade aggregate). Fill in 2-inch lifts and compact each one. Don't soak the base while compacting or you'll soften it.
- Lay a strip of geotextile fabric along the trench bottom and sides if you're in a weed-prone area or want to prevent fine soil from migrating up into the base over time.
- Add a 1-inch layer of bedding sand on top of the gravel if you're setting brick or stone edging. Level it with a screed board or straight piece of wood.
- For metal or plastic edging that sits directly on the base, skip the sand and set the edging directly onto the compacted gravel.
The compacted base should extend at least 6 to 8 inches beyond the outer edge of your pavers to properly support the restraint. This is easy to overlook but it makes a real difference in preventing the edging from tipping outward over time.
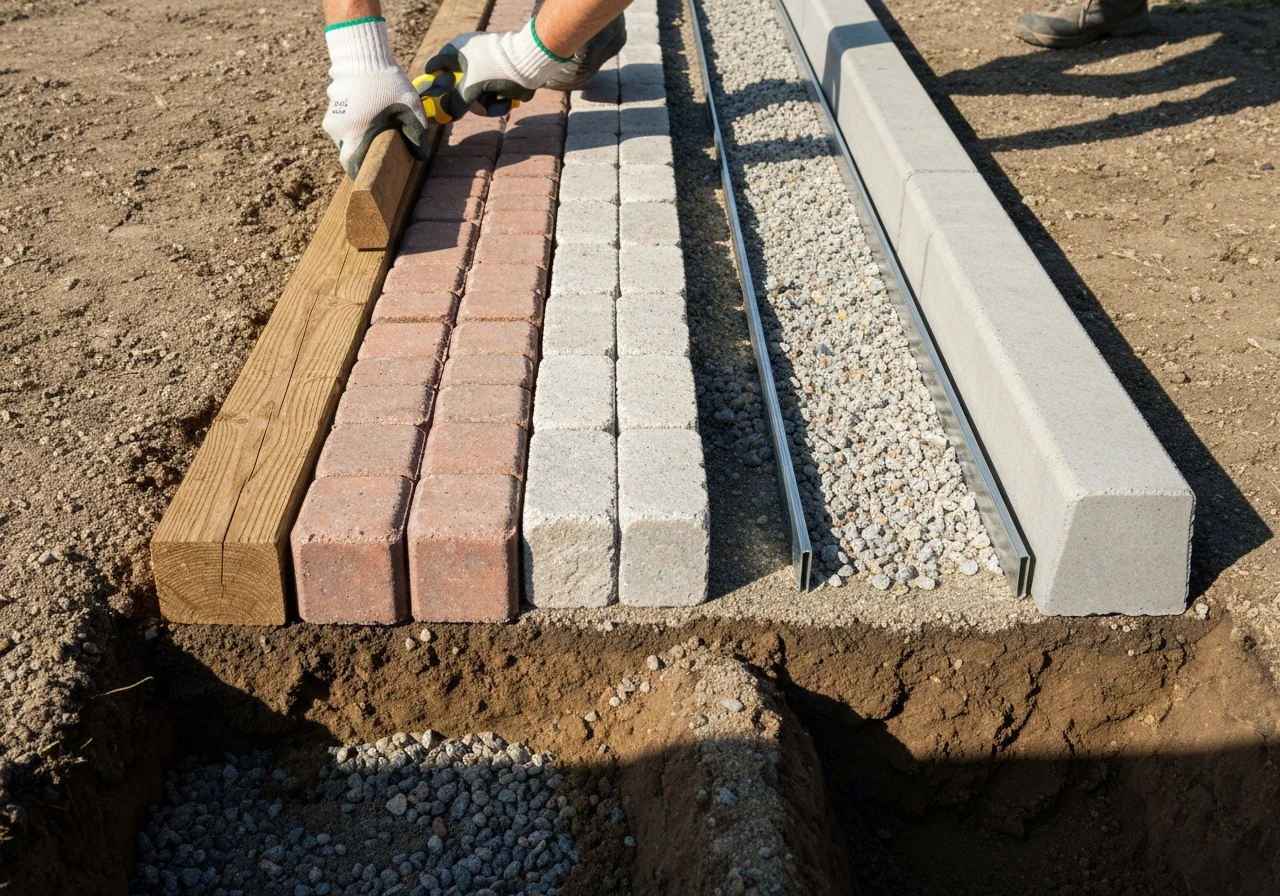
Installing common edging types: brick, stone, metal, timber, and concrete
Brick edging
Set bricks on your 1-inch bedding sand layer, tapping each one level with a rubber mallet. ICPI consumer guidance notes that [bedding sand should typically be brought up to about 3/4 in (20 mm)](https://www. willowcreekpavingstones. com/resources/pdf/icpi-consumer-guide.
pdf) relative to the edge restraint to help prevent sand loss and movement. You can stand them on end (called soldiers) for a taller border, lay them flat for a low profile, or set them at an angle (called sailors) for a decorative zigzag look. Check level frequently, every three or four bricks. For a dry-set installation (no mortar), pack the sand joints tight and use polymeric sand to fill the gaps when you're done.
For a mortared installation, use a Type S mortar bed under and between each brick, and plan your expansion joints every 16 feet to handle thermal movement. Don't skip the expansion joints in mortared systems, because they're what prevents cracking as the ground moves seasonally.
Natural stone edging
Stone edging works the same way as brick but with irregular shapes, so you'll spend more time fitting pieces together. Flagstone or cut bluestone are common choices. Set each piece on bedding sand, check for level, and tap down with a rubber mallet. For longer straight runs, snap a chalk line and keep each piece aligned to it. Gaps between stones can be filled with polymeric sand, small gravel, or groundcover plants depending on the look you want.
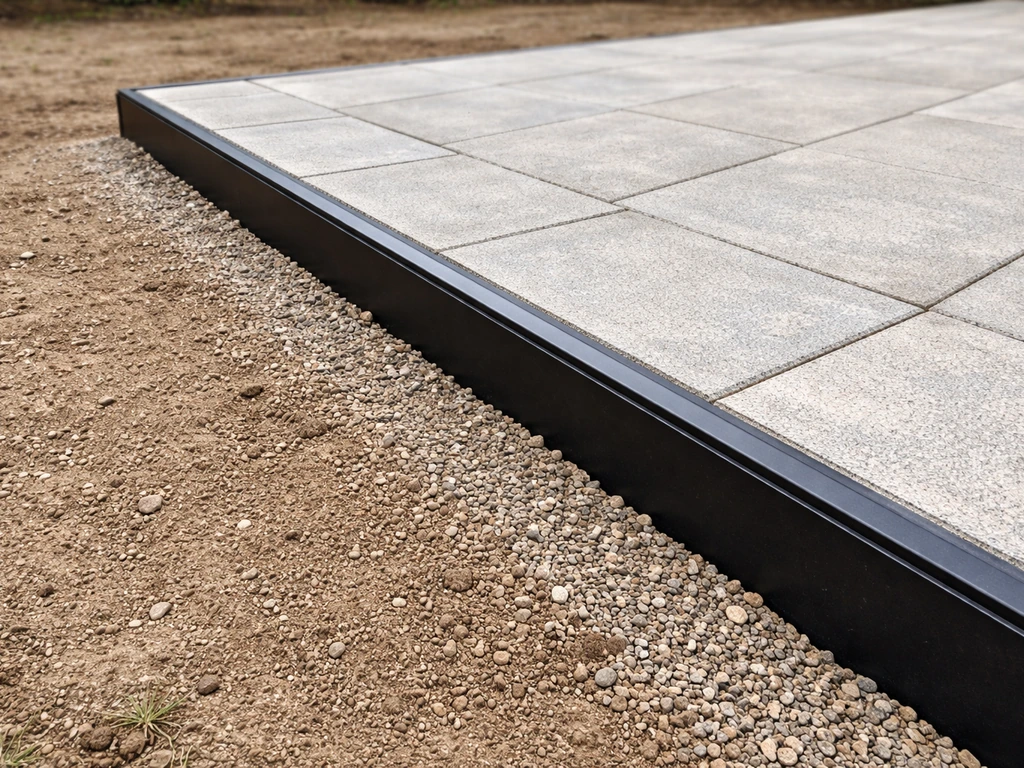
Metal edging (steel or aluminum)
Metal edging is installed directly on top of your compacted gravel base, before you screed sand and set any pavers. Set the edging strip along your layout line, aligning the top to your marked height. Then anchor it with steel spikes driven through the pre-drilled holes or tabs. Drive the spikes straight down with a hammer, stopping when the spike top is flush with the top of the edging flange.
Don't overdrive them, because bending the flange makes the edging shift. For typical pedestrian patio work, space spikes every 12 inches. In areas with heavy use or vehicle traffic, go every 8 inches. Flexible metal edging bends easily around curves.
For tight curves, make small relief cuts in the flange with tin snips. Connect sections with the manufacturer's connector stakes to keep ends from separating.
Landscape timber edging
Use pressure-treated lumber rated for ground contact (UC4B or higher). Lay the timbers in your trench on a thin gravel base, pre-drill holes, and drive 12-inch galvanized spikes or rebar stakes through the timber and into the ground every 4 feet. For corners, cut the timbers at 45 degrees and overlap layers like log-cabin corners for stacked timber borders. Be honest with yourself about your climate here: in places with hard freezes, frost heave will work on timber edging year after year. It's not a deal-breaker, but plan on checking it every spring and re-driving any stakes that have worked loose.
Concrete edging (poured or precast)
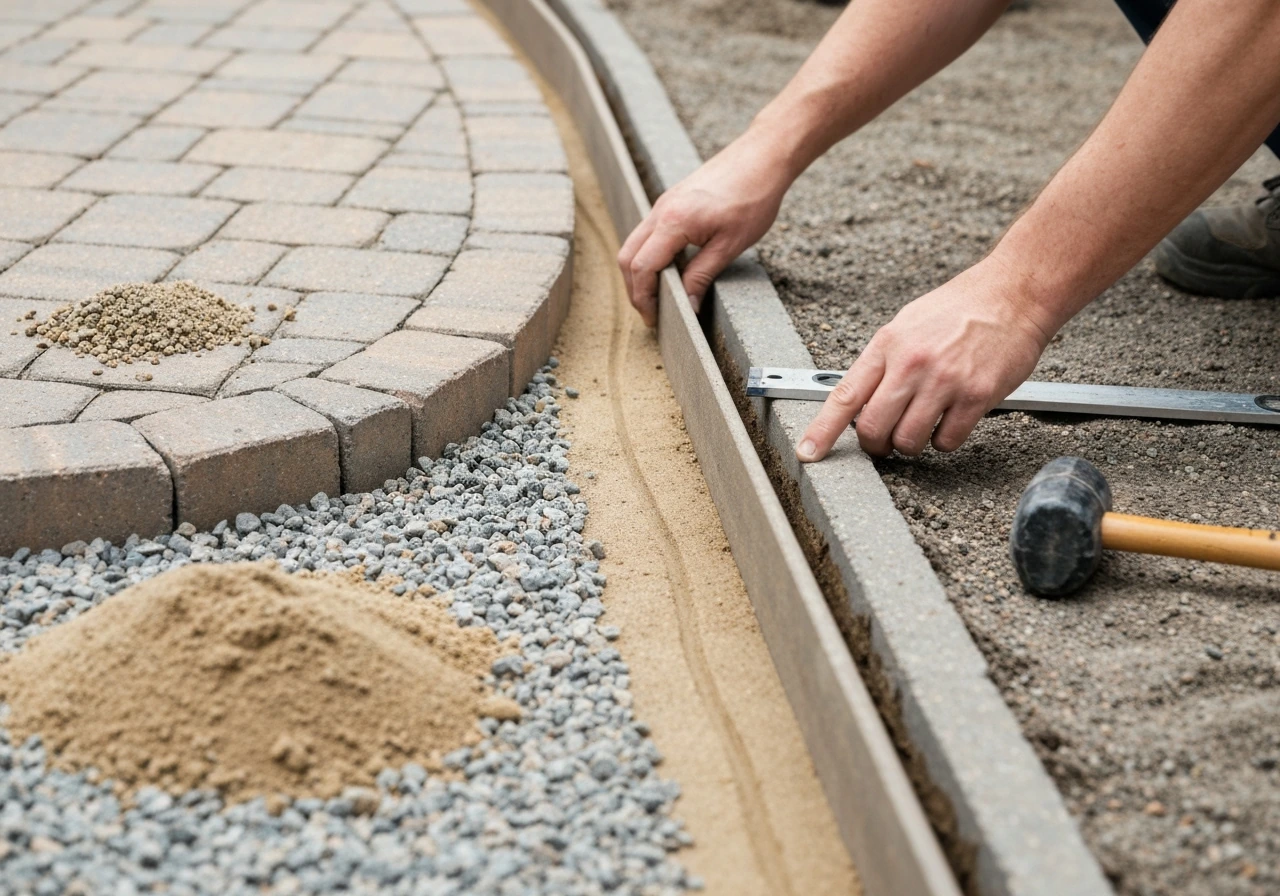
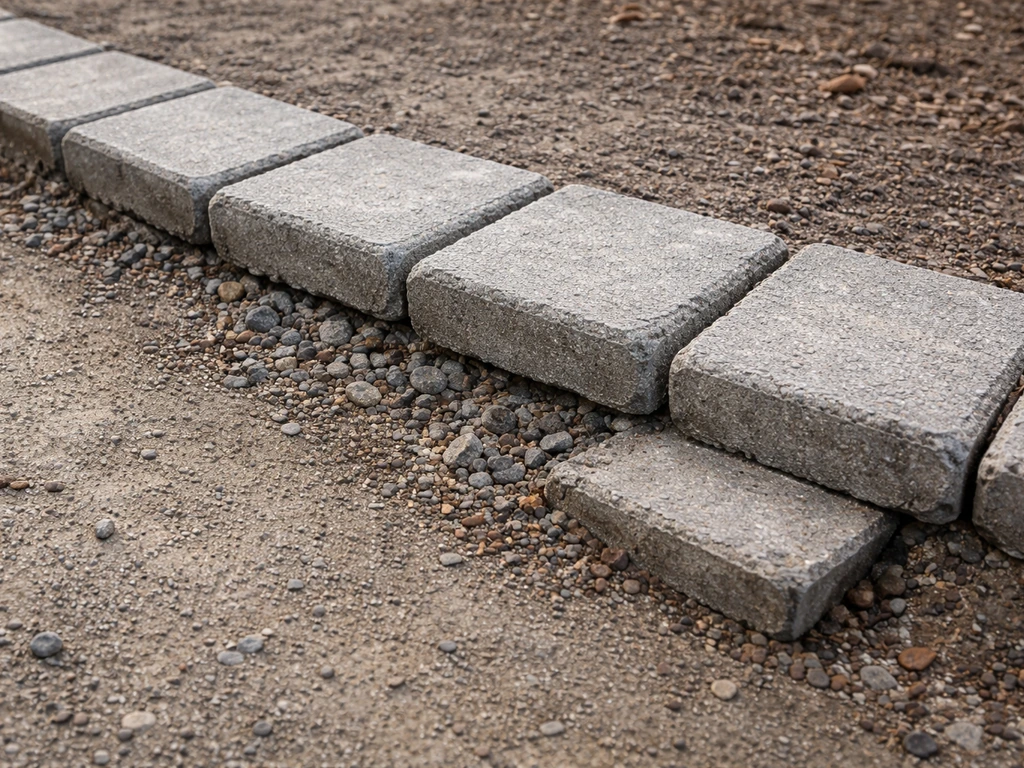
Poured concrete edging is the most permanent option. Build a simple form from 1x4 boards, stake it in place along your layout line, and pour a mix of QUIKRETE or similar bagged concrete to fill it. Typical poured edging is 4 to 6 inches wide and 4 to 6 inches deep. Trowel the top smooth and add control joints (scored lines) every 4 to 6 feet to control where cracking happens if there's any ground movement. Precast concrete edging blocks are easier: set them on bedding sand just like brick, check level, and tap into place. Both options are very durable but neither handles significant ground movement well without those control or expansion joints built in.
Securing and backfilling: leveling, compaction, and locking joints
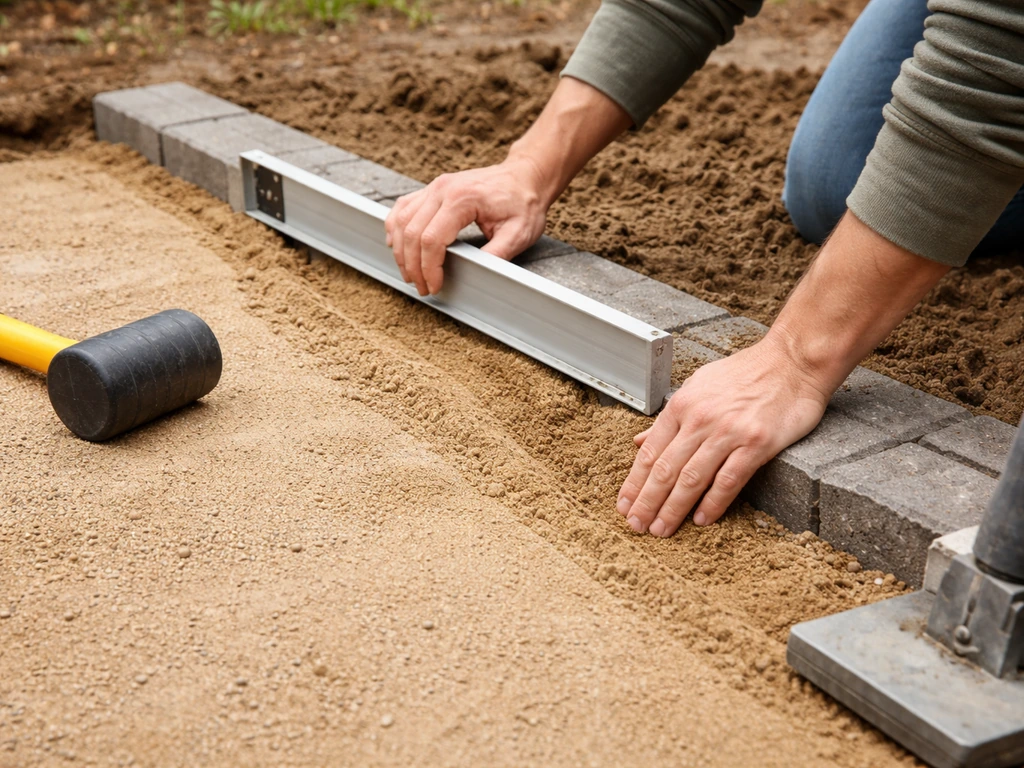
Once your edging is set, check level one more time before you do anything else. Sight down the line from both ends. Tap down any high spots. Add a small amount of sand under any pieces that rock. This is your last easy chance to fix alignment before backfilling locks things in.
Backfill the outer side of the trench (away from the patio) with the soil you dug out, adding it in thin layers and tamping each layer with a hand tamper or the back of a spade. Compact it firmly enough that there's no soft, spongy feel underfoot. Don't use a plate compactor directly against the edging itself, as the vibration can shift pieces that aren't fully anchored yet. Work the compactor parallel to the edging, not perpendicular.
For brick, stone, or precast concrete edging, fill the joints between pieces with polymeric jointing sand. Sweep it into every gap, mist it lightly with water, let it partially set, sweep again, and mist once more. Polymeric sand hardens as it cures and resists erosion, weeds, and insects. It works in joints up to about 2 inches wide. For wider gaps in stone edging, use fine gravel or a mortar mix instead. Don't rush this step: tight, well-filled joints are a big part of what keeps individual pieces from rotating or rocking under foot traffic.
Finishing details: caps, borders, and transitions to pavers, grass, and gravel
The transition from your edging to the surrounding surfaces is where a lot of DIY projects look unfinished. A little attention here goes a long way. The goal is a clean, intentional-looking line that also handles water and foot traffic without creating trip hazards or erosion.
Transitions to pavers
The top of your edging should sit at or slightly below the finished surface of adjacent pavers. Once your patio pavers are set, finishing the edge means double-checking height and transitions so the whole border looks crisp and stays stable trip hazard. If it's proud (sticking up higher), it becomes a trip hazard and mower obstacle. If metal or plastic edging is sitting too high after installation, the most common fix is to partially re-dig and re-set it lower.
For brick or stone edging that's too high, pull the pieces and remove some bedding sand before re-setting. Once the height is right, the joint between the last row of pavers and the edging gets filled with the same polymeric sand you used on the paver joints.
Transitions to lawn
Set the edging top at about half an inch above the soil level on the grass side so you can run a mower along it cleanly. If the edging is flush with or below lawn grade, grass will creep over and under it quickly. Tamp the soil on the lawn side firmly, then sod or seed right up to the edging. If you're adding a separate decorative border treatment between the patio and the lawn, the structural edging needs to be in place first. Thinking about how to edge a patio for a cleaner visual line is worth considering after the structural work is done.
Transitions to gravel
Edging that borders a gravel area needs to be tall enough to contain the gravel, typically at least 3 to 4 inches above the gravel surface. Lay landscape fabric under the gravel before you add it, and tuck it right up against the back of the edging. This prevents gravel from sinking into the soil and keeps weeds from pushing through from below.
Caps and decorative borders
If you want a more finished look, cap bricks or stone can be set flat on top of soldier-course or stacked edging to create a small ledge. This works well on raised patio edges where a finished-edge detail matters. Use construction adhesive to bond caps to the top course, especially on raised edges. If you want to explore more specific techniques for finishing the top edge, the topic of how to finish a patio edge covers decorative cap options in more detail.
Troubleshooting and maintenance: shifting, gaps, and long-term durability
Even a well-built edge needs occasional attention. Here are the most common problems and what actually fixes them.
Edging that shifts or goes uneven
The most common cause is frost heave, especially in climates with hard winters. Saturated soil freezes, expands, and pushes edging upward. Brick edging that heaves is often described as looking like a rollercoaster after a couple of winters. The fix is to pull the affected pieces in early spring once the ground has thawed completely, add gravel to re-establish the base, and re-set and re-level. For metal edging that has risen, re-drive the stakes deeper and push the strip back down into position. The long-term prevention is a deeper, well-drained gravel base that doesn't hold water near the frost line.
Gaps appearing between pieces
Gaps usually mean the base has settled unevenly or the backfill wasn't compacted enough. Pull the loose pieces, add a little sand or gravel to fill the void under the base, re-level, and reset. Then re-fill the joint with fresh polymeric sand and water it in properly. If the same gap keeps opening, you have a drainage issue: water is pooling under that section, softening the base, and causing movement. Check the grade in that area and redirect runoff if needed.
Pavers moving near the edge
If pavers near the border rock or shift when you step on them, the problem is almost always base compaction, not the edging itself. Polymeric sand in the joints won't fix a soft base. Lift the affected pavers, check the base for soft spots or water damage, add fresh compactable gravel, compact it, re-screed the sand, and re-lay the pavers. This is more work, but it's the only real fix. Adding more polymeric sand over a moving paver just hides the problem for a few months.
Cracking in mortared or poured concrete edging
Cracks in mortared brick or poured concrete edging usually happen at weak spots where expansion and contraction have no release valve. If you didn't include expansion or control joints, the concrete or mortar will crack wherever it wants. Small hairline cracks can be filled with flexible concrete caulk rated for exterior use. Larger cracks or sections that have lifted indicate a base or drainage problem underneath. Those sections need to be removed and rebuilt with proper base prep and joints.
Basic annual maintenance
- Every spring, walk the entire perimeter and look for heaved, tilted, or sunken sections. Address them early before the problem spreads.
- Check polymeric sand joints annually and top up any areas where sand has eroded, then re-wet to activate the binder.
- Re-drive any metal or timber anchor stakes that have worked loose after freeze-thaw cycles.
- Pull any weeds that establish in joints immediately, before their roots can force pieces apart.
- Check the grade on both sides of the edging each year to make sure water isn't pooling against it.
- For timber edging, inspect for rot at ground level every two to three years and replace sections that have softened.
Building good patio edging isn't complicated, but it does reward patience at the base prep stage. Get the trench right, compact the gravel properly, set your pieces level, anchor them well, and backfill firmly. Do that and you'll have a border that looks great and stays put for years, whether you're going simple with metal edging or taking on a full brick soldier course with mortared joints.
FAQ
Can I install patio edging without compacting the gravel base first?
You can, but the odds of movement go way up. Compact the gravel in thin layers until you cannot push it with firm hand pressure, then keep the base well-drained. If you skip compaction, even properly set edging can tilt or gaps can appear as the edge settles.
How deep should I dig if my patio pavers already exist?
Dig only as deep as needed to match the edge system height, do not undermine the paver base. A practical method is to measure the paver base thickness at an existing edge (if visible) and keep your trench depth no deeper than that nearby base, while keeping the trench narrow so you do not disturb the outside row.
What’s the best way to keep edging straight when my yard has sloped ground?
Set the layout line first, then mark the intended top height at regular intervals on stakes (not just one end). Use a level or string line for the top, so you adjust height as you go rather than forcing a straight line across changing grade.
How do I choose between flush, proud, or recessed edging for pavers?
Use flush or slightly proud for most paver patios to prevent gravel and mulch escape. Recessed edging works better where you want mowing clearance, but it can encourage soil and grass creep if you leave the joint loose. Match the edge height to your maintenance routine, not just the look.
Do polymeric sand work for every edging joint type?
No. Polymeric sand is designed for relatively narrow joints (about up to 2 inches wide) and for joints that stay mostly stable. For wider gaps in irregular stone, or if joints are likely to move, use fine gravel or a mortar mix strategy rather than relying on polymeric sand.
How much water should I use when misting polymeric sand?
Use light misting, enough to initiate curing, not so much that it washes sand out of joints. After the first partial set, sweep again and mist once more. Over-watering can weaken the joint and lead to early washout or weeds returning.
Metal edging is bending in waves, what’s causing it?
Usually the spikes are overdriven (bending the flange), sections were not anchored often enough on curves, or the base is not firm and level. Re-set by pulling and re-aligning, then drive spikes straight down until the top is flush, with tighter spacing for heavier traffic areas.
Can I cut flexible metal edging to fit tight corners without ruining it?
Yes, for tight curves use small relief cuts in the flange, then bend gradually. Keep connector stakes in place at section joins so ends do not separate as the curve forces the strip to move.
How do I prevent frost heave from ruining timber or stone edging?
The main prevention is drainage and a deeper gravel base that does not hold water near the frost line. For timber, re-drive stakes after winter if needed, but also ensure water has a route away from the edge rather than pooling behind it.
What’s the right way to handle expansion joints with mortared brick edging?
Include them at planned intervals, and do not mortar across the joint like it is just another seam. Expansion joints relieve seasonal movement, if you skip them you can get cracking where you least want it.
Why is my edging separating from pavers or leaving a visible gap?
Most separations come from an uneven or soft base, not from the edging itself. Lift the affected pavers, inspect for soft or water-damaged material, rebuild the base with compactable gravel, re-screed sand, then reset and refill joints properly.
My edging is too high after installation, can I just backfill more to fix the height?
No, backfilling usually creates a similar problem elsewhere because it changes support conditions. The correct fix is to partially re-dig and re-set the edging to the marked height, then re-pack the base and restore the joint fill where needed.
How do I transition edging at a foundation or fence line without cracking?
Avoid hard butting against rigid surfaces. Leave a small gap for movement or use a flexible transition material at the connection point, then dress the surrounding grade so runoff does not funnel into the gap.
What should I do if my edging sinks or rocks under foot traffic?
Pull the affected section and check the void under it, base material and compaction are the usual culprits. Add compactable gravel or sand where needed, re-level the pieces, and only then re-install and re-fill joints, since adding joint sand alone will not stabilize a soft base.
Next Article
How to Edge a Raised Patio: Clean Borders That Last
Learn how to edge a raised patio with stable, clean borders. Step-by-step materials, base prep, corners, drainage, and l