To edge a raised patio, you install a rigid border along the outer perimeter that locks your patio surface in place, ties visually into the face or risers of the raised structure, and separates the patio from the surrounding landscape. The process goes: choose your edging material, excavate and compact a base for it, set and level each unit, secure it (with spikes, mortar, or adhesive depending on your material), then finish with drainage provisions and weed control. Done right, the edge won't shift, crack, or let weeds push through even after several freeze-thaw cycles.
How to Edge a Raised Patio: Clean Borders That Last

Nolan Lennox
1 Jun 2026
What edging actually does on a raised patio
A raised patio sits above the surrounding grade, which means its outer edge is under constant lateral pressure from soil, frost heave, foot traffic, and the weight of the patio surface itself pushing outward. Without a proper edge restraint, pavers migrate, gravel spreads, and the patio face starts to slump or crumble over time. The edging you install is the thing stopping all of that. It's not just decorative, though it can look great. It's a structural element.
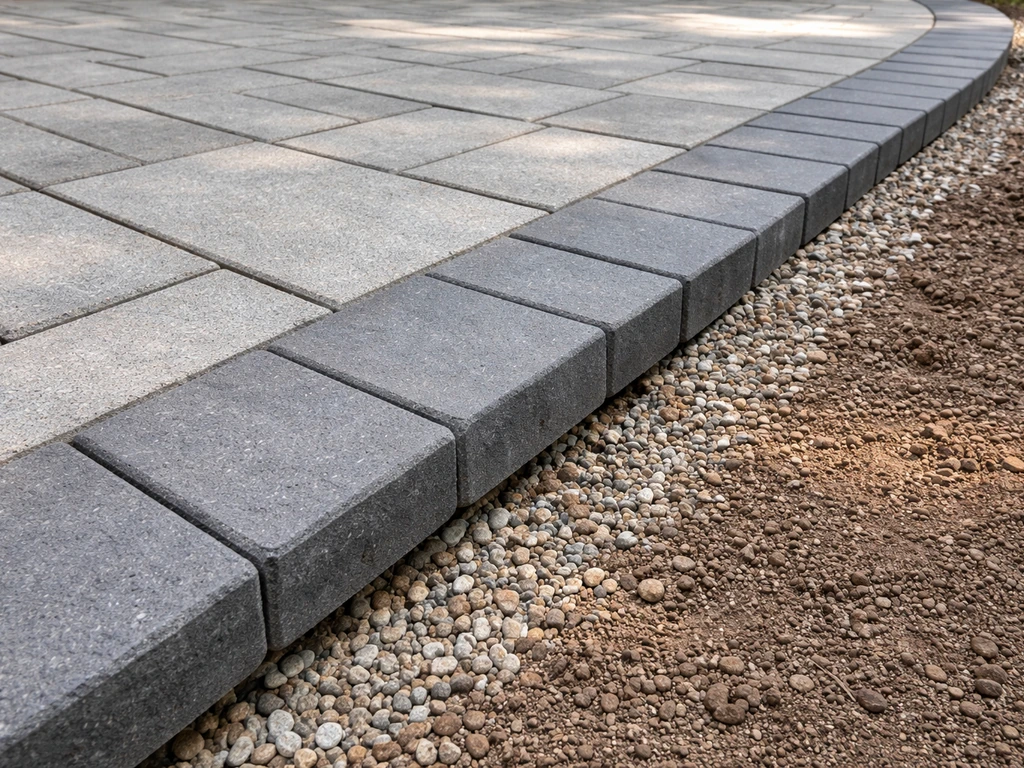
On a raised patio specifically, edging has to do two jobs at once. First, it acts as a perimeter restraint for whatever surface material you're using, whether that's pavers, brick, gravel, or composite decking. Second, it integrates with or sits directly above the patio's face wall or risers, so the transition from the top surface down to the surrounding yard is clean and intentional rather than crumbling. If you're also planning how to border or finish the outer face of your raised patio, those elements work hand in hand with what you install on top.
Choosing your edging material
This is the decision that shapes every other choice in the project, so make it before you buy anything. Your edging needs to be compatible with your patio surface, strong enough to hold under lateral load, and weather-resistant for your climate. Here's how the common options stack up.
| Material | Best For | Approximate Cost | Durability | DIY Friendliness |
|---|---|---|---|---|
| Concrete pavers / brick | Paver or stone patio surfaces | $1–$4 per linear ft | Excellent (25+ years) | Good — dry-set or mortar |
| Natural stone | Flagstone or upscale paver patios | $3–$8 per linear ft | Excellent | Moderate — heavier, needs cutting |
| Pressure-treated wood | Budget builds, wood-surface patios | $1–$3 per linear ft | Moderate (10–15 years) | Easy — screws and spikes |
| Composite lumber | Wood-look with less maintenance | $3–$6 per linear ft | Good (20+ years) | Easy — same as wood install |
| Galvanized steel | Clean modern look, paver systems | $2–$5 per linear ft | Very good | Easy with spike system |
| Aluminum edging | Curved layouts, any surface | $1–$4 per linear ft | Good | Very easy — flexible |
For most raised paver or brick patios, I'd lean toward matching brick or concrete pavers set on a compacted base with mortar or construction adhesive at the corners. They blend with the patio, handle load well, and last decades with minimal care. If you're on a budget or your patio surface is composite or wood, pressure-treated 2x4 or 2x6 lumber staked into the ground with galvanized spikes gets the job done cleanly. Metal edging is a great middle-ground option for curves and irregular shapes, and it installs faster than anything else.
One thing worth knowing if you're edging with wood: pressure-treated lumber directly in contact with soil will eventually rot, typically in 10 to 15 years depending on your climate and drainage. Composite lumber costs more upfront but doubles that lifespan with almost no maintenance. If you want to dig deeper into wood-specific edging methods, that's its own process with some differences in how you attach and seal it. To build a live edge wood patio, focus on the same edge durability fundamentals, especially rot resistance, proper drainage, and tight connections where the wood meets the patio frame.
Tools, supplies, and measurements to have before you start
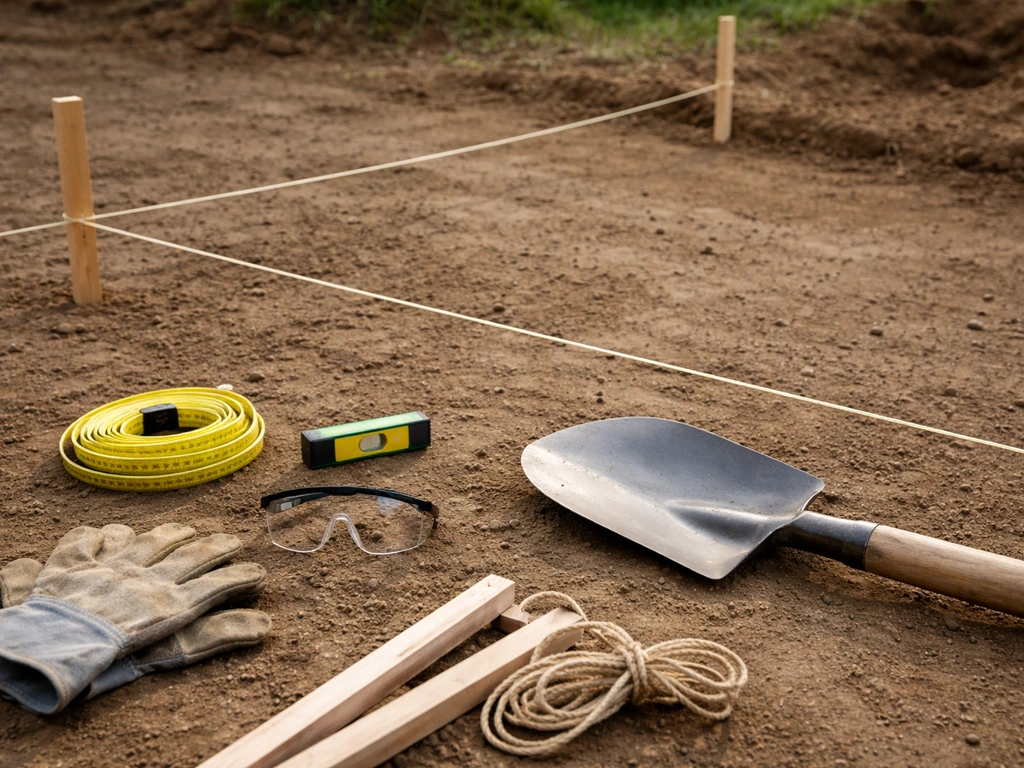
Don't start digging until you have everything on the list below. Running to the hardware store mid-install when you've got open excavation and loose edging sitting in the dirt is a headache you don't need.
- Mason's line and stakes (for marking a straight or curved edge line)
- Tape measure and pencil or chalk spray
- Spade or flat-bladed edging spade
- Hand tamper or plate compactor (rent for larger areas)
- Rubber mallet
- Level (4-ft is ideal, 2-ft works)
- Angle grinder or wet saw with diamond blade (for cutting pavers/stone/brick)
- Circular saw or miter saw (for wood/composite edging)
- Tin snips or hacksaw (for metal edging)
- Torpedo level for checking individual units
- Gravel or crushed stone for base (about 2–3 inches worth)
- Coarse bedding sand if you're dry-setting pavers
- Type S mortar or landscape construction adhesive
- Galvanized landscape spikes (10-inch for wood/metal edging)
- Weed barrier fabric and landscape staples
- Safety glasses and work gloves
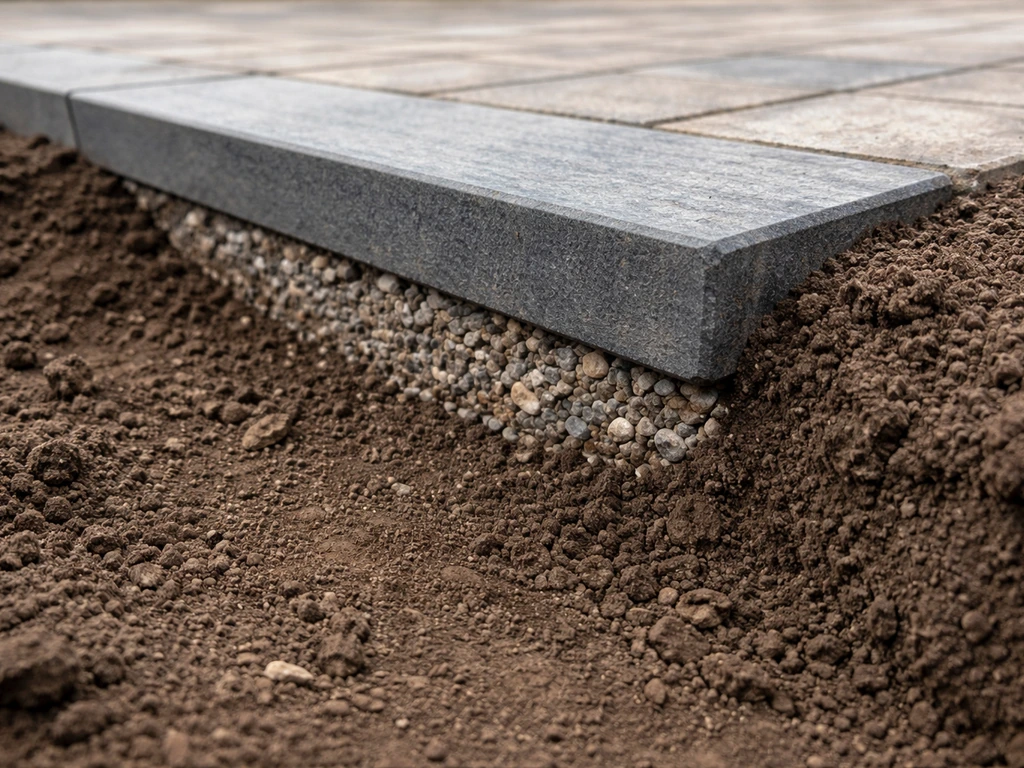
For measurements, walk the full perimeter of your raised patio and record the total linear footage. Add 10% for waste and cuts. Note any corners (inside and outside), any curved sections, and any spots where the edging will meet a riser or step. If your edging is brick or pavers, do a quick dry layout before buying materials so you can verify your unit count. For concrete pavers used as edge restraints, plan for the restraint to cover at least two-thirds of the side depth of your surface pavers, that's the standard that ensures the restraint is actually doing its structural job.
Prep work: marking, excavating, grading, and building the base
Good prep is 80% of a successful edge install. Skipping or rushing the base is why edges fail. Here's the sequence.
- Mark your edge line using mason's line strung between stakes. For a straight edge, use a chalk line snapped on the existing patio surface projected down the face. For curves, use a garden hose laid flat to find the shape, then mark it with chalk spray or sand poured along the hose.
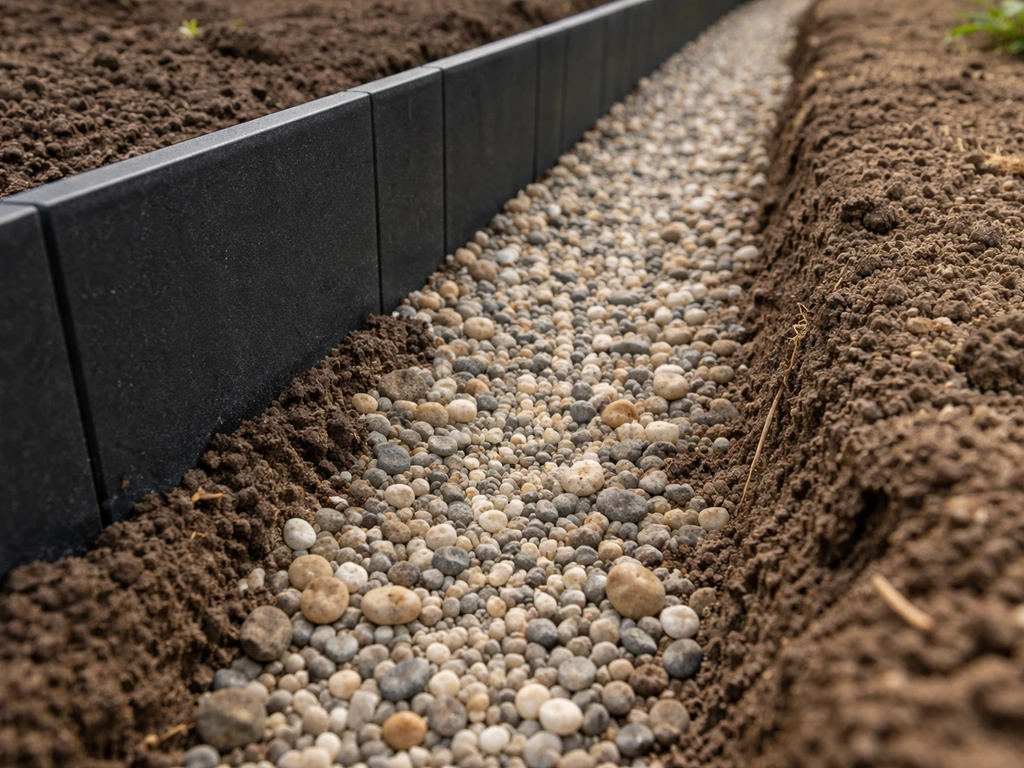
- Excavate along the outside of the line. For paver or brick edging, dig down to 6–8 inches below the finished grade you want. For wood or metal edging, you only need to go 3–4 inches. Slope the bottom of the trench slightly away from the patio (about 1 inch per 8 feet) to encourage drainage.
- Remove all vegetation, roots, and loose soil from the trench bottom. Tamp the exposed subgrade firmly with a hand tamper until it doesn't give when you press on it. Soft spots mean future settling.
- Pour a 2–3 inch layer of compacted crushed stone (3/4-inch clean gravel works well) into the trench. Compact it. This base layer is what keeps your edging from sinking or tilting over time. Do not skip this step, and do not use soil backfill as your base — it compresses and drains poorly.
- For paver or brick edging on clay-heavy or wet soil, this is also when you'd consider drainage. If water pools near the patio edge after rain, cut small vertical drainage holes through any concrete base before covering, or install a perforated drain pipe alongside the base before you set edging.
How to install the edging: dry-fit, mortared, and anchored methods
There are three main ways to actually set and secure patio edging, and the right one depends on your material. Here's how each method works.
Dry-fit with compacted base (best for pavers and brick)
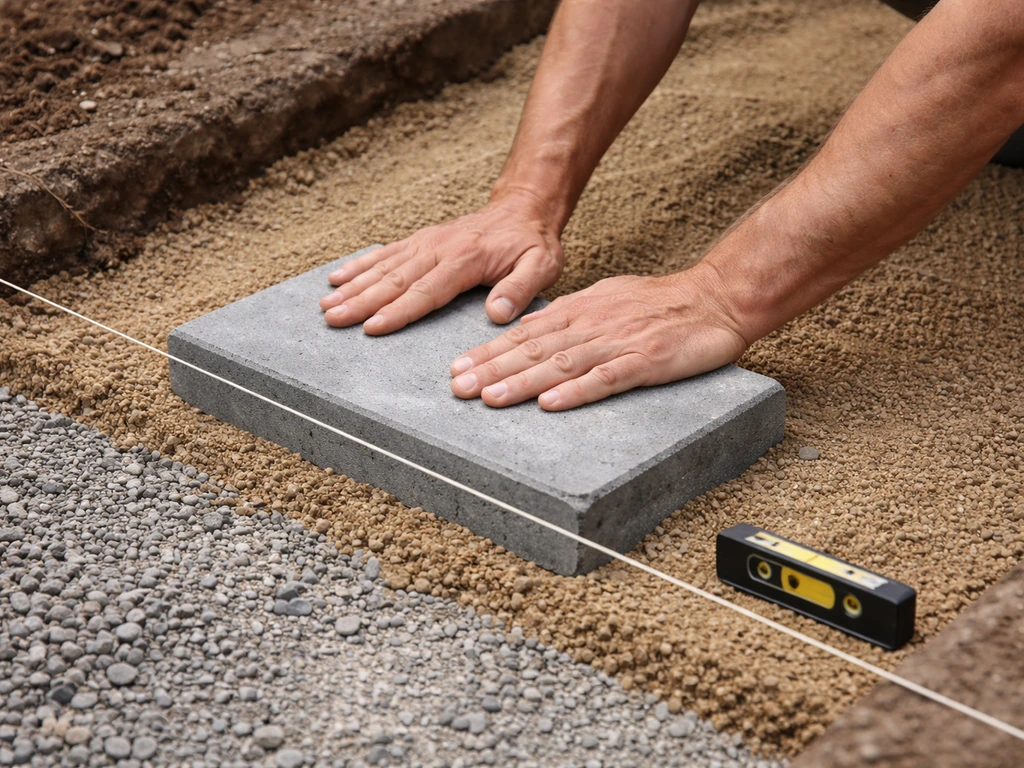
- Spread a 1-inch layer of coarse bedding sand over the compacted gravel base in the trench.
- Set your first paver or brick unit at one end, pressing it firmly into the sand. Check it with a level in both directions — side to side and front to back.
- Continue setting units end to end, tapping each one with a rubber mallet to seat it. Keep checking level every 3–4 units.
- Once all units are set, pack coarse sand into the joints between them by sweeping dry sand across the surface and tamping gently with the mallet.
- Backfill the outer side of the trench with compacted soil or gravel, pressing it against the edging face to lock units in place horizontally. This is what actually stops lateral movement — the backfill holds the restraint from outside while the patio base holds it from inside.
Mortared edging (best for permanent stone, brick, or concrete
- After compacting your gravel base, pour a 1–2 inch bed of Type S mortar mix (mixed to a stiff peanut butter consistency) along the base trench.
- Set each unit into the mortar bed, pressing and wiggling slightly to make full contact. Level each unit immediately — mortar sets fast, especially in heat.
- Apply mortar to the sides of each unit before setting the next one (this is called buttering). Leave no air gaps in the joints.
- Wipe off excess mortar from faces with a damp sponge before it skins over. Once it skins, it stains.
- Let the mortar cure 24–48 hours before backfilling or putting any load on the edging. In cold weather (below 40°F), cover it with burlap and wait longer.
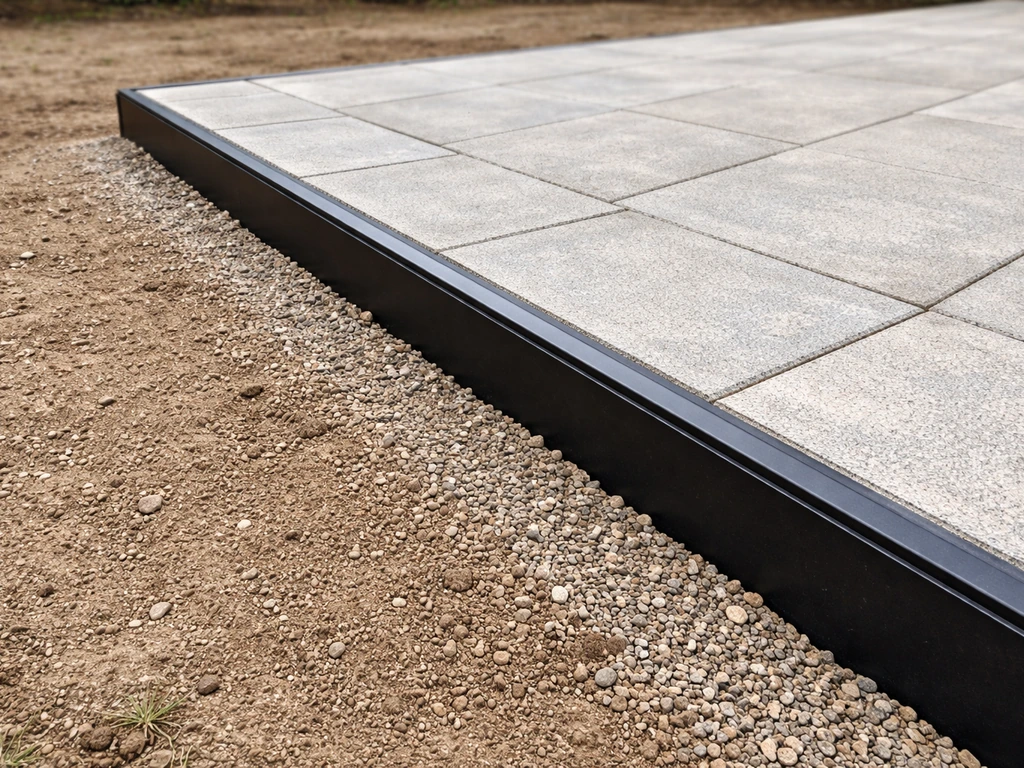
Anchored edging (best for metal, aluminum, and wood)
- Position your first section of edging along the trench, flush with your marked line and at your target finished height.
- Drive a 10-inch galvanized landscape spike through the pre-punched holes in metal edging (or through a wood edging board) every 12–18 inches. Use a hand maul or hammer — the spike should drive into the compacted gravel base below.
- For wood edging (2x4 or 2x6 treated lumber), pre-drill pilot holes to avoid splitting, then drive 12-inch galvanized spikes at an angle through the face of the board into the ground every 16 inches.
- Connect sections with the manufacturer's connector clips for metal, or by overlapping and screwing boards together for wood. All connections should be rigid, not floppy.
- Check level across the full run and adjust before all spikes are fully driven. It's much easier to pull a partially driven spike than a fully driven one.
Handling corners, curves, and connections to risers
Corners and curves are where most DIY edging installs get sloppy. Take your time here, these details are what separates a patio that looks professional from one that looks like a weekend project.
Outside corners (90-degree and angled)
For pavers and brick at outside corners, cut a 45-degree miter on each unit so the two pieces meet cleanly at the point. Use a wet saw with a diamond blade for a clean cut. If you don't have one, you can rent a tile or masonry saw for about $40–$60 per day. Don't try to snap-cut corners, you'll get rough edges. For metal or aluminum edging, cut to length with tin snips and use the manufacturer's corner connector piece. For wood edging, miter the boards at 45 degrees and fasten with exterior-grade screws driven from both sides at the corner.
Curves
Flexible aluminum or steel edging handles curves naturally, just bend it to your line and spike it in place every 8–10 inches on tight curves (closer spacing than straight runs keeps it from kinking). For brick or pavers on curved runs, you'll cut pie-shaped wedges to follow the curve. The tighter the curve, the more pieces and cuts you need. If the curve is gentle, you can sometimes cheat by setting units at a slight angle and filling the gaps with mortar or sand. Avoid gaps wider than about half an inch, they invite weeds and ant nests.
Connecting edging to risers and steps
Where your edging meets the face wall, riser, or step of the raised patio, you need a solid connection that won't open up over time. For mortar-set edging, run a bead of mortar into the joint where the edging meets the riser face and tool it smooth. For dry-set paver edging, butt the last unit tight against the riser and use construction adhesive (like Loctite PL Premium) on the contact face. For wood or metal edging, drive a screw or anchor bolt directly into the patio frame or face wall if it's wood, or use masonry anchors if the riser is concrete or block. This joint is where separation happens most often, it's worth the extra fastener.
Finishing up: leveling, drainage, weed control, and cleanup
Once the edging is set and secured, do a final level check across the full perimeter before you touch anything else. Walk the edge and press on each unit, nothing should rock or shift. If something moves, pull it, repack the base material underneath, and reset. It's much easier to fix now than after the soil has settled around it.
Drainage
The outer face of your edging needs backfill, but how you backfill affects drainage significantly. In areas with clay soil or poor drainage, backfill with pea gravel or crushed stone rather than native soil. Gravel doesn't hold water against the back of your edging, which is one of the main causes of frost heave and mortar cracking over time. CMHA notes that excess water draining from the concrete base is achieved using 2 to 3 in. (50 to 75 mm) diameter vertical holes through the concrete, which is a detail relevant to stopping water-related edge problems 2 to 3 in. diameter vertical holes through the concrete. If you're dealing with a slope or water running toward the patio base, this is the point to add a perforated drain pipe behind the edging before you fill the trench.
Weed control
Lay weed barrier fabric in the trench before you set your gravel base, and extend it up the outer face of the edging before backfilling. Overlap any fabric seams by at least 6 inches and pin them with landscape staples every foot. For the joints between edging units, polymeric sand (for paver edging) or a bead of landscape caulk (for wood and metal) will stop weeds better than regular joint sand alone. Polymeric sand hardens when wet and stays firm, which also helps prevent ants from nesting in joints.
Final cleanup and finishing details
Sweep or blow any loose sand, mortar crumbs, or gravel debris off the patio surface and away from the edging. If you used mortar, mist the joints lightly with water to initiate the cure. For wood edging, apply a coat of exterior wood sealant to any cut ends, this is where rot starts. If you edge a patio with wood, sealing the cut ends helps prevent premature rot and keeps the lineup tight for years exterior wood sealant. For stone or brick, a penetrating masonry sealer (applied once the mortar is fully cured, usually after 28 days) will protect against staining and weathering. Stand back, check your lines one more time, and make any final tweaks to joint sand or backfill before calling it done.
Finishing the edge of your raised patio is one of those projects where the work is very visible, and the payoff is immediate. A clean, level edge makes the whole patio look intentional and solid rather than thrown together. From here, you might look at how to finish the patio edge with caps or trim pieces, or explore bordering the outer face of the raised structure for a fully polished look. If you're aiming for the cleanest results, see our step-by-step guide on how to finish a patio edge with caps, trim, or edging transitions finish the patio edge. If you want step-by-step help, review our guide on how to border a patio for the full process from layout to finishing. Once the edging is set, you can build on it by learning how to finish the patio edge with caps or trim pieces. Both of those details layer on top of what you've built here and can really elevate the final result.
FAQ
Can I install patio edging before laying the pavers or decking?
Yes, you can edge before the patio surface is fully installed, but you need to plan the height so the top of the edging matches the final thickness of your pavers, brick, or decking. If the patio top ends up higher or lower later, you will create a gap at the riser joint that can open up and invite weeds.
What should I use for backfill behind raised patio edging?
Avoid using native soil as backfill behind the edging in cold or wet climates. Native soil compacts and holds water, which increases frost heave risk and can crack mortar at the riser. Pea gravel or crushed stone keeps water from sitting behind the edge.
Can I replace just part of the edging on a raised patio?
You can, but it is only safe if the edge is still restrained and stable after you remove the old material. If you currently have movement, settlement, or a failed base, piecemeal replacement will usually repeat the problem. The practical approach is to excavate back to solid base, redo the restraint section, then reconnect at the riser with a tight joint.
What should I do if an edging unit rocks or sinks after installation?
If you see rocking units, the base is underfilled or not compacted. Pull the loose section, scrape away loose material, add base material in thin lifts, compact thoroughly, then reset and recheck level across multiple adjacent units.
How deep should my edging restraint extend for raised paver patios?
For raised patios, aim for consistent restraint coverage at the contact depth. As a rule of thumb, edge restraints like concrete pavers should extend at least about two-thirds of the side depth of the patio units so the edging can resist lateral push, not just act as a decorative border.
How does cold weather affect mortar-set edging on a raised patio?
It depends on the edging type, but general guidance is to avoid freezing mortar work. Cold weather can prevent proper curing and weaken the joint at the riser. If you must work near freezing, use appropriate cold-weather mortar practices and allow extra cure time before traffic and freeze-thaw conditions.
Can I use wood edging on a raised patio riser without sealing every joint?
Typically, yes, but keep the transition tight where wood meets concrete or block. Use exterior-rated screws and seal cut ends, then pre-drill to reduce splitting. The key is preventing a gap at the riser joint, because that opening is where movement and rot risk start.
What gap size is acceptable between edging pieces and along curves?
Avoid gaps that are larger than roughly half an inch at the edging line. Larger openings allow weeds and ants to establish, and they also let sand or joint material wash out over time, which can worsen shifting.
How do I handle corners and curves with metal edging?
Use corner connectors for metal edging and follow the manufacturer’s alignment method, because forcing corners can bow the line and reduce restraint. For curves, keep the spacing and anchoring consistent and avoid bending metal too sharply, which can create kinks.
Can I use polymeric sand for joints with raised patio edging, and when should I apply it?
Polymeric sand is usually best for locking paver joints, but only after the base and edging are fully stable and dry. If the bedding is too wet or not compacted, polymeric sand can fail to lock. Also, avoid over-application, and follow the misting instructions to activate it correctly.
What if water collects behind the raised patio edge?
If your patio edge is near a downspout, slope, or persistent runoff, you should add drainage provisions behind the edging before final backfill. A perforated drain pipe placed behind the edging (with proper slope) can prevent water pressure from building up against the restraint and reduce frost-heave and mortar cracking risk.
Can I add decorative caps or trim after edging is installed?
Yes, but only as a top finish step, not as the main structural restraint. If you add caps or trim, the under-connection between edging and riser still needs to be tight, otherwise the finish can look fine while the base joint slowly separates.
What’s the best way to fix an edging measurement mistake discovered mid-install?
If your measurements are off, the most common fix is to adjust the last section placement at a less visible location, then cut units to size with proper saw methods. Trying to stretch gaps with extra mortar or thin joint material often fails over time, because it does not compensate for a missing or loose base.
Next Article
How to Border a Patio: Step-by-Step DIY Edging Guide
Step-by-step DIY guide to border a patio with edging, prep, drainage tips, curved corners, materials, and cost estimates