To build patio steps you can actually use safely and comfortably, you need three numbers before anything else: the total rise (the height from ground to patio or door threshold), your desired riser height (aim for 6 to 7 inches), and your available run (how far out from the patio edge you have room to work). Divide the total rise by your riser height to get your step count, then use Blondel's rule (2 × riser + tread depth = 24 to 25 inches) to dial in the tread depth. Once those numbers are on paper, the rest of the plan, material, base prep, and build sequence, falls into place quickly.
Patio Steps Plans: Layout, Dimensions, and DIY Build Guide

Nolan Lennox
13 May 2026
What to decide before you pick a plan
A lot of people jump straight to looking at photos and picking a style they like, then try to reverse-engineer dimensions from there. That usually creates problems. Start with the practical constraints first, then choose a style that fits them.
Location
Where your steps land matters more than most people realize. You want them to be the natural path people actually walk, not a 45-degree detour to the gate. Look at where foot traffic already wears down the grass or creates a mud path. That's usually the right spot. Also consider drainage: steps shouldn't funnel water toward a door threshold or foundation. A location that sheds water to the side is almost always better than one that channels it straight toward the house.
Total height (the rise)
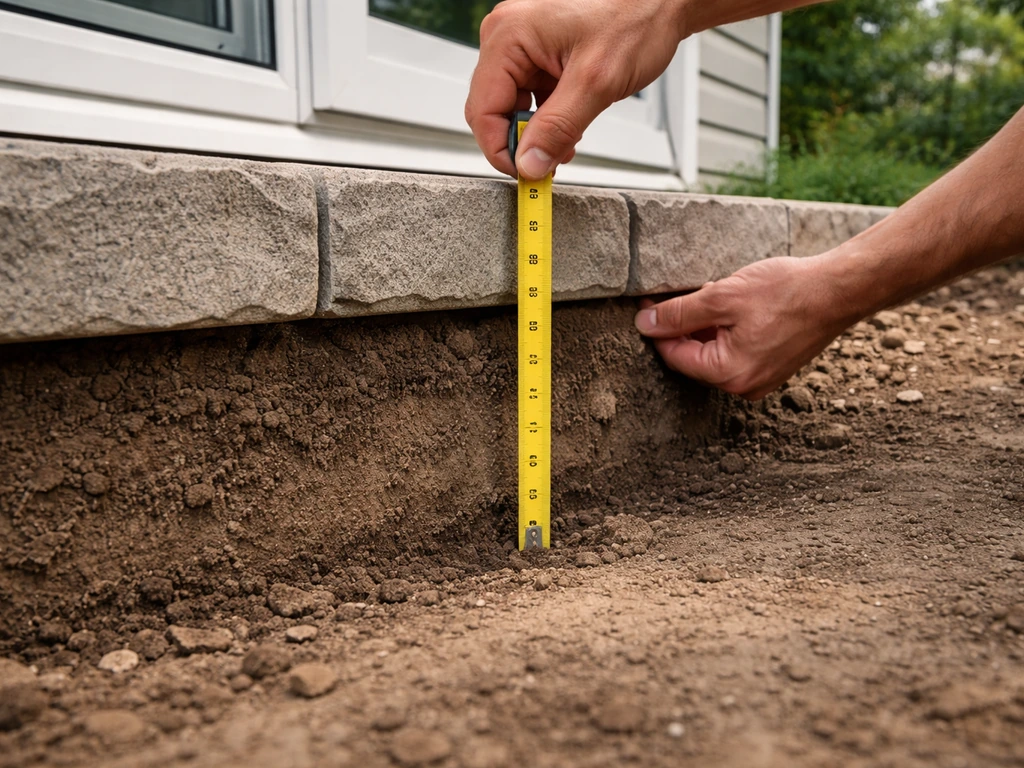
Measure the vertical distance from your finished patio or door threshold down to the finished grade where the bottom step will land. Do this carefully, it's the number everything else depends on. Use a long level or a string line with a line level to get an accurate reading, especially if the ground slopes away unevenly.
Width
For a single person, 36 inches wide is functional. For a comfortable two-person pass or a relaxed, welcoming feel, go 48 to 60 inches or wider. Wide steps also give you a visual anchor between patio and yard and are often safer because people aren't forced to step sideways. If you're building a semi-circular or curved design, the width at the front edge will be wider than at the back, so plan for that in your material estimate.
Style
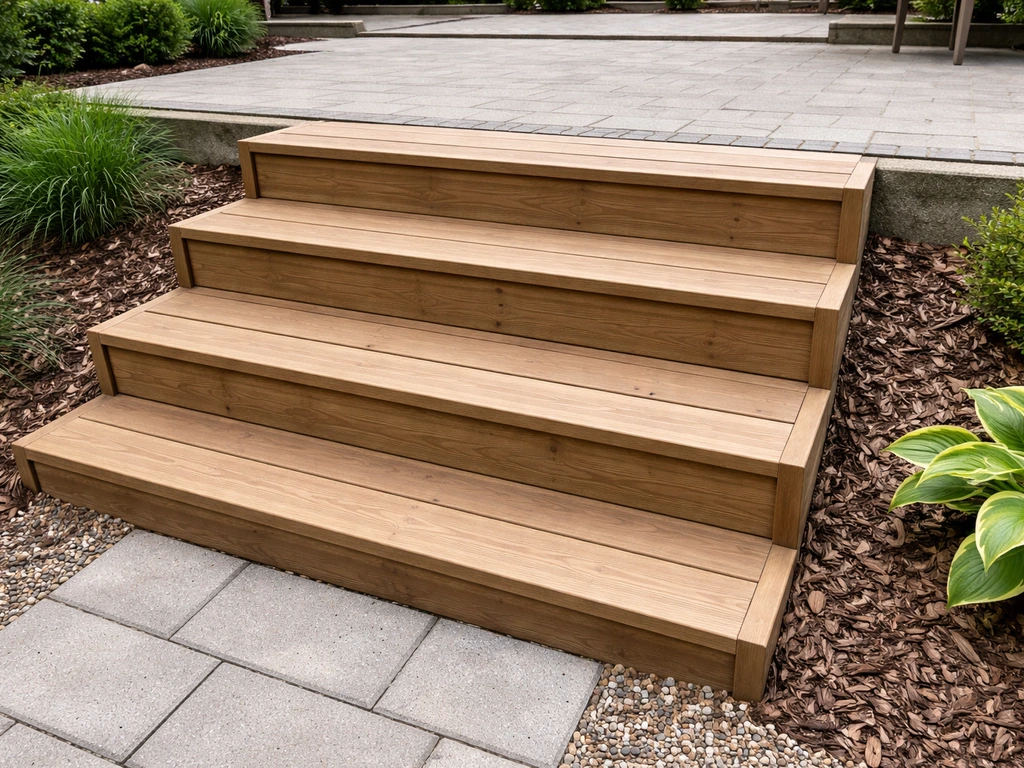
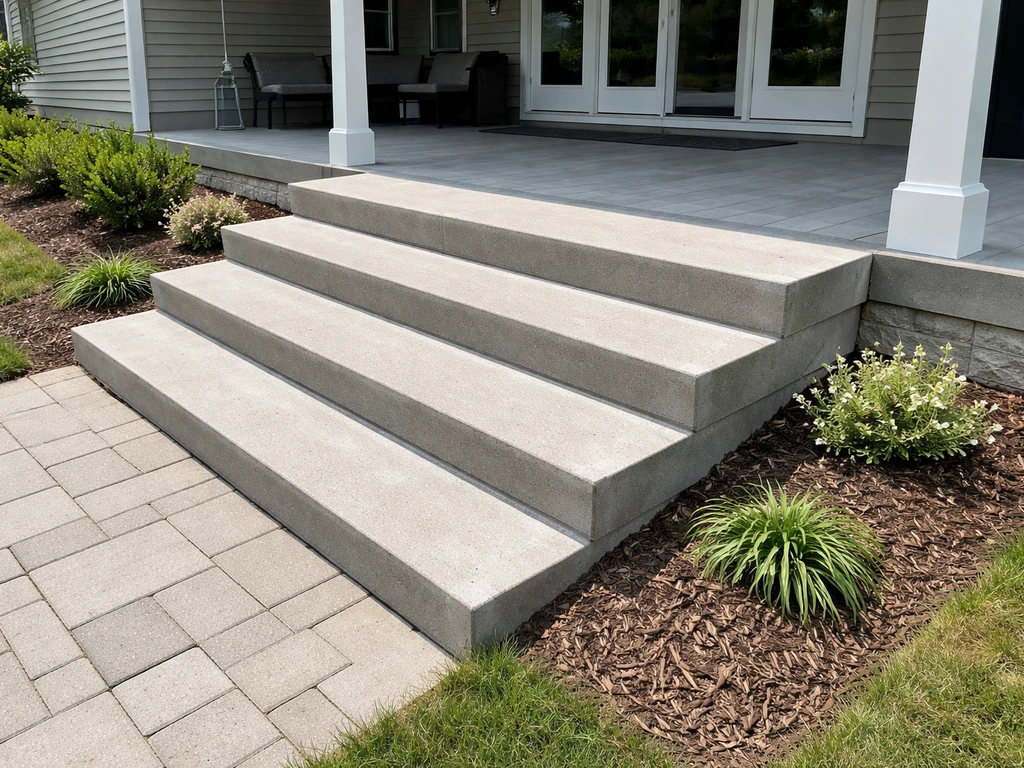
The four most common residential styles are straight rectangular steps, angled (splayed) steps that widen toward the bottom, semi-circular or curved steps, and freestanding landing-style steps for low rises of one or two steps. Straight steps are easiest to build and work with almost any material. Splayed and curved steps look great but add layout complexity and material waste. Pick style after you've confirmed the dimensions work, not before.
Sizing the steps so they're actually comfortable
The IRC sets a maximum riser height of 7-3/4 inches and a minimum tread depth of 10 inches. Those are the legal minimums, not the comfort targets. For outdoor patio steps, I'd push for risers between 6 and 7 inches and treads between 12 and 14 inches. That range satisfies Blondel's rule (2R + T = 24 to 25 inches), which is the most reliable comfort formula I've used: if your riser is 6.5 inches, your tread should be around 11 to 12 inches (2 × 6.5 + 12 = 25). Outdoor steps are typically shallower and wider than indoor stairs because you're walking down them in dim light, in sandals, sometimes with your hands full.
Calculating your step count
Measure your total rise in inches, then divide by a trial riser height. For example, a total rise of 21 inches divided by 3 gives 7 steps at 7 inches each. Divide by 7 and you get 3 steps at exactly 7 inches. Always round to a whole number of steps, then adjust the riser height slightly so all risers are equal. A 21-inch total rise works out cleanly at 3 steps of 7 inches. A 19-inch rise at 3 steps gives 6.33 inches per riser, totally fine. Uneven risers are a tripping hazard and a code violation, so always do this math before you start cutting or laying anything.
Total run and landing tie-in
Multiply your step count by your tread depth to get the total run, the horizontal distance the steps will consume. Three steps with 12-inch treads need 36 inches of run in front of the patio. Make sure you have that space, and that the landing (the patio surface itself or a small platform at the top) is at least 36 inches deep so someone can stand at the top while another person comes up. If your run runs into a fence, driveway, or another structure, either reduce the tread depth (keeping it above 10 inches), add a landing, or reconsider the step location.
Measuring and mapping the layout on your actual site
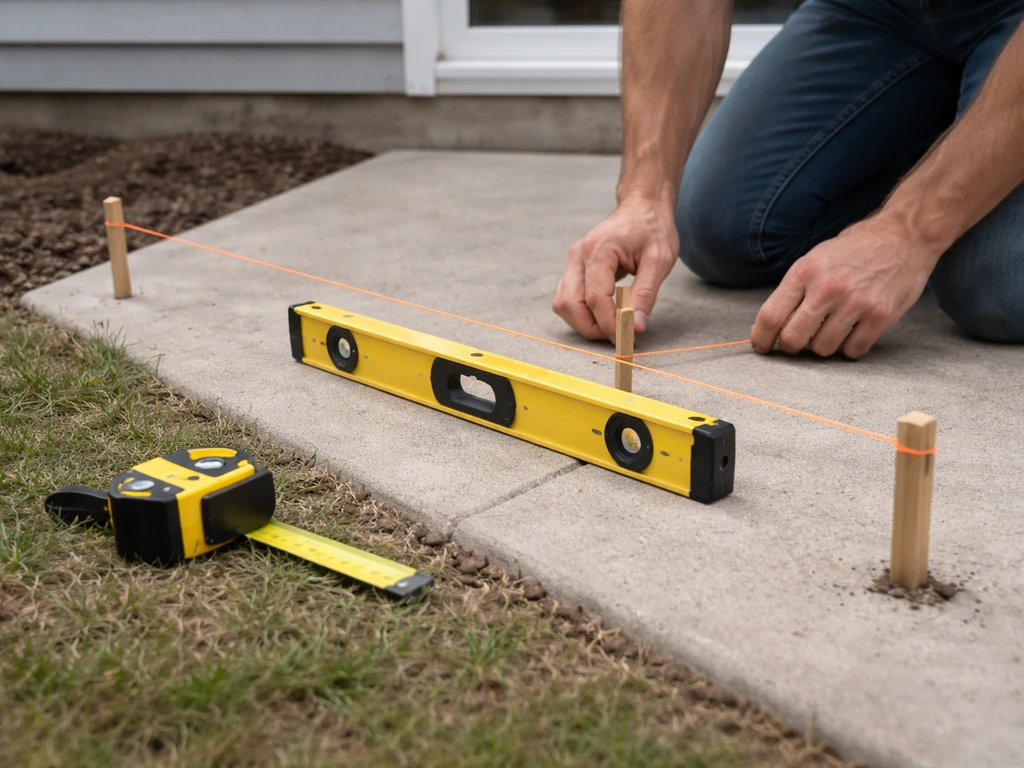
Do not trust your eye. Grab stakes, string line, a tape measure, and a 4-foot level. This 20-minute site check will save you hours of rework.
- Establish your finished top elevation: measure from the door threshold or patio surface down to the ground using a level string line. Write that number down. That's your total rise.
- Set stakes at the front corners of where the bottom step will land. Run string lines from the patio edge out to those stakes to map the horizontal run.
- Check that the ground is reasonably level left-to-right across the full step width using a level on a long board. If one side is more than 2 inches lower than the other, you'll need to account for that in your base prep.
- Check drainage direction: pour a small amount of water at the base of the planned steps and watch where it goes. Ideally it runs away from the house. If it pools or runs toward the foundation, adjust placement or plan for a slight cross-slope in the base.
- Mark the full footprint with spray paint or stakes and stand back. Make sure the steps align with how you actually approach the patio — adjust before you dig, not after.
One thing I always do: walk the path from the yard to the door a few times before committing to a stake location. You'll catch alignment issues that look fine on paper but feel awkward in practice.
Picking your material (and being honest about your skill level)
This is where most DIYers spend too long overthinking. Here's a straightforward comparison to help you decide fast.
| Material | Best For | Approx. Cost (materials) | Skill Level | Durability |
|---|---|---|---|---|
| Poured concrete | Permanent, clean look, any height | $$$ | Intermediate–Advanced | Excellent (30+ years) |
| Concrete block / CMU | Tall or retaining-style steps, structural | $$–$$$ | Intermediate | Excellent |
| Natural stone or pavers | Attractive, flexible, repairable | $$$–$$$$ | Beginner–Intermediate | Very good (20+ years) |
| Brick | Classic look, easy to replace individual units | $$–$$$ | Beginner–Intermediate | Very good |
| Gravel with edging | Low rises, budget builds, rustic look | $ | Beginner | Fair (needs upkeep) |
| Pressure-treated wood | Fast build, budget-friendly, raised patios | $–$$ | Beginner–Intermediate | Good (10–15 years w/ maintenance) |
| Composite decking | Clean look, low maintenance, raised patios | $$$ | Intermediate | Very good (20+ years) |
My honest recommendation: if your total rise is under 14 inches and you want a weekend project, pavers or brick on a compacted gravel base are the sweet spot for most DIYers. If you are building patio steps, choose a base that compacts well so the steps stay level as the ground shifts pavers or brick on a compacted gravel base. They're forgiving, repairable, and look great. Poured concrete is the most durable option but requires forming, mixing (or a ready-mix truck), and more experience. Wood and composite make a lot of sense when the steps tie into an existing deck or raised patio structure. Gravel works for a single step or a very informal path edge, but it shifts over time and isn't great for primary entry points.
Getting the base right (this is where steps fail or last)
The most common reason patio steps crack, shift, or sink within a few years isn't the material, it's a bad base. Every material type needs a stable, compacted subbase that won't move with freeze-thaw cycles or rain.
Excavation and subbase
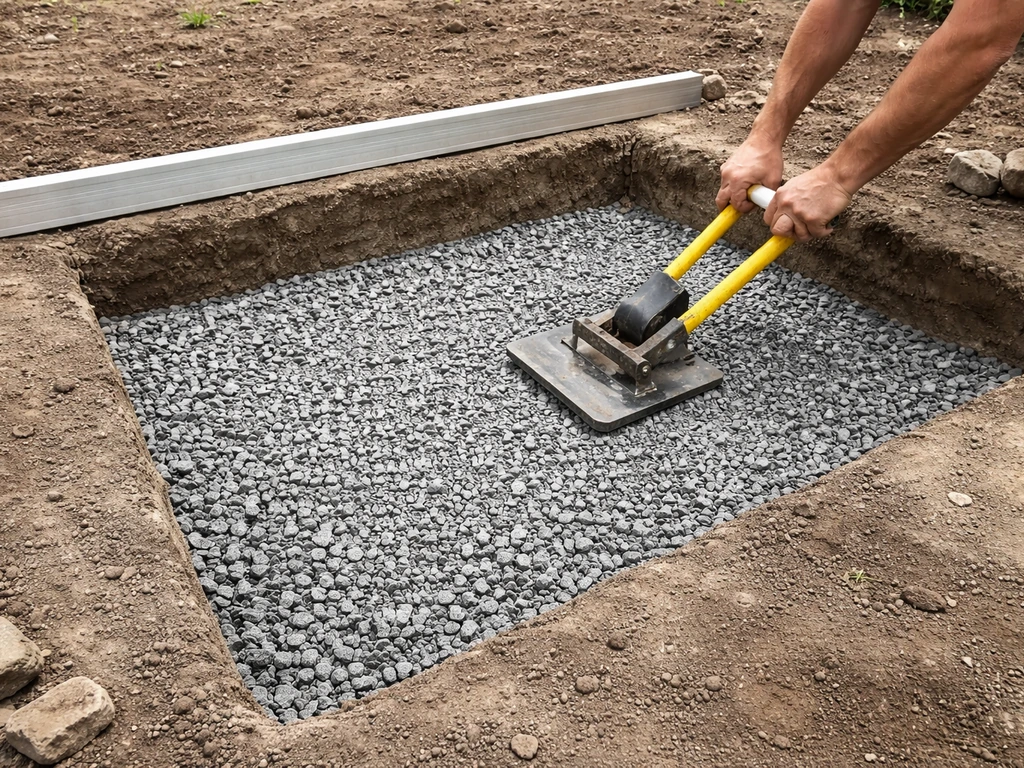
For pavers, brick, or stone steps, excavate 6 to 8 inches below your planned finished surface. Fill with crushed stone (3/4-inch clean or road base), add it in 2 to 3 inch lifts, and compact each lift with a plate compactor or a hand tamper. Finish with a 1-inch layer of coarse sand (for pavers/brick) or a 1/2-inch layer of stone dust. For poured concrete, excavate to undisturbed soil, add 4 inches of gravel, compact, and add rebar for steps taller than one riser. For wood or composite, you're anchoring posts or stringers into the ground or patio frame, treated lumber or concrete footings below the frost line are required in cold climates.
Edging and containment
Without edging, paver and brick steps spread outward over time. Use steel, aluminum, or plastic paver edging spiked every 12 inches on both sides and across the front nose of each step. For steps that tie into the patio slab or a retaining wall, the existing structure acts as edging, just make sure the connection point is solid.
Slope for drainage
Build a 1/8 to 1/4 inch per foot slope into each tread, pitching slightly forward (toward the yard, away from the house). This keeps water from pooling on the tread surface, which causes ice in winter and moss growth year-round. Don't go steeper than 1/4 inch per foot or the steps will feel tilted underfoot.
How to actually build the steps: material-by-material walkthrough
Paver or brick steps
- Excavate the full footprint to 6–8 inches below finished grade, cutting a rough stair profile into the soil.
- Fill each step's tread area and riser face area with compacted crushed stone, building the stair profile in gravel. Each 'step' in the gravel base should be about 1/2 inch lower than your finished tread height to account for sand and paver thickness.
- Lay a 1-inch screed layer of coarse sand on each tread area. Screed it flat with slight forward pitch.
- Set the first (bottom) riser course: stand pavers or bricks on edge as the riser face, then lay tread pavers flat behind them. Tap each unit level with a rubber mallet.
- Repeat for each step up, checking level and run as you go.
- Once all units are set, compact with a plate compactor (use a rubber pad to avoid cracking pavers), sweep polymeric sand into joints, and compact again.
- Install edging on both sides and the front nose before final compaction.
Poured concrete steps
- Excavate, add 4 inches of compacted gravel, and stake rebar grid (use #3 or #4 rebar in a 12-inch grid).
- Build forms using 3/4-inch plywood for risers and 2x lumber for the sides. Brace them well — wet concrete exerts significant pressure.
- Mix or order concrete (3,000 psi minimum for exterior steps). Pour from the bottom step up, consolidating with a rod or vibrator.
- Screed tread surfaces flat with slight forward pitch using a float.
- After initial set (a few hours), finish tread surfaces with a broom drag for texture/grip.
- Cure for at least 7 days, keeping the surface damp or covered. Do not walk on it for 24 hours minimum.
- Strip forms after 24–48 hours, patch any voids, and seal after full cure (28 days ideally).
Pressure-treated wood or composite steps
- Calculate stringer cuts using your riser and tread dimensions. Use a framing square with stair gauges to mark the cuts on a 2x12 PT board.
- Cut stringers carefully with a circular saw, finishing corners with a hand saw to avoid over-cutting.
- Anchor the top of each stringer to the patio rim joist or ledger with joist hanger hardware. Anchor the bottom to a concrete pad or concrete footings set below the frost line.
- Install treads using PT 2x6 or composite decking boards. Leave a 1/8-inch gap between boards for drainage. Use exterior-rated screws or hidden fasteners.
- Check that each tread is level side-to-side and has a slight forward pitch (1/8 inch per foot).
- For composite treads, follow the manufacturer's max span specs — composite usually needs a stringer every 16 inches for rigid, safe treads.
Gravel steps with edging (low-rise, informal)
- Cut the stair profile into the soil, stepping it back so each tread is at least 12 inches deep and each riser is 6–7 inches tall.
- Set landscape timbers, large flat stones, or steel edging as the riser face for each step, staked securely.
- Fill each tread area with 3–4 inches of compacted crushed stone, then top with pea gravel or decomposed granite.
- Re-compact and re-dress with fresh gravel annually — these steps shift more than rigid materials.
The finishing details that make steps last and feel safe
Grip and traction
Smooth paver and concrete surfaces get slippery when wet. A broom finish on concrete adds grip during the pour. For pavers and stone, anti-slip grit additive mixed into sealer does the job. You can also use adhesive grip tape strips (the kind sold for stair nosings) on each tread nose, not the prettiest option but practical for existing steps that have become slick.
Handrails
The IRC requires a handrail on any stairway with four or more risers. Even if you're building three steps and code doesn't require it, I'd still consider a rail if anyone in the household is elderly or if the steps are the primary entry. A simple steel or aluminum post-and-rail system anchored with surface-mount post bases is a manageable DIY add-on.
Lighting
Low-voltage step lights (the kind that mount in the riser face) are inexpensive, easy to wire into an existing landscape lighting system, and make a big safety difference at night. Solar riser lights are even simpler if you don't want to run wire. Neither is required, but both are worth the hour of install time.
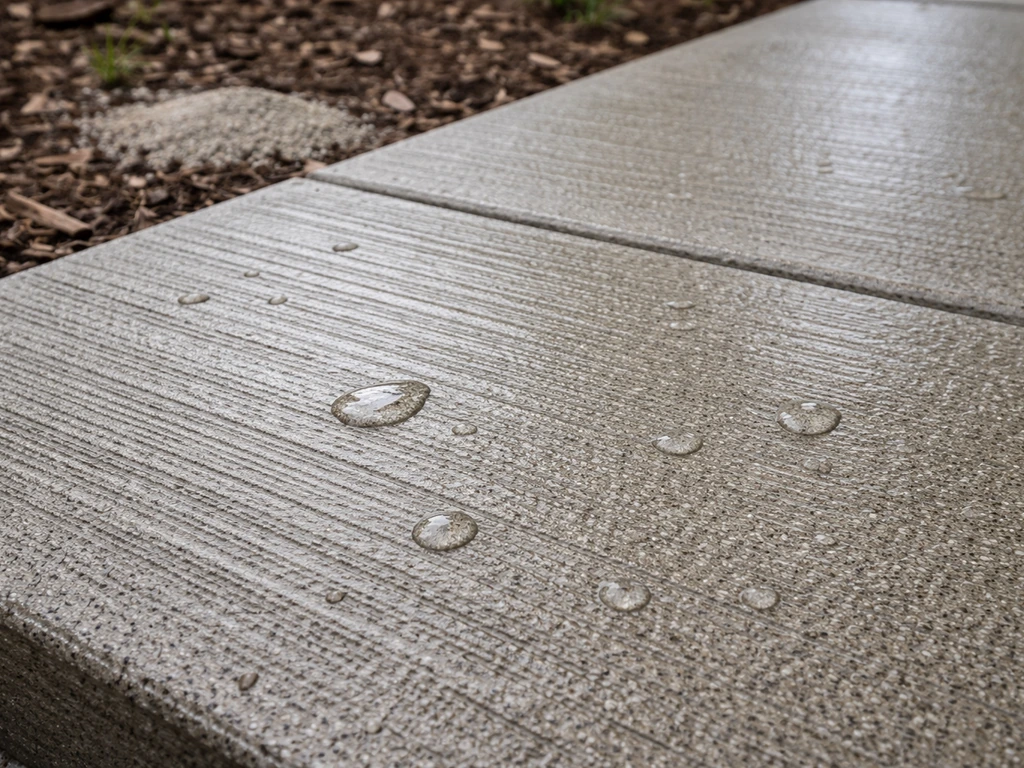
Sealing and long-term maintenance
Concrete steps should be sealed with a penetrating concrete sealer every 2 to 3 years to prevent moisture absorption and freeze-thaw spalling. Pavers and brick benefit from a polymeric sand re-application every few years as joints erode, and a paver sealer every 3 to 5 years to lock in color and resist weeds. Wood steps need a fresh coat of exterior deck stain or sealer every 1 to 2 years; check for soft spots or rot annually at the stringer-to-ground connections. Composite steps need almost nothing: an occasional scrub with soap and water and a check that fasteners haven't backed out.
Dealing with settling and erosion
If a paver or brick step sinks or tilts, the fix is almost always the same: pull up the affected units, add compacted gravel to restore height, re-screed the sand layer, and reset the units. Catching it early (a 1/4-inch dip) is much easier than waiting until a full step has sunk an inch and the joint pattern has opened up. For concrete, small cracks can be filled with concrete caulk or a hydraulic cement filler, let them go and they become big cracks that hold water and worsen every winter. For wood, soft or spongy treads need to be replaced before they become a fall hazard, not patched.
If you're planning to build steps as part of a larger patio project, the base preparation principles here connect directly to the work involved in building the steps themselves from scratch. Curved or semi-circular layouts follow the same dimension rules covered above but require more cutting and careful radius layout on-site. Curved patio steps follow the same rise, tread, and base-prep rules, but the layout and cutting need extra attention to keep the radius consistent. Wood-framed steps off a raised patio are their own sub-project with stringer math at the center of the plan. Whatever direction your project goes, getting the rise, run, and base right first is what separates steps that feel solid and stay put from ones that need work again in two years.
FAQ
How do I handle a total rise that does not divide evenly into a practical number of steps?
Decide the whole-number step count first (round to the nearest whole number), then slightly adjust the riser height so every riser matches. Avoid mixing riser sizes to “make the math work,” because even small differences create a tripping risk and will make the step feel uneven when walking down.
What should I do if my patio edge or door threshold is not level because the yard slopes?
Use finished-grade measurements at the exact landing location and the intended bottom step landing, then keep risers equal by adjusting the base excavation depth rather than changing the riser height. If you try to “step around” uneven ground by varying risers, you usually end up with a crooked appearance and an uncomfortable stride.
Can I reuse an existing patio slab edge as the landing and still keep steps safe?
Yes, but confirm the landing has enough depth for safe footing and that drainage does not sheet water onto the top tread. A good next check is to test the top area with a quick “foot placement” simulation (step onto the landing while another person comes up) to ensure there is room without people stepping into the tread line.
How wide should I make patio steps if the opening to the door is narrow?
Match the width to the real path of travel, not the door width alone. If only one person typically uses the route, 36 inches is workable, but if you expect groceries or guests, bump toward 48 inches. Also keep the front nose aligned with the path you tested walking from yard to door, because narrow width can force awkward sideways stepping.
What is the best way to confirm my tread depth when space is tight (like near a fence)?
Convert your trial tread depth into total run (step count times tread depth) and see if that run can fit without hitting obstructions. If it cannot, you generally have two options: reduce tread depth only within safe comfort limits, or change the step count and riser height. Avoid “eyeballing” a shorter run because it changes stride length and makes steps feel cramped.
Do I need a landing for outdoor steps, and how do I decide?
If your steps are more than just a single rise, or if you have two people using the entry at once, a small landing at the top helps prevent congestion. Plan for a landing depth that allows a person to stand fully at the top while someone approaches the first tread, especially if the steps align with a narrow walkway.
Is it ever okay to make outdoor steps steeper or shallower than Blondel’s comfort range?
It’s usually better not to. Outdoor lighting is dim and footing is sometimes compromised by sandals or wet conditions, so too-steep steps increase slip risk and too-shallow treads lead to “stubbing” the foot. If you must deviate, keep the riser height consistent and prioritize tread depth over aesthetics.
How do I prevent pavers or brick from rocking or settling on only one side?
Check compaction during base build, not just at the end. Ensure crushed stone is placed in consistent lifts, compacted each lift, and that the sand layer is screeded evenly. Rocking on one side is often a sign of uneven subbase thickness or insufficient compaction under that side.
What base depth do I need for freeze-thaw climates?
Use the same excavation-to-crushed-stone approach described for your material system, but do not shortcut lift thickness or compaction time. Freeze-thaw failures typically come from water movement through voids or from a subbase that was not fully compacted, so overcompacting the subbase is safer than leaving “extra looseness” for convenience.
How important is a small slope on each tread, and where should the water go?
It matters because pooled water can freeze, cause algae or moss, and make surfaces slick. Keep the slope subtle and consistent, and make sure runoff flows away from the door threshold and foundation. If you cannot direct runoff safely, adjust step location or drainage plan rather than increasing tread pitch.
What can I do if my steps feel slippery even after adding a broom finish or grit additive?
First verify drainage and tread pitch, because wet pooling makes any surface more slippery. If the surface still gets slick, add grip at the tread nose where feet land, not across the whole tread area, and consider replacing any worn top layer (grout or joint sand in pavers, or degraded sealer on concrete).
Do I need a handrail for only three steps outdoors?
Code may not require it for fewer than four risers, but practical safety can. If the steps are the main entry, used by elderly family members, or become icy in winter, a simple post-and-rail rail adds support where people actually need it during wet or low-visibility conditions.
How should I plan step lighting if I want it to work year-round without maintenance headaches?
For the most reliable visibility, consider low-voltage lights integrated into an existing landscape lighting circuit, and route wiring so connections are protected from standing water. If using solar, expect reduced performance in winter or in shaded areas, so check sun exposure before committing to the layout.
What maintenance should I do in the first year to catch problems early?
After the first rain and first freeze-thaw cycle, walk the steps and check for rocking, dips, or joint sand loss. For pavers, reapply polymeric sand if joints erode, and for concrete, look for early spalling around edges before cracks widen. Catching a small dip early is far cheaper than resetting a fully settled tread later.
Citations
For residential stair geometry, a commonly used comfort target is Blondel’s “step rule”: **2 × riser height + tread depth ≈ 24–25 inches**.
https://calcuable.com/en/calculators/stairs/
The International Residential Code (IRC) minimum safety limits include **maximum riser height of 7-3/4 inches** and **minimum tread depth of 10 inches (254 mm)** (measured per stair-code rules).
https://www.iccsafe.org/wp-content/uploads/IRC-RB_-RB7-RB102.pdf
Next Article
Building Patio Steps: DIY Wood Stair Guide for Any Patio
DIY guide to building patio steps in wood: measure rise and treads, build secure footings, finish and maintain.