Building brick patio steps comes down to three things done right: a solid compacted base, consistent riser and tread measurements, and bricks laid tight enough that nothing shifts over a freeze-thaw cycle. For most residential patios, you're aiming for risers between 4 and 7 inches tall and treads at least 11 inches deep. Get those numbers locked in before you buy a single brick, excavate deep enough for 6 to 8 inches of compacted gravel base, and you'll end up with steps that look sharp and stay put for years without mortar cracking or bricks rocking underfoot.
Brick Patio Steps: Design Ideas and DIY Build Guide

Nolan Lennox
28 Apr 2026
Design ideas and layout choices for brick patio steps
Before you touch a shovel, spend some time thinking about how your steps connect the patio to the rest of the yard. If you are not ready for permanent brick steps yet, use temporary steps for a short-term solution while you finish site prep and materials temporary steps for patio. The layout choice affects how much material you need, how the steps feel underfoot, and how the whole outdoor space reads visually. There are really four common approaches homeowners use, and each suits a different yard situation. A patio steps design plan also helps you choose a matching brick pattern, confirm riser and tread sizes, and budget time for proper curing.
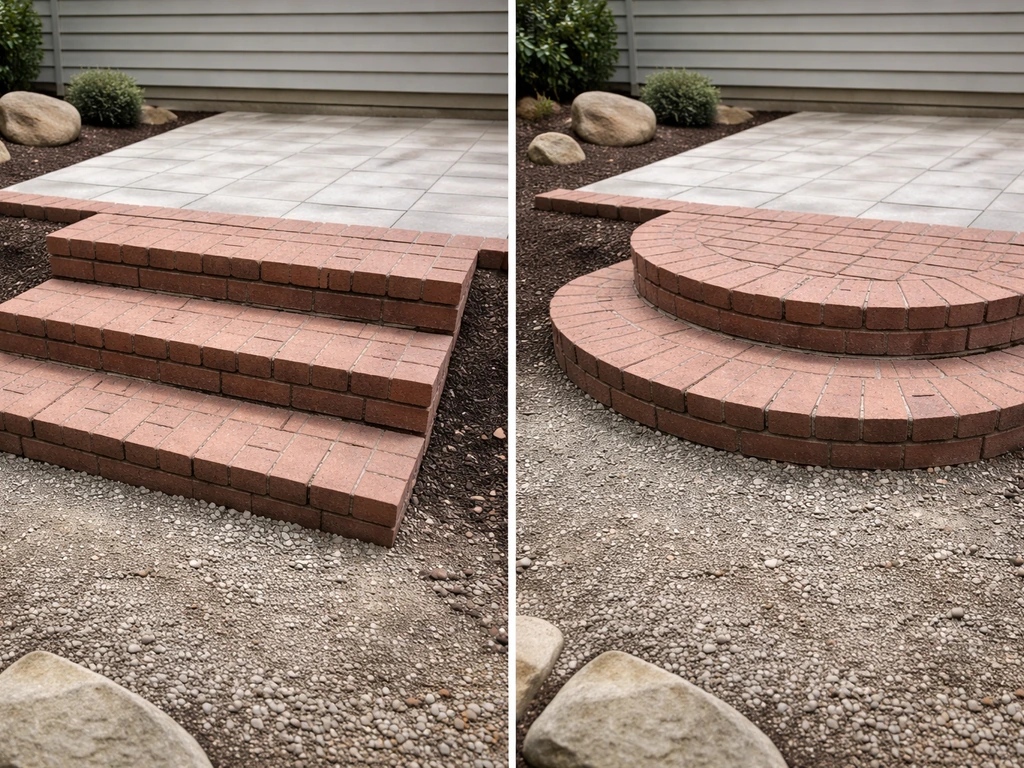
- Straight steps: The most common and simplest to build. Steps run directly perpendicular to the patio edge, dropping straight down to grade. Best for narrow entries or when you want a clean, formal look.
- Wraparound or L-shaped steps: Steps extend along two sides of a patio corner. This spreads traffic, makes a wider entry feel welcoming, and works well on larger patios with an elevated edge on multiple sides.
- Cascading or terraced steps: Each step is wider than the one above it, creating a pyramid-like descent. This design works especially well on slopes and lets you incorporate plantings between tiers.
- Sweeping curved steps: Bricks are cut or laid in a gentle arc to create a curved front edge on each step. More material and cutting work involved, but the result feels architectural and integrates naturally with curved patio edges.
- Side-entry steps: Instead of leading straight off the patio edge, steps run along the side and turn 90 degrees up onto the patio surface. Useful when your patio edge faces a fence, wall, or landscaping bed.
In terms of brick pattern, running bond (each brick offset halfway) is the standard choice for treads because it's stable and easy to cut. Herringbone adds visual interest and is genuinely stronger in resisting lateral movement, but it requires more cuts and takes longer to lay. If your patio surface uses a particular pattern, repeating it on the steps ties the whole project together. If you're starting fresh and want a cohesive look, decide on the pattern for both the patio and the steps at the same time.
Planning your measurements: risers, treads, and total step count
This is the part most DIYers rush, and it's the part that determines whether your steps feel natural to walk or awkward and tiring. Start by measuring the total rise: the vertical distance from the top of your patio surface down to finish grade at the base. Use a level and a tape measure or a long straight board. That total rise number drives everything else.
Standard guidance for outdoor residential stairs (and what building inspectors look for) puts riser height between 4 and 7 inches, with tread depth of at least 11 inches. The sweet spot for comfortable outdoor steps is a riser around 6 inches and a tread of 12 to 14 inches. Divide your total rise by your planned riser height to get your step count. For example, a 24-inch total rise divided by 6-inch risers gives you 4 steps. If the number doesn't divide evenly, adjust your riser height slightly rather than making one step a different height than the others. Inconsistent risers are a tripping hazard and a red flag on any inspection.
Once you know your step count and riser height, calculate your total run: multiply the number of steps by your tread depth (not including any overlap or nosing). This tells you how far the steps will extend out from the patio edge and how much ground you need to excavate. A 4-step stair with 13-inch treads runs about 52 inches out from the patio, so make sure you have that footprint available in your yard.
| Total Rise | Riser Height | Number of Steps | Total Run (13" tread) |
|---|---|---|---|
| 12 inches | 6 inches | 2 steps | 26 inches |
| 18 inches | 6 inches | 3 steps | 39 inches |
| 24 inches | 6 inches | 4 steps | 52 inches |
| 30 inches | 6 inches | 5 steps | 65 inches |
| 36 inches | 6 inches | 6 steps | 78 inches |
One more thing worth knowing: if your total rise exceeds 30 inches, most residential building codes require a handrail. Even if yours doesn't technically require it, adding one is a good idea for safety, especially if elderly family members or kids use the steps regularly.
Materials and tools: what to buy before you start
Choosing the right brick
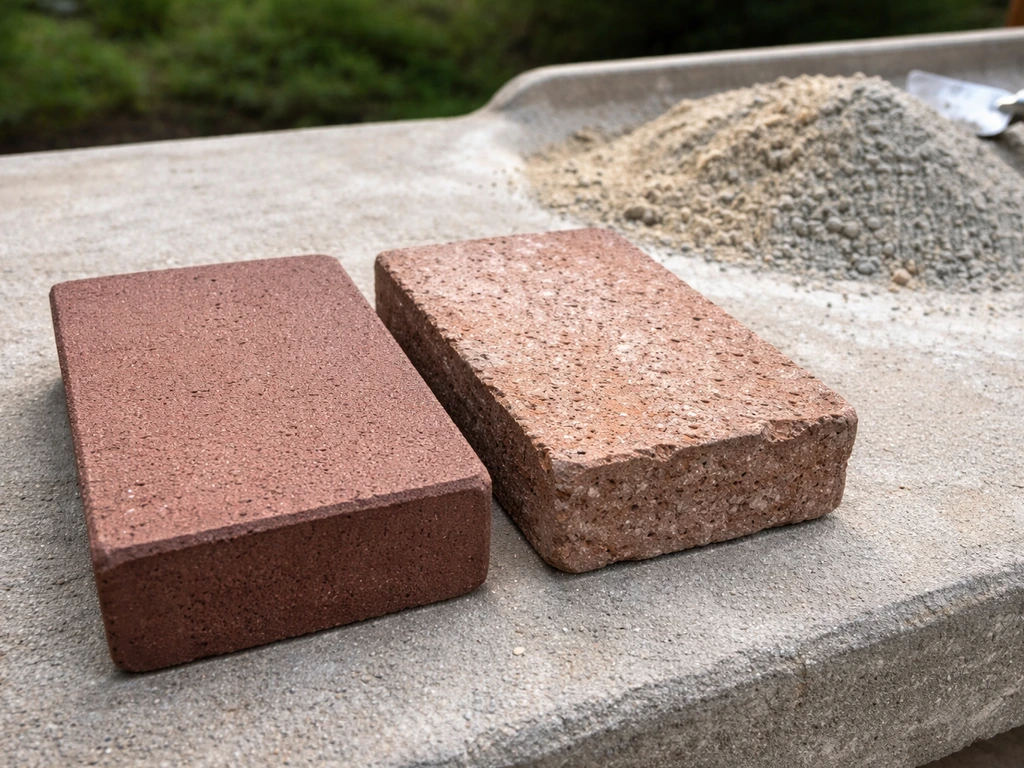
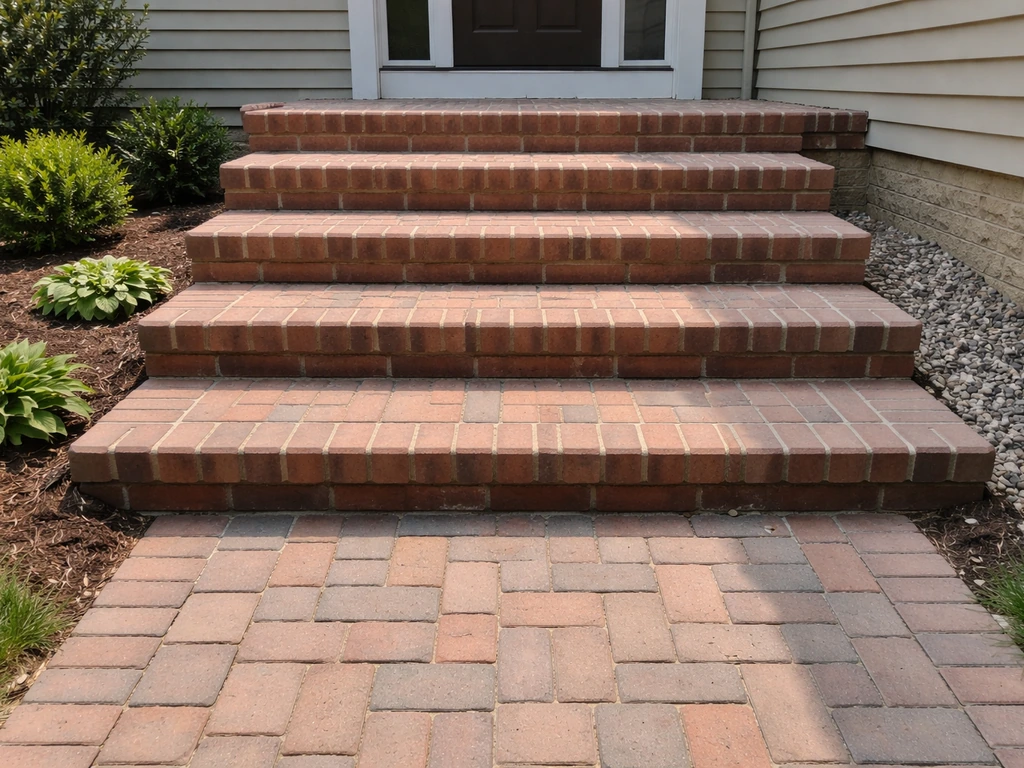
Not all bricks are created equal for outdoor use. You want a brick rated for exterior paving, often labeled SW (severe weathering) grade. Workforce Masonry Strong also describes ASTM brick durability grades, including Severe Weathering (SW), Moderate Weathering (MW), and Negligible Weathering (NW). These are denser and more resistant to freeze-thaw cycles than standard wall or interior bricks. Common choices are standard paving bricks (roughly 4x8x2.25 inches), tumbled or antique-style bricks for a more rustic look, and bullnose bricks for the front edge of treads (they have a rounded leading edge that looks finished and reduces chipping). If you want your steps to match an existing brick patio, bring a sample brick when you shop or note the manufacturer and product name from your original order.
Base materials and mortar options
For a dry-set installation (the approach most DIYers use and the one this guide focuses on), you need crushed gravel or recycled concrete for the base layer, coarse concrete sand for the setting bed, and polymeric sand for the joints. For a mortared installation, you'll also need Portland cement-based mortar mix and a concrete sub-base under the steps. Dry-set works well for most residential projects because it's more forgiving, allows for drainage, and can be adjusted if something settles. Mortared steps are more rigid and better for formal entries or areas with heavy foot traffic, but cracks in mortar are harder to repair than re-leveling a dry-set brick.
Tools you'll actually need
- Tape measure and level (4-foot level is ideal)
- Mason's string line and stakes
- Spade shovel and square-bladed spade for cutting clean edges
- Plate compactor (rent this, don't skip it)
- Rubber mallet
- Hand tamper for tight spaces
- Brick chisel and hammer, or a wet saw/angle grinder with a diamond blade for clean cuts
- Screed board (a straight 2x4 works fine)
- Wheelbarrow and mixing tub
- Stiff bristle broom for sweeping in polymeric sand
Edging and finishing materials
Plastic or aluminum paver edging along the sides of your steps keeps the structure from spreading laterally. Edging spikes every 12 inches hold it in place. For the front face of each step, you can use a row of bricks set vertically (called soldiers or sailors depending on orientation) as a structural riser, or use a concrete or stone block riser with brick treads on top. The soldier course approach keeps the whole project in brick and looks cohesive.
Site prep and base installation
Good base prep is what separates steps that last 20 years from steps that need a redo in 3. Don't let anyone talk you out of doing this part properly. Start by marking out your full footprint with stakes and string, including the staircase projection out from the patio edge. You want to excavate the entire footprint to a consistent depth.
- Mark the outline of the stair footprint using stakes and mason's string. Double-check your measurements and make sure the layout is square to the patio edge.
- Excavate the entire footprint to a depth of at least 8 inches below where your finished base of the lowest step tread will sit. In colder climates, go 10 to 12 inches if you can. This is the most physically demanding part of the job.
- Remove all organic material, roots, and loose soil from the bottom of the excavation. Compact the native soil with a plate compactor or hand tamper.
- Add 6 inches of compacted crushed gravel (3/4 inch crushed stone or road base) in two 3-inch lifts. Wet each lift slightly and compact thoroughly before adding the next layer. This base layer is your drainage and your stability.
- Add a 1-inch layer of coarse concrete sand over the compacted gravel. Screed it level. This is your setting bed for the bricks.
For the step structure itself, you're essentially building up a series of terraced platforms from the bottom up. Each step level needs its own compacted gravel base. The bottom step sits on the gravel base you've already prepared. Each successive step up sits on a raised gravel and sand platform. You can also use solid concrete blocks or CMU (concrete masonry unit) blocks to build up the riser structure, then lay brick on top as the tread surface. This approach is extremely stable and reduces the total number of bricks needed.
Building the steps: forms, leveling, laying bricks, and cutting
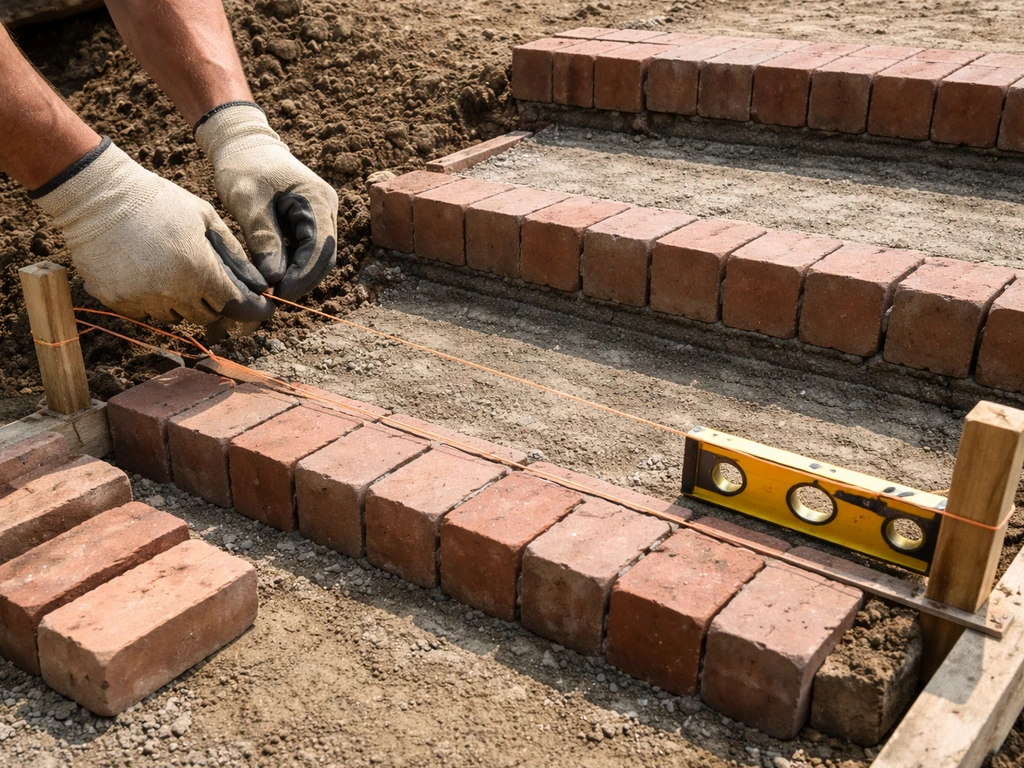
Work from the bottom step up to the top. Set your string lines at the correct height for each step level before you start placing any bricks. This gives you a reference to keep everything consistent as you go.
- Set the riser course first for the bottom step. Place bricks or concrete blocks on edge along the front of the step, checking that they are level side to side and at the correct height. For a standard 6-inch riser with a 2.25-inch brick, you'll need multiple courses or a combination of gravel fill and bricks to achieve the right height.
- Backfill behind the riser course with compacted gravel to create the sub-base for the first tread. Compact it thoroughly and top with a 1-inch sand setting bed.
- Lay the tread bricks from the back of the tread toward the front. Set each brick with a rubber mallet, checking level in both directions as you go. Maintain consistent joint spacing (typically 3/8 inch for dry-set work).
- For the front tread edge, use a bullnose brick or set a standard brick with a slight overhang (nosing) of about 3/4 to 1 inch over the riser face. This creates a defined edge and sheds water forward.
- Once the first tread is fully laid, build the next riser course on top of the back portion of the first tread or directly on the compacted fill behind it, depending on your design. Repeat the process for each step.
- For cuts along the sides or back edges, score and snap with a brick chisel for rough cuts, or use an angle grinder with a diamond blade or a wet saw for clean, precise cuts. Wet saws produce much cleaner results and reduce cracking.
- Check your riser height and tread depth at every step as you go. Catching a problem at step two is easy. Catching it at step five means taking apart most of your work.
After all bricks are laid, sweep polymeric sand into the joints using a stiff broom. Work it in thoroughly with multiple passes, then mist lightly with water to activate the binding agent. Polymeric sand sets firm, resists ant tunneling, and stays in place far better than regular joint sand. Let it cure for at least 24 hours before foot traffic.
Drainage, safety, and finishing touches
Water is the main enemy of brick steps. If it pools on treads, it freezes, expands, and pries bricks apart. If it gets under the base, it erodes the sand and causes settling. Build a slight forward pitch of about 1/8 inch per foot into each tread so water drains off the front edge. This is barely perceptible when walking but makes a significant difference in long-term performance.
At the base of the steps, make sure water has somewhere to go. If the grade naturally carries runoff away from the steps, you're fine. If the base of your steps sits in a low spot, consider adding a shallow gravel trench or perforated drain pipe along the bottom to carry water away. Ignoring drainage is the single most common reason well-built steps eventually heave or settle.
For safety, check that the transition from the top step to the patio surface is flush or has no more than a 1/4-inch height difference. A lip at the top of the stairs is a tripping hazard. Apply a penetrating brick sealer to the finished surface to protect against staining, moisture absorption, and freeze-thaw damage. Reapply every 2 to 3 years. If your total rise is 30 inches or more, install a handrail post in a concrete footing or anchor it to the side of the step structure.
- Pitch treads forward 1/8 inch per foot for drainage
- Ensure water drains away from the base of the steps
- Flush transition at the top step to patio surface (no lip)
- Seal the surface after polymeric sand has fully cured
- Add a handrail if total rise exceeds 30 inches
- Install landscape lighting near the steps if they are used after dark
DIY cost, realistic timeline, and mistakes to avoid
What it costs to build brick patio steps yourself
For a basic 4-step dry-set brick stair (roughly 4 feet wide), expect to spend between $400 and $900 in materials depending on brick type, your region, and how much gravel you need. Paving bricks typically run $0.50 to $1.50 each, and a 4-step stair at 4 feet wide will use roughly 100 to 150 bricks. Crushed gravel and sand together might run $80 to $150 depending on how much you need and delivery costs. Renting a plate compactor for a day is typically $60 to $100. Polymeric sand, edging, and sealer add another $40 to $80. If you go with a mortared installation or use CMU blocks as a structural base under the treads, costs bump up by $100 to $200 but you get a more rigid result.
Hiring out this work professionally typically costs $1,500 to $4,000 or more for a comparable project, depending on local labor rates and complexity. The DIY savings are real, but be honest with yourself about your skill level and the time commitment involved. A 4-step stair is a solid weekend project for someone comfortable with basic masonry. A 6-step curved wraparound with mortared joints is a multi-weekend project that benefits from prior experience.
How long it takes
For a straightforward 3 to 4 step dry-set stair, plan on one day for excavation and base prep, and another half to full day for laying bricks. Add time for the polymeric sand to cure (24 hours minimum) before you use the steps. Total elapsed time from start to walkable is typically 2 to 3 days. If you're building something larger or more complex, or if you're doing it alone, budget more time. Trying to rush the base compaction or the leveling process is how you end up with uneven steps six months later.
Common mistakes and how to avoid them
- Skipping or under-compacting the gravel base: This is the number one cause of settling and brick movement. Rent the plate compactor and use it on every layer.
- Inconsistent riser heights: Measure every single step before you commit. Even a 1/2-inch difference between steps is noticeable and unsafe.
- Not accounting for drainage: Steps that don't shed water will heave and crack. Build in that forward pitch from the beginning.
- Using interior or non-rated bricks: Only use bricks rated for exterior paving (SW grade). Standard wall bricks absorb too much water and spall in freeze-thaw conditions.
- Skipping edging: Without edge restraints, dry-set bricks will slowly migrate outward under foot traffic. Install edging on both sides.
- Laying bricks on a dry, unsealed sand bed in hot weather: Dry conditions pull moisture from the polymeric sand too quickly. Lightly mist the setting bed before laying bricks on hot days.
- Not checking square at the start: A staircase that's slightly off-square to the patio looks wrong and is harder to fix once bricks are laid. Spend the extra 10 minutes checking with a framing square or the 3-4-5 triangle method.
When to call a pro instead
If your total rise exceeds 36 inches, your yard has significant drainage issues or unstable fill soil, or you need a permit for a mortared masonry structure, getting a professional assessment makes sense. Mortared brick work over concrete footings in particular requires more experience to do durably, and a failed mortared stair is more expensive to repair than a dry-set one. For most homeowners with a straightforward 2 to 5 step stair and reasonable DIY experience, this is a very doable project. If you've built a patio before, you already have most of the skills you need.
If you're weighing brick against other materials, it's worth knowing that wood steps require regular sealing and eventually rot, composite steps like Trex are low maintenance but carry a higher upfront material cost, and premade precast concrete steps are fast to install but limited in design flexibility. If you are also considering Trex, review the steps-to-patio guidance in your next phase: how to build a trex patio. Premade patio steps can also be a good choice when you want quick installation, but you should still verify that the dimensions and drainage will work for your site premade precast concrete steps. If you're comparing options, composite patio steps like Trex can be a low-maintenance alternative to brick, but you'll want to weigh cost and design limits before you decide. If you are also planning to use Trex steps, review the Trex steps to patio plan for how to line up risers and treads with your existing surface. Wooden steps for patio projects can still last for years, but you need consistent construction and ongoing protection from moisture wood steps. Brick sits in a great middle ground: durable, repairable, and visually flexible enough to match almost any patio style. If you want a step-by-step overview, follow a diy patio steps checklist to plan measurements, base prep, and finishing.
FAQ
Can I use interior bricks or wall brick for brick patio steps?
You generally should not. Interior or wall bricks are more porous and less freeze-thaw resistant, so they are more likely to spall or loosen after winter cycles. Use brick specifically rated for exterior paving, often marked SW (severe weathering), for the treads and front edges.
What should I do if my total rise does not divide evenly into equal risers?
Instead of making one step taller, adjust the riser height slightly so all risers match. If you must choose between changing riser height or tread depth, prioritize consistent risers for safety, then confirm the tread depth still meets your minimum comfort target.
How much slope should I build into brick patio steps for drainage?
Aim for a slight forward pitch of about 1/8 inch per foot across each tread surface so water runs off the front. Avoid pitching the step so much that your footing feels “slippery downhill,” since too much slope can change how the steps feel and increase slipping risk.
Is polymeric sand required for the joints, or can I use regular sand?
Polymeric sand is strongly recommended because it locks joints in place and resists ant tunneling and washout. Regular joint sand can work short term but typically loosens faster when exposed to repeated wetting and freeze-thaw, leading to rocking bricks.
How long should I keep people off the steps after installation?
After you mist polymeric sand to activate it, plan for at least 24 hours before foot traffic. For heavy use or if weather is cool or damp, extend the wait because curing can take longer and premature loading can loosen joints.
Do I need to cut bricks for a clean look at the edges and corners?
Not always, but you should expect some cuts for consistent stair geometry and tight side finishes, especially with herringbone patterns or soldier-course risers. Plan cuts early using a dry layout, then verify the cut widths still leave strong, supported brick areas.
What is the safest way to build the top transition to the patio?
Keep the top step level with the patio surface, or maintain a gap of no more than 1/4 inch. A higher lip creates a tripping point, and a low spot can catch water and accelerate joint erosion.
Should I build separate gravel base layers under each step level?
Yes. Each step level should sit on its own compacted gravel and sand platform so loads transfer evenly and the “terraced” structure stays rigid. Skipping base separation often leads to uneven settling between steps over time.
Can I install brick patio steps without a concrete sub-base?
For a typical dry-set design on a properly prepared compacted gravel base, a concrete sub-base is often unnecessary. However, if you are building mortared steps, you will generally need a concrete sub-base under the stair structure for rigidity. When in doubt, match the method to your chosen jointing and structural system.
Do I need a handrail for brick patio steps even if my rise is only slightly above 30 inches?
Many codes require a handrail once total rise exceeds 30 inches, but requirements can vary by location. If you are near that threshold, err on the side of safety, especially if kids or older adults use the steps regularly. Also confirm the handrail is securely anchored to a stable footing.
What edging should I use to prevent brick patio steps from spreading?
Use plastic or aluminum paver edging along the sides, then spike it in place about every 12 inches. Proper edging helps resist lateral movement from foot traffic and freeze-thaw, but it only works if the base underneath the edging is well-compacted.
Why are my steps rocking or uneven, even though the bricks look aligned?
Rocking usually means the base was not compacted to a consistent depth, sand was uneven, or one step level settled differently from the others. Re-check that every step tier has full support and that string lines were set correctly before laying bricks.
Can I match an existing patio brick if I cannot find the exact same bricks?
Bring a sample brick and compare color, thickness, and surface finish in person. If the exact brick is unavailable, choose a close match but keep the same brick type rating for freeze-thaw (exterior paving grade) so the steps age similarly to the rest of the patio.
Do I need to seal brick patio steps, and how often?
Sealing helps reduce staining and slows moisture absorption, which supports longevity in freeze-thaw climates. Plan to reapply about every 2 to 3 years, and apply only after the installation has fully cured and joints are properly set.
What are the warning signs that my brick patio steps have drainage problems?
Look for standing water on treads, damp joints that persist after rain, or recurring settling at specific steps. These issues often indicate inadequate pitch or a base that lacks a path for runoff, and fixing the drainage early is usually cheaper than rebuilding settled brickwork.
Next Article
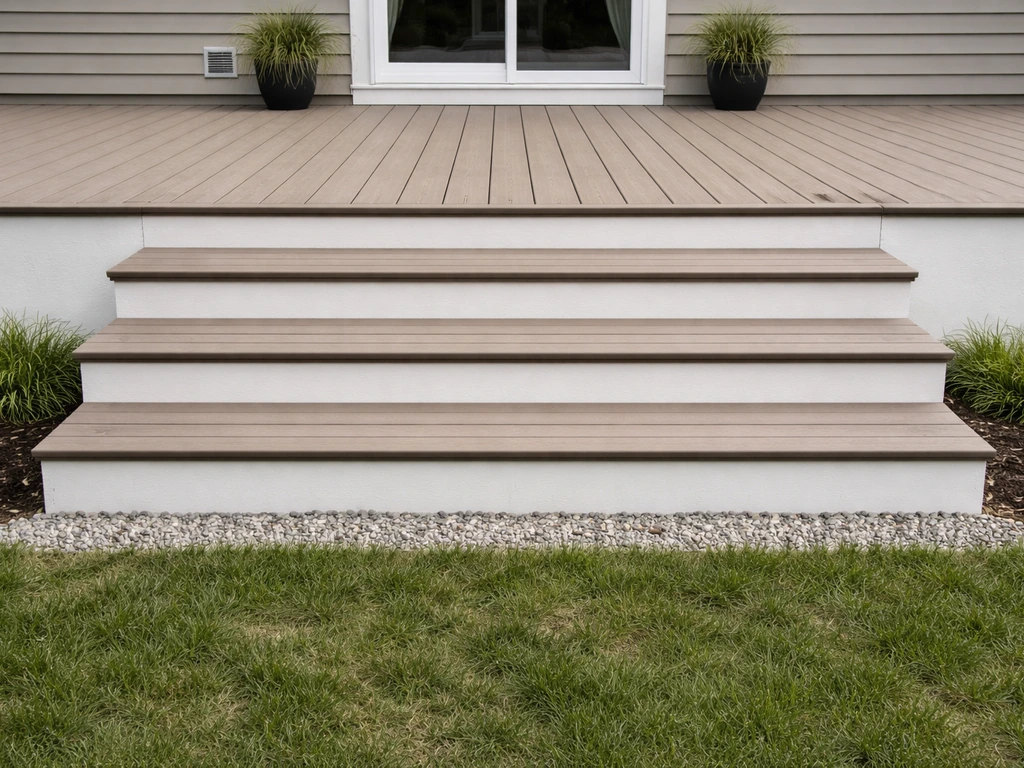
Composite Patio Steps DIY Guide for Deck and Raised Patios
DIY guide to design and build durable composite patio steps for raised, wide, or rounded deck and patio transitions