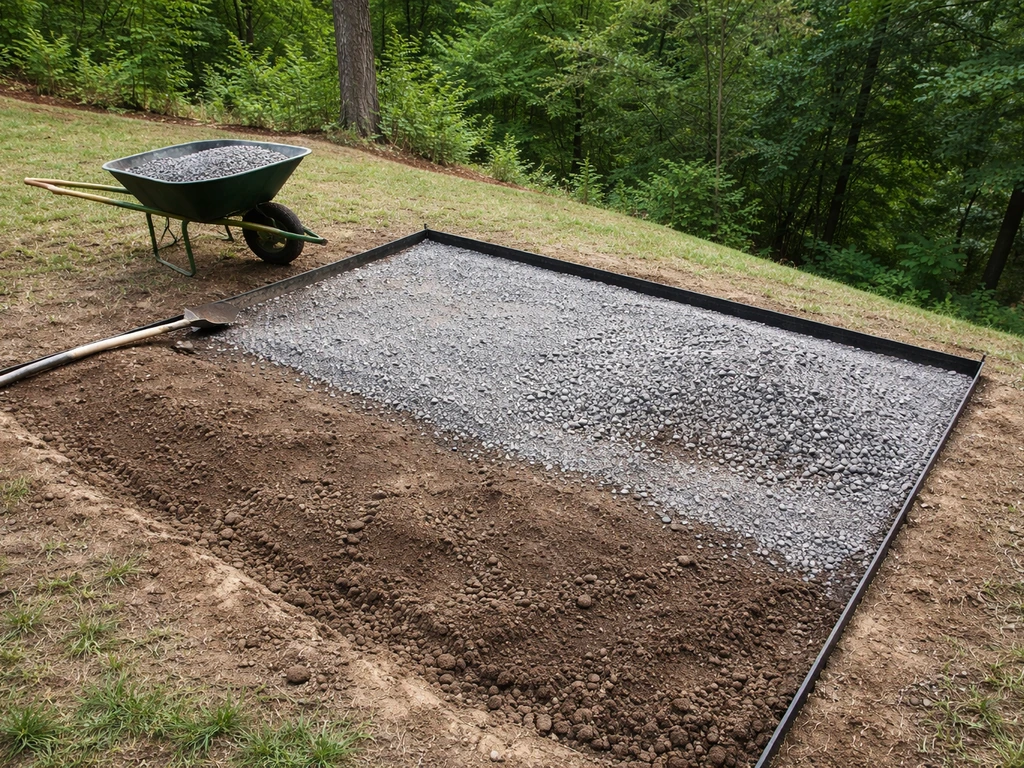
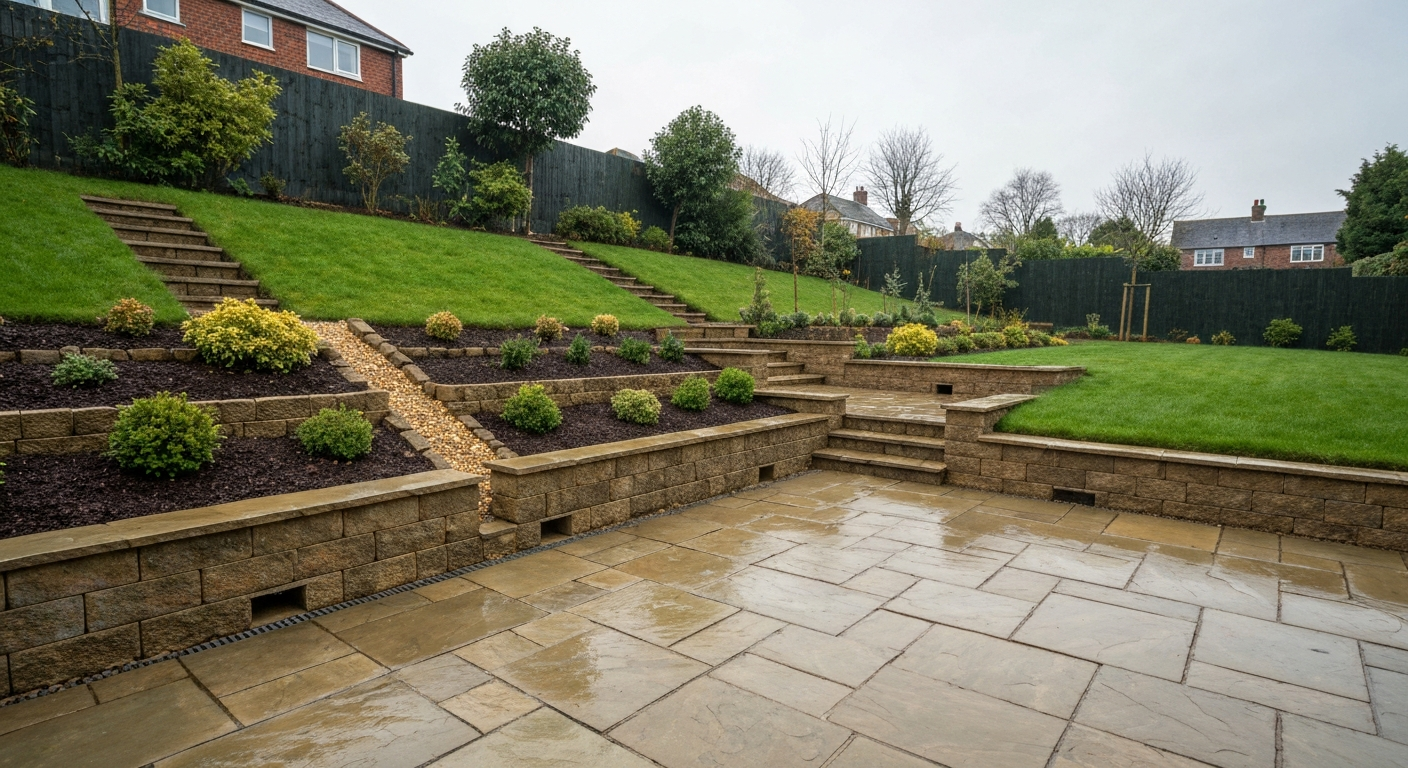
You can absolutely build a patio on a hillside yourself, but the slope changes almost every decision you make, from how you measure the site to whether you pour a gravel base, stack retaining walls, or frame a raised platform. The three approaches that actually work are: a gravel patio (best on slopes up to about 5%), a terraced paved patio with retaining walls (solid choice from 5% up to around 15%), and a raised deck-style platform (the go-to when the slope exceeds 15% or the terrain is too uneven to cut and fill sensibly). Pick the wrong method for your gradient and you'll be fighting erosion, pooling water, or shifting slabs within a couple of seasons, so the planning stage matters more here than on a flat lot.
How to Build a Patio on a Hillside: Step‑by‑Step Guide

Nolan Lennox
13 Jul 2026
What you're getting into: goals and approach
Building on a hillside isn't harder than building on flat ground, it's just different. The extra steps are mostly about managing the earth: keeping it in place, draining water off it, and creating a level surface to sit on. Every hillside patio project has three goals working at the same time: structural stability (the patio doesn't slide, heave, or collapse), effective drainage (water moves away from the house and doesn't pool underfoot), and usable comfort (the finished surface is level or very close to it, safe to walk on, and connected to the house by stairs or a smooth transition). Getting all three right from the start is the whole game. I've seen patios that looked great on day one and were a muddy disaster by spring because drainage wasn't thought through. Don't skip the planning steps below.
Site survey and planning before you dig anything
Walk the site first and sketch it out on paper, a rough sketch is fine, it doesn't need to be an architect's drawing. Mark the house, the slope direction, any trees, existing paths, gates, and where water currently flows after rain. That last one is genuinely useful: go outside during or right after a downpour and watch. Water always tells you where it wants to go, and your drainage design should work with that, not against it.
Checking your soil
Dig a test hole about 300–400 mm deep in a couple of spots. Grab a handful of soil and do the simple squeeze test: wet it slightly and roll it. See the RHS soil texture test for a simple DIY wet‑squeeze method to distinguish sand, silt and clay. Sand feels gritty and falls apart; silt feels silky; clay feels sticky and holds a ribbon shape. Clay is the tricky one, it swells when wet and shrinks when dry, which can shift a patio or crack a retaining wall over time. In the UK, shrink-swell clay is particularly common in southern and eastern England, and the British Geological Survey (BGS) has a free GeoSure map you can check before you start. If your soil is heavy clay, made ground (filled or landscaped previously), or you suspect a high water table, the conservative move is to get a brief geotechnical survey done before committing to anything structural. It's not expensive for a basic site check and it can save you a very costly rebuild. Also do a simple percolation test while you're at it: dig a 300 mm cube hole, fill it with water twice, then on the third fill time how long it takes to drain. Fast drainage means sandy/free-draining soil; slow drainage (more than a few hours) means you'll need a designed soakaway rather than just relying on the ground absorbing runoff.
Sun, aspect and access
Note which way the slope faces. A south-facing slope in the UK gets the most afternoon sun and dries faster after rain, making it ideal for a usable outdoor space. A north-facing slope stays damp longer and frost lingers, that matters for both your drainage design and your material choices. Check where overhead cables or underground services might run. In the UK, always call or use the free 'Dial Before You Dig' service before any excavation. Also think practically about access: will you be wheeling a loaded barrow down a slope? Can a small digger get in? Planning the logistics of moving materials saves a lot of back strain.
Choosing your approach: gravel, terraced pavers, or raised platform
Your slope percentage is the biggest deciding factor. Here's a practical breakdown of what works at each gradient range, with honest pros and cons for each method. For step-by-step guidance on building a raised patio on a slope in the UK, see our practical guide on how to build a raised patio on a slope (UK guide).
| Approach | Best slope range | Pros | Cons | Rough cost (DIY materials, UK 2026) |
|---|---|---|---|---|
| Gravel patio | 0–5% (0–~2.86°) | Cheapest, permeable, fast to install, flexible for irregular shapes | Gravel migrates on steeper slopes, needs edging and top-up maintenance, less formal look | £10–£25 per m² |
| Terraced pavers with retaining walls | 5–15% (~2.86–8.53°) | Solid and long-lasting, excellent drainage if built right, suits most materials | More complex to build, requires good wall footings, heavier labour | £40–£90 per m² depending on wall height and material |
| Raised platform (deck or paved on piers) | >15% (>~8.53°) or very uneven ground | Avoids major excavation, works on any terrain, can look striking | Higher material cost, requires structural planning, railing and stair requirements | £60–£150+ per m² depending on deck or paved finish |
A note on permeable paving: British standards guidance makes clear that infiltration-based permeable paving systems are not recommended where gradients exceed about 1:20 (5%), because surface water moves too fast for it to infiltrate properly and instead sheets off. Once you're above 5%, plan for directed drainage rather than simple permeability. If you're specifically looking at how to handle a gravel build on a slope or how a raised patio works in UK conditions (including frost-depth considerations), those topics get a deeper treatment in dedicated guides on this site.
How to measure your slope accurately
You need two numbers: the rise (vertical height change) and the run (horizontal distance). For a step-by-step guide, see how to measure patio slope. From those, slope percentage = (rise ÷ run) × 100, and slope angle in degrees = arctan(rise ÷ run). A 0.5 m rise over a 10 m horizontal run gives you 5% or about 2.86°. For most patio planning, the percentage is more useful than the angle.
Method 1: string line and line level
This is the classic DIY method and it works fine for slopes under about 10%. Bang two stakes into the ground at each end of your planned patio area. Tie a string between them and clip a small line level (a bubble level that clips to string) to the middle. Adjust the string at one end until the bubble is centred, now the string is level. Measure the vertical distance from the string down to the ground at the lower stake: that's your rise. Measure the horizontal distance between the stakes: that's your run. Do the maths. Accuracy is roughly ±10–20 mm depending on string sag and how carefully you work, fine for planning, but use a stiffer mason's line rather than floppy twine to reduce sag.
Method 2: laser level
A rotary or self-levelling laser level is the more reliable method for anything over 5% or a larger site. Set up the laser on a tripod, establish a datum height, then use a staff (measuring rod) to read heights at multiple points across the site. The difference in readings between two points divided by the horizontal distance between them gives you the slope. Laser levels can give sub-10 mm accuracy over a typical patio run when set up on stable ground. You can hire a decent rotary laser for around £30–£50 per day in the UK, which is worth it for a larger project.
Method 3: smartphone level apps
Smartphone inclinometer apps are handy for a quick sanity check, modern phones can read to roughly 0.1–0.2° under ideal conditions. But accuracy varies with device, calibration, temperature, and placement, and it drops on uneven ground. Use them to confirm your string-line reading or to check a finished surface, not as your primary measurement tool for anything structural.
Worked examples
| Rise | Run | Slope % | Angle (°) | What this means for your build |
|---|---|---|---|---|
| 0.15 m | 3 m | 5% | 2.86° | Upper limit for simple gravel patio; standard sub-base with good edging |
| 0.45 m | 3 m | 15% | 8.53° | Moderate — terrace with one retaining wall makes sense; gravel will migrate |
| 0.9 m | 3 m | 30% | 16.7° | Steep — terracing with walls or raised platform; avoid loose surfacing entirely |
| 0.05 m | 4 m | 1.25% | 0.72° | Essentially flat — conventional paved patio, just ensure minimum drainage fall |
Which way should the patio slope for drainage and comfort
The finished surface of your patio should always drain water away from the house, never toward it. If you're unsure which way should a patio slope, aim for a fall away from the building (minimum 1:80, preferred around 1:40) so water drains safely off the surface. The minimum fall recommended under BS 7533 for domestic paving is 1:80 (about 1.25%) away from the building in the longitudinal direction, with a preferred transverse fall of 1:40 (2.5%) to avoid ponding on smooth slabs. In practice, if you're building on a hillside that already slopes away from the house, you may be working with the natural grade, but you still need to check the cross-fall isn't sending water sideways into a neighbour's garden or pooling in a corner. The patio surface fall is separate from the overall terrain slope, and on a terraced patio you're creating your own level platform, so you engineer the surface fall deliberately.
Keep the finished patio surface at least 150 mm below the building's damp-proof course (DPC). This is standard UK guidance and it applies regardless of what material you use. If you're building up toward an existing house wall on a slope that rises toward the building, you may need to excavate more on the high side to maintain that clearance. Accessibility is another consideration: if the patio needs to accommodate a wheelchair user, the preferred maximum running slope for independent wheelchair access is 1:20 (5%), with 1:12 (8. Inclusive Mobility (UK Government guidance), references BS 8300/Approved Document M ramp guidance Inclusive Mobility (UK Government guidance) — references BS 8300/Approved Document M ramp guidance. 3%) as an absolute maximum for short ramp runs under BS 8300. In most cases a patio surface should be nowhere near those limits, aim for 1:40 to 1:80 on the usable surface.
Drainage solutions in detail
This is where a lot of hillside patios fail, not in the construction, but in the drainage design. Water from uphill doesn't stop at your patio edge. You need to intercept it, channel it, and give it somewhere to go. Here are the main tools you have.
French drains (land drains)
A French drain is a trench filled with gravel and containing a perforated pipe that collects and redirects groundwater or surface water. For a domestic hillside patio, the standard detail is a 300–450 mm wide trench, a 100 mm perforated pipe (the most common domestic size), pipe wrapped in geotextile sock to stop silting, surrounded by free-draining aggregate (pea gravel or clean stone), and the whole trench topped with more geotextile before backfilling. The pipe needs a fall, aim for at least 1:100 (1%) along the pipe toward the outfall, though steeper is better. The outfall needs to discharge somewhere legal: a soakaway at least 5 m from the building, a ditch, or a surface water drain (check local regulations, you generally cannot connect to a foul sewer).
Interceptor drains at the top of the patio
If water flows down the hillside and reaches your patio from uphill, an interceptor (or cut-off) drain is the most effective first line of defence. Position a channel drain or a gravel-filled trench across the slope just above your patio, and connect it to a French drain running around the edge and away to an outfall. This catches most of the water before it reaches your base layers.
Weep holes in retaining walls
Any retaining wall will build up water pressure behind it if drainage is poor, this is called hydrostatic pressure and it's one of the main reasons retaining walls fail. Weep holes (typically 75–100 mm diameter openings through the wall at the base, spaced roughly every 1–1.5 m) allow water to escape from behind the wall. Slot or round pipes set through the wall as it's built work well. The backfill behind the wall should be free-draining aggregate (not the clay you dug out), ideally wrapped in geotextile to keep fine material from migrating through the weep holes over time.
Permeable membranes and geotextiles
Geotextile membrane (landscape fabric) is used in two different ways here and it's worth being clear about both. As a separation layer under sub-base aggregate, it prevents fine soil particles from migrating up into your drainage layers and clogging them, always use it between natural ground and imported aggregate. As a filter around a drainage pipe or in a French drain trench, it prevents the pipe or gravel from silting up over years. Use non-woven geotextile (the bonded needle-punch type, not woven) for filtration applications around drainage, it has better long-term filtration properties.
Geogrid for slope stabilisation
Geogrid is a polymer mesh product used to stabilise granular fill on steeper slopes. Unlike geotextile, it doesn't filter, it mechanically interlocks with aggregate to create a reinforced layer that resists sliding and lateral spreading. On a hillside gravel patio or as reinforcement within a compacted sub-base on a gradient, a layer of biaxial geogrid at the base of the aggregate significantly reduces the risk of your base material migrating downhill over time. It's relatively cheap (around £1–£3 per m²) and worth including on any slope above about 3%.
Soakaways: sizing and siting
If you're directing drainage to a soakaway, it needs to be big enough to handle the volume of water from your patio area during heavy rain, and the ground needs to be able to absorb it. The UK standard approach follows BRE Digest 365 methodology (referenced in CIRIA's SuDS Manual C753): size the soakaway from a measured percolation test result, not a guess. As a very rough DIY first pass, a patio of 20–30 m² in moderate UK rainfall might need a soakaway with 1–2 m³ of void space (using crate modules or rubble fill), but measure your infiltration rate first. Site the soakaway at least 5 m from any building foundation and downhill from the patio.
Base preparation and compaction
The base is what makes a patio last. On a hillside, it's doing double duty: supporting the surface load and resisting the constant tendency of the slope to move material downhill. Getting this right is not glamorous, but it's where most DIY hillside patios either succeed or eventually fail.
Excavation depth by approach
- Gravel patio: excavate 150–200 mm below final surface level. Allow for 100–150 mm compacted MOT Type 1 sub-base plus 50 mm gravel surface layer. On a slope, cut a slight step into the hillside at the back edge to create a firm anchor.
- Terraced paved patio (concrete slabs or natural stone): excavate to 250–300 mm below finished surface level. Allow for 150 mm compacted Type 1, 50 mm sharp sand or mortar bed, plus slab thickness (typically 40–60 mm for standard flags).
- Raised platform on piers: minimal ground excavation for pier footings — typically 400–600 mm deep holes or pad footings at regular intervals (spacing depends on span and load). In UK frost conditions, footings should go below the frost-affected zone, generally a minimum of 450 mm depth, often deeper on exposed or clay-heavy sites.
- Retaining wall footings: a minimum of 150–300 mm of compacted concrete, and the footing depth should be at least one-third of the wall height below ground. Walls over about 900 mm high should be designed by a structural engineer.
Sub-base materials
MOT Type 1 crushed limestone or granite is the standard sub-base material for domestic paving in the UK, and for good reason, it compacts to a dense, stable layer with minimal settlement. Avoid using soil, topsoil, or ungraded rubble as sub-base fill. On a hillside, you may be creating a cut-and-fill situation where one side of the patio is dug out and the other is built up, on the built-up (fill) side, compact the fill in 100 mm layers, not all at once. Loose, uncompacted fill will settle and cause your paving to dip.
Compaction methods and testing
For most DIY patio work, a hired vibrating plate compactor (wacker plate) does the job, a 70–90 kg plate compactor hired for around £60–£80 per day in the UK will compact Type 1 sub-base in 100 mm lifts effectively. Make at least two or three passes over each layer. A simple field test: if you press your heel firmly into the compacted surface and make less than a 5 mm impression, compaction is reasonable. For larger areas or softer ground, a vibrating roller gives better results. Hand tampers work for small patching jobs and around edges but are not adequate for large area compaction.
Retaining walls: footing, build sequence and backfill
Build the retaining wall first, then compact and backfill behind it, then lay the patio surface. The reverse order is a common mistake that leads to walls being pushed over during compaction. The wall base should be built on a concrete strip or pad footing, never on uncompacted fill or topsoil. Use concrete blocks, natural stone, or timber sleepers (note: railway sleepers treated with creosote are now restricted in the UK for domestic use, use new softwood sleepers treated with UC4b preservative instead). As you backfill behind the wall, install your weep holes and drainage aggregate as described above. Don't compact directly against the back of a masonry wall with a plate compactor, compact in stages working back from the wall by hand, then use the plate further back.
Materials, tools and what you need for each approach
Below is a consolidated checklist. I've split it into tiers because the right tool depends on the scale and type of your project, you don't need a laser level to build a small gravel patio, but you'd be making things hard on yourself building a terraced patio without one.
Materials by approach
| Material | Gravel patio | Terraced/paved | Raised platform |
|---|---|---|---|
| MOT Type 1 sub-base | Yes — 100–150 mm layer | Yes — 150 mm minimum | For any ground-level infill areas |
| Sharp sand or mortar bed | No | Yes — 50 mm bedding layer | No (use structural fixing instead) |
| Gravel (surface layer) | Yes — 40–50 mm pea or shingle | Optional for drainage channels | No |
| Concrete paving slabs/natural stone | No | Yes — core surface material | Optional for paved platform finish |
| Decking boards (composite or timber) | No | No | Yes — main surface |
| Concrete blocks or natural stone for walls | Edging only | Yes — retaining walls | Pier cladding if desired |
| Concrete (ready-mix or bagged) | For post/edging footings only | For wall and step footings | For pier pads/footings |
| Geotextile membrane (non-woven) | Yes — under sub-base | Yes — under sub-base and behind walls | Yes — under any ground areas |
| Geogrid (biaxial) | Recommended on >3% slopes | Yes — in sub-base on slopes | For any cut-and-fill areas |
| Perforated land drain pipe (100 mm) | Recommended | Yes — behind walls and at perimeter | Yes — at ground level around footings |
| Pea gravel (drainage fill) | Yes — around any drains | Yes — behind walls and in trenches | Around footing drainage |
| Edging restraints (steel, aluminium, or plastic) | Yes — essential to hold gravel | Yes — perimeter restraint | As trim/flashing |
| Structural timber (treated C24 or higher) | No | No | Yes — joists, posts, beams |
| Post base fixings / joist hangers | No | No | Yes — galvanised or stainless steel |
| Decking screws or hidden fixings | No | No | Yes — stainless steel recommended |
Tool checklist by skill tier
| Tool | Basic (gravel patio, simple edging) | Intermediate (terraced/paved) | Advanced (raised platform, walls >600 mm) |
|---|---|---|---|
| Tape measure (5 m+) | Essential | Essential | Essential |
| String line and line level | Essential | Essential | Essential |
| Rotary or self-levelling laser level (hire) | Useful | Strongly recommended | Essential |
| Smartphone level app | Useful for quick checks | Backup only | Backup only |
| Spade and fork | Essential | Essential | Essential |
| Wheelbarrow | Essential | Essential | Essential |
| Vibrating plate compactor (hire, 70–90 kg) | Useful | Essential | Essential |
| Hand tamper | For edges and small patches | For tight spots | For tight spots |
| Rubber mallet | For edging | For slab setting | For general use |
| Bolster chisel and club hammer | No | For cutting slabs | For masonry work |
| Angle grinder with diamond blade | No | For precise slab cuts | For masonry cuts |
| Circular saw or mitre saw | No | No | Essential for timber platform |
| Drill/driver (corded or 18V+) | No | Useful | Essential |
| Spirit level (1.2 m or longer) | Essential | Essential | Essential |
| Screeding board / straight edge (2–3 m) | No | Essential for bedding layer | For any paved areas |
| Pointing trowel | No | For mortar work | For any masonry |
| Concrete mixer or access to ready-mix | No | For footings | Essential for footings/piers |
| Post hole auger or hired mini digger | No | For footing holes if needed | Essential for pier holes |
| Safety gear (gloves, boots, eye protection, knee pads) | Essential | Essential | Essential |
Drainage-specific components
- 100 mm perforated pipe (flexible or rigid, with geotextile sock pre-fitted if available)
- Non-woven geotextile fabric (3–4 m wide rolls are easiest to handle in trenches)
- Biaxial geogrid (roll out under sub-base on any sloped area)
- Pea gravel or 10 mm clean stone for drainage surround (minimum 150 mm around pipe)
- Channel drain sections with grating (for surface water at patio edge or across access routes)
- Inspection chamber or rodding eye (if connecting to soakaway — useful for future maintenance)
- Soakaway crate modules (if using modular soakaway — rate them for your patio area and local rainfall)
- Pipe fittings: bends, junctions, end caps
- Ground stakes and string for marking drain routes before digging
Step-by-step construction sequences
Building a gravel patio on a slope
- Mark out the patio area with pegs and string. Check the slope — if it's over 5%, consider stepping the design or switching approach.
- Excavate to 200 mm below your intended finished surface. On the uphill edge, cut a clean, near-vertical face into the slope to give a firm back wall. Remove and dispose of topsoil.
- Lay geotextile membrane over the entire excavated area, running it up the sides of the cut.
- If the slope is above 3%, lay a layer of biaxial geogrid over the membrane before adding aggregate.
- Install edge restraints (steel or aluminium edging on wooden stakes) around the perimeter. These are critical — without them the gravel will migrate downhill within a season.
- Install any French drain or interceptor drain at the uphill edge before adding sub-base material.
- Spread and compact MOT Type 1 sub-base to 100–150 mm depth in two lifts, checking falls as you go — you want the base to slope away from the house at roughly 1:40 to 1:60.
- Add 40–50 mm of finishing gravel (pea gravel, slate chippings, or decorative stone) and rake level.
- Check the finished surface falls in the right direction (away from the house) with a level and tape.
Building a terraced paved patio with retaining walls
- Survey the full slope and plan how many terraces you need. A single level works on slopes up to about 10%; steeper sites may need two or more tiers.
- Mark out terrace positions. Excavate the upper terrace: cut back into the hill and save the spoil to build up the lower terrace edge if needed.
- Dig footing trenches for retaining walls. Footing depth should be at least one-third the wall height below ground, on a concrete base minimum 150 mm thick.
- Pour concrete footings and allow to cure (minimum 24–48 hours before loading).
- Build retaining walls, installing weep holes (75–100 mm pipes through the wall) at approximately 1–1.5 m spacing at the base. Leave the back face clear for drainage aggregate.
- Lay non-woven geotextile against the rear face of the wall, then backfill with 150–300 mm of free-draining aggregate behind the wall.
- Install a French drain pipe along the back of the wall at the base, connected to a perimeter drain running to the outfall or soakaway.
- Spread and compact MOT Type 1 sub-base to 150 mm depth in the terrace area. Check the fall — aim for 1:60 to 1:80 away from the house across the paved surface.
- Lay a 50 mm sharp sand or semi-dry mortar bedding layer, screeded to the correct fall.
- Lay slabs or pavers, cutting to fit as needed. Adjust each slab with a rubber mallet and check level and fall frequently.
- Point joints with mortar or kiln-dried sand depending on joint width and slab type.
- Build steps between levels if required (see notes on stairs below).
- Install edging restraints around the perimeter and check all drainage outfalls are clear.
Building a raised platform on a steep slope
- Design the platform size and layout. Calculate the post positions to achieve your required spans — as a rough rule, treated C24 timber joists (47x145 mm) can typically span about 2–2.4 m unsupported in normal domestic loading conditions, but check actual span tables for your joist size.
- Mark post positions and dig or auger footing holes to at least 450 mm depth (deeper on clay or frost-exposed sites in the UK — consider 600 mm minimum in colder regions).
- Set post base fixings in concrete footings, or set posts directly in concrete (use UC4b treated posts and compact the concrete well). Allow concrete to cure fully before loading.
- Erect posts and fix the bearer (outer) frame, checking for level across the full platform using a laser level or long spirit level.
- Fix joists to bearers using galvanised joist hangers — never notch the top of bearer to accommodate joists as it weakens them.
- Lay decking boards or paved surface, fixing with stainless steel decking screws or hidden fixings if using composite decking.
- Install balustrades/railings where the platform is 600 mm or more above ground level — in the UK, Building Regulations Part K requires a minimum 900 mm railing height for a platform at this height (1,100 mm adjacent to a drop accessible to the public).
- Build stairs to connect the platform to the garden. Comfortable garden step dimensions are typically a 150 mm rise and 300 mm going (tread depth); steeper stairs are harder on the knees and unsafe for elderly users.
- Treat all cut timber ends with appropriate preservative. Seal any gaps where moisture could collect.
Stairs, edging and railings
Steps are where hillside patios connect to the rest of the garden and they're worth doing properly. The golden rule for comfortable outdoor steps: rise (vertical height) × going (horizontal depth) should equal roughly 600–650 mm. A 150 mm rise with a 300 mm going works out at 600 mm and is the most comfortable. Avoid risers above 175 mm for anyone who's not young and agile, and keep risers consistent, a sudden height variation on a flight of steps is a tripping hazard. Step landings should be at least 900 mm front to back for a comfortable pause. Use the same or complementary material to your main patio surface for a unified look, and ensure each step has a positive fall forward (away from the slope) of about 1:80–1:60 so rain drains off rather than icing up.
Edging restraints on any paved or gravel patio on a slope are structural, not just decorative. Steel or aluminium restraint edging, staked at 400–600 mm intervals, keeps your surface material from creeping downhill over time. On a terraced patio, the retaining wall acts as the lower edge restraint, but you still need a physical edge along the sides and at the top of each terrace. Railings are legally required in the UK where a raised platform or terrace has a drop above 600 mm (Building Regulations Approved Document K). Even where not legally required, any terrace edge above 300–400 mm above the surrounding ground is worth fitting a railing on for practical safety.
Cost and time estimates
| Project type | Materials cost (DIY, UK 2026) | Time estimate (DIY, including prep) | Skill level required |
|---|---|---|---|
| Gravel patio, 20 m², gentle slope | £300–£600 | 1–2 weekends | Beginner |
| Terraced paved patio, 20 m², one retaining wall | £1,000–£2,500 | 3–5 weekends | Intermediate |
| Terraced paved patio, 30 m², two levels with walls | £2,500–£5,000 | 6–10 weekends | Intermediate–Advanced |
| Raised timber deck platform, 20 m² | £1,500–£3,500 | 3–5 weekends | Intermediate |
| Raised paved platform on piers, 20 m² | £2,500–£5,500 | 4–7 weekends | Advanced |
| French drain and soakaway (as standalone) | £150–£500 | 1 weekend | Beginner–Intermediate |
These are materials-only estimates for DIY projects. Labour costs if you hire trades typically add 100–200% to materials cost. Hiring tools (plate compactor, laser level, mini digger) adds £150–£400 per project depending on duration but is nearly always cheaper and faster than trying to do without them.
UK-specific notes: frost, regulations and planning
Frost heave is a real issue for hillside patios in the UK, particularly in northern England, Scotland, Wales, and any exposed or north-facing site. Water in the soil expands when it freezes and can lift paving, crack mortar joints, and push retaining wall footings. The practical response: ensure footing depth is at least 450 mm (600 mm in colder or wetter areas), use free-draining sub-base material that doesn't hold water, ensure drainage is effective so water doesn't sit in the base layers over winter, and where possible choose more freeze-thaw resistant materials (porcelain tiles and engineering bricks resist frost better than softer sandstones or standard concrete flags).
Planning permission is not usually required for a ground-level patio in England and Wales under permitted development rights, provided the patio is not raised above ground level, is not adjacent to a listed building, and the drainage doesn't direct water onto the highway. However, a raised platform or deck that's more than 300 mm above ground level may require Building Regulations notification (Part K for balustrades, Part A for structural safety). Scotland and Northern Ireland have slightly different rules, check with your local planning authority if you're unsure. If you're building a retaining wall over about 1 m high that retains a neighbour's land, Party Wall Act notice may also be required.
Finishing and long-term maintenance
Once the build is done, a few finishing steps extend the life of the whole project significantly. For paved surfaces: apply a penetrating sealer to natural stone or sandstone flags within the first few weeks (before they stain). Repoint any mortar joints that show gaps after the first winter. For timber decks: treat with a UV-stabilised decking oil or stain annually, and check fixings each spring for corrosion. For all hillside patios: clear the drainage outlets and channels in autumn before leaf fall blocks them, and inspect retaining walls after the first severe frost for any signs of movement or cracking. Catch small problems early, a slight lean or a couple of loose stones in a wall is a quick fix; a collapsed wall after two winters of neglect is not.
When to stop and call a professional
Most hillside patio work is absolutely within DIY reach, but there are some clear situations where bringing in a structural engineer or contractor is the right call and not an admission of defeat, it's just risk management.
- Retaining walls over approximately 900 mm–1 m high: hydrostatic pressure and overturning moments at this height require proper structural calculation. An engineer's fee for a simple retaining wall design is typically £300–£700 and is money well spent.
- Suspected made ground, filled areas, or deep topsoil (more than 300–400 mm): these materials settle unpredictably and need a geotechnical assessment before you build a patio on them.
- Heavy clay soils with known shrink-swell behaviour, especially in a prolonged dry or wet period: get a BGS GeoSure check and consider a geotechnical report before designing footings.
- Slopes above about 30–35%: at this gradient, ground stability is a meaningful concern. An engineer should assess whether the slope itself is stable before you add load or excavate into it.
- Any raised platform with a drop over about 2 m or that will carry significant loads (hot tub, heavy planters, large gatherings): get structural calculations.
- Work close to an existing building's foundations: any excavation within 1–2 m of a foundation (depending on depth and soil type) can undermine it. Get professional advice before digging.
- Formal soakaway design for drainage from a large paved area: use a SuDS practitioner or civil engineer to size this properly using BRE 365/CIRIA methods — an undersized soakaway that backs up into your new patio is a frustrating and expensive problem to fix.
Troubleshooting common hillside patio problems
| Problem | Likely cause | Fix |
|---|---|---|
| Paving slabs rocking or sinking | Insufficient sub-base depth or compaction; settlement in fill areas | Lift slabs, add and compact additional Type 1, relay with correct bedding |
| Water pooling on patio surface | Incorrect surface fall direction or insufficient fall (below 1:80) | Re-lay affected area with correct falls; add channel drain if needed |
| Gravel migrating downhill | No edging restraint; no geogrid in base; slope too steep for loose gravel | Install edging; add geogrid layer; consider switching to bound surface or pavers |
| Retaining wall leaning or cracking | Hydrostatic pressure (no weep holes/drainage); inadequate footing; overloaded backfill | Rebuild with proper drainage behind wall; consult engineer if wall is >1 m |
| Water coming through retaining wall face | Clogged or absent weep holes; blocked French drain behind wall | Clear or install weep holes; rod out French drain; check outfall |
| Frost heave lifting paving or cracking mortar | Inadequate drainage keeping water in base layers over winter; shallow footings | Improve sub-base drainage; re-lay affected areas; deepen footings if possible |
| Steps becoming slippery in wet weather | Smooth slab surface; moss/algae growth; no textured finish | Apply anti-slip coating; brush with stiff broom annually; consider adding grit strips |
| Soil erosion behind or under patio | No geotextile separation layer; no uphill interceptor drain; bare soil exposed | Install interceptor drain above patio; add geotextile and stone mulch to exposed soil |
FAQ
How do I decide whether to build a gravel patio, a terraced paved patio, or a raised platform on a hillside?
Use the slope and site conditions as the primary guide: 0–5% (gentle) — gravel or conventional paving with standard sub‑base and simple drainage is usually fine; 5–15% (moderate) — prefer terracing with small retaining walls, paved levels, or engineered stabilization (geogrid); >15% (steep) — avoid loose gravel and plan terraces or a raised/decked platform on piled or founded supports with engineered retaining and drainage. Also consider soil type (clay or made ground needs caution), proximity to buildings, desired appearance, budget, and whether you want level access (accessibility rules favour low gradients or ramps/landings). If structural retaining, deep fill, or unclear ground conditions exist, hire a pro/engineer.
How do I measure my slope accurately for patio design?
Measure rise and run and calculate percent slope = (rise ÷ run) × 100 and angle = arctan(rise/run). DIY methods: string-and-line level between two stakes for quick checks; smartphone inclinometers for rough checks; rotary/self‑levelling laser level with a staff for accurate readings (sub‑10 mm accuracy over typical runs). Take multiple readings along the area, note high and low points, and map drainage direction. For terraces, measure along each intended level run and the drop between levels.
Which direction and amount should a patio slope for drainage?
Always slope away from buildings. UK guidance commonly uses minimum longitudinal falls around 1:80 (~1.25%) and transverse falls ~1:40 (~2.5%), with 1:60 or 1:40 preferred for smooth slabs to avoid ponding. For accessibility and comfort, slopes steeper than 1:20 (5%) are undesirable for continuous walking surfaces; where required, provide landings/steps. Ensure finished paving stays below the building DPC (typically at least 150 mm) and provide positive drainage to a soakaway or storm system.
How should I design drainage on a hillside patio — surface and subsurface options?
Combine surface falls, edge channels, and subsurface drains. Surface drainage: grade paving to a fall and use slot drains or crossfalls to direct water. Subsurface: French drains (100–150 mm perforated pipe in a 300–450 mm gravel trench wrapped in geotextile) to collect and move groundwater to an outfall or soakaway. For high infiltration needs, size soakaways using BRE/CIRIA methods and a percolation test; where soakaways aren’t suitable, discharge to approved sewer/outfall per local rules. Use membranes under bound surfaces, geotextile separators, and geogrid where slopes/loads require stabilization. Always keep water away from foundations and retaining walls; provide weep holes/relief drainage behind retaining structures.
What are the basic step‑by‑step sequences for building a terraced paved patio on a slope?
1) Site survey and slope measurement, check utilities and permissions. 2) Prepare a plan with levels, drainage, stair/edging positions. 3) Excavate for terraces and retaining wall footings, set datum. 4) Install retaining walls (temporary or permanent) with proper foundations or blocks/stonework per height; include drainage behind walls. 5) Lay sub‑base (type 1 or crushed stone) in compacted layers with falls for drainage. 6) Install geotextile or membrane where required, and any geogrid reinforcement. 7) Lay bedding layer (sharp sand or mortar bed for flags) and place paving/edging. 8) Joint, compact (for block paving) and seal if required; add edging, steps and railings. 9) Final grading, connect drains to outfall/soakaway, restore surrounding planting. Throughout, compact in layers and check levels frequently.
What are the key points for building retaining walls and erosion control for patio terraces?
Design retaining walls to suit wall height and soil load; for walls under ~1 m, well‑built gravity walls (stone or concrete blocks with gravel drainage behind) can work; above that or with surcharge, use engineered reinforced walls. Provide a drained backfill of free‑draining aggregate, a perforated drain at the base, and geotextile to stop fines. Use geogrid reinforcement for higher fills. Control erosion on exposed slopes with turf, geotextile, coir matting, or planted terraces; avoid bare soil. If in doubt about wall design, get a structural engineer.
Next Article
How to Build a Gravel Patio on a Slope: DIY Guide
Step-by-step DIY plan to build a gravel patio on a slope, including base layers, drainage, edging, and fixes.