You can build a rooftop patio yourself, but it has to start with a structural check and a waterproofing plan before you ever buy a single paver or plank. Get those two things right and everything else is manageable. Skip them and you risk a leaking roof, a sagging structure, or a deck that fails inspection. This guide walks you through the whole process: planning, permits, roof suitability, material choices, and the actual build sequence, with real cost and timeline expectations throughout.
How to Build a Rooftop Patio: Step-by-Step DIY Guide

Nolan Lennox
15 May 2026
Planning and designing your rooftop patio
Start by sketching out what you actually want: a lounging area, a dining space, a container garden, or some combination. The layout will directly affect how much load you are adding and where that load is concentrated. Rooftop patios on flat or low-slope roofs (common on row houses, garages, and low-rise additions) are the most practical candidates for DIY builds. Steep-pitched roofs are a different beast entirely and usually require a proper framed platform, which pushes the project closer to professional territory.
Think about traffic flow and access first. Where will you put the door or hatch? How wide does the pathway need to be? Plan for at least 36 inches of clear walking space. If you are adding furniture, map it out on paper with real dimensions before you commit to a layout. Account for the setback your local code requires from the roof edge, which is typically where guardrail requirements kick in. You will almost certainly need perimeter railings at a minimum height of 36 inches above the walking surface, and any railing openings cannot allow a 4-inch sphere to pass through. Factor those rails into your design from the start, not as an afterthought.
A few other design decisions to lock in early: Will you add shade (a pergola, sail shade, or umbrella footings)? Do you want built-in planters or lighting conduit? Each adds weight and complexity. Keep the first version simple. You can always add features later once the base is solid.
Permits, building codes, and structural safety
I will be straight with you: most rooftop patios require a permit. This is not the kind of project you want to quietly complete and hope nobody notices, because the risks are real. A permit review forces a structural check, and that check protects you from building something that could fail or void your homeowner's insurance. Check with your local building department before you do anything else. Bring a rough sketch of your plan and describe the materials you intend to use.
Under the International Residential Code (IRC), exterior balconies and decks are typically designed for a live load of 40 pounds per square foot (psf). That is the standard your roof structure needs to meet or exceed before you add any patio surface. A structural engineer can assess your existing framing and tell you whether it is adequate, needs reinforcement, or simply cannot support a patio without a major overhaul. For most homeowners, a one-time consultation with a structural engineer (usually $300 to $600) is money very well spent and is often required as part of the permit application anyway.
Also verify that your planned guardrails meet code. The 36-inch minimum height applies to any open-sided walking surface elevated above grade, and the 4-inch sphere rule for openings is strictly enforced by most inspectors. Building to code protects you legally and keeps the space genuinely safe.
Is your roof actually ready? Waterproofing, drainage, and load checks
This is the most important section in the whole guide. A rooftop patio sitting on a compromised membrane is a slow leak waiting to happen, and leaks in this location are expensive to diagnose and fix after the fact. Before any surface goes down, you need to evaluate three things: the condition of your existing waterproofing, how water drains off the roof, and whether the structure can handle the added weight.
Waterproofing condition
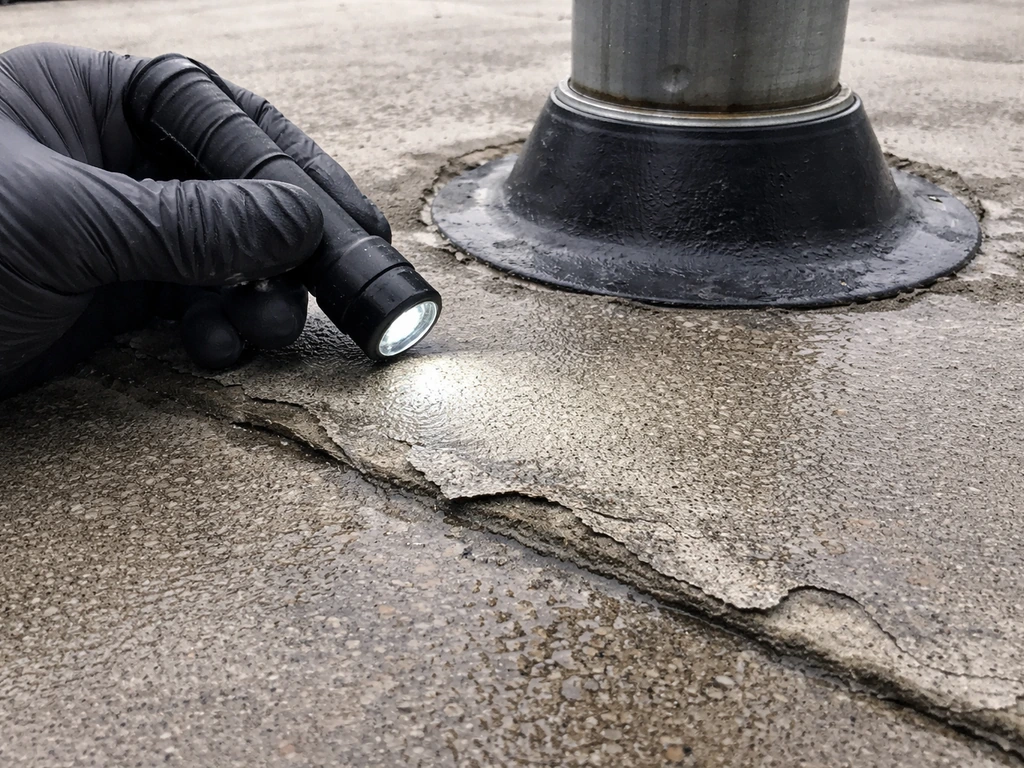
Walk the roof and look for cracked, blistered, or peeling membrane material. Check around any penetrations (vents, HVAC units, parapet flashings) because those are the first places leaks develop. If your roof membrane is more than 10 to 15 years old, has visible damage, or you are not sure of its condition, have a roofing contractor inspect and repair or replace it before you build. Adding a patio surface on top makes future repairs dramatically harder and more expensive.
Drainage slope
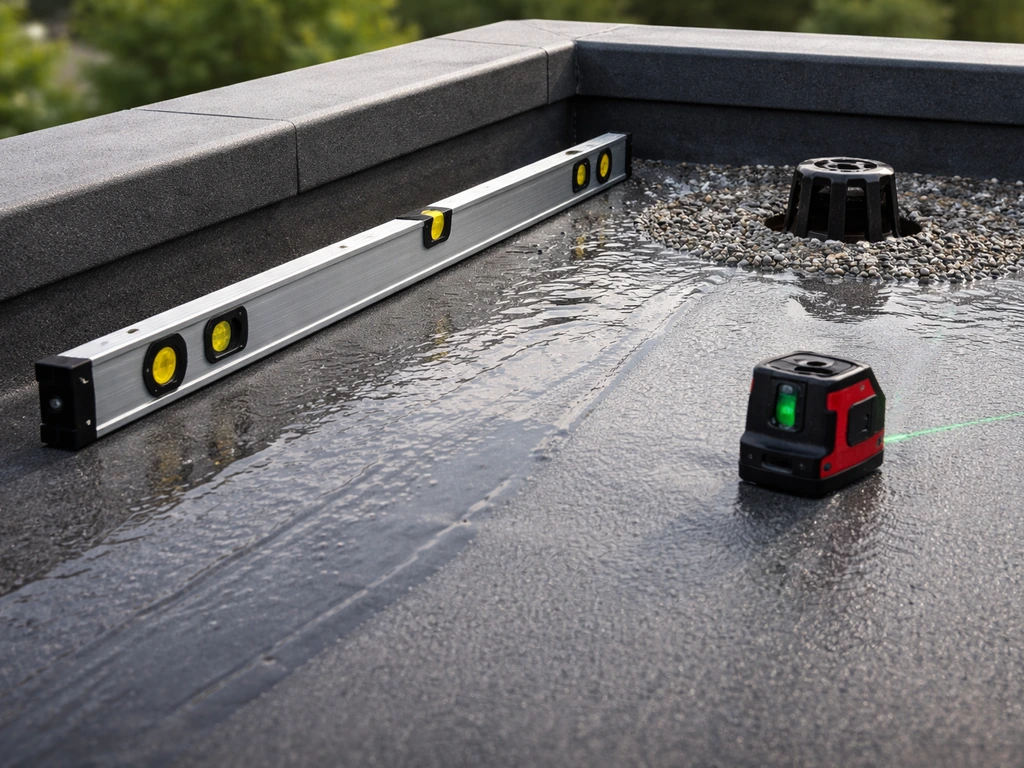
Flat roofs should have a minimum slope of about 1/4 inch per foot (roughly 2%) to move water toward drains and prevent ponding. Ponding water is heavy (water weighs about 5 psf per inch of depth), degrades membrane materials over time, and can find its way into any existing vulnerability in your waterproofing. Confirm your roof meets this minimum slope and that all drains are clear and functional.
Flat or low-slope roof best practice is to provide a minimum slope of about 1/4 inch per foot (about 2%) to achieve positive drainage and avoid ponding minimum slope of about 1/4 inch per foot (≈2%). If you are also planning drainage across an exposed surface, the exact slope targets and leveling approach are covered in how to slope a patio.
Your patio surface system needs to allow water to flow through or around it freely so it does not block drainage. This is why pedestals and open-joint pavers or elevated decking systems are so popular on rooftops.
Structural load capacity
A rooftop patio adds both dead load (the weight of permanent materials) and live load (people, furniture, snow if you are in a cold climate). Common paver systems run 15 to 25 psf for the pavers alone. Add a pedestal system, furniture, and a full crowd of people and you can easily approach or exceed 60 to 80 psf total. Your structural engineer needs to confirm the roof framing can handle the design live load of 40 psf plus the dead load of your chosen materials. Do not guess on this one.
Choosing the right materials for a rooftop patio
Material choice on a rooftop is different from a ground-level patio because you have to balance weight, compatibility with your waterproofing membrane, drainage, and longevity in a fully exposed environment. Here is how the main options compare.
| Material | Weight (approx.) | Cost Range (per sq ft installed) | Membrane Friendly? | Maintenance |
|---|---|---|---|---|
| Porcelain or concrete pavers on pedestals | 15–25 psf | $15–$35 | Yes, if pedestals used | Low |
| Composite decking on sleepers | 3–6 psf | $20–$45 | Yes, if sleepers padded | Low to medium |
| Hardwood (ipe, teak) on sleepers | 4–7 psf | $25–$55 | Yes, if sleepers padded | Medium to high |
| Gravel ballast | 10–20 psf | $3–$8 | Yes, protects membrane | Very low |
| Brick/clay pavers on sand bed | 20–30 psf | $8–$18 | Risky without protection layer | Low to medium |
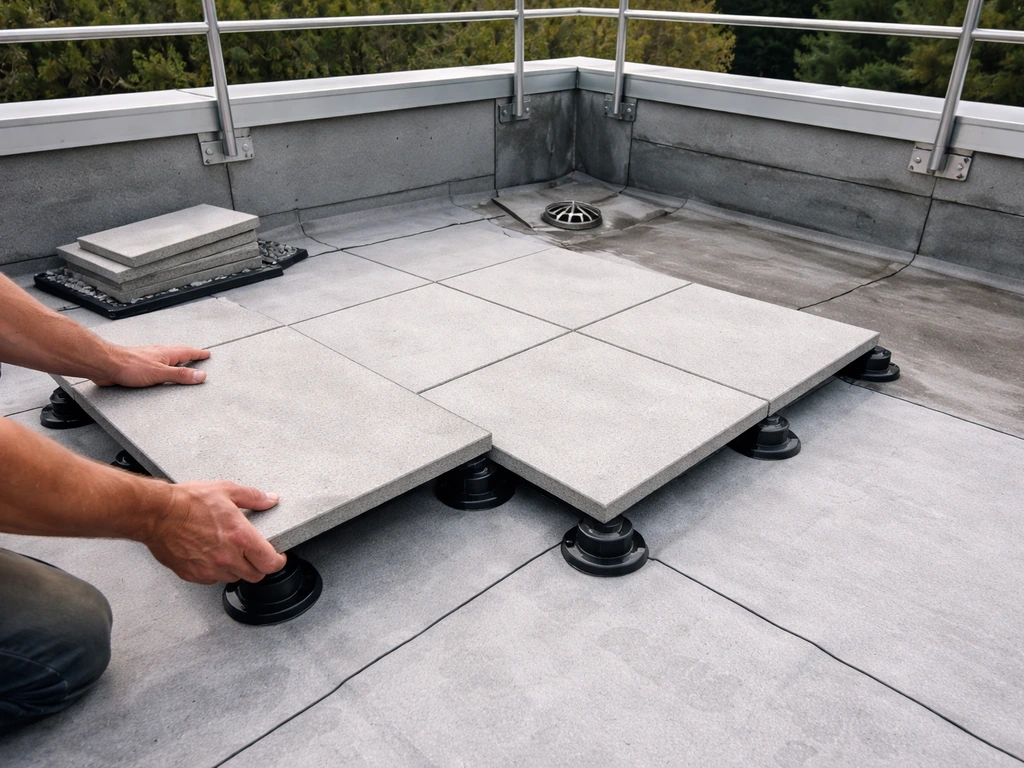
Porcelain or concrete pavers on pedestals
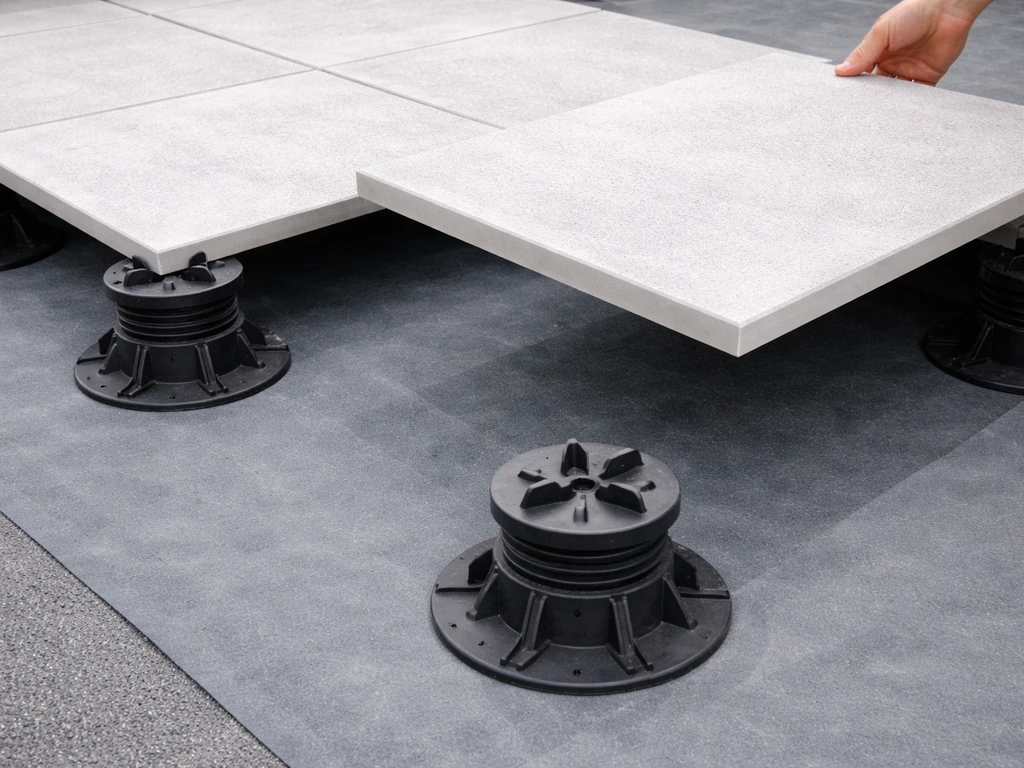
This is my top recommendation for most rooftop DIY projects. Adjustable pedestals sit directly on the membrane (usually with rubber feet that protect the surface), and the pavers rest on top with open joints that allow free drainage underneath. You can level an uneven surface without any wet work, and pavers are removable if you ever need membrane access. Porcelain pavers are lighter, frost-resistant, and virtually maintenance-free. Concrete pavers cost less but are heavier.
Composite decking on sleepers
Composite is the lightest structural decking option and it handles moisture and UV exposure well. You lay it over pressure-treated or composite sleepers that run perpendicular to the planks, with rubber or EPDM pads under each sleeper to protect the membrane. Leave gaps between boards for drainage. The main downside is cost: quality composite runs high, and you also need a sleeper framing system. That said, it gives the patio a warm, wood-like feel that pavers cannot match.
Hardwood on sleepers
Ipe and teak are beautiful and extremely durable, but they require oiling to stay looking good and are the most expensive option. The installation process mirrors composite decking with sleepers and membrane pads. If you love the look and are willing to do annual maintenance, hardwood delivers a premium result. Just make sure any fasteners and hardware are stainless steel to resist rust.
Gravel
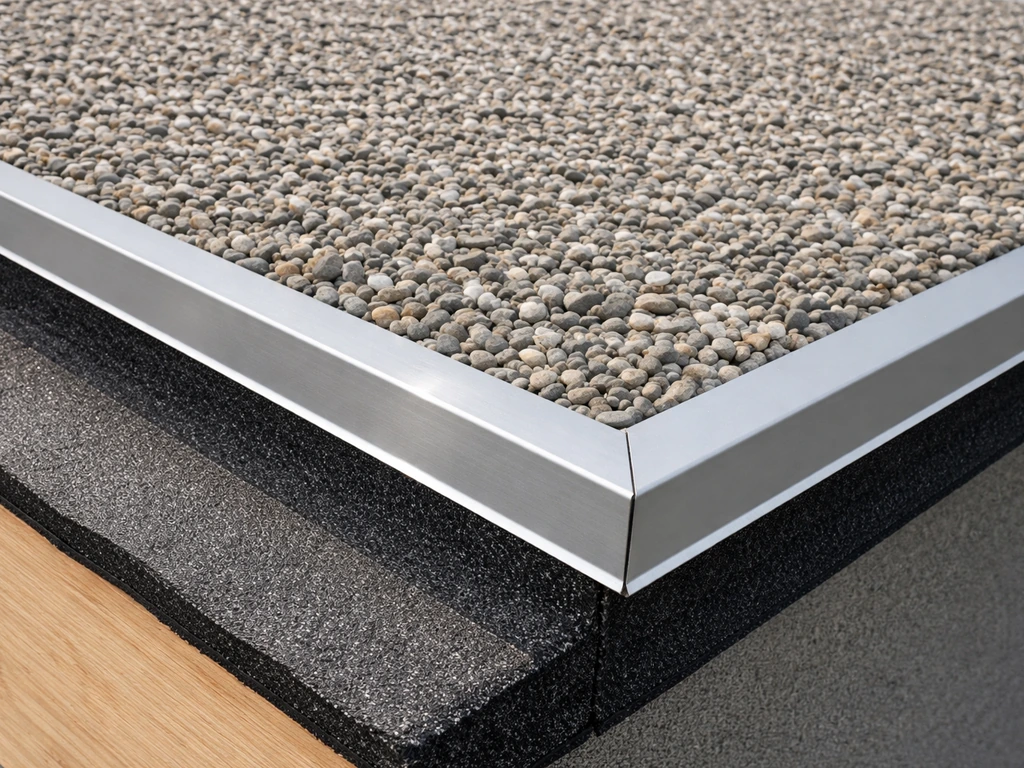
Gravel is the lowest-cost option and it is actually good for the membrane because it acts as a protective ballast layer. It works well as a low-traffic utility roof surface or as fill between raised planting beds or pavers. The downside is that it is not comfortable underfoot for a real gathering space, it migrates, and you need containment edging to keep it in place. Gravel is a solid choice if your primary goal is protecting the membrane on a mostly utilitarian roof with light foot traffic.
Brick and clay pavers
Traditional brick pavers set in a sand bed are heavy, and the sand bed itself can trap water against the membrane, which is a problem. If you want the brick look on a rooftop, use thin-set porcelain tiles that mimic brick instead, or use brick-style concrete pavers on a pedestal system. Traditional mortared brick and mortar beds are generally not suitable for rooftop use unless you have a fully engineered waterproofing system designed for it.
How to build a rooftop patio: step by step
Once your permits are in hand, your structural check is complete, and your membrane is in good shape, you are ready to build. This sequence applies to a paver-on-pedestal or composite decking build, which covers most residential DIY rooftop projects.
- Clean and inspect the roof surface. Sweep or blow off all debris. Do a final walk to look for any areas of soft membrane, blistering, or standing water. Address any issues with a roofing contractor before proceeding. Mark the locations of all drains, scuppers, and penetrations so you never cover them.
- Measure and mark your layout. Use chalk lines to establish your patio boundary, confirming required setbacks from the roof edge. Measure twice. If you are installing a guardrail system, mark post locations now and confirm they can be attached to the parapet or structure without penetrating the membrane.
- Install or repair waterproofing as needed. If your roofer recommended a new membrane layer or additional flashing around penetrations, have that work done before anything else goes on the roof. For DIY membrane repair, liquid-applied roofing membranes (like a brush-grade elastomeric coating) can patch problem areas.
- Install a drainage protection layer (optional but recommended). A root barrier or drainage mat (like a dimple mat) laid over the membrane adds protection and promotes drainage beneath the patio surface. This step is especially valuable if you are using a sand-set or fully covered system.
- Set up your pedestal system or sleeper framework. For pavers: start at a fixed reference point (usually a corner or drain location) and set pedestals at your planned spacing, typically 12 to 24 inches on center depending on paver size. Adjust pedestal heights to create a level surface while maintaining the roof's natural drainage slope underneath. For decking: lay out sleepers perpendicular to the planned plank direction, spacing them per the decking manufacturer's specification (usually 12 to 16 inches on center). Place rubber or EPDM pads under each sleeper contact point to protect the membrane.
- Lay the patio surface. Start from one end and work methodically. For pavers, set each one on the pedestals and check for level as you go. Leave consistent joint gaps (1/8 to 1/4 inch) for drainage and movement. For decking, fasten boards using hidden fasteners or face screws, maintaining a 1/8-inch gap between boards for drainage and expansion.
- Install edging and trim. At the perimeter, finish exposed edges with matching edge pavers, fascia boards, or aluminum trim. This keeps the surface looking clean and prevents material from shifting.
- Install guardrails. This is non-negotiable on any open-sided rooftop. Your guardrails must reach at least 36 inches above the walking surface and must not have any openings that allow a 4-inch sphere to pass through. Core-drilled post bases set into the parapet, or parapet-clamping rail systems, keep the membrane intact while giving you a solid anchor. Have a structural engineer or experienced contractor verify the rail attachment if you are unsure.
- Check drainage one more time. Run a hose across the surface and watch where water goes. It should drain freely under or between the surface materials and toward the roof drains, not pool anywhere. Adjust any pedestal heights or sleeper shims if needed.
- Add access, lighting, and finishing touches. Install a safe, code-compliant stair or hatch with a proper landing. Add exterior-rated low-voltage lighting, outlet conduit, or anything else you planned in the design phase. Do a final inspection walk before declaring it done.
Budget, tools, timeline, and DIY tips
What it will cost
A basic rooftop patio using concrete pavers on a pedestal system will typically run $15 to $25 per square foot in materials for a DIYer, not counting any structural reinforcement or membrane repairs. A 200-square-foot patio would cost roughly $3,000 to $5,000 in materials. Composite decking systems push that to $20 to $35 per square foot, or $4,000 to $7,000 for the same size. Add $300 to $600 for the structural engineer consultation, $150 to $500 or more for permits depending on your municipality, and whatever membrane repair costs if needed. Guardrail materials can add $40 to $80 per linear foot depending on the system. Budget a 15 to 20 percent contingency for surprises.
Tools you will need
- Tape measure and chalk line
- 4-foot level and laser level (rent if you don't own one)
- Rubber mallet
- Angle grinder with diamond blade for cutting pavers (or a wet tile saw)
- Circular saw or miter saw for decking
- Drill and bits
- Broom and leaf blower for cleanup
- Safety glasses, knee pads, and gloves
- Bucket and stiff brush for membrane prep
- Garden hose for drainage testing
How long it takes
For a solo DIYer working weekends, expect two to four weeks from permit approval to finished patio on a 150 to 300 square foot project. The permit process alone can take one to four weeks depending on your jurisdiction. The actual build, once materials are on-site, is typically one to three full weekends of work for a paver pedestal system on a well-prepped roof. Budget more time if you are doing membrane repairs, installing complex railings, or building access stairs.
Common mistakes to avoid
- Skipping the structural engineer: the 40 psf live load requirement is not something to guess at. Pay for the consultation.
- Building on a failing membrane: any leak after the patio is built is ten times harder to find and fix. Inspect and repair first.
- Blocking drains or scuppers: water that cannot escape will pond, add weight, and find any weakness in your waterproofing.
- Using materials that trap moisture against the membrane: sand beds, mortared systems, or impermeable underlayment without drainage paths will cause long-term problems.
- Ignoring thermal expansion: pavers and decking boards expand and contract. Leave proper joint spacing and do not pack materials tight.
- Underestimating rail requirements: building a beautiful deck with non-compliant rails will fail inspection and be a safety hazard.
- Overloading concentrated areas: placing a heavy planter, hot tub, or HVAC unit on a specific spot without checking point load capacity can exceed local structural limits even if overall load is acceptable.
One last note: if your project involves a sloped roof section, or if drainage from the rooftop patio affects how water moves down a pitched surface, think carefully about how water exits the rooftop and where it goes from there. If you are dealing with a sloped surface, you need to plan the patio layers and drainage carefully so runoff does not lead to leaks or damage sloped roof section. The same drainage discipline that applies to patios built on slopes at ground level applies here, just with higher stakes because the water is directly above your living space.
A well-built rooftop patio is one of the most rewarding DIY projects you can take on. It turns unused square footage into functional outdoor living space, and when you do it right, it protects your roof as much as it uses it. Start with the structural check, nail the waterproofing, pick a material system that lets water drain freely, and build it to code. That combination is what separates a rooftop patio that lasts decades from one that causes headaches in year two.
FAQ
Can I build a rooftop patio directly over my current roof surface if it looks fine?
Do a documented condition check first, look for soft spots, bubbling, and failed seams, and confirm the membrane type is compatible with pedestals or sleepers. Even if it looks intact, roof coatings and patched areas can be weak points that fail after you add permanent weight and block access for future repairs.
What is the safest patio surface if I’m worried about future roof repairs?
Use an elevated system that allows access, like pavers on adjustable pedestals with open joints or composite decking with sleepers. The key advantage is that you can lift sections to reach penetrations without destroying the entire patio build-up.
How do I handle roof penetrations like vents, HVAC curbs, and skylights?
Treat every penetration as a separate waterproofing detail, plan the elevated system so it can be serviced, and keep deck components from trapping water around flashings. Your engineer or roofer should confirm that the pedestal or sleeper layout does not overload or compromise flashing edges.
Do pedestals or sleepers require special spacers or pads to protect the membrane?
Yes. Use manufacturer-recommended pads (often rubber or EPDM) under contact points so loads transfer without abrasion or point stress. Skipping pads or improvising with generic foam can lead to membrane wear over time, especially with UV exposure and thermal cycling.
How should I plan drainage if my roof has multiple drains or scuppers?
Map where roof water naturally travels, then design the patio layer so it does not block those paths. Keep drainage clear at the downspouts and drains, confirm that your patio system does not create a “bathtub” effect, and verify that water exits the roof to a safe discharge area.
What if my rooftop is not flat enough to hit the recommended slope?
You may need an elevated leveling strategy rather than trying to force slope with thick mortar or sand beds. Adjustable pedestal heights can help you maintain a workable drainage plane, but your structural engineer should still confirm that the added height and layout do not alter load distribution or access.
Are pavers on pedestals actually light enough for most roofs?
They are usually lighter than fully bonded tile or mortar beds, but “light” is relative. Total dead load depends on paver type, pedestal system, and any leveling additions, so your structural calculation must include the full build-up plus live loads, not just the paver thickness.
Can I use traditional brick pavers on a rooftop if I put them on a sand bed?
In most cases, no. A sand bed can trap water and keep it in contact with the membrane, increasing deterioration and leak risk. If you want a brick look, use brick-style units designed for pedestal systems or use porcelain tile that mimics brick.
What guardrail mistakes cause the most failed inspections?
Common issues include rail heights that miss the minimum requirement, openings that allow a 4-inch sphere to pass, and guardrail posts that are installed without accounting for the deck structure. Before buying materials, verify your local code requirements and plan the railing base attachment method so it does not puncture or compromise waterproofing.
Do I need separate waterproofing around the patio system perimeter and at edges?
Usually, yes. Edge transitions (near walls, parapets, and doors) need flashing continuity so water does not bypass the membrane at the perimeter. Plan these details early because fixing edge leaks after installation is far more difficult.
How do I keep gravel patios from migrating on a rooftop?
Use containment edging and consider geotextile or a designed base system to prevent movement and to keep gravel from clogging drainage layers. Also note that gravel comfort is limited, so it can be better suited to low-traffic zones or between raised plant beds.
What fasteners should I use for composite decking or hardwood on rooftops?
Use stainless steel or corrosion-resistant hardware suitable for exterior, fully exposed conditions. For hardwood, confirm the entire fastener and bracket system is compatible with treated framing, and follow the manufacturer’s drainage gap requirements so moisture can escape.
How long will permits and inspections take, and can I start building immediately after applying?
In many places, permit approval can take weeks, and you typically cannot begin until you have written approval and, in some jurisdictions, an inspection booked. Plan for scheduling delays, especially for structural review and guardrail details, so you do not lose material-time on site.
What’s a good first step if I want to estimate DIY cost more accurately?
Break the estimate into categories: structural engineering or reinforcement, membrane inspection or repair, railing and posts, and the patio system itself. Then add a line item for access stairs or a safe walkway from the door to the patio, because stairs and railing often cost more than the surface area suggests.
Next Article
How to Slope a Patio: Step-by-Step Drainage Guide
Step-by-step guide on how to slope a patio for drainage: set target pitch, grade base, and finish pavers or concrete.