Slope your patio at 1/4 inch per foot away from the house. That's the sweet spot most professionals use, and it's what I recommend for almost every DIY build. It's enough to move water off the surface without making the patio feel like a ramp. If you're in a drier climate, you can get away with 1/8 inch per foot, but 1/4 inch gives you a real margin for imperfect workmanship, settling, and heavy rain.
How to Slope a Patio: Step-by-Step Drainage Guide

Nolan Lennox
15 May 2026
What patio slope is actually for (and how much you need)
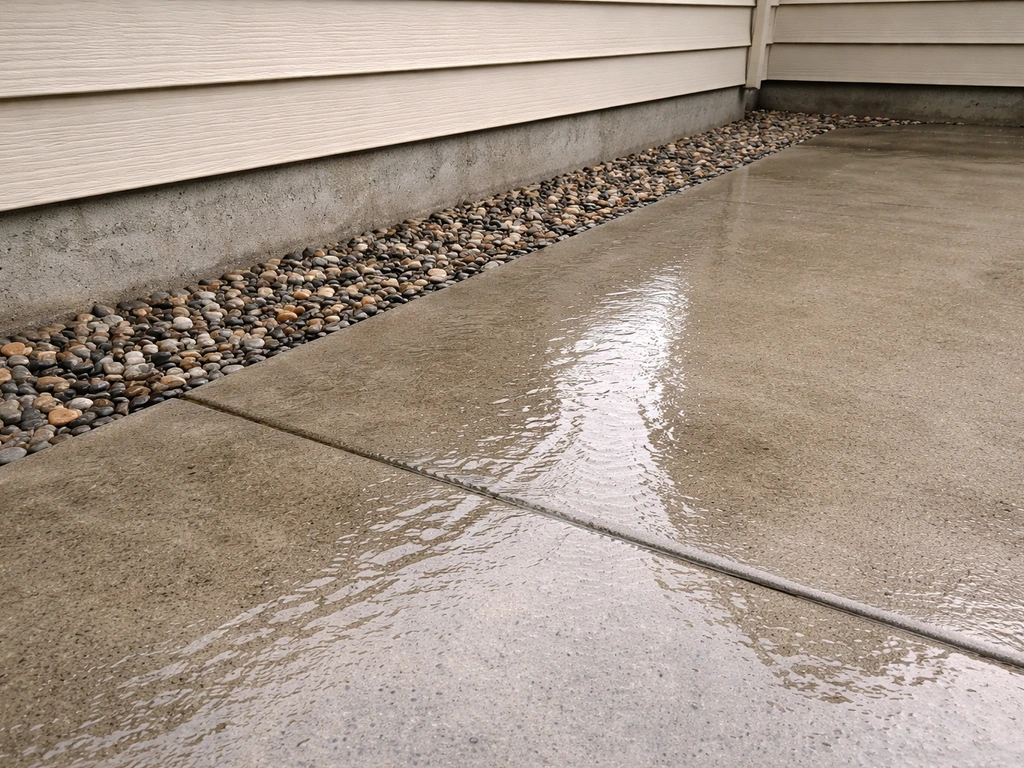
Slope isn't just about keeping your feet dry. It's about protecting your foundation. Water that puddles near the house eventually finds its way into the ground next to your footings, which leads to basement moisture, frost heave, and cracked concrete over time. Even a low-traffic patio needs to send water somewhere other than toward the house.
Here's how the numbers break down in real terms. A 1/4 inch per foot slope over a 10-foot-wide patio means your outer edge sits exactly 2.5 inches lower than the edge against the house. Over 12 feet, a 1/8 inch per foot slope equals a 1.5-inch total drop. Neither of those is dramatic when you're standing on the patio, but both are enough to drain water reliably.
| Slope Rate | Per Foot Drop | Total Drop (10 ft) | Best For |
|---|---|---|---|
| 1/8 inch per foot (~1%) | 1/8 in | 1.25 in | Dry climates, minimal rain |
| 1/4 inch per foot (~2%) | 1/4 in | 2.5 in | Most DIY patios, recommended standard |
| 3/8 inch per foot (~3%) | 3/8 in | 3.75 in | Heavy rain or snowy climates |
The 1/4 inch per foot target is backed by industry guidance for both concrete and paver surfaces, and it's forgiving enough that minor variation in your finished surface still drains properly. I'd avoid going steeper than 1/2 inch per foot unless you have a specific drainage problem to solve, because it starts to feel uncomfortable underfoot and makes furniture placement awkward.
Pick the drainage direction before you do anything else
Before you set a single stake, figure out where the water is going to go. This sounds obvious but it's where most first-timers get tripped up. You need a clear destination for runoff, and it can't be someone else's foundation, a low spot in your yard that already collects water, or a neighbor's property.
The most straightforward option is sloping the patio away from the house toward the open yard. That works great if your yard has natural positive grade (meaning the ground slopes away from the house already). If your yard slopes back toward the house, you'll need a catch basin, a French drain, or a channel drain at the outer edge of the patio to intercept the water before it heads back.
Walk the site and look at where water goes after a rain right now. That tells you everything. If there's already a low spot at the edge of your planned patio footprint, design so the slope drains toward it. If you're planning a drain, set it into your design now before you start grading, not as an afterthought when the base is already in.
- Slope away from the house foundation as the primary rule
- Identify where the water will go once it leaves the patio edge
- Never slope toward a neighbor's property or an existing low spot that floods
- Plan for a channel drain or catch basin if your yard grade works against you
- Check that the house's existing drainage (downspouts, swales) won't conflict with your patio drainage direction
Tools and setup for accurate slope measuring
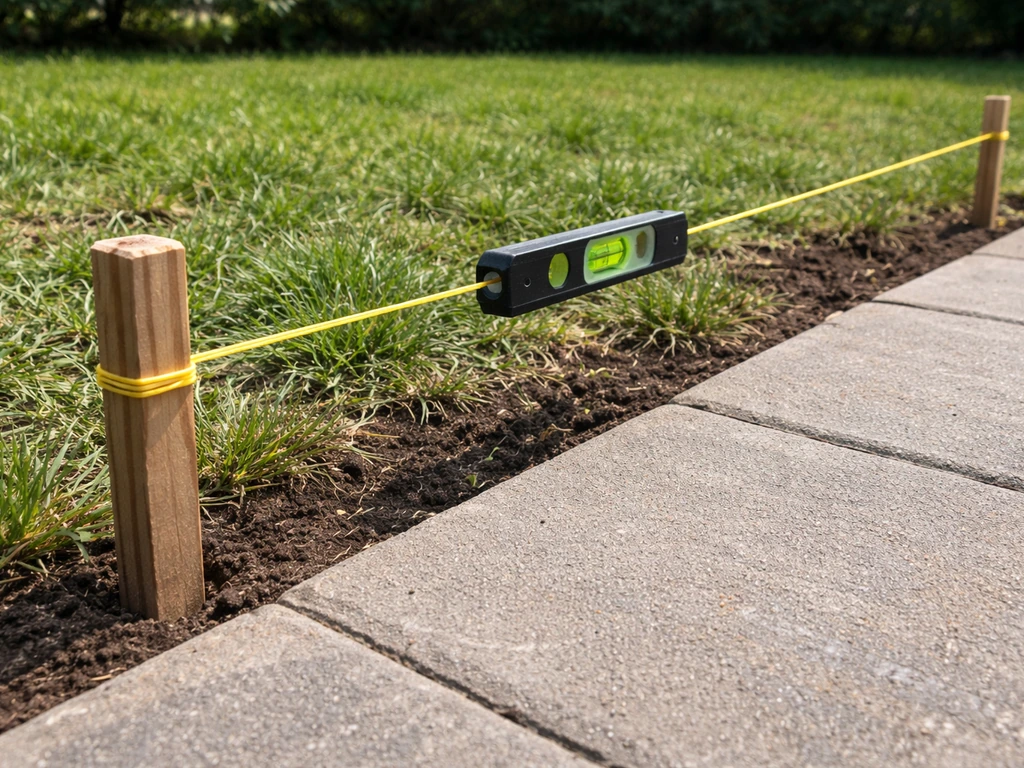
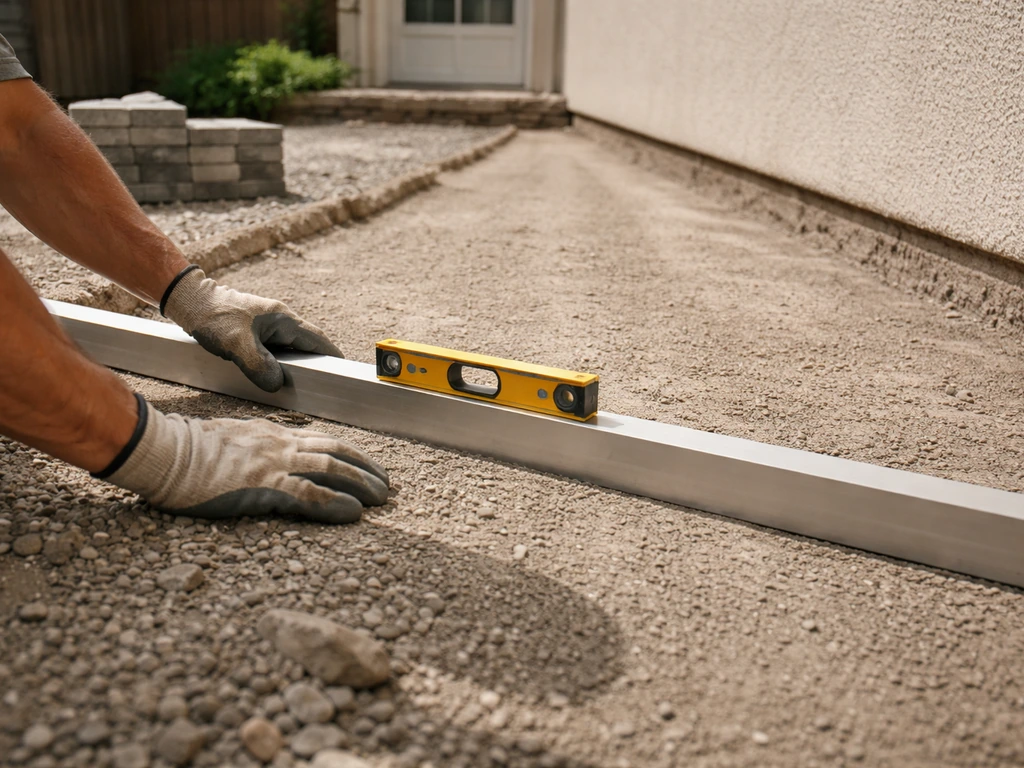
You don't need a laser level to get this right, though one helps. A string line and a basic line level (the small torpedo-style bubble level that clips onto string) is the classic DIY method and it works fine if you're patient and set it up carefully.
Here's the setup: drive two stakes at the uphill end of your patio (along the house wall), and two at the outer edge. Tie a string between the house-side stakes at a consistent reference height, level it with your line level, then drop the string at the outer stakes by your calculated total drop. For a 12-foot-wide patio at 1/4 inch per foot, that's 3 inches of intentional drop at the outer stakes. When you check that string with your level, it should read off-level by exactly the amount you've dropped it.
A rotary laser level with a grade rod speeds this up significantly, especially on a larger patio. You set the laser at your target slope, walk the grade rod around the perimeter, and get an instant read. If you're renting tools for the weekend, a laser level is worth the extra cost. A 4-foot spirit level is also useful for spot-checking after you screed or compact.
- String line and line level: budget-friendly, slow but accurate if done carefully
- Rotary laser level with grade rod: fastest and most reliable, worth renting
- 4-foot spirit level: good for spot checking finished surfaces
- Tape measure: for calculating your exact total drop before you set strings
- Marking paint or flags: to mark the perimeter and any drain locations
Always double-check your string measurements before you commit to excavation. It takes five minutes to re-verify and can save you from grading the whole thing wrong. I've regraded a base twice because I trusted a sloppy string setup the first time around, and it's not a fun afternoon.
Base prep: subgrade, depth, and compaction with slope built in
The slope you set on your base is what determines the slope on your finished surface. If your base is flat or inconsistent, your patio will be too. Get the grade right at the subgrade level and everything above it follows.
Excavation depth
For pavers, dig down 7 to 9 inches below your finished surface height: that accounts for 4 to 6 inches of compacted gravel base plus 1 inch of bedding sand plus the paver thickness (usually around 2.375 inches for standard pavers). For a concrete slab, excavate 6 to 8 inches: about 4 inches of compacted gravel base and 4 inches of concrete. Adjust for your local frost depth if you're in a cold climate.
Start by stripping all vegetation and soft topsoil, then use your string lines to check the subgrade elevation at multiple points. The subgrade should mirror your target slope. If you're sloping at 1/4 inch per foot, the subgrade should also fall 1/4 inch per foot across the same distance. Scrape or fill as needed to get close, then move on to the base.
Compacting the base in lifts
A plate compactor only penetrates 3 to 4 inches effectively, so you can't dump 6 inches of gravel and compact it all at once. Spread your base material in 2-inch lifts, compact each one completely before adding the next, and check the slope after each lift. This is the step people skip when they're rushing, and it leads to settling and low spots later.
Lightly dampen each lift before compacting if the material is dry. It helps the particles lock together better. On the final base lift, check your slope with a level and grade rod before moving to the next step. This is your last easy chance to correct grade before the bedding sand or forms go in.
How to grade for pavers versus concrete
Paver patios
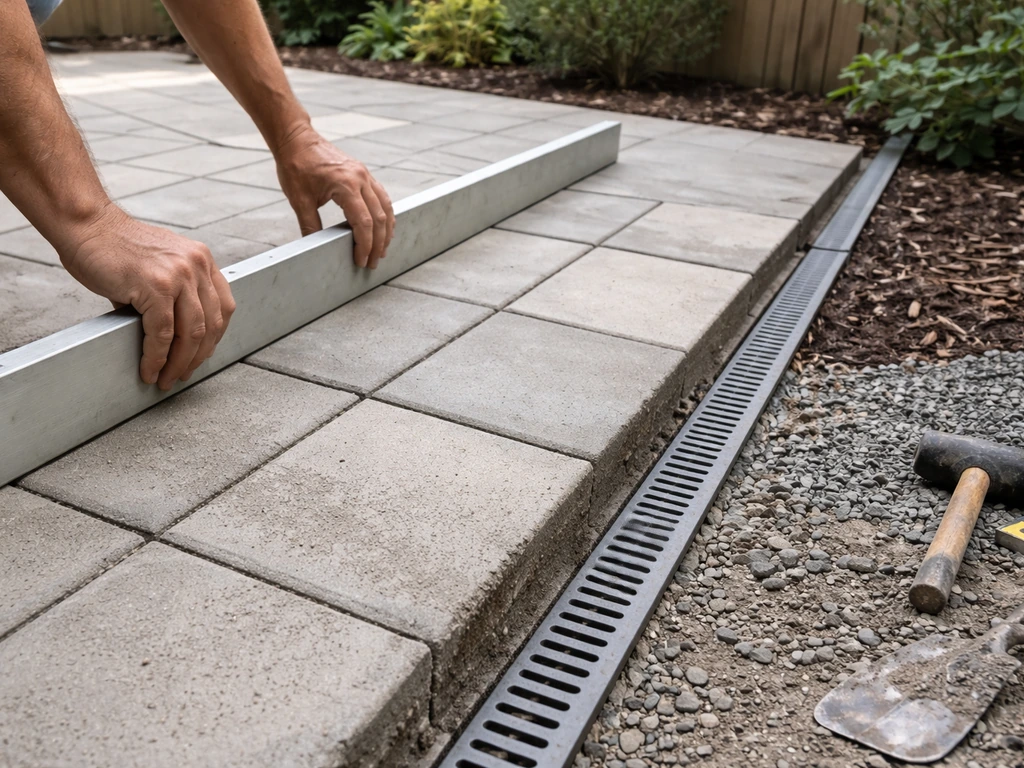
After your compacted gravel base is done, add 1 to 1.5 inches of bedding sand. The goal is a consistent, uniform layer, not a variable cushion to correct base problems. Screed the sand using a screed board riding on two pipes or guides set at your target slope, and don't walk on the screeded sand before placing pavers.
As you place pavers, check your slope every four to five rows. Use a 4-foot level set across the direction of slope, and confirm the bubble is reading the correct amount of tilt. Pavers can drift slightly as you work, and catching a problem at row five is a lot easier than catching it at row twenty. Tap each paver down with a rubber mallet and keep joints tight and consistent.
The ICPI-recommended slope range for pavers is 1/8 to 1/4 inch per foot minimum, with some contractor guides pushing up to 1/2 inch per foot max. Stay in that range and you're fine. Once all pavers are set, compact the whole surface with the plate compactor (add a pad to protect the pavers), then sweep polymeric sand into the joints.
Concrete patios

For a concrete slab, you build the slope into the forms before any concrete is poured. Set your form boards so the outer form is lower than the house-side form by your calculated total drop. Use a level and a tape measure to confirm the form height difference, then lock the forms in place with stakes every 2 to 3 feet.
When you pour, screed the concrete using your forms as guides. The screed board rides on the form edges, so if your forms are set correctly, the surface slope is already built in. Finish the surface with a float and broom for texture, but don't over-finish with a steel trowel: a broom finish provides grip and doesn't affect drainage.
Quikrete's guidance for residential concrete patios specifically targets 1/8 inch per running foot sloping away from the house as a minimum. I recommend aiming for 1/4 inch per foot as your form setup target, so even if the pour settles or you lose a little slope during finishing, you're still above the minimum.
Edge restraints, transitions, and avoiding low spots
Edge restraints are non-negotiable for paver patios. Any paver edge that isn't bordered by a solid fixed structure (a house wall, a concrete footing, a curb) needs a plastic or aluminum edge restraint system. Without it, pavers migrate outward over time, joints open up, and you end up with low spots and trip hazards. Secure the restraints with 10-inch steel spikes driven through the pre-drilled holes into the base material.
Low spots are usually caused by one of three things: inconsistent base compaction, bedding sand that wasn't screeded flat, or an edge that wasn't restrained and has shifted. The easiest way to avoid them is to screed the bedding sand carefully and check the slope before placing each new section of pavers rather than checking only at the end.
At transitions, whether that's where your patio meets a step, a grass edge, a sidewalk, or a planting bed, make sure the final patio surface sits slightly above the surrounding grade so water sheds off the edge. If the transition point is lower than your patio surface, water will pool right there every time it rains. A 1/4 to 1/2 inch positive lip at the outer edge is enough.
In poor-draining soils (heavy clay, for example), consider laying geotextile fabric on the subgrade before adding your base material. It keeps the clay from migrating up into the base over time, which is one of the less obvious causes of base failure and slope loss several years down the road.
Troubleshooting and fixes when the slope isn't right
If you check your patio after it's built and water is pooling, first identify exactly where the low spot is. Walk the patio during or right after rain and watch where the water sits. Mark those spots with chalk or tape. That tells you whether you have a localized dip or a slope that's simply not steep enough across the whole surface.
Fixes for paver patios
Paver patios are the most forgiving to fix. Pull up the pavers in and around the problem area, remove the bedding sand, re-grade the base material if the base itself is the issue, re-screed with fresh sand at the correct slope, and relay the pavers. This is tedious but completely doable as a solo DIY repair on a weekend. The pavers themselves are reusable as long as you haven't chipped them.
Fixes for concrete patios
Concrete is less forgiving. For a small low spot (1/4 inch deep or less), a self-leveling concrete resurfacer or topping compound can fill the dip and re-establish slope. For a larger area with inadequate overall slope, a concrete overlay or thinset slurry can be built up to redirect water, though you typically need at least 1/4 inch of thickness for these products to bond properly.
If the entire slab is pitched the wrong way (sloping toward the house), those surface patches are only a partial fix. The permanent solution is breaking up and replacing the slab, which is a much bigger job. That's exactly why getting the forms right before the pour is worth the extra time upfront.
Common measuring mistakes and how to catch them early
- String lines that sag in the middle will read falsely level at the ends: use a tight string and check it at the center too
- Using a 2-foot level instead of a 4-foot level misses gradual undulations in the surface
- Forgetting to account for the paver or concrete thickness when calculating base grade height
- Checking slope in only one direction: always verify slope in both the drainage direction and perpendicular to it
- Assuming the house wall is level: it often isn't, so use a benchmark on the wall rather than trusting the wall itself as your reference
If your base is already in and you realize the slope is off, you can still fix it before adding bedding sand or pouring concrete. Add or remove base material to correct the grade, compact again, and re-verify. It's an extra step but much cheaper than rebuilding after the surface is done. The rule I follow: check slope at every stage, not just at the end.
For anyone dealing with a site that has significant natural slope rather than a flat yard, the drainage and grading approach gets more involved. Once the patio grade is correct, you can move on to how to build a slanted patio roof so runoff sheds away from the space and the house. Building a patio on a slope introduces retaining walls, cut-and-fill calculations, and more complex drainage routing. Similarly, if you're working on a rooftop or elevated deck situation, the slope requirements and waterproofing considerations are a different conversation entirely. But for a standard ground-level patio, the 1/4 inch per foot rule and the process above will get you a well-draining, durable surface you can be proud of.
FAQ
What’s the best way to confirm my patio slope is still correct after I compact the gravel base?
Recheck the slope after compaction, not just after you set the subgrade. The base can settle a bit as you compact, especially if you added more than 2-inch lifts or didn’t dampen dry gravel, which can turn a correct pitch into a low, puddling surface.
Can I fix an imperfect base slope by using more bedding sand?
Avoid “compensating” with thicker bedding sand. If the base grade is wrong, extra sand only creates a soft, unstable cushion that can wash out or compress later, leading to uneven slope and drifting pavers.
At which layer should I actually build the slope, subgrade, base, bedding, or forms?
For pavers, you typically set the overall slope during the subgrade and base, then keep the bedding sand uniform, around 1 to 1.5 inches. For concrete, you set the slope by placing forms correctly and screeding to the forms, since you cannot reliably add slope after the pour.
Why do I still get water pooling near the house even though my patio has the right slope?
If you only slope the surface away from the house but don’t manage the water path off the patio, runoff can hit a low spot in the yard or splash back at the foundation. Plan the destination first, then confirm that water will leave the patio footprint and keep flowing away during the first minutes after heavy rain.
What happens if I slope my patio steeper than 1/2 inch per foot?
Stay within the recommended range for comfort and performance. Going too steep can look uneven and make furniture placement awkward, and it can also increase the chance of joint sand washing out if edges are not restrained. If you have a drainage problem that needs more pitch, address the outlet (drain, basin, channel) rather than pushing the entire patio slope higher.
How many times should I measure slope during installation?
Don’t rely on a single measurement point. Use checks across several perimeter points (and along the direction of slope), because localized dips can occur from uneven excavation or a compacted pocket in the base.
What should I do about slope at transitions like steps, grass edges, or sidewalks?
For paver edges at steps, grass, sidewalks, and planters, ensure the patio surface ends up slightly higher than the adjacent finished grade, then add a solid fixed edge or properly restrained transition. If the transition point is lower, water will repeatedly collect exactly there, even if the rest of the patio drains correctly.
Do I need geotextile fabric if my yard has heavy clay?
Yes, in clay or other poor-draining soils, a geotextile layer on the subgrade can reduce base contamination and migration that gradually flattens your slope over time. It does not replace proper drainage outlets, but it helps maintain the grade you worked hard to build.
My patio pools water in one spot, how do I troubleshoot whether it’s a localized dip or not enough overall slope?
If water pools, determine whether it’s a true localized dip or an overall slope issue. Mark the exact pooling points after rain, then correct the underlying cause: for pavers, that usually means re-grading the base in the affected area; for concrete, resurfacing can help only for very small, shallow dips.
If I have a low spot on a paver patio, should I replace the pavers or can I reuse them?
Before repairing, decide what you’re trying to preserve. Pavers are reusable if they are not chipped, but you should still remove affected pavers, re-screed bedding at the correct grade, and restore tight jointing. If you leave displaced pavers in place, the repaired area will often drift again.
When is a concrete repair patch enough, and when does it mean I need to replace the slab?
For concrete, resurfacing or topping products are most appropriate for small dips, but they don’t fix a slab that is pitched the wrong direction. If the entire slab slopes toward the house, patching just redirects water temporarily and can still leave you with persistent drainage and moisture problems.
What should I do if my yard’s existing grade slopes back toward the house?
If the entire patio drains toward an area you cannot safely discharge to, improve the water outlet instead. Options include adding a properly placed channel drain, catch basin, or intercepting drainage system at the outer edge, so runoff leaves the patio footprint without re-entering the foundation zone.
Next Article
How to Slope a Patio for Drainage: Step-by-Step Guide
Step-by-step on how to slope a patio for drainage, with exact slope amounts, fall direction, and fixes for pooling water