Installing a patio yourself is absolutely doable, even for a first-timer. The basic sequence is: plan the size and slope, choose your material and matching base system, excavate and compact the ground, build up your foundation layers, lay the surface, then finish the edges and joints. The whole project can take a weekend for a simple gravel patio or a week of evenings for a full paver or concrete build, but getting the slope and base right from the start is what separates a patio that lasts 20 years from one that heaves, floods, and frustrates you every spring.
How to Install a Patio: Step-by-Step DIY Guide
Nolan Lennox
1 May 2026
Planning and measuring your patio area
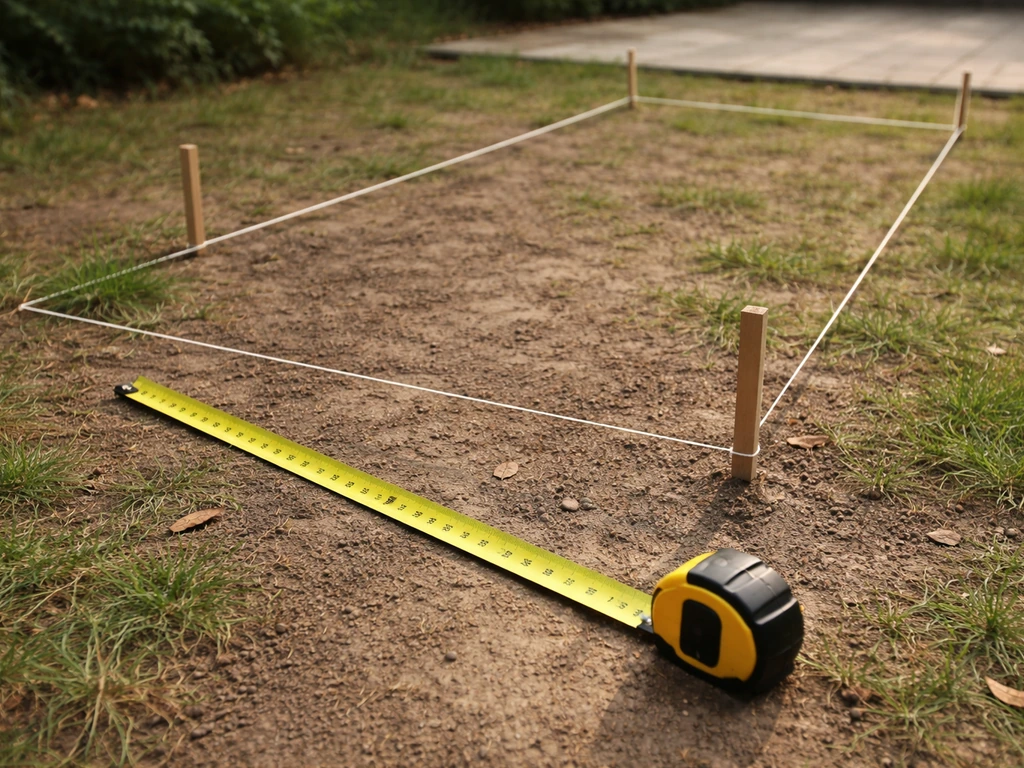
Start by deciding where the patio goes and how big it needs to be. Typical outdoor dining setups need at least 10 x 12 feet, and most people underestimate how much furniture eats into usable space. Sketch it out on paper first, then take that sketch outside and mark the actual footprint with stakes and string or spray paint so you can walk around in it and reality-check the size.
Once the shape is marked, figure out your slope. Every patio needs to drain away from your house, and the minimum slope is 1/4 inch of drop per linear foot. So a patio that runs 12 feet out from your house needs to sit 3 inches lower at the far edge than it does at the house. This is non-negotiable: skip the slope and you will have standing water against your foundation. Use a line level or a long level on a straight board to measure and confirm this grade as you set your layout strings.
Also check with your local municipality before you dig. Many areas require a permit for permanent patios over a certain square footage, and you always need to call 811 (in the US) to have underground utilities marked before any excavation. This takes a couple of days to schedule, so do it first.
Choosing patio materials and base type
Your material choice dictates everything downstream: how deep you dig, what base you need, what tools you rent, and what the finished surface looks and feels like. Here is a quick comparison of the most common DIY options:
| Material | DIY Difficulty | Base Needed | Approximate Cost (per sq ft, materials) | Best For |
|---|---|---|---|---|
| Pea gravel | Easy | Compacted crushed stone, 1 in. | $1–$3 | Casual, budget-friendly, permeable |
| Concrete pavers / brick | Moderate | 4–6 in. compacted aggregate + 1 in. bedding sand | $5–$15 | Durable, DIY-friendly, repairable |
| Poured concrete | Hard | 4–6 in. compacted gravel + forms | $6–$12 | Long-lasting, clean look |
| Natural stone / flagstone | Moderate–Hard | 4–6 in. compacted aggregate + 1 in. bedding sand or mortar | $10–$30 | High-end look, natural feel |
| Composite / wood decking | Moderate | Concrete footings + frame with joists | $15–$35 | Elevated or uneven ground, warm underfoot |
If this is your first patio, concrete pavers are the sweet spot. They are forgiving (you can pull and reset individual pieces if something is off), widely available, and the interlocking system means no mixing concrete. Pea gravel is even easier but shifts underfoot and is not ideal for furniture-heavy setups. Poured concrete is permanent, strong, and affordable, but mistakes are hard to fix. Composite and wood decking make sense when the ground is too uneven or sloped to excavate practically, but they involve framing skills and are a different build process entirely.
Preparing the site: grading, excavation, and forms
This is the part most beginners rush and later regret. A patio is only as good as what is underneath it, and that starts with proper excavation and grading. If you want step-by-step guidance, follow this guide on how to put in a patio from base to final surface.
How deep to dig
For a standard concrete paver or brick patio, dig down far enough to accommodate: the paver thickness (usually about 2.5–3 inches for most standard pavers), plus 1 inch of bedding sand, plus 4–6 inches of compacted aggregate base, plus an inch or two below that if the soil is soft or clay-heavy. In practice, most paver patios require digging 8–10 inches below the finished surface height. For a pea gravel patio, 4–5 inches of total depth is usually enough. For poured concrete, plan for a 4-inch slab on top of 4–6 inches of gravel base.
Setting grade and slope
Before you start shoveling, re-establish your slope with stakes and string at the excavation depth. Use your 1/4-inch-per-foot rule as a guide: drive a stake at the house end, drive one at the far end, and lower the far stake accordingly so your string represents the future finished surface with the right pitch. These strings become your reference for everything that follows. Keep them up through the whole build.
Excavating and removing debris
Strip away all sod and organic material from the entire patio footprint plus about 6 inches beyond your edge line on all sides. Grass and roots under your base will decompose and cause settling. Rent a sod cutter for anything over 100 square feet since doing it by hand with a flat spade is exhausting. Once the organics are out, use a plate compactor (rent one for about $60–$80 per day) to firm up the native soil before you add anything on top. Do not skip this step: loose native soil is one of the top reasons patios sink unevenly.
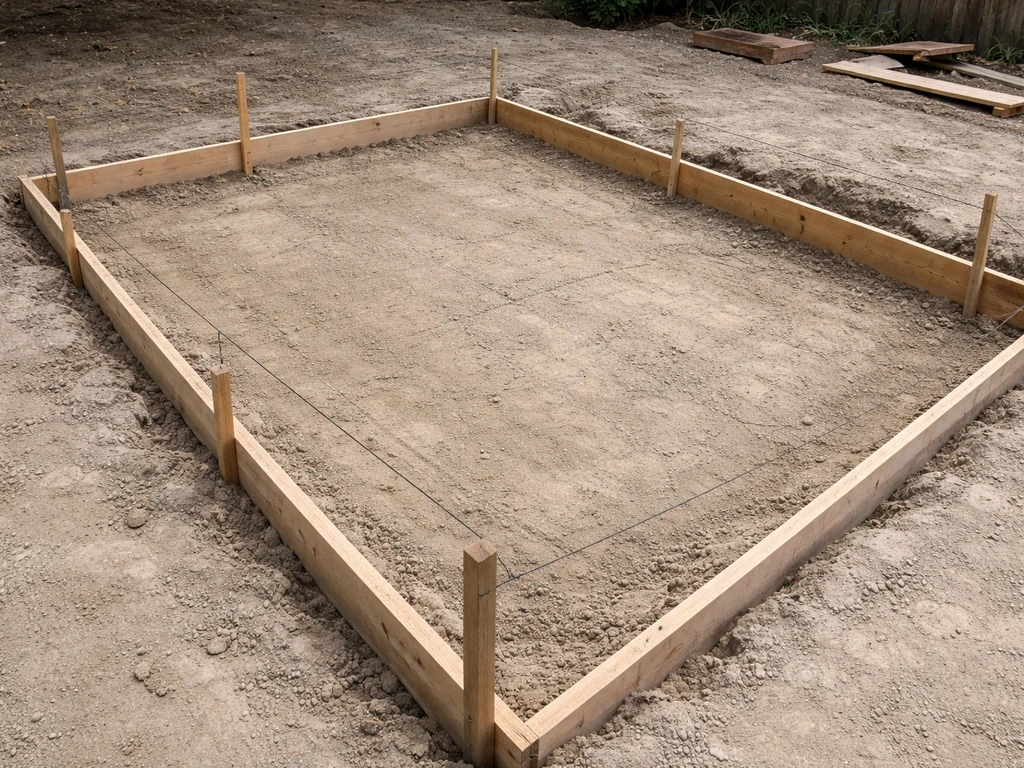
Setting forms (for concrete patios)
If you are pouring concrete, build forms out of 2x4 lumber staked along the perimeter. The top of the form boards represent your finished slab surface, so set them with the slope built in using your string lines as a guide. Brace the forms every 2–3 feet so they do not bow out when you pour. Oil the inside face of the boards lightly so concrete does not bond to them permanently.
Installing the patio foundation and base layers

The foundation is what keeps your patio from moving, cracking, or sinking over time. This layer is invisible once you are done, but it is the most important part of the whole project.
Geotextile fabric: worth using
Before adding any base material, lay a geotextile landscape fabric over the compacted native soil. This is a water-permeable fabric that keeps soil particles from migrating up into your gravel base, which would eventually cause the base to shift and your surface to become uneven. Overlap seams by at least 6 inches and fold the edges up the sides of your excavation. It is inexpensive (usually under $0.10 per square foot) and worth every penny.
Compacted aggregate base
Add your crushed stone aggregate (sometimes called 'paver base,' '3/4-inch minus,' or 'dense grade aggregate') in layers no more than 2–4 inches thick at a time, compacting each lift with the plate compactor before adding the next. The total compacted depth should be 4–6 inches for standard paver or concrete patios on reasonably solid soil. Run the compactor in overlapping passes across the entire area, then make a second set of passes at a 90-degree angle to the first. You are targeting a firm, stable surface that does not give when you walk on it. Do not dump all the gravel in at once and compact it in one go: it will not compact properly in the middle of a thick layer.
Bedding sand layer (for pavers and natural stone)
Once the aggregate base is compacted and checked for slope, spread a 1-inch layer of coarse bedding sand (also called concrete sand or washed sand, not play sand) across the entire surface. Use two lengths of 1-inch diameter conduit pipe as screed guides: lay them parallel across the base, dump sand between them, and drag a straight 2x4 across the tops of the pipes to create a perfectly even, 1-inch-deep sand bed. Pull the pipes out as you go and fill the channels with sand by hand. Do not walk on or compact the bedding sand: it needs to stay loose so the pavers can be set and tapped into it. This layer is not for compaction; it is for fine-tuning individual paver height.
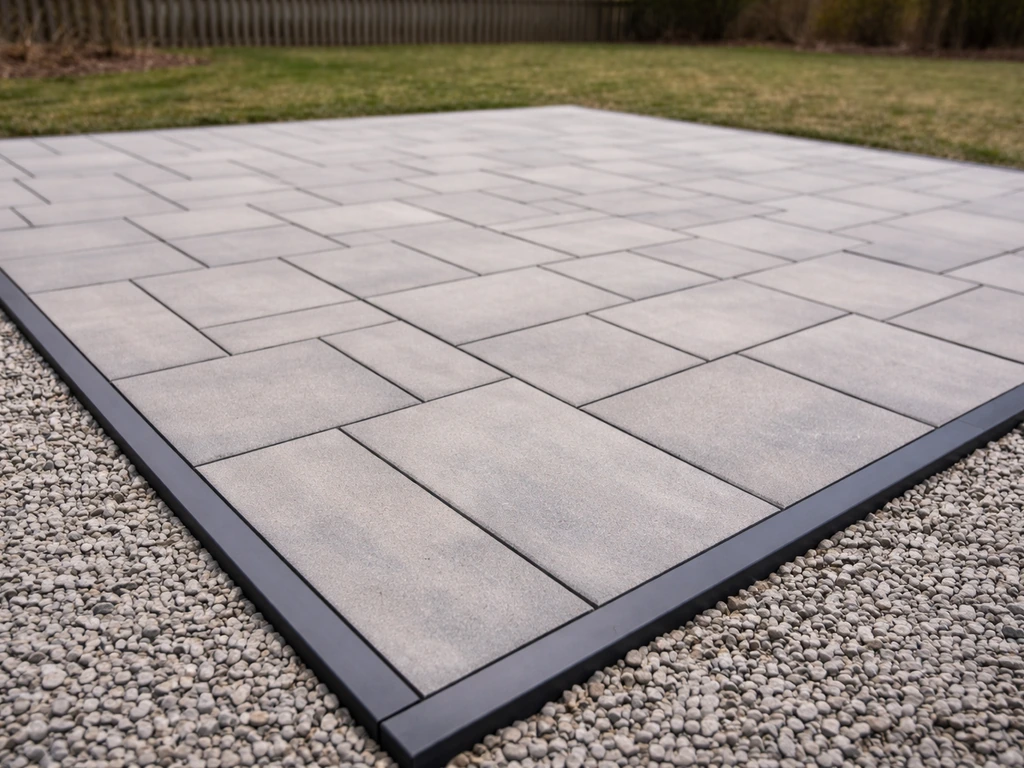
Laying the patio surface
Now comes the part that actually looks like progress. Each material type has slightly different technique, but the principles are consistent: start from a straight reference edge, work outward, check level constantly, and do not rush the cuts.
Concrete pavers and brick
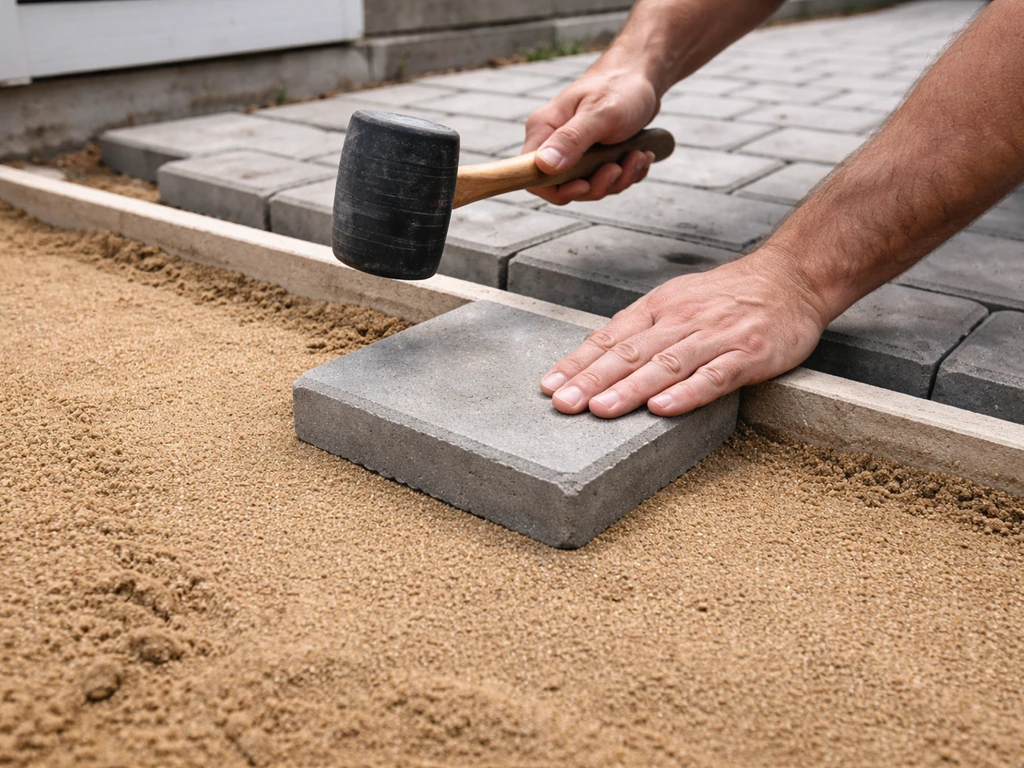
Start at a corner against the house (or another fixed straight edge like a wall or permanent edging) and lay pavers along two perpendicular reference lines first to establish your grid. Set each paver by pressing it firmly into the bedding sand and tapping it down with a rubber mallet. Check for level across neighboring pavers constantly, and slide a flat bar or a firm knock with the mallet to adjust height. Maintain consistent joint spacing, typically about 1/8 inch, using spacers or just eyeballing if you are good. When you reach the edges and need cuts, rent a diamond-blade wet saw or angle grinder with a diamond blade. Mark your cuts with chalk, and cut one piece at a time as you reach those spots rather than cutting a big batch in advance. Buy about 5% more material than your square footage calculation to account for cuts and breakage.
Pea gravel
After compacting the soil and adding a 1-inch layer of compacted crushed stone as a base, install your edging (more on that below) to contain the gravel. Then simply pour and rake pea gravel to fill the area to about 2–3 inches deep. Total excavation for a gravel patio is usually only 4–5 inches. The low barrier to entry here is real, but plan on occasionally raking and topping up gravel every year or two as it migrates.
Poured concrete
Pour concrete into your forms and work it quickly. Use a screed board to level the surface flush with the top of your forms, then finish with a float for smoothness. If you want texture (for slip resistance, which you should), drag a broom lightly across the surface before it sets fully. Cure the slab by keeping it moist for at least 3–5 days, which means covering it with plastic sheeting or burlap and wetting it down regularly. Do not let it dry out fast in hot weather or it will crack.
Composite and wood decking
Composite patio surfaces (like Trex and similar brands) require a frame of joists set on concrete footings or a concrete pad. Joist spacing matters a lot here: most composite decking products require joists no more than 16 inches on center for straight installations, and 12 inches on center for diagonal patterns. Always follow the specific manufacturer's specs for the product you buy because these vary. Composite is forgiving on maintenance but less forgiving during installation if your frame is not level and square.
Finishing details: edges, leveling, jointing, and drainage
Edge restraints
For any paver or brick patio, plastic or aluminum edge restraints are not optional. Without them, pavers at the perimeter will gradually migrate outward over time, spreading the joints and eventually causing the whole field to loosen. Install edge restraints by spiking them into the ground (through the geotextile and into the aggregate base) along all exposed edges. Do this before you compact the pavers. For gravel patios, metal or plastic landscape edging does the same job of keeping material contained.
Final compaction and jointing sand
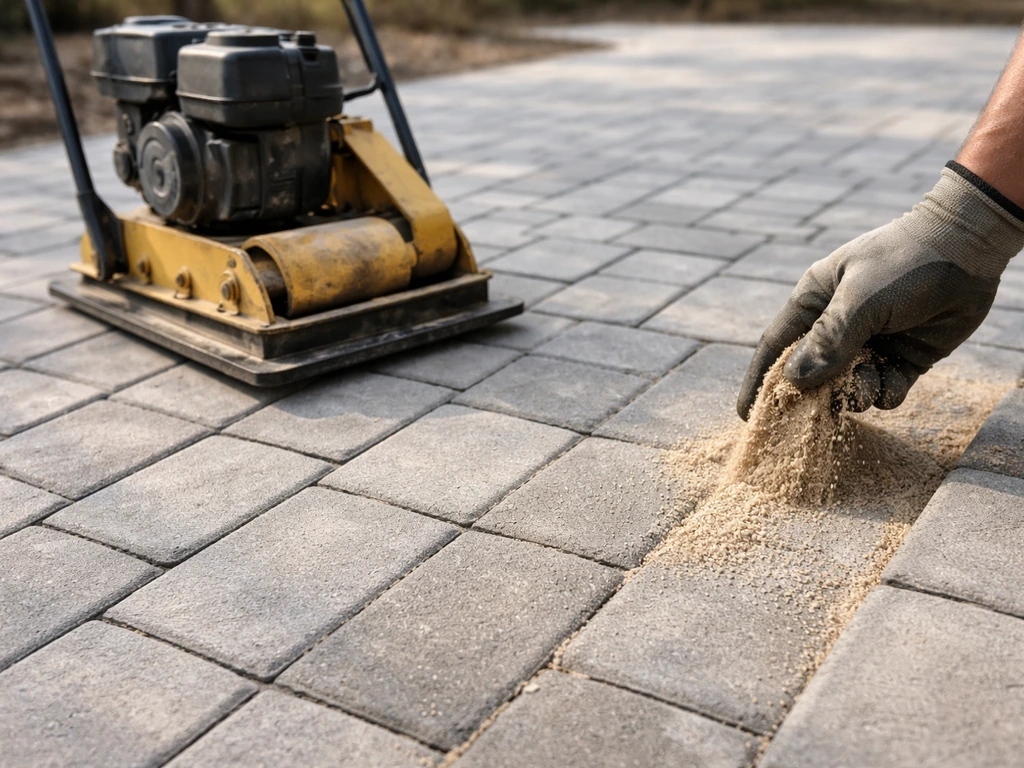
Once all pavers are laid, run the plate compactor over the entire surface to seat the pavers firmly into the bedding sand. Put a piece of plywood or a rubber pad under the compactor base plate if your paver surface is textured or delicate. After compacting, spread jointing sand over the entire surface and sweep it into the joints. Compact again, add more sand, and sweep again until all the joints are full from top to bottom. You have two good options for jointing material: standard coarse sand is cheaper and easy to add to later, but it washes out more easily and gives weeds a foothold. Polymeric sand costs a bit more but locks together when activated with water, resisting washout and weed growth significantly better. For most patios, polymeric sand is worth it.
Checking drainage and final leveling
After all jointing is done, run a garden hose on the surface and watch where water goes. It should sheet off the patio in the direction you planned, with no puddles forming anywhere. If you see a low spot, you can sometimes correct minor dips by carefully removing the offending pavers, adding a little more bedding sand, re-setting and re-tamping. Major drainage issues mean going back and correcting the base grade, which is painful but worth fixing now rather than living with a wet patio for years.
Tools, safety, and troubleshooting DIY problems
What you need for a paver or concrete patio
- Plate compactor (rent, do not buy for a one-time project)
- Diamond-blade wet saw or angle grinder with diamond wheel for cuts
- Rubber mallet
- Long straight 2x4 for screeding
- Screed pipes (1-inch diameter conduit)
- Line level and string
- 4-foot spirit level
- Tape measure and chalk line
- Flat spade and square shovel
- Stiff broom for sweeping in jointing sand
- Garden hose with adjustable nozzle
- Safety glasses and hearing protection (especially when cutting)
- Heavy work gloves (pavers have sharp edges)
Safety basics you should not skip
Always call 811 before digging. Wear eye protection when cutting pavers or concrete, every single cut. Lift with your legs, not your back: a standard concrete paver can weigh 10–15 pounds, and you will handle hundreds of them. Wet-cut saws spray slurry, so wear a respirator or N95 mask and work downwind. When mixing or handling concrete, wear waterproof gloves: fresh concrete is highly alkaline and can cause chemical burns with prolonged skin contact.
Common problems and how to fix them
| Problem | Likely Cause | Fix |
|---|---|---|
| Pavers sinking or rocking | Bedding sand not even, or base not compacted enough | Pull affected pavers, add or remove sand, reset and tamp |
| Water pooling on surface | Insufficient slope or low spot in base | Remove pavers in low area, regrade base, relay pavers |
| Paver edges spreading apart over time | No edge restraint installed, or restraint not spiked deep enough | Install or re-spike edge restraints; compact perimeter |
| Weeds growing through joints | Standard sand used instead of polymeric, or joints left unfilled | Remove sand, clean joints, apply polymeric sand and activate with water |
| Concrete cracking within first year | Insufficient base, no expansion joints, rapid drying during cure | Seal existing cracks with concrete caulk; plan control joints on future pours |
| Gravel spreading onto lawn | No edging installed or edging too shallow | Install or deepen metal or plastic landscape edging all around perimeter |
When to call a professional
If your site has significant slope changes, large tree roots, or poor-draining clay soil that holds water for days after rain, it is worth getting at least a consultation with a landscape contractor before you invest time and money. Drainage problems that are not solved at the soil level will defeat any surface you put on top. Similarly, if your patio is adjacent to a retaining wall or a foundation with any existing water issues, address those first. Everything else in this guide is genuinely manageable for a motivated DIYer willing to take it step by step.
The best place to start today is staking out your area and checking your slope with a level. Once you know your square footage and confirmed your grade, you can calculate your materials: measure area, multiply by base depth in feet for aggregate volume, add your 1-inch sand layer, then count pavers per square foot from the product specs, and add 5% for cuts and waste. From there, you have a materials list and a clear path from the ground up. If you want a full walkthrough from planning to finishing, follow our guide on how to do patio step by step.
FAQ
How do I know my patio slope is correct before I start digging deeper layers?
Measure at least two points across the width, not just one line. A patio can be pitched correctly along the length but still be low across the width, causing puddles. Keep your layout strings up until the bedding sand is installed, then re-check finished height in a few spots with a level or straightedge.
What should I do if my yard is soft or clay-heavy underneath?
Increase base thickness only after you confirm the soil is stabilized, compacted, and draining. If water stays pooled for days, address drainage at the soil level first (for example, a French drain or regrading away from the house), then build the base in compacted lifts. Putting a thicker surface over unstable soil can still lead to settling.
Can I install a patio directly over old concrete or pavers?
Usually no. Even if the surface looks level, old concrete and existing pavers can settle or remain slightly tilted, and cracking or lifting transfers upward. For most DIY builds, remove the existing material down to stable soil, then rebuild the foundation layers to restore the correct drainage pitch.
Do I need landscape fabric under every patio material?
For paver and brick patios, fabric is strongly recommended over compacted native soil to reduce soil particle migration. For poured concrete, fabric alone is not a substitute for the right base and proper slab design, and in some climates you may need additional moisture control details. If you are unsure, match the approach to the system you chose.
How far beyond the patio edge should I excavate and remove organics?
Plan to remove sod and organic material not only inside the marked footprint but also slightly beyond your intended edges, then set your edging so it extends into the base. A common mistake is keeping grass clippings, roots, or topsoil right near the border, then getting uneven settlement and edge movement later.
What’s the safest way to adjust height if I realize I dug too deep or too shallow?
If you are too shallow, you may need additional compacted aggregate and re-screeding bedding sand, while keeping the slope unchanged. If you are too deep, you can add compacted base but you must re-check drainage after every adjustment. Avoid compensating by adding extra bedding sand only, because the sand layer is meant for fine tuning and can be washed out or crushed if it’s too thick.
When I compact the base, how can I tell it’s actually ready for the next layer?
The goal is a surface that does not visibly deform when you walk on it, and that stays firm during repeated compactor passes. Compact in thin lifts (not a single thick layer), make overlapping passes, and confirm slope before placing bedding sand. If the base feels spongy or you sink with light pressure, it is not ready.
Should I tamp or compact bedding sand before setting pavers?
No. Bedding sand should be loose and even, not compacted. Compacting it too much can make the surface uneven and reduce how well pavers seat. Use conduit pipes as screed guides to create a uniform 1-inch layer, then set pavers directly into it.
What’s the difference between coarse sand and polymeric sand, and when should I use each?
Coarse sand is easier and cheaper to refill later, but it washes out more readily and may allow weeds to grow. Polymeric sand is designed to lock joints when activated with water, improving resistance to washout. Use the product recommended for your specific paver and joint width, and avoid overwatering right after application.
How should I compact pavers without damaging them?
Use a plate compactor at the right stage, after pavers are installed, to seat them into the bedding sand. For textured or delicate paver surfaces, place a protective pad or plywood between the compactor and the pavers. Don’t compact before the pavers are fully set, and keep passes overlapping and controlled.
Why are my pavers shifting or joints widening at the edges?
This is almost always an edging containment issue. If perimeter restraints were skipped or not driven through the full thickness down into the base, pavers can gradually migrate outward as you walk on them and as water and freeze-thaw act on the joints. Install edge restraints before final compaction of the pavers.
What should I do if water still puddles after everything is installed?
First identify whether the puddle is caused by a low spot in the surface or by drainage traveling in the wrong direction. For minor dips, you can lift and reset only the affected pavers by removing and adding bedding sand, then re-level and re-seat. If puddling occurs broadly or the slope direction is wrong, the base grade likely needs correction, which means more work but prevents recurring failures.
How much extra material should I buy, and what usually causes shortages?
A 5% buffer covers many straightforward layouts, but complex shapes, diagonal patterns, tight setbacks, and irregular edges can require more. Another common cause of overages is cutting fewer than expected because pieces get broken during fitting. Plan for extra at the same time you plan your cut sequence.
What mistakes cause concrete slabs to crack or scale?
Common issues include incorrect thickness, poor base support, and curing problems. Keep the slab moist during the recommended curing window, avoid letting it dry out too fast in hot weather, and ensure the base is compacted and correctly sloped. For larger slabs, consider joints and reinforcement strategy rather than assuming a one-size slab.
Do I need to use a wet saw for pavers every time, and is a grinder acceptable?
You can cut many pavers with a diamond-blade wet saw or an angle grinder with a proper diamond blade, depending on thickness and your cut style. The key is clean, straight cuts and adequate eye protection. For dusty or slurry-producing work, wear a proper respirator and work downwind, and plan your cuts one piece at a time near the end to avoid layout drift.
Is 811 (utility marking) really necessary if I think the area is clear?
Yes, because underground lines can be routed differently than surface assumptions and can change over time. Marking utilities before excavation reduces the risk of service disruptions and injuries. Schedule it early, then proceed once the marked lines are confirmed safe for your digging depth.
When should I consider hiring a contractor instead of DIY?
If you have significant grade transitions, persistent runoff issues, large tree roots, or clay that holds water for days, you may need drainage design or excavation beyond a basic build. If your patio is adjacent to a foundation or retaining wall with existing moisture problems, fix or manage that water path before installing any surface system.
Next Article
How to Do a Patio: Step-by-Step DIY Guide
Step-by-step DIY patio build: plan, base, drainage, materials, layout, leveling, compaction, and finishing tips for a pr
