The cheapest practical way to build a backyard patio is to use compacted gravel or a dry-laid paver system on a properly prepared base, do all the labor yourself, and keep the footprint under 200 square feet to start. A well-built gravel patio can run as little as $200 to $400 in materials for a 10x16 space. Dry-laid concrete pavers typically land between $400 and $900 depending on your region and paver choice.
How to Make a Backyard Patio Cheap: DIY Guide

Nolan Lennox
4 Jul 2026
A poured concrete slab costs more upfront (usually $600 to $1,200 in materials for a similar size) but requires less long-term maintenance. Any of these can look great and last decades if you get the site prep right. That last part is where most cheap DIY patios fail, and it's the thing worth spending time on.
Start with a plan before you spend a dollar

Before you buy anything, spend an hour figuring out size, shape, and a realistic budget. This sounds obvious but skipping it is how people end up with a half-finished project or a patio that's too small to actually use.
How big does your patio need to be?
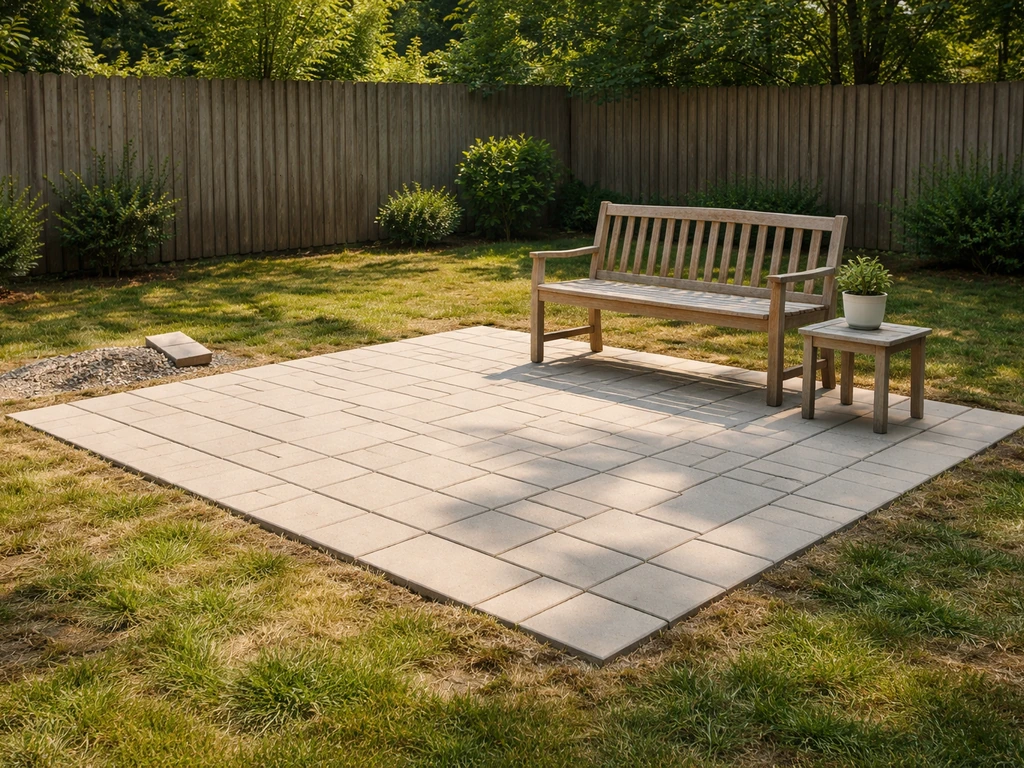
A 10x10 ft patio (100 sq ft) fits a small bistro table and two chairs with room to walk around. A 10x16 ft or 12x14 ft space (around 160 to 168 sq ft) fits a 4-person dining set comfortably. If you want a lounge area plus a dining zone, aim for at least 200 to 250 sq ft. For a first cheap build, I'd aim at 150 to 200 sq ft. It gives you real usable space without blowing the budget, and if you want to expand later, dry-laid materials like pavers and gravel make that easy.
Layout and shape
Rectangles and squares are the cheapest shapes to build because they minimize material waste and simplify the base excavation. Curves and irregular shapes look beautiful but they require cutting pavers or custom edging, which adds both cost and labor. Stick to a rectangle for your first build, especially on a tight budget.
Set a budget target before you pick materials
Here are realistic material-only budget targets for a DIY patio in 2026. These don't include tool rental or any landscaping around the edges.
| Patio Type | Size | Estimated Material Cost | Skill Level |
|---|---|---|---|
| Compacted gravel | 10x16 ft | $200–$400 | Beginner |
| Dry-laid concrete pavers | 10x16 ft | $450–$900 | Beginner–Intermediate |
| Poured concrete slab | 10x16 ft | $600–$1,200 | Intermediate |
| Pressure-treated wood deck/platform | 10x16 ft | $700–$1,400 | Intermediate |
| Reclaimed brick or salvage pavers | 10x16 ft | $100–$400 (materials) | Intermediate |
These ranges are wide because material prices vary by region and supplier. Always get at least two quotes from local suppliers before committing, and check if your municipality requires a permit for patios over a certain size (often 200 sq ft or when attached to the house). Permits typically run $50 to $150 and are worth it to avoid headaches when you sell.
Picking the most affordable patio material
Each material has a different cost profile, installation complexity, and long-term maintenance load. Here's an honest breakdown of what I've seen work and what I'd recommend for someone building on a budget.
Gravel: the cheapest entry point
Crushed gravel or pea gravel is the lowest upfront cost, and if you're willing to live with a more casual look, it's a perfectly legitimate patio surface. It drains naturally, which is a genuine advantage in wet climates. The downsides are that it shifts underfoot, requires edging to keep it contained, and isn't ideal under furniture unless you use pavers or stepping stones in high-traffic spots. Use a weed barrier fabric under the gravel and at least 3 to 4 inches of depth. Decomposed granite is a step up from pea gravel because it compacts harder, giving a firmer surface, and it's often similarly priced.
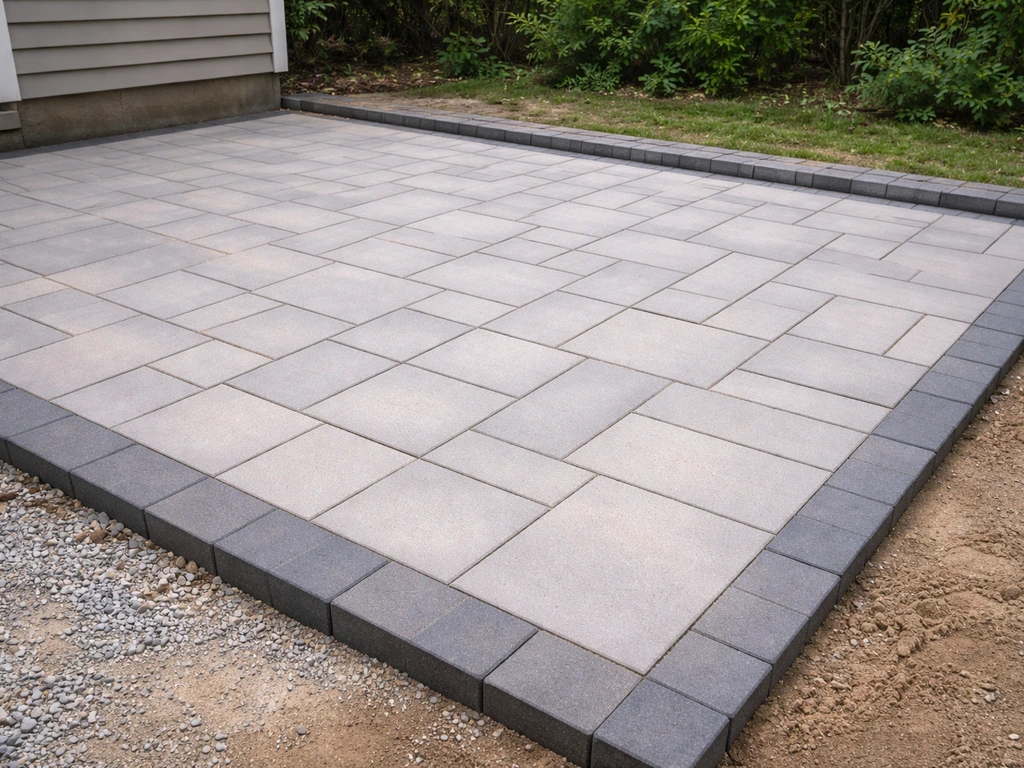
Dry-laid pavers: the best value for most DIYers
Standard concrete pavers from a home center or masonry supplier are my top recommendation for most budget DIY patios. They're durable, easy to work with, forgiving to install (you can pull and reset them if something's off), and they look clean and finished. Budget pavers run around $1.50 to $3.00 per square foot for the paver itself. Natural stone pavers like flagstone or travertine look amazing but can run $5 to $15 per square foot, which quickly blows a tight budget. For cheap builds, stick to standard concrete or tumbled concrete pavers.
Poured concrete: higher upfront, lower maintenance
A poured concrete slab costs more in materials and is harder to DIY correctly, but it's essentially maintenance-free once it cures. It won't shift, settle unevenly (if the base is right), or need re-sanding. For a large patio over 200 sq ft, the cost advantage of pavers narrows. If you're comfortable with concrete work, or want to use a QUIKRETE system for smaller areas, it's a real option. Note that a slope of about 1/8 inch per foot (roughly 1% grade) is the minimum you need for drainage, with 1/4 inch per foot being the practical standard most builders use. Getting this wrong causes water to pool against your foundation, which is a much more expensive problem to fix later.
Pressure-treated wood or composite: good for sloped yards
If your yard slopes significantly, a ground-level wood platform or floating deck can actually be cheaper than regrading the land for a paved patio. Pressure-treated lumber is cost-effective but needs annual sealing or staining. Composite decking costs more upfront but holds up much better over 10 to 20 years. Wood patios tend to show their age faster than pavers or concrete, but for a sloped backyard where grading would be expensive, they're often the most practical budget choice.
Salvage and reclaimed materials: high reward, high patience
Reclaimed brick, salvaged pavers, or leftover concrete chunks (sometimes called urbanite) can bring material costs close to zero if you're willing to source them. Check Facebook Marketplace, Craigslist, Habitat for Humanity ReStores, and local demolition sites. The catch is that irregular sizes and thickness variation make installation much slower and more skill-dependent. Great option if you have time and enjoy the hunt. Not recommended if you're on a deadline.
Site prep is where cheap patios succeed or fail
I'll be direct: poor site prep is the single most common reason DIY patios fail within 2 to 5 years. Pavers that heave, concrete that cracks, gravel that disappears into the ground, pooling water, and sinking sections are all almost always a site prep problem, not a material problem. Spending an extra afternoon on the base will save you from tearing the whole thing out and redoing it. If you already have a failing patio, the same site-prep lessons are what you'll use when you redo a patio for cheap.
Grading and slope
Your finished patio surface needs to slope away from your house at a minimum of 1/8 inch per foot, which is about a 1% grade. The more practical and widely recommended standard is 1/4 inch per foot (roughly 2%), and this is what I'd aim for. This ensures water flows away from your foundation and doesn't pool on the surface. If your existing yard slopes toward the house, you have to address this before laying anything. Use mason's lines and line levels to map out your existing grade before you start digging. If the slope toward the house is steeper than about 1 inch per foot, you're looking at more significant regrading work.
Excavation depth
For a standard dry-laid paver patio, you need to dig down enough to accommodate the base layers plus the paver thickness. A typical residential paver installation calls for about 4 inches of compacted aggregate base, 1 inch of bedding sand, and then the paver on top (usually 2 to 2. [CalculateGravel.
com](https://calculategravel. com/guides/gravel-depth-guide) recommends a compacted aggregate base (often about 4, 6 inches) plus roughly 1 inch of bedding sand beneath pavers, with geotextile where soils are soft or prone to foul the base. 5 inches thick). That's roughly 7 to 7.
5 inches total depth from finished surface to subgrade. For a gravel patio, plan on 4 to 5 inches. For a poured concrete slab, plan on 4 inches of compacted base plus 4 inches of concrete, so about 8 inches total.
The base layers
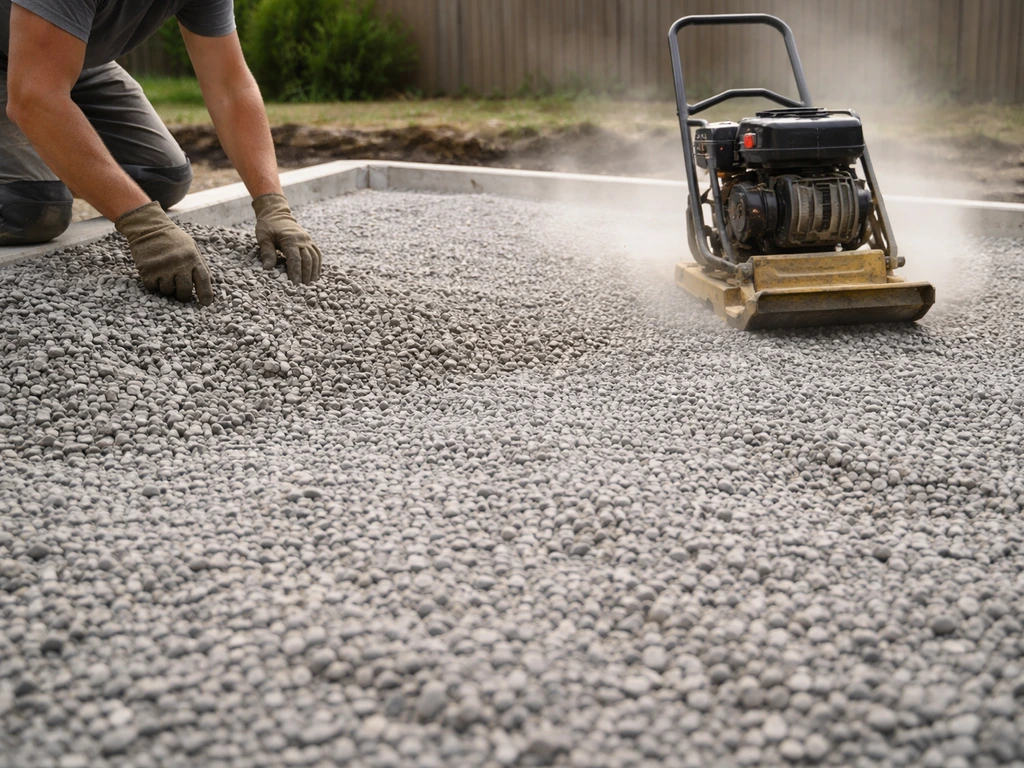
Compacted crushed stone aggregate (road base, Class II base, or similar depending on your region) is your best friend here. It locks together when compacted, sheds water, and resists shifting. Pea gravel and sand alone as a base material are common DIY mistakes because they shift and drain poorly under load. Compact the subgrade first with a plate compactor (rent one for around $50 to $75 per day), then add your aggregate base in 2 to 3 inch lifts and compact each layer. If your soil is particularly soft or clay-heavy, lay a geotextile landscape fabric on the subgrade before the base to prevent the aggregate from migrating down into the soil over time.
Drainage planning
Think about where water goes after it leaves your patio. If you have an established lawn or garden, natural drainage is usually fine. If you have a fence line, neighboring structures, or a low point where water will collect, you may need to add a simple channel drain or route water toward a planted bed. This doesn't have to be expensive, but it does have to be planned before you build.
Step-by-step: building a dry-laid paver patio

This is the build I'd recommend for most budget-conscious DIYers. It's forgiving, durable, and doesn't require specialty equipment beyond a plate compactor rental. Here's the full workflow for a 10x16 ft patio. If you want a fuller checklist, see the full guide on how to make a quick patio from start to finish.
- Mark out your patio area using stakes and mason's line. Check for square by measuring the diagonals (they should be equal). Mark the perimeter with spray paint or a hose.
- Check and set your slope. Use a line level on your mason's string to establish your 1/4 inch per foot slope away from the house. If your string is 10 ft long running away from the house, the far end of the string should sit about 2.5 inches lower than the end near the house.
- Excavate the area to a depth of about 7 to 8 inches below your desired finished patio height. Remove all sod and organic material. This is the hardest physical labor of the whole project.
- If your soil is soft or clay-based, roll out a geotextile landscape fabric on the compacted subgrade before adding base material. Overlap seams by at least 6 inches.
- Add your crushed aggregate base in layers, no more than 3 inches at a time. Compact each layer thoroughly with a plate compactor. You're targeting 4 inches of compacted base total.
- Spread approximately 1 inch of coarse bedding sand (not fine play sand) over the compacted base. Screed it level using a straight board pulled across temporary screed rails (1-inch diameter pipes work perfectly for this).
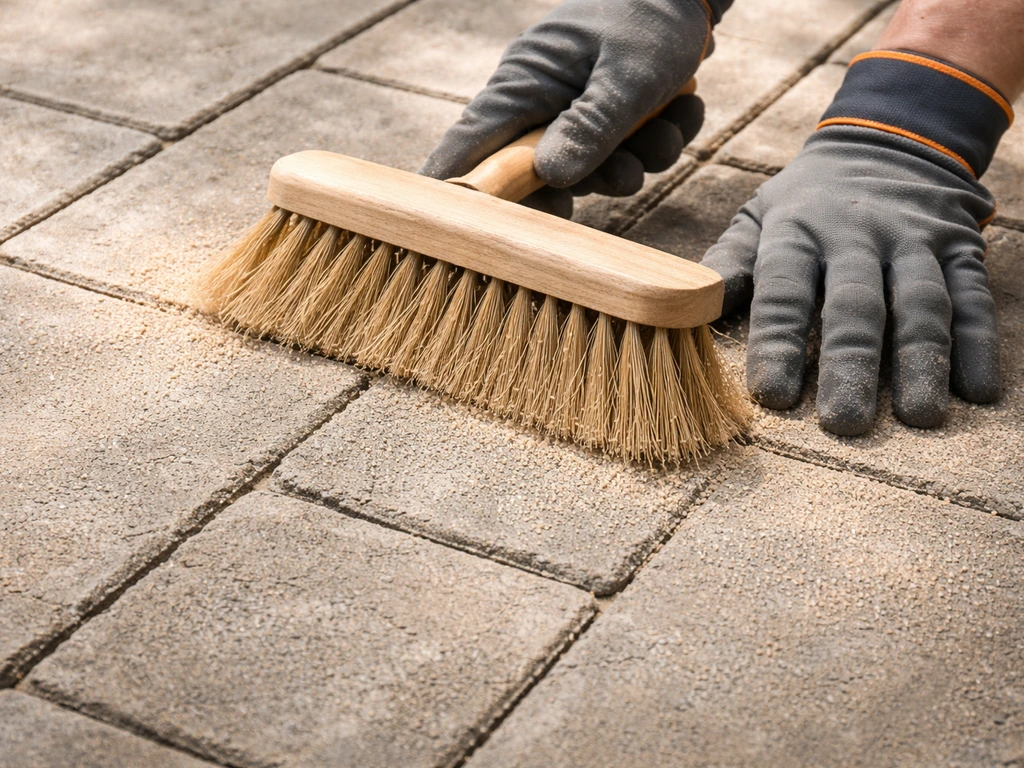
- Lay your pavers starting from the corner closest to your house or a visible edge, working outward. Keep joints tight and consistent. Use a rubber mallet to tap each paver level as you go. Check frequently with a long level.
- Cut pavers for the edges as needed using an angle grinder with a diamond blade or a rented paver saw.
- Install rigid plastic edge restraints around the perimeter and spike them into the base at every 12 inches. This is non-negotiable, it prevents the whole field from spreading outward over time.
- Spread polymeric joint sand over the entire surface, sweep it into the joints, and compact the whole surface one more time with the plate compactor (use a rubber pad on the compactor plate to avoid scratching pavers). Mist the surface lightly to activate the polymeric sand binder.
- Remove any excess sand from the paver surface and let everything cure for 24 hours before putting furniture on it.
If you're building a gravel patio instead, the process is similar through step 5, then you skip the bedding sand step and simply pour and rake your surface gravel to your desired depth (2 to 3 inches of pea gravel or decomposed granite on top of the compacted base). Edge restraints are even more important for gravel patios.
Real cost-saving tactics (and what you can't skip)
Where you can save money
- Buy pavers or gravel in bulk from a masonry supplier rather than a home center. Bag-by-bag pricing at big box stores is often 30 to 50% more expensive than bulk per-yard pricing from a local supplier.
- Rent equipment rather than buy it. A plate compactor, paver saw, and hand tamper cover everything you need for a weekend build. Expect to spend $80 to $150 total on rentals.
- Do all the excavation yourself. Hiring out just the dig can cost $300 to $600 depending on your area. It's physical work, but a standard patio is very manageable over a weekend with the right shovel and a wheelbarrow.
- Build in phases. A 10x10 patio now and a 10x6 extension next spring is a perfectly valid strategy. Dry-laid systems make it easy to extend later without demolishing anything.
- Reuse your excavated soil. Level low spots in your lawn instead of paying to haul it away.
- Source reclaimed edging or bricks for decorative borders rather than buying new.
- Check local municipal or county excess material programs. Some offer free or cheap crushed stone from road projects.
What you cannot cut corners on
- Compaction. Under-compacted base is the number one cause of sunken pavers and cracked concrete. Compact each base layer. Don't skip this.
- Proper drainage slope. Build in that 1/4 inch per foot slope away from your house every single time. Water pooling against your foundation will cost far more to fix than the extra time to set the grade properly.
- Edge restraints. For dry-laid systems, edge restraints are not optional. Without them, pavers migrate outward within a year or two and your whole patio becomes wobbly and uneven.
- Removing organic material. Any sod, roots, or organic material left under your base will decompose and cause settling. Excavate down to mineral soil.
- Geotextile in problem soils. If you have clay, soft loam, or poor-draining soil, the fabric barrier between subgrade and base is cheap insurance that prevents years of sinking and heaving.
Tools, materials, and how long this actually takes
What you'll need
| Item | Purpose | Buy or Rent |
|---|---|---|
| Plate compactor | Compact base layers and set pavers | Rent (~$50–$75/day) |
| Paver or angle grinder with diamond blade | Cut pavers to fit edges | Rent (~$40–$60/day) |
| Mason's line and line level | Set grade and layout | Buy (~$15–$25) |
| Stakes (wood or metal) | Mark perimeter and grade | Buy (~$10) |
| Round-point shovel and flat spade | Excavation and edging | Buy or borrow |
| Wheelbarrow | Moving soil and base material | Buy or borrow |
| Hand tamper | Compacting small or tight areas | Buy (~$25–$35) |
| Rubber mallet | Setting pavers | Buy (~$15) |
| Long level (4 ft) | Checking paver level | Buy or borrow |
| Screed pipes (1-in diameter) | Setting bedding sand thickness | Buy (~$10) |
| Straight 2x4 board | Screeding bedding sand | Use scrap lumber |
| Push broom | Sweeping joint sand into gaps | Buy or borrow |
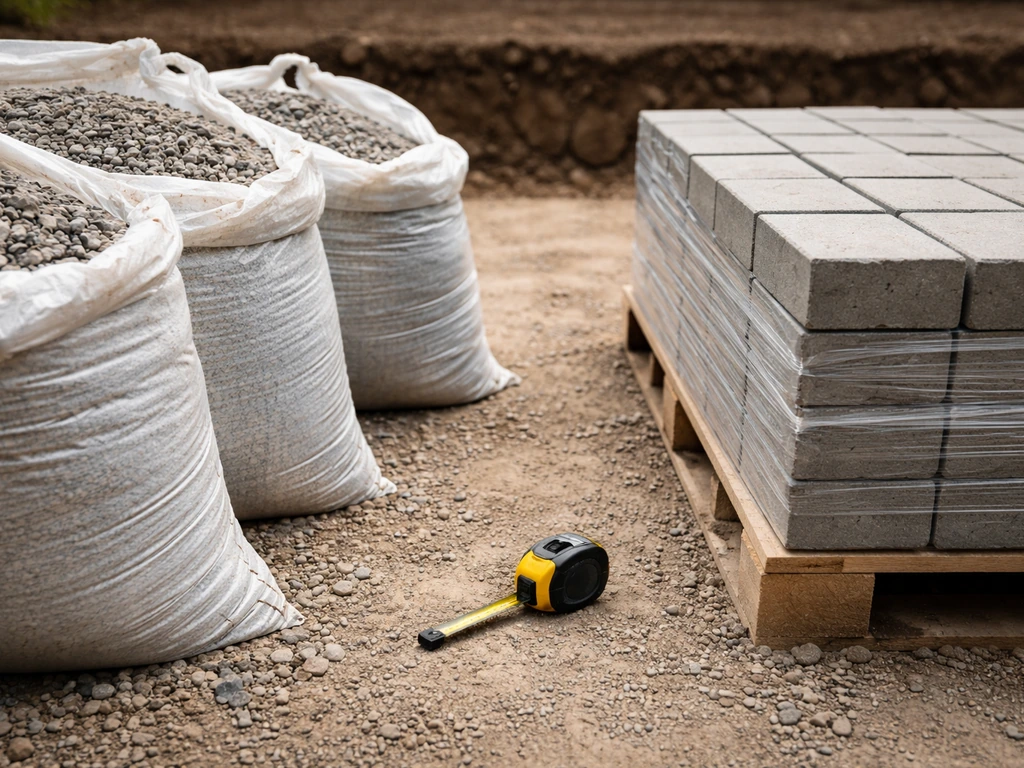
Materials list for a 10x16 ft paver patio
- Concrete pavers: approximately 175 to 185 sq ft worth (order 10% extra for cuts and breakage)
- Crushed aggregate base: approximately 1.5 to 2 cubic yards (about 3 to 4 tons)
- Coarse bedding sand: approximately 0.5 cubic yards
- Polymeric joint sand: 2 to 3 bags (50 lb each)
- Rigid plastic edge restraints: enough linear feet to match your perimeter (roughly 52 linear feet for 10x16), plus spikes
- Geotextile landscape fabric (optional but recommended for clay soils): slightly larger than your patio footprint
Realistic project timeline
For a first-time DIYer working alone on a 10x16 patio, plan for two full weekends. The first weekend covers marking layout, excavation, and getting your base compacted. The second covers the bedding sand, laying pavers, cutting edges, installing restraints, and polymeric sand. If you have a helper, you can realistically get through the whole thing in one solid weekend. Don't rush the base work to try to finish in a single day.
Finishing touches, weatherproofing, and keeping it looking good
Edging and transition zones
Once your patio surface is in, the edges matter more than most people think. A clean transition from patio to lawn or garden bed prevents grass from creeping in and gives the whole project a finished look. Metal landscape edging (the thin steel or aluminum kind) works well alongside paver patios and holds back lawn grass reliably. A simple gravel border or a row of standing-on-edge bricks also looks great and costs almost nothing if you have leftover material.
Steps and access
If your patio sits more than a couple of inches below the back door threshold, build at least one low step from stacked pavers or a poured concrete step before putting furniture out. A single trip on an uneven transition is all it takes to regret skipping this. Two stacked pavers on a compacted gravel base makes a safe, cheap, and durable step that matches your patio surface.
Seating zones and simple layout ideas
For a budget patio, a defined zone for dining and a separate zone for lounging goes a long way toward making the space feel intentional. You don't need built-in furniture or a pergola to get there. A simple outdoor rug anchors a seating area visually and is an inexpensive way to define the space without any construction. If you want to add a water feature or a small patio pond down the line, the planning for that is much easier once your hardscape base is in place.
Weatherproofing your patio
For concrete pavers and poured concrete slabs, applying a penetrating concrete sealer every 3 to 5 years is the single most effective thing you can do to extend the life of the surface. It reduces moisture absorption, slows freeze-thaw damage, and keeps the surface from absorbing staining from leaves, grease, or furniture feet. Expect to spend $40 to $80 on a quality concrete sealer for a 160 sq ft surface. For wood or composite patio platforms, make sure all structural lumber is rated for ground contact (UC4B or better) and seal any cut ends with preservative before installation.
Basic maintenance routine
A dry-laid paver patio needs very little once it's in. Every spring, check the polymeric sand in the joints and reapply in any spots where it has washed out or cracked. Pull any weeds that find their way into joints early, before they establish roots that can lift pavers. Check the perimeter edge restraints to make sure none have come loose or been disturbed. For gravel patios, rake and redistribute the surface gravel after winter and top off with a fresh half-inch layer every couple of years. For poured concrete, watch for cracks and seal them with a flexible polyurethane caulk before water and freeze-thaw cycles make them larger.
Once your basic patio is solid and you've enjoyed it for a season, it's natural to start thinking about upgrades. A simple patio pond, a shade structure, or expanding the footprint are all much easier to plan when you've got a good base to work from. And if you want to redo an older patio that's already in poor shape, many of the same principles here apply directly to that kind of renovation work too.
FAQ
Can I build a cheap patio directly on top of existing grass or pavers?
You usually should not. Even if you cover existing material, roots and organic debris keep breaking down and shift your base over time. For a budget build, remove to stable subgrade (or at least down to compactable soil), then rebuild the base layers to the right depth.
How do I know if my soil is too soft or clay-heavy for a DIY base?
If you can press a shovel in easily, see standing water after rain, or notice the area is springy when you walk on it, treat it as soft soil. Add geotextile, use compacted road base in thicker layers, and strongly consider increasing base depth (within your excavation limits) before installing pavers or gravel.
What’s the cheapest way to handle drainage if the yard slopes toward the house?
If water is already moving toward your foundation, grading is part of the solution, not just a patio surface slope. Aim for the patio to fall away from the house, and direct runoff toward a planted bed or add a simple linear drain at the lowest edge. Don’t rely on a near-flat patio plus hope.
Do I really need polymeric sand for a dry-laid paver patio?
For most budget paver patios, yes, it helps lock joints and reduces weed growth and minor movement. If you skip it, joints can wash out and pavers can shift sooner. If you use it, keep the layer thin and follow the correct watering amount so it activates properly.
How can I keep gravel from migrating into the soil over time?
Use edging restraints plus a real base. That means compacted road base, geotextile if your soil is soft or clay-heavy, and enough gravel depth (2 to 3 inches on top of a base layer). Also re-edge after winter, because even small gaps let gravel escape.
Is compacting the base with a plate compactor absolutely necessary?
It is the biggest quality difference you can control on a cheap build. Hand-tamping looks solid but usually under-compacts the base, leading to sinking and uneven pavers later. Rent a plate compactor for about $50 to $75 per day and compact in 2 to 3 inch lifts.
What’s the most common mistake that ruins “cheap” pavers?
Wrong drainage and insufficient base depth. If the patio doesn’t slope away from the house and the base isn’t compacted correctly, you get pooling, heaving, and cracked joints. Verify grade with lines and levels before you lay a single paver.
How do I choose between gravel, decomposed granite, and pavers on a budget?
Pick based on traffic and comfort. Gravel is cheapest and drains well, but it feels loose. Decomposed granite compacts harder and feels firmer. Standard concrete pavers cost more but are easiest to keep stable under furniture and regular foot traffic, and they look more finished.
What size patio can I get away with if I’m trying to stay under budget?
For a usable layout, a 10x10 often supports a small bistro setup with room to walk. If you want more flexibility, 10x16 is a common sweet spot for dining sets. If you go below 150 sq ft, plan on either smaller furniture or more limited movement zones.
Do I need a permit for a backyard patio even if it’s DIY?
Possibly. Permits are often tied to size and whether the patio is attached to the home, commonly around the 200 sq ft range in many areas. Check with your municipality before you dig, since DIY still counts.
How should I edge a cheap patio so grass and weeds don’t invade?
Use a restraint that actually holds back material. For pavers, steel or aluminum landscape edging works well, install it firmly on the base, and don’t leave gaps. For gravel, edging matters even more, and a defined border prevents migration and keeps the look crisp.
How often will I need to maintain a budget patio after it’s built?
Expect seasonal checks. For dry-laid pavers, recheck polymeric sand in spring and repair washed-out areas early, pull weeds in joints before they root, and inspect edge restraints. For gravel, rake and top off the surface with a thin half-inch layer every couple of years.
Can I expand a cheap patio later without rebuilding everything?
Yes, especially with dry-laid systems. Keep the expansion area as a planned extension of the same base and slope, and avoid cutting corners by patching over unprepared soil. If you think you’ll expand, leave a straight, easy boundary now.
What’s the cheapest upgrade that makes the patio feel “done”?
A defined furniture zone with an outdoor rug (for seating) and a clear transition edge (patio to lawn or bed). This costs far less than structural add-ons and makes the space look intentional immediately.
What if I’m building near a back door and the threshold is higher than the patio?
Don’t rely on furniture to “bridge” the difference. Build a small step using pavers on a compacted base or a poured step so the transition is safe and even. Even a couple of inches of uneven change can cause trips and damage to the patio edge.
Next Article
How to Make a Quick Patio: Fast DIY Steps and Plan
Quick patio DIY: pick the fastest surface, prep and compact base, install pavers or decking-style boards, and finish fas