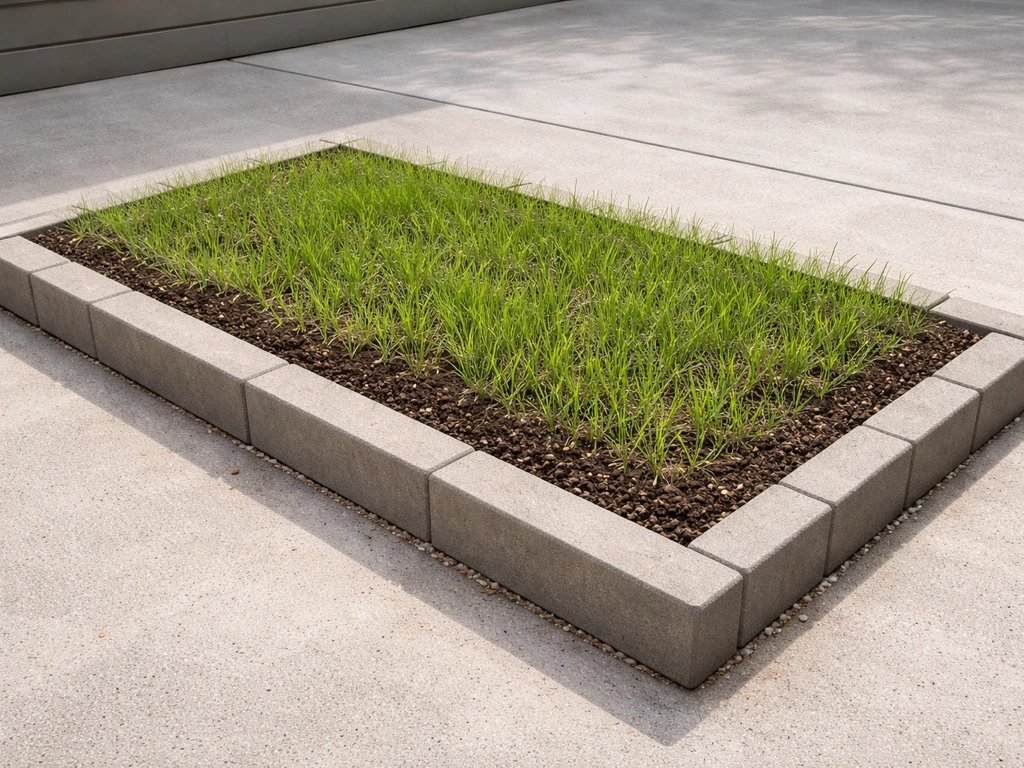
You can absolutely turn a driveway into a patio, and depending on what your driveway is made of and what kind of patio you want, you might not even need to tear everything out. For a mulch patio, the key is building a stable base, edging it well, and keeping the mulch depth consistent so it doesn't wash out turn a driveway into a patio.
How to Turn a Driveway Into a Patio: DIY Steps

Nolan Lennox
24 Jun 2026
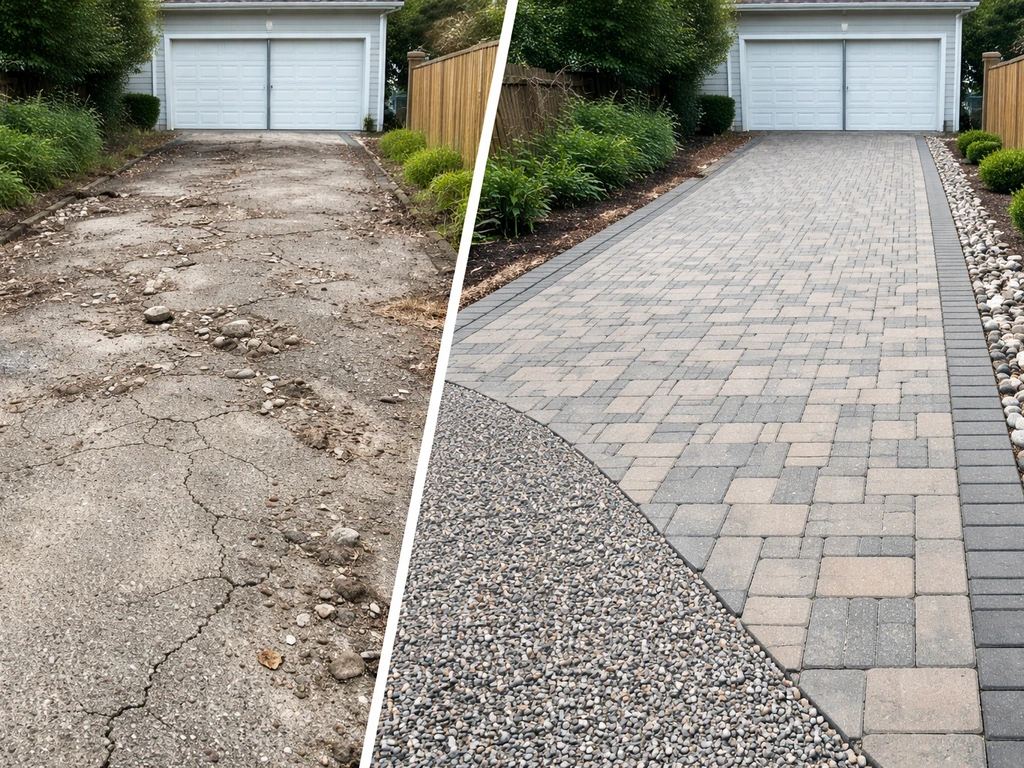
The basic path is: measure and plan your layout, assess what stays and what goes, prep the base for proper drainage, then lay your chosen surface (gravel, pavers, a concrete overlay, or composite decking). Most DIYers can pull this off in a weekend or two with rented equipment, but the details matter a lot. Get the base wrong and you'll be pulling everything up in three years.
Plan and measure your driveway-to-patio layout first
Before you touch a single tool, spend an hour outside with a tape measure and some spray paint. Mark out the full footprint of your intended patio on the driveway surface. Think about how you actually want to use the space: dining table and chairs, a lounge area, a fire pit spot, or all three. A dining table for four needs roughly 10x12 feet minimum to feel comfortable. A lounging area with two chairs and a small table can work in 8x10 feet. If you're trying to do both, think 16x20 feet or larger.
Also think through traffic flow. If cars still need to access part of the driveway (say, to reach a garage), you need to clearly delineate where the patio ends and the vehicle lane begins. That boundary line will drive your edging and material choices. If the full driveway is being retired, you have more freedom, but you still need to plan how people will walk between the patio and the house, yard, and sidewalk. Sketch it on paper with real dimensions before moving on.
Check for height transitions too. Your patio surface needs to match up reasonably well with the house door threshold, any adjacent sidewalk, and the lawn or garden edge. A surface that's 4 inches higher than your back door is a tripping hazard. One that's flush with the surrounding lawn will collect water against the house foundation. Aim to finish the patio surface at least 1 inch below any adjacent door threshold and slope it away from the house at roughly 1/8 to 1/4 inch per foot.
Check drainage, slope, and what's underneath
Driveways are built to drain, which actually gives you a head start over starting from raw ground. But you need to verify the existing slope direction. ICPI Tech Spec 4 discusses interlocking concrete pavement installation requirements that include ensuring proper base preparation and compaction conditions, which influence drainage performance blank" rel="noopener noreferrer">verify the existing slope direction. Water should be moving away from the house, not pooling in the center or running toward a foundation wall. Use a 4-foot level and a tape measure to check slope: you want roughly 1 inch of drop per 8 feet of run, away from the structure. If the existing driveway slopes the wrong direction, you'll need to factor that into your base work.
Dig a test hole at the edge of your planned patio area, ideally 12 inches deep. Look at what the soil beneath looks like: is it compacted clay, sandy loam, or loose fill? If you want to compost on a patio, you can still work with this kind of soil by keeping compost containers on a stable surface and using a covered bin to manage moisture clay-heavy soil. Clay-heavy soil holds water and expands when frozen, which causes heaving.
If you see clay and you're in a freeze-thaw climate, your gravel base needs to be generous (more on that in the material section). Also look for any buried utilities. Call 811 before you dig anything deeper than a few inches, because driveways often have irrigation lines, electrical conduit, or even gas lines running nearby.
What to do with the existing driveway surface
This is where a lot of people get stuck. Here's the practical breakdown by driveway type:
- Gravel driveway: You're already halfway there. Rake it level, compact it, add your new base layers, and proceed with whatever surface you choose. This is the easiest conversion.
- Concrete driveway in good condition: A solid, crack-free slab can serve as your base for pavers or a concrete overlay. Check for low spots that pool water and look for significant cracks wider than 1/4 inch. Minor surface cracks are fine. Structural cracks that run through the full slab thickness are a problem.
- Concrete driveway that's crumbling or severely cracked: Break it up and remove it. Rent a jackhammer (about $80/day) and a dumpster. Leaving a failing slab under pavers means your patio will fail too.
- Asphalt driveway: Asphalt is flexible and not a stable base for rigid pavers. It also softens in heat. You generally need to remove it before laying pavers or concrete overlays. Composite decking on a frame is one exception where asphalt removal is less critical.
- Brick or older paver driveway: These can often be salvaged. Pull them up carefully, reset the base, and relay them as patio pavers. Free materials.
Choose the right patio material for your budget and goals
There's no single best choice here. The right material depends on your budget, your DIY comfort level, how much demolition the existing driveway needs, and what look you're going for. If you also want to keep demolition and mess under control, the choices in patio materials like concrete pavers, gravel, or a concrete overlay can help you map out how to turn grass into patio with the right approach. Here's how the main options compare:
| Material | Approx. DIY Cost (per sq ft) | Skill Level | Best For | Key Limitation |
|---|---|---|---|---|
| Gravel/decomposed granite | $1–$4 | Beginner | Budget builds, large areas, informal style | Needs edging to stay contained; not ideal for furniture |
| Concrete pavers or brick | $8–$18 | Intermediate | Durable, classic look, DIY-friendly system | Labor-intensive; base prep is critical |
| Concrete overlay (on existing slab) | $3–$10 | Intermediate | Refreshing a solid existing slab fast | Only works on structurally sound concrete |
| New poured concrete | $6–$12 | Advanced/Pro | Seamless, permanent, very durable | Difficult to DIY; requires forms and finishing skill |
| Composite/wood decking on frame | $15–$30 | Intermediate | Elevated or uneven sites; modern look | Higher cost; frame requires proper footing or slab base |
For most DIYers converting a driveway, concrete pavers are the sweet spot. They're forgiving because you can pull and reset individual pieces if something goes wrong, they look great, they're durable, and the installation process is very learnable. Gravel is the right call if budget is tight or you want a casual, permeable surface fast. A concrete overlay is underrated if your existing slab is solid: it's one of the fastest transformations you can make. Composite decking suits people who want a wood look without the maintenance, or who need to elevate the surface above an uneven base.
Tools, supplies, and what to order (DIY checklist)
Here's what you'll need for the most common conversion path: removing an old surface (if needed) and installing pavers or gravel on a compacted base. If you're specifically removing grass to create patio space, the process starts with clearing and digging out the turf before you build your base and drainage installing pavers or gravel. Adjust based on your chosen material.
Tools (buy or rent)
- Plate compactor (rent: $60–$100/day) — non-negotiable for base compaction
- Jackhammer or rotary hammer with chisel bit (rent: $70–$90/day) — for breaking up concrete if needed
- Circular saw with diamond blade or angle grinder — for cutting pavers to fit edges
- 4-foot level and a long straightedge or screed board
- Rubber mallet
- Paver splitter/chisel (rent or buy) — optional but makes cuts easier
- Hand tamper — for tight spots where the plate compactor can't reach
- Wheelbarrow and flat shovel
- String line and stakes — for establishing level reference lines
- Tape measure, chalk line, and spray paint for layout
- Safety glasses, gloves, and knee pads
Materials to order
- Crushed gravel/compactable aggregate base — calculate 4 inches deep for a patio (6 inches if your soil is soft or clay-heavy); add 10–15% for waste
- Coarse bedding sand — 1 inch deep layer on top of compacted gravel (for pavers)
- Pavers, brick, or chosen surface material — measure square footage and add 10% for cuts and breakage
- Polymeric sand — for filling joints between pavers
- Paver edging (aluminum or plastic with spikes) — enough to run the full perimeter
- Landscape fabric (optional) — below the gravel base on soft/clay soil to reduce weed intrusion
- Concrete sealer — if sealing a concrete overlay or poured surface
- Paver/brick sealer — optional but recommended for pavers in harsh climates
Order materials a few days before your build weekend. Gravel and sand typically come by the cubic yard (one cubic yard covers about 80 square feet at 4 inches deep). Belgard notes that pavers are typically installed over compacted granular aggregate about 4, 6 inches deep, and bedding sand should be at least 1 inch deep compacted granular aggregate about 4–6 inches deep. Pavers are sold by the square foot or pallet. Most suppliers will deliver; factor that into your budget.
Step-by-step: how to do the full conversion
This walkthrough covers the full sequence from demolition through finished surface. I'll use pavers as the primary example since it's the most common choice, but I'll note where the steps differ for other materials.
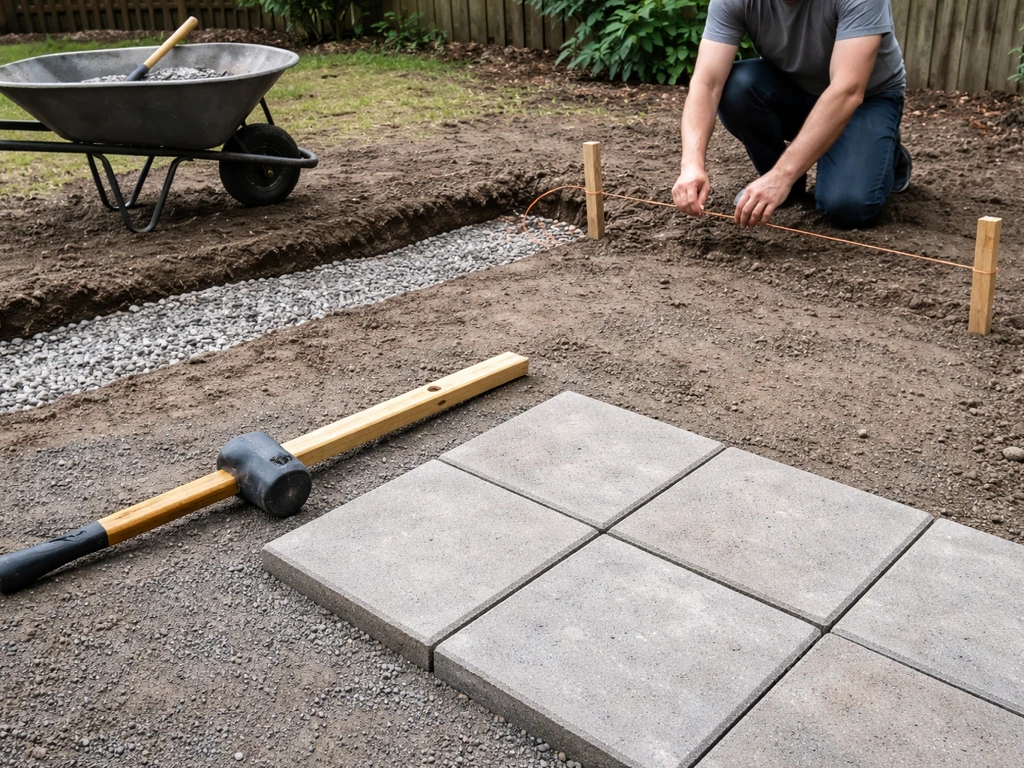
- Mark your patio boundary with spray paint or stakes and string. Double-check your measurements and confirm your slope direction before anything else.
- Call 811 and wait for utility marking. Do not skip this.
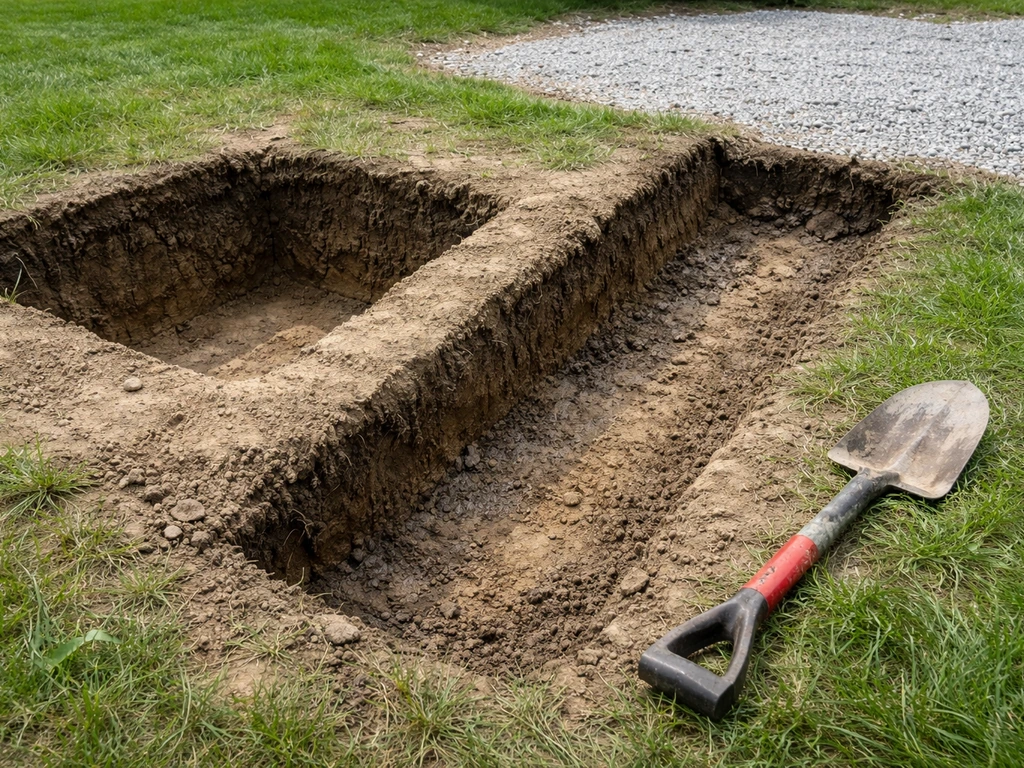
- Remove the existing surface if needed. Break up concrete with a jackhammer, load debris into a rented dumpster or haul bags to a disposal site. For asphalt, cut it into manageable sections. For gravel, just rake and regrade.
- Excavate to the correct depth. For a paver patio, you need 4 inches of compacted gravel base plus 1 inch of bedding sand plus the paver thickness (typically 2.375 inches for standard concrete pavers). Total excavation from finished grade: about 7.5 inches. Mark this depth on your stakes so you can check as you dig.
- Compact the subgrade. Before adding any base material, run your plate compactor over the exposed soil until it's firm. This is the step people skip and then wonder why their patio heaves.
- Add compacted gravel base in 2-inch lifts. Spread 2 inches of crushed aggregate, compact it thoroughly, then add another 2 inches and compact again. Don't dump all 4 inches in at once. The ICPI standard for residential patio subgrade compaction targets about 95% Standard Proctor density — what that means practically is compact until the plate compactor stops leaving marks.
- Install edge restraints before you lay sand. Stake your aluminum or plastic paver edging along the perimeter first. This gives you a fixed boundary to screed sand against.
- Screed your bedding sand to exactly 1 inch deep. Use two pieces of conduit pipe as screed guides, set them 1 inch below your finished surface height, spread sand between them, and drag a straight 2x4 across to level it. Do not walk on the screeded sand — keep boards to kneel on.
- Lay your pavers starting from a corner or a straight reference line. Set each paver gently, don't slide them (sliding disturbs the sand bed). Use your rubber mallet to tap them level. Check level frequently with your 4-foot level.
- Cut pavers to fit edges and around any obstacles using a circular saw with a diamond blade or a paver splitter.
- Once all pavers are laid, run the plate compactor over the entire surface with a rubber pad or paver protection mat to seat them firmly into the sand.
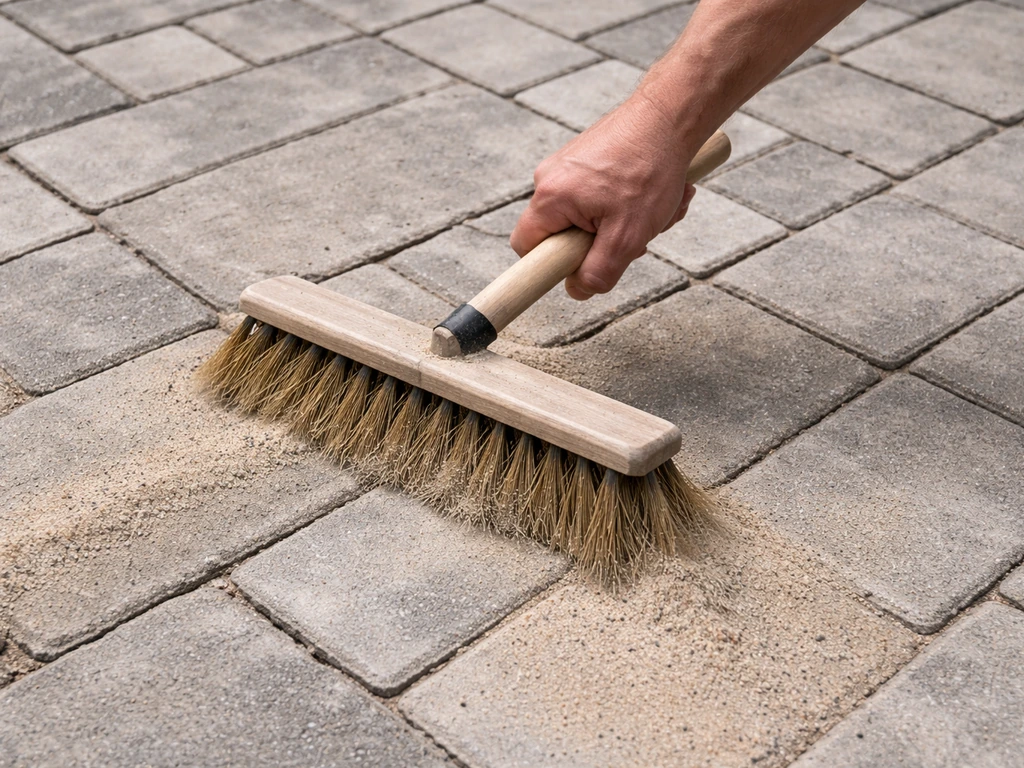
- Sweep polymeric sand into the joints. Work it into every gap, blow off the excess, then lightly mist with water to activate. Let it cure 24 hours before walking on it heavily.
- For a gravel patio: steps 1–5 are the same, but instead of sand and pavers you're just adding a final 2-inch layer of decorative gravel or decomposed granite on top of your compacted base. No screeding needed, just rake level.
- For a concrete overlay: clean the existing slab thoroughly, etch it with concrete etching solution, apply a bonding primer, then trowel or pour your overlay product per the manufacturer's instructions. Most overlays need 24–48 hours to cure before foot traffic.
Finishing details and weatherproofing
Edge containment
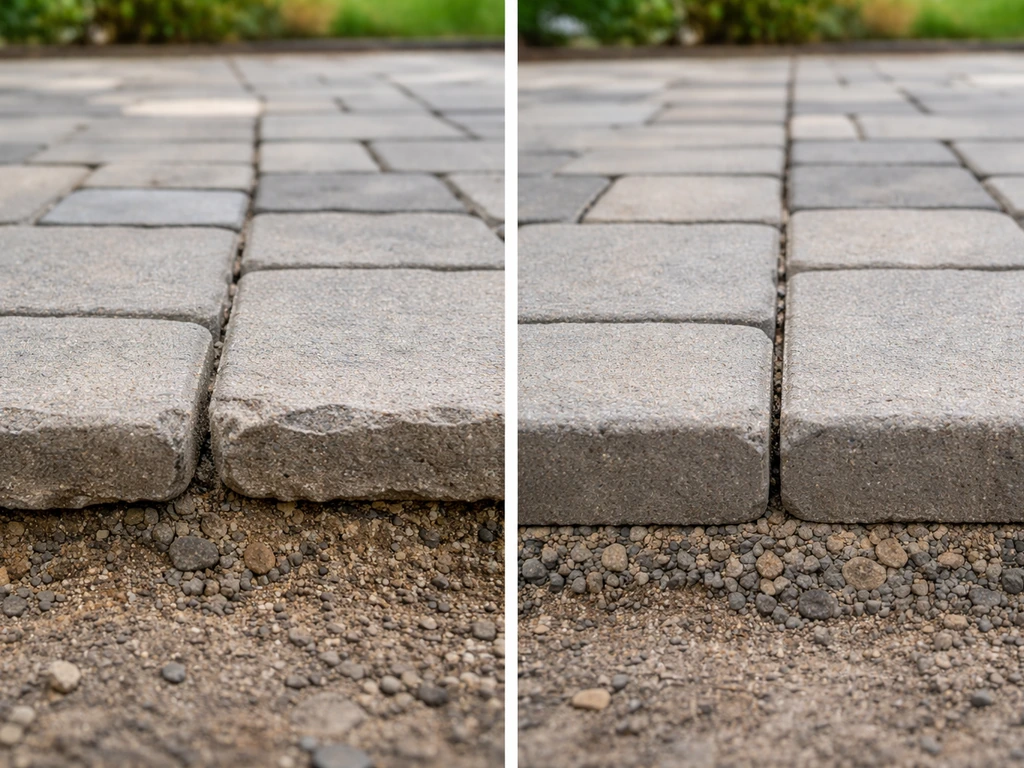
Edges are what holds the whole system together. Without proper edging, pavers migrate outward over time and joints open up. Use spiked aluminum or heavy-duty plastic paver edging along every exposed edge. Drive spikes every 12 inches on straight runs and every 6 inches on curves.
Where the patio meets a structure, the wall itself acts as the restraint. Where it meets lawn or garden beds, your edging is the only thing keeping the surface contained. This is also a good moment to think about how you're separating the patio from the surrounding landscape, since that transition affects both function and drainage.
A clean separation between the patio and grass helps prevent weeds, reduces water pooling, and keeps the edge from shifting separating the patio from the surrounding landscape.
Jointing and polymeric sand
Polymeric sand is worth the extra cost over regular joint sand. It hardens slightly when activated with water, which locks pavers in place and resists ants, weeds, and washout. If you are trying to grow grass in patio joints instead of sealing them, you'll want a different approach to drainage and weed control polymeric sand. Sweep three or four passes in different directions, using a leaf blower on a low setting to clear the surface of excess sand before misting. Don't saturate it: a light mist to activate is all you need. Give it a full 24 hours before any heavy use.
Sealing
Sealing concrete pavers is optional but smart in climates with harsh winters, heavy freeze-thaw cycles, or if you're using lighter-colored pavers that stain easily. Wait at least 60–90 days after installation before sealing pavers, they need to breathe and cure first. Use a penetrating concrete sealer rather than a film-forming one (film sealers can trap moisture and cause spalling). For concrete overlays, follow the product manufacturer's timeline, but most recommend a cure-and-seal product applied within a day or two of finishing. Reapply sealer every 3–5 years depending on traffic and climate.
What this costs, how long it takes, and mistakes to avoid
Realistic cost and timeline
A 200-square-foot DIY paver patio conversion from a concrete driveway will typically run $1,600–$3,600 in materials (pavers, base gravel, sand, edging, polymeric sand, and any sealer), plus $150–$200 in tool rentals (plate compactor, jackhammer if needed). A gravel or decomposed granite version of the same size might run $400–$900 all-in. A concrete overlay on a good existing slab can come in around $600–$2,000 depending on the product and any decorative finishes. Hiring out the labor for a paver patio typically doubles or triples the cost.
Timeline for a 200-square-foot paver conversion: plan on one full day for demo and base prep, one day for screeding and laying pavers, and a day for finishing and cleanup. That's a three-day weekend project for one or two people. Gravel is faster, two days comfortably. A concrete overlay is often a single long day of work, then waiting for cure time.
Common mistakes that will cost you later
- Skipping subgrade compaction: This is the number one cause of sinking and heaving patios. The soil under your base must be compacted before you add anything on top.
- Too little base depth: Four inches of compacted gravel is the minimum for a pedestrian patio. On soft or clay soil, go 6 inches. Cutting corners here causes long-term settlement.
- Adding base material in one thick lift instead of compacting in 2-inch layers: Thick lifts don't compact evenly. The bottom stays loose, and your patio surface will shift.
- Bad drainage design: If water runs toward the house or pools in the center, no amount of good installation will save you. Check slope before you build, not after.
- Laying pavers over a failing asphalt or cracked slab: A bad base produces a bad patio. Remove and start fresh if the existing surface isn't structurally sound.
- Ignoring height transitions at doors and adjacent hardscaping: A tripping hazard at the back door will bother you every single day. Confirm finished heights before you screed the sand.
- Rushing concrete cure times: If you're pouring new concrete or applying an overlay, let it cure fully before loading it with furniture or traffic. For overlays, check the product spec — many need 24–72 hours before foot traffic and 7 days before furniture.
- No edge restraints on exposed paver edges: Pavers without containment migrate outward within one or two freeze-thaw cycles. Install edging on every exposed side.
- Using regular joint sand instead of polymeric: Regular sand washes out, encourages weeds, and lets pavers shift. Polymeric sand is worth every extra dollar.
The whole project is very doable for a motivated DIYer, but it rewards patience at the prep stage. Most people who've done it before will tell you the same thing: rush the demo and base, regret it for years. Take your time getting the foundation right, and the surface installation goes surprisingly smoothly.
FAQ
Can I keep the existing driveway instead of tearing it out when converting it into a patio?
Yes, but only if the slab is sound and drains correctly. If the concrete is cracked or spalling, pavers can be laid over the old surface with the right base buildup, or a concrete overlay can be used, but you must still verify slope away from the house and consider patching before installing anything on top.
How do I make sure water does not pool after the patio conversion?
Use a slope check at multiple points, not just one measurement. Mark the patio perimeter and check for low spots where runoff might collect, then adjust base thickness or grading so the finished surface slopes away from the house at about 1/8 to 1/4 inch per foot.
What if my driveway has existing cracks or uneven areas, can I still install pavers?
You can, but you need to prevent differential settlement from creating rocking pavers. For pavers, build a compacted base that bridges minor irregularities, and avoid trying to level everything by adding thin base in spots. For overlays, uneven slabs may require leveling compounds or patching depending on the product specs.
Do I need a permit or zoning approval to turn a driveway into a patio?
Often you do, especially if the project changes stormwater drainage, reduces permeable area, or alters setbacks. Check local rules before demo, and be ready to document the new layout and drainage plan, particularly if you are removing a driveway apron or modifying curb lines.
What is the best way to handle a garage access lane during installation?
Treat the driveway lane as a separate “zone” and keep the edging and base work consistent at the boundary. Plan for wheel access, protect newly prepped base from heavy traffic, and stage materials so deliveries and moving boards do not disturb the finished subgrade.
Can I convert only part of the driveway into a patio?
Yes, and it usually works best when you define a clean edge line with restraint. Use edging along the exposed perimeter and ensure the transition area has a controlled slope, otherwise the patio surface may become a runoff “collection area” where water gathers at the junction.
How deep should the base be for pavers vs gravel on a former driveway?
Pavers generally need a thicker, well-compacted base layer than a surface that will only be walk-on gravel. If your soil is clay-heavy or your climate has freeze-thaw, plan for a more generous base depth and proper drainage layers, since inadequate thickness is a common cause of heaving and joint opening.
Is polymeric sand safe for areas that stay wet or where sprinklers run?
Polymeric sand performs best when it stays relatively dry and is activated properly. If sprinklers frequently wet the joints, you may need to adjust sprinkler heads or choose a jointing approach that tolerates periodic saturation, because repeated washout can weaken the joint lock.
Should I seal pavers, and how do I avoid making them slick?
Sealing is optional, but it can reduce staining and help in harsh winters. Use a penetrating sealer and follow the cure timing, then evaluate slip risk by checking the product label for traction rating. If you live in a freeze-thaw climate, sealing too early can trap moisture and cause issues later.
How soon can I use the patio after installation?
For pavers with polymeric sand, wait a full day before normal foot traffic and avoid heavy loads for about 24 hours after activation. If sealing is involved, you must allow the full cure period recommended by the sealer manufacturer before bringing furniture close or driving over any adjacent surfaces.
What are the most common DIY mistakes when converting a driveway into a patio?
The big ones are rushing base prep, skipping edging, and assuming existing slope is correct everywhere. Other frequent issues include insufficient compaction, forgetting to protect buried utilities during excavation, and over-saturating polymeric sand during activation, which can wash fines out of the joints.
Can I build a patio that supports a fire pit or heavy grill?
Yes, but design the base for the load. Place the fire pit on a solid, level support zone, consider extra base depth and a reinforced restraint edge, and keep combustible clearances per appliance requirements, because settling or shifting around the heavy unit can crack pavers or open joints.
Next Article
How to Grow Grass on a Patio: Step-by-Step DIY Guide
DIY steps to grow real grass on a concrete patio: prep, soil depth, drainage, seeding or sod, and ongoing care.