The most reliable way to separate a patio from grass is to install a physical edge restraint flush with your patio surface, back it with a properly compacted gravel base, and lay landscape fabric underneath so grass roots and soil can't migrate into the bedding layer. If you’re starting from scratch, the same edge restraint and geotextile steps are what turn grass into a stable patio surface turn grass into patio. Done right, this combo stops grass from creeping across the border, keeps your patio edges from shifting outward over time, and gives you a clean line that actually holds up year after year.
How to Separate Patio From Grass: Step by Step Guide

Nolan Lennox
4 Jun 2026
There are faster band-aid fixes too, and I'll cover those for people dealing with a messy edge on an existing patio. But if you want a separation that lasts, the approach above is what works. Everything else is maintenance you'll keep repeating.
First, figure out what problem you're actually solving
Before you buy anything or dig anything, get clear on which problem you have, because the solution is slightly different depending on your situation. Most patio-to-grass separation issues fall into one of two categories: grass creep or edge instability.
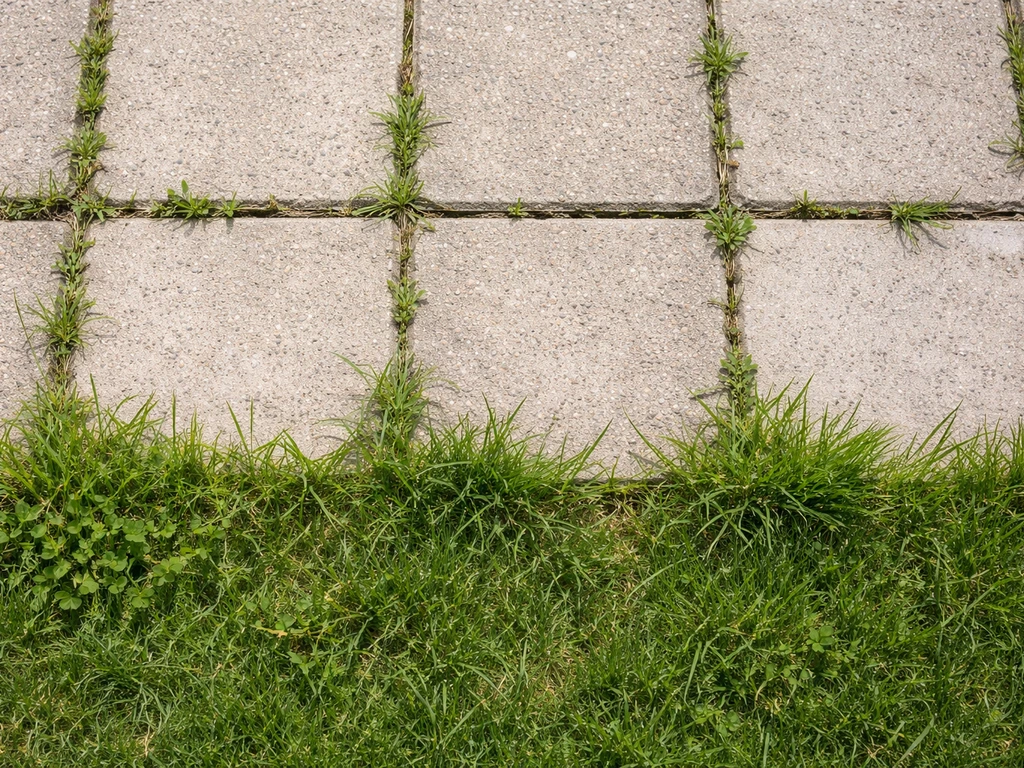
Grass creep is exactly what it sounds like. Turf stolons or rhizomes slowly push across the patio edge, filling joints with roots, lifting pavers, and turning a clean border into a ragged one. This is mostly a surface and root-barrier problem. Edge instability is when the patio itself is shifting, pavers are spreading outward, or the boundary between patio and lawn keeps sinking or washing out. That's a structural problem involving your base layer and edge restraint system.
In a lot of cases you'll have both happening at once, especially on older patios that were installed without proper restraints. If grass is already in your joints and your pavers have shifted even slightly, assume you're dealing with both and plan accordingly.
Plan and prep the boundary before you touch a shovel
A little planning here saves you a lot of backfilling regret later. Walk the full perimeter of your patio and take measurements. You want to know the total linear footage of the grass-to-patio edge, how far the grass has already encroached, and whether any part of the patio edge is sitting above or below the lawn grade.
Mark your intended separation line with spray paint or a garden hose laid along the edge. This becomes your excavation guide. For most residential patio edges, you're going to excavate about 6 inches out into the lawn side of the boundary to give yourself room to set the edging and backfill properly.
Check drainage while you're out there. Your patio surface should slope away from any adjacent structure at a minimum of 1/8 inch per foot. If your existing patio is flat or pitching toward the house, address that before you rebuild the edge, because water pooling at the grass border will undo your work fast. Look for any low spots along the perimeter where runoff collects, and plan to grade those out when you backfill.
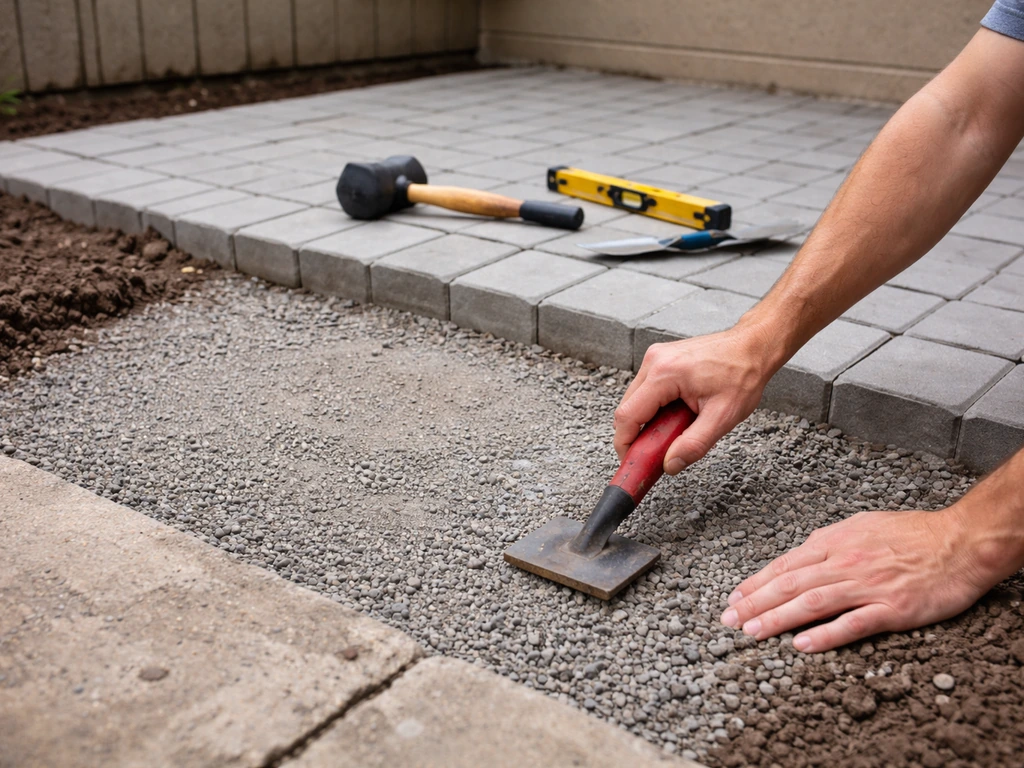
Remove the grass and prep the transition zone

You need to strip back the grass and a layer of soil from the lawn side of your boundary line. When you need to remove grass for a patio edge, focus on stripping roots and soil so the barrier can actually stop regrowth. For a brand-new edge installation, dig a trench about 6 inches wide and deep enough to match your patio's base depth. Pavement Interactive’s joint design rule of thumb for structural concrete joints suggests setting joint depth between one-quarter and one-third of the total slab depth so cracking forms at the joint blank" rel="noopener noreferrer">dig a trench about 6 inches wide and deep enough to match your patio's base depth. A standard residential patio base runs about 4 inches of compacted gravel plus roughly 1 inch of bedding sand, so your total excavation from finished surface level will be around 5 to 6 inches plus the thickness of your pavers. If you're working alongside an existing patio, you're mostly removing the grass and the top 3 to 4 inches of soil in the transition strip.
If grass has crept into paver joints, pull it now. A flat weeding knife or a reciprocating saw with a grout blade cuts through grass and roots in the joints faster than hand-pulling. Remove as much root material as you can, because anything left will regrow through even decent landscape fabric if you just cover over it.
If your base layer under the pavers is contaminated with soil (you'll see this as dark, silty material mixed into the gravel), that's the failure mode that geotextile fabric is designed to prevent. If contamination is bad, the real fix is to pull up the affected pavers, remove the compromised base material, install fabric, replace the base, recompact, and reset. It's more work, but patching over a failed base never holds.
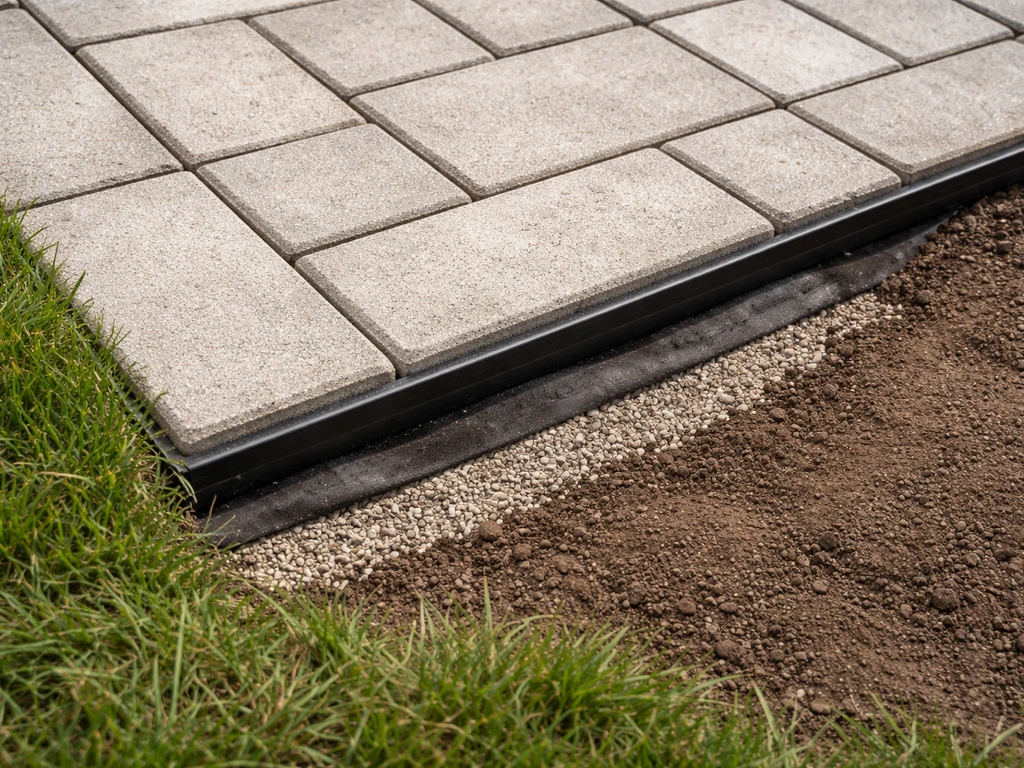
Choose the right edge system for your situation
Edge restraints are not optional on a sand-set paver system. Without them, the pavers at the perimeter have nothing stopping them from slowly spreading outward, which loosens joints, lets sand migrate out, and opens up gaps where grass roots happily move in. Here's how the main options compare:
| Edging Type | Best For | Durability | Cost Range (per linear ft) | DIY Friendliness |
|---|---|---|---|---|
| Flexible plastic edging | Curved or irregular patio edges | Moderate (can heave in freeze-thaw) | Low ($0.50–$1.50) | Very easy |
| Steel or aluminum edging | Straight or gently curved edges, long-term installs | High | Moderate ($2–$5) | Easy to moderate |
| Concrete curb/haunch | High-traffic edges, permanent installs | Very high | Higher ($5–$10+ DIY formed) | Moderate to hard |
| Timber or landscape timbers | Casual/rustic patios, raised edges | Moderate (rots over time) | Low–moderate ($1–$4) | Easy |
| Natural stone or brick border course | Decorative separation, flagstone patios | High | Higher (material cost varies) | Moderate |
For most DIYers doing a paver patio, steel or aluminum edging hits the right balance of durability and ease. It holds a straight line, doesn't rot, and stakes down securely. Flexible plastic edging is fine for curves and lower-traffic areas, just know it can pop up over time if you don't pin it at close intervals. Natural stone borders look great but require more precision to set level.
Don't skip the geotextile fabric
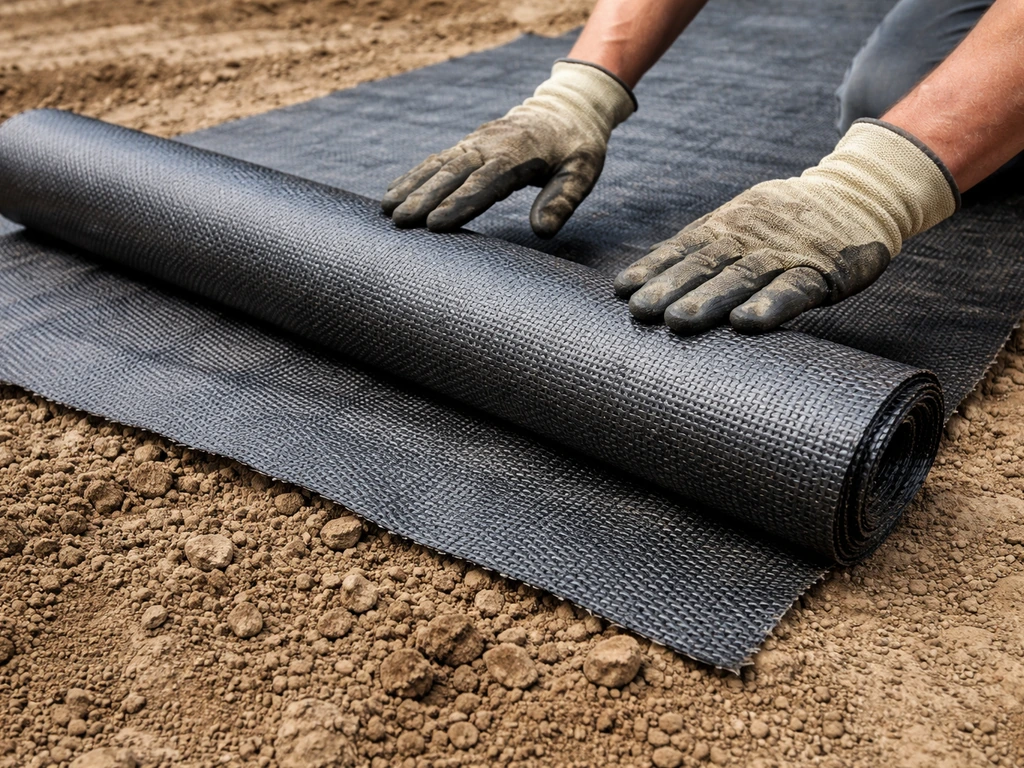
Geotextile fabric (sometimes called landscape fabric or filter fabric) goes directly on top of your excavated native soil before you add any base material. It acts as a permanent separation barrier, letting water drain through while blocking soil particles from migrating up into your gravel base and destabilizing it. This is what keeps your base layer clean and your patio level years down the road.
Use a woven geotextile rated for separation and filtration, not the cheap spun-bond stuff sold for flower beds. The AASHTO M-288 specification is the industry benchmark if you want to get specific. When you're setting the fabric, run it up the inside face of your edging (the "turn-up" detail) so there's no gap at the edge where soil can sneak in from the lawn side.
How to install the edging and base at the patio edge
- Excavate your trench along the patio boundary. For a new install, go deep enough for 4 inches of compacted gravel base, 1 inch of bedding sand, and your paver thickness. For an existing patio, you're mostly digging the transition strip on the lawn side.
- Lay geotextile fabric across the bottom of your excavated area, extending it under the existing patio base if you can, and letting it run up the side of the trench wall. You'll fold it back over the top once the base is in.
- Add and compact your crushed stone base in 2-inch lifts. Compaction is what actually gives you a stable edge: it increases load-bearing strength, prevents settlement, and reduces seasonal movement. Renting a plate compactor for a day is worth it.
- Set the edge restraint along the patio perimeter with the top of the restraint flush with the intended finished paver surface. This is the most common mistake I see: people set it too low and end up with a lip that catches debris, or too high and it becomes a trip hazard.
- Drive stakes or spikes through the restraint flanges into the compacted base on the outside of the restraint (the lawn side). Stakes should end up below the finished grade so they're not visible. Space them at 12 inches on center for straight runs, and every 6 inches on tight curves.
- Fold the geotextile fabric back up against the inside face of the edging (the turn-up). This closes off the gap between edging and base so soil can't migrate in from the lawn side.
- Add your 1-inch bedding sand layer on top of the fabric inside the patio area. Screed it flat. Use concrete sand or coarse manufactured sand, not fine beach sand, which can let pavers rock and shift after installation.
- Set or reset pavers up to the edge restraint, keeping joint spacing consistent. Tap each paver level with a rubber mallet.
Backfill, finish the edge, and lock it all in
Once edging and pavers are in place, backfill the trench on the lawn side with topsoil or compacted fill, grading it so the soil slopes away from the patio edge. You don't want water pooling right at the restraint, because that's how you get frost heaving and edge washout in colder climates. Tamp the backfill down firmly and check that your edging hasn't shifted during the process.
Now fill the paver joints. Polymeric sand is worth the extra cost here, especially along the perimeter where grass pressure is highest. It's kiln-dried sand blended with polymer binders that activate with water to form a semi-rigid matrix. Regular joint sand has no binder and washes out easily. Sweep polymeric sand across the patio surface, work it into joints in multiple passes, compact the pavers with a plate compactor (put a rubber pad or piece of carpet under the plate to protect the paver faces), then sweep again to refill any joints that settled. Polymeric sand installation generally involves sweeping polymeric sand into paver joints, compacting it, then lightly misting with water to activate the binders, often in multiple passes Sweep polymeric sand across the patio surface, work it into joints in multiple passes, compact the pavers with a plate compactor. Finish with a light misting of water, following the manufacturer's instructions exactly. Over-watering washes the binders out before they cure.
If you're sealing the patio surface as well, wait a minimum of 60 to 90 days after installation before applying sealer. The base needs time to fully cure and settle, and sealing too early can trap moisture and cause problems.
One last check: run a straight edge or your level across the patio-to-grass transition to confirm there's no abrupt lip or dip. A smooth, consistent transition here sheds water correctly and makes mowing along the edge much easier.
Keeping grass out for the long haul
Even a well-installed edge needs some attention over time. If you’re trying to grow grass on a patio instead, you’ll need a different setup than just keeping turf out of the joints how to grow grass on patio. Grass is persistent, and a few simple habits will keep your separation clean without a lot of work.
- Trim along the edge with a string trimmer 2 to 3 times per season. This cuts stolons before they get long enough to bridge the edging.
- Inspect the joint sand level every spring. If you see sand loss at the patio perimeter, sweep in fresh polymeric sand and re-activate it before the growing season starts.
- Check that your edging stakes are still flush with or below grade each spring after freeze-thaw cycles. Heaved stakes can lift sections of edging, creating a gap at the bottom where roots and soil enter.
- If grass is growing through paver joints mid-season, spot-treat with a non-selective herbicide applied carefully with a foam brush or squeeze bottle. Avoid spraying on windy days and keep it off the grass you want to keep.
- After heavy rain events, look for areas where soil has washed from the lawn side under or around the edging. Repack any voids immediately, because gaps there become permanent pathways for grass roots.
- For patios that sit flush with or lower than the surrounding lawn, consider cutting a small v-shaped trench (a mowing edge) along the patio side of the edging each season. The trench gives stolons nowhere to anchor and makes edging with a trimmer faster.
Quick fixes for a messy edge on an existing patio
If you're not ready to excavate and rebuild but your current edge is a mess, here's what you can do today. Use a flat spade or half-moon edger to cut a crisp vertical line along the boundary. Remove any grass that has crept onto the patio surface and clean out the paver joints along the perimeter with a weeding knife. Drop in fresh polymeric sand and activate it. Then add a flexible plastic or steel edging strip along the cut line, staking it every 12 inches. It won't be as bombproof as a full install, but it buys you a season or two and looks significantly better than an overgrown border.
This kind of surface-level work pairs well with other lawn-to-patio transition projects. If you're considering converting more turf area, the work involved overlaps significantly with the excavation and prep steps covered here. If you’re figuring out how to turn a driveway into a patio, plan for the same excavation and edge-prep steps needed for a clean lawn-to-patio transition converting more turf area. And if you've thought about adding a mulch buffer zone between the patio edge and the lawn, that's a low-maintenance option that makes keeping the separation clean much easier over time. A mulch patio uses the same idea of a defined boundary and layered buildup to keep grass from creeping into the surface. If you also compost kitchen scraps, you can do it on a patio by using a sealed bin and choosing a location that stays dry and well-ventilated compost on a patio.
FAQ
What should I do if my patio edge is already sinking or washing out, not just overgrown with grass?
Treat it like an edge instability problem, meaning you usually need to pull the perimeter pavers, remove the compromised base layer, and rebuild with compacted gravel plus a properly anchored edge restraint. If you only cut grass and add edging on top, the boundary will keep settling because the foundation is still failing.
Can I separate patio from grass with landscape fabric alone, without installing edging restraints?
No. Fabric helps stop soil migration into the gravel, but without a rigid edge restraint the pavers at the border can spread outward over time. That joint movement reopens gaps and lets roots re-enter, so the separation fails even if the fabric is intact.
How do I tell whether I have grass creep, base contamination, or both before I start digging?
Check paver joints for rooted growth, and inspect the excavated base if possible. Dark, silty material mixed into the gravel indicates soil contamination, which is a deeper failure mode than just weeded joints. If pavers have moved outward or the edge is uneven, assume you also have an instability issue.
Is 6 inches of excavation always the right amount to separate patio from grass?
Use about 6 inches into the lawn side as a starting target for typical residential transitions, but match the excavation to your existing patio base depth and paver thickness. If you end up short on base depth, the edging and pavers will sit improperly, causing future lip dips or washouts.
What happens if I install the geotextile but forget the turn-up detail at the edge?
If the fabric does not run up the inside face of the edging, soil can sneak into the boundary gap from the lawn side. That can gradually contaminate the gravel base and destabilize the pavers, creating a border that looks fine at first but fails after repeated watering and freeze-thaw.
Can I use regular sand in paver joints instead of polymeric sand along the patio border?
You can, but along the perimeter it tends to wash out faster because grass pressure and water flow are concentrated at the edge. Polymeric sand cures into a semi-rigid matrix after misting, which is specifically helpful where gaps are most likely to form.
How long should I wait before compacting, watering, or walking on a newly edged patio?
After resetting pavers and filling joints, compacting should be done carefully with face protection (rubber pad or carpet under the plate). For joint activation, misting should follow the product instructions exactly, and avoid heavy traffic during curing so the binder is not disrupted before it sets.
What slope should my patio-to-grass transition have to prevent water pooling?
Confirm the overall patio surface drains away from nearby structures at a minimum of about 1/8 inch per foot. Also inspect the immediate strip at the border for low spots, because pooling right at the restraint increases risk of frost heaving and edge washout.
My current edge is messy, but I cannot excavate. What are the most common “quick fixes” that fail?
Cutting the lawn line and adding edging without cleaning out rooted joints is a common failure, because grass regrows through leftover roots. Another common mistake is using the wrong type of joint sand or over-watering polymeric sand, which prevents proper activation and leads to washout before the season ends.
Should I seal the patio right after installation if I want less staining and easier cleaning?
Wait at least 60 to 90 days before sealing so the base and bedding have time to settle and the moisture cycle stabilizes. Sealing too early can trap moisture in the system, which may contribute to edge issues and recurring joint problems.
What’s a safe way to check whether my patio-to-grass border is even enough for drainage and mowing?
Use a straight edge or level across the transition to look for abrupt lips or dips. A smooth, consistent change in height helps water shed correctly and makes mowing along the edge easier, reducing the chance of repeated edge disturbance from mower impacts.
Next Article
How to Rebuild a Patio Step by Step DIY Guide
Step-by-step DIY guide to rebuild a cracked or uneven patio, including base prep, drainage, finishes, costs, and pro cal