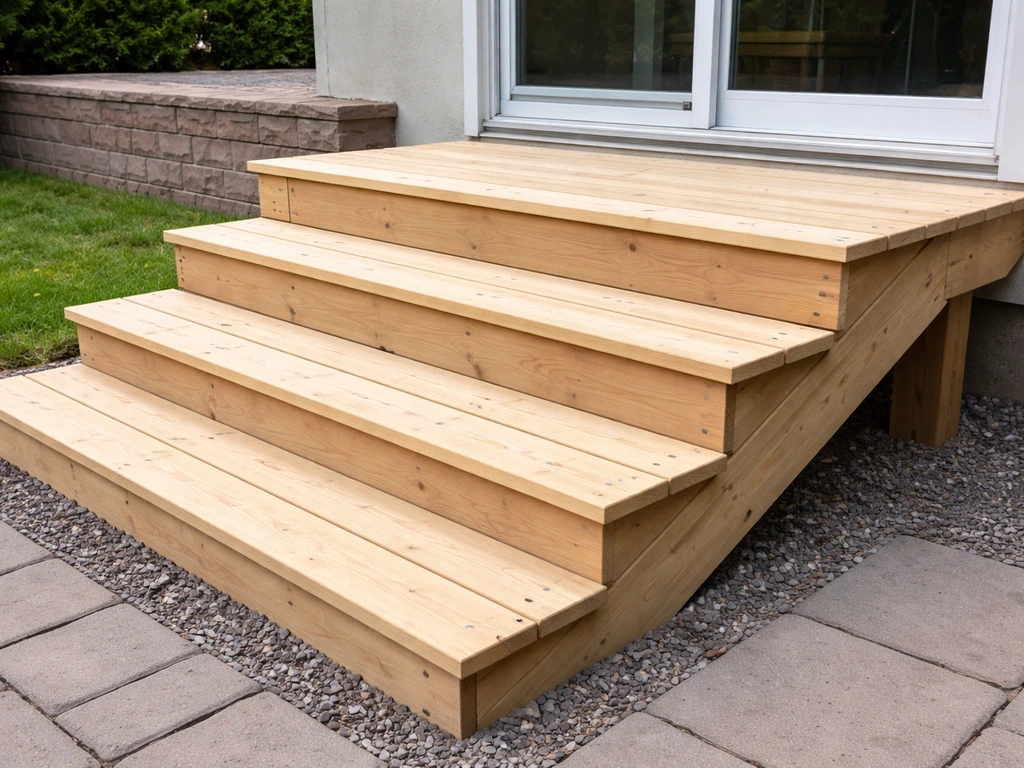
Building TREX composite patio steps means constructing a wood or metal substructure (the stringers and frame) and then surfacing it with TREX composite deck boards as the treads, sometimes with composite fascia covering the risers. TREX doesn't make a plug-and-play step unit you just bolt to your patio, you build a proper stair frame and then finish it with TREX materials. For a similar step-by-step approach, you can also follow the diy patio steps process for planning and building the full layout build a proper stair frame. If you need quick guidance, these temporary steps for patio projects can help you stage the area until the permanent stair work is ready. Done right, you get steps that look sharp, handle weather without rotting, and stay low-maintenance for years. If you want the same materials and a consistent look across the whole project, follow our guide on how to build a trex patio.
Trex Steps to Patio: DIY Installation Guide and Checklist

What 'TREX patio steps' actually means
This is worth clarifying upfront because it trips people up. TREX composite boards aren't structural, they're the surface you walk on, not the thing holding your weight. The bones of your steps will be pressure-treated lumber stringers (or TREX Elevations steel framing if you're going that route), and the TREX decking boards form the treads and optionally the riser faces. If you've been searching for a pre-built TREX step kit, the Trex Elevations stair system comes closest, but most DIYers are building a conventional framed stair structure and capping it with TREX boards. That's exactly what this guide covers. If you're also planning to build the patio surface itself from TREX, the build process for the steps integrates naturally with that project.
TREX patio steps are also different from brick or concrete stair builds, which are essentially masonry projects with different tools and techniques. Composite steps are lighter, faster to build, and don't require curing time, but they do require a solid framed substructure, correct fastening, and careful attention to gapping and drainage to perform well long-term.
Measure first: rise, run, and total drop
Before you buy a single board, you need three numbers: total rise (the vertical height from your patio surface down to grade or the landing), unit rise (height of each step), and unit run (the horizontal depth of each tread). These govern everything else about your stair layout.
Measure your total rise from the top of the deck frame (or patio surface) straight down to where the bottom of the stairs will land. Trex's own stair-building guide starts here, you're measuring from the top of the deck frame, not the top of the decking boards, because the framing is your reference point. Once you have that number, divide it by your target unit rise. A comfortable riser height sits between 6 and 7.75 inches. Round to a whole number of steps and then recalculate your exact unit rise so every step is identical, uneven risers are a tripping hazard and will fail most local code inspections.
For the tread depth (unit run), Trex's installation guide requires stair treads be at least 11 inches deep. A common comfortable run is 11 to 12 inches, which works well with two standard 5.5-inch composite boards side by side on each tread. The nosing overhang of the front tread board must not exceed 3/4 inch past the riser face, Trex is specific about this and it's a non-negotiable limit, not a suggestion.
A simple rise and run example
Say your total rise is 21 inches. Divide by 7 (your target riser) and you get 3 steps exactly, clean math. Each riser is 7 inches and each tread is 11 inches deep. Your stringer will be marked with those numbers using a framing square, and your overall stair run will be 3 steps x 11 inches = 33 inches of horizontal length. That tells you how much room you need on the ground in front of your patio.
What materials and tools you'll need
Getting your materials list right before you start saves you multiple trips to the lumber yard. Here's what a typical TREX patio steps build requires:
- Pressure-treated 2x12 lumber for stair stringers (you need at least 3 stringers for most step widths—more on spacing below)
- TREX composite decking boards in your chosen line (Enhance, Select, or Transcend) for treads—match the line to your patio decking if they're connected
- TREX composite fascia boards (optional but clean-looking) to cover the riser faces and stringer sides
- TREX-approved composite deck screws—do not substitute exterior wood screws, which Trex explicitly warns against for composite boards
- Hidden fastening clips (start clips) if you're using a clip-based system on the tread boards
- Post base hardware and concrete anchors if the bottom of the stringers land on a concrete patio or slab
- Joist hanger hardware and structural screws for attaching the top of the stringers to the deck frame or ledger
- Framing square and stair gauges for laying out the stringer cuts
- Circular saw for cutting stringers, jigsaw for tight corners
- Drill and impact driver, 1/8-inch drill bit for pre-drilling composite
- Level (4-foot and torpedo), tape measure, chalk line
- Speed square and pencil
On fastener choice: Trex's 2024 installation guide specifies using two screws per joist or stair stringer for each board. If you're using the Trex Enhance plug-based fastener system, you'll also need the Enhance depth setter tool, it ensures screws are driven to the correct depth (you'll hear a change in the driving sound when you hit it). For visible screw installs on stair treads, composite deck screws in a matching color hide well and hold firmly. Pre-drill with a 1/8-inch bit to avoid surface cracking near board edges.
Matching your TREX line matters
If your patio deck is already built with a specific TREX product line, match your step treads to that same line so the color and texture are consistent. Each TREX line (Enhance, Select, Transcend) has slightly different board profiles and thicknesses, and the stringer spacing requirements vary by board thickness. Thinner boards need shorter stringer spans. Always check the current Trex installation guide for the specific stringer spacing chart for the product you're using, spacing that works for a 1-inch board won't necessarily work for a thicker grooved board.
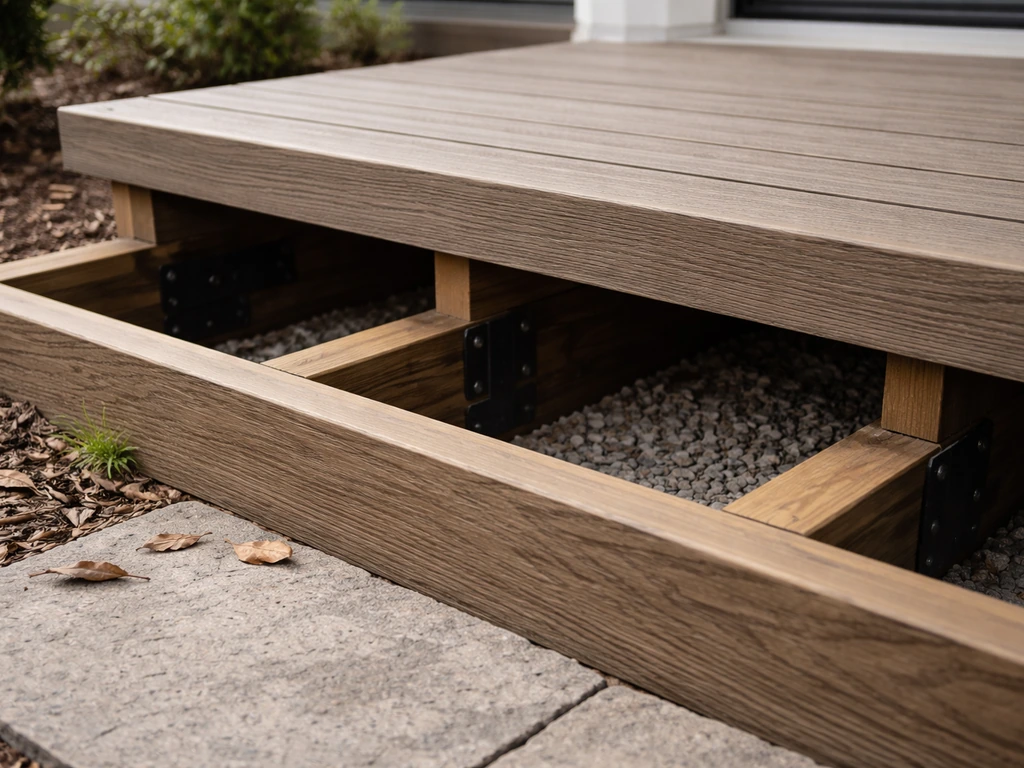
Building the substructure: stringers, frame, and landing prep
The substructure is where the real work happens, and it's where most DIY stair projects go wrong. A shaky or undersized frame leads to bouncy, uneven treads, and with composite decking, there's no structural stiffness in the boards themselves to hide a weak frame.
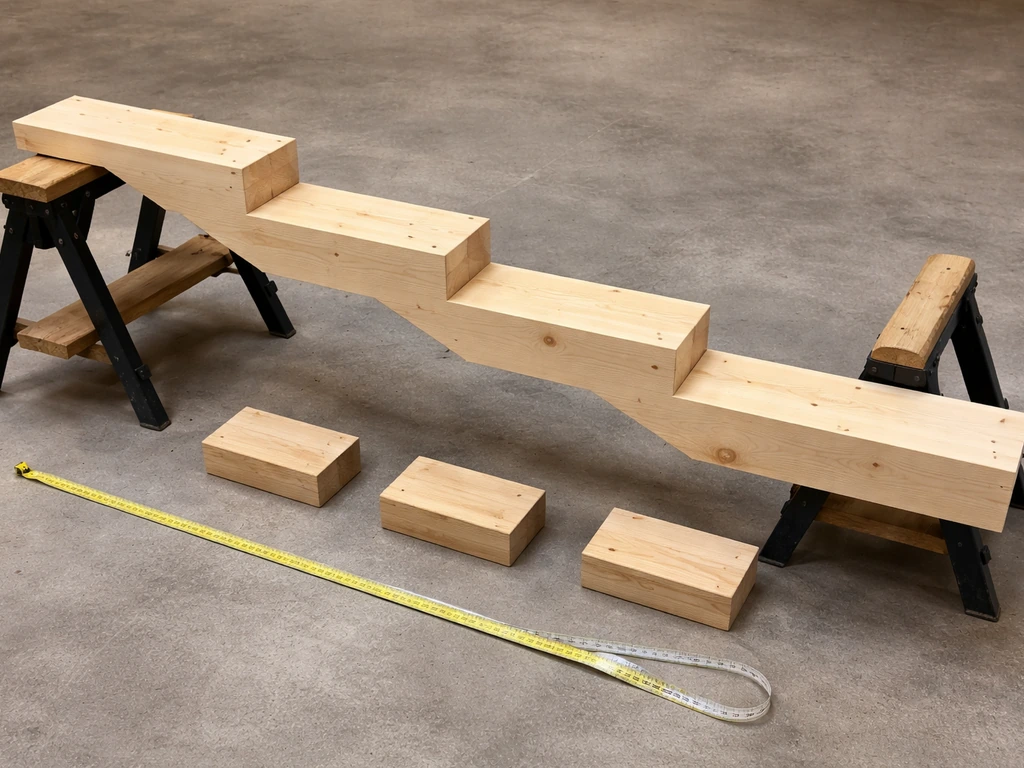
Laying out and cutting your stringers
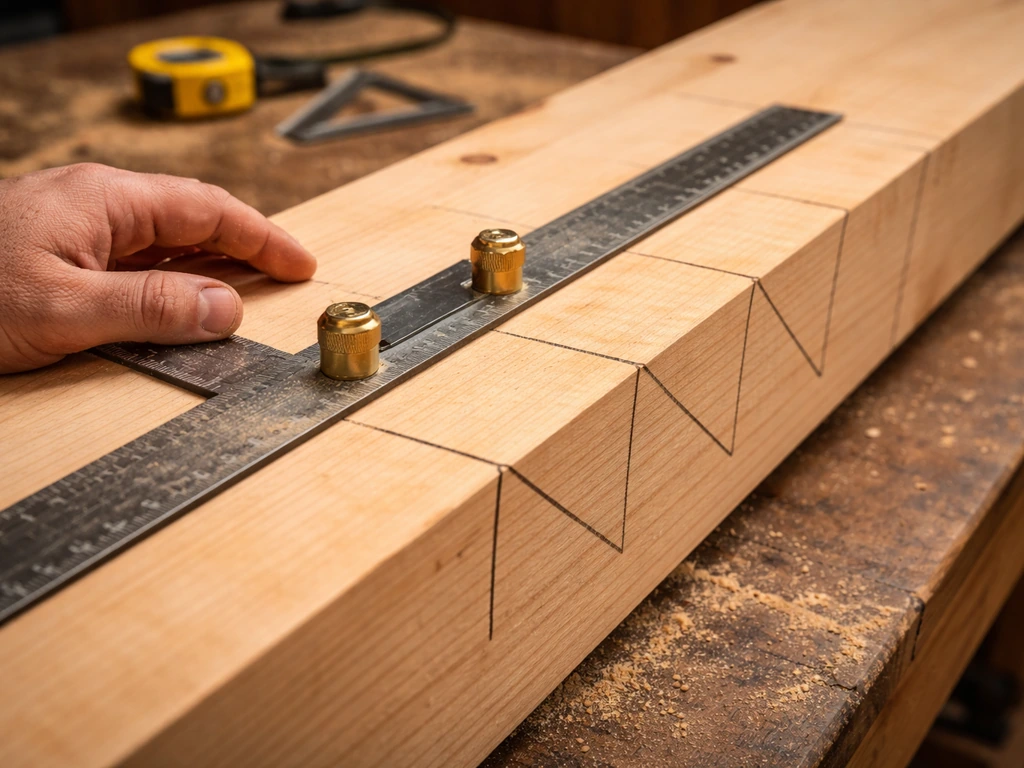
Use a framing square with stair gauges locked to your unit rise and unit run measurements. Walk the square along the top edge of your 2x12, marking each step notch. Before you cut, double-check that the remaining depth at each notch (the structural section of the stringer below each cut) meets your local code minimum, typically 3.5 inches of net depth after the notch. Cut carefully with a circular saw, stopping just short of the corner, and finish the corner cut with a handsaw or jigsaw to avoid overcutting. Overcutting weakens the stringer and can cause a crack point under load.
Trex's guidance is clear that incorrect stringer sizing and spacing creates uneven steps that are both uncomfortable and unsafe. For most standard step widths (36 to 48 inches), you'll need three stringers: one on each outside edge and one in the center. Trex references a maximum stringer spacing of 9 to 12 inches on center depending on the board you're using, for most Trex composite boards, 12 inches on center is the outer limit, and some thinner boards require closer spacing. When in doubt, add a stringer rather than stretch the span.
Attaching stringers at the top and bottom
At the top, stringers typically attach to a header board or the rim joist of your patio deck using structural stringer hangers or hurricane ties rated for the load. Make sure the attachment hardware is rated for the connection type, don't just toe-screw a stringer to a header and call it good. At the bottom, if you're landing on a concrete patio or paver surface, anchor the stringer bases with post base hardware set into the concrete. If you're landing on compacted gravel or soil, you'll want a small concrete footing pad under each stringer to prevent settling. The landing needs to be solid, level, and permanent, a stringer that shifts over time will throw off the whole tread level.
Accounting for the TREX tread thickness in your rise
Here's a detail that bites a lot of first-timers: your calculated unit rise is the finished riser height including the tread board on top. If your TREX boards are 1 inch thick, you need to cut the top step of your stringer 1 inch lower than all the other steps so the finished rise at the top matches every other step. Trex's stair layout workflow walks through this exact math, the tread thickness gets factored into the stringer layout at the top of the run so every step feels identical underfoot.
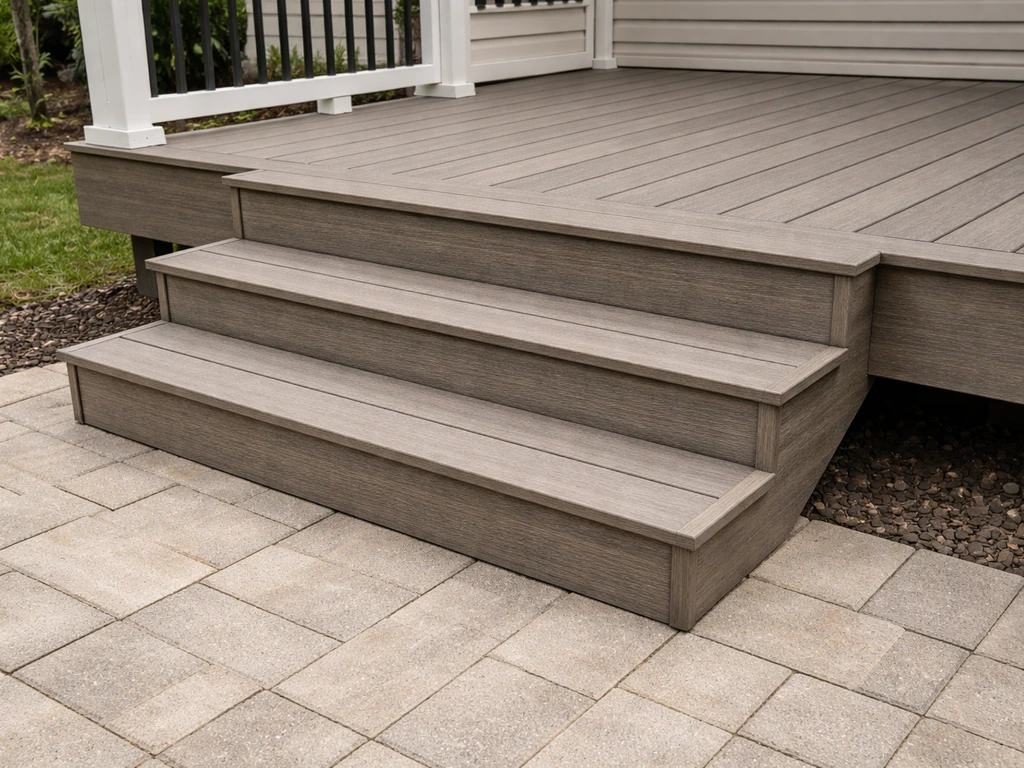
Installing TREX treads: fastening, gapping, and nosing
Once your stringer frame is solid, square, and level, installing the TREX boards is the satisfying part. But there are a few non-negotiable rules that separate a professional-looking result from a warranty-voiding mess.
Gapping between boards
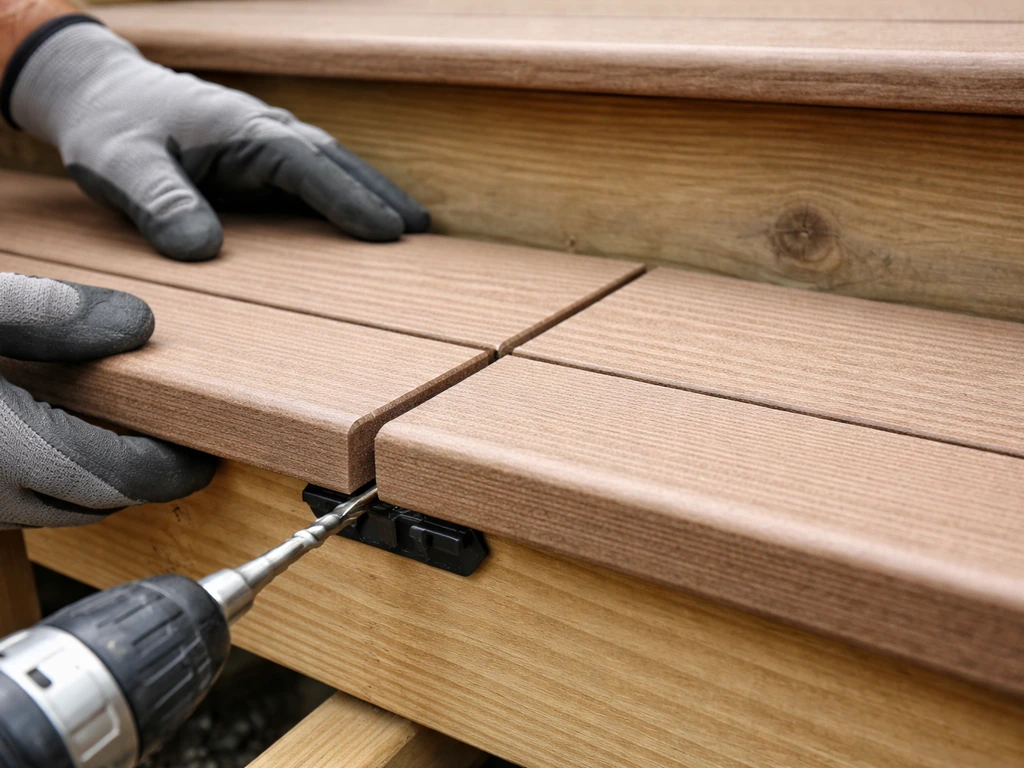
Each tread typically uses two deck boards side by side. Leave a gap of 1/4 to 3/8 inch between those boards. This gap isn't optional, composite boards expand and contract with temperature, and if you install them tight, especially in cold weather, they'll buckle in summer heat. Trex's installation guide includes temperature-dependent gapping rules: if you're installing in cold weather, use a wider gap (toward 3/8 inch) to account for the boards being at their contracted state. Installing in heat? A slightly tighter gap is acceptable because the boards are already expanded. Also leave a gap between the back of the tread boards and any riser face or wall, typically 1/8 inch minimum.
Fastening: screws, clips, and placement
Use two composite deck screws per board per stringer, that's two fastening points at each crossing. Trex's 2024 installation guide is explicit about this. Position screws 1 inch from the edge of the stringer and keep them out of the very end of the board. Pre-drill a 1/8-inch pilot hole before driving any screw near the edge of a board or near the nosing, composite can crack at the edge if you power-drive a screw without a pilot hole. Drive screws flush, not countersunk so deep that you compromise the surface. If you're using the Enhance plug-based system, follow the depth setter tool guidance and listen for the audible cue when the screw reaches proper depth.
For hidden clip systems on stair treads, Trex's Australian installation guide specifically calls out using start clips installed against the riser on each tread. The start clip sits at the back of the tread board (nearest the riser) and the standard hidden fastener clips manage the gap at the front. This keeps the tread boards properly spaced and secured without any visible fasteners on the walking surface.
Nosing: the front edge overhang
The front tread board should overhang the riser face by no more than 3/4 inch. This is both a safety requirement (larger overhangs become a tripping lip) and a Trex installation spec. Many builders aim for exactly 3/4 inch because it gives a clean shadow line and a finished look. If you're using composite fascia on the riser face, factor its thickness into your nosing math: if the riser fascia is 1/2 inch thick, the tread needs to extend past the stringer face by 3/4 inch plus 1/2 inch (1.25 inches total past the stringer) to achieve the 3/4-inch visual overhang past the fascia. This is the math Trex's stair guide walks through explicitly.
Fascia on risers and stringer sides
Composite fascia boards glued and screwed to the riser faces and exposed stringer sides give the steps a clean, finished appearance. Use composite-approved adhesive and fasten with composite screws. The fascia fastener should sit at least 1 inch from the edge of the stringer to avoid cracking the fascia at the attachment point. If you're boxing in the sides of the staircase, the same rule applies to any side fascia boards.
Leveling, drainage, and long-term performance
Composite decking handles water well but it doesn't like sitting in standing water or trapping debris. Your step design needs to allow water to move through and off the surface rather than pooling. For a full patio steps design process, focus on rise, run, stringer spacing, and drainage so the finished steps look right and perform long-term.
The tread gaps (1/4 to 3/8 inch) serve double duty: thermal expansion management and drainage. Water and debris fall through the gaps rather than sitting on the surface. To keep this working, don't let the gaps pack with leaves and grit, clean them out with a stiff brush seasonally. If your steps are against a house wall or under an overhang where debris accumulates fast, plan for more frequent cleaning.
On leveling: each tread surface should be either perfectly level or pitched very slightly forward (toward the nosing edge) by about 1/8 inch over the depth of the tread. This tiny forward pitch ensures any water that lands on the tread surface drains off the front rather than running toward the riser and pooling at the back. Check level on every tread during installation, not just the first one, stringers can have subtle bows that throw individual treads off even if the frame looks fine overall.
At the bottom landing, make sure water drains away from the base of the stringers. If you're landing on concrete, angle the slab surface away from the stair base. If you're on gravel or soil, build up a slightly crowned landing pad so water sheds outward. Stringers sitting in pooled water will deteriorate faster even if they're pressure-treated.
Common problems and how to avoid them
A lot of composite stair builds fail for predictable reasons. Here are the ones I see most often and what to do about each:
| Problem | Why it happens | Fix or prevention |
|---|---|---|
| Uneven riser heights | Stringer top step not adjusted for tread thickness, or total rise measured incorrectly | Remeasure total rise from deck frame (not top of decking). Factor tread board thickness into top-step stringer cut. |
| Bouncy or springy treads | Stringer spacing too wide for the board thickness used | Add a center stringer. Check Trex's spacing chart for your specific board—max is typically 12 in. on center. |
| Boards cracking near edges | Screws driven without pre-drilling, or too close to board end | Always pre-drill with 1/8-in. bit. Keep fasteners 1 in. from stringer edge, never in board ends. |
| Boards buckling in summer | Installed with zero gap in cold weather | Follow temperature-dependent gapping rules. Use 3/8-in. gap when installing in cold conditions. |
| Tread nosing too long | Front board placed without measuring overhang | Overhang must not exceed 3/4 in. past the riser fascia face. Measure before fastening. |
| Water pooling at tread back | Tread installed level or tilted backward | Pitch tread boards 1/8 in. forward so water drains off the front edge. |
| Stringer base settling | Bottom of stringer landed on soil without a footing | Pour a small concrete pad (at least 2x2 ft) under each stringer base before installing. |
Your build checklist before you start
Run through this list before you cut your first board. It sounds like overkill but catching a planning error before you've bought materials is a lot cheaper than discovering it mid-build.
- Measure total rise from the top of the deck frame to the finished landing surface—not the top of the decking boards
- Calculate number of steps and exact unit rise so every step is equal; confirm unit rise is between 6 and 7.75 inches
- Confirm tread depth will be at least 11 inches with two composite boards and the required gaps
- Verify horizontal run fits the available space in front of your patio
- Check local building codes for stair geometry requirements and any permit needs
- Select TREX product line to match existing patio decking; confirm stringer spacing requirements for that board thickness
- Order materials: stringers (PT 2x12), TREX boards, fascia, composite screws, hardware, footings
- Cut and test-fit stringers before final attachment—confirm rise and run measurements are consistent across all three (or more) stringers
- Anchor stringers at top and bottom with rated hardware before installing any boards
- Install tread boards with correct gapping and fastener placement, checking level on each tread as you go
- Add riser and side fascia boards last, working from bottom to top
- Final inspection: check every tread for level/pitch, verify all gaps are clear, test for bounce or movement under load
How this compares to other step options
TREX composite steps sit between wood steps and masonry options in terms of cost, effort, and long-term maintenance. If you're comparing, here's a quick honest breakdown: Premade patio steps can be a convenient alternative when you only need a simple rise and run, but a framed composite approach still offers more control over fit, drainage, and long-term performance.
| Step type | Material cost (3-step, 36 in. wide) | Maintenance | DIY difficulty | Lifespan |
|---|---|---|---|---|
| Pressure-treated wood | Low ($80–$150) | High (stain, seal every 1–2 yrs) | Easy | 10–15 yrs with upkeep |
| TREX composite | Medium ($300–$600+) | Low (clean 1–2x/yr) | Moderate | 25+ yrs |
| Brick/concrete block | Low-medium ($100–$250 DIY) | Low | Hard (masonry skills needed) | 30+ yrs |
| Premade precast concrete | Low ($50–$150/step) | Very low | Easy (no framing) | 20–30 yrs |
TREX makes the most sense when your patio surface is already composite and you want everything to match, or when you're genuinely done with the cycle of sanding and staining wooden steps every couple of years. If budget is the main driver and you're comfortable with ongoing maintenance, pressure-treated wooden steps built with the same framing technique are a perfectly valid choice. If budget is the main driver and you're comfortable with ongoing maintenance, wooden steps for patio built with the same framing technique are a perfectly valid choice. Premade concrete steps are the fastest option for a simple one or two-step drop, but they can't match the look or customization of a framed composite build.
Whatever route you take, the substructure fundamentals, proper stringer layout, correct spacing, solid anchoring, and drainage-friendly tread installation, are the same across all framed step builds. Get those right and the TREX surface will take care of itself for decades.
FAQ
Can I use Trex boards as the structural stair stringers instead of building a framed substructure?
No. Trex deck boards (including composite tread pieces) are a walking surface, they are not rated as structural members. Your stringers and frame (pressure-treated lumber or approved steel framing) must carry the stair loads, then the Trex boards are attached as treads and optional fascia.
How do I handle an uneven patio surface or a not-level landing when installing Trex steps?
Fix the landing first. If the landing is out of level or water pools near the base, the steps will end up uneven even with correctly cut stringers. For concrete, check the slab angle and consider shimming/leveling only where appropriate, for pavers or soil build a stable, compacted, crowned pad that sheds water away from the stringer feet.
What temperature should I use to decide tread gaps (1/4 to 3/8 inch) and when is it a mistake?
Pick your gap based on the installation temperature and conditions. In cold conditions, boards are more contracted, so use the wider end of the gap range to prevent summer buckling. Avoid “tight gaps” if you are installing in the morning when boards are cold or if you expect direct sun and large temperature swings within the first year.
If my riser height math gives a weird number of steps, is it better to adjust unit rise or re-measure total rise?
Adjust unit rise after you finalize total rise based on your reference point (top of deck frame to the landing location). The goal is equal risers and consistent finished heights. Don’t “eyeball” different riser heights, even small differences can create a trip hazard and fail typical inspection checks.
Do I need to change stringer layout if my Trex tread board thickness is different from what the guide example uses?
Yes. Tread thickness affects the finished riser height at the top step, so the top stringer notch or cut height must account for the tread thickness you are installing. Also, different Trex lines can have different board profiles and spacing requirements, so confirm the stringer spacing chart for the exact product thickness you purchased.
What happens if I space stringers too far apart to save effort or materials?
You risk bouncy or flexing treads, fastener issues, and uneven step surfaces. Trex decking can’t compensate for an undersized frame, so if you are near or above the maximum stringer spacing for your board thickness, add a stringer rather than stretching the span.
Should the tread be perfectly level, or is a slight slope okay for drainage?
A very small forward pitch is recommended. Make each tread either dead level or pitched slightly toward the nosing (about 1/8 inch over the tread depth) so water drains off the front rather than toward the riser. Verify level or pitch on every tread, not just the first one.
How do I avoid cracking composite boards when installing screws near the edges and near the nosing?
Always pre-drill with the specified small pilot size (commonly 1/8 inch near edges) and keep screws a safe distance from the board ends and stringer edges. Drive screws flush, not overdriven, and stop if you notice binding or surface splitting. This is especially important on stair treads because edge loading is higher at the nosing.
Can I install composite fascia on the risers without adjusting the tread overhang calculation?
You should not. If you add fascia thickness, the tread overhang needed to achieve the same finished visual nosing distance changes. Use the fascia thickness in the overhang math, otherwise you can end up with an overhang outside the 3/4 inch safety spec or a misaligned appearance.
What is the best way to keep tread gaps from clogging and losing drainage?
Plan for seasonal cleaning. The gaps (often 1/4 to 3/8 inch) allow debris to pass through, but leaves and grit can pack into the joints over time. Use a stiff brush to clear gaps seasonally, and if the steps are near a wall or under an overhang, clean more frequently.
If I’m tempted to use temporary patio steps first, how do I ensure the permanent Trex steps still fit correctly?
Stage your build so the temporary steps do not change your final measurements. Set your stringer and tread layout based on the permanent deck frame reference point and planned landing, then remove the temporary system without shifting grade or landing height. Re-check total rise and the landing level before you cut stringers.
Wooden Steps for Patio: DIY Design and Build Guide
DIY wooden steps for patio with layouts, measurements, stringer build, anchoring, drainage, and sealing for safe, level