You can build solid, good-looking patio steps yourself in a weekend or two. The key is getting three things right before you mix a single bag of mortar: the rise-and-run math, a compacted gravel base that goes deep enough, and a material choice that suits your climate and budget. Get those locked in and the rest is just methodical work.
DIY Patio Steps: Step-by-Step Stone Step Build Guide

Nolan Lennox
5 May 2026
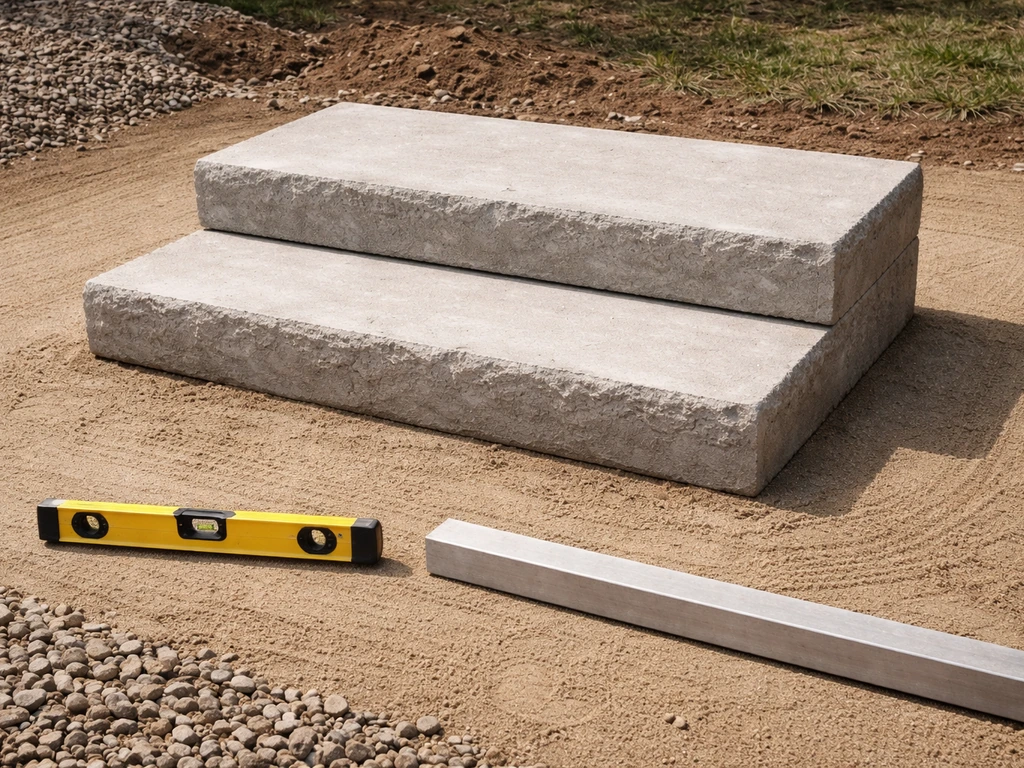
Planning and measurements for DIY patio steps
Start by measuring the total rise: the vertical distance from the lower patio or ground level to the top of the upper surface the steps need to reach. Use a long level and a tape measure, or a line level and string. Be precise here, a half-inch error spread across three steps becomes a noticeable trip hazard.
Once you have the total rise, divide it into steps using the standard formula. The IRC sets a maximum riser height of 7-3/4 inches and a minimum tread depth of 10 inches. A comfortable rule of thumb is the "2R + T" formula: twice the riser height plus the tread depth should land between 24 and 26 inches. So if you want a 6-inch rise, your tread should be 12 to 14 inches deep. That math gives you an easy, comfortable stride rather than the steep, cramped feel you get when treads are too shallow.
Here is how to work through the numbers. Measure your total rise (let's say 18 inches). Divide by a target riser height: 18 divided by 6 = 3 steps. Check your tread: using 2R + T = 25 inches, T = 25 minus 12 = 13 inches per tread. That gives you 3 risers at 6 inches each and treads at 13 inches deep. Write these numbers down and double-check them before ordering materials, changing them mid-build is painful.
Width is your other key measurement. Exterior steps should be at least 36 inches wide for comfortable single-person use. For a main entry or a wide patio connection, 48 to 60 inches feels much more generous and proportional. Wider steps also need more structural support along the sides, so factor that into your plan.
| Total Rise | Recommended Risers | Riser Height | Tread Depth (2R+T=25") |
|---|---|---|---|
| 6 inches | 1 | 6 inches | 13 inches |
| 12 inches | 2 | 6 inches | 13 inches |
| 18 inches | 3 | 6 inches | 13 inches |
| 24 inches | 4 | 6 inches | 13 inches |
| 30 inches | 5 | 6 inches | 13 inches |
One thing people skip: account for the finish surface thickness in your riser math. If you're setting 2-inch-thick stone treads on top of a concrete or block base, those 2 inches count toward your riser height. Build your base to the rough height, then fine-tune with the stone layer on top.
Choosing your materials
Stone is the most popular DIY choice for patio steps because it looks great, lasts decades, and is genuinely workable for a careful beginner. But "stone" covers a lot of ground, so let's break down the real options.
Natural stone: bluestone, flagstone, and fieldstone
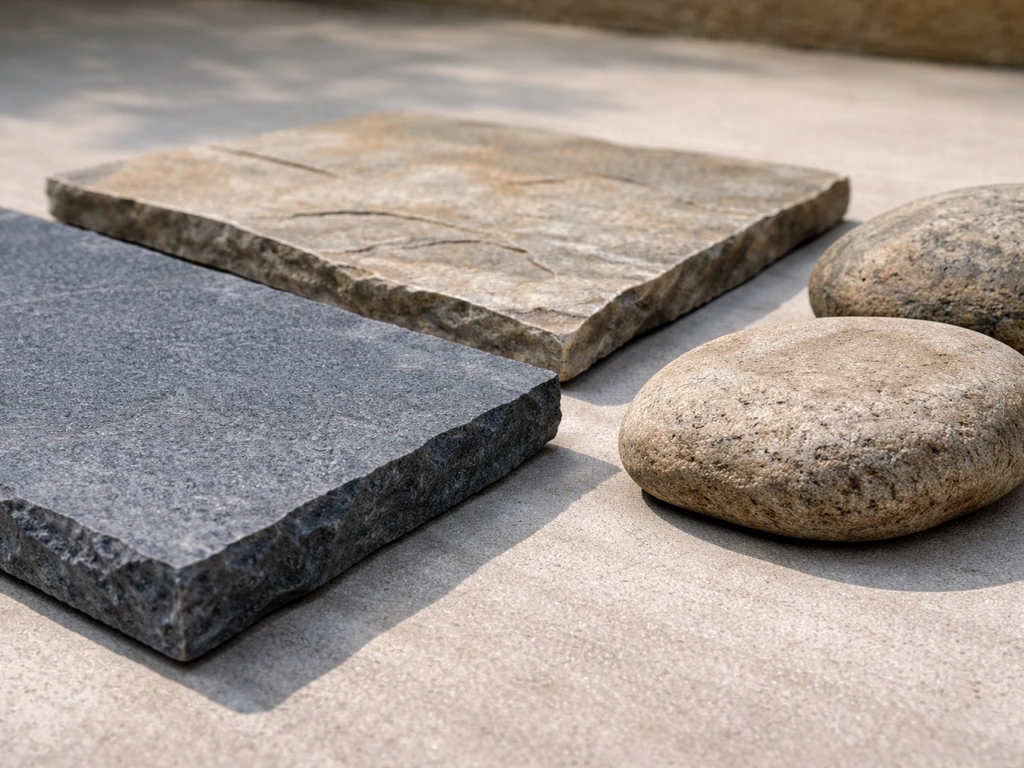
Bluestone is the classic for East Coast patios. It cuts clean, has a naturally slip-resistant texture, and holds up well through freeze-thaw cycles. Expect to pay $15 to $30 per square foot depending on thickness and your region. Flagstone (which can be limestone, sandstone, or bluestone) is a broader category and prices vary more widely. Fieldstone and boulders can work beautifully for a rustic, dry-stack look but require more judgment in placement since the pieces aren't uniform. For tread surfaces, look for pieces at least 1.5 to 2 inches thick, anything thinner risks cracking under foot traffic.
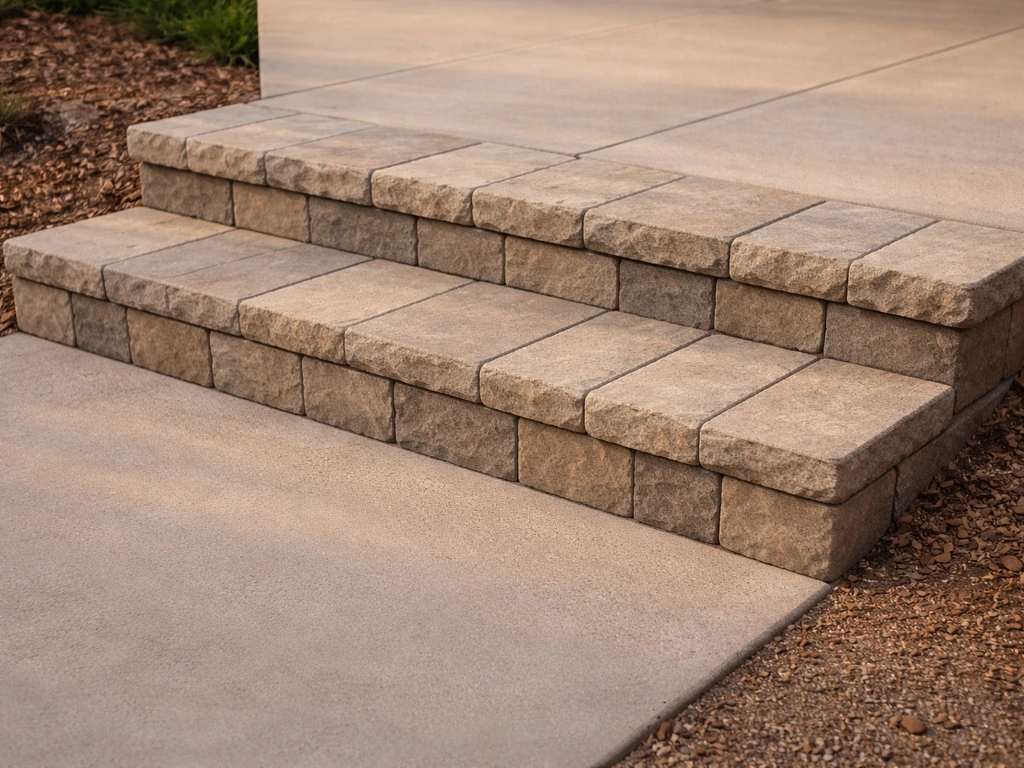
Manufactured stone and concrete block
Retaining wall blocks (like Allan Block, Versa-Lok, or similar) are arguably the best material for a first-time DIYer building steps. They're uniform in size, designed to stack and lock together, readily available at any big-box store, and cost-effective at roughly $2 to $6 per block. You can use them for both the riser structure and top with a natural stone cap for the tread surface. They're also easier to adjust before you set them permanently. Concrete cap blocks (sold specifically as step treads) combine both functions in one piece.
Brick pavers
Brick pavers are a solid choice if your patio already uses brick, consistency of material ties the whole space together. They're durable, widely available, and easier to work with than full natural stone. The limitation is that standard brick pavers are thin (about 2.25 inches) so you often need to double them up or use a concrete core for the riser structure. Brick patio steps have their own design considerations worth digging into if that's your direction. For more patio steps design ideas, pay attention to width, tread depth, and how the materials match your existing patio surface.
Other options worth knowing about
Composite and Trex-style decking materials work beautifully for steps attached to a deck or composite patio surface. Composite patio steps can be a great choice when you want a low-maintenance finish that blends with your existing deck or composite patio surface. Pressure-treated wood is the most affordable option and still very common for transitional steps between a deck and a patio.
If you want wooden steps for patio use, focus on choosing boards rated for exterior ground contact and plan for fast drainage Pressure-treated wood. Premade precast steps are worth considering if you just need a simple two- or three-step solution at a side door and don't want a full build. Each of these has its own install approach.
| Material | Approx. Cost | Durability | DIY Difficulty | Best For |
|---|---|---|---|---|
| Natural bluestone/flagstone | $15–$30/sq ft | Excellent | Moderate | Classic, long-lasting look |
| Retaining wall block | $2–$6/block | Excellent | Easy | First-time builders, clean lines |
| Concrete cap/tread blocks | $20–$60/tread | Very good | Easy | Fast, uniform results |
| Brick pavers | $3–$8/sq ft | Very good | Moderate | Matching existing brick patios |
| Pressure-treated wood | $1–$4/linear ft | Good (5–15 yrs) | Easy | Budget builds, deck transitions |
| Composite/Trex | $8–$20/linear ft | Excellent | Moderate | Low-maintenance, deck-adjacent |
For most DIYers building standalone patio steps, the best combination is retaining wall blocks for the riser structure with natural stone or concrete cap treads on top. It gives you the stability and uniformity of manufactured block with the look of natural stone, and you can do it without any special equipment.
Tools, supplies, and estimating quantities
Tools you'll need
- Tape measure and carpenter's level (4-foot level is ideal)
- Line level and string or a laser level
- Shovel and mattock for excavation
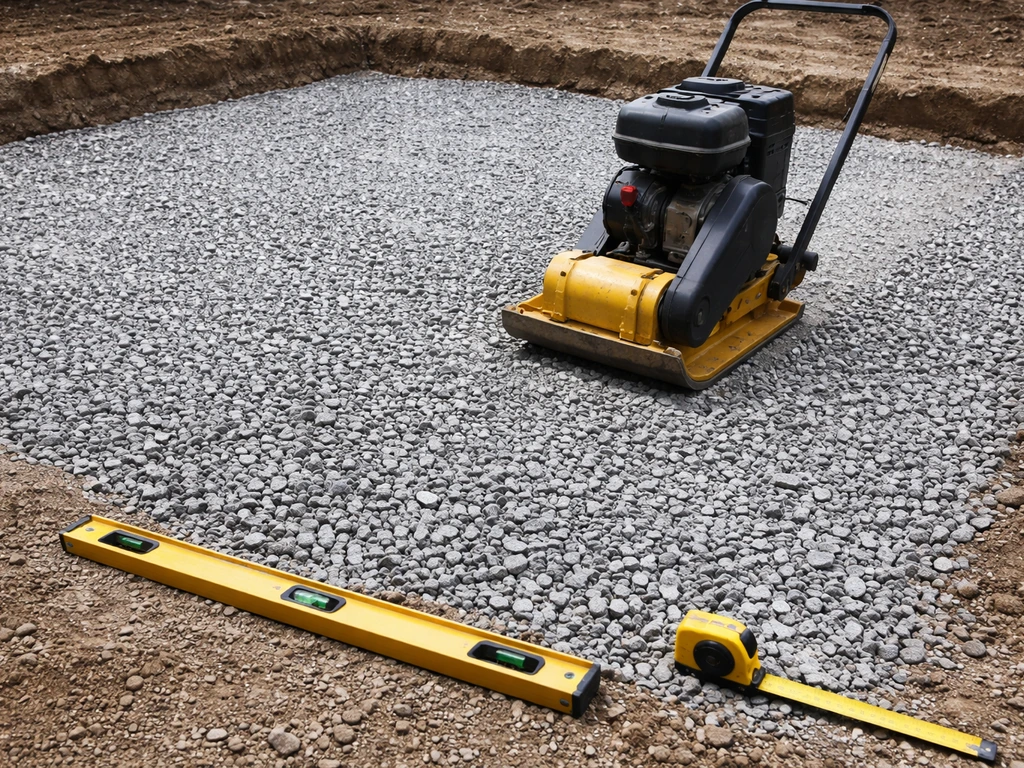
- Plate compactor (rent one — don't skip this)
- Hand tamper for tight corners
- Rubber mallet
- Chisel and small sledgehammer or angle grinder with diamond blade for cutting stone
- Wheelbarrow
- Masonry trowel and margin trowel if mortaring
- Bucket and mixing paddle or mixing tub
- Safety glasses, work gloves, and knee pads
Supplies checklist
- Crushed gravel (3/4-inch clean stone) for base — plan on 6 to 8 inches of compacted base minimum
- Coarse sand or stone dust for bedding layer (1 to 2 inches)
- Your chosen riser material (block, brick, or stone)
- Your tread material (stone slabs, concrete caps, or pavers)
- Type S mortar mix if mortaring joints (recommended for stone-cap treads)
- Landscape fabric (optional, under the gravel base)
- Stakes and string for layout
- Concrete adhesive or construction adhesive for cap blocks
- Polymeric sand if dry-setting pavers
Estimating quantities
For gravel: calculate the footprint of your steps (length x width) plus 12 inches on each side for the base extension. Multiply by 0. 67 feet (8 inches converted) for base depth. Divide by 27 to get cubic yards.
Add 10 to 15 percent for waste. For a 3-step set of steps 48 inches wide with 13-inch treads, the base footprint is roughly 5 feet x 4. 5 feet = 22. 5 square feet.
At 8 inches deep, that's about 0. 55 cubic yards of gravel, so order at least a third of a ton. For block, calculate the number of courses needed for each step and multiply by the number of blocks per course based on the step width. Always order 10 percent extra.
Site prep: excavation, drainage, and base construction
This is the step most DIYers rush, and it's the reason steps settle, shift, and crack within a couple of years. The base is everything. If you build a beautiful set of stone steps on a poorly prepared subgrade, you'll be rebuilding them in three years.
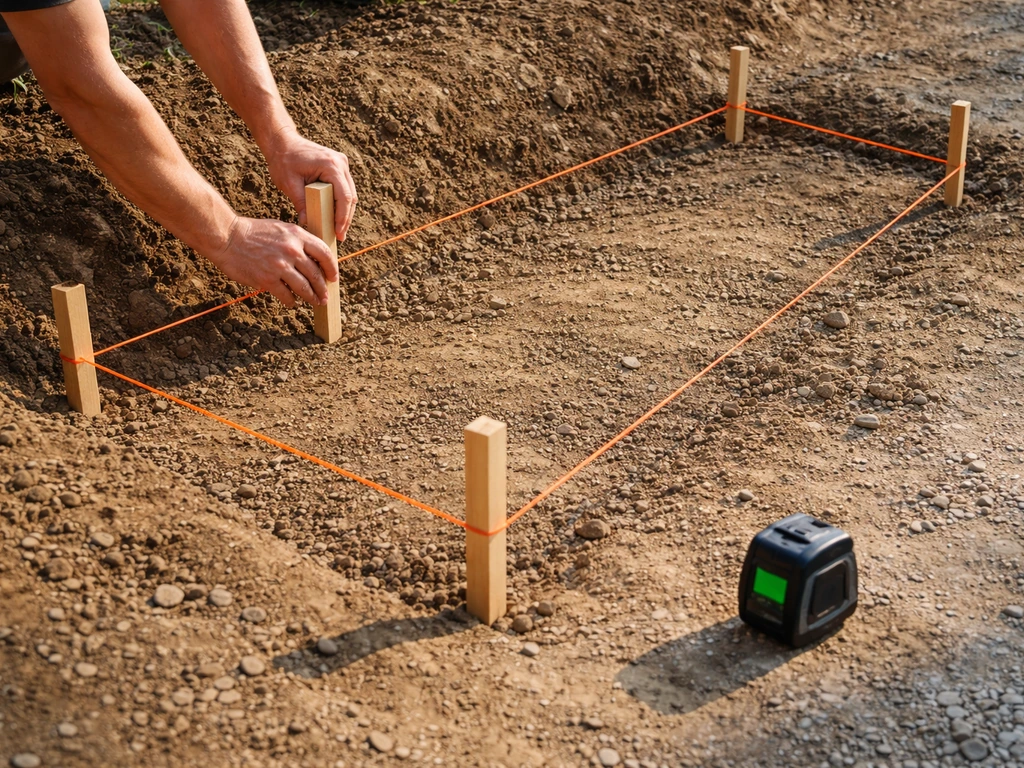
Start by marking the full footprint of your steps with stakes and string, including the base extension (12 inches beyond each side). Excavate down at least 8 inches below your planned finished base level in freeze-prone climates, 6 inches minimum in warmer areas. Remove all organic material (topsoil, roots, sod). You want to be digging into firm, undisturbed subsoil. If you hit soft or sandy soil, go deeper until you hit something solid.
Drainage is your next priority. The base should slope very slightly away from the house, about 1/8 inch per foot is enough. This tiny slope ensures water doesn't pool under the steps and cause frost heaving. If your area has poor drainage or clay soil, consider laying a perforated drain pipe alongside the base before you fill with gravel, running it to daylight or a dry well.
Fine Homebuilding recommends installing a perforated pipe behind a dry-stack retaining wall and covering it with filter fabric to help prevent the drain from clogging with silt consider laying a perforated drain pipe alongside the base before you fill with gravel. French drains are trenches filled with gravel or rock and they may include a perforated (slotted) pipe to redirect water away from an area [perforated drain pipe](https://en.
wikipedia. org/wiki/French_drain).
Fill your excavation with 3/4-inch crushed gravel (not pea gravel or stone dust, you need angular stone that locks together). Add it in 3- to 4-inch lifts and compact each lift with the plate compactor before adding the next. This is where renting a plate compactor pays for itself. Hand tamping is fine for final touch-up but it can't replace a compactor for the main base. Your finished compacted gravel base should be solid enough that walking on it leaves virtually no impression.
Once your gravel base is compacted and level, add a 1-inch layer of coarse sand or stone dust as a bedding layer. Screed it flat with a straight board or screed rail. This layer gives you fine-tune adjustability when setting your first course of block or stone.
Building the step structure
Think of each step as a small retaining wall. The bottom step has the largest footprint, and each successive step sits further back (into the slope) and higher up. The key structural rule: each course of block should extend back under the step above it by at least 6 to 12 inches so the weight of the upper steps is transferred down through the structure, not just balanced on the front edge.
Setting the first course
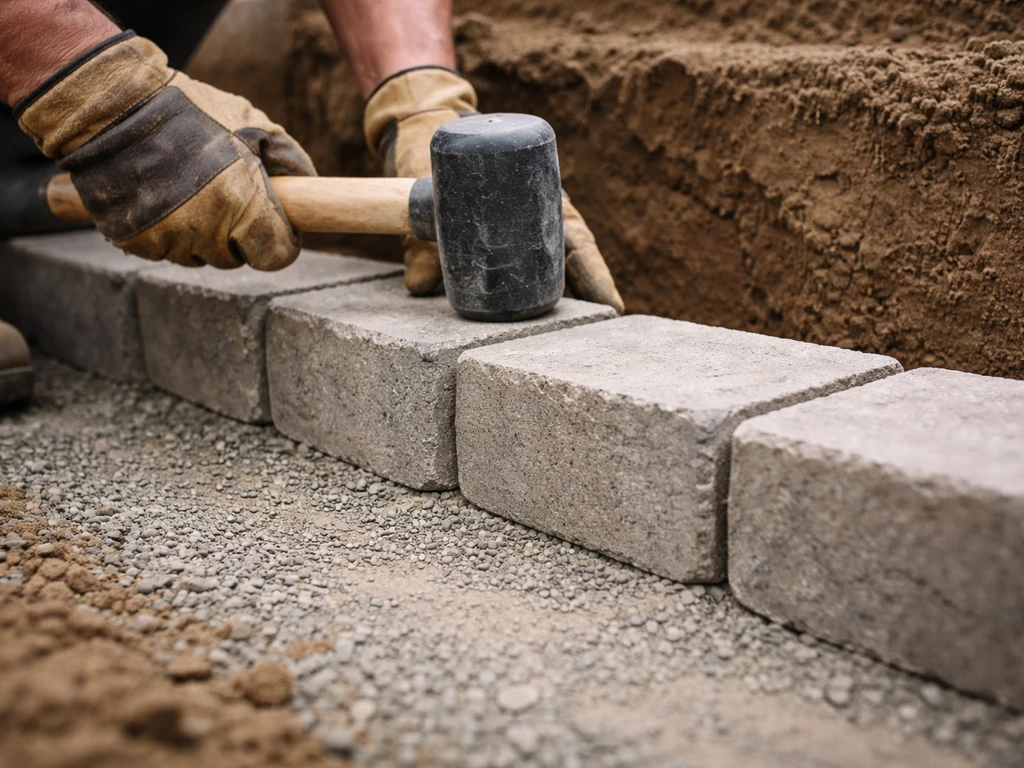
Set your first course of retaining wall blocks on the compacted, screeded base. Check level side to side and front to back. Tap blocks into the bedding layer with a rubber mallet to adjust. The front face of this first course will be the face of your bottom riser, so it needs to be perfectly level and properly aligned. For extra stability on the first course, you can bury it partially below grade (1 to 2 inches below finish grade on the front face). This is called a buried first course and it dramatically improves stability.
Building up the courses and backfilling
Stack subsequent courses in a running bond pattern (staggered joints, like brickwork), with each course set back to create the tread depth. Fill the space behind each course with compacted gravel as you go, don't leave hollow voids. Apply construction adhesive between courses if your block system calls for it. Some interlocking block systems have a built-in pin or clip system instead. Check the manufacturer instructions for your specific block.
Side supports and edging
The sides of your steps need containment too. You can run your retaining wall blocks in an L-shape to create side walls, or use large flagstone pieces set vertically as cheek walls. Without solid side supports, the steps can splay outward over time, especially if the soil around them shifts. Cheek walls also give you a place to attach handrails later if you ever need them, something worth thinking about if the steps are more than 30 inches tall total, where code in many jurisdictions starts requiring a railing.
Installing stone steps: layout, treads, risers, and finishing
With your block structure built and backfilled, you're ready to set the stone tread surfaces. This is the most satisfying part of the build, and if you've done the base work properly, it goes smoothly.
Laying out tread stones
Dry-fit all your tread stones on the steps before you set any of them. This lets you pick the best fit and orientation for each piece, and identify any that need cutting. For natural stone, you want a 1/4- to 3/8-inch gap between stones if you're doing a mortared finish. For a dry-stack look, keep gaps tight (1/8 inch or less) and fill with polymeric sand. Tread stones should overhang the front riser face by 1 to 1.5 inches, this is the nosing, and it both looks intentional and helps shed water away from the riser face.
Setting treads with mortar
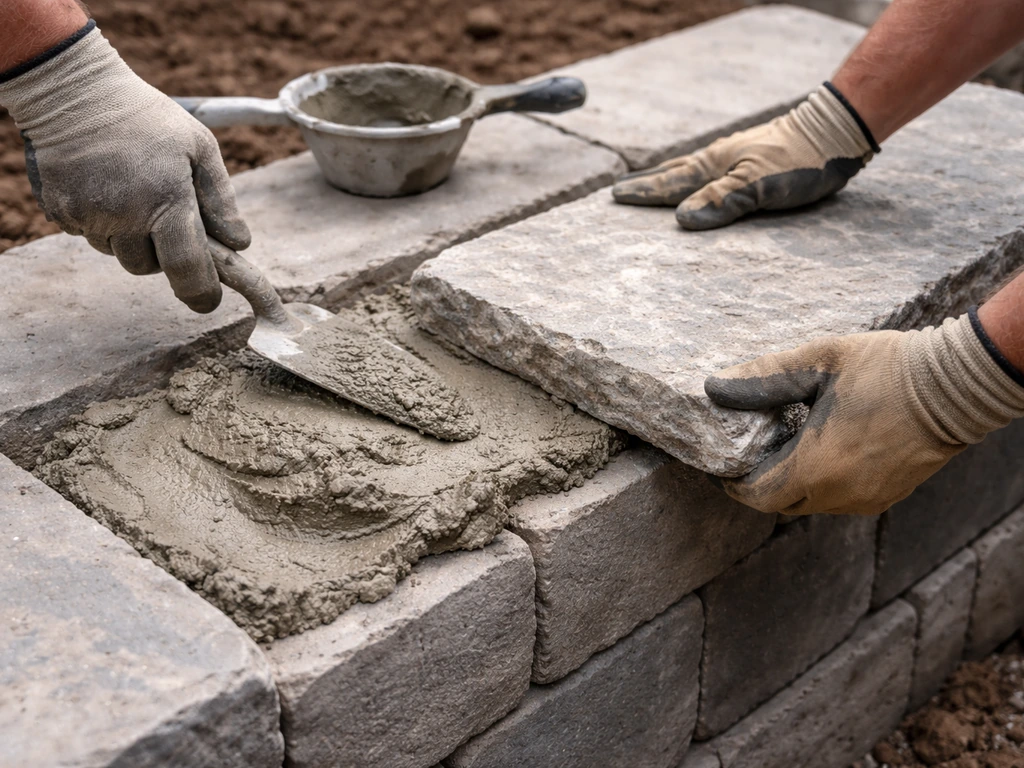
Mix Type S mortar to a peanut-butter consistency. Apply a 1-inch-thick mortar bed to the top of your block course, covering the area where your tread will land. Set the stone in place, check level (it should have a slight 1/8-inch-per-foot forward pitch for drainage), and tap firmly with a rubber mallet. Remove any mortar that squeezes out from the edges. Let the bed set for 24 hours before walking on it.
For the joints between stones (if you're mortaring them), wait until the bed mortar has cured for at least 24 hours, then pack joint mortar in with a margin trowel and tool it smooth with a jointing tool or the handle of a spoon. Keep mortar off the face of the stone, wipe any smears off immediately with a damp cloth before they cure.
Finishing details
Once all treads are set, check every step with a level and walk each one. Any high spots will be obvious now. If a stone is slightly high, you can carefully remove it (within 24 hours of setting) and scrape down the mortar bed. After everything has cured for at least 48 to 72 hours, fill any remaining joints with mortar or polymeric sand. For natural stone, applying a penetrating stone sealer is optional but adds stain resistance and makes cleanup easier long-term.
Common problems, troubleshooting, and a safety checklist
The problems DIYers hit most often
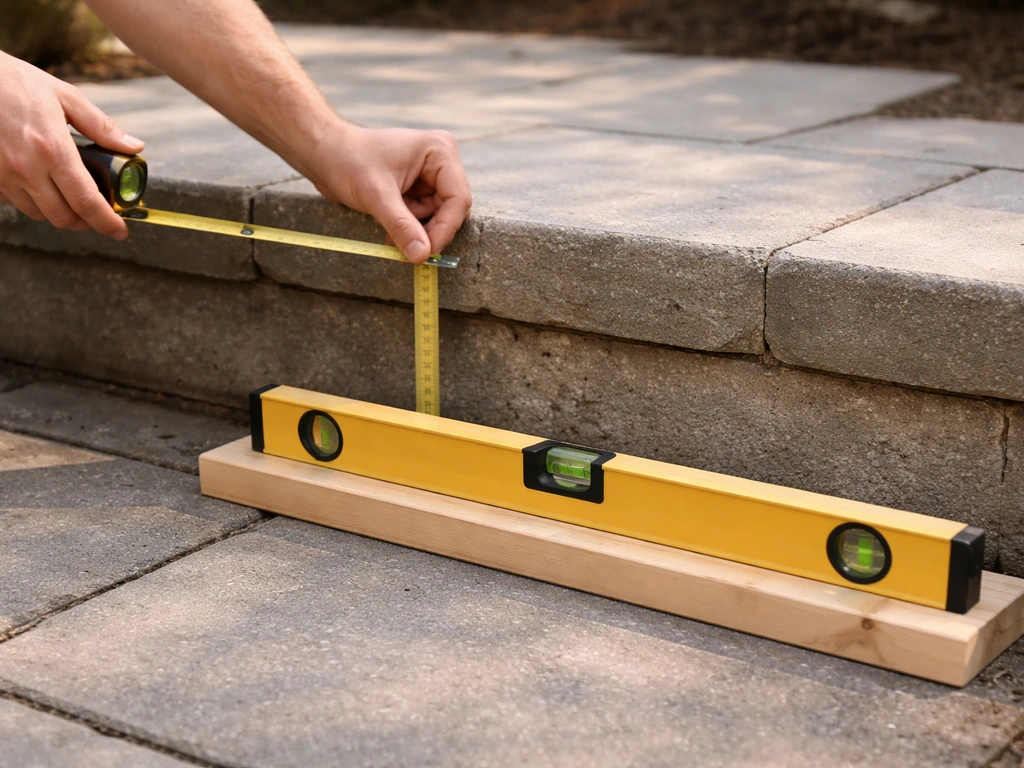
- Uneven riser heights: this happens when the base isn't truly level before you start building up. Always check and recheck level at the base before laying the first course. Even a 1/4-inch error at the base becomes a full inch of inconsistency by the top step.
- Steps settling or tipping forward: almost always caused by an inadequate or poorly compacted base, or by not burying the first course. Redo the base — there's no shortcut fix.
- Water pooling on treads: you need that slight forward pitch on every tread (1/8 inch per foot). If treads are dead-level or pitched back toward the house, water sits and causes freeze-thaw damage and algae growth.
- Mortar cracking within the first season: usually a mix-ratio problem (too much water) or mortar applied in cold weather below 40°F. Use Type S and follow temperature guidelines.
- Stones shifting or wobbling after setting: the mortar bed wasn't thick or consistent enough, or the stone was set before the base had cured. Pull the stone, re-bed it, and allow a full 24 hours before traffic.
- Steps feel too steep or too shallow: go back to your rise-run math. Ideal riser height for outdoor steps is 5.5 to 7 inches — the lower end of that range feels most comfortable for casual outdoor use.
Pre-build safety checklist
- Call 811 (US) before digging to check for buried utilities.
- Confirm riser heights are consistent — every riser in the flight must be the same height within 3/8 inch per IRC guidelines.
- Verify tread depth meets the 10-inch minimum (11 inches per ADA standards if this is a public-access path).
- Check that the total step width is at least 36 inches for safe single-file use.
- Plan for a landing at the top and bottom of the steps — minimum 36 x 36 inches, ideally matching the step width.
- If total rise exceeds 30 inches, check your local code for handrail requirements before finishing.
- Confirm drainage pitch on every tread before mortar fully cures.
- Wear safety glasses when cutting stone — always.
Your next steps before you start building
Before you buy anything, do these three things: measure the total rise at least twice (using a level, not eyeballing the slope), sketch your step plan with riser height, tread depth, step count, and width written down, and call your local building department to find out if a permit is required. If you want temporary steps for a patio while you plan the permanent build, start by measuring the rise and creating a stable, drained base so they do not shift or sink. In many areas, exterior steps over a certain height or connected to a structure need a permit. It takes five minutes to ask and saves you from having to tear out work later.
Once your measurements are solid, rent the plate compactor the same day you plan to excavate, it makes the whole base process faster and the results are dramatically better. Order your gravel a day ahead so it's on-site when you're ready. Buy 10 percent more block and stone than your estimate. You'll use the extra, and running out mid-project on a Saturday afternoon when the supply yard is closed is a genuinely miserable experience.
If you're not sure which material direction to take, retaining wall blocks with bluestone or concrete cap treads is the combination I'd recommend for a first project. It's forgiving, looks sharp, holds up through hard winters, and you can get it done in a weekend with one helper. From there, if you catch the bug, there's a whole world of dry-stack fieldstone, mortared flagstone, brick, and even composite and Trex step options to explore as your skills and ambition grow. If you are planning Trex steps to a patio, start by confirming rise and tread dimensions, then match the material to the way the steps will attach and drain.
FAQ
How do I handle an uneven yard slope when laying out diy patio steps?
Use your measured total rise between the lower and upper finished surfaces, then transfer the rise and tread dimensions onto the slope with a string line. Keep every tread level front to back (with the small drainage pitch you plan), rather than “following” the slope with uneven treads. If the landing areas are out of plane, rework the base elevation so the first course is level, then step up from there.
What’s the safest way to prevent diy patio steps from rocking on uneven stone?
Before setting any tread, ensure the top course of block is fully compacted and screeded, then dry-fit and mark each stone’s intended orientation. When mortar setting, remove any high mortar ridges under the stone and check both directions with a level. If you detect a wobble during dry-fit, fix it in the bedding stage (sand layer thickness and mortar bed flatness), not by “hoping” the stone settles.
Can I reuse extra block or stone I already have for my diy patio steps?
It’s usually fine for materials like fieldstone or salvaged pavers, but only if thickness and finish face are consistent for tread surfaces. For treads, avoid pieces thinner than about 1.5 inches for natural stone because they can crack under repeated foot traffic. For retaining blocks, mixing systems or using non-matching blocks can break interlock and weaken alignment, so stick to a single retaining-wall block type for the structural courses.
How much overhang (nosing) should I use if I want better protection from rain splash?
Keep the tread overhang modest, about 1 to 1.5 inches, so it sheds water away from the riser face without creating an overly fragile cantilever. If your overhang is larger, you’ll need tighter base support and potentially thicker tread pieces, otherwise the front edge can chip over time.
Do I need to slope the tread, and what happens if I don’t?
Yes, a slight forward pitch on each tread (about 1/8 inch per foot) helps water drain away from the riser. If you leave treads flat, water can sit in the joint lines, increasing freeze-thaw damage and loosening mortar or bedding material over time.
What’s the difference between mortared joints and polymeric sand in diy patio steps, and when should I choose each?
Mortared joints lock stones more rigidly and can handle freeze-thaw better if workmanship is solid, but they require careful cleaning and curing and can be harder to adjust later. Polymer sand in dry-stack joints is easier and still effective when stones are well fitted, but it relies on correct base drainage to avoid washing out. If your area gets heavy runoff onto the steps, mortared joints or a well-drained design is typically more durable.
How do I size the gravel base correctly for diy patio steps with a landing or wider top?
Expand the base footprint to match the widest step area plus the side extension. For landings, treat the landing as part of the structural footprint, not just the tread area, then calculate depth from your planned finished base level. A common mistake is basing calculations only on the step footprint, which leaves the landing area unsupported and can lead to settling.
What should I do if my calculated riser height doesn’t divide evenly into steps?
Pick a target riser height range that stays within code limits, then adjust the tread count so the riser ends up consistent across all steps. Avoid making one “odd” riser at the bottom or top if you can, since that’s where people misstep. If you must change one, make it the last step to the landing and keep it close to the average riser height.
When should I install a handrail for diy patio steps?
Plan ahead if your total step run is high. Even when permits vary by location, jurisdictions often require handrails when there’s a certain rise or when steps connect to a structure like a porch. Also consider adding attachment points to the cheek walls during the block build, it’s much easier than trying to retrofit later into stone treads.
How do I keep diy patio steps from heaving in freeze-thaw climates?
You need both depth and drainage. Excavate to at least your climate minimum and remove organic material, then use angular 3/4-inch crushed gravel and compact in lifts so water cannot trap and freeze in voids. Add a perforated drain to daylight or a dry well if you have clay or poor drainage, because gravel alone may not solve water accumulation.
Is Type S mortar always required for setting stone treads?
Type S is a common choice for strength and durability on masonry-like applications, but the key is using a mortar appropriate for outdoor freeze-thaw exposure and the stone-to-mortar interface you’re building. If you switch mortar types, verify cure time and weather compatibility, and do not rush the 24-hour bed set before stressing the treads.
What’s the correct method to check if my diy patio steps are level versus properly pitched?
Use two checks: a level check for each tread’s surface consistency, and a separate measurement for the gentle drainage pitch. A good practice is to set a straightedge across the tread, verify it’s flat enough to prevent rocking stones, then confirm the forward pitch using a level and measuring distance over the tread depth.
Can I build diy patio steps without a plate compactor?
You can do it without one, but it’s a common failure point. Hand tamping alone usually doesn’t achieve the dense, non-impressible base you want, especially with wider steps. If you skip the plate compactor, you must be extra conservative: reduce step width if possible, increase base depth, and compact longer and more systematically, but expect a higher risk of settling.
Next Article
Premade Patio Steps DIY Guide: Fit, Install, and Finish
Plan, measure, and install premade patio steps with DIY layout, ground prep, leveling, finishing, costs, and troubleshoo