You can absolutely build a patio around a large tree, but the key is treating the tree as a permanent part of the design rather than an obstacle to work around at the last minute. Following these steps is the safest way to build a patio over tree roots without damaging the root zone. Leave at least 3 to 4 feet of open space between the trunk and the nearest paver or slab edge, use a permeable base system instead of a solid compacted or concrete sub-base directly over the root zone, and never bury the root flare. Get those three things right and you'll end up with a patio that lasts, a tree that stays healthy, and no surprise heaving or cracking a few seasons down the road.
How to Build a Patio Around a Large Tree: DIY Guide

Nolan Lennox
17 Jun 2026
Planning and Measuring Around a Large Tree
Before you touch a shovel, spend an afternoon doing a proper site read. This is the step most DIYers skip, and it's the reason patios fail or trees decline years later. You need three measurements: trunk diameter, canopy drip line radius, and the distance from the trunk to any structures or grade changes nearby.
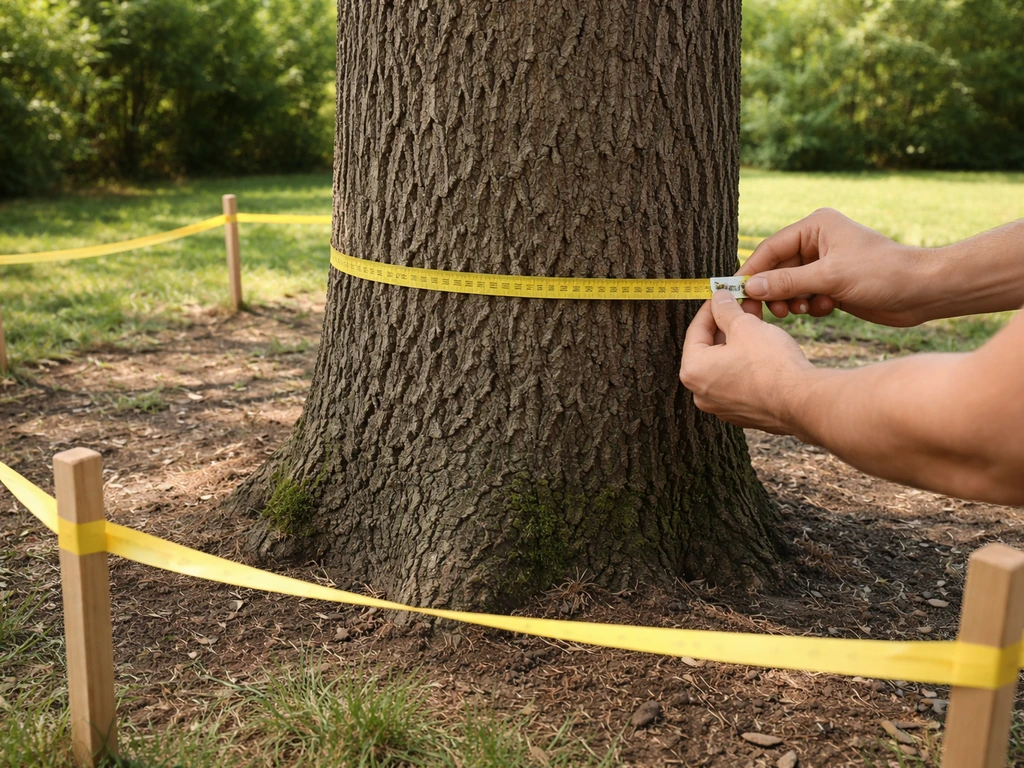
Measure trunk diameter at breast height, which is 4.5 feet above grade. That number drives your critical root zone (CRZ) calculation. The standard used by arborists, city planners, and university extension programs is straightforward: allow 1 foot of protected root radius for every 1 inch of trunk diameter. So a tree with a 14-inch diameter trunk has a CRZ of 14 feet out from the center of the trunk. That's the zone where you want to minimize excavation, compaction, and grade changes as much as possible.
Next, walk out to the drip line (the outer edge of the canopy) and measure that radius too. Roots typically extend at least as far as the drip line, and often well beyond it. Your patio design should aim to keep the bulk of hardscape construction outside the CRZ, or at minimum use tree-friendly methods when any work falls within it.
Sketch your space on paper with the trunk at center, draw your CRZ circle, and then mark out your proposed patio footprint. Give yourself realistic dimensions: a comfortable seating patio needs at least 12 by 12 feet for a small table and chairs, and 16 by 16 feet or more if you want room to move. Plan the tree opening now, before you commit to anything else. A tree expected to reach 30 feet tall needs roughly 3 to 4 feet of clear space between the trunk and the first paver row as a minimum starting point.
Tree Clearance, Root Strategy, and What Not to Do
The three ways a patio project kills a tree are soil compaction over the root zone, grade changes (adding or removing soil depth), and root severance. Texas A&M Forest Service specifically calls these out as the primary construction injury mechanisms. The bad news is that a normal DIY patio build can trigger all three at once if you're not intentional about it.
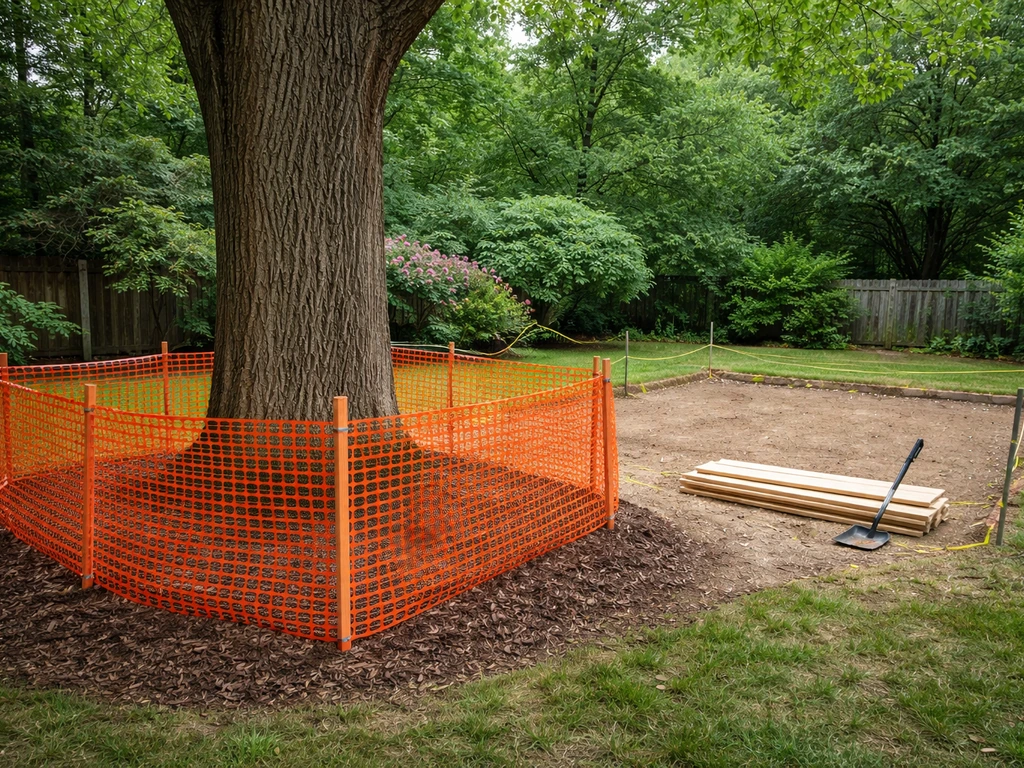
Soil compaction is the sneaky one. Every time you or a wheelbarrow rolls over the root zone during construction, you're compacting soil and reducing the oxygen and water movement that roots depend on. The fix is simple: fence off the tree protection zone before you start. A ring of construction fencing or even staked snow fence around the CRZ keeps foot traffic, equipment, and material stockpiles out of that area for the entire build. It takes 20 minutes and can save the tree's life.
Grade changes are just as dangerous. Adding even a few inches of soil over the root zone reduces the air and water that reach roots. Removing soil exposes roots and destabilizes the tree. The golden rule: try to maintain preconstruction grade within the protected root zone wherever possible.
Root severance is the most tempting mistake. You hit a big root, it's in the way of where you want your edge or form, and it seems easier to just cut it. Resist this. Severing large structural or anchor roots can destabilize a mature tree and open the door to disease. If a major root is blocking your layout, redesign around it rather than cutting through it. Minor feeder roots can sometimes be cleanly cut with a sharp saw as a last resort, but anything thicker than an inch or two should be treated as a hard boundary for your design.
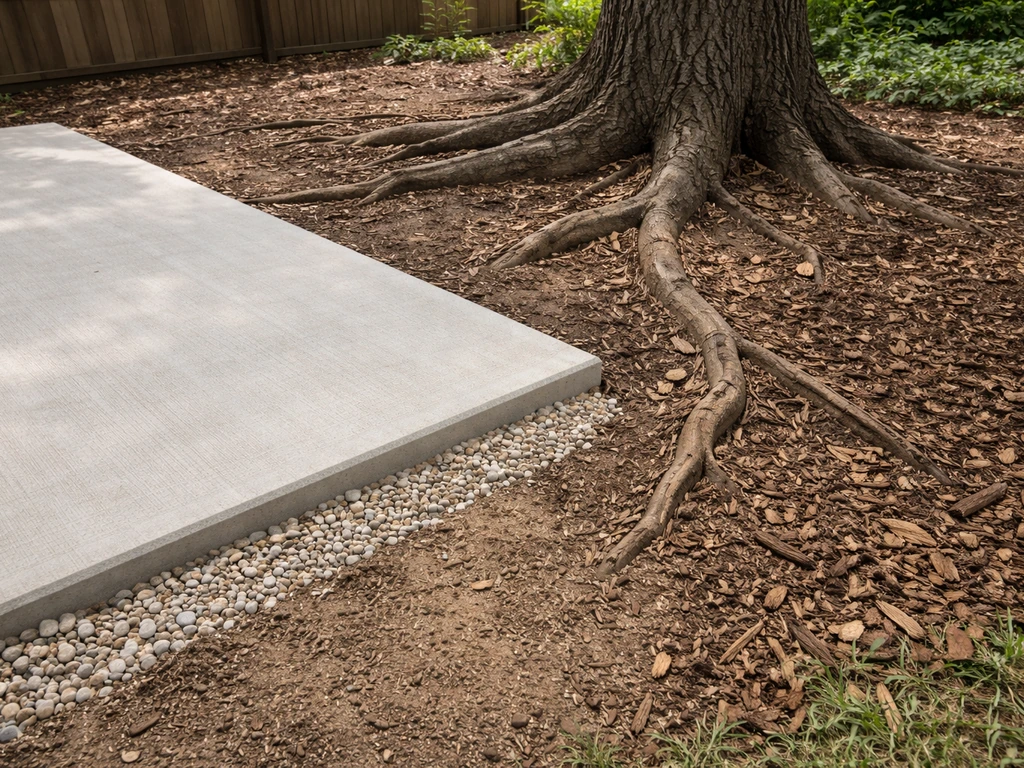
One more thing that seems harmless but isn't: piling mulch against the trunk flare. The root flare is the area where the trunk transitions to roots at grade level. It needs to breathe. Burying it with soil, mulch, or paver material causes bark deterioration and long-term tree decline. When you design your tree opening, make sure the flare stays completely exposed and above the finished patio grade.
Design Options: Ring, Partial Enclosure, and Drainage Layout
You have two practical layout options when building around a tree: a full ring (the patio completely surrounds the trunk with an open center) or a partial enclosure (the patio extends from one side, treating the tree as an edge feature rather than a centerpiece). Both can look great. The choice depends on your yard, how you use the space, and how much of the root zone you need to disturb.
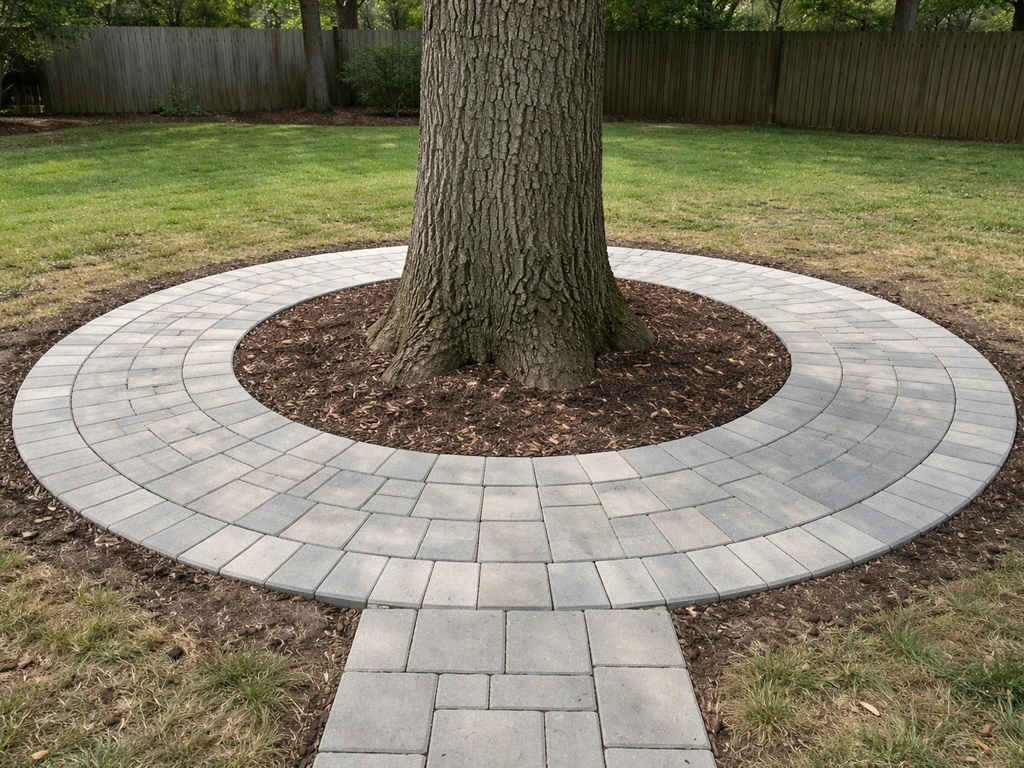
Full Ring Design
A full ring creates a defined outdoor room with the tree as the focal point. It looks intentional and works beautifully with a round or oval patio shape. The practical challenge is that you're working on all sides of the tree, which means more root zone exposure during construction. Leave the center open to at least the CRZ radius, and use a gentle mulched or gravel buffer zone between the trunk and the first row of pavers. Some builders plant low groundcover or creeping thyme in that buffer gap, which softens the transition and lets water permeate naturally.
Partial Enclosure Design
A partial enclosure keeps the patio on one side of the tree or wraps it loosely on two or three sides, leaving the rest of the root zone undisturbed. This is the lower-risk option if the tree is large, if the root zone is extensive, or if you want to minimize construction complexity. It can also feel more natural and less formal, which suits some backyards better than a symmetrical ring.
Drainage Planning
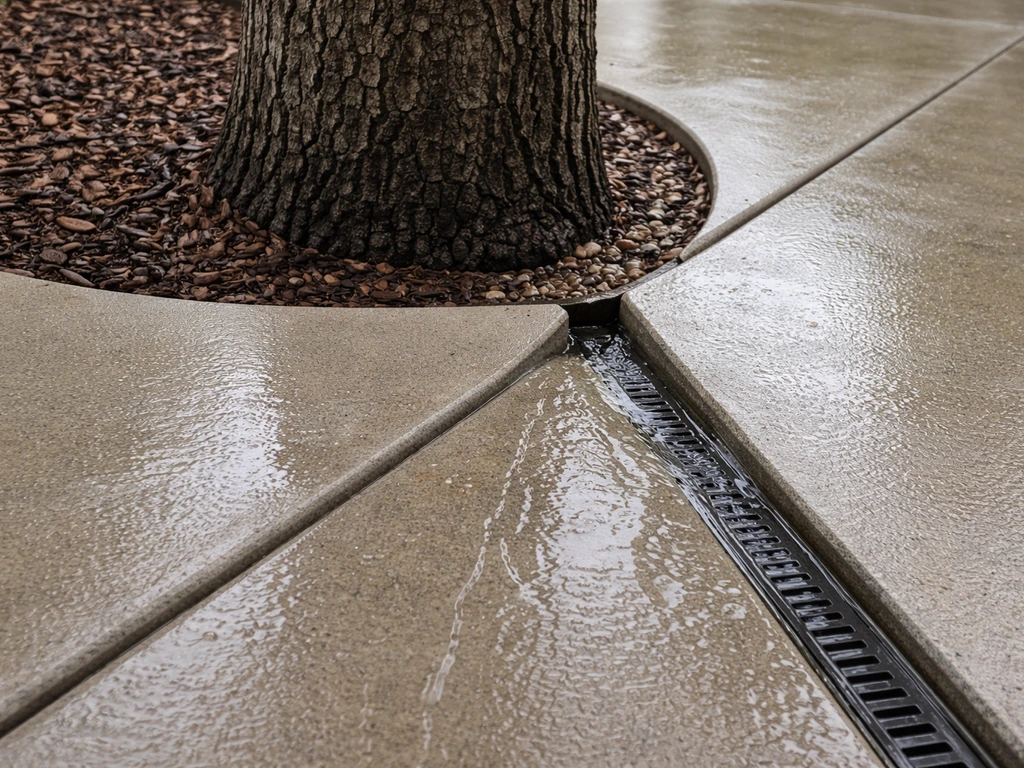
Drainage is where a lot of tree-adjacent patios go wrong. You don't want water channeling toward and pooling against the trunk, and you don't want the patio to become a basin that holds water over the root zone. Plan for a minimum slope of 1/8 inch per foot (about 1%) running away from the trunk and toward the patio perimeter. If you're using a permeable base and permeable joint fill, water will move down through the system rather than running off the surface, which is actually better for the tree. More on that in the materials section. Also think about where runoff ends up: direct it toward a lawn area, a garden bed, or a dry creek, not toward the house foundation.
Choosing Patio Materials That Work Near Trees
Not every patio material is equally tree-friendly. The core issue is permeability: materials and base systems that allow water and air to reach the root zone are safer for the tree and more forgiving when roots move over time. Here's how the main DIY options compare near a large tree.
| Material | Tree Friendliness | Root Heave Risk | DIY Difficulty | Relative Cost |
|---|---|---|---|---|
| Gravel / Decomposed Granite | Excellent (fully permeable) | Very low | Easy | Low |
| Brick or Concrete Pavers (open-graded base) | Good (permeable system) | Low to moderate | Moderate | Moderate |
| Flagstone (dry-laid, no mortar) | Good (gaps allow permeation) | Low | Moderate | Moderate to high |
| Poured Concrete (solid slab) | Poor (impermeable, rigid) | High (roots lift slabs) | Hard | Moderate |
| Wood or Composite Decking | Good (raised, no soil grade change) | Low (if built above roots) | Moderate to hard | Moderate to high |
Pavers on an open-graded aggregate base are the best all-around choice for most DIYers building near a large tree. An open-graded base uses washed angular stone (think #57 or #8 crushed stone) instead of compacted screenings, which keeps the whole system permeable and avoids suffocating roots. You top the open-graded base with a permeable geotextile fabric layer, then lay a thin bedding aggregate, and set your pavers. Joint gaps filled with #8 or #9 washed stone (instead of standard polymeric sand) keep the drainage function intact all the way through the surface.
Avoid poured concrete as your primary surface anywhere close to a large tree. It's impermeable, it traps roots, and when roots eventually grow under it (they will), the slab heaves and cracks. When you’re planting around a patio, prioritize permeable mulch, avoid piling material against the trunk, and keep the work mostly outside the protected root zone. If you're set on a concrete look, use individual concrete paver units on a permeable base rather than a poured slab. If concrete is unavoidable, isolate the slab sections with expansion joints around the tree opening so each section can move independently without forcing the whole slab to crack.
Dry-laid flagstone is an underrated option near trees. The natural gaps between stones allow water infiltration, the stones can be individually lifted and reset if a root shifts them, and the aesthetic suits a naturalistic tree-centered patio well. Skip mortar between joints entirely in the root zone area.
Wood or composite decking built as a raised structure works extremely well because you're essentially building above the root zone rather than into it. The posts go into the ground at defined points that you can plan around roots, and the deck surface leaves the soil below largely undisturbed. If you're considering this route, it overlaps with arbor and overhead structure planning that pairs naturally with a tree-centered outdoor space. If you want to go beyond the patio itself, use the same planning mindset for an arbor, ensuring airflow and enough clearance around the tree arbor and overhead structure planning.
Preparing the Site: Excavation, Base, and Managing the Tree Area
Site prep is where you either protect the tree or start harming it. Set up your tree protection zone fencing first, before any tools come out. Mark the CRZ with stakes and fence it off. This is not optional if you care about keeping the tree healthy.
Excavation Strategy
For the patio area outside the CRZ, excavate normally: remove sod and topsoil to a depth that accommodates your base layers plus paver thickness, typically 6 to 8 inches total for a paver system. For any area within the CRZ (which ideally should be minimal), use hand tools only: no plate compactors, no mechanized excavation. Work carefully, expose roots gently, and stop digging when you hit roots thicker than about half an inch.
If you expose roots during excavation and can't cover them right away, cover them temporarily with at least 6 inches of shredded hardwood mulch to protect them from drying out. This is a practice recommended in tree protection specs for active construction sites and it's worth following even on a DIY weekend project.
Base and Subbase Installation
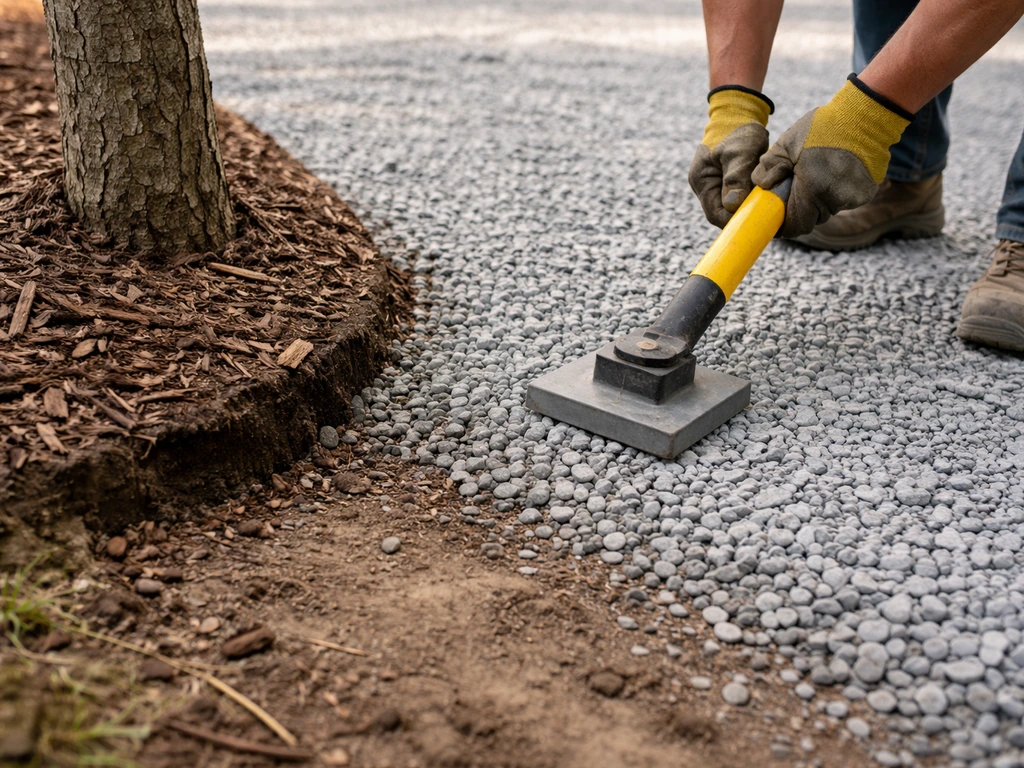
Outside the root zone, install a standard compacted gravel subbase (typically 4 inches of compacted Class II base or compacted crushed stone). Inside the root zone and transitioning toward the tree, switch to an open-graded aggregate system: lay your geotextile fabric first to separate soil from aggregate, then add 4 inches of open-graded crushed stone without compacting it. For guidance on permeable hardscape systems, Permeable Interlocking Concrete Paver systems Technical Guide 3-B recommends an open-graded aggregate base and geotextile layers to help manage water movement under pavers open-graded aggregate base and geotextile layers to manage water movement under pavers. This maintains the air and water permeability the roots need. The geotextile must be a high-permeability fabric rated for this use, not a standard landscape weed barrier.
Do not use a plate compactor over the open-graded zone near the tree. The open-graded aggregate self-consolidates under the weight of the pavers. Compacting it defeats the purpose and can still transfer damaging force to roots below. Outside the root zone you can compact normally.
Handling Exposed Roots at Grade
If you encounter surface roots at the edge of your patio area, work with them rather than against them. You have three good options: route your patio edge around the root, build a slight ramp or transition using additional base material to bridge over the root (keeping load off it), or treat the root zone as part of your open gap around the trunk. What you should not do is add soil over exposed roots to level the surface, especially fine-textured fill soil, which impedes water and air movement significantly.
Step-by-Step Construction Around the Trunk
With the site prepped, the base down, and the tree still fenced off, you're ready to build. Here's how to work through the actual construction phase from edging to laying units.
- Install perimeter edging first. For standard paver installations, use plastic or aluminum paver restraint edging along the outer patio boundary, staked every 12 inches. This holds the field pavers tight and prevents migration over time.
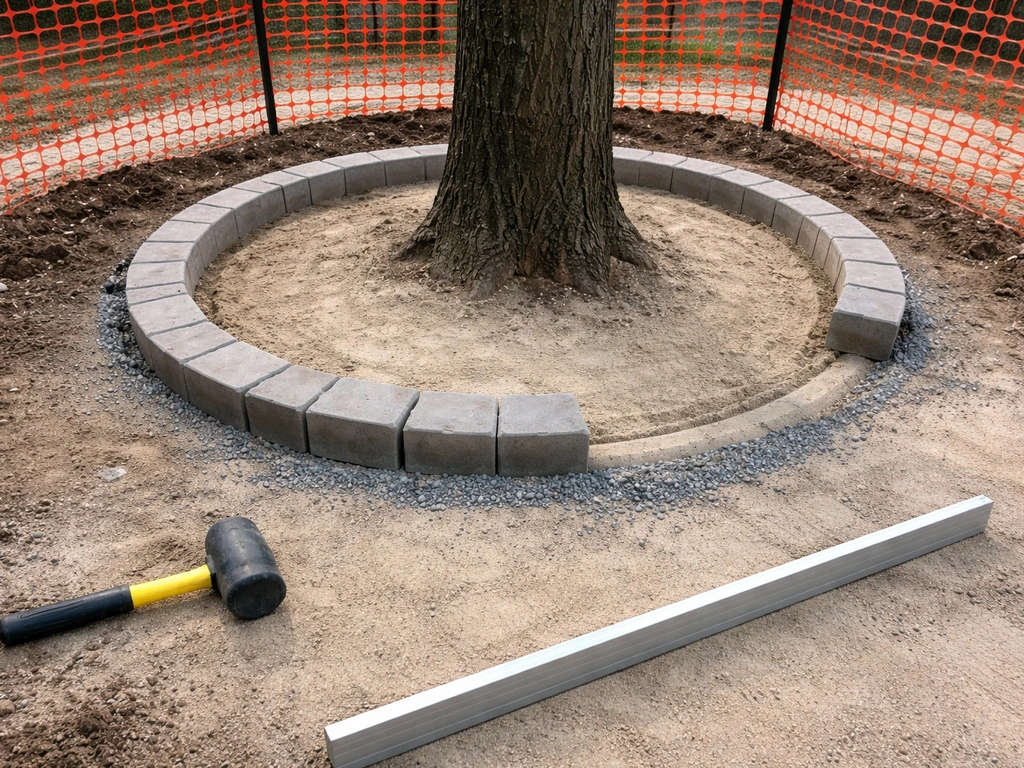
- Define the tree opening edge. This is the inner edge of your patio ring, framing the gap around the trunk. Use a flexible aluminum edging for this curved section rather than rigid forms: it bends smoothly into a circle or oval and conforms around any surface roots at the opening edge. Leave a minimum 3 to 4 feet of clear space from trunk to inner edge, more for large trees.
- Check that the root flare is fully above finished grade. Before you lay a single paver, confirm the flare is exposed. The visible flare-to-root transition should sit at or above your finished paver surface. If it's not visible, you may need to gently remove soil from that area with a hand trowel to expose it.
- Spread and screed your bedding layer. For an open-graded system, use a 1-inch layer of #8 or #9 washed stone as your bedding course. Set screed pipes or rails at your target grade, accounting for a 1/8-inch-per-foot slope away from the trunk, and drag a straight board across them to create a level screed surface.
- Lay pavers from the outside in toward the tree opening. Work row by row, using a rubber mallet to seat each unit and a level or string line to keep your surface flat. Leave consistent joint gaps of about 3/16 inch between units.
- Cut pavers to fit the curved inner edge. Use a diamond blade wet saw or angle grinder with a diamond blade to cut units that fit the curve around the tree opening. Measure each cut individually as the curve may shift slightly around the ring.
- Install the inner edging restraint. Once the field pavers are laid and cut, install your flexible inner edging against the last row of pavers and stake it securely. This locks the inner edge in place.
- Fill joints with washed aggregate or polymeric sand. For a fully permeable system, sweep #8 or #9 washed stone into the joints. For an area outside the root zone where you prefer polymeric sand for weed suppression, that's fine too. Compact gently with a plate compactor (with a rubber pad protector) over the field area only, staying well clear of the root zone.
- Finish the tree opening gap. Fill the open ring between your inner edging and the trunk flare with 2 to 3 inches of coarse mulch, pea gravel, or a planted groundcover. This buffers the transition, protects the flare, and allows water to permeate freely.
Finishing, Sealing, and Long-Term Tree-Friendly Maintenance
Once the build is done, do a final surface check with a long straightedge or level. Minor lippage between individual pavers (more than 1/8 inch height difference) is a trip hazard and should be corrected now by lifting the unit, adjusting bedding material, and re-setting. Check your slope with a level and tape measure: water should sheet away from the trunk, not toward it.
Sealing
If you used polymeric sand in joints, check the manufacturer's cure time (typically 24 to 48 hours after final compaction and moisture activation) before sealing. Apply a penetrating paver sealer to the field area if you want to protect color and reduce weeds. Avoid sealing over the open-graded zone near the tree if it would reduce permeability. Sealers are optional on permeable systems and may actually reduce drainage performance if applied incorrectly.
Maintenance Schedule
The ongoing maintenance needs here are modest but consistent. The tree opening requires the most attention over time because this is where things can creep out of control if you ignore it.
- Every spring: check that the root flare is still exposed and the trunk gap hasn't filled with debris, mulch, or soil migration. Clear it out if needed.
- Every spring and fall: inspect pavers near the tree opening for any lifting or height changes. A paver that has risen even a quarter inch is worth investigating. Lift it, check what's below, and either regrade the bedding or adjust the tree gap boundary if a root has pushed up.
- Every 1 to 2 years: sweep fresh joint material into gaps that have lost fill. For open-graded joints, top up with fresh washed stone. For polymeric sand sections, spot-repair as needed.
- Every 3 to 5 years: consider a full re-jointing with fresh polymeric sand on sections outside the root zone to maintain weed suppression and paver stability.
- After heavy rain or storm events: check that drainage channels are clear and that no pooling has developed near the trunk. Adjust grading around the tree gap if needed.
- Annually: look up. As the tree grows, the canopy may eventually shade the patio heavily, which can encourage moss on pavers. A light scrub with a stiff brush and low-pressure rinse handles this. Avoid power washing at high pressure directly over joint material as it blasts out the fill.
When the Tree Keeps Growing
This is the long game of building near a tree. Roots grow, and over 5 to 10 years a well-established large tree will push into whatever space it can find. The permeable, open-graded base system you built gives roots somewhere to go without immediately heaving your surface. But eventually you may need to reset a section of pavers near the tree opening, or expand the gap slightly to accommodate growth. Homeowners in the landscaping subreddit report pavers being pushed up or changed in height when nearby tree roots expand, and many advise adjusting layouts or leaving gaps around critical root areas reset a section of pavers near the tree opening. That's not a failure of your build, it's just the nature of working with living things. The advantage of a dry-laid paver or flagstone system over poured concrete is exactly this: individual units can be lifted, adjusted, and reset without tearing out the whole patio. Plan for it from day one and it's a 20-minute job when it happens rather than a major repair.
If you find yourself dealing with roots that have grown up to the surface at the patio boundary, resist the urge to pile soil or mulch over them to hide them. That's a common instinct but it causes more problems than it solves. Instead, consider adjusting the planted buffer zone in the tree gap, or treating surfacing roots as a natural design element with low groundcover plants. Managing the planting around the patio perimeter ties into broader landscaping decisions that affect both the tree's long-term health and how the whole outdoor space feels over time. If you are planning the rest of your outdoor space, use the same root-friendly thinking for landscaping around the patio so the tree and hardscape both thrive how to landscape around patio.
FAQ
How close can I place patio pavers to the tree if I still want a finished, tight look?
Use the protected root zone as the decision boundary, not the “looks nice” boundary. If you need a tighter edge, keep the first paver row outside the CRZ and use a deliberately wider mulched or gravel buffer where the gap is visually defined. That buffer can be dressed with low groundcover, but it should not be filled with compacted soil or leveled fill.
What should I do if my tree is already stressed (roots exposed, canopy thinning, previous construction damage)?
Pause the project and address tree health first, because the patio build can worsen existing root issues. Give the tree a season to recover, or consult an arborist before excavating near the CRZ, especially if there are signs of dieback, significant fungi, or soil heaving already visible around the trunk.
Can I use a raised walkway or small border instead of fully permeable pavers near the trunk?
Yes, but only if the raised section is still designed to avoid trapping water and soil. Keep any base under the walkway permeable in the root zone, and avoid concrete curbs or mortar that effectively seal off drainage around the tree opening. A modular, dry-laid approach (like dry-set flagstone) is safer than grout or solid edging in the CRZ.
Should I remove existing roots or big surface roots to make excavation easier?
Do not remove structural or anchor roots to “make room.” If you hit a thicker root during digging, treat it as a hard constraint and redesign the footprint or edge alignment. For thinner feeder roots, clean cuts with sharp tools can sometimes be tolerated, but it is still better to adjust layout and minimize the number of cuts.
How do I handle uneven ground or a slope on my property while still protecting the tree?
Plan the slope so water flows away from the trunk, but do the grade work outside the CRZ. Inside the protected zone, avoid cut-and-fill balancing that changes soil depth. If you have to create height differences, do it with base buildup on the patio side while keeping the root-zone elevation consistent with preconstruction grade.
Is it ever okay to pour a small concrete pad or a couple of steps around the tree?
Small concrete sections can work only if they are isolated from the trunk opening and the root zone stays permeable underneath. Prefer individual paver units or isolated, jointed concrete pieces with expansion gaps rather than a monolithic pour. If any part of the pad’s base sits over the CRZ, it should not be a solid, impermeable sub-base.
What is the best way to protect the tree during construction if I need to bring equipment close by?
Fence the CRZ and also control where deliveries land. Place a temporary staging area well outside the fenced zone, and do not stockpile soil, mulch, or aggregate near the tree. If you must cross near the CRZ, use planned, temporary load paths (like thick boards over geotextile) and keep crossings minimal.
Do I need a weed barrier under the patio near the tree?
Avoid typical “landscape weed barrier” fabric in the root zone. If you use fabric, use a high-permeability geotextile intended to separate soil from open-graded aggregate, not a dense membrane that reduces water movement. Where roots need to breathe, the fabric choice matters as much as the base system.
My pavers settle slightly over time near the tree, is that a sign I built it wrong?
Minor movement is common over years as the tree grows and soil densities equilibrate. What matters is that you avoid burying the root flare and you can lift and reset individual units. If settlement creates pooling or directs water toward the trunk, correct it promptly by adjusting bedding and slope, not by topping up with soil over roots.
When I do maintenance later, what’s the safest way to reset a sinking section near the tree?
Lift and reset only the affected units, then restore the original permeable layering. Do not add fine fill soil over the root zone, and do not compact open-graded aggregate. Rebuild the gap and buffer area so drainage performance stays the same.
How can I keep water from pooling against the trunk when the patio is installed around it?
Use a minimum slope away from the trunk and verify it with a level during final finishing. Then confirm the joint infill stays permeable, and keep sealers limited because sealing can reduce infiltration at the surface. If you notice persistent dampness in the tree opening after rain, adjust drainage direction or increase the boundary gap rather than adding soil.
Next Article
How to Build a Patio Over Tree Roots Safely
DIY steps to build a patio over tree roots safely, with root checks, design options, drainage planning, and long-term ma