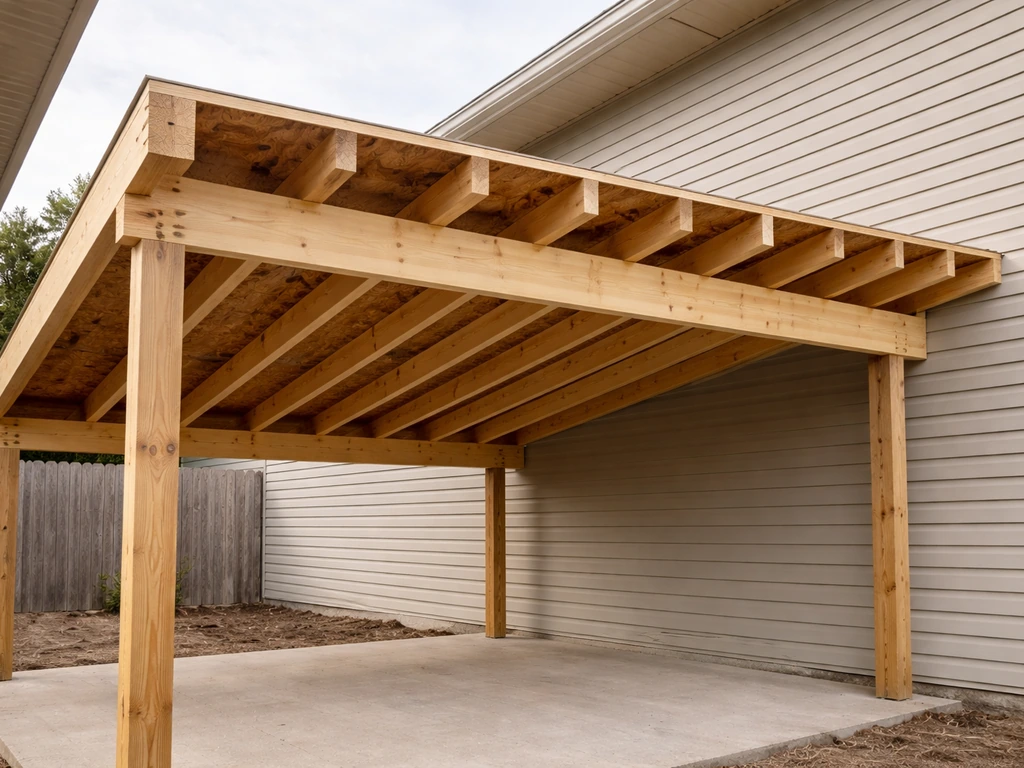
You build a slanted patio roof by framing a simple shed-style structure: a ledger bolted to your house wall, posts set on concrete footings, a beam across the outer posts, and rafters running downhill from the ledger to that beam. Slope them at least 2 inches for every 12 inches of horizontal run (2:12), sheathe the top, add underlayment and roofing, then flash and seal every joint where the roof meets the house. That's the whole arc. Everything below is just the detail that keeps it standing, dry, and code-legal.
How to Build a Slanted Patio Roof DIY Step by Step

Nolan Lennox
18 Jun 2026
Choose your roof type and the right pitch for runoff
A shed-style (monopitch) roof is the go-to for most DIY patio covers. It attaches to the house on the high side and slopes outward to a beam supported by posts. It's simple to frame, easy to waterproof, and sheds rain away from the house wall. The alternative is a freestanding gable, which is more complex to build and only makes sense if you want the patio roof completely detached.
Pitch is the single biggest decision you make before you cut anything. It controls which roofing material you can use, how fast water drains, and how much snow load the roof can carry in your climate. Here's what that looks like in practice:
| Roofing Material | Minimum Pitch | Notes |
|---|---|---|
| Asphalt shingles | 2:12 | Below 2:12 manufacturers won't guarantee against leaks; low-slope methods required |
| Metal roofing (standing seam / interlocking) | 3:12 | Some interlocking metal systems specify 3:12 as their minimum |
| Polycarbonate panels | >5% (~0.6:12) | Steeper is better; below 5% slope requires extra sealing attention |
| EPDM or TPO membrane | 1/8 in. per foot | True low-slope systems; good option if you're stuck with a very shallow pitch |
| Corrugated metal | 2:12 | Works well on patio covers; easy DIY install |
For most patio covers I'd target 3:12 as a comfortable working pitch. It drains fast, it's compatible with almost any roofing material, and it doesn't look weird on a single-story addition. If the geometry of your house forces you lower, go with a membrane or polycarbonate and be meticulous with sealing. For polycarbonate roof systems, minimum roof pitch requirements are based on the product and system details, and choosing too-low a pitch can mean you need extra sealing and careful water management to prevent leaks. Going steeper than 4:12 or 5:12 starts to make ladder work on the finished roof uncomfortable and adds height at the house wall, which can conflict with windows or soffit.
Permits, site planning, and safety basics
Almost every jurisdiction requires a building permit for a permanent attached patio roof. I know it's tempting to skip this step, but a roofed patio structure fastened to your house is treated as an addition by most building departments. If you sell the house, an unpermitted structure can kill the deal or require expensive removal. Pull the permit.
What the permit process actually involves: you'll submit a simple site plan showing the patio footprint, a framing plan (post locations, beam size, rafter spacing and span), and sometimes a footing detail. Most building departments have a standard residential deck/patio cover checklist you can download. The review is typically faster than people expect, often one to two weeks for a straightforward project.
Before you finalize anything, check these site-specific factors:
- Setback requirements: most municipalities require patio covers to sit a minimum distance from property lines, typically 3 to 5 feet
- Overhead utilities: call 811 before you dig any footings, and look up for power lines if you're working at height
- HOA restrictions: some associations restrict roof materials, colors, or structure height
- Attachment point: confirm your house rim joist or wall framing can support a ledger (a ledger bolted into stucco over foam insulation needs special consideration)
- Snow and wind loads: your permit reviewer will flag if your framing plan needs upsizing for local conditions
On safety: you will be working on a ladder and eventually walking on sheathing. Use a pump jack or scaffolding for anything over 8 feet rather than leaning a ladder repeatedly. Wear fall protection if your local code requires it for the roof slope you're working on. Never work on a wet roof surface. Have a second person on site any time you're lifting beams or setting posts.
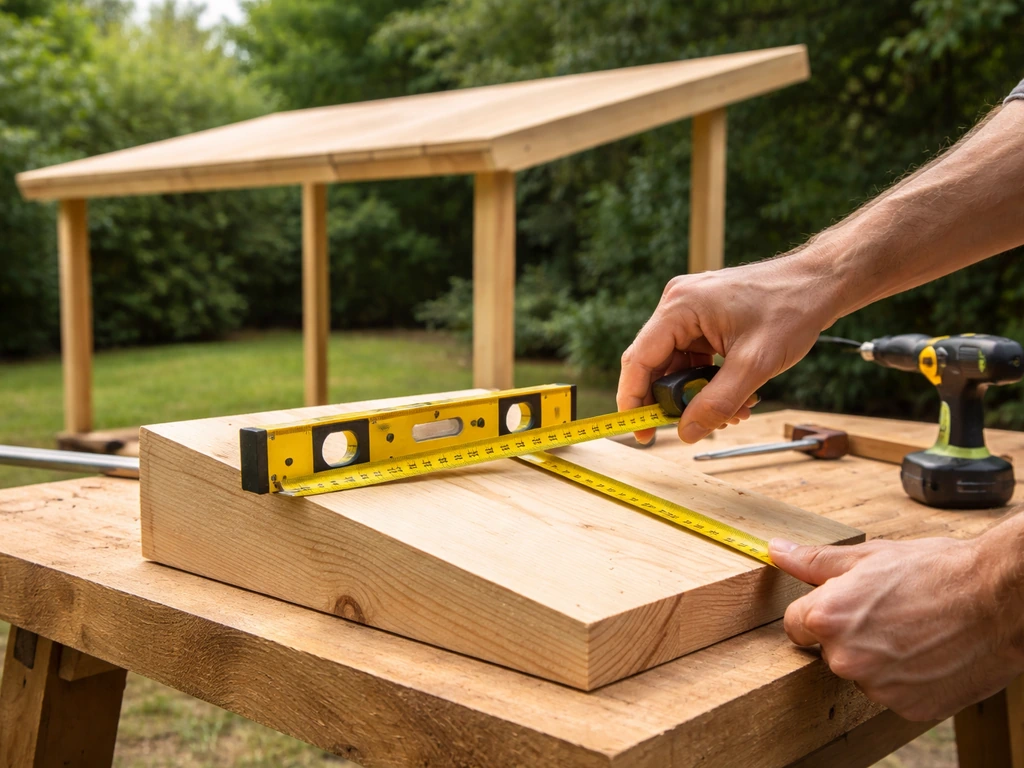
Layout and measurements: posts, ledger heights, and rafter runs
Get this phase right and the framing goes together smoothly. Rush through it and you'll be shimming, re-cutting, and fighting the whole build. Take your time here.
Establish your ledger height first
The ledger sits on the house wall and is the high point of your roof. Decide how tall you want the finished roof at the house wall, then subtract the rafter depth and any fascia height to find where the top of the ledger sits. A comfortable clearance under the roof at the house is 8 feet. The roof then drops toward the outer beam as you move away from the house.
For a 3:12 pitch over a 12-foot-deep patio, your roof drops 3 inches for every 12 inches of run, so: 12 feet of run x 3 inches = 36 inches total drop. If the ledger top is at 9 feet above the patio slab, the outer beam top sits at 9 feet minus 36 inches = 6 feet. That's still comfortable headroom at the outer edge.
Post spacing and beam sizing
Posts are typically spaced 8 to 10 feet apart along the outer beam. Wider spacing is possible but requires a larger beam to handle the span. A rough rule that works for most residential patio covers: a double 2x10 beam handles up to a 10-foot span between posts under standard residential loads. If you're in a heavy snow region or spanning wider, size up or check a span table. Your building department will often confirm this during plan review.
Rafter spacing is almost always 16 inches on center for a sheathed roof (where you're nailing plywood on top) or 24 inches on center if you're using exposed rafters with polycarbonate or corrugated metal panels that bridge directly between them. For anything structural, reference the span tables in your local residential code or the IRC (International Residential Code). A 2x6 rafter at 16 inches on center can typically span around 13 to 14 feet depending on species and grade.
Snap lines and setout
Mark post locations on the patio with chalk or stakes before you dig. Use batter boards and string lines to establish the outer edge of your beam, then drop a plumb bob to confirm footing centers. Check square by measuring diagonals: if both diagonals are equal, your layout is square. Do this before you pour a single footing. Moving a string line takes 30 seconds; moving a cured concrete footing takes a jackhammer.
Build the structure: footings, posts, beams, and bracing
Footings
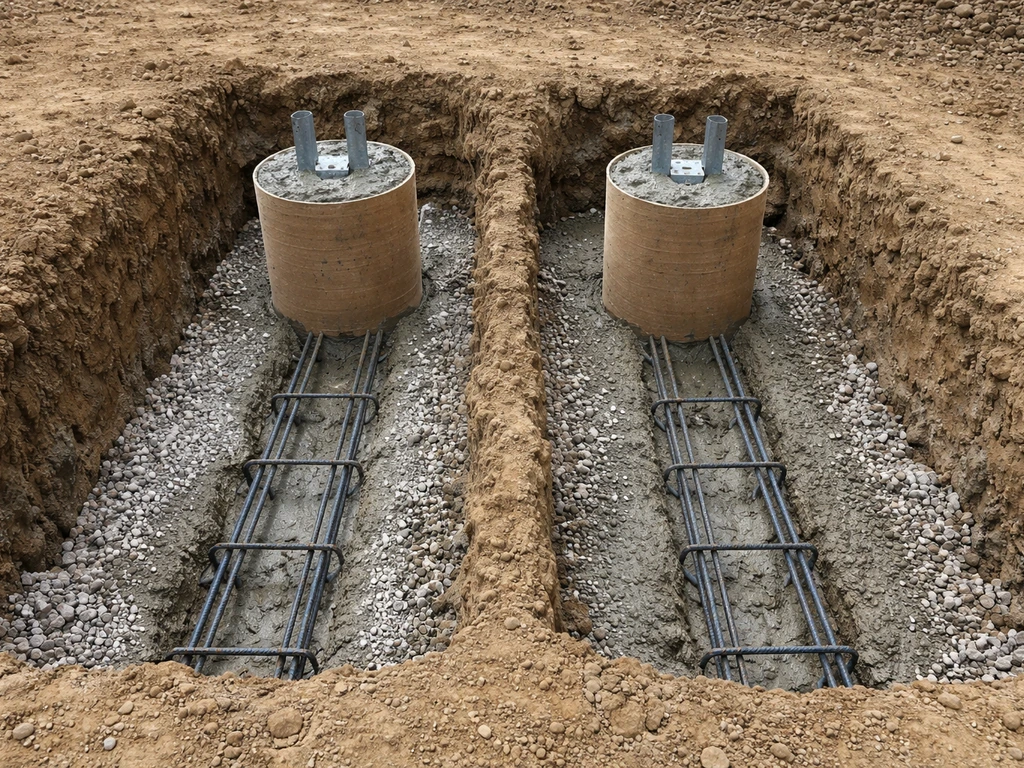
Each post needs a concrete footing that extends below the frost line in your area (check your local frost depth, which ranges from zero in southern states to 48 inches or more in northern climates). A typical approach: dig with a post-hole digger or rent a one-man auger, pour a tube form (like a Sonotube) to the right diameter (usually 10 to 12 inches for a patio cover post), and set a post base anchor in the wet concrete. Let the concrete cure for at least 48 hours before loading it. Don't skip the post base hardware and set posts directly in concrete. Direct burial rots posts; post bases keep wood off the concrete and extend post life dramatically.
Posts and beams
4x4 posts work fine for patio cover heights under about 8 feet. For anything taller or in high-wind areas, use 4x6 or 6x6 posts. Cut each post to the height you calculated earlier (beam top height minus post base height), plumb them with a level, and brace them temporarily with diagonal 2x4 braces staked to the ground before you install the beam.
The beam sits on top of or in post caps connected to each post. Beam-to-post connections using manufactured hardware (Simpson Strong-Tie or equivalent) are far stronger than toenailing and are what inspectors want to see. Sandwich a double beam around a post top with through-bolts if you're not using post caps, but post cap hardware is cleaner and easier.
Bracing
A patio roof attached to the house gets lateral bracing from the ledger connection. But the outer posts still need to resist racking (side-to-side movement). Install diagonal knee braces at 45 degrees from each post up to the beam. Minimum 2x4 for lighter structures; 4x4 for anything over about 10 feet tall. Alternatively, knee bracing can be replaced by a solid blocking panel between posts if you want a more finished look.
Frame the roof: rafters, sheathing, and ventilation
Installing the ledger
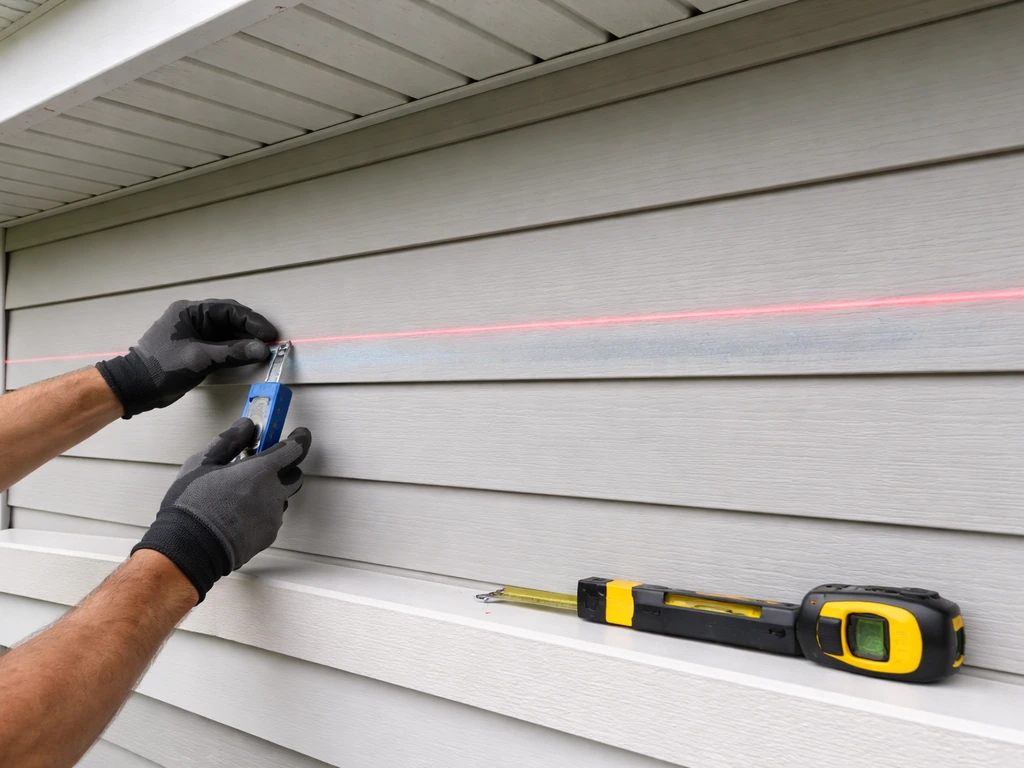
The ledger is typically a 2x8 or 2x10 pressure-treated board lagged into the house's rim joist or wall studs. Use 1/2-inch lag screws or structural bolts in a staggered pattern (two fasteners per stud bay, offset vertically so they don't split the framing). For a wood-framed house with siding, you'll need to cut back the siding where the ledger sits and install flashing before you bolt it in. More on that in the weatherproofing section. If your house has a stucco or EIFS exterior, get specific guidance from your building department because standard ledger attachment methods don't always work well.
Setting rafters
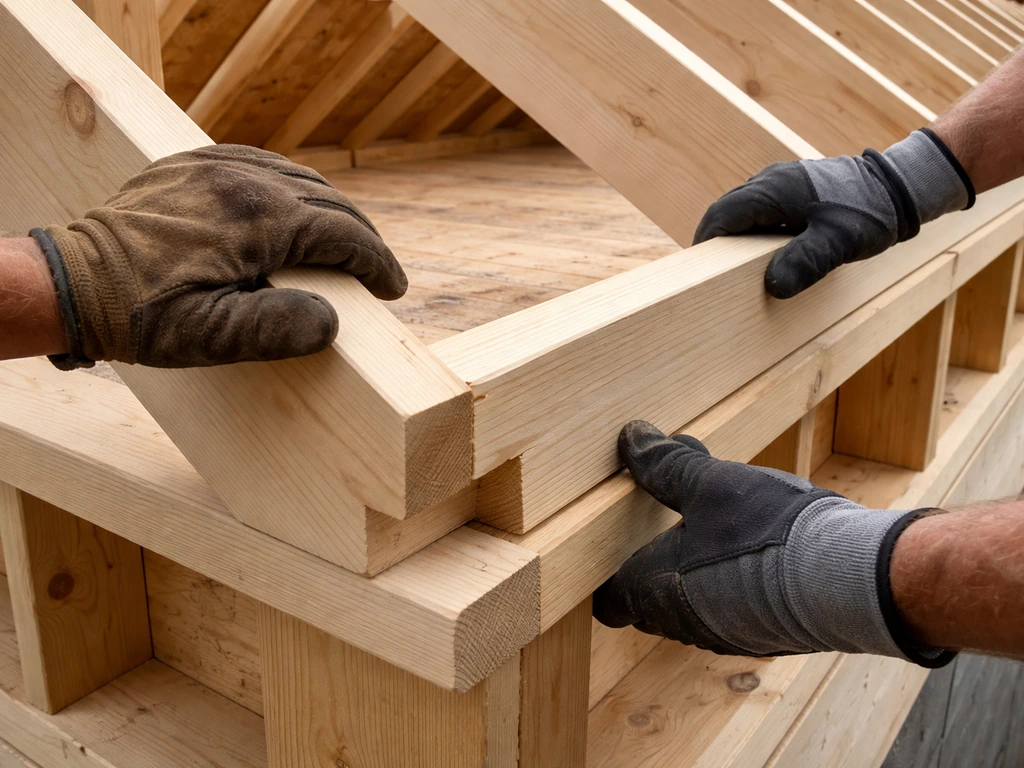
Rafters run from the ledger down to the top of the outer beam. Cut a bird's mouth (a notch that lets the rafter sit flat on the beam) at the outer end if you're using a conventional notched-rafter connection. The bird's mouth depth should be no more than one-third of the rafter depth. At the ledger end, hang the rafter with a joist hanger hardware connector. This is faster than toenailing and far stronger. Space rafters at your planned interval (16 or 24 inches on center), snap a chalk line across the ledger and beam to mark each position, and nail off all hangers before you put rafters in place to make the install smoother.
Sheathing
For a sheathed roof (asphalt shingles, metal, or EPDM), use 1/2-inch or 5/8-inch OSB or plywood. Run sheets perpendicular to rafters, stagger the seams, and leave a 1/8-inch gap between sheet edges for expansion. Nail at 6 inches on center along edges and 12 inches in the field with 8d ring-shank nails or structural screws. Add H-clips between rafters on the unsupported edges of each sheet if your rafter spacing is 24 inches.
Ventilation
A small patio cover attached to the house doesn't typically require the same ventilation as a full roof assembly, but it's still worth thinking about moisture. If you're enclosing the rafter bays with a ceiling underneath, add soffit vents at the low end and a ridge vent or open vent at the house wall to let air move through. If the rafters are exposed (open patio feel), ventilation is a non-issue.
Weatherproofing: underlayment, flashing, sealing, and drainage
This is where most DIY patio roofs eventually fail. The framing might be solid for decades, but a poor flashing job at the house wall or a missed lap in the underlayment will show up as a stain on your patio ceiling within a couple of years. Take your time on every step below. If you are planning a patio cover, learn the basics of how to slope a patio so water drains away from the house.
Drip edge and underlayment
Install metal drip edge along the eaves (low end) before the underlayment goes down, and along the rake edges (sides) after the underlayment. This sequence matters because it controls how water sheds. For underlayment, a self-adhering modified bitumen membrane (ice-and-water shield) is the most waterproof option and worth using on a patio roof given the relatively small area and low cost. If you use felt or synthetic underlayment instead, lap each course a minimum of 2 to 3 inches over the course below, and lap it 2 to 3 inches onto the drip edge at the eaves and rakes. Start at the low edge and work up.
Flashing at the house wall
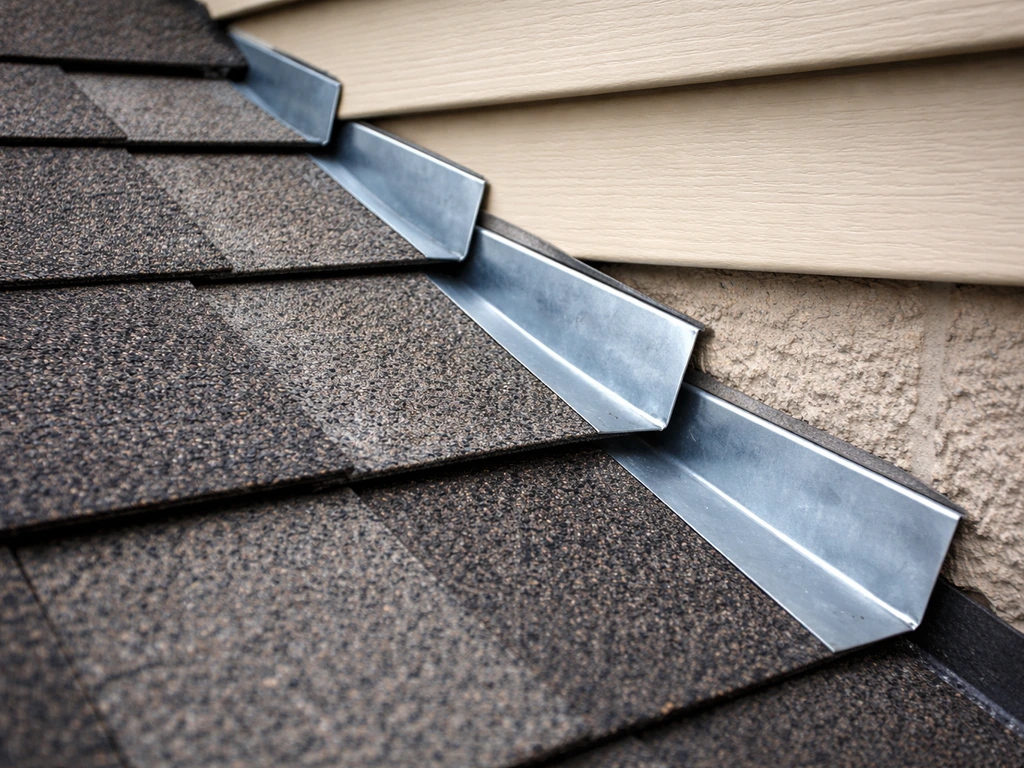
This is the most critical detail on the entire project. Where the roof meets the house wall, you need step flashing woven with the roofing material (for shingles) or continuous L-flashing (for metal or membrane roofs) plus a counter-flashing or kickout flashing to direct water away from the wall. The sequence for a shingle roof: install the first course of shingles, lay a piece of step flashing over the shingle with the vertical leg going up the wall, install the next shingle course overlapping the step flashing, and repeat up the slope. Then cover the vertical legs of step flashing with counter-flashing inserted into a mortar joint or cut into the siding. Seal all siding penetrations with a high-quality exterior caulk rated for your siding material.
Gutters and drainage
Install a gutter on the low edge (eave) of the patio roof to collect runoff and route it away from the patio slab and foundation. For a typical residential patio, a 4-inch or 5-inch K-style aluminum gutter is fine. Slope the gutter 1/4 inch per 10 feet toward the downspout. Connect the downspout to a buried drain line or at minimum point it at least 6 feet away from the foundation. If you're also dealing with how to slope the patio surface itself for drainage, that's a separate (but related) consideration covered in detail elsewhere on this site. If you are also working on the patio surface, follow the same drainage-slope principles so water moves away from the home instead of pooling how to slope the patio surface itself for drainage.
Materials, tools, cost-saving tips, and common DIY mistakes
What you'll need
| Category | Typical Specification | Budget Tip |
|---|---|---|
| Posts | 4x4 or 4x6 pressure-treated | 4x4 PT is often half the cost of 4x6 and fine for most patio cover heights |
| Beam | Double 2x10 or LVL | Double 2x lumber is cheaper than LVL and works for most spans under 12 ft |
| Rafters | 2x6 or 2x8 at 16" o.c. | 2x6 at 16" handles most spans up to 13 ft; no need to oversize |
| Sheathing | 1/2" OSB | OSB is significantly cheaper than plywood and performs identically for sheathing |
| Roofing | Asphalt shingles, corrugated metal, or polycarbonate | Corrugated metal panels are often the cheapest durable option for patio covers |
| Underlayment | Self-adhering ice-and-water or 30lb felt | Ice-and-water is worth the extra cost on a small roof area |
| Hardware | Post bases, joist hangers, beam caps, lag screws | Buy Simpson or USP brand; cheap hardware costs more in callbacks |
| Concrete | 80 lb bags for tube forms | Mix-your-own is cheaper than ready-mix for small footing quantities |
| Gutters | 5" aluminum K-style | DIY gutter installation saves $200-400 on a typical patio cover |
Tool list
- Circular saw and miter saw (miter saw makes rafter cuts much faster)
- Drill/driver and impact driver
- Post-hole digger or rented one-man power auger
- 4-foot level and torpedo level
- Chalk line and tape measure
- Speed square (for marking rafter angles)
- Hammer and nail gun (framing nailer is a huge time saver)
- Safety glasses, hearing protection, and work gloves
- Scaffolding or pump jack for safe overhead work
Cost range
A typical DIY attached patio roof covering a 12x16-foot area runs roughly $1,500 to $3,500 in materials depending on roofing choice, lumber prices in your area, and how much hardware you're starting from scratch on. Asphalt shingles over OSB sheathing is usually the low end. Metal roofing or polycarbonate over exposed rafters can be cheaper on labor (no sheathing) but the panels themselves can push costs up. Hiring a contractor for the same job typically runs $6,000 to $12,000+, so the DIY savings are real.
Common mistakes that come back to bite you
- Skipping the permit and finding out at resale that the structure has to be removed
- Setting posts in direct-bury without post base hardware (rot happens faster than you think)
- Bolting the ledger without proper flashing first, then wondering where the leak is two years later
- Using a pitch below the roofing material's minimum and expecting it to stay dry
- Not checking rafter spans against a span table and underbuilding for snow load
- Installing gutters level instead of sloped toward the downspout (standing water in gutters leads to overflow and eventual rot)
- Forgetting to install kickout flashing where the roof meets a vertical wall, which funnels water directly into the wall assembly
Step-by-step construction checklist
Use this as your sequenced build plan from day one through final inspection. Print it out and check off as you go.
Prep phase
- Confirm local frost depth, setback requirements, and permit requirements with your building department
- Draw a simple framing plan: footprint dimensions, post locations, beam size, rafter size and spacing, and roof pitch
- Submit permit application with site plan and framing plan; wait for approval before breaking ground
- Call 811 to mark underground utilities at footing locations
- Purchase and gather all materials and hardware before starting (mid-project lumber runs cost you hours)
Layout and footings
- Set batter boards and string lines; establish post centers and check square with diagonal measurements
- Dig footing holes to required depth and diameter
- Set tube forms, pour concrete, and embed post base hardware at exact locations; check post bases are level and square to string lines
- Let concrete cure 48 hours minimum before loading
Structure installation
- Cut posts to calculated height, set in post bases, plumb, and brace temporarily
- Install ledger on house wall: cut back siding, install ledger flashing, bolt ledger to rim joist or studs with staggered lag screws
- Lift beam onto post tops and secure with post cap hardware; check beam is level
- Install knee braces at 45 degrees from posts to beam
- Mark rafter layout on ledger and beam (16 or 24 inches on center)
- Install joist hanger hardware on ledger at all rafter marks
- Cut all rafters to length with correct plumb cut at ledger end and bird's mouth at beam end
- Install rafters into hangers at ledger, nail to beam at outer end; check each rafter is plumb
Roof and weatherproofing
- Install fascia board on outer rafter ends
- Install eave drip edge (nailed to sheathing, above fascia)
- Nail OSB or plywood sheathing perpendicular to rafters, staggered seams, 1/8-inch gaps
- Install rake drip edge on sides (over underlayment)
- Install underlayment starting at low edge, lapping 2 to 3 inches per course, lapping 2 to 3 inches onto drip edge
- Install step flashing and counter-flashing at house wall; install kickout flashing at the base of the wall/roof intersection
- Install roofing material (shingles, metal panels, or polycarbonate) per manufacturer instructions and your pitch minimum requirements
- Seal all penetrations and flashing joints with appropriate caulk or roofing sealant
- Install gutter on eave, sloped 1/4 inch per 10 feet to downspout; route downspout away from foundation
Final inspection
- Schedule framing inspection before sheathing if required by your jurisdiction (some require this mid-build)
- Schedule final inspection after roofing is complete
- Walk the inspector through your flashing details at the house wall; this is usually their primary concern on patio covers
- Test gutters with a garden hose: confirm water flows to downspout without overflow or standing water
- Check all hardware connections for missing nails or loose bolts and correct before the final inspection walk
- Remove all temporary bracing after structure is fully connected and inspected
Once you've got the permit in hand and materials stacked in the driveway, most DIYers with moderate tool experience can complete a standard 12x16-foot attached patio roof in two to three weekends. If you want the complete step-by-step, follow this guidance on how to build rooftop patio from layout and permits through weatherproofing. The permit and concrete cure time take longer than the actual build. Start your permit application now and use the wait time to finalize your material list and double-check your measurements.
FAQ
What pitch should I choose if I live somewhere with heavy snow or ice?
Beyond picking a steeper angle, you should also plan for roof-snow load and ice-damming risk by selecting roofing rated for your climate and using ice-and-water shield (at least at the eaves and along the wall interface). If your proposed pitch forces you below typical drainage comfort, you may need a more robust underlayment and wider flashing details at the house wall to prevent water from backing up under roofing.
Can I build a slanted patio roof with the lowest edge higher than the patio, like a “reverse” slope?
In most cases, no. A reverse slope (roof low side toward the house) traps water at the ledger and dramatically increases the chance of staining and leaks. If your design constraint forces a low-to-high direction, you typically need a different roof concept or additional water-management elements (often professional design), not just minor adjustments to framing.
Do I really need a gutter if the roof drains away from the house?
A gutter helps even when the roof sheds outward, because runoff often lands in the same spot every rain and can erode soil near footings. Use at least a 4 or 5 inch gutter, slope it 1/4 inch per 10 feet, and route the downspout to away-from-foundation drainage (burying it or discharging far enough so it does not re-wet the slab).
How do I decide between 16-inch and 24-inch rafter spacing?
Rafter spacing is not just structural, it affects the roof skin build. If you plan to use sheathing like OSB or plywood under shingles, 16-inch on center is usually easier. If you use panels that bridge between rafters (polycarbonate or corrugated metal), 24-inch spacing can work, but you must verify the panel span rating and fastening pattern so the panels do not oil-can or crack.
What roofing materials are most forgiving for DIYers on a slanted patio roof?
Asphalt shingles over sheathing are usually the most forgiving because the system is well understood and works cleanly with step flashing at the wall. Metal and polycarbonate can be fine, but they require strict attention to panel overlap directions, fastener type and location, and the exact flashing system that matches the material and wall cladding.
How can I tell if my ledger connection is installed into real structural framing instead of just siding or sheathing?
Before lagging or bolting, locate rim joists and studs or other structural members with a stud finder plus verification (drill pilot holes and confirm). If you cannot reliably hit studs or rim framing, you will need a fastening plan that adds framing or uses approved hardware, because fasteners into sheathing alone can loosen and fail over time.
Is it okay to set posts directly in concrete if I’m using treated lumber?
No, direct embed is still a common failure path. Concrete holds moisture against the wood, accelerating rot at the bottom. Use post base anchors set in wet concrete and keep wood up on the hardware, then cut any bottom edges clean and dry, which extends post life significantly.
What’s the common mistake that causes patio roof leaks even when framing is solid?
Most DIY leaks come from the wall intersection details. Even a correctly pitched roof can leak if step flashing is not interwoven properly with the shingle courses, or if kickout flashing and counterflashing are missing or mis-sequenced. Also check for underlayment laps that do not drain in the direction of water flow.
How much headroom is “good enough” under a slanted patio roof?
A practical target is about 8 feet under the roof at the house side, but you should also check the low edge so you are not constantly ducking. Account for rafter thickness, any fascia/trim depth, and your ceiling finish plan (if you plan one), because those reduce clearance more than people expect.
Can I omit knee braces if the roof is small?
You generally should not omit them. While the ledger helps with lateral restraint, the outer posts still must resist racking. For small structures, diagonal knee braces at about 45 degrees are the easiest code-friendly method, and solid blocking between posts is an alternate option when it is sized and installed correctly.
What should I do if I can’t meet frost depth for the footings?
If you cannot dig to frost depth, do not guess. Your local building department may require deeper footings, different footing design, or alternatives like frost-protected shallow foundations. The correct approach is to follow the permit plan or inspector guidance so the post base stays stable through freeze-thaw cycles.
How should I handle water where the downspout discharges?
Route discharge at least several feet away from the foundation and keep it from spraying back toward the patio slab. If you bury a drain line, plan the outlet location so it does not saturate soil near footings. Also verify that your discharge path does not create a new pooling spot under the roof edge.
Next Article
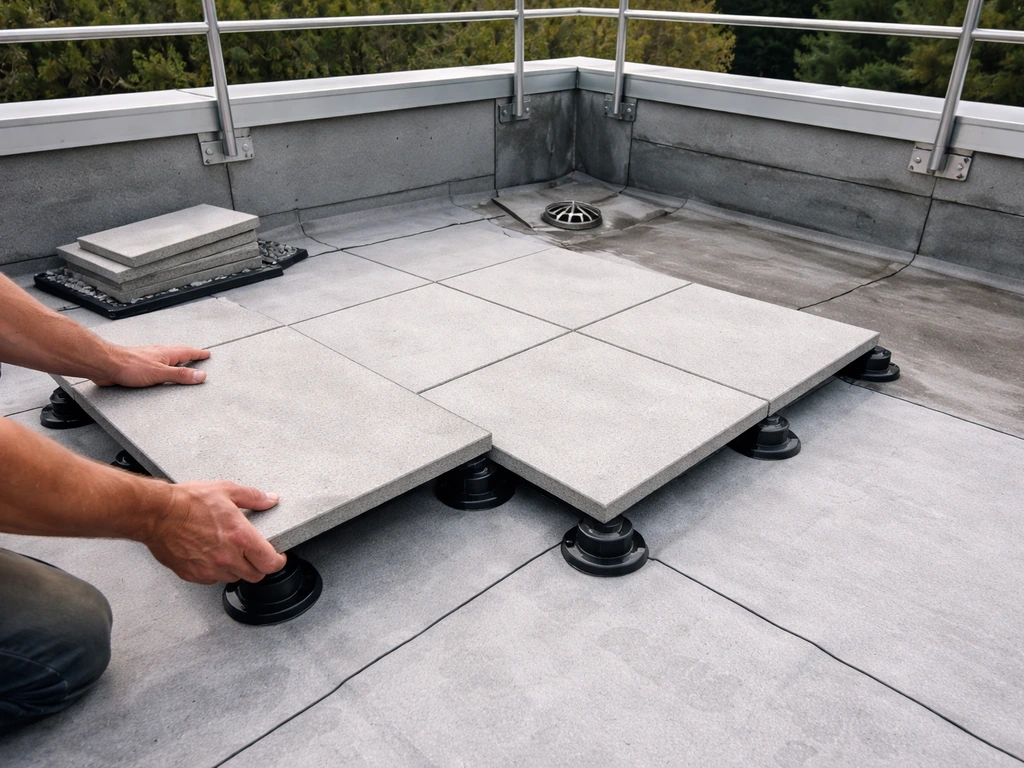
How to Build a Rooftop Patio: Step-by-Step DIY Guide
Step-by-step how to build rooftop patio: planning, permits, roof checks, waterproofing drainage, materials, base, pavers