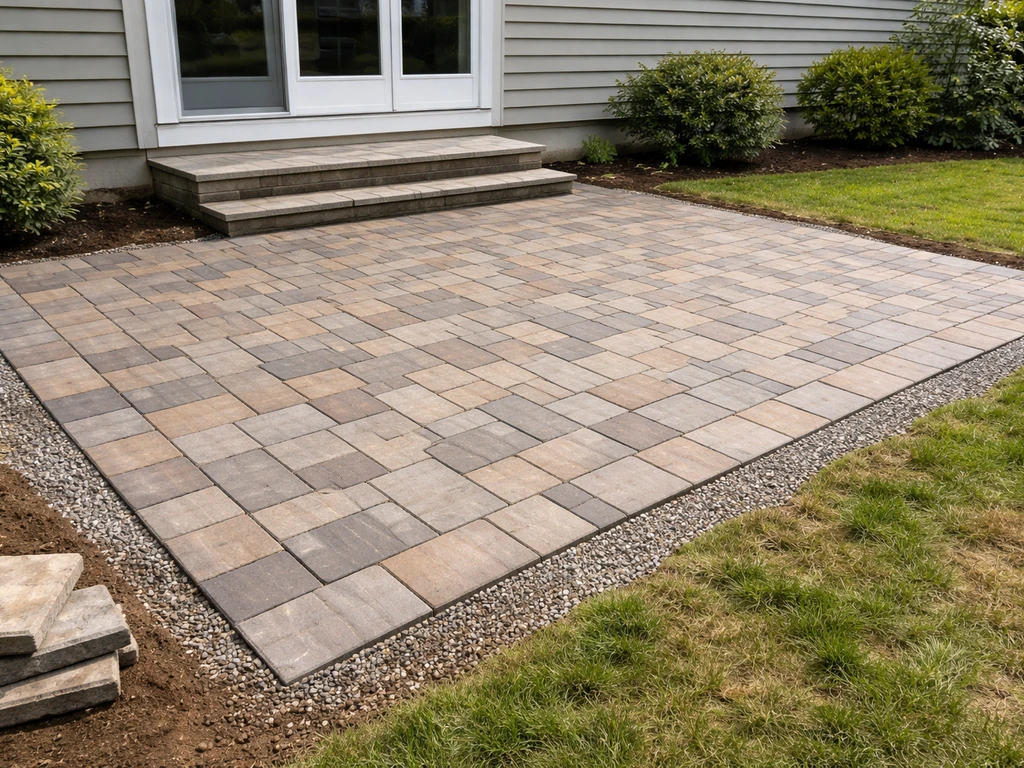
Yes, you can build a deck over an existing patio, and it's one of the more satisfying upgrades you can do on a weekend or two. The basic process is: confirm the patio is structurally sound, plan your framing layout and check local codes, prep the surface, build a pressure-treated frame on top, and fasten your decking boards down. This deck-over-patio approach is the same overall process as learning how to build decking on top of patio, including framing, drainage, and fastening. In most cases, the key is making sure the existing patio is structurally sound before you build a new deck on top can you build a deck over an existing patio. The result looks like a fully built deck and costs less than starting from scratch because the concrete slab is already doing a lot of the structural heavy lifting.
How to Deck Over a Patio Step by Step DIY Guide

Determine If Your Patio Can Be Decked Over

Before you buy a single board, walk the patio and be honest with yourself about what you're working with. A concrete patio that's cracked through, heaving in sections, or actively sinking is not a great candidate for decking over. You'll be hiding a problem that will eventually cause your new deck to go uneven or worse. A few hairline cracks are fine. Major structural failure is not.
Here's what to actually check. First, look at the slab thickness and condition. Most residential concrete patios are poured at 3.5 to 4 inches thick, which is generally adequate to support a sleeper or joist system sitting on top. Second, check for drainage. Does water pool on the patio after rain? If so, you need to address that before you frame over it, because trapped moisture under a deck is how you get rot and mold problems fast. Third, check the height situation. Once you add a sleeper system and decking boards, you're typically adding 3 to 5 inches of total height. That matters a lot if you have a sliding door or entry threshold nearby.
One thing worth knowing from a code standpoint: the IRC (International Residential Code, Section R507.3) is clear that deck structures need compliant structural support down to the ground. A patio slab alone doesn't automatically satisfy footing requirements for a ledger-attached deck. If your project is a simple ground-level platform sitting on the concrete with no ledger attachment to the house, you have more flexibility. If you're building something larger or attaching to the house, loop in your local building department early.
- Slab is mostly intact with no major heaving or active settling
- No large sections of spalling or crumbling concrete underneath
- Water drains off the patio rather than pooling in the center
- The finished deck height won't block door thresholds or create a tripping hazard at entries
- The patio size and shape works for the deck layout you have in mind
Planning: Layout, Height, Drainage, and Permits
Spend real time on planning before anything else. Sketch out your deck dimensions relative to the patio footprint. You don't have to deck over the entire patio. Sometimes leaving a strip of concrete exposed around the edge is actually a smart move for drainage. Decide now whether your deck will be freestanding (sitting on the patio only) or ledger-attached to the house, because that decision drives almost everything else including permit requirements and structural considerations.
Joist direction matters more than people think. Run your joists so that the decking boards run in the most visually appealing direction, usually parallel to or away from the house. Also think about where water needs to flow. You want a slight slope built into your frame (1/8 inch per foot is common) so water sheds away from the house rather than toward it. On a concrete patio that already has a slope, you can use that to your advantage by shimming your sleepers to follow it.
On permits: most municipalities require a building permit for any deck that's attached to the house, elevated above a certain height, or over a certain square footage. Ground-level freestanding platforms sometimes fall under a simpler process or don't require a permit at all, but don't assume that. Call your local building department or check their website. A permit protects you at resale and ensures your deck meets code for guard rail height (IRC requires guards to be at least 36 inches tall on decks where the walking surface is 30 inches or more above grade), stair rise and run dimensions, and fastener specs.
Assess and Prep the Patio Surface

You need a clean, stable surface before framing begins. Start by pressure washing the entire patio. You're looking to remove algae, mold, loose surface material, and anything that might compress or shift under your framing. Let it dry completely, ideally for a day or two.
Once it's dry, get down and look closely at the slab surface. Any sections that are spalling (flaking off in chunks), crumbling, or that sound hollow when you tap them need attention. Hollow spots can indicate a void underneath, which is a settling problem. Small surface spalls can be patched with hydraulic cement or concrete patching compound and leveled flush. If a large section is dramatically uneven, you may need to grind it down or use a self-leveling concrete compound to bring it close to level before you frame.
Mark any low spots and high spots on the slab with chalk. You'll use this info when you shim your sleepers or set your frame. A 4-foot or 6-foot level is your best friend here. Also pull out any loose expansion joint material and check whether there's a gap at the house foundation. That gap needs to stay clear for drainage rather than becoming a water trap under your new frame.
Choose Your Materials and Fasteners
This decision shapes your budget, maintenance schedule, and how long the deck lasts. For framing (joists and beams), pressure-treated lumber is the standard choice regardless of what you use for the deck boards on top. Use ground-contact rated treated lumber (rated UC4A or UC4B) for any framing member that will be in contact with or close to concrete, since moisture migrates up through slab surfaces even when you can't see it.
For the decking boards themselves, you're choosing between wood and composite. Here's the honest comparison:
| Feature | Pressure-Treated Wood | Composite Decking |
|---|---|---|
| Upfront cost | Lower (roughly $2–$4/linear ft) | Higher (roughly $4–$10/linear ft) |
| Maintenance | Needs staining/sealing every 1–3 years | Occasional cleaning only |
| Lifespan | 15–25 years with upkeep | 25–30+ years |
| Moisture resistance | Good with treatment, vulnerable if neglected | Excellent |
| Feel underfoot | Natural, warm | Can get hot in direct sun |
| DIY friendliness | Easy to cut and fasten | Requires specific fastener systems |
| Best for | Budget builds, shaded patios | Low-maintenance builds, high-use areas |
My recommendation for most DIYers: if you want the project done cheap and you're okay with sealing it every couple of years, go with pressure-treated wood decking. If you want to build it once and forget about it, composite is worth the extra upfront cost. Just make sure your composite brand's minimum joist spacing matches what you're building, because some composite products require 12-inch on-center joist spacing rather than the standard 16-inch.
On fasteners: this is not the place to cheap out. Any fastener going into pressure-treated lumber needs to be corrosion-resistant. The IBC and IRC are explicit about this. Your options are hot-dipped zinc-coated galvanized steel, stainless steel, silicon bronze, or copper. Standard zinc-plated or electroplated screws will corrode quickly, especially with ACQ-treated lumber which is highly corrosive to carbon steel. For structural connectors like joist hangers, Simpson Strong-Tie ZMAX or stainless connectors are the go-to. Match your fasteners to your connectors. If you're using stainless connectors, use stainless nails or screws. Mixing metals causes accelerated corrosion at contact points.
Build the Frame: Supports, Joists, Leveling, and Bracing
For a deck-over-patio build, you have two main framing approaches depending on your situation: a sleeper system or a full raised frame with posts. A sleeper system uses flat 2x4 or 2x6 boards laid directly on the concrete and anchored down, with decking boards running perpendicular on top. This works great when your patio is already fairly level and close to the grade you want. A raised frame with posts is used when you need to build up significant height, manage a dramatic slope, or attach to a house ledger.
Sleeper System (Low-Profile Builds)
Lay your sleepers (typically 2x4 pressure-treated) flat on the concrete at 16 inches on center (or 12 inches if your composite requires it). Use a level and shims to bring each sleeper to the same plane. You can shim with composite shims, plastic pads, or pre-cut pressure-treated wedges. Don't use wood shims directly on concrete without a moisture barrier beneath them. A strip of EPDM rubber, roofing felt, or closed-cell foam under each sleeper creates a capillary break and stops moisture from wicking up directly into the wood. Anchor sleepers to the concrete using concrete screws like Tapcon anchors every 24 inches. Check that everything is level as you go.
Raised Frame with Posts
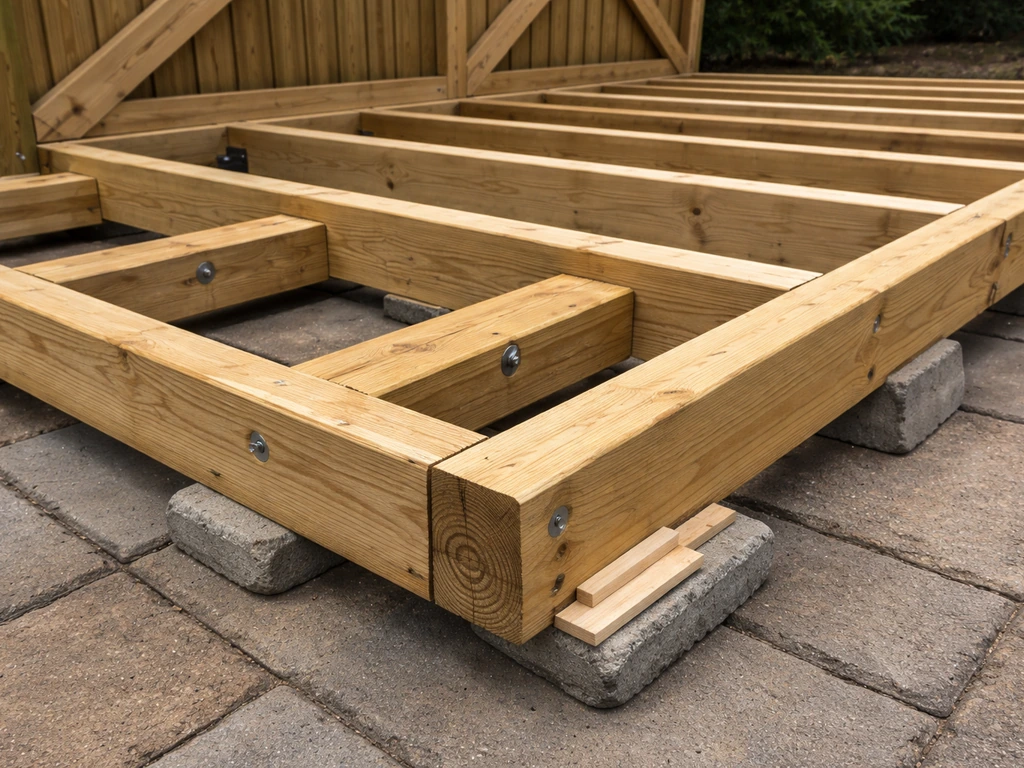
If you need more height or are attaching to the house, you'll set posts on footings (not just on the concrete slab) per IRC R507. The 2024 IRC R507.3 requires decks to be supported on concrete footings or other approved structural systems designed to carry deck loads down to the ground, with deck footings sized for imposed loads. 3. The patio slab can sometimes serve as a base for surface-mount post bases anchored with concrete anchors, but you need to verify slab thickness and load capacity for this. Set your outer beam first, then run joists back to the ledger or header. The IRC requires ledger connections to the house band joist using half-inch bolts or lag screws per the IRC fastener table. Flash the ledger thoroughly. Water intrusion at the ledger is one of the leading causes of deck failures, so don't skip the Z-flashing and self-stick waterproofing membrane behind the ledger board.
For standard deck framing, joists are typically 2x8 or 2x10 lumber at 16 inches on center for spans up to about 12 to 14 feet. Use joist hangers at both ends rather than toe-nailing. Install blocking between joists at the midspan for longer runs to prevent twist and add lateral rigidity. The AWC has made clear since the 2015 IRC that beams must bear fully on posts with post caps rather than sitting in notches, so use the right connectors.
Managing Moisture Under the Frame
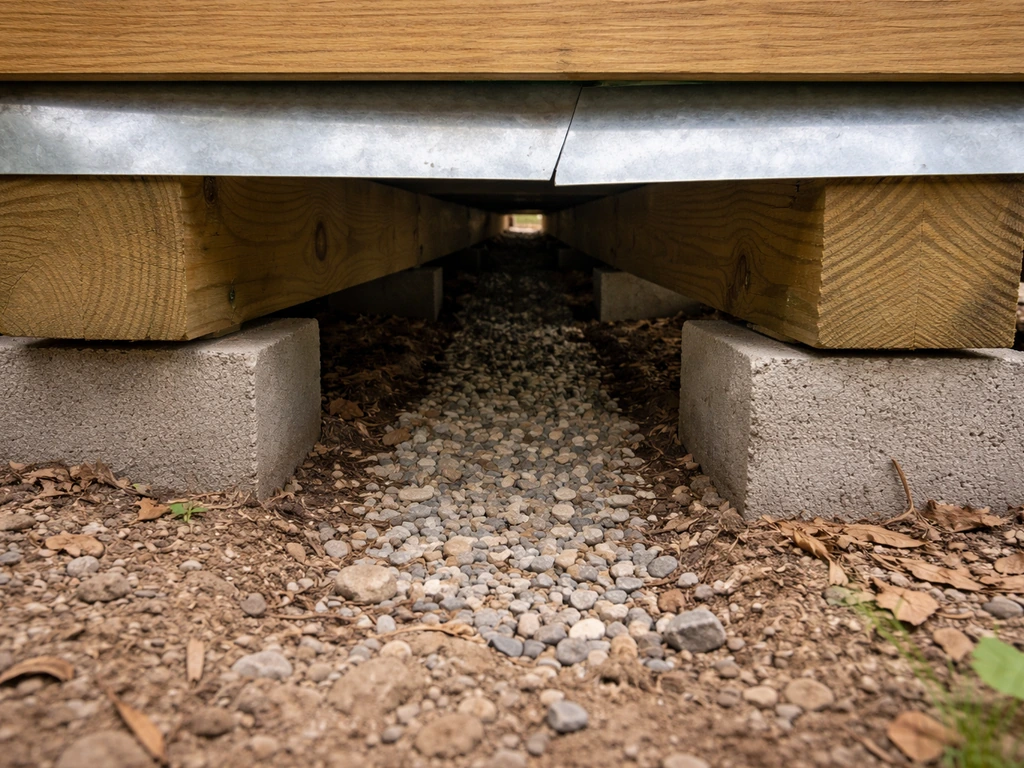
Whether you go sleepers or raised frame, you need airflow and drainage under the deck. Leave gaps between sleepers, never fully seal the perimeter at ground level, and allow water a path to run off the patio and away. For raised builds, under-deck drainage systems like Trex RainEscape capture water that passes through the boards and divert it via troughs to gutters or a controlled outlet. This is especially useful if the space under a raised deck needs to stay dry. Joist flashing tape (applied over each joist top before decking goes down) is a simpler and cheaper option that protects the joist tops from water sitting on them between the board gaps.
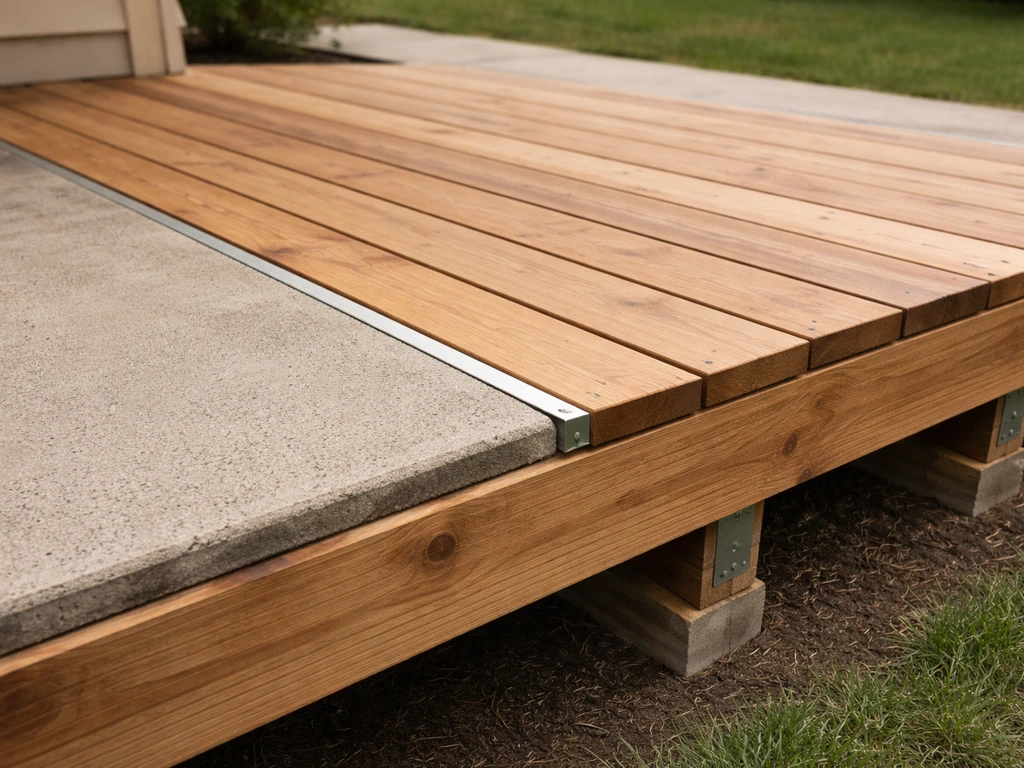
Install the Decking Boards and Finishing Details
Start your first deck board at the house wall or at the most visible edge and work outward. For wood decking, leave a 1/8-inch gap between boards for drainage and expansion. In wet climates or for wider boards, go to 3/16 inch. You can use composite deck spacers or a spare nail as a quick spacing guide. For composite decking, follow the manufacturer's gap specs precisely because composite expands and contracts with temperature changes more than wood does.
Face-screwing is the simplest fastening method. Drill a slightly oversized pilot hole to prevent splitting, then drive two screws per board at each joist. Hidden fastener systems (like Camo or Ipe Clip style) give you a cleaner look with no visible screws on the surface, but they add time and cost. Most composite brands now have a proprietary hidden fastener system that's designed to work with their groove-edge boards. If that cleaner look matters to you, factor the extra cost into your budget upfront.
Once all boards are down, snap a chalk line along the outer edge and trim the whole deck flush with a circular saw. This gives you a clean, consistent edge that looks professionally done. For the perimeter, install a fascia board (same material as your decking) to cover the exposed joist ends. Miter the corners at 45 degrees for a polished finish.
Stairs and Steps
If your deck raises the surface level above the surrounding yard or patio, you'll need at least one step or a full stair run. The IRC lays out stair dimensions clearly: risers should be between 4 and 7.75 inches tall, and treads at least 10 inches deep. Stair stringers (the angled side supports) need to be cut from 2x12 stock and should have no less than 3.5 inches of bearing at each tread cut. For a low deck with just one or two steps, pre-cut aluminum or pressure-treated stair stringers from the home center work great and save a lot of layout time.
Railings
If your deck surface ends up 30 inches or more above the ground, code requires a guard rail at least 36 inches tall. Even below that threshold, a railing adds safety and finished look. Mount your post bases before you lay deck boards if possible, or use surface-mount post bases with through-bolts after. Composite railing systems are popular because they're low maintenance and come as complete kits, but wood railings with metal balusters are a solid and cheaper DIY option.
Troubleshooting Common Problems and Your DIY Checklist
A few issues come up repeatedly with deck-over-patio builds. Here's what to watch for and how to handle each one.
- Uneven patio surface: Shim individual sleepers or use self-leveling concrete to fill low spots before framing. Don't try to flex your frame into level over an unlevel slab.
- Moisture under the deck: Use a moisture barrier under sleepers, leave drainage gaps at the perimeter, and consider joist tape or an under-deck drainage system on raised builds.
- Rot risk at concrete contact points: Only use ground-contact rated pressure-treated lumber (UC4A or UC4B) at any point near or touching concrete. Add rubber or EPDM pads between the wood and slab.
- Fastener corrosion: Every fastener and connector must be hot-dipped galvanized, stainless steel, silicon bronze, or copper. Swapping in cheap screws will cost you the whole structure within a few years.
- Door clearance issues: Measure your door threshold height before you build. If clearance is tight, a lower-profile sleeper system or a recessed threshold transition strip may be needed.
- Composite boards cupping or warping: Usually caused by inadequate fastening, wrong joist spacing for the product, or boards installed wrong-side up. Check the manufacturer's install instructions carefully before you start.
- Board gaps filling with debris: Normal in wooded areas. Use a deck cleaning tool or pressure wash annually to keep gaps clear and draining properly.
This project is closely related to other builds you might be considering. If your existing concrete patio has more structural problems than this approach can handle, you might be better off replacing it with a fresh patio surface before decking over it, or exploring a fully elevated deck off the ground rather than on top of existing concrete. A freestanding deck built off the ground has a different framing and support setup than a patio-deck-over, so it pays to plan the post and beam layout early fully elevated deck off the ground. The choice really comes down to patio condition and how much height you need.
Your Pre-Build Checklist
- Inspect and document patio condition: cracks, heaving, drainage, and slab thickness
- Measure patio dimensions and sketch your deck layout with joist direction noted
- Check your door threshold height and calculate finished deck height including sleepers and boards
- Contact your local building department about permit requirements for your deck size and attachment type
- Choose framing material (pressure-treated, ground-contact rated) and decking material (wood or composite)
- Order corrosion-resistant fasteners and structural connectors matched to your lumber treatment type
- Pressure wash and repair the slab, let it dry completely
- Mark high and low points on the slab with chalk
- Gather tools: circular saw, drill/driver, level (4-foot and 2-foot), chalk line, tape measure, concrete screw bit, speed square
- Budget for staining or sealing if using wood decking, or confirm composite warranty terms
- Schedule a permit inspection at the framing stage if your project requires one
- Plan for finishing touches: fascia, stairs, railings, and any lighting or post caps
The timeline for a basic deck-over-patio project is typically one to two weekends for a solo DIYer working on a 12x16-foot space. Budget around $1,500 to $3,500 for materials depending on whether you go wood or composite and how much framing the job requires. If you're methodical about the prep work and don't rush the framing phase, the actual board installation goes surprisingly fast. Get the frame right and the rest follows.
FAQ
Can I deck over a patio if I seal or coat the concrete first?
No, you should not. Pressure-treated sleepers and joists need a capillary break, so keep a moisture barrier under the framing (like EPDM or roofing felt) and keep expansion gaps and drainage paths where they can dry out. If you glue or foam everything tight to the slab, trapped moisture can still build up and shorten the life of the deck-over system.
How do I handle door thresholds and steps when I deck over a patio?
Your biggest risk is height-related clearance at doors, eaves, and step transitions. As a rule of thumb, total added height is often 3 to 5 inches for sleepers plus decking, then add any rim/fascia thickness and shims. Dry-fit your planned deck height against thresholds (especially sliding doors) and ensure you still have a safe landing depth for any entry steps.
Can I mix hidden fasteners and face-screws on the same deck-over-patio?
Choose the fastening strategy that matches your deck board type. Face-screwing works widely for wood and many composites, but hidden fasteners must match the board profile and brand system. If you switch between wood and composite mid-project, hidden systems often do not line up correctly, leading to inconsistent board spacing and movement.
What should I do if I find a hollow or settling spot in the patio?
If you notice a section that feels hollow or has movement after walking on the concrete, stop. Deck-over builds rely on the slab not settling under the sleeper lines. Hairline cracks are usually fine, but heaving, sinking, or large hollow areas often mean the concrete needs repair or replacement before you frame.
How much unevenness in the patio is acceptable before framing, and how do I fix it?
For a sleeper system, start by confirming the patio is close to the deck plane, then shim under sleepers so the top edges land in a consistent plane. If the patio varies a lot, you may need to grind or use a self-leveling compound in localized areas, because excessive shimming reduces support where you need it most and can create bounce.
What spacing and expansion gaps should I keep around the perimeter and between boards?
Plan for thermal movement and drainage together. Use the exact board-gap spec for your material (wood often uses about 1/8 to 3/16 inch, composites vary by brand). Also leave the perimeter unsealed and keep small gaps so water can escape, otherwise expansion can push boards and trap moisture at the edges.
Can the patio slab support a raised deck frame with posts or ledger attachment?
Don’t assume the slab thickness automatically qualifies as footing support for ledger attachments or posts. Deck-over builds can be trickier when you need a raised frame, significant height, or ledger connections. If you’re building high enough for guards or attaching to the house, verify load paths with your local code requirements before relying on slab anchors.
What’s the most common mistake with screws and connectors on deck-over-patio projects?
Replace corroded hardware immediately. Mixing metals (for example, stainless connectors with carbon-steel fasteners) can accelerate corrosion at contact points, especially with ACQ-treated lumber. When a fastener is compromised, board movement and stain streaking can start quickly, so use the same corrosion-resistant system throughout.
How do I build in drainage slope if the patio already has its own slope?
If you need to create a slope so water runs away from the house, incorporate it into the sleeper plane using shimming. A common approach is a small slope built into framing (often cited around 1/8 inch per foot) and then keep sleepers level relative to that slope, rather than trying to “fix it” with board bending after the fact.
Do I always need a permit to deck over a patio, even if it stays close to the ground?
It depends on how the deck relates to the house and how high it is. Freestanding ground-level platforms sometimes have simpler permit pathways, but attachments to the house, guard-requiring heights, and certain sizes often trigger permits and inspections. Call your local building department with your planned deck dimensions, height, and whether you are ledger-attaching.
When should I install stair stringers and guard rails, before or after decking boards?
If your project requires steps or railings, install those support elements at the framing stage, not after boards are down. Blocking and proper stringer bearing are what make stairs feel solid, and guard-post locations need to be reinforced before decking obscures the structure.
Can I just patch minor concrete cracks and keep going with a deck-over?
Yes, but treat it as a warning sign. If you cover cracked or spalling concrete without addressing the cause (like drainage issues or underlying settlement), the deck-over framing can become uneven and accelerate rot. Localized patching is fine for minor surface spalls, but active movement or major deterioration is not a good candidate for “cover and forget.”
How to Replace a Deck With a Patio: DIY Step-by-Step
Learn how to replace a deck with a patio, from permits and removal to base prep, grading, patio installation, and mainte