Building an interlocking paver patio is genuinely one of the most satisfying DIY projects you can tackle. You dig out, build up a compacted gravel base, screed a sand bedding layer, lay your pavers in a pattern, compact everything together, sweep in jointing sand, and you're done. The whole process is very learnable, even for a first-timer, as long as you respect the base work. That's where most DIY interlock jobs either succeed or slowly fall apart.
How to Do an Interlock Patio: Step-by-Step DIY Guide

Nolan Lennox
21 Jun 2026
Choosing your paver type and layout pattern first
Before you touch a shovel, lock in your paver choice because it affects every thickness and quantity calculation you'll do. For a standard residential pedestrian patio, 2-3/8 inch (60 mm) thick concrete pavers are the industry-recommended size. That spec comes straight from ICPI and manufacturers like Unilock and Nitterhouse Masonry. If cars will occasionally roll onto the edge of your patio, stick with that same 2-3/8 inch thickness and bump up your base depth. For a purely foot-traffic patio, you're good.
Concrete pavers are the most DIY-friendly option: consistent in size, easy to cut, widely available, and they meet ASTM C936 material standards. Clay pavers like Pine Hall Brick are beautiful and offer impressive freeze-thaw durability, but they cost more and are harder to source locally. If you're in a cold climate and the freeze-thaw cycle is a concern, look for pavers that have been tested to ASTM C1262 freeze-thaw durability standards, whether concrete or clay.
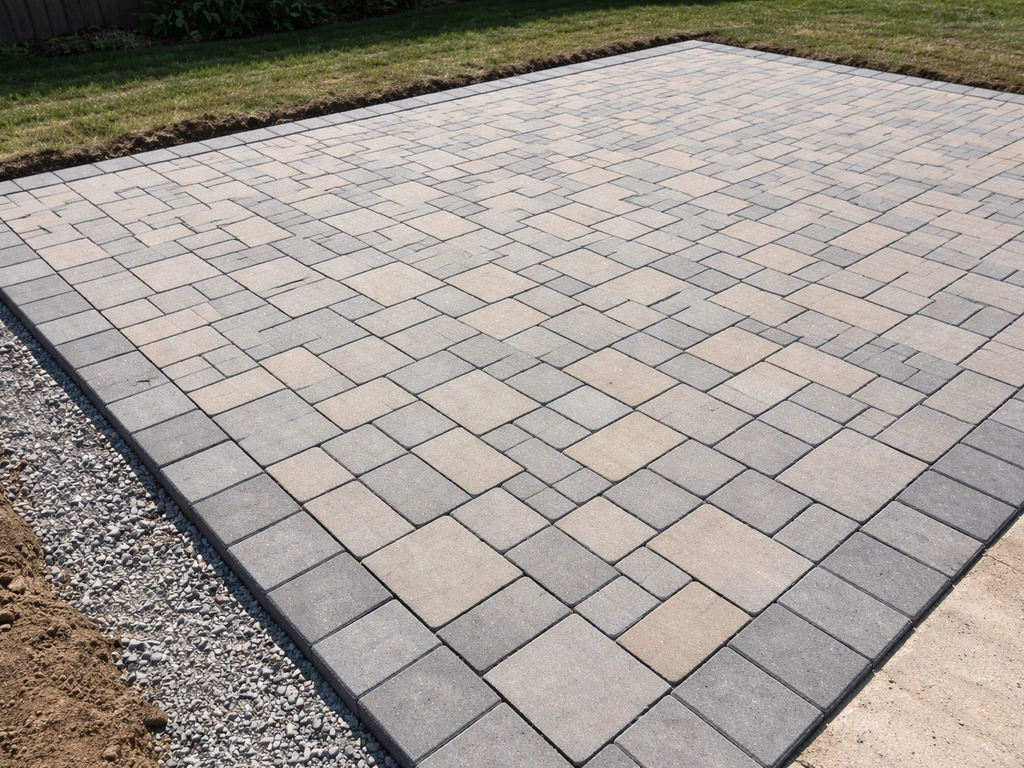
Layout pattern matters more than most people realize. It's not just visual. A running bond (brickwork offset) or herringbone pattern actually locks pavers together structurally better than a simple grid. Herringbone at 45 or 90 degrees is the strongest option for patios that see regular foot traffic, and it's what I'd recommend to most DIYers. Running bond is easier to lay and cut but still performs well. Avoid a simple stacked grid pattern for anything larger than a small accent area.
| Pattern | Structural Strength | Cut Complexity | Best For |
|---|---|---|---|
| Herringbone 45° | Highest | More cuts on edges | High-traffic patios, driveways |
| Herringbone 90° | High | Moderate cuts | Standard patios |
| Running Bond | Good | Minimal cuts | Simple rectangular patios |
| Basketweave | Moderate | Minimal cuts | Decorative, low-traffic areas |
| Stacked Grid | Low | Almost none | Avoid for main patio surfaces |
Planning, measuring, and calculating your materials
Measure your patio footprint in feet, then multiply length by width to get square footage. Add 10% for cuts and breakage on a simple rectangle, and bump that to 15% if you're doing a 45-degree herringbone or have an irregular shape. Write that number down: it's your paver order quantity.
Your total excavation depth is the sum of three layers: gravel base, bedding sand, and paver thickness. For a standard residential patio, that math looks like this: 4 inches of compacted gravel base (the CMHA recommends a minimum 4 inches for properly installed residential interlock), plus 1 inch of bedding sand (Belgard and most manufacturers specify at least 1 inch, spread evenly), plus your 2-3/8 inch paver. Round that up and you're digging roughly 7.5 to 8 inches deep below your finished surface grade. Mark that depth on a stake before you start.
For gravel base material, calculate your base volume in cubic feet (length x width x base depth in feet) and convert to tons. A rough rule is one cubic foot of compacted Class II or road base gravel weighs about 100 to 110 pounds, so 1 cubic yard covers roughly 80 square feet at 4 inches deep. Order 10% extra because compaction reduces volume. For bedding sand, a 1-inch layer over your area in square feet divided by 12 gives you cubic feet; one ton of coarse concrete sand covers about 70 to 80 square feet at 1 inch. Order your pavers, base gravel, and bedding sand at the same time so you're not making multiple delivery calls.
Tools and materials checklist

- Interlocking pavers (square footage plus 10-15% overage)
- Compactible granular base (road base, Class II gravel, or crusher run)
- Coarse concrete bedding sand (not fine play sand)
- Polymeric jointing sand
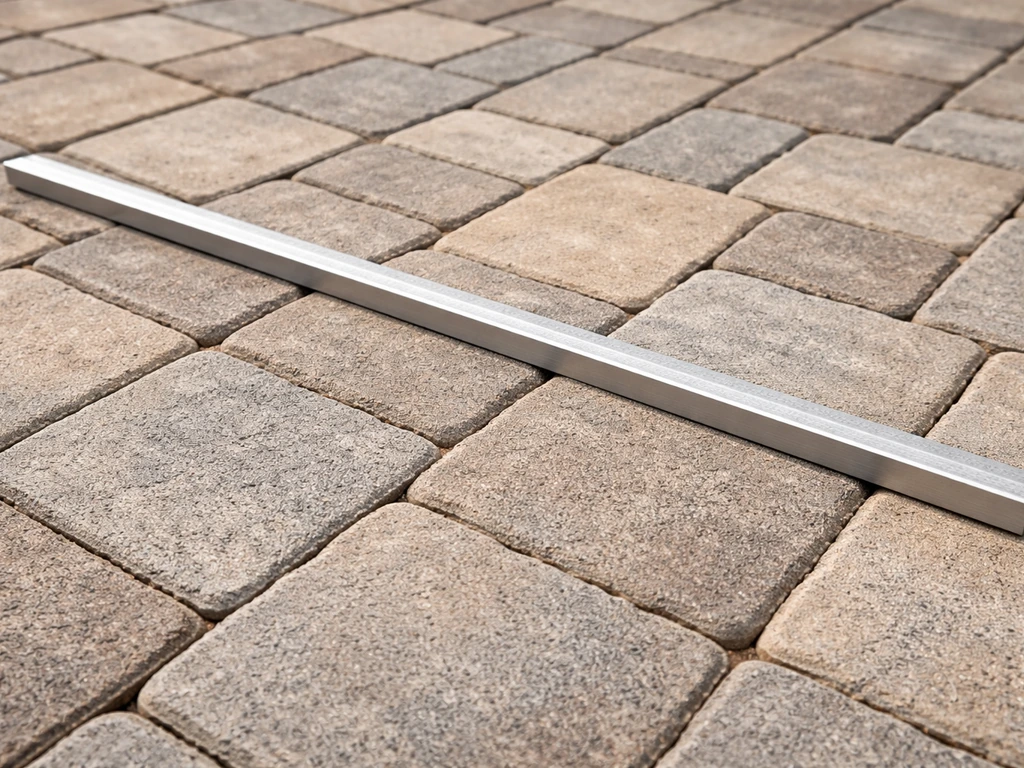
- Plastic or aluminum paver edge restraints with spikes
- Plate compactor (rent one if you don't own it)
- Hand tamper for areas the plate compactor can't reach
- Screed pipes or 1-inch diameter conduit (2 pieces)
- Straight 2x4 or magnesium screed board
- 4-foot level and string lines with stakes
- Rubber mallet
- Angle grinder with diamond blade or paver splitter/chisel
- Tape measure, chalk line, marking pencil
- Shovel, pickaxe, and wheelbarrow
- Broom for sweeping in jointing sand
- Garden hose and spray nozzle
- Optional: laser level for large or sloped areas
- Optional: paver sealer for the finish coat
Site prep, excavation, and getting drainage right
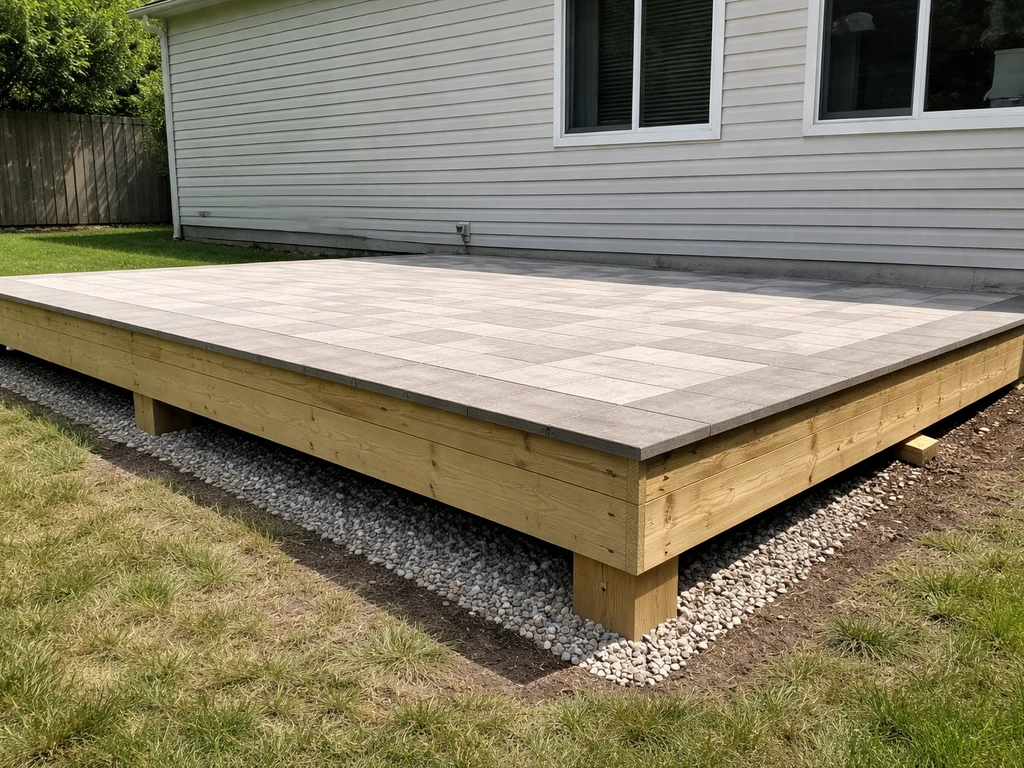
Call 811 (or your regional utility locating service) before you dig anything. It's free, fast, and potentially saves you from a very bad day. Once you've confirmed your lines are clear, mark your patio perimeter with spray paint or stakes and string. If you're aiming for a raised patio, you'll want to plan the base height and drainage slope early so the installation stays stable raised patio how to.
Excavate to your calculated depth, typically 7.5 to 8 inches below finished grade for a standard residential patio. Keep your excavation walls clean and remove all organic material, sod, and roots. Soft spots in the subgrade need to be addressed now, not later. If you hit a soft or wet area, dig it out a few more inches and backfill with compactible gravel before you continue. Skipping this step is how patios sink unevenly two years later.
Drainage is non-negotiable. Your finished patio surface needs a slope of at least 1/8 inch per foot (1% grade) away from your house or any structure. Don't try to drain toward a wall or fence. Plan your slope direction before you set a single string line, because it determines how you establish your base grades. On large patios, I like to run string lines with a line level and physically verify the slope is built into every layer as I go, not just checked at the end.
If you're demolishing an old concrete slab, remove it completely. Don't lay interlock over old concrete without a proper engineer assessment. Old concrete creates unpredictable settlement and undermines all the base work you're about to do. If you're taking out an old deck, fill and compact any post holes before starting.
Building the compacted base and setting edge restraints
The compacted gravel base is the most important part of this entire project. Spend extra time here and you'll have a patio that stays flat and solid for decades. Applying these patio installation tips will help you avoid common mistakes and keep your pavers level for years. Rush it and you'll be releveling pavers within a few seasons.
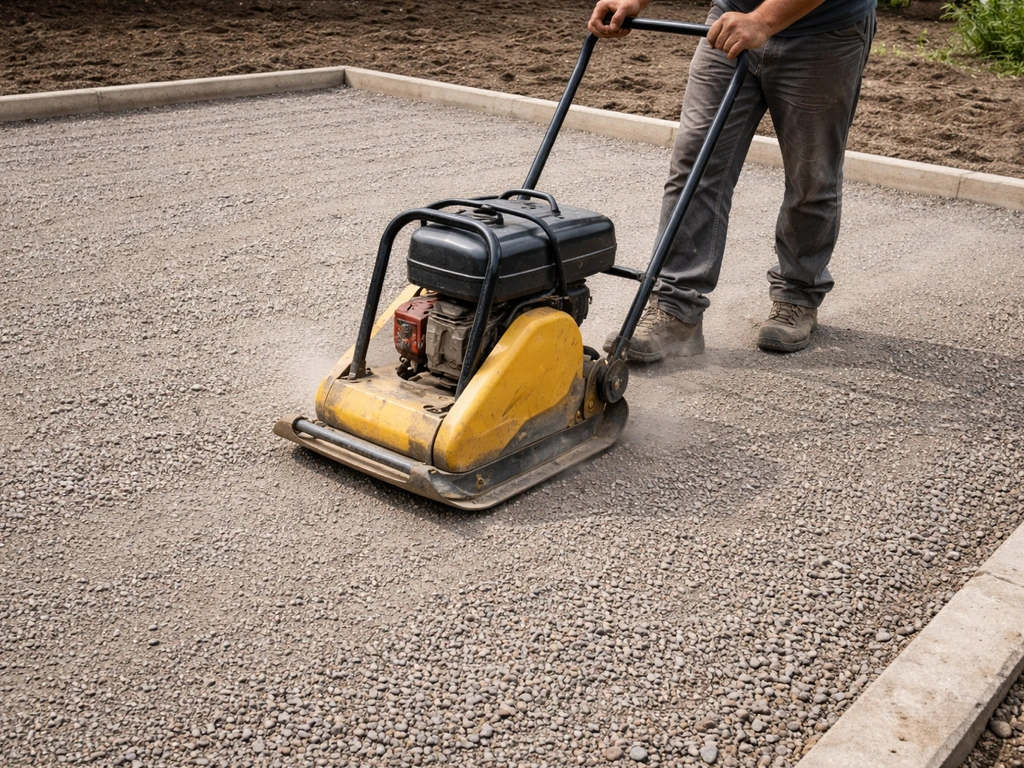
Spread your first 2-inch lift of compactible granular base material evenly across the excavated area. Never try to compact more than 2 to 3 inches at a time. Run the plate compactor over it in overlapping passes, working from the edges toward the center. Then add another 2-inch lift and repeat. For a 4-inch base, that's two compaction passes minimum. The surface should feel rock-solid when you're done, with no give underfoot. Check your slope during compaction, adjusting as needed.
Edge restraints go in before your bedding sand, not after. This is where I've seen a lot of DIYers cut corners and regret it. Plastic paver edging or aluminum restraints get staked into the compacted base around the entire perimeter of your patio. Space the spikes at roughly 12-inch intervals and hammer them flush. The restraints keep your pavers from slowly migrating outward over time. If you're butting against a wall, existing concrete, or a step, that surface acts as your restraint on that side. But every free edge needs staking.
If your patio has a curved edge, use flexible plastic edging designed for curves and cut small slits on the inside of the curve so it bends smoothly. Rigid edging on a curve creates weak points that eventually fail.
Screeding the bedding sand and laying pavers
Bedding sand is what gives your pavers their final, precise level. It's not a fill layer, it's a precision layer. Use coarse concrete sand (sometimes called washed concrete sand or sharp sand), never fine play sand or stone dust by itself. Fine sand compacts too densely and doesn't allow for the minor adjustments you need during laying.
Set two screed guides (1-inch diameter metal conduit works perfectly) parallel to each other on the compacted base, about 3 to 4 feet apart, running in the direction you'll screed. Pour bedding sand between and around them to roughly 1 to 1. 5 inches deep, then drag your 2x4 screed board along the top of the pipes to create a perfectly flat, 1-inch deep sand bed.
The 2025 interlocking paver installation guide also recommends using a 2x4 screed board (with screed guides) to create the proper bedding sand bed depth drag your 2x4 screed board along the top of the pipes. Belgard's installation specs confirm at least 1 inch deep is the minimum.
Pull the screed pipes out carefully after screeding a section and fill those channels with sand, smoothing them over lightly by hand.
Start laying pavers from a straight reference edge, ideally a wall or a chalk line you've snapped. Set each paver down gently without sliding it, which would displace sand and create uneven spots. Place them snug against each other with the natural joint gaps created by the small nibs molded into the sides of concrete pavers (usually about 1/16 to 1/8 inch). Use a rubber mallet to tap pavers level with each other as you go, and check with a level every few rows. Don't walk on freshly screeded sand that hasn't had pavers set yet.
Work across the patio in a consistent direction so you're always placing pavers into fresh sand ahead of you and kneeling on completed sections behind you. Lay all your full pavers first and leave the edge cuts for the end.
Cutting edge pavers and handling obstacles
Cutting is unavoidable unless you have a perfectly rectangular patio with zero obstacles. An angle grinder with a diamond-tipped blade is the most accessible tool for most DIYers. A dedicated paver saw (wet saw) gives cleaner cuts and is worth renting for larger projects. For straight cuts on concrete pavers, you can also score and split with a chisel and hammer, but this takes practice and leaves rougher edges.
Measure each cut piece individually rather than assuming they're all the same. Even in a well-laid patio, slight variations accumulate. Mark the cut line with a pencil or chalk, make the cut, and dry-fit before setting in sand. Keep all cut pieces at least half a paver wide. Slivers smaller than that tend to crack and pop loose over time.
Around obstacles like drain cleanouts, posts, or utility boxes, cut pavers to fit as closely as possible. Fill very small gaps (less than half a paver width) with a cut piece secured with construction adhesive rated for masonry, not just jointing sand. Around circular obstacles, you'll be making angled cuts. Take your time here, it's a detail that really shows in the finished product.
Once all cuts are in place, walk the entire surface and tap down any pavers that are rocking or sitting high. A low paver is harder to fix at this stage (you'd need to lift it and add sand underneath), so it's better to check level as you go than to find a dip at the end.
Final compaction, jointing sand, sealing, and fixing problems
Once all pavers are laid and cut edges are in, run the plate compactor over the entire surface. This drives the pavers down into the bedding sand and locks them into their final position. Make at least two passes in different directions. The pavers will drop slightly during this step, which is normal and expected. After compaction, the surface should feel completely solid with no individual paver movement.
Sweep polymeric jointing sand across the surface and work it into the joints with a stiff broom. Polymeric sand has a binding agent that hardens when wet, locking the joints and resisting weed growth and insect intrusion. Make multiple passes until the joints are filled to within about 1/8 inch of the paver surface. Then run the plate compactor over the surface one more time to settle the sand deeper into the joints. Sweep in another light pass of sand, then follow the manufacturer's instructions for wetting it down. Most polymeric sands require a gentle mist, not a heavy spray, to activate. Let it cure for 24 hours before foot traffic.
Sealing is optional but recommended for concrete pavers. A paver sealer enhances color, adds a layer of stain resistance, and helps the polymeric sand hold longer. Apply it after the polymeric sand has fully cured (typically 24 to 72 hours after wetting). Use a pump sprayer or roller designed for sealers. Reapply every 3 to 5 years depending on traffic and exposure.
Troubleshooting the most common interlock problems
Sinking pavers almost always mean either a soft spot in the subgrade that wasn't addressed, insufficient base depth, or base material that wasn't properly compacted in lifts. To fix it: pull up the affected pavers, excavate to find the problem, add and compact more base material, re-screed the sand, and relay. It's a pain, but it's the only real fix.
Uneven or rocking pavers after compaction usually mean the bedding sand wasn't screeded evenly, or pavers were slid into position instead of placed straight down. Pull the affected pavers, add or remove sand as needed, and re-lay them. One trick: keep a small bucket of bedding sand nearby while you work so you can make micro-adjustments without going back to the sand pile.
Gaps or shifting along the edges mean your edge restraints aren't holding. Check that spikes are driven fully into the base material, not just into sand. If pavers have already migrated, pull back the affected section, reposition your edging, add more spikes, and relay. On soft or sandy soils, use longer spikes and space them at 8 inches instead of 12.
Water pooling on the surface means your drainage slope wasn't established correctly in the base. This is the hardest problem to fix after the fact. For minor pooling, you can sometimes correct it by pulling up pavers in the low area and adding bedding sand to raise the elevation slightly. For major drainage issues, you may need to tear out and re-establish the base grade. This is why slope verification at every layer during construction is so important.
Weeds pushing through the joints are almost always a sign that jointing sand wasn't packed deep enough or that non-polymeric sand was used. Sweep in fresh polymeric jointing sand, compact it, and wet it down properly. For a quicker fix between resealing cycles, pull the weeds and spot-fill with polymeric sand.
When to call in help instead of pushing through
Most of this project is very DIY-able. But if you're building a large patio (over 500 square feet), dealing with significant slopes, or working next to a retaining wall or structure, getting a professional assessment of your drainage and base design is worth it. The same goes if you find consistently wet or unstable subgrade during excavation. A geotextile fabric layer between subgrade and base material can help in those situations, but chronic drainage problems sometimes need engineered solutions. The rest of this build, from gravel to final seal, you can absolutely handle yourself. You can also plan for patio payment options, including financing, budgeting tips, and how to pay contractors.
If you're exploring other approaches for your outdoor space, a raised patio build follows similar base principles but adds framing and height considerations. If you decide to go with a raised patio instead, the base and drainage principles still matter, but the build adds framing and height considerations raised patio build. And if you're budgeting the project, understanding how patio payment and financing options work can make a bigger build more manageable without cutting corners on materials.
FAQ
How thick should the bedding sand be, and can I make up for unevenness by adding more sand?
For most residential patios you should not add a second layer of sand or “thicker bedding” to compensate for bad base work. The bedding sand is a leveling layer, typically about 1 inch after screeding, so if your base is out of grade you fix the base (and compact it) rather than trying to float it with extra sand.
Can I use the same pavers if cars will drive only occasionally onto the patio?
Yes. If your patio will see regular foot traffic with occasional carts or light maintenance vehicles at the edge, keep using the 2-3/8 inch (60 mm) pavers and increase base depth rather than relying on thicker sand or edging alone. If heavier vehicles will park on the patio, you should plan a load-rated design and consider professional guidance.
What should I do if my paver joints look too wide or inconsistent?
Keep joint gaps consistent and full. If you have gaps bigger than the manufacturer’s normal joint width, it usually means pavers were slid into place, sand was displaced, or the pattern is drifting. The fix is to pull the affected section, re-screed, and re-lay so joints are not overly open.
Should I compact the bedding sand before setting pavers?
Don’t compact the bedding sand. Compact only the gravel base in lifts and then, after pavers are set, compact the installed surface. If you compact before laying pavers, you can end up with a sand bed that is too dense to allow minor adjustment and final leveling.
Do I need geotextile under the gravel base?
On standard residential builds, geotextile is not a replacement for base depth and proper compaction. It can help separate subgrade from base material on problematic soils, but it may also reduce drainage if misused. If you have consistently wet ground, consult a local installer or engineer for whether to place fabric and where.
How do I know I added the right amount of water for polymeric joint sand?
Polymeric sand needs the right moisture to activate. Use a light mist and avoid overwatering, because excessive water can wash the binder out of the joints. After wetting, follow the brand’s cure window and avoid foot traffic until it has fully set.
Why do my edge pavers keep cracking or popping loose?
Cut pieces need to be wide enough to stay locked. As a rule of thumb from common patio practice, try not to use very thin slivers at the perimeter. If you end up with small scraps, adjust your layout (shift the whole pattern) so the cut at the edge is a reasonable width.
Can I do an interlock patio if it’s raised off the ground?
Yes, but it changes how you build the base grade. You still follow the same base and bedding principles, yet a raised patio usually needs a maintained drainage path and careful height steps so water does not pool at the transition. Plan slope and base height early, then verify it at each layer before laying pavers.
What’s the real cause of pavers sinking, and how do I fix it without replacing the whole patio?
If you compacted correctly and the patio later sinks unevenly, the usual causes are a soft spot that was not removed, inadequate base depth, or base lifts that were too thick or not compacted. The real fix is local tear-out to the problem area, add compacted base in lifts, re-screed, and relay.
My patio edges are shifting. How do I troubleshoot the restraint system?
Edge restraints can fail if spikes are only driven into sand, if spacing is too wide, or if the edging is not continuous. For sandy or soft subgrades, use longer spikes and tighter spacing, and make sure the edging is anchored into compacted base material.
How do I handle paver cuts around utility boxes or drain cleanouts?
If you plan to cut around posts, boxes, or utility covers, dry-fit each piece and label them so you keep the same orientation. Also, don’t rely on joint sand for big voids near fixtures. For small gaps, use the correct masonry-rated construction adhesive for cut pieces as needed.
How do I prevent pattern drift when the patio shape is irregular?
For long straight runs, small layout errors can compound. Use a consistent reference edge, check your pattern line as you go, and periodically confirm the overall dimensions. If the patio has an irregular perimeter, expect more cuts, and budget extra material beyond a simple rectangle estimate.
Weeds are coming through the joints. Is it a sand choice issue or a wetting/compaction issue?
If weeds appear between pavers soon after installation, it usually means joints were not filled deeply with polymeric sand, the sand was not compacted into the joints, or it was not activated with the correct moisture. Remove loose weeds and joints sand as needed, then re-fill with polymeric joint sand and wet it correctly.
Next Article
Raised Patio How to Build a DIY Elevated Patio
Step-by-step DIY raised patio build, with measurements, materials, drainage tips, framing options, costs, and common mis