Building a raised patio means excavating or building up a level outdoor surface that sits higher than the surrounding grade, either by using a structural subbase with pavers or stone on top, or by building a deck-style framed platform. You plan the height and drainage first, dig or build to a stable base, install footings or compacted subbase, frame or retain the elevated area, lay your surface, then add steps and any required guardrails. Done right, it handles drainage, stays level through freeze-thaw cycles, and lasts decades with almost no maintenance.
Raised Patio How to Build a DIY Elevated Patio

Nolan Lennox
10 Jun 2026
Why build a raised patio (and how high should it be)
Most people need a raised patio for one of three reasons: the ground slopes away from the house and a flat usable surface requires building up, the existing grade sits below a door threshold and you want a seamless connection to the interior floor level, or you simply want to create an elevated vantage point that separates the patio from the yard. All three are great reasons.
Height is where things get real. A raised patio that's just a few inches above grade is essentially a standard patio with a thicker base, and you can treat it mostly like a ground-level build. Once you go above about 8 to 12 inches, you're adding retaining walls or some kind of structural edge.
Above 30 inches above grade, the IRC (International Residential Code) kicks in and requires guardrails at least 36 inches high measured from the deck surface to the top rail. That single number, 30 inches, is the dividing line between a simple paver project and something that requires the same planning discipline as a deck. Keep your finished surface under 30 inches above grade wherever possible, especially if you want to avoid permits and guardrail requirements.
If you do go over, plan for compliant guards from the start.
The other height consideration is your door threshold. You want the patio surface to sit at least 1 inch below the interior finished floor, sometimes more depending on your door type and flashing situation. Measure from the bottom of your door threshold to the existing ground and that difference tells you exactly how much you need to raise the surface.
Site assessment and measurements before you dig anything
Skipping a proper site assessment is the number-one reason raised patios fail early. Spend an hour here and you'll save days of rework later.
Check the grade and establish your target elevation
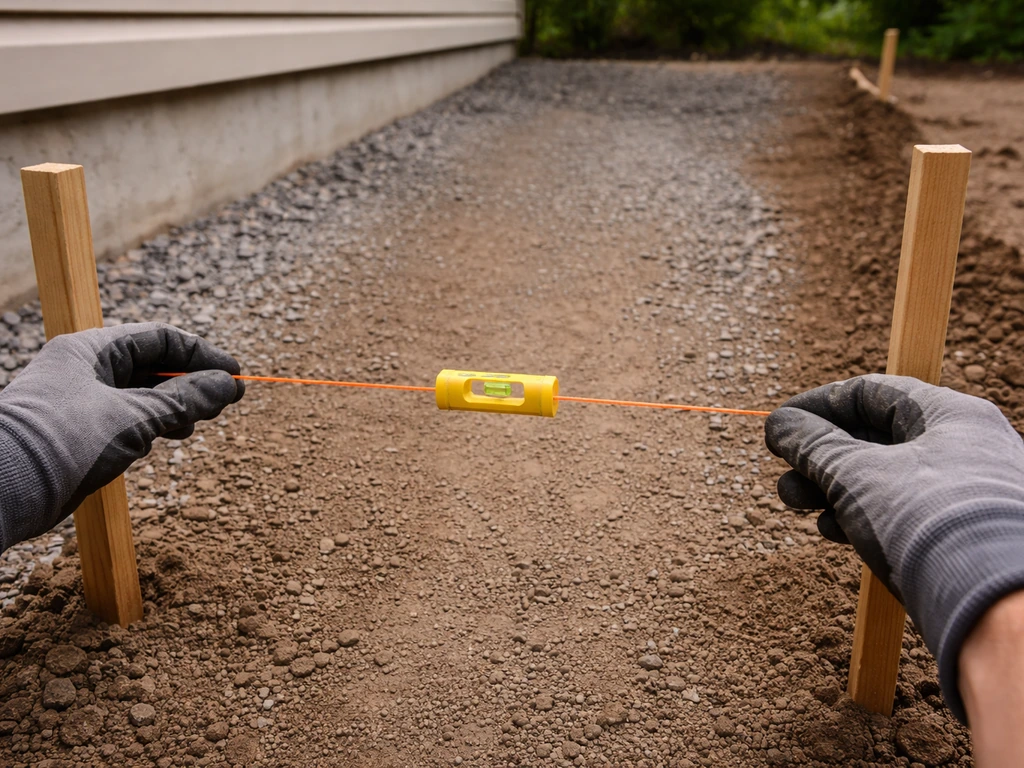
Drive a stake at the house wall and another at the far edge of where the patio will go. Run a string line level between them and measure the drop from string to ground at the far stake. That drop is your grade change over the run. A site that drops 8 inches over 12 feet, for example, means the far edge of the patio needs to be built up 8 inches to match the house end. Once you know those two elevation points, you know whether your raised patio is a modest 4-inch build-up or a serious 18-inch structure that needs retaining on three sides.
Drainage: slope away and plan for water from day one
Your finished patio surface should slope away from the house at 1/8 to 1/4 inch per foot (roughly 1% to 2%). That range keeps water moving without making the surface feel tilted. The subgrade and compacted base layer should match that same slope direction. If you're building a raised structure with fill, you also need to think about where the water goes when it hits the retaining walls or edges. Building in a French drain behind a retaining wall, or perforated pipe at the base of fill sections, is far easier before you build than after.
Find your utilities before you excavate
Call 811 (in the US) before any digging. Underground utilities including gas, electrical, water, and communication lines must be marked. This isn't optional. Many raised patios require footings or retaining wall footings that go down 12 to 36 inches depending on your frost line, and hitting a gas line is not a DIY recovery situation. Give the utility companies 2 to 3 business days before your planned dig date.
Check your local permit requirements
Permit thresholds vary by municipality even when they reference the same IRC. Many jurisdictions require a permit for any structure over 200 square feet, or any raised surface over 30 inches, or any project that requires footings. A deck-style raised patio almost always needs a permit and inspection in most jurisdictions.
A raised patio that needs a deck-style build often has higher upfront costs, so knowing how to pay for a patio project helps you plan the budget deck-style raised patio. A low paver patio on a compacted gravel base under 30 inches often does not, but check before you build. A quick call or online lookup at your local building department takes ten minutes and can save you a stop-work order.
Design decisions: retaining walls, framing, and how people will get on and off
There are two broad structural approaches to a raised patio: the masonry/paver approach (fill, retaining, compacted base, then paver surface) and the deck-frame approach (footings, posts, beams, joists, then a wood or composite surface). Which one you choose depends on height, soil conditions, your material preference, and honestly how much framing work you want to do.
For a raise under about 18 to 24 inches, a well-engineered paver-on-compacted-base system with retaining walls or treated timber edging on the downhill side works beautifully and is often simpler for a solo DIYer. For raises over 18 to 24 inches, or where the soil is poor and settling is a real risk, a deck-frame system on proper footings gives you more structural confidence and easier access to the space underneath.
Retaining walls and structural edging
Any raised patio with fill behind it needs something to hold that fill in place. For low raises (under 12 inches), a soldier course of pavers, a row of concrete retaining wall blocks, or treated 6x6 timber edging spiked into the ground does the job. For taller walls over 24 to 30 inches, you're into engineered retaining wall territory. Segmental retaining wall block systems from manufacturers like Allan Block or Versa-Lok come with design guides that tell you when you need geogrid reinforcement based on wall height. Don't guess on this: a wall failure under a loaded patio is a serious safety problem.
Steps and access planning
Steps are often an afterthought and they shouldn't be. Plan them at the design stage because they affect where your edge restraint lands, where the retaining meets the grade, and how wide your patio needs to be. IRC code requires a maximum riser height of 7-3/4 inches and a minimum tread depth of 10 inches, measured from nosing to nosing. Variation between any two consecutive risers can be no more than 3/8 inch.
Those numbers matter for comfort and code compliance. A 20-inch raised patio needs 3 comfortable steps with roughly 6-7 inch risers. Sketch it out before you start and adjust your platform height slightly if it makes the stair math work better. Handrails are required when there are 4 or more risers.
Materials and systems: paver-on-base vs. deck-frame
Both systems can look excellent and last 20 to 30 years. The right choice depends on your raise height, your soil, your budget, and what kind of work you enjoy doing.
| Factor | Paver/Masonry on Compacted Base | Wood/Composite Deck-Frame |
|---|---|---|
| Best raise height | Under 18-24 inches | Any height, ideal over 18 inches |
| Typical material cost (per sq ft) | $8–$20 (base + pavers) | $15–$35 (framing + composite) |
| DIY skill level | Moderate (physical, not technical) | Moderate-advanced (framing, fasteners) |
| Drainage | Built into slope and base | Gaps between boards or slope to drainage |
| Maintenance | Very low (occasional re-leveling) | Low (composite) to moderate (wood) |
| Footing requirements | Compacted base/gravel (shallow) | Concrete footings to frost depth |
| Permits typically required | Often no (under 30 in) | Usually yes |
| Lifespan with good install | 30+ years | 25–30 years (composite), 15–20 (wood) |
Paver and masonry systems
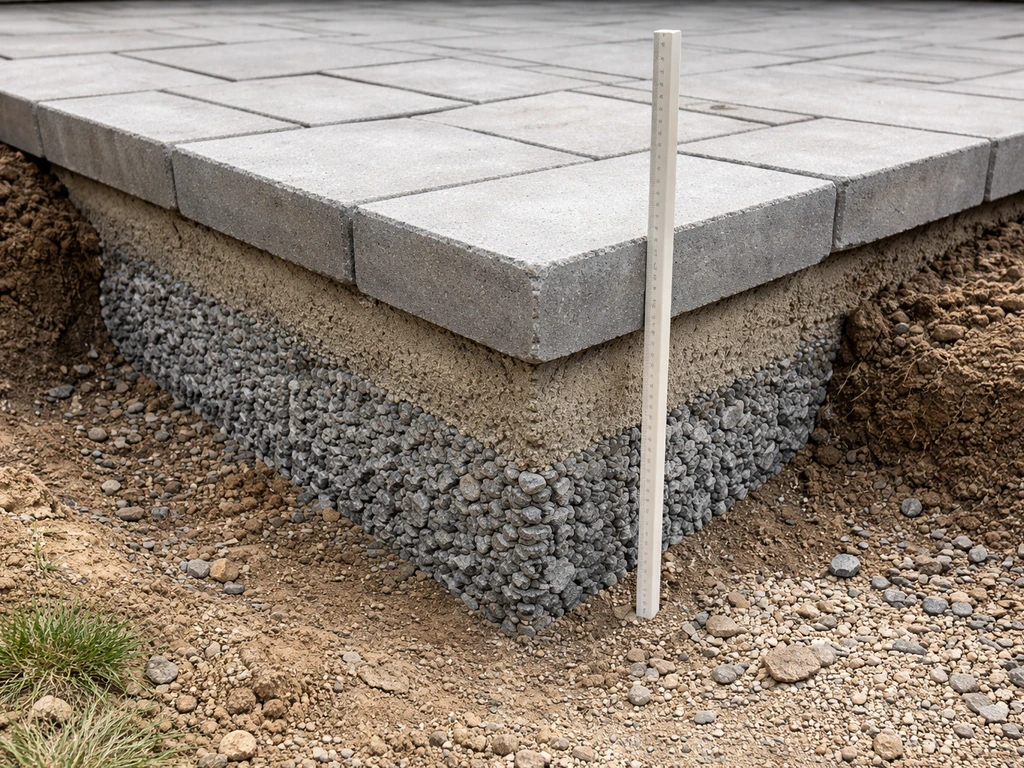
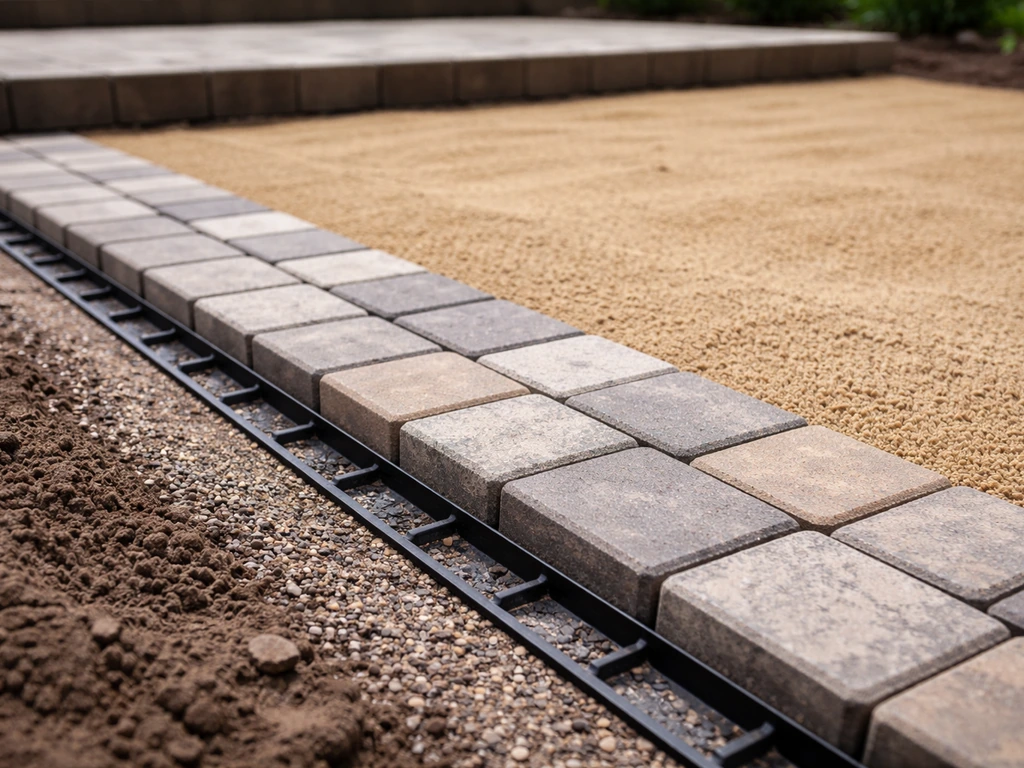
The standard build is: compacted gravel base (typically 6 inches for pedestrian patios, more on soft soil), 1 inch of bedding sand screeded flat, then pavers or natural stone on top. The total excavation or build-up depth depends on your paver thickness (usually 2-3/8 inches for standard concrete pavers) plus the base layers. On clay or unstable soil, lay a geotextile fabric (AASHTO M288 Class 1 or 2 depending on site conditions) on the subgrade before adding any gravel. It keeps the base from mixing with the native soil over time, which is one of the main reasons patios settle unevenly after a few winters.
Edge restraint is mandatory on any paver system. Without it, the pavers creep outward over time and the whole surface eventually buckles. Plastic snap-lock edge restraint spiked every 12 inches into the base is the easiest option. For a raised section, your retaining wall blocks or timber edging serves this function on the downhill sides.
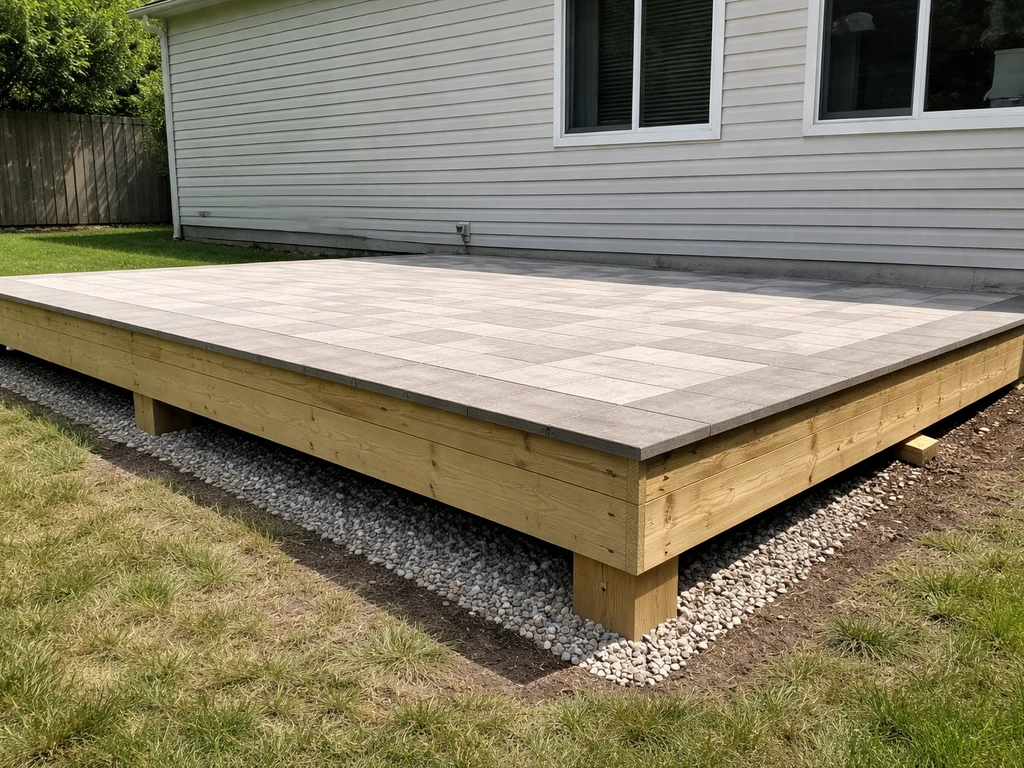
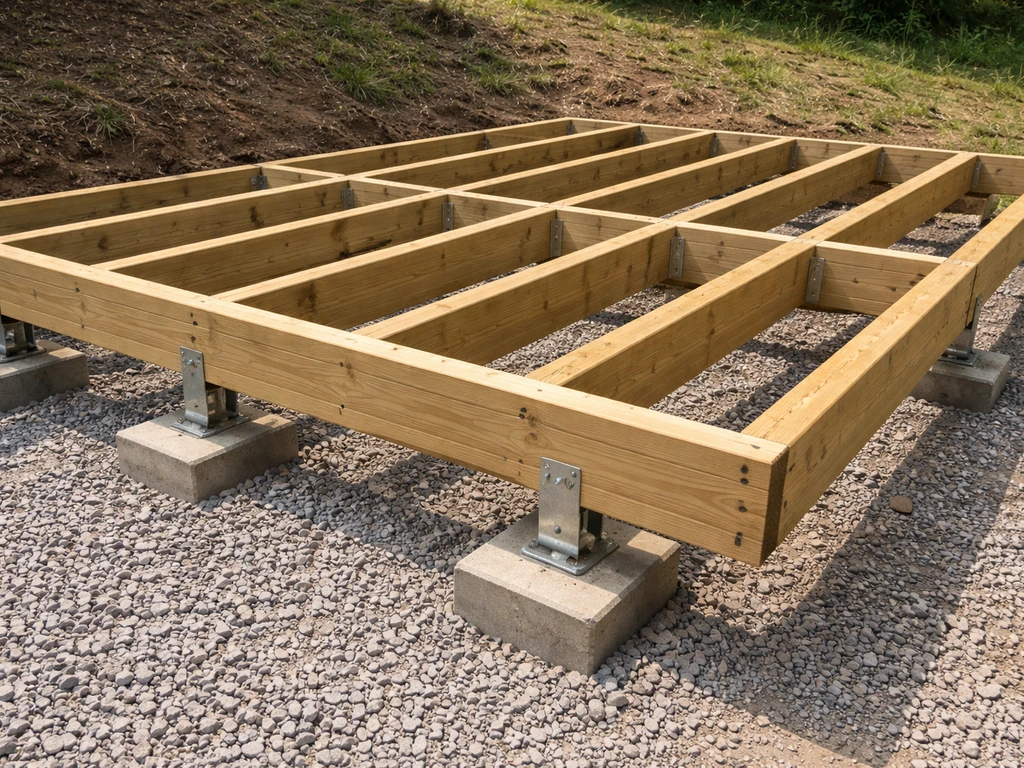
Deck-frame systems (wood and composite)
A deck-style raised patio uses concrete footings set to the local frost depth (governed by IRC R507.3 and R403.1.4), posts, beams, and joists to create a structural platform. The surface is composite decking, pressure-treated wood, or hardwood like ipe. Composite is the smart long-term choice: it doesn't rot, warp, or need staining, and the price premium over PT wood pays back in maintenance savings within 5 to 7 years. Use hot-dipped galvanized or stainless steel hardware throughout. Mixing metal types (e.g., standard zinc screws with stainless joist hangers) causes galvanic corrosion that can destroy connections in a few years in wet climates.
For a ledger-attached build (attached to the house), the ledger connection is the most code-critical detail in the whole project. It must be properly flashed to prevent water intrusion and fastened with approved lag screws or through-bolts per the IRC spacing tables. This is where most deck failures originate. If you're unsure about the ledger, spend the money to have a contractor or structural inspector look at it.
Tools, supplies, and prep work
Core tools you'll need
- Tape measure, string line, and line level (or a laser level for larger areas)
- Plate compactor (rent one — hand tampers are not sufficient for a proper base)
- Circular saw or miter saw (for framing or cutting pavers with a diamond blade)
- Drill/driver with impact driver
- Rubber mallet and screed pipes (for paver bedding sand)
- Hand level and 4-foot level
- Shovel, wheelbarrow, and a good rake
- Safety glasses, ear protection, and heavy gloves
Materials list (paver system)
- Compactable gravel base (3/4-inch crushed stone or road base) — calculate 6 inches deep over the full area plus 10% extra
- Coarse bedding sand (concrete sand, not play sand) — 1-inch layer
- Geotextile fabric (on clay or soft soils)
- Pavers, natural stone, or brick of your choice
- Plastic edge restraint and 10-inch spikes
- Polymeric sand for joints
- Retaining wall block or treated 6x6 timber for edges/walls
Materials list (deck-frame system)
- Concrete tube forms and concrete mix (or auger-placed footings) to frost depth
- Adjustable post bases (hot-dipped galvanized or stainless)
- Pressure-treated 4x4 or 6x6 posts
- Pressure-treated or LVL beams sized to your span
- Pressure-treated 2x8 or 2x10 joists at 12-16 inch spacing
- Joist hangers, beam hardware, and corrosion-resistant structural screws
- Composite decking or PT wood decking boards
- Ledger board (if attaching to house) plus lag screws and flashing
- Post caps, railing posts, and guardrail components if over 30 inches
Ground prep
Remove all sod, topsoil, and organic material down to mineral soil. Topsoil compresses and decomposes under a load, and leaving it in place is the leading cause of patio settling. For a paver system, dig to a depth that accommodates your base layers plus paver thickness and still comes out at your target finished elevation. Mark that depth on your stakes and stay consistent. For a deck-frame system, clear the area under the footprint and plan to put down gravel or landscape fabric under the structure to control vegetation and improve drainage under the platform.
Step-by-step construction process
Step 1: Establish layout and mark footprint
Set batter boards and string lines to define the exact perimeter of your patio. Check for square using the 3-4-5 triangle method (or multiples of it: 6-8-10 works well for larger patios). Measure corner to corner diagonally and adjust until both diagonals are equal. Mark the perimeter with marking paint. Confirm your footing or excavation locations now before moving any soil.
Step 2: Dig footings (deck-frame builds) or excavate base area (paver builds)
For deck-frame builds: dig or auger footing holes to the local frost depth plus a few inches for a gravel drainage layer at the bottom. In many northern US states that means 36 to 42 inches. Set tube forms, pour concrete, and set your post base hardware while the concrete is wet. Let concrete cure at least 48 hours, ideally 72, before loading. For paver builds: excavate the full area to your calculated depth. Slope the subgrade at 1% to 2% in the drainage direction. If soil is clay or very soft, lay geotextile fabric at this stage with at least a 12-inch overlap at seams.
Step 3: Install and compact the base (paver builds)
Add compactable gravel base in 3-inch lifts, compacting each lift with a plate compactor before adding the next. Do not add 6 inches at once and compact from the top, it won't compact properly in the middle. Check your slope after each pass. Your finished compacted base should be about 1 inch below your target finished grade to leave room for the bedding sand. The total base depth is typically 6 inches for a standard pedestrian patio, or up to 8 to 10 inches on soft or clay-heavy soil.
Step 4: Build framing and supports (deck-frame builds)
Set posts in the anchored post bases and cut to height. Install beams on top of posts using approved post caps, then hang joists from the beam(s) using joist hangers. For a ledger-attached build, the ledger goes on the house wall first with proper flashing installed before attaching to the structure. Joist spacing of 12 to 16 inches on center is standard; 12 inches is worth the extra material cost if you're running composite decking at an angle. Blocking at the midpoint of longer joist spans adds stiffness and is required in many jurisdictions. Use only approved structural connectors and corrosion-resistant screws or bolts throughout.
Step 5: Install retaining walls or structural edging
For paver builds: install your edge restraint or retaining walls before placing bedding sand. Retaining wall blocks go on a compacted gravel footing at least 6 inches deep (below frost in cold climates). Set the first course below finished grade so it anchors into the base. For timber edging, spike through the timber into the compacted base with rebar pins. Make sure drainage can get out from behind any retaining structure, a perforated pipe along the base of the wall drained to daylight or a dry well will prevent hydrostatic pressure buildup that destroys walls.
Step 6: Screed bedding sand and lay pavers (paver builds)
Set 1-inch diameter screed pipes on the compacted base at the correct slope and pull coarse concrete sand across them to create a perfectly level 1-inch bedding layer. Pull the pipes out as you go and fill the channels with sand. Do not walk on the screeded sand before laying pavers. Start laying pavers from a straight, fixed edge (usually the house wall or a finished edge) and work outward. Use spacers if your paver doesn't have built-in lugs, maintain consistent joint widths (usually 1/8 to 3/16 inch), and check level constantly. Cut pavers at the edges with a diamond blade or a rented paver splitter.
Step 7: Install the deck surface (deck-frame builds)
Run decking boards perpendicular to joists (or at 45 degrees if you prefer the look, but that requires closer joist spacing). Leave the manufacturer-specified gap between boards for drainage and expansion, typically 3/16 inch for composite, 1/8 inch for dense hardwoods. Use hidden fastener clips where the decking system supports them, or face-screw with appropriate composite decking screws. Pre-drill near board ends to prevent splitting. Keep a 1/4-inch clearance between the decking and any wall surface.
Step 8: Compact, joint, and seal (paver builds)
Once all pavers are laid, run the plate compactor over the entire surface (put a rubber pad or protective mat under the compactor plate to avoid scratching the pavers). Then sweep polymeric sand into the joints until they're filled to within 1/8 inch of the paver top, not flush, not proud, but just below the surface. Compact again lightly, sweep more poly sand in, and blow off the excess with a leaf blower.
Bell Industries notes that using blowers to manage excess water helps reduce haze and supports proper timing and conditions during polymeric sand activation blow off the excess with a leaf blower. Then lightly mist with water to activate the polymers.
Important: only do this on dry pavers in dry conditions. Applying poly sand to damp pavers causes a white haze that is very hard to remove.
Step 9: Build and install steps
Whether you're using precast concrete step units, stacked paver steps, or built stair stringers on a framed platform, work backwards from your total rise. Total rise divided by a comfortable riser height (5. 5 to 7 inches works well, maximum 7-3/4 inches per IRC) gives you your number of steps. Each tread must be at least 10 inches deep.
Keep riser height variation between steps to no more than 3/8 inch or people will trip. On a framed stair, use metal stringer connectors rated for the load and set the bottom of the stringer on a concrete pad that won't settle away from the structure. For paver stair steps, each course of block or paver step unit gets bedded on compacted gravel and mortared or pinned in place.
Step 10: Install guardrails and handrails
If your finished surface is more than 30 inches above grade at any point, a guardrail with a top rail at least 36 inches high is required. Posts should be bolted to the framing or to a structural post, not just face-screwed to a fascia board. For stairs, a handrail is required when there are 4 or more risers. Handrail ends should return to the wall or a newel post rather than ending as an open projection. Use the same corrosion-resistant hardware philosophy here as everywhere else, this is not the place for standard drywall screws.
Common mistakes, troubleshooting, and when to call in help
Mistakes I see on almost every first-time build
- Skipping the plate compactor or only doing one pass. A hand tamper cannot produce the density a plate compactor creates. Rent the compactor.
- Not sloping the subgrade. Everyone slopes the top surface but forgets the base layer needs the same pitch, so water pools under the pavers.
- Using play sand (fine-grained) for bedding instead of coarse concrete sand. Fine sand flows and erodes under the pavers over time.
- Leaving topsoil or organic material under the base. It compresses and rots. Take it all out.
- Mixing corrosion-resistant and standard hardware in a framed build. The weak link corrodes and the whole connection fails.
- Building steps that are too steep or with inconsistent risers. A 1/2-inch variation between risers is a tripping hazard and a code violation.
- Applying polymeric sand on a damp surface or in humid conditions. White haze on a new patio is a heartbreak you can mostly avoid.
Troubleshooting problems after the build
Rocking or uneven pavers almost always trace back to inconsistent base compaction, bedding sand that eroded or migrated, or edge restraint failure at a corner. To fix isolated rocking pavers, pull them up, add sand back to the low spot, tamp it, and relay. If you have widespread settling across a large area, the base was inadequate and the fix is to remove the pavers, add more base material, recompact, and relay. That's a multi-weekend job, which is why getting the base right the first time is worth the extra rental cost.
Water pooling on the surface means your slope is either insufficient or was installed incorrectly. Pooling toward the house is the most serious scenario because it pushes water against the foundation. If it's minor, you can sometimes grind high spots or build up low spots with mortar under affected pavers. If the drainage direction is just wrong, there's no good shortcut: the surface has to come up and the base has to be re-sloped.
On framed deck-style patios, the most common early problem is a springy or bouncy surface, which usually means joist spans are too long, blocking is missing, or the joist-to-beam connections weren't made with proper hardware. You can often add blocking or sister joists to fix this without tearing up the decking.
When to hire help instead of pushing through
Some parts of this project are genuinely worth paying a pro for, even if you do the rest yourself. Retaining walls over 24 to 30 inches high should be engineered or at minimum built from a manufacturer's design guide with geogrid reinforcement. Ledger board connections on deck-style builds in areas with significant snow load or wind are worth a structural engineer's sign-off. Any footing or framing that your permit requires an inspection on should be inspected before you cover it up, schedule that inspection proactively. And if your site has complex drainage problems, a drainage contractor's assessment before you build is far cheaper than fixing a flooded patio after the fact.
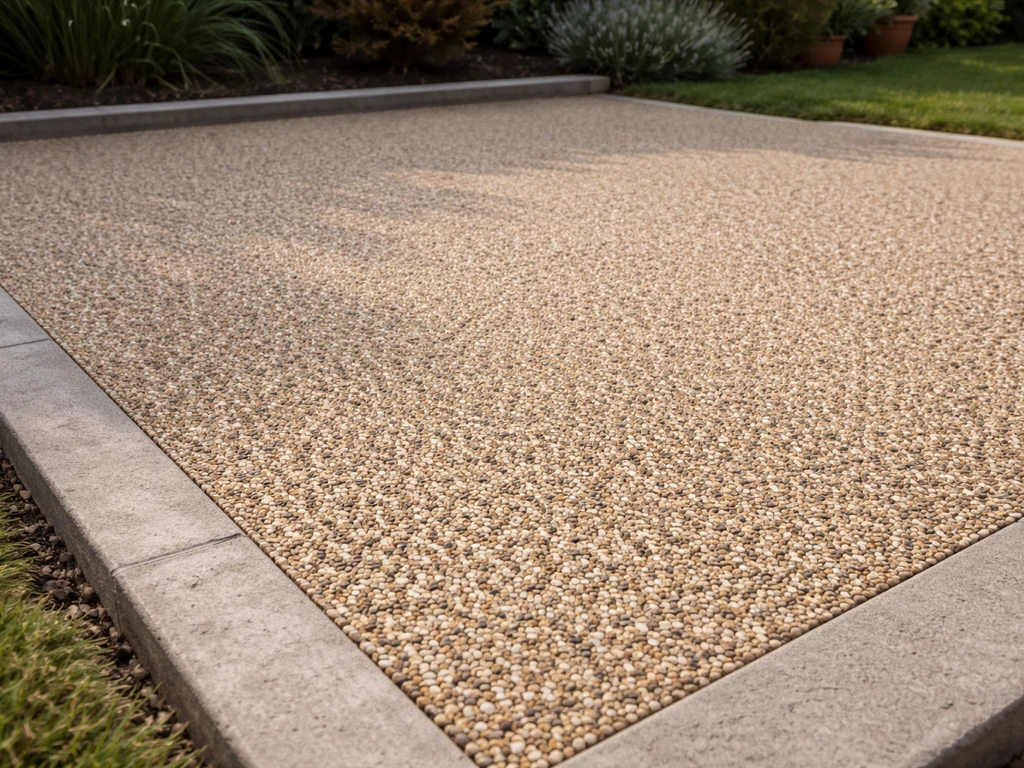
If you're getting into the paving and jointing portion and want to explore specialty finishes, resin-bound surfacing is another option for a raised base, and interlocking pavers offer a particularly forgiving installation process for first-timers. If you're also planning specialty finishes, review these patio installation tips for how to plan base, slope, and hardware so the surface stays stable.
Interlocking patio pavers also benefit from careful base prep, proper edge restraint, and the right slope so joints stay stable interlocking pavers. Resin-bound surfacing can be a durable way to achieve a smooth, attractive patio surface on a properly built raised base. The core planning and construction sequencing described above applies to all of them.
Pay attention to the base, get the slope right, and use the right hardware throughout, and you'll end up with a raised patio that stays solid and level for many years with almost nothing in the way of ongoing maintenance.
FAQ
How high can a raised patio be without needing guardrails or a permit in most places?
If any point of the finished surface is more than 30 inches above the adjacent grade, guardrails are typically required (top rail at least 36 inches). Permits vary widely by municipality, even when they reference the same code, so treat 30 inches as a planning threshold, then confirm locally for area size, footings, and retaining requirements.
What’s the right way to connect a raised patio to my existing door so it doesn’t leak or trap water?
Aim for the exterior patio surface to end about 1 inch below the interior finished floor, then build the slope away from the house. Also coordinate flashing and any door thresholds, because raising the patio but ignoring flashing can cause water intrusion even if the patio looks level.
Can I build a raised patio level, and rely on gutters or weather to handle drainage?
No, it should still slope away from the house. The typical target is 1/8 to 1/4 inch per foot, and the subgrade or deck drainage plane should match that direction. A level surface is how you get pooling, and pooling toward the foundation is the worst-case scenario.
Do I need geotextile fabric under a paver patio every time?
Not always, but use it when you have clay, very soft subgrade, or conditions where the base could mix with native soil. The purpose is separation, preventing settlement caused by migration of fines into your gravel and loss of compaction.
How do I tell whether I should choose the paver-on-base approach or the deck-frame approach?
Use the paver system when the raise is relatively modest and you can build solid edge restraint and retaining on the downhill side. For taller elevations (roughly above 18 to 24 inches) or when soil settling is a major concern, a deck-frame platform on footings is usually more structurally reliable and gives you access beneath.
What’s a common mistake that causes rocking pavers on raised patios?
Most rocking comes from an inadequate or inconsistent compacted base, sand/bedding that erodes, or edge restraint failure at corners. If it’s localized, lifting and re-bedding may work, but if the movement spans an area, the fix is usually base rework and re-laying.
If I’m building with fill, how do I prevent retaining walls from bowing or failing?
Provide an outlet for water before you close everything in. A French drain or perforated pipe at the base of the fill reduces hydrostatic pressure, and make sure the retaining wall sits on a properly prepared footing. For taller walls, rely on a manufacturer design guide and reinforcement instructions rather than guessing.
Can I skip compacting in small lifts if I’m in a hurry?
Usually no. Compaction works by lift thickness, typically 3-inch layers for granular base, compacted each time before the next lift. If you dump thicker layers, you can compact the top but leave voids underneath, which later turns into uneven settlement.
How do I calculate steps correctly for a raised patio?
Work backward from the total rise. Divide the total rise by a comfortable riser height (commonly about 5.5 to 7 inches, with a maximum of 7-3/4 inches). Then confirm each tread is at least 10 inches deep, keep risers consistent within about 3/8 inch, and remember that handrails become relevant when there are 4 or more risers.
What guardrail details should I pay attention to beyond the height number?
Make sure posts are anchored to the structure framing or a structural post, not just attached to a non-structural surface. For stair setups, handrail ends should return to a wall or newel, rather than ending in a way that creates a snag or open projection.
If my deck-style raised patio feels bouncy, what are the most likely fixes?
Bounciness often means joist spans are too long, mid-span blocking is missing, or the joists were not connected to beams with the correct rated hardware. In many cases, adding blocking or sistering joists can reduce flex without removing the decking.
Is it a big deal if I mix different metals on deck hardware in wet climates?
Yes. Mixing zinc-plated hardware with stainless or using mismatched connectors can accelerate corrosion in wet environments. Stick to a single corrosion-resistant system approach (for example, hot-dipped galvanized or stainless throughout) so connectors, screws, and joist hangers stay compatible.
What’s the safest approach if I discover I hit an underground utility while digging?
Stop immediately and do not try to repair anything. Call the utility companies and follow their instructions. This is exactly why you should call 811 (in the US) 2 to 3 business days ahead, since many raised patio footings extend well below typical surface digging depths.
Next Article
How to Do a Resin Patio: Step-by-Step DIY Guide
Step-by-step DIY for a resin patio: prep base, choose resin type, lay resin and aggregate, cure, and maintain for durabi