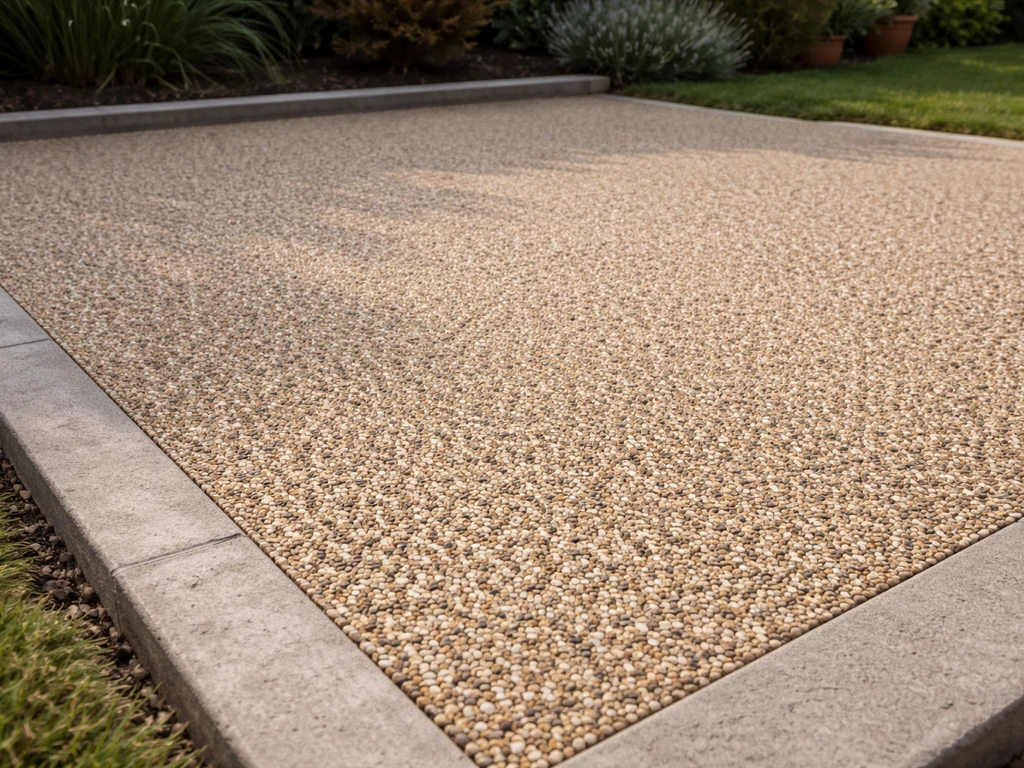
A resin patio is a layer of UV-stable polyurethane resin mixed with decorative aggregate, spread over a prepared base and left to cure into a smooth, durable, and good-looking surface. Done right, it lasts 15-25 years, handles foot traffic easily, and can be made fully permeable so rainwater drains straight through it rather than pooling on top. The catch is that the prep work and mixing are less forgiving than, say, laying pavers, get the base wrong or mix in damp conditions and you'll have problems. This guide walks you through the whole process, from planning and base prep to laying, curing, and keeping it looking sharp for years.
How to Do a Resin Patio: Step-by-Step DIY Guide

Nolan Lennox
7 Jun 2026
Resin patio basics and when to choose resin
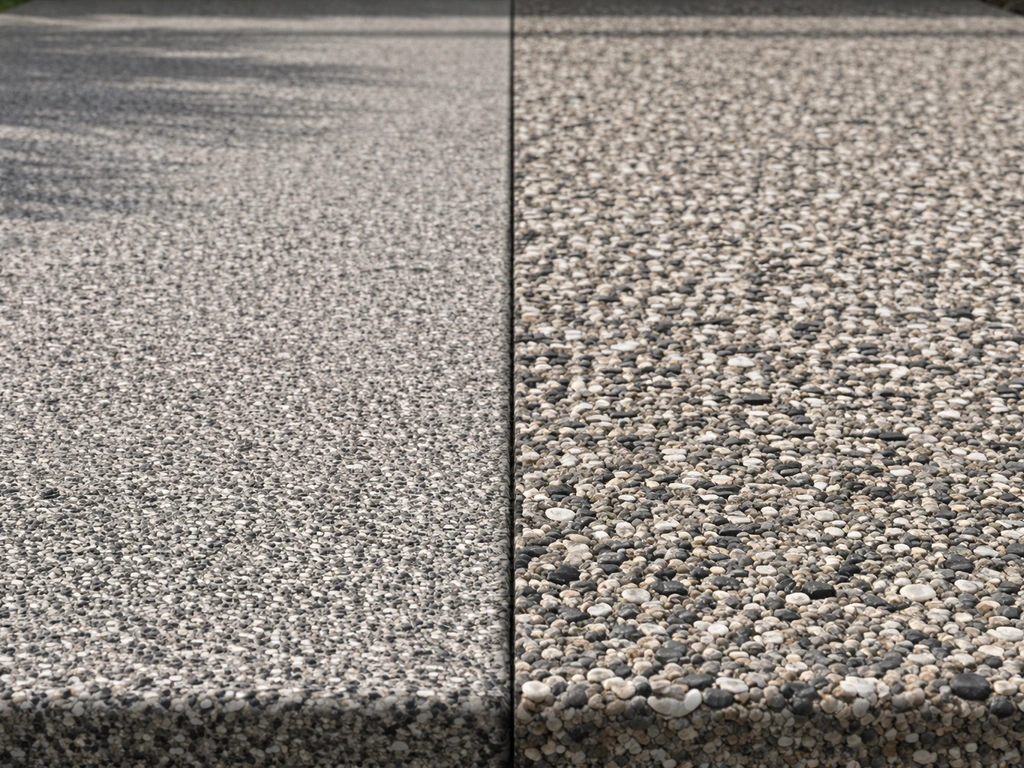
There are two types of resin surface, and they're genuinely different products. Resin-bound (the one most people should choose for a patio) mixes resin and aggregate together before laying, creating a porous surface where water passes through the gaps between the stones into the ground below. It's fully permeable, looks cleaner, and the aggregate is fully encapsulated so it won't scatter underfoot. Resin-bonded, sometimes called a scattercoat, applies resin to the base first and then throws loose aggregate on top. It's cheaper and quicker, but the surface is not permeable, stones can come loose over time, and it gives a rougher texture. For a backyard patio, resin-bound is the better investment almost every time.
Resin-bound is worth choosing when you want something that looks premium without the joints and weeding maintenance of block paving or interlock, when drainage is a concern (especially if your garden has heavy clay soil), or when you want a seamless, customizable look with lots of color and aggregate options. It also fits curved or irregular shapes that would be awkward with pavers.
Where it falls short is cost: resin-bound materials are pricier than gravel or concrete, and the mixing equipment requirement is more involved than most simple DIY surface projects. If you are working with a raised patio, the base build-up and edging details are even more important, so plan for correct depth, drainage fall, and a stable sub-base raised patio how to. If your budget is tight and the shape is simple, interlock or concrete might get you further. But for a polished, low-maintenance patio surface that handles wet UK or northern climates well, resin-bound delivers.
Planning: size, layout, and checking the base
Start by nailing down your dimensions. Measure the area in square metres, then add about 10% to your material estimates to cover waste, edges, and any mixing inconsistencies. Think about where the edges will land: you'll need to install edging boards or aluminium edging strips around the perimeter to contain the resin while it cures, so those boundaries need to be clean and defined before anything else.
Drainage direction matters from the start. Even though resin-bound is permeable, you still need the overall surface to slope very slightly away from the house, typically around 1:60 to 1:80 (roughly 15mm drop per metre). This helps with surface drainage and prevents any ponding if the sub-base ever compacts unevenly. Mark this fall into your layout plan before you dig.
Check your existing ground carefully. If you're building on bare soil, you'll need a full excavation. If there's already a concrete or tarmac base in good condition, with no cracking, crumbling, or movement, you may be able to prime and lay directly on top, which saves significant time and cost. However, a failing or cracked base will telegraph its problems straight through the resin layer, do not try to patch over a bad base. Probe soft spots, check for tree roots nearby, and make sure any existing surface has a clean bond potential (free of moss, oil, and loose material).
Materials and tools: what you actually need
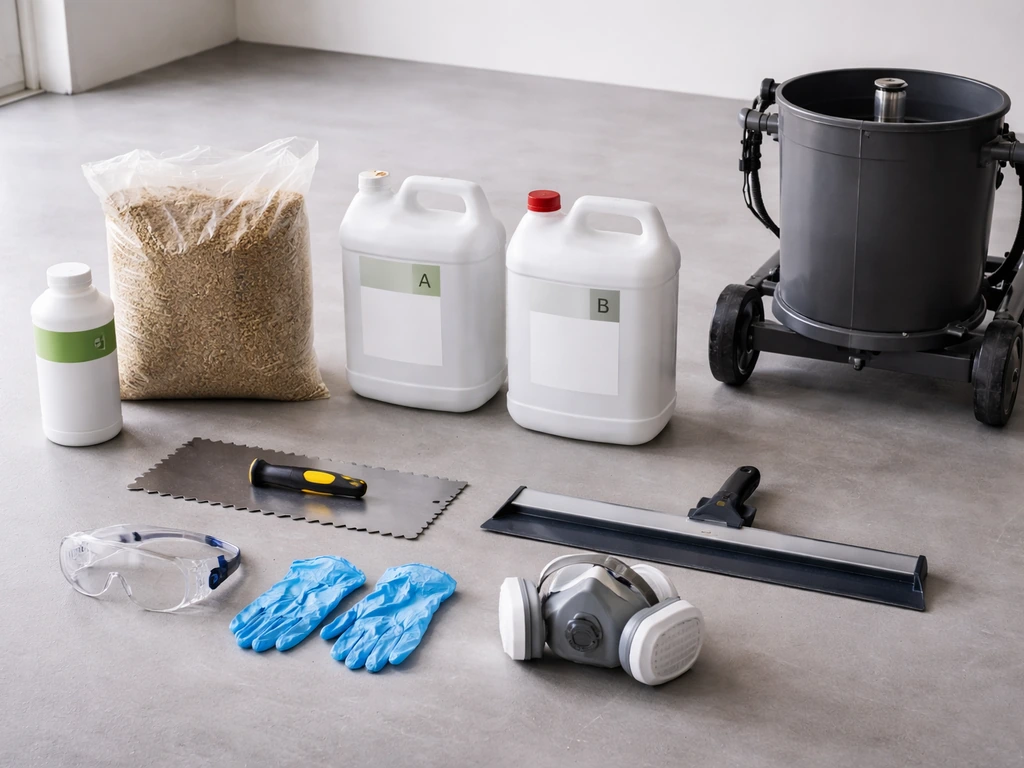
Before you start buying, get your area calculation right. Then work through this list systematically, missing any of these, especially the safety gear or the primer, is a common DIY mistake that leads to poor results.
Materials
- MOT Type 1 sub-base aggregate (compacted depth of around 100mm for a patio, laid in two 50mm layers)
- Open-textured macadam or permeable binder course, 50mm, if building a full permeable sub-base stack
- UV-stable polyurethane resin (Part A and Part B system) — calculate approximately 7-15% resin by weight of aggregate, depending on stone size
- Decorative aggregate (a common blend is 50% 1-3mm and 50% 2-5mm stone for appearance and stability)
- SBR primer or manufacturer-specified bonding primer for the base layer
- Aluminium or steel edging strips with stakes
- Kiln-dried silica sand (for base leveling if needed)
- Patio sealer (optional, applied no earlier than 3 months post-installation)
Tools
- Forced action mixer (not a standard drum mixer — the resin needs shearing action to mix properly)
- Paddle mixer or whisk drill attachment for the resin components
- Wheelbarrow and buckets for transporting mixed material
- Spazzle or flat-edge spreading rake for laying the resin-aggregate mix
- Hand trowel for edges and tight spots
- Steel float or roller for final leveling/compaction
- Stiff brush for cleaning the existing base
- Pressure washer (for base prep)
- Plate compactor (for sub-base compaction if building from scratch)
- PPE: nitrile gloves, safety glasses, and an appropriate respirator rated for isocyanate vapours
The forced action mixer is the one piece of kit that often trips up DIYers. A standard cement drum mixer won't cut it, the resin won't coat the aggregate evenly. You can hire a forced action mixer from most plant hire companies, usually for around £60-100 per day. It's worth every penny.
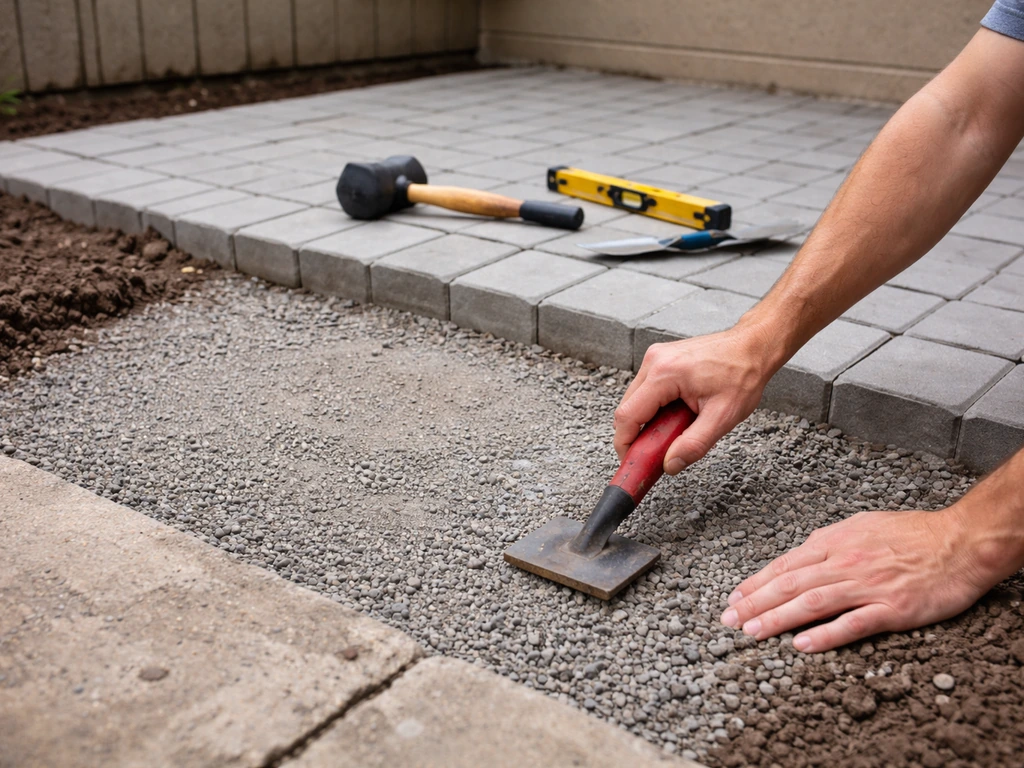
Base preparation and drainage details
This is genuinely the most important part of the whole job. A thin resin layer laid over a poor base will crack, lift, and fail within a year or two. EcoGrid notes that a resin-bound resin layer is not sufficient on its own for driving upon and should be installed over a permeable, load-bearing sub-base such as a crush-stone system. Get the base right and the resin layer looks after itself for decades.
If you're starting from bare ground, excavate to a total depth of 150-200mm below your finished surface level. Fill and compact 100mm of MOT Type 1 granular sub-base in two 50mm layers, compacting each pass with a plate compactor. For a fully permeable build (which is best practice for a resin-bound patio and important for drainage compliance in many UK areas), add 50mm of open-textured macadam on top of the Type 1 before the resin layer goes down. This full stack is what gives you a SUDS-compliant, permeable surface that can handle real rainfall without flooding.
If you're laying on an existing concrete or tarmac base, the requirements are simpler but still important. The base must be structurally sound, with no hollow spots, significant cracking, or movement. Clean it thoroughly with a stiff brush and pressure washer, removing all moss, algae, oil stains, and loose debris. Oil stains need a degreaser treatment before priming, resin will not bond to a greasy surface. Allow the base to dry completely before proceeding. Any moisture trapped beneath the resin layer is one of the primary causes of bubbling and adhesion failure.
Install your edging strips before the primer goes down. Stake them firmly at your finished height, using a string line to keep them level and aligned with your planned drainage fall. Once the resin is in, you can't adjust the edges without cutting.
Step-by-step build process
- Check the weather. Do not start installation if the surface temperature is below 3°C, if rain is forecast within 4-6 hours, or if humidity is very high and the surface temperature is close to the dew point. Moisture and cold are enemies of resin cure. A clear, dry day between 10-25°C is ideal.
- Prime the base. Apply SBR primer or your resin system's specified bonding primer across the entire base surface using a roller. Follow the manufacturer's drying time — usually 30-60 minutes. This step is what makes the resin layer grip the base; skipping it leads to delamination.
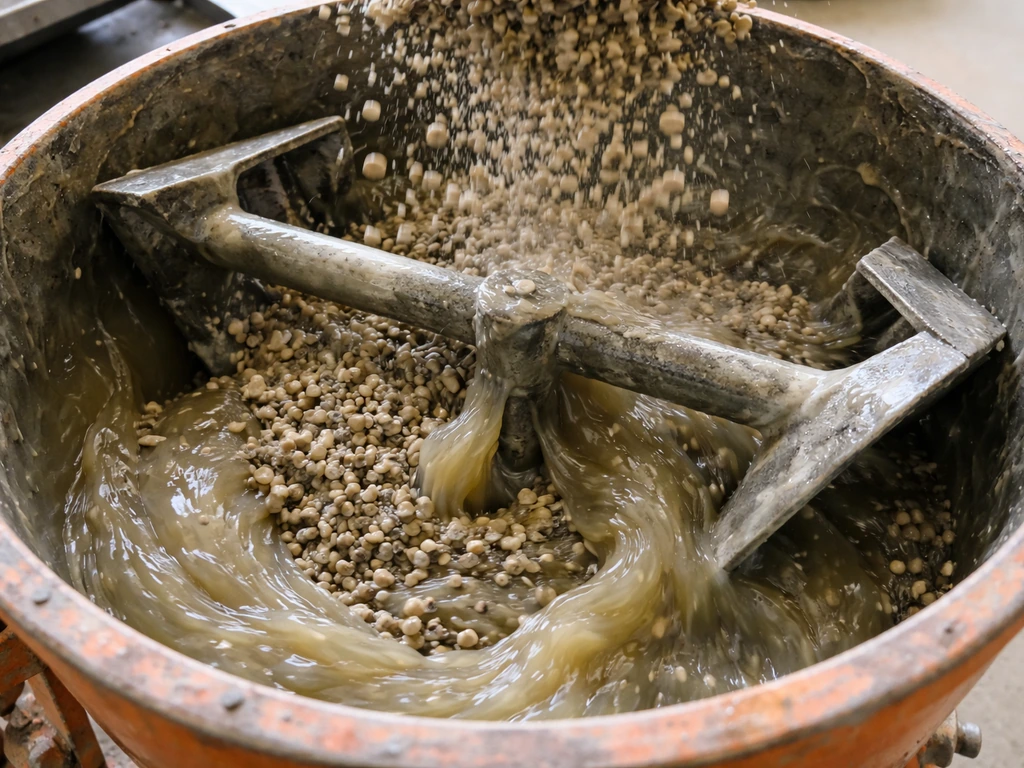
- Load the forced action mixer with your dry, clean aggregate first. Aggregate must be kiln-dried — any moisture in the stone will prevent the resin from bonding properly and cause bubbling.
- Mix the resin components. Combine Part A and Part B of the polyurethane resin together (typically a 1:1 or manufacturer-specified ratio) using your paddle mixer or whisk drill in a separate bucket for 60-90 seconds until fully blended.
- Add the combined resin mix to the aggregate in the forced action mixer. Run the mixer for 2-3 minutes until every piece of aggregate is uniformly coated. The mix should look consistently glistening — no dry patches or pooled resin.
- Transfer the mixed material to your prepared area promptly. Work in batches that you can spread within the resin's open time (typically 20-30 minutes depending on temperature — warmer weather shortens this).
- Spread the mix using your spazzle or flat-edge rake. Start at one end and work backward toward your exit point so you don't step on freshly laid material. Work in consistent passes, building up to your target depth of at least 18mm — thinner than this and the surface will crumble and fail prematurely.
- Use a hand trowel to work the material into edges and corners, ensuring no gaps against the edging strips.
- Run a steel float or roller lightly over the surface to even out the texture and gently compact the layer. Don't over-work it — you just want consistent depth and a uniform surface texture.
- Leave the surface completely undisturbed to cure. Put up barriers if needed to keep people, pets, and leaves off the fresh surface.
Common problems and how to fix them
Bubbling or voids in the surface
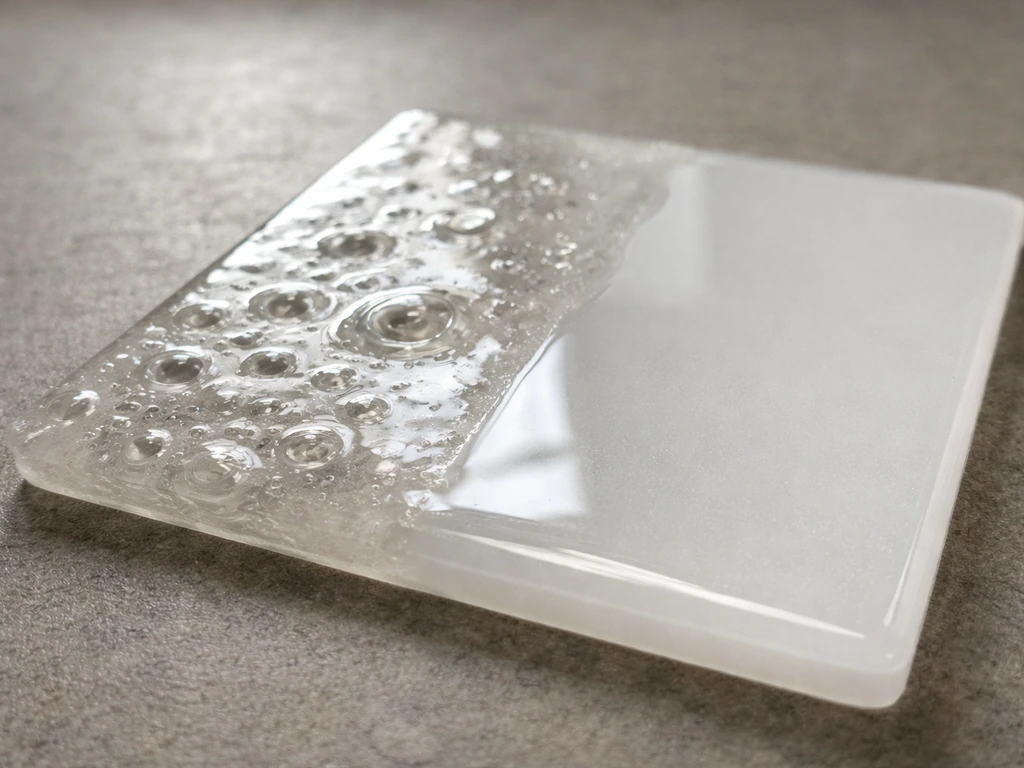
Bubbles are almost always caused by one of two things: moisture in the aggregate or base, or mixing too vigorously and whipping air into the resin. Make sure your aggregate is genuinely kiln-dried (check bags are sealed and dry before use), your base is bone dry before priming, and mix your resin components steadily rather than at maximum drill speed. If you get minor bubbles after laying, try rolling over the area while the resin is still in its open time, this can pop and flatten surface bubbles before cure.
Uneven finish or patchiness
Patchy or uneven finish usually comes from inconsistent spreading, going too thin in some areas, piling up in others, or from the resin starting to cure before it's spread properly. The fix during installation is to keep batch sizes manageable and work methodically with the spazzle. If you spot a thin area before the resin has cured, gently push extra material into it and re-float. Once cured, thin patches are difficult to repair invisibly and you may need to grind the area back and patch with a fresh mix, which is why consistent depth matters from the start.
Aggregate loss or crumbling surface
If stones are coming loose, the most likely culprits are laying too thin (below 18mm), using too little resin in the mix, or damp aggregate preventing a good bond. The published minimum depth is 18mm, anything less is a known failure mode. Check your resin-to-aggregate ratio against the manufacturer's data sheet (generally 7-15% resin by weight) and never cut corners on resin quantity to save money.
Color or aggregate inconsistency
Variation in color across the surface usually comes from inconsistent mixing, using aggregate from different batches with slight color variation, or uneven primer coverage affecting how the resin sits. Order all your aggregate from the same batch for the whole job, mix each load for the same amount of time, and ensure the primer coat is even before you start laying. Sunlight exposure differences (one area in shade, one in full sun) can also make the finished surface look different on the day but this usually evens out.
Curing, maintenance, and how long it lasts
Curing timeline
| Stage | Timeframe | What it means |
|---|---|---|
| Initial cure | 2-8 hours | Surface firms up; keep all foot traffic off |
| Light foot traffic | 24-48 hours | Can walk on it carefully; avoid heavy loads |
| Full mechanical cure | 28 days | Safe for normal patio use and furniture |
| Apply sealer (optional) | 3 months minimum | Do not seal before this point |
Resist the temptation to walk on it 'just to check' within the first 24 hours. Footprints that compress the still-curing surface will leave permanent marks. Put up a barrier if you need to, it's worth the inconvenience.
Ongoing maintenance
Day-to-day, resin-bound patios are very low maintenance compared to block paving or interlock (no weeding, no re-sanding joints). A few times a year, sweep off debris and give the surface a light jet wash at a sensible distance, keep the lance at least 30cm from the surface and avoid concentrating the jet on one spot for too long, which can dislodge aggregate over time. For winter, you can use sand or light salt for de-icing without damaging the surface. Avoid metal shovels directly on the resin, use a plastic snow shovel or a soft brush.
If you decide to apply an optional sealer to boost UV resistance and give the surface a refreshed look, wait at least 3 months after installation before applying anything, applying sealer to insufficiently cured resin can cause adhesion problems and surface clouding. After that, a sealer every 3-5 years is reasonable depending on use and sun exposure.
How long will it actually last?
A properly installed resin-bound patio on a solid base typically lasts 15-25 years before showing significant wear. The surface will gradually lose a little of its texture and sheen over time, especially in high-traffic areas. Premature failure almost always traces back to base movement, insufficient depth (below 18mm), frost damage on a compromised base, or the DIY shortcuts covered in the troubleshooting section above. Get those fundamentals right on day one and you'll have a patio that outlasts most other options.
If you're weighing up the effort involved, it's worth knowing that the base preparation and drainage planning overlap significantly with other patio builds. If you are planning a patio purchase or install, you can also map out how to pay for it step by step before work begins how to pay a patio.
The sub-base work described here, excavation, compaction, fall planning, is essentially the same foundation logic that applies whether you're building a raised patio, installing interlock pavers, or laying any other hard surface. For a raised patio, the key is getting the step-up structure and drainage fall right before you lay the resin surface. Getting comfortable with that groundwork pays dividends across all kinds of patio projects.
These patio installation tips will help you avoid common problems and get a long-lasting resin-bound finish.
FAQ
Can I install a resin-bound patio over old resin, or does it need to be removed?
Only if the existing surface is sound, firmly bonded, and clean. Any lifting, soft patches, crumbling edges, or areas with dampness must be removed first, because resin will not bridge structural defects. In many cases it is safer to grind and remove any unstable top layer to expose a solid, durable substrate, then prime and lay to the correct finished depth.
What’s the best weather window to lay resin-bound, especially in the UK?
Aim for a dry period when the ground is dry and temperatures are within the resin manufacturer’s recommended range. Avoid laying if rain is expected during or immediately after install, and be cautious after cold nights because condensation can form on the base. If your aggregate or base is even slightly damp, you increase the risk of bubbles and adhesion failure.
How do I calculate the amount of resin and aggregate I need if my patio isn’t perfectly flat?
Estimate area using the true laid footprint, then account for the specified thickness and include the recommended waste. If the patio has a noticeable fall, measure the length over the slope but keep the thickness consistent by ensuring your base levels are built to the design fall, not by “adding thickness” of resin. Resin depth changes affect both durability and appearance, so build the base correctly first.
Do I need to use a primer every time, and what happens if I skip it?
Most resin systems require priming to promote adhesion and reduce moisture issues. Skipping primer often leads to poor bond, patchiness, and increased likelihood of bubbling, especially on concrete or tarmac. If you are laying over an existing base, use the exact primer specified by your resin manufacturer, and make sure the substrate is completely dry before applying it.
What’s the correct way to mix resin-bound so it doesn’t cure unevenly or trap air?
Mix to the manufacturer’s time instructions, with steady mixing rather than high-speed agitation. High mixing energy can whip air into the resin, which later shows up as bubbles. Also keep batch sizes manageable so you can spread before the mix reaches the end of its working (open) time.
Can I do it without a forced action mixer if I’m doing a small patio?
If the resin you’ve chosen specifies a forced action mixer, you should follow that. A standard drum mixer often does not coat aggregate evenly, which can create weak spots that wear faster and increase stone movement. For small areas, hiring a forced action mixer for the day is usually still cheaper than repairing a failed finish later.
How thick should the resin layer be for a patio, and what if my base is limited in depth?
Stay at or above the system’s minimum recommended depth, often around 18mm for resin-bound patio failures prevention. If your construction depth is constrained, do not try to solve it by using a thinner resin layer. Instead adjust the excavation, rebuild the sub-base, or reduce the overall scope until you can meet the required finished thickness.
How long should I wait before driving over the finished patio (or moving heavy items onto it)?
Foot traffic immediately after cure is not ideal, and vehicle loads require longer cure and system-specific confirmation. Resin-bound is designed for pedestrian use, and heavy point loads can imprint if curing is incomplete. Follow the product’s guidance on “traffic” and “full cure,” and consider adding temporary protection or barriers for the first period.
Will de-icing salts or sand damage the surface over time?
Light sand is generally safe for grip, and light salt use is typically tolerated, but frequent heavy salting can accelerate surface dulling and dislodge some aggregate at edges. Use the smallest amount for safety, avoid scraping with metal tools, and focus on preventing ice buildup through regular brushing and surface cleanliness.
Why does my resin look different in patches, even when the color was the same?
Uneven primer coverage, inconsistent batch mixing, or aggregate from multiple batches with slightly different tone can cause patchiness. Sun and shade can also change how the resin looks on installation day, which may even out later, but it will not fix true mixing or coverage problems. If you notice inconsistencies early in the same pour, correct spreading and mixing discipline before the area fully cures.
Do I need weed control under a resin-bound patio?
Even though resin-bound is not jointed like block paving, weeds can still emerge from the edges or if organic material remains in the sub-base. Remove roots and topsoil during excavation, compact thoroughly, and ensure perimeter areas are properly edged. For the most stable results, keep the sub-base clean and do not bury vegetation behind the build-up layers.
When, if ever, should I apply sealer to a resin-bound patio?
If your system is already UV-stable and you want to avoid changing the surface behavior, you can often skip sealer. If you do apply it, wait at least the manufacturer’s recommended curing period, because sealing too early can cause clouding or adhesion issues. Also note that sealer can change slip resistance, so test in a small hidden area before committing to the full patio.
Next Article
How to Rebuild a Patio Step by Step DIY Guide
Step-by-step DIY guide to rebuild a cracked or uneven patio, including base prep, drainage, finishes, costs, and pro cal