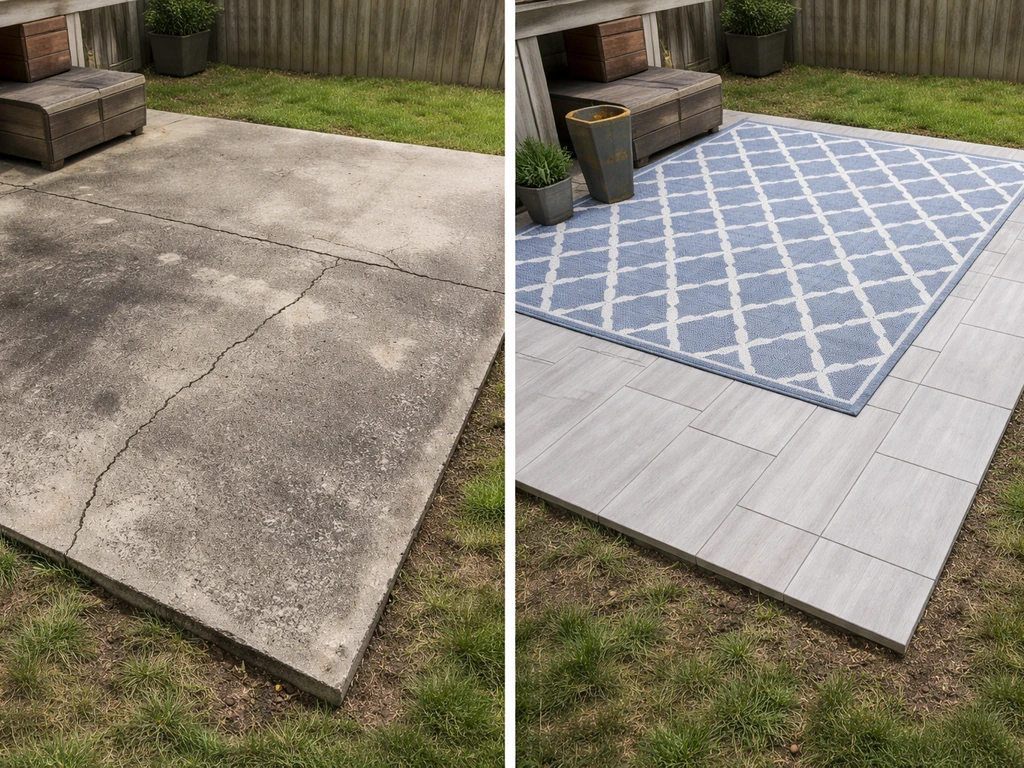
You can improve most patios significantly with a weekend of work and a few hundred dollars. The biggest wins come from cleaning and sealing the surface, fixing cracked or sunken spots, pulling weeds and refilling joints, adding proper edging, and then layering in comfort upgrades like lighting, shade, and better seating. Whether your patio is crumbling concrete, shifting pavers, faded wood, or just depressingly bare, there is a clear DIY path for each situation. Start with a diagnosis, build a simple plan, and stack the improvements in order from structural to cosmetic.
How to Improve a Patio: DIY Steps, Fixes, and Upgrades

Nolan Lennox
24 May 2026
Step one: figure out what is actually wrong
Before buying a single bag of sand or a can of sealer, walk your patio slowly and honestly. The improvements that matter most depend entirely on what you are working with. A fresh-looking slab that just needs furniture is a very different project from a sunken brick patio with weeds growing through every joint.
Look for these specific problems and note which ones apply to your space. Cracks in concrete or pavers are often the first sign of slab settlement caused by soil erosion or soft spots underneath. If you also see one section sitting lower than another, or you notice water pooling in low spots after rain, that is a progression beyond surface-only damage and it points to a base problem, not just a cosmetic one.
Standing water is a red flag: it usually means the base was not compacted properly, the aggregate depth was insufficient, or the grading is off. Envisioning Green notes that if the base is not designed to let water move freely, freeze-thaw cycles can push pavers out of place or contribute to uneven settlement Standing water is a red flag.
These issues feed each other and get worse, especially in freeze-thaw climates where water in cracks expands and causes progressive spalling and internal cracking.
Weeds coming up between pavers almost always mean the polymeric sand in the joints has degraded or was never there. Loose, debris-filled joints act like potting soil and weeds love them. Faded or stained surfaces, peeling sealers, and grimy concrete are cosmetic but they affect how the whole space feels. Privacy, shade, traffic flow, and seating are usability problems, not structural ones. They matter a lot for enjoyment but should come after the surface and drainage are sorted.
- Cracks: surface only, or are sections also uneven or sunken?
- Water pooling: where exactly does it collect, and how long does it sit?
- Weeds or moss in joints: a joint sand problem
- Sunken or rocking pavers: base compaction or drainage failure
- Staining, spalling, or flaking: surface deterioration, likely needs cleaning and sealing
- Faded wood or composite: maintenance issue, often reversible
- No shade, no seating, no privacy: usability gaps to fill after structure is solid
Plan it before you buy anything: budget, layout, drainage, and terrain
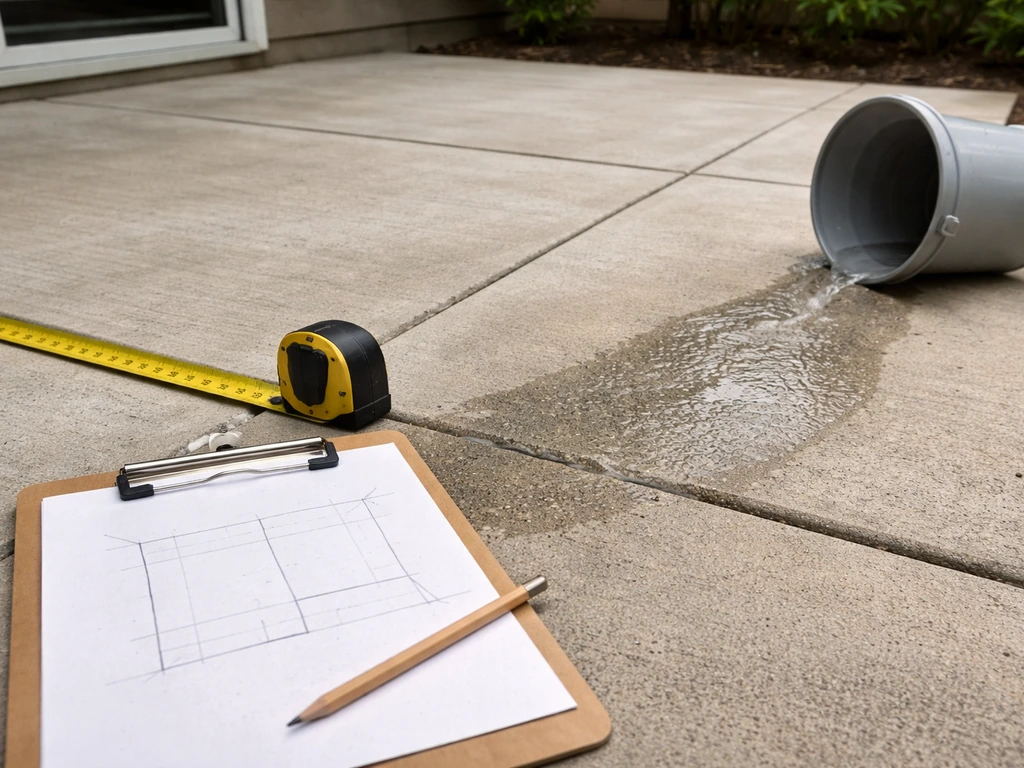
Measure your patio before you do anything else. Get the square footage (length times width), note any irregular shapes, and sketch a rough layout. This drives every material quantity calculation. A patio that feels small on paper might just need furniture rearranged, or it might genuinely need to be extended. Knowing the number helps you make that call.
Check your drainage carefully. Pour a bucket of water on different spots and watch where it goes. Water should flow away from the house, ideally at a slope of about 1/8 inch per foot. If it flows toward the foundation or pools in the middle, that is a problem you need to fix before any surface work, because water sitting under or against whatever you install will undermine it. Soil erosion from poor drainage is one of the most common causes of sunken concrete slabs and shifting pavers.
Know what is under your patio. Concrete slabs typically sit on a compacted gravel sub-base. Pavers typically have 4 to 6 inches of crushed rock base plus about 1 inch of bedding sand. Gravel patios need edging and geotextile fabric to stay stable. Wood or composite decking sits on framing and posts. This matters because some improvements, like overlaying new pavers, require you to account for added height at doors and thresholds. Others, like fixing a sunken section, require excavating and rebuilding the base.
Set a realistic budget range before you go shopping. Quick fixes like cleaning, weed control, re-sanding joints, and sealing a typical 200-square-foot patio usually run $50 to $200 in materials. Resetting a few sunken pavers and adding edging might add another $100 to $300. A full surface overlay or material upgrade scales with square footage and material choice. Decide upfront whether you are doing a tune-up, a refresh, or a real renovation, because those are three very different scopes.
Quick wins that make a huge difference fast
If you do nothing else, do these. They are low cost, doable in a weekend, and they transform how a patio looks and performs more than most bigger projects. Start here even if you are planning larger upgrades later.
Clean the surface thoroughly

A pressure washer is the single best tool for patio improvement. Rent one if you do not own one. It removes years of grime, algae, mildew, and old sealer residue from concrete and pavers, and it strips surface dirt from wood before refinishing. Any sealer or stain you apply afterward must go onto a clean, dry surface, so this step is not optional. For composite decking, use warm water and a pH-neutral detergent (pH 5 to 8) rather than aggressive pressure, which can damage the surface.
Fill cracks and repair surface damage
Small cracks in concrete can be filled with concrete crack filler or a polymer-modified patching compound. For pavers, a cracked paver should be replaced entirely since patching rarely looks or holds well. Pull the damaged unit, check the sand bed underneath, add or level bedding sand if needed, set the new paver, and re-sand the joints. A crack that is just a surface issue is a cosmetic repair. A crack accompanied by a height difference between slabs signals a base problem that needs more investigation.
Seal concrete and pavers
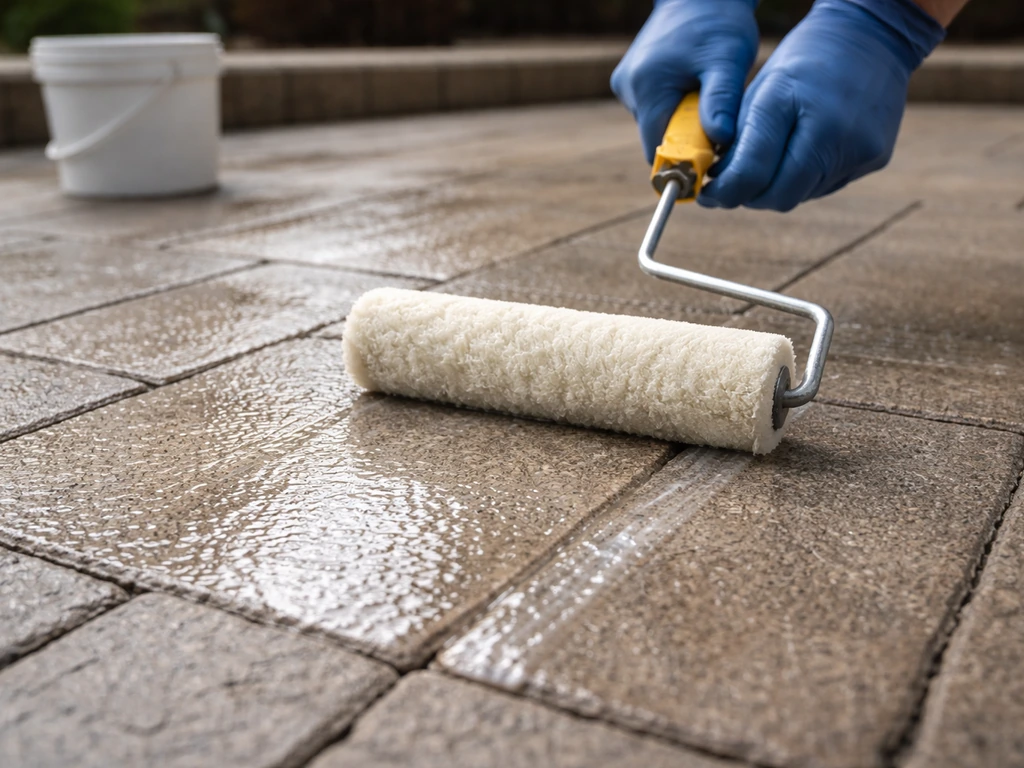
Sealing protects against staining, freeze-thaw damage, and surface deterioration. Do not apply sealer when the surface or air temperature is below 40°F or above 95°F. Do not apply to a damp or wet surface, and do not apply if rain is expected within 12 to 24 hours, depending on the product. After pressure washing, give the surface at least 1 to 3 days to fully dry before sealing. New concrete should cure for a minimum of 28 days before sealing. These are not suggestions, they are the conditions that determine whether the sealer bonds correctly.
Refill joints with polymeric sand
Degraded or missing joint sand is the main reason weeds take over paver patios. Sweep polymeric sand into the joints, compact the pavers to settle the sand down, and then sweep again until joints are fully filled. Remove all excess sand from paver faces with a leaf blower before wetting, because polymeric sand hardens and leaves a haze if it dries on the surface. Then mist the entire area until the sand is activated through the full depth of the joint. Wait 10 to 15 minutes and mist again. Do not apply over damp pavers and do not proceed if rain is coming.
Add or replace edging
Edging is one of the most underrated patio improvements. Without solid edge restraints, even a perfectly compacted paver base will shift laterally over time, gaps open up, and the whole system spreads. Plastic or metal paver edging staked into the ground along all perimeter edges stops this. It also prevents soil and organic material from migrating into the joint sand, which is the other big reason weeds establish between pavers.
Surface refresh and material upgrades by patio type
Your material determines your upgrade options. Here is a practical breakdown of what actually works for each common patio type, including when a surface refresh is enough and when you need to go deeper.
| Patio Material | Common Problems | Surface Refresh Options | Bigger Upgrade Options | DIY Difficulty |
|---|---|---|---|---|
| Concrete slab | Cracking, staining, spalling, pooling water | Clean, patch cracks, apply sealer or concrete stain/paint | Paver overlay, resurface with microtop or overlay mix, correct grading | Easy to moderate |
| Brick/pavers | Weeds in joints, sunken sections, faded color | Pressure wash, re-sand joints with polymeric sand, reseal | Reset sunken sections, rebuild base, add edging, replace damaged units | Moderate |
| Gravel | Spreading gravel, weeds, uneven surface | Add fresh gravel layer, pull weeds, install edging, add geotextile fabric | Full excavation with fabric base, compacted gravel refresh, upgrade edging | Easy |
| Wood decking | Splintering, greying, rot in boards | Clean, sand lightly, apply deck stain or sealant | Replace damaged boards, add hidden fasteners, refinish entire surface | Moderate |
| Composite decking | Mold/mildew, fading, staining | Clean with pH-neutral detergent semi-annually, spot-treat stains | Replace boards, upgrade to capped composite, improve drainage underneath | Easy to moderate |
Concrete slab upgrades
If your concrete slab is structurally sound but ugly, a concrete stain or overlay is a genuinely transformative upgrade. If your patio is ugly but still structurally sound, a stain or overlay can dramatically improve its appearance without a full rebuild ugly patio. Acid stain and water-based concrete stain both give plain grey concrete a lot more character and they bond well to clean, properly prepped surfaces. If the slab has significant sections that are sunken due to soil erosion and void formation underneath, those need to be addressed before any surface work, either by mudjacking (pumping grout under the slab) or by breaking out and repouringthe affected sections.
Paver and brick patios
Resetting sunken or rocking pavers is manageable as a DIY project. Pull the affected units, scrape out the old bedding sand, add or level fresh sand, reset the pavers flush with the surrounding surface, and re-sand all the joints. For larger areas of settlement caused by base failure, you may need to excavate to the base layer, add and re-compact crushed rock aggregate (4 to 6 inches is standard for patios), and re-lay everything. That is a bigger job but very doable over a long weekend with a plate compactor rental.
Wood and composite surfaces
Wood decking that is greying but structurally sound can be brought back dramatically with cleaning and a fresh coat of deck stain or sealant. Replace any boards that are soft, rotted, or cracked through. Composite decking is lower maintenance but not no-maintenance: clean it at least twice a year (spring and fall) to prevent buildup that causes discoloration and mildew. Less frequent but consistent cleaning is always better than waiting until problems are visible.
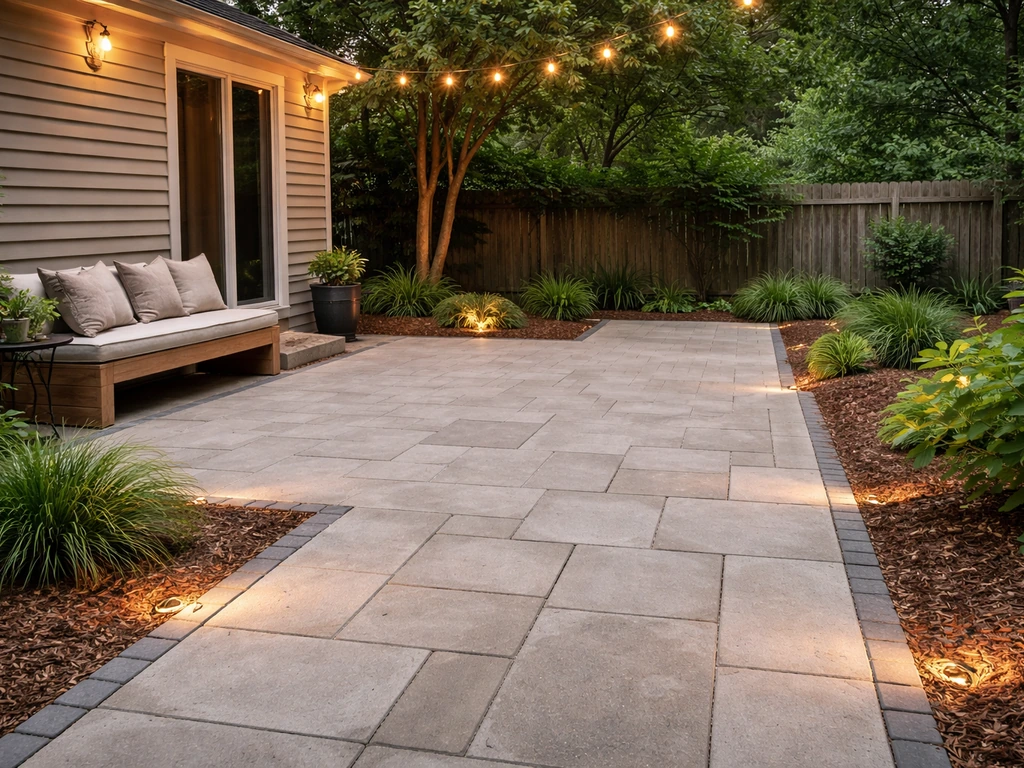
Making your patio more comfortable and usable
Once the surface is sorted, usability upgrades are where a patio goes from functional to genuinely enjoyable. Think about how you actually want to use the space: dining, lounging, cooking, entertaining, or some combination. Then design those zones intentionally rather than just filling the space with furniture.
Seating zones and traffic flow

Define distinct zones if your patio is large enough. A dining area needs about 10 to 12 feet of clearance around the table for chairs to pull out comfortably. A lounge area works well with a rug anchoring the seating group, which also visually separates the zones. Leave a clear 3-foot-wide pathway for traffic to move without interrupting either zone. If your patio is small, multi-functional furniture (benches with storage, folding chairs) gives you flexibility without clutter.
Shade options
Shade is one of the highest-impact comfort upgrades you can make, and there is a DIY option at every price point. A freestanding patio umbrella ($80 to $300) is the easiest entry point and requires no installation. A shade sail strung between posts or anchor points is more modern-looking and covers more area ($100 to $400 for DIY installation). A pergola kit is the most substantial upgrade: it adds structure, increases the perceived value of the space, and can support climbing plants, string lights, or even a shade canopy. Many pergola kits designed for DIY installation go together with basic tools in a day or two.
Lighting
Solar string lights are the easiest patio upgrade there is. No wiring, no electrician, just hang them and let them charge. For better and more reliable output, low-voltage LED landscape lighting wired to a timer is a step up and still a DIY job. Path lights around the perimeter, uplights on a focal plant or wall, and string lights overhead create layered lighting that makes the space usable after dark and looks great doing it.
Privacy
Privacy screens, lattice panels, tall planters with columnar plants, or a simple fence section can make a patio feel like a real outdoor room rather than an exposed slab. Freestanding privacy screens are the easiest to install. If you want something more permanent, a section of fence or trellis with hardware attached to a concrete anchor is a solid weekend project. This ties closely into how the patio looks and feels overall, and it is one of those upgrades that also transforms the style of the space considerably.
How to actually execute the work: tools, steps, and mistakes to avoid
Most patio improvement projects follow the same general sequence: demo and removal of what is not working, base repair or correction if needed, surface work, then finishing and cosmetic upgrades. Skipping the base because you want to get to the fun part is the most common and costly mistake in patio DIY work.
Tools and materials to have on hand
- Pressure washer (rent if needed, 2,000 to 3,000 PSI for concrete/pavers)
- Stiff-bristle push broom and leaf blower for polymeric sand work
- Rubber mallet for setting and tapping pavers
- Plate compactor (rent for larger paver reset jobs, minimum 5,000 lbf centrifugal force recommended)
- Pry bar and flat shovel for pulling up pavers or lifting edging
- Level and string line for checking slope and drainage grade
- Tape measure and chalk line for layout
- Concrete crack filler or patching compound for slab repairs
- Polymeric sand (jointing sand with polymer binder)
- Concrete or paver sealer appropriate for your surface type
- Paver edging stakes (plastic or metal) plus a rubber mallet to drive them
- Safety gear: gloves, eye protection, knee pads for paver work
Step-by-step workflow for a full patio refresh
- Clear the patio completely: remove all furniture, planters, and rugs
- Inspect and mark problems: sunken areas, cracked pavers, joint gaps, drainage low spots
- Address any base or drainage issues first: excavate and re-compact or re-grade as needed
- Pressure wash the entire surface thoroughly and let it dry for 24 to 72 hours
- Make surface repairs: fill cracks in concrete, replace or reset individual pavers
- Check and add edging around all perimeter edges before re-sanding
- Sweep polymeric sand into all joints, compact, re-sweep, blow off excess, then mist to activate
- Apply sealer once the surface is confirmed dry and conditions are within temperature range (40 to 95°F, no rain expected for 12 to 24 hours)
- Add cosmetic and comfort upgrades: lighting, shade, furniture, planters, privacy elements
Common mistakes that derail DIY patio work
- Sealing over a damp surface or in cold/hot weather, which causes the sealer to fail and peel
- Leaving polymeric sand on paver faces when misting, which creates a hardened haze
- Skipping edging, which means pavers will shift again within a season or two
- Fixing surface cracks without checking whether underlying settlement is still active
- Adding a surface overlay to a patio with unresolved drainage issues, trapping water underneath
- Not compacting the base layer adequately when resetting pavers, leading to immediate re-sinking
- Applying deck stain or sealer to wood that was not cleaned first, causing adhesion failure
Keeping it looking good long-term
A patio that gets a little routine attention every year stays in good shape almost indefinitely. The problems that lead to expensive repairs, sunken pavers, crumbling concrete, rotted wood, are almost always the result of years of skipped maintenance. Building a simple annual habit is the best investment you can make after doing the initial improvements.
Clean the surface at least once a year, ideally in spring after winter. For composite surfaces, aim for twice a year (spring and fall) to prevent mildew and staining from building up. For pavers and concrete, inspect the joints and sealer condition every year. Re-sand joints when you notice gaps or weed pressure returning. Reseal concrete and pavers every 2 to 4 years depending on traffic and exposure. For wood decking, clean and re-apply stain or sealant every 1 to 2 years to maintain the protective finish.
Check for settling and drainage problems after heavy rainfall seasons or after the first winter in a new climate. A quick pass with a level over your paver field every spring catches small shifts before they become big repairs. Pull weeds early, before they root deep and start pushing pavers apart. Inspect edging stakes and re-drive any that have heaved or loosened. These checks take twenty minutes and prevent hundreds of dollars in future repairs.
Once your patio is structurally solid and well-maintained, the really fun part begins: making it look and feel exactly the way you want. If you want to make a patio look nice without missing the fundamentals, focus first on cleaning, sealing, drainage, and then build up with comfort and style upgrades. The structural and surface work covered here gives you the right foundation for all the styling, furniture, and decor choices that turn a plain patio into a space you actually want to spend time in.
FAQ
How can I tell if my patio is dry enough to seal after pressure washing?
Before you seal or stain, wait until moisture is truly gone, not just “looks dry.” A practical test is tape a 2 ft by 2 ft plastic sheet to the surface for 24 hours, if you see condensation or darkening under it, keep drying and postpone coating.
What should I do if weeds come back even after I re-sand paver joints?
If weeds keep returning, the cause is usually joint failure or ongoing water problems. Reapply polymeric sand only after you fix drainage and remove all cracked or failing edging, otherwise the new joints will wash out or degrade again.
Will improving or overlaying pavers raise the patio level, and how do I avoid door clearance problems?
Plan for added height where the patio meets doors and thresholds. If you overlay pavers or add a leveling layer, check that the finished surface will not create a tripping hazard or block door clearance, you may need to adjust transitions or reduce lift by rebuilding only the affected area.
How do I know when resetting a few pavers is enough versus when I must rebuild the base?
For pavers, reseating the base is the key decision. If a paver is rocking because the bedding sand is hollowed out or contaminated, reset it, but if you see repeated sinking in an area, you likely need to excavate to the base layer and re-compact crushed rock.
Can I clean and seal on a sunny day, or does temperature matter during application?
A general rule is to avoid staining or sealing while the surface is warming or cooling unevenly in direct sun. If you can feel the surface is hot to the touch, wait, hot concrete and pavers can cause rapid skinning, hazing, or poor bond.
Why do paver joints keep opening near the edges, even when the field is solid?
Do a quick “edge check” before reseating any pavers. If edging is missing, loose, or not level, gaps will reopen even with perfect joint sand, re-stake or re-set edging along all perimeter edges before you add or re-activate polymeric sand.
Can I stain or overlay a concrete slab if there are cracks but the surface looks mostly fine?
Yes, but only in the limited scenario of a sound slab and cosmetic changes. If you see vertical displacement, widespread cracking with height differences, or ongoing drainage issues, stains and overlays will not fix the underlying movement.
What is the safest way to pressure wash or clean composite decking?
Composite decking needs gentler cleaning because aggressive pressure can open the surface and speed up discoloration. Use a soft bristle brush or mop, warm water, and a pH-neutral cleaner, then rinse thoroughly and let it dry before any protective coating if you choose to reapply it.
I have haze on my pavers after using polymeric sand, how do I fix it?
When polymeric sand haze is the issue, stop and let it dry completely, then remove the residue by dry brushing or a specialized haze remover suitable for your sand type. Avoid immediately misting again, because activation over residual sand can worsen the film.
What simple yearly maintenance routine prevents the biggest patio repairs?
Annual maintenance is less expensive than reactive repairs. Set a simple checklist: inspect joints and edging for gaps, confirm water runs away from the house after storms, top up joint sand as soon as weeds or gaps start, and touch up sealing on the highest-wear zones earlier than the rest.
How should freeze-thaw weather change my approach to cracks, sealing, and drainage?
If you have freeze-thaw cycles, drainage and joint stability matter even more. Cracks that are only cosmetic can still widen with water intrusion, so prioritize sealing or patching after you address pooling and re-establish correct slope, otherwise the next winter will undo your repair.
What order should I prioritize if I want to upgrade comfort like lighting, shade, and seating?
The best upgrades usually start with function you can measure. Identify your main use first, then size clearances around seating (like chair pull-out), keep a dedicated traffic path, and only then choose lighting and shade so you do not block outlets, paths, or sightlines.
Next Article
How to Cover an Ugly Patio: DIY Fixes That Last
DIY guide to cover an ugly patio fast. Diagnose cracks, stains, unevenness, then prep and install durable rugs, tiles, p