You can make a patio look genuinely pretty without tearing it out and starting over. The biggest upgrades almost always come from three things: cleaning up the edges, adding a cohesive color story, and layering in plants and lighting so the space has depth. If you want a quick way to spruce up a patio without a full teardown, start with those edge cleanups and build outward from there cleaning up the edges. Whether your patio is bare concrete, aging pavers, or a rough gravel pad, there's a clear path from "this looks sad" to "this is my favorite part of the yard", and most of it is DIY-friendly with a weekend and a reasonable budget.
How to Make a Patio Pretty: DIY Steps That Last

Nolan Lennox
22 Jun 2026
Step 1: Start with a quick patio style audit
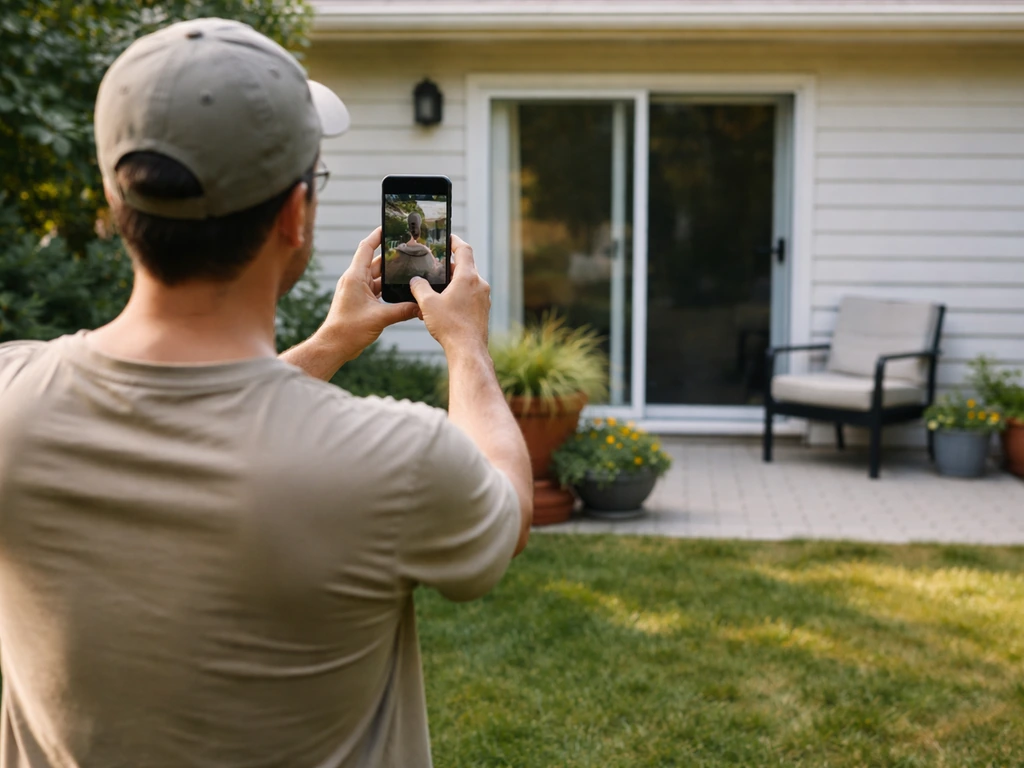
Before you buy a single plant or string light, walk out to your patio and look at it like a stranger would. Take a photo from the back door or from the yard looking in. Photos are brutal, they show you things your eye skips past when you're standing there. What you're looking for is a short list of actual problems, not just a vague feeling that something's off.
Ask yourself these questions as you look at the space. Is there a clear edge between the patio and the lawn or garden beds, or does it just sort of bleed out? Are the pavers, concrete, or gravel level and intact, or are there sunken spots, cracks, or gaps with weeds growing through? Does the furniture face anything worth looking at, or is it just pushed against a wall? If you are unsure where to start, this guide on how to fix up your patio walks through practical steps from the surface and drainage to layout, plants, and lighting short list of actual problems. Is there any lighting at all after dark? And does the patio relate to the house, meaning do the materials, colors, and scale actually connect, or does it feel like a separate afterthought?
Write down your three biggest visual problems. Seriously, just three. Most patios suffer from the same core issues: no defined edge, no focal point, and no layering of height. Once you name what's actually wrong, you can stop guessing and start fixing.
Check the structure before you decorate
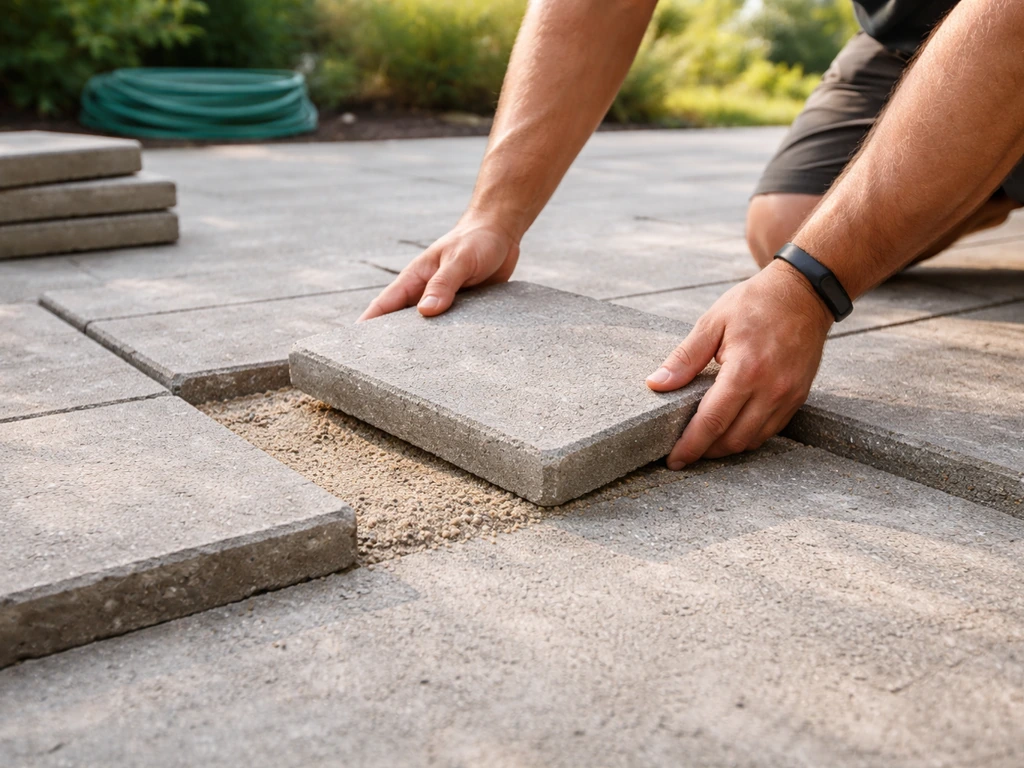
If you have pavers or brick, check for settlement. Press on individual units to see if they rock. Look for sections that have shifted or pulled apart, paver failure almost always starts at the perimeter and corners where edge restraint is weak or missing. Cracked or sunken concrete, persistent puddles after rain, or pavers that have migrated out of position are structural signals you want to fix before you invest in decor. A pretty rug over a lumpy, draining-wrong surface just delays a bigger headache. If you have settled paver sections, those can often be lifted and reset rather than replaced entirely, it's a targeted fix that saves the rest of your installation.
Step 2: Pick a cohesive look before you touch anything
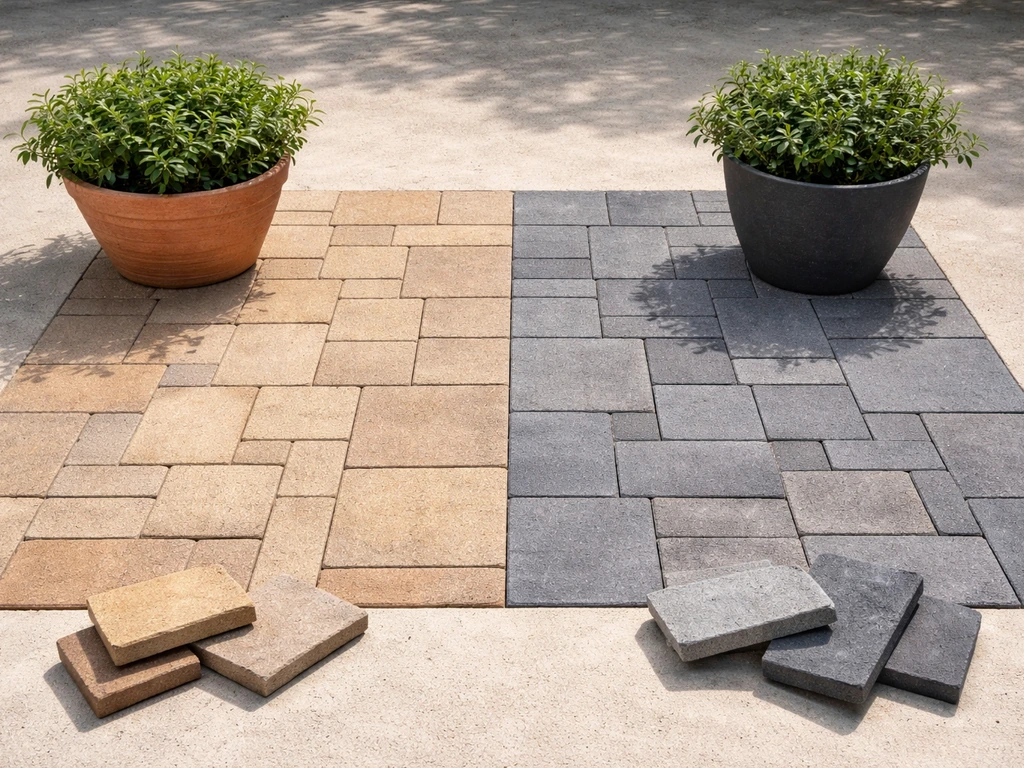
The single fastest way to make a patio look put-together is to stop mixing random materials and colors. A cohesive outdoor palette doesn't mean everything matches, it means everything belongs to the same color family. The practical starting point is your house exterior: look at your siding tone, your roof color, and your window trim or brick. Your patio hardscape should pull from those same warm or cool tones. If your house has warm beige and brown tones, a charcoal gray paver or a stark white gravel will fight it. A buff, tan, or earthy brown paver will tie it together without you doing anything else.
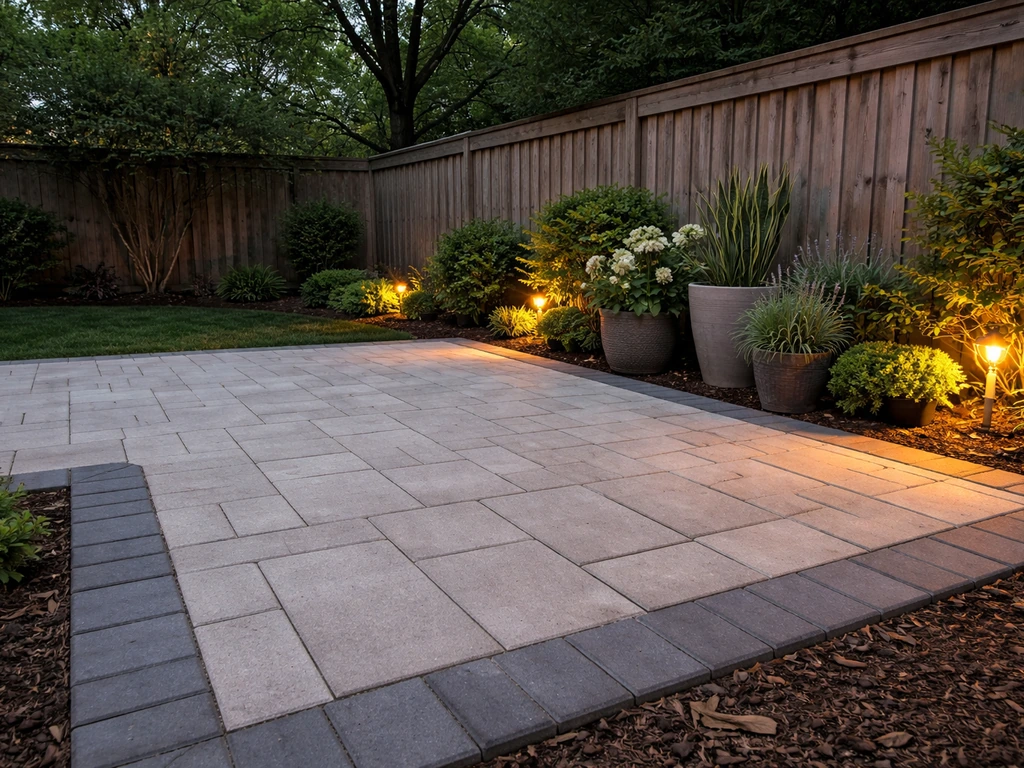
This same logic carries through every surface detail. If you're adding coping, wall caps, a fire pit surround, or outdoor steps, repeat the same 1 to 2 tones across all of them. The moment you carry consistent stone tones from the patio surface to the step risers to the planting bed edge, the whole yard starts to look intentional. Contrast is fine, actually, it's good, but it should be deliberate. A dark charcoal edge restraint or border paver against a lighter field paver creates definition. Three different colors of mismatched pavers just creates noise.
Warm vs. cool tones: a quick cheat sheet
| House Exterior Tone | Patio Surface That Works | What to Avoid |
|---|---|---|
| Warm (tan, cream, red brick, brown roof) | Buff, tan, sand, warm gray, brown-blend pavers | Cool blue-gray, stark white gravel, charcoal |
| Cool (gray siding, white trim, blue-slate roof) | Cool gray, bluestone-look, charcoal, light ash pavers | Yellow-tan, red brick tones, terracotta |
| Neutral (greige, weathered wood, mixed materials) | Either warm or cool gray — pick one and commit | Mixing both warm and cool tones in the same space |
Step 3: Upgrade the layout and surface details
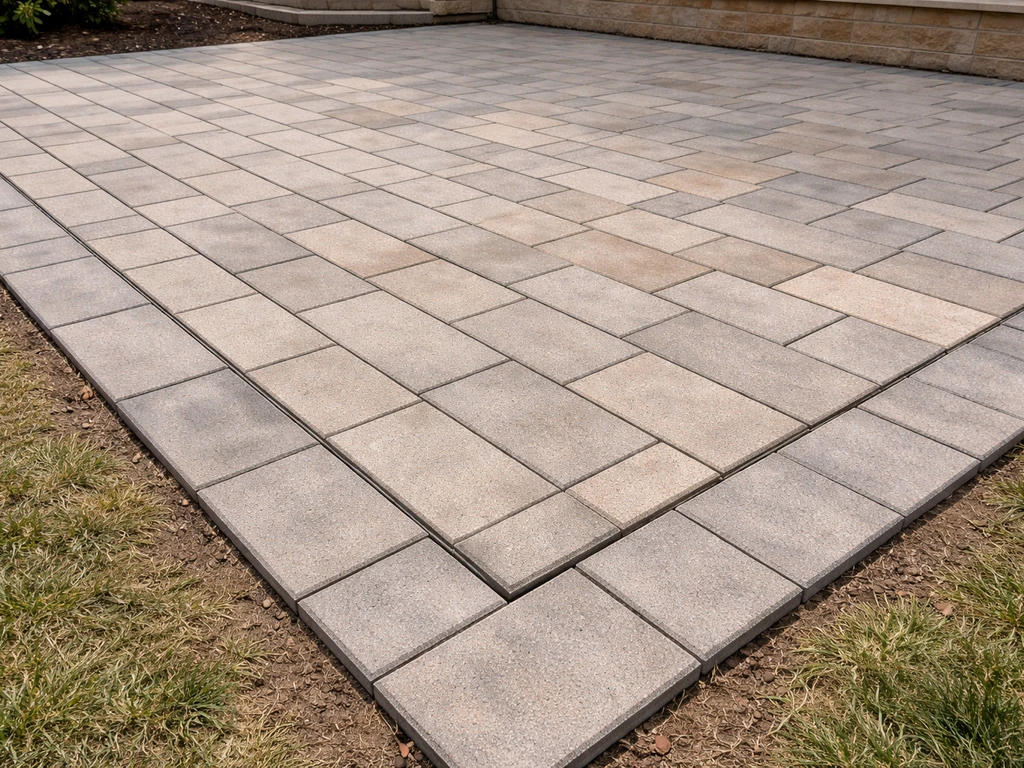
A patio's surface and edges do more visual work than most people realize. Clean, defined edges instantly make a patio look more finished, even if nothing else changes. If you are looking specifically for the cheap ways to make patio look better, start with quick visual upgrades like defined edges, better lighting, and a cohesive palette. If your patio has no edge restraint, pavers that have migrated outward, or a lawn that's crept over the edge, fixing that one thing will make the whole space look sharper. Edge restraints aren't just aesthetic: they hold the paver system together by resisting lateral movement, and blank" rel="noopener noreferrer">paver failure almost always starts where restraint is absent or inadequate, especially at corners and curves.
Surface patterns and texture
If you're working with existing pavers that are in decent shape, look at the laying pattern. A basic running bond (like brick) is fine but predictable. A herringbone or basketweave pattern adds visual interest with no extra material cost, just more careful cutting and layout work. If you're patching a section or adding to an existing patio, matching the pattern and keeping consistent joint widths makes repairs nearly invisible. For concrete patios, resurfacing with a decorative overlay is a legitimate middle path, professional installation typically runs around $3 to $15 per square foot for overlays versus $8 to $20 or more for a full replacement, so resurfacing makes sense when the underlying slab is structurally sound.
A note on base and drainage
If you're resetting pavers or doing any digging, this is the moment to get the base right. A proper residential paver base typically means a compacted gravel layer of about 4 to 6 inches, followed by roughly 1 inch of bedding sand, then the pavers on top. Geotextile fabric between the native soil and the gravel base prevents material migration over time. The reason this matters for aesthetics is simple: a patio that settles unevenly or holds water will always look rough, no matter how nice the pavers are. Getting the grade right (a slight slope away from the house, roughly 1/8 inch per foot) is the invisible upgrade that keeps everything looking good years later.
Step 4: Add depth with plants, height, and zones
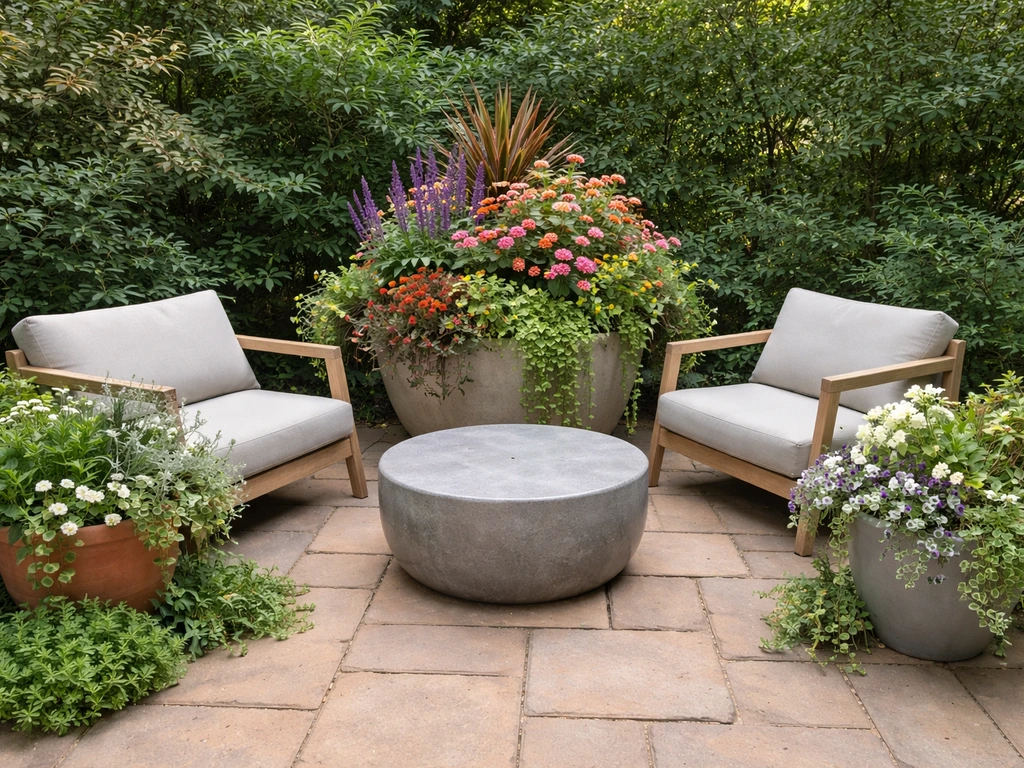
Flat patios with furniture pushed against the walls look like waiting rooms. What separates a pretty patio from a functional-but-boring one is layering: different heights, different textures, and a sense that the space is divided into purposeful zones. You don't need a big yard to do this, you need to think vertically and to give different parts of the patio a reason to exist.
Start with a focal point. A focal point can be a planted container grouping, a fire pit, a water feature, a pergola post, or even just a tall potted tree in the corner. The eye needs somewhere to land. Once you have a focal point, arrange your furniture to face it rather than just filling the open floor space. This single move transforms a patio from a storage area for outdoor chairs into an actual room.
Using plants to create visual structure
Plants do three things on a patio: they soften hard surfaces, they add height variation, and they create a sense of enclosure that makes the space feel more intimate. The most effective approach is to think in three layers: tall anchor plants (6 feet and up, ornamental grasses, columnar trees, tall bamboo in planters), mid-level plants (2 to 4 feet, shrubs, large perennials, medium-sized potted plants), and low ground-layer plants (herbs, ground covers, low annuals along edges). You don't need all three in every corner, but having at least two layers somewhere in the space changes the whole feel.
Container gardens are especially powerful for renters or anyone who doesn't want to commit to permanent beds. Large planters (18 inches and bigger) with a single bold plant, a banana, a sculptural agave, a standard rose, a tall ornamental grass, look far better than ten small pots of annuals scattered everywhere. Fewer, bigger, bolder almost always wins.
Defining zones without building walls
Even a small patio benefits from having two distinct zones, a dining area and a lounging area, for instance. You can define zones without any construction using an outdoor rug under the seating area, a change in planter arrangement, or even just different lighting. On larger patios, a pergola, a low planting bed wall, or a change in paver pattern between zones gives the space a layout that feels designed rather than random.
Step 5: Outdoor lighting and decor that actually work
Lighting is the single most underused upgrade on residential patios. A patio that looks plain in daylight can look genuinely beautiful at night with the right lights, and the right lights aren't expensive. The key is layering light sources at different heights rather than relying on one overhead fixture.
Types of outdoor lighting and where to use them
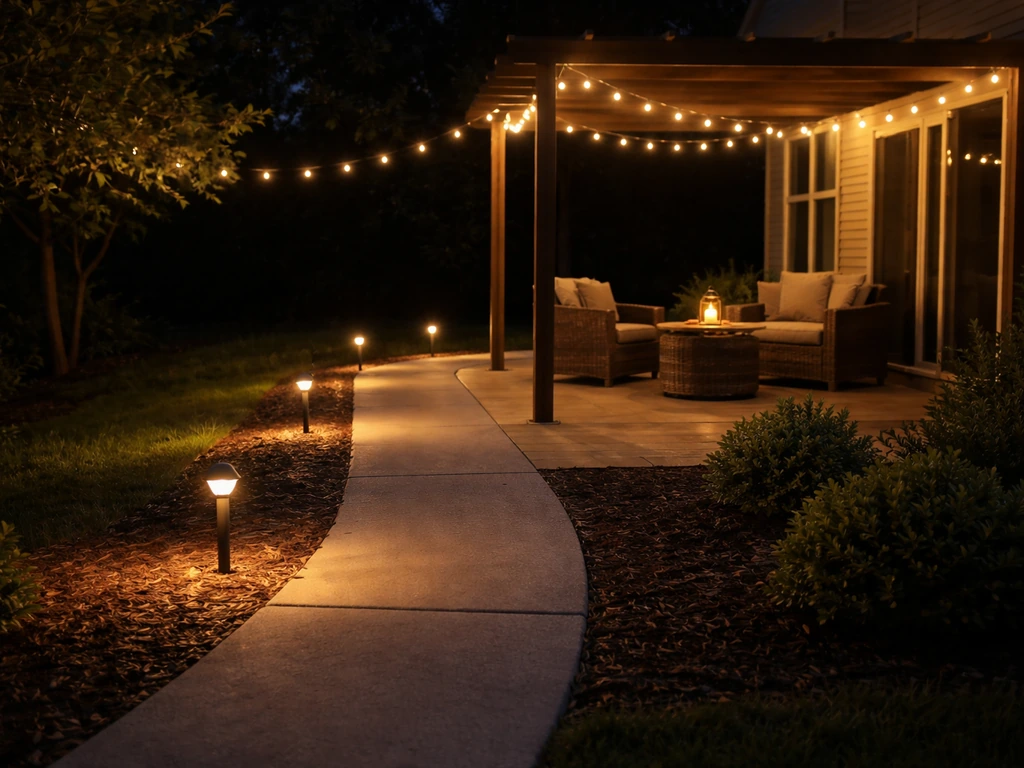
- String lights: Probably the highest return-on-investment lighting upgrade you can do. Hung overhead between posts or across a pergola, they create warmth and atmosphere immediately. Use weatherproof bulbs rated for outdoor use.
- Path lights: Low-voltage landscape path lights work well along patio edges, walkways, or through planting beds. Space them roughly 10 to 15 feet apart for gentle, overlapping pools of light rather than a row of bright spots. These connect to a low-voltage transformer that plugs into a standard outdoor GFCI outlet.
- Step lights: For any steps leading to the patio, recessed step lights (typically 12 to 100 lumens) add safety and a polished look. Look for fixtures rated IP67 or UL wet-location rated — they're sitting in rain and need to handle it.
- Uplights and spotlights: Place a low-voltage uplight at the base of a large container plant, a feature tree, or a fence post to add drama. Match the beam angle to the height: taller features need a narrower, more focused beam.
- Lanterns and candles: Tabletop candle lanterns, pillar candles in hurricane holders, or battery-powered lanterns are zero-install options that add warmth to a dining table or side surface.
For any permanent landscape lighting, always buy fixtures with a UL wet or damp rating (or an IP65 and above equivalent). The difference between a wet-rated and a non-rated fixture becomes very obvious after the first winter, the non-rated ones corrode, the seals fail, and the housing cracks. It's worth paying a little more upfront.
Decor that earns its spot
The best outdoor decor follows the same rule as the best indoor decor: it should be functional, durable, and scaled to the space. Oversized art on a fence panel or wall, a large outdoor clock, a water feature with sound, or a bold-colored planter can all work as focal point accessories. What doesn't work is too many small objects, six little decorative items scattered across a patio just look cluttered. Edit aggressively and leave space between things.
Step 6: Furniture, accessories, and maintenance-friendly choices
Pretty patios stay pretty because the furniture and materials hold up. Choosing the wrong outdoor materials means fading, warping, rust stains, and mildew within two seasons, and a patio that looks worse every year instead of better. The three most durable mainstream options for outdoor furniture are powder-coated aluminum, teak, and all-weather resin wicker. Each has trade-offs.
| Material | Durability | Maintenance | Best For |
|---|---|---|---|
| Powder-coated aluminum | Excellent — won't rust, lightweight | Low — wipe down, touch up chips | Clean/modern styles, any climate |
| Teak | Very good — naturally weather-resistant | Medium — needs oiling to keep color, will silver otherwise | Traditional or transitional styles, dry-to-moderate climates |
| All-weather resin wicker | Good — UV-stabilized frames resist fading | Low — rinse off, dry fully | Casual/coastal styles, covered patios or milder climates |
| Wrought iron | Good structurally but prone to rust if coating chips | Higher — needs rust prevention, heavy to move | Traditional/formal styles, covered or dry climates |
Outdoor rugs: pick the right material
An outdoor rug instantly anchors a seating area and makes a patio feel finished. But the wrong rug becomes a soggy mildew trap within a season. UV-stabilized polypropylene (olefin) and solution-dyed polyester are the go-to materials, they resist fading, tolerate moisture, and dry quickly. In humid climates especially, avoid natural-fiber rugs like jute or sisal outdoors: they absorb water and are almost guaranteed to develop mildew underneath. Whatever material you choose, make sure water can pass through or off it easily, and lift the rug occasionally to let the patio surface breathe.
Umbrellas, cushions, and fabrics
For patio umbrellas and cushion covers, blank" rel="noopener noreferrer">solution-dyed acrylic fabric (commonly sold under the Sunbrella brand name) is the standard recommendation for fade resistance and weather tolerance. It costs more than polyester alternatives, but the color stays true for years rather than washing out in one summer. Whatever fabric you choose, bring cushions inside or store them in a deck box when not in use, no outdoor fabric survives years of direct UV exposure and wet nights completely unscathed.
Step 7: DIY upgrade path, low-budget fixes vs. full remodel
Not every patio needs a full rebuild to look dramatically better. The right path depends on your current patio's condition and your budget. Here's a honest breakdown of what's achievable at different investment levels.
Weekend fixes under $300
- Deep clean the patio surface: rent or borrow a pressure washer and clean every inch of the hardscape, furniture, and planters. This alone transforms how a patio looks.
- Pull weeds from joints and edges, treat with a polymeric sand refresh or joint stabilizer to keep them from coming back.
- Add a large outdoor rug under your main seating area to define the zone.
- Hang string lights overhead — one set of café-style string lights from $25 to $60 does more for ambiance than almost any other single purchase.
- Add 2 to 3 large potted plants in coordinated containers to create height and visual structure.
- Re-edge the lawn line around the patio with a half-moon edger for a crisp, defined border.
Mid-range upgrades: $300 to $1,500
- Install low-voltage path lighting around the perimeter and along any walkways — budget around $150 to $400 for a starter kit with transformer.
- Reset and re-level sunken or rocking pavers: lift the section, regrade the bedding sand, and relay. This is DIY-able on small areas and makes a big structural and visual difference.
- Add or replace edge restraints around the patio perimeter, especially at corners and curves, to stop further lateral movement.
- Paint or stain a concrete patio with a patio floor paint or concrete stain — a clean coat in a single, well-chosen color is a dramatic visual upgrade.
- Replace worn or mismatched patio furniture with a coordinated set in durable aluminum or resin wicker.
Full remodel: when the surface needs to change
If your concrete patio is cracked but structurally sound, a decorative overlay or resurfacing is the most cost-effective surface upgrade, typically $3 to $15 per square foot installed, versus $8 to $20 or more for full demo and replacement. If your paver patio has widespread settling or base failure, targeted sections can often be lifted and reset with corrected base material rather than demolishing everything. The test: if the problems are isolated to specific zones and the base is otherwise adequate, reset those sections. If the whole patio is sinking or the base was never properly built (no compacted gravel, no edge restraint), a full rebuild is the more durable long-term investment. Putting pretty new pavers on a failed base just delays the problem.
Your action plan depending on where you're starting
| Your Patio Situation | First Move | Second Move |
|---|---|---|
| Structurally fine, just ugly | Deep clean + define edges + add rug and lights | Add plants, focal point, and cohesive furniture |
| Pavers settled in a few spots | Reset and re-level the settled sections | Refresh joints, install edge restraints, then decorate |
| Cracked but stable concrete slab | Concrete overlay or stain | Add border, lighting, plants, and zone-defining furniture |
| Old concrete with poor drainage or major cracking | Plan for full replacement with proper base and grade | Choose new paver material tied to house exterior tones |
| Gravel patio that looks rough | Add clean metal or timber edging to define the space | Top-dress with fresh gravel, add stepping stones and lighting |
Making a patio pretty is genuinely achievable in stages. You don't have to solve everything at once, and you definitely don't have to spend a fortune. Start with the audit, fix the one thing that bothers you most, and build from there. The patios that end up looking the best are rarely the ones that got a single massive renovation; they're the ones that got steady, thoughtful attention season by season. If you're weighing whether to cover an existing surface, tackle a broader sprucing project, or focus purely on budget-friendly cosmetic fixes, those decisions all connect back to the same foundation: knowing what you have, being honest about what needs structural attention, and then layering in the details that make the space feel worth being in.
FAQ
My patio looks pretty for a day, then weeds come back fast. What am I missing?
If weeds are coming through the patio edges, pull and reset the visible problem areas first, then address the cause. For pavers, look for missing edge restraint and weak base compaction, add geotextile where appropriate, and re-level with the correct gravel plus bedding sand. For concrete, patch and seal cracks before adding an overlay or decorative finish, otherwise water will keep traveling underneath and discolor the surface.
How do I make a patio look pretty without sacrificing usability for dining and lounging?
Tactile comfort matters as much as aesthetics. For dining zones, aim for seating and table edges at a comfortable walking path width, keep rugs fully dryable, and choose lighting that doesn’t create glare in faces. If you have a slope or irregular joints, consider leveling only the seating footprint area so chairs rock less and the space feels more “designed,” not “temporary.”
What’s the best way to choose decor and planter sizes for a small or oddly shaped patio?
Start with a “spare” plan for scale. On small patios, use fewer large pieces instead of many small ones: one bold planter, one outdoor rug sized for at least the front legs of seating furniture, and a single focal feature (like a fire pit, tall grass, or sculpture). In larger patios, repeat a color or material once across zones, so the space reads as cohesive instead of scattered.
How can I tell whether drainage problems will ruin my “pretty patio” plans?
Before you buy stone, pavers, or planters, do a quick drainage check after a rain. If water lingers or creates puddles, you likely have a grading issue, trapped low spots, or failing base beneath the surface. In that case, fix base and grade first, because any cosmetic upgrade over a poor drainage setup will look rough quickly (stains, shifting, weed growth).
Can I make a cracked concrete patio pretty with an overlay, or do I need replacement?
Yes, but the rules change. If you want to cover an existing slab or resurface, only proceed when the underlying concrete is structurally sound, not actively lifting or heaving. Also plan for joints and cracks, because they may telegraph through an overlay unless properly prepared and patched.
What should I do when my patio has a focal point but still feels bare and unbalanced?
Aim for “no empty corners” rather than filling everything. Use visual anchors: a tall planter, a plant at the corner, or a vertical element like a trellis. Then balance with mid-height shrubs or potted plants and low edging. If you already have a focal point like a fire pit, place the tallest plant slightly off-center to create depth rather than duplicating height exactly behind the focal feature.
How do I make repaired or expanded paver sections look seamless?
When matching patterns, keep joint widths consistent and do the most visible transitions in low-attention areas if possible. If you’re patching only part of a paver patio, buy a small extra batch of the closest match and confirm the exact paver dimensions and thickness, since small differences can make seams look uneven even when the pattern is correct.
Where should I place patio lights so they look attractive at night, not like random fixtures?
For lighting placement, don’t just “add lights,” layer them. Use a mix of low path or step lighting plus mid-level string or wall lights, and reserve the brightest fixture for your focal point. Keep light warm (not overly blue) for a cozy look, and avoid aiming fixtures directly at windows, it creates glare and reduces the stylish nighttime effect.
How do I prevent a patio rug from turning into a mildew trap?
Outdoor rugs and fabrics last longer when you treat them like part of the system. Use an underlay or rug pad made for outdoor use so water can move, shake or lift the rug periodically to let the surface breathe, and store cushions and covers when the weather is harsh. In humid climates, prioritize moisture-tolerant rug materials and quick-dry behavior.
What outdoor furniture materials hold up best for different weather conditions?
If your furniture keeps looking worn, match materials to your climate and maintenance capacity. Powder-coated aluminum is low-maintenance, teak weathers beautifully but needs simple cleaning, and all-weather resin wicker resists rot. Also check for how items tolerate salt air or heavy rain, and use covers only when they can vent and not trap constant moisture.
What’s the single most effective upgrade if my patio edges look sloppy or unstable?
If it’s missing definition, start with edge restraint. For pavers, that often means adding or repairing border restraints, re-setting lifted areas, and ensuring the base is properly compacted. For gravel patios, a clean border and stable edge keeps the “pretty” look longer by preventing the material from creeping and visually blurring the patio shape.
Next Article
How to Cover an Existing Patio: DIY Step by Step Guide
DIY steps to cover an existing patio with overlays, decks, pavers, or coatings, avoiding drainage and trip hazards.