You can cover an existing patio without tearing it out by installing a surface overlay system on top of it. The best approach depends on what condition the slab is in and what you want at the end: pavers or tile bonded with mortar, composite or wood decking on sleepers, interlocking pedestal tile systems, concrete coatings/overlays, or artificial turf.
How to Cover an Existing Patio: DIY Step by Step Guide

Nolan Lennox
9 Jun 2026
Each one can make a tired, cracked, or ugly patio look completely new and perform better, as long as you prep the surface correctly, keep drainage flowing in the right direction, and finish the edges cleanly. Here is how to do all of that, start to finish. Once you know which system fits your patio, you can follow the prep, drainage, and finishing steps to fix up your patio start to finish.
Start by honestly assessing what you have and what you want
Before you buy anything or make any decisions, spend an afternoon looking at your existing patio with fresh eyes. Walk every square foot of it. You need to know three things: what condition the surface is in, what material it is made of, and what problem you are actually trying to solve.
For condition, look for cracks (hairline vs. structural), spalling, heaved sections, soft or crumbling areas, and any low spots that hold standing water. Hairline cracks are normal and workable. Cracks wider than about 1/4 inch, sections that shift or rock when you step on them, or widespread spalling usually signal a bigger structural issue. Covering over a fundamentally failing slab will not fix it. You will just end up with a failing slab under your new surface.
For material, most existing patios are poured concrete or concrete pavers. Some older homes have asphalt, flagstone set in mortar, or brick. Your base material affects which coverage systems will bond or fasten properly, and how heavy your overlay can be before you need to worry about load.
For your goal, be specific. Are you covering it because the concrete is stained and ugly? Because it is uneven and a trip hazard? Because you want it to feel warmer underfoot? Because it leaks into a basement below? Because you want a more finished, furniture-friendly surface? Knowing your actual goal keeps you from spending money on a system that does not solve your problem.
Red flags that mean you should repair before covering
- Sections of slab that move, rock, or feel hollow when you tap them
- Cracks wider than 1/4 inch, especially if they are actively growing or uneven in height across the gap
- Standing water that pools more than 30 minutes after rain (drainage failure that will get worse under a cover)
- Soft or crumbling concrete that you can break off by hand
- Significant height differential across the slab (more than 1.5 to 2 inches without a correction plan)
Plan layout, utilities, and drainage before you touch anything
This is the step most DIYers skip and later regret. Do not buy materials or start demo work until you have answered these four planning questions.
Call 811 before any digging
If your coverage plan involves any kind of edge work, footer installation, anchor posts, or drainage trenching near the patio perimeter, you need to call 811 first. That is the national Call Before You Dig number. blank" rel="noopener noreferrer">In most states, including Washington, it is legally required to call at least two business days before breaking ground so utilities can be marked. North Carolina 811’s homeowner guidance document also emphasizes calling before you dig so underground utilities can be marked before excavation begins blank" rel="noopener noreferrer">it is legally required to call at least two business days before breaking ground so utilities can be marked. It is free, it is fast, and it protects you from a very expensive and potentially dangerous mistake.
Understand your finished height
Every coverage system adds height. Bonded pavers or tile typically add 1. 5 to 2. 5 inches.
Sleeper-mounted deck boards add 3 to 5 inches depending on the sleeper thickness. Pedestal tile systems can add anywhere from 2 to 6-plus inches depending on the pedestals. Concrete overlays are the thinnest option, often just 1/4 to 1/2 inch. Before you commit, measure the height of your door threshold, any steps leading to the patio, and the transition to your yard.
Adding 3 inches to a patio that already sits close to a door threshold can create a trip hazard or block door swing. If the patio abuts a public or commercial space, ADA standards limit vertical changes at accessible route transitions, which is worth checking with your local building department.
Protect drainage before you lock it in
Every patio needs to slope away from your house. The standard is about 1/8 to 1/4 inch of drop per foot. When you add a covering layer, you need to maintain or recreate that slope in the new surface. If your existing slab drains poorly, this is your chance to fix it. Pedestal systems are especially useful here because they let you create a level or custom-sloped top surface while the water drains through the gaps underneath onto the original slab and away from the structure. Bonded systems like mortar-set tile lock in whatever drainage situation is already there, so confirm your slope is adequate before committing.
Sketch a layout and check your material quantities
Measure the patio length and width, account for any irregular shapes, and draw a simple layout to scale. Decide where cut pieces will land (ideally away from the most visible edges), plan where grout lines or board gaps will run, and figure out how many full pieces you need versus cut pieces. Add 10 to 15 percent overage to your material order for cuts and breakage.
Choose the right coverage material for your situation
Here is an honest breakdown of the main systems homeowners use to cover an existing patio, with the real tradeoffs for each.
| System | Best For | Added Thickness | DIY Difficulty | Rough Cost Range (per sq ft) |
|---|---|---|---|---|
| Mortar-set pavers or tile over concrete | Solid slab in decent condition, permanent look | 1.5 to 2.5 in | Moderate | $5 to $20+ |
| Composite or wood deck over sleepers | Uneven slabs, modern look, warm underfoot feel | 3 to 5 in | Moderate | $8 to $25+ |
| Interlocking pedestal tile system | Unlevel surfaces, rooftop or elevated decks, rental-friendly | 2 to 6+ in | Easy to Moderate | $10 to $30+ |
| Concrete overlay or microtopping | Cosmetic refresh, minimal height gain, staining potential | 0.25 to 0.5 in | Moderate to Hard | $3 to $10+ |
| Artificial turf over concrete | Play areas, comfort, low maintenance, easy install | 1 to 2 in with pad | Easy | $4 to $12+ |
Mortar-set pavers and tile
This is a popular option because it looks great and feels permanent. But it does have real failure risks if done wrong. Pavers or tile set over concrete need to be bonded with a polymer-modified thinset mortar or a concrete-specific adhesive, not just set dry like you would in a soil bed. Skipping the bonding step leads to rocking pavers, drainage failure, and trapped moisture that can stain or crack the units from below. The existing concrete also needs to be in decent shape. If the slab has significant movement or large cracks, those cracks will eventually telegraph up through the new surface.
Composite or wood decking over sleepers
Installing deck boards over a concrete slab is one of the more DIY-friendly options and it handles uneven slabs well because you can shim the sleepers to create a level frame. Composite boards are the better long-term choice over wood for outdoor use: they resist rot, do not warp as dramatically with moisture changes, and require almost no maintenance. Pressure-treated 2x4s laid flat make good sleepers. The main downside is height: this system adds at least 3 to 4 inches, so you really need to check your door threshold and step clearances first.
Interlocking pedestal tile systems
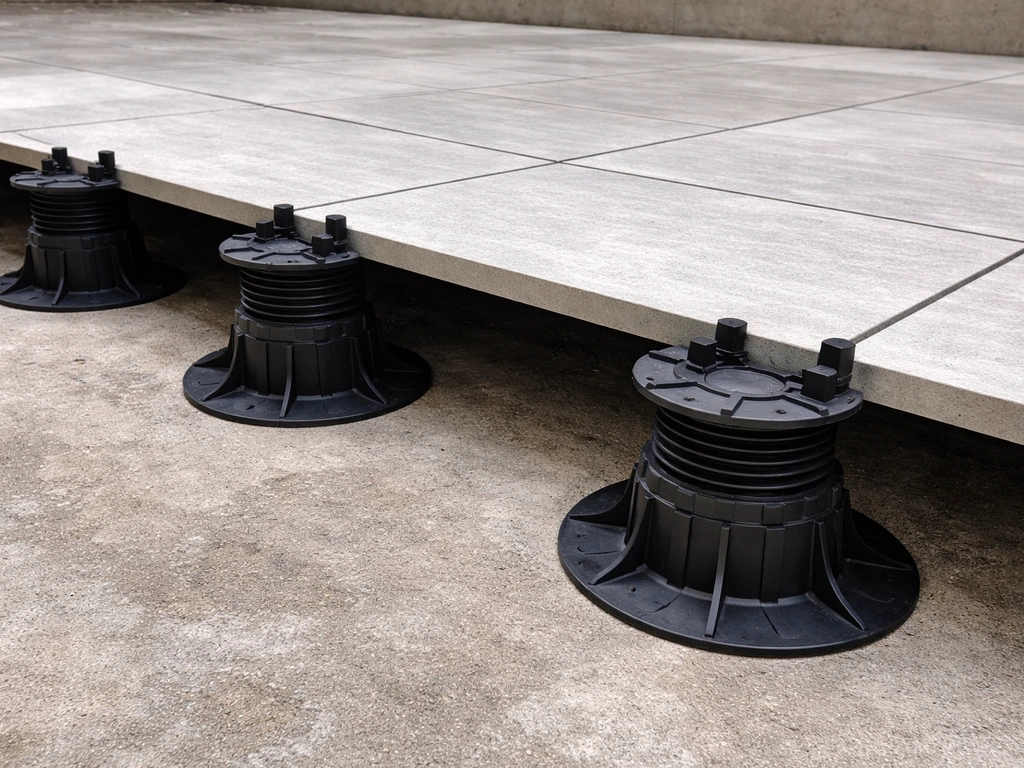
These systems use adjustable plastic or composite pedestals to support large-format tiles or pavers, creating a raised floating deck surface. The pedestals can compensate for slope, with quality systems handling up to a 2 percent slope (about 1/4 inch per foot) and some aggressive ones handling more. Because water drains freely through the joints and down to the original slab, these systems solve drainage naturally. They are also removable, which is great if you rent or want to access the slab underneath. The cost is higher than basic options, but the installation is fast and forgiving.
Concrete overlays and microtoppings
If the slab is structurally sound and you just hate how it looks, a concrete overlay can transform it with minimal height change. These polymer-cement products are troweled on at 1/4 to 1/2 inch thick and can be stamped, stained, or textured to look like stone or wood. They bond directly to the existing concrete without changing your door clearance or step height. The downside: they require serious surface prep, they have a learning curve to apply smoothly, and they are not as forgiving of slab movement as a floating system.
Artificial turf
Turf over concrete is underrated for patios used as play areas or lounging spaces. Modern synthetic turf looks realistic, holds up to UV, and creates a soft surface that is dramatically more comfortable underfoot than bare concrete. You install a foam or rubber infill pad first, then roll and cut the turf to fit. Drainage holes in the turf backing allow water through, but if you are using a dense pad layer, make sure the slab has adequate slope so water does not pool beneath. Turf is among the easiest systems to install yourself.
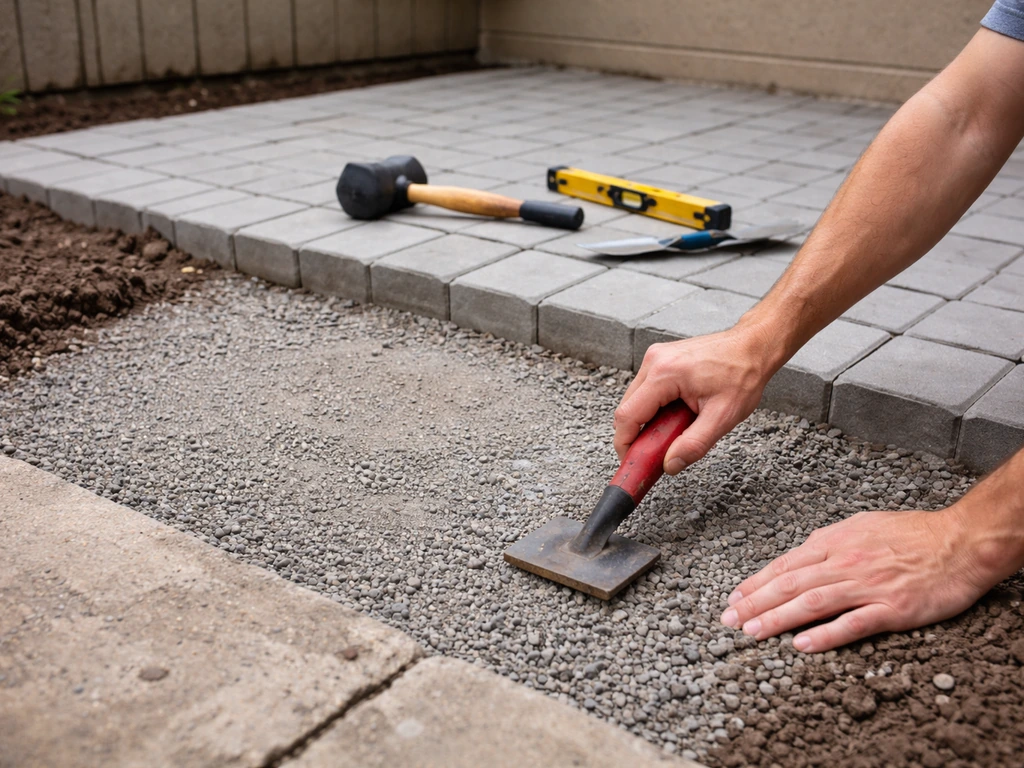
Prep and base work: the part you cannot skip
No matter which system you choose, prep is where the job is won or lost. A well-prepped surface makes the installation go smoothly and makes the result last. A poorly prepped surface means callbacks, failures, and redoing the work.
Deep cleaning the existing surface
Pressure wash the entire patio to remove dirt, mildew, algae, and loose debris. For concrete overlays or mortar-set systems, go further: use a concrete degreaser on any oil stains, and etch the surface with a diluted muriatic acid solution or a commercial concrete etcher to open the pores and improve adhesion. Rinse thoroughly and let it dry completely (usually 24 to 48 hours) before applying any bonding material. For mechanical fastening systems like sleepers or pedestal tiles, you just need the surface clean and dry.
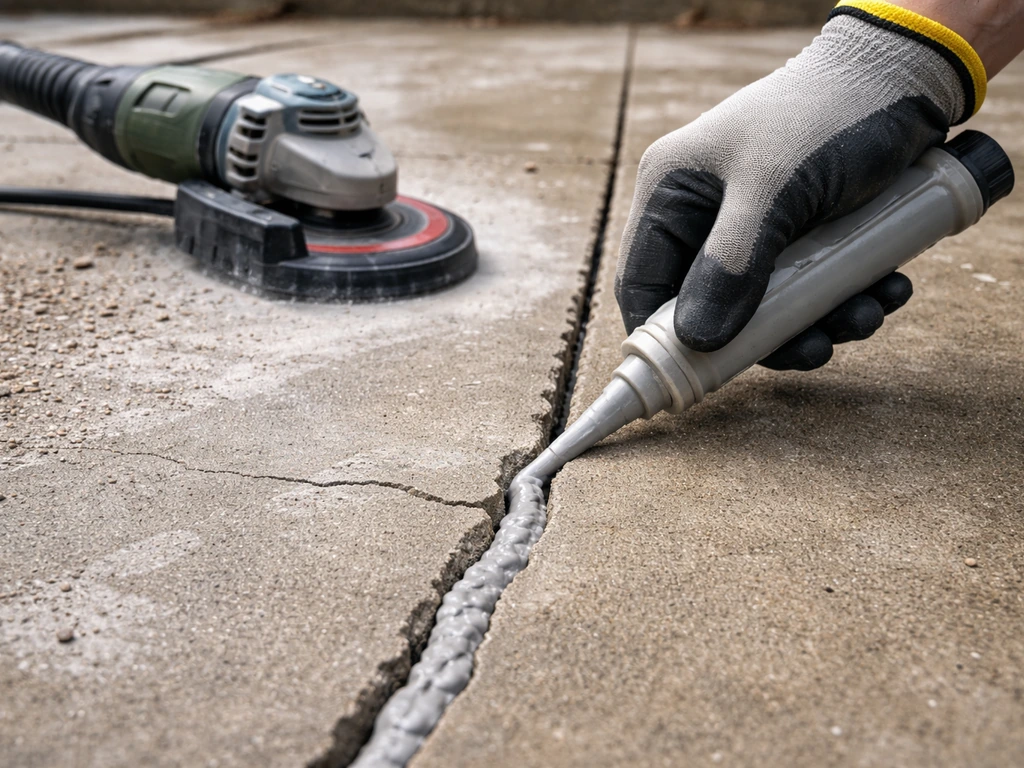
Repairing cracks and uneven spots
Fill cracks up to 1/4 inch wide with a polyurethane or epoxy concrete crack filler. Let it cure fully before proceeding. For low spots that will cause bonded tiles to rock, grind down high spots with a concrete angle grinder or fill low spots with a self-leveling concrete underlayment compound. Self-levelers are poured and spread to fill depressions and cure to a flat surface, usually within a few hours. For sleeper-based systems, you can handle moderate height variation by shimming the sleepers rather than fixing the slab itself.
Addressing adhesion and fastening
For mortar-set tile or pavers: use a polymer-modified thinset rated for exterior use. Apply a concrete bonding primer to the slab first if the surface is smooth or has low porosity. For sleepers: use concrete screws (Tapcon-style fasteners) driven into the slab to anchor the sleepers so they cannot shift. Drill pilot holes with a hammer drill and a masonry bit. For overlays: apply a concrete bonding adhesive (often a latex or acrylic product) to the existing slab immediately before troweling on the overlay material. For pedestal systems and turf: the weight of the system itself holds everything in place, but you can use perimeter anchor strips or edge restraints to keep things from walking over time.
Step-by-step installation for the most common approaches
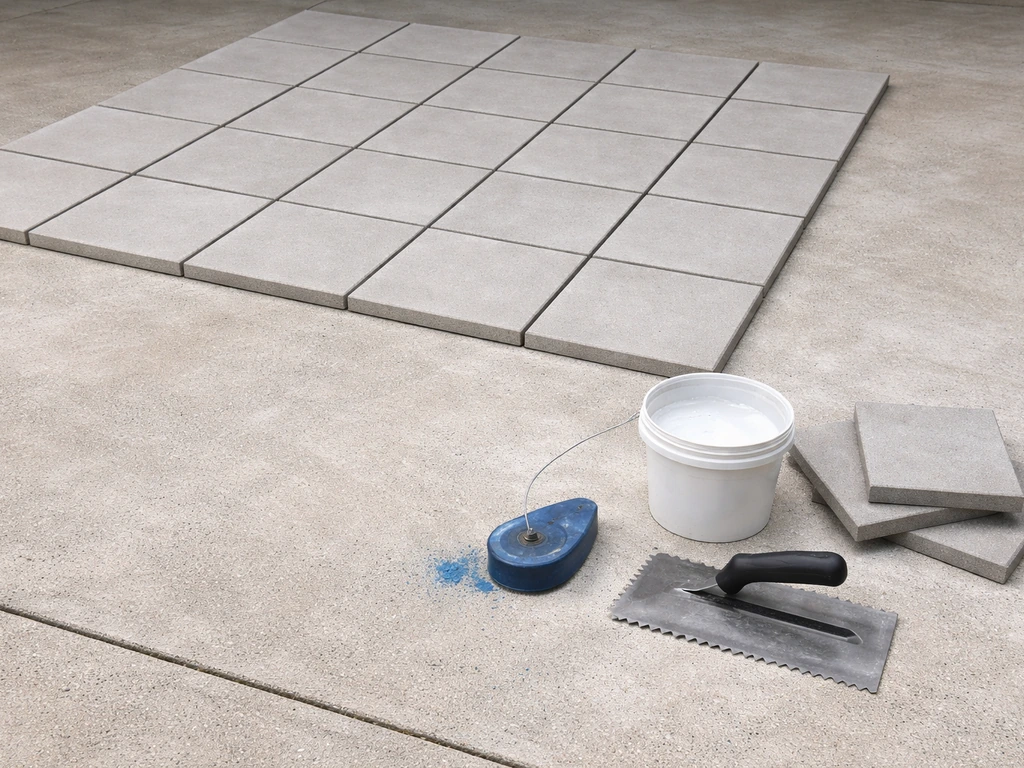
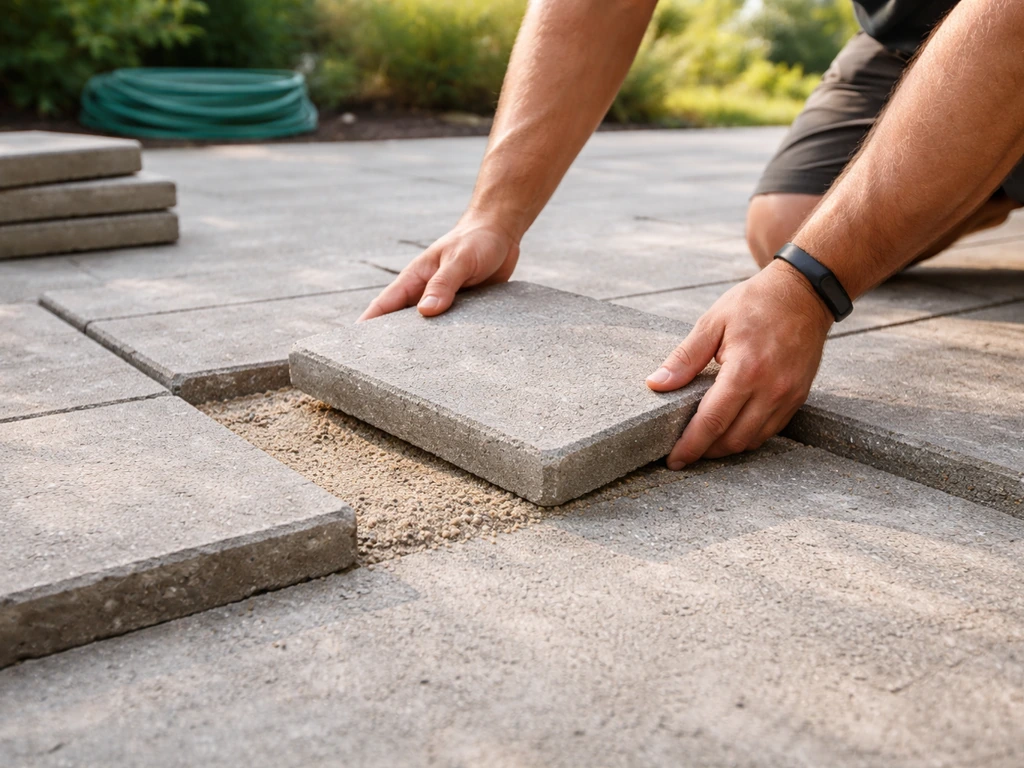
Mortar-set pavers or tile over concrete
- Clean, etch, and fully dry the concrete slab.
- Repair all cracks wider than a hairline and fill low spots with self-leveling compound.
- Establish your layout lines using chalk lines. Start from the most visible edge and work back so cut pieces end up in the least visible spots.
- Mix your polymer-modified thinset to a peanut butter consistency.
- Apply bonding primer to the slab if it is smooth or sealed.
- Spread thinset with a notched trowel (3/8 or 1/2 inch notch is typical for pavers). Work in manageable sections of 10 to 15 square feet at a time so the mortar does not skin over.
- Back-butter each paver or tile (apply a thin coat of thinset to the back) for full contact.
- Set the unit firmly, twist slightly to embed, and check for level. Use spacers for consistent joints.
- Check for level and slope frequently with a straightedge and a level. Maintain your target drainage slope throughout.
- Let the mortar cure for at least 24 hours before grouting or walking on the surface.
- Apply sanded exterior grout to joints, working it in with a grout float and wiping haze off with a damp sponge.
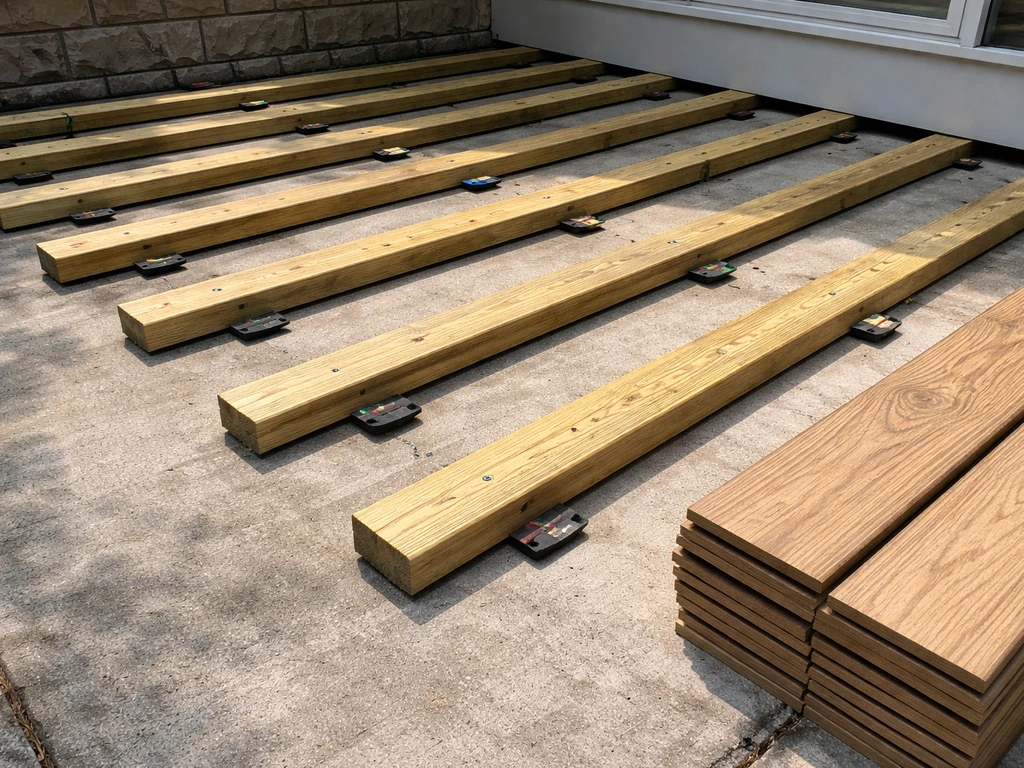
Composite or wood decking over sleepers
- Clean the slab and let it dry.
- Lay out your sleeper pattern. Sleepers typically run perpendicular to the deck boards, spaced 16 inches on center for 1-inch composite boards or 24 inches for thicker boards. Check your decking manufacturer's specs.
- Position the first sleeper along one edge. Drill pilot holes and drive Tapcon concrete screws every 24 inches to anchor it.
- Use a level to check each sleeper. Shim low spots with composite shim stock or pressure-treated wood scraps. This is where you correct for an unlevel slab without touching the slab itself.
- Continue installing sleepers across the patio, shimming as needed to keep them coplanar.
- Install the deck boards perpendicular to the sleepers starting at the most visible edge. Use the fastening system specified by the decking manufacturer (hidden clips for composite, face screws for wood).
- Maintain a 1/8 to 1/4 inch gap between composite boards for drainage and expansion.
- Cut the final row to fit using a circular saw with a fine-tooth blade. Composite cuts like wood.
- Install perimeter trim or fascia boards to cover the sleeper layer and give a finished look.
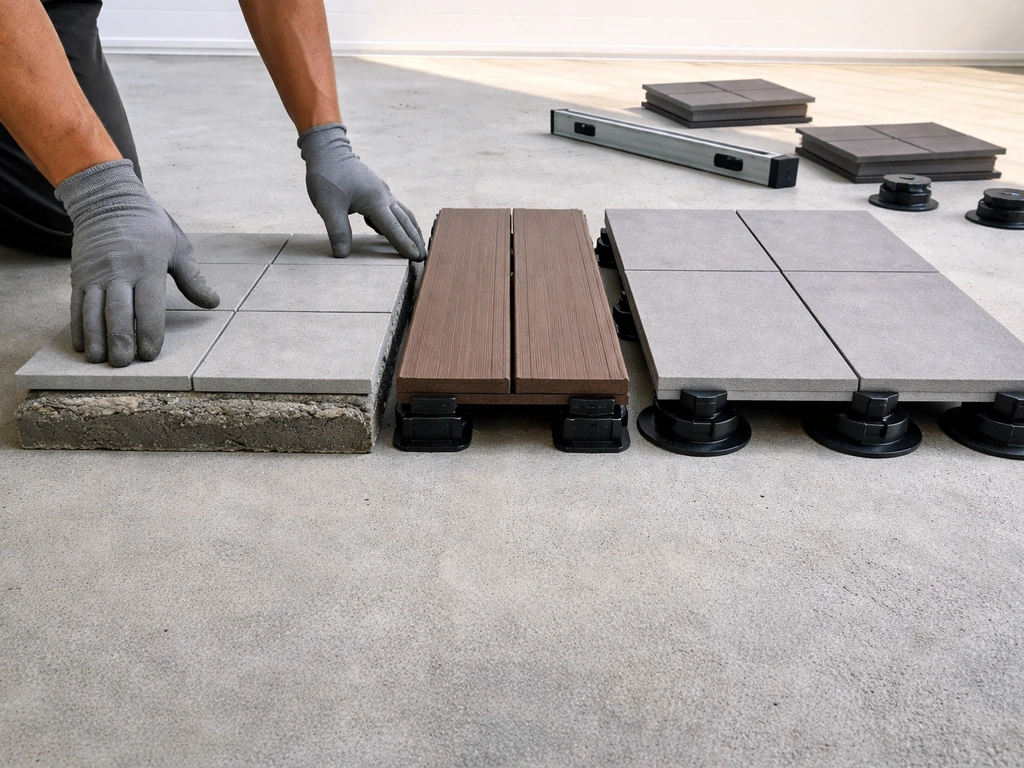
Pedestal tile or paver system
- Clean the slab. No bonding or fastening needed for the substrate.
- Confirm the slab slope. Pedestal systems compensate for slope by adjusting pedestal height, so measure your existing slope to know how much adjustment you need.
- Start at the highest corner of the patio and place your first pedestal. Set the height to bring the tile surface to your target elevation.
- Place the first tile on the pedestal and work outward, adjusting each pedestal to keep the top surface level (or at your intended slope).
- Most systems use a crossing tab at each pedestal head to maintain consistent joint width between four tiles meeting at one corner.
- Cut tiles as needed at edges using a wet saw.
- Install edge restraints or perimeter trim to keep the system from spreading and to cover the pedestal layer.
- Check the whole surface with a long straightedge when finished and adjust any pedestals that are slightly off.
Concrete overlay
- Clean and degrease the slab thoroughly. This step matters more for overlays than any other system.
- Acid etch or mechanically scarify the surface to give the overlay something to grip.
- Repair all cracks and fill them flush. Cracks will telegraph through overlays if not addressed.
- Apply the bonding adhesive or primer specified by your overlay product manufacturer and let it become tacky.
- Mix the overlay material to the manufacturer's consistency specifications.
- Pour and trowel the overlay working quickly in sections. Use a gauge rake or squeegee to spread it to even thickness.
- Texture the surface (knockdown, broom finish, or stamp) before it sets if you want a non-slip or decorative finish.
- Let cure per manufacturer instructions, usually 24 to 72 hours before foot traffic.
- Apply a penetrating concrete sealer or topcoat sealer once fully cured.
Finishing details that make the whole thing last
The installation itself is only part of the job. How you finish the edges, manage water, and seal the surface determines how long it all holds up.
Edge detailing
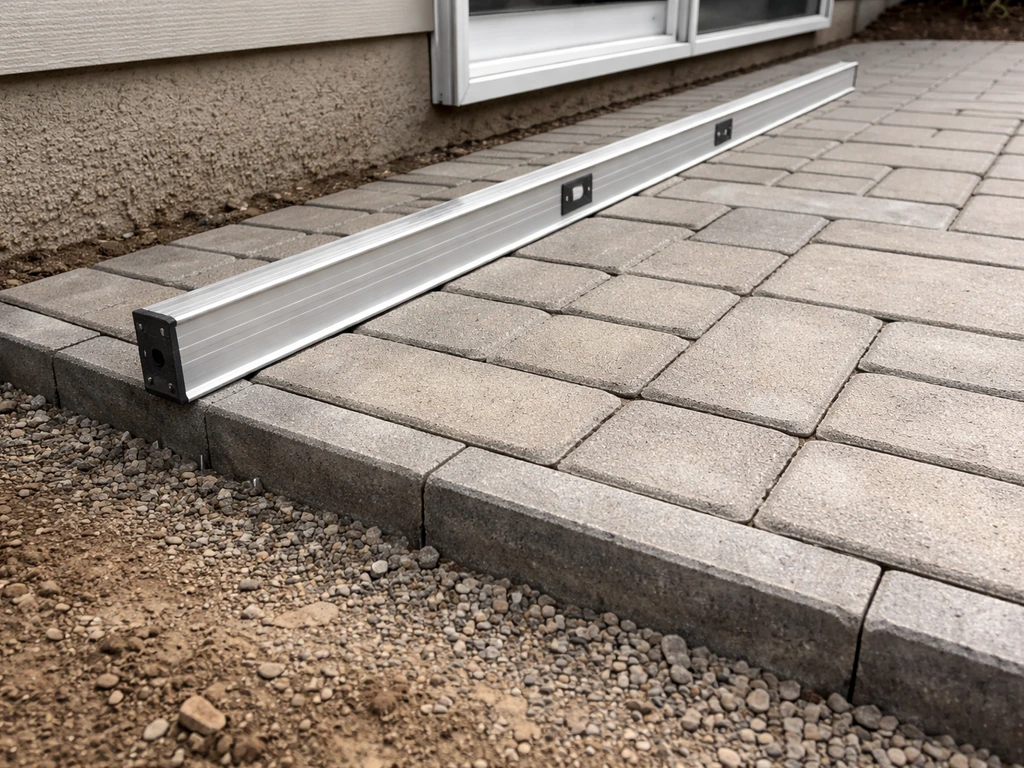
Every covering system needs a clean, stable edge. For mortar-set tile or pavers, cut the perimeter tiles cleanly with a wet saw and use an aluminum or plastic edge restraint along any exposed edges where the overlay meets the yard or a walkway. For sleeper-based decks, add a fascia board to cover the structural layer and give a finished face. For pedestal systems, trim tiles to fit along the perimeter and add a coping or trim piece to cap the edge. A sharp, tidy edge also prevents the surface from creeping or spreading outward over time, which is one of the more common long-term failure points.
Slope management and drainage
Check your finished surface slope before you call it done. Lay a long level on the surface and measure the gap at the low end. You want 1/8 inch of drop per foot minimum, 1/4 inch per foot is better. Water that sits on a patio surface will find a way under it, through it, or into your house over time. For bonded systems, if you end up with a low spot that holds water, you may need to grind it down or fill it before sealing. For floating systems, you can often adjust individual pedestals or shims after the fact.
Sealing and weatherproofing
Concrete pavers, natural stone tile, and concrete overlays all benefit from a penetrating sealer applied after the surface is fully cured and clean. A penetrating sealer (silane or siloxane-based) soaks into the material and repels water without changing the appearance much. A topcoat or film-forming sealer provides more stain resistance and can add a sheen, but it will need to be reapplied every 2 to 3 years as it wears. Composite decking and artificial turf do not need sealing. Wood decking should be sealed or stained with an exterior deck finish annually or every other year depending on your climate and sun exposure.
Ongoing maintenance that protects your investment
Once the project is done, a little regular attention goes a long way. Clear debris from drainage gaps in pedestal or sleeper systems so water can still flow. Reseal grout lines in mortar-set tile or paver systems every 3 to 5 years with a polymeric grout sealer. Inspect the perimeter edge restraints each spring for movement or lifting.
For overlays, check for any new cracks and fill them promptly before water gets underneath. If you are thinking about ways to take the space further visually, things like planting, lighting, and outdoor furniture all play a huge role in how the finished patio feels, and those updates can layer on top of any of these surface improvements without adding complexity to the base project.
If you want cheap ways to make patio look better, focus on planting, lighting, and simple furniture upgrades that build on your new surface ways to take the space further visually. Once you have the surface system and drainage right, you can keep upgrading the look with simple patio styling, like lighting, greenery, and furniture that suits the space planting, lighting, and outdoor furniture.
To get your patio pretty, focus on finishing details like a clean edge, good drainage, and the right sealers so the surface looks great and stays that way how to make a patio pretty. If you are planning those finishing touches, start by choosing a surface system that matches your goals and then build up the look with lighting, plants, and outdoor furniture how to make a patio pretty.
FAQ
Can I cover an existing patio if the concrete is stained with oil or other spots?
Yes, but oil staining must be addressed before bonding. Use a concrete degreaser for oil and grease, then rinse thoroughly and let the slab dry completely. If stains remain, bonded systems like mortar-set tile may not achieve full adhesion, so you may need stronger remediation or localized grinding in those areas.
What should I do if the patio has cracks that are wider than hairlines?
Cracks wider than about 1/4 inch, rocking sections, or widespread spalling are a warning sign that the slab may be moving. In those cases, choose a floating system (like pedestals/decking) only if the slab is still stable, or have the base evaluated before spending on a bonded overlay that can telegraph movement.
How do I choose between bonded tile/pavers and a pedestal or sleeper system?
Pick bonded systems when the slab is sound and drainage slope is already correct, because they lock you into the existing surface profile. Choose pedestal or sleeper systems when you need to correct slope, bridge uneven areas, or want a more forgiving install where water can drain through joints or gaps.
Will covering a patio trap moisture under my new surface?
It can, especially with bonded tile/paver installations done without proper bonding or with inadequate drainage. Floating systems reduce this risk because water can pass through, but they still require the overall slope to keep water moving away from the house. Any system should be finished with clean edges so water does not get redirected under the overlay.
How thick is too thick when covering a patio near doors or steps?
Measure door thresholds, step heights, and any transitions before you buy materials. A practical rule is to verify you can maintain safe clearance and avoid creating a new trip edge. If adding thickness would interfere with accessibility or code requirements, consider a thinner bonded option or a design change that lowers height where it matters most.
Do I need to remove old pavers or coverings before installing an overlay?
Not necessarily, but you do need a stable base. If existing units are loose, rocking, or the slab underneath is failing, simply covering over them will transfer problems upward. For bonded systems, smooth, sound concrete is critical, so inspect and remove anything that could move or compromise adhesion.
What type of underlayment or leveling material can I use for low spots under a floating patio?
Floating systems can use shimming at the sleeper or pedestal level for moderate variation. If you are using a bonded system, low spots must be corrected with grinding or a suitable cementitious self-leveler to create a flat, stable surface, because bonded thin materials can fracture if they span depressions.
Is calling 811 always required, even for a small DIY patio project?
If your plan involves digging anywhere near the patio perimeter, installing edge restraints that require ground disturbance, adding trenches, or setting anchors that penetrate the slab, you should call. It is free and helps prevent accidental damage to buried utilities, even for seemingly minor work.
How can I prevent pavers or tile from rocking after installation?
Rocking usually comes from missing or incorrect bonding, weak mortar contact, or a slab with movement. Use the correct exterior-rated polymer-modified thinset or adhesive for the system, spread properly for full coverage, and ensure the base is stable and prepped. After set-up, avoid walking on tiles until the bonding material has cured as directed.
Can I use artificial turf if my patio slopes poorly?
You can, but you must ensure water will not pool. Turf allows drainage through backing and any intended drain paths, yet pooled water can still increase risk of odor and maintenance issues, especially if you add a dense pad. Fix slope first if you see standing water during rain or after washing.
What sealer should I use, and do I need it for every patio covering?
Not every system needs sealing. Penetrating silane or siloxane sealers are commonly used for concrete pavers, stone tile, and overlays to repel water without heavy shine, and film-forming topcoats add stain resistance but typically require more frequent reapplication. Composite decking and turf generally do not need sealing, while wood decking needs regular exterior finishing.
How do I maintain drainage gaps in pedestal or sleeper systems?
Treat drainage openings like critical infrastructure. Clear leaves, soil, and debris from the joints and gaps periodically, especially after storms and in seasonal leaf drop. If gaps clog, water can accumulate and eventually stain the slab or create surface issues.
When should I recheck edges and grout lines after installation?
Do a first check soon after completion for any minor settling or movement, then inspect again each spring. For mortar-set tile and pavers, reseal grout lines at a practical interval (often every few years) based on product type and weather exposure, and re-tighten or re-level anything that looks lifted near the perimeter.
Next Article
How to Rebuild a Patio Step by Step DIY Guide
Step-by-step DIY guide to rebuild a cracked or uneven patio, including base prep, drainage, finishes, costs, and pro cal