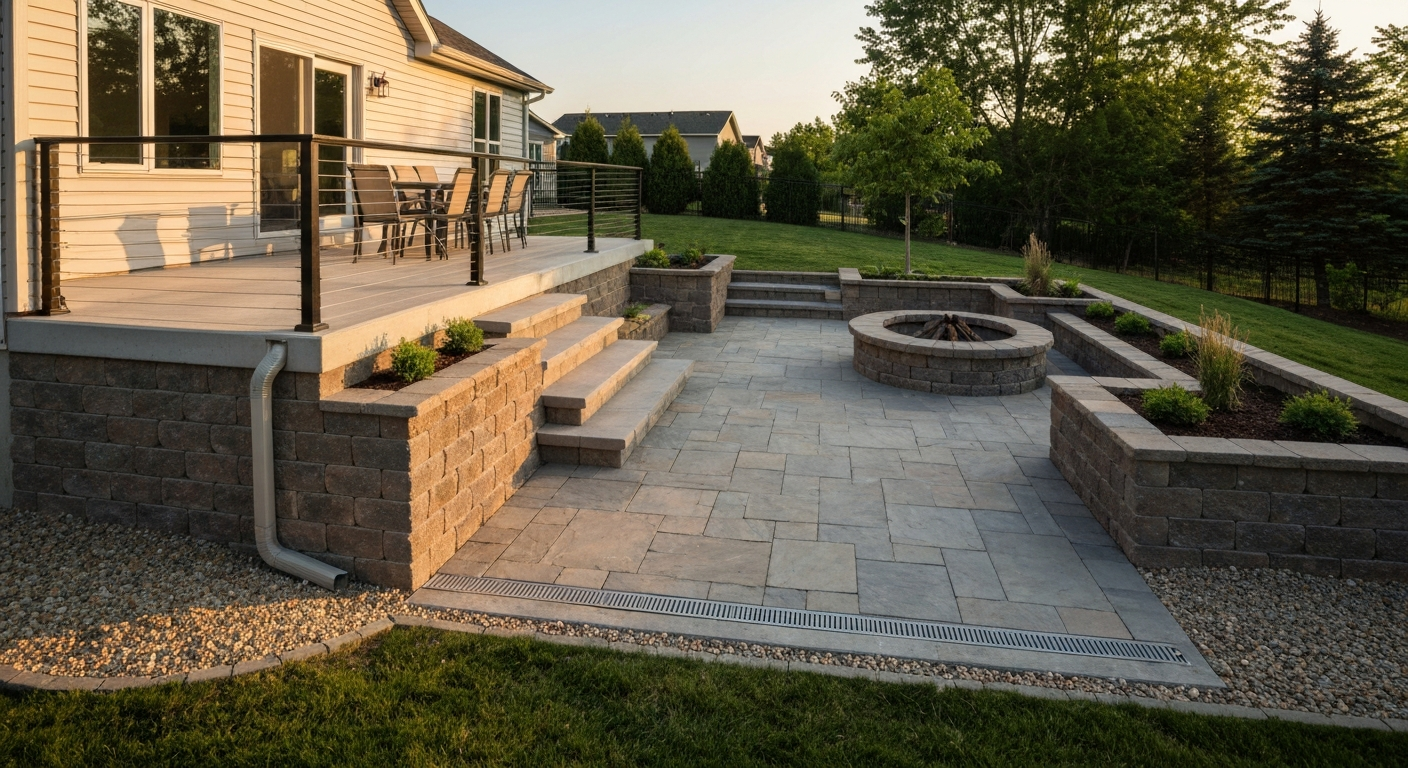
Setting levels for a patio comes down to one core rule: slope the surface 1/4 inch per foot (2%) away from your house, verify that slope at every stage of the build, and hit a final flatness tolerance of no more than 3/8 inch over any 10-foot run. Get those numbers right and water drains cleanly, pavers stay tight, and the whole thing lasts decades. Miss them and you end up with puddles near your foundation, shifting pavers, or a tripping hazard. I've made most of the classic mistakes on my own backyard projects, so everything in this guide is geared toward helping you avoid them.
How to Set Levels for a Patio: DIY Laser, Grading & Steps

Nolan Lennox
26 Jul 2026
What this project actually involves
Leveling a patio isn't just about making the surface flat. It's about controlling where water goes, how the patio relates to your house's finished floor elevation, and (on sloped ground) whether you need one continuous surface or a terraced multi-level design with steps and retaining walls. A single-level patio on near-flat ground is a confident DIY project for almost any homeowner willing to rent a plate compactor and borrow a laser level for a weekend. A multi-level patio on a steep slope, near a foundation, or over problem soil is a bigger commitment that sometimes requires professional input. This guide covers both ends of that spectrum honestly.
Planning checklist before you dig a single shovelful
Skipping the planning phase is the single most expensive mistake I see homeowners make. Spend a Saturday on these steps before you touch a shovel and you'll save yourself real money and frustration.
- Call 811 (USA) or your national utility-locate service at least three business days before any excavation. It's free and legally required in most states. Mark the flags before you finalize your layout.
- Survey the site with a long level or laser. Measure the highest and lowest corners. If the total grade change across the planned patio footprint is 4 to 6 inches or less, a single-level pour or paver install is usually straightforward. More than 6 inches starts a conversation about terracing.
- Check local permit requirements. Many jurisdictions require permits for patios over a certain size (often 200 sq ft), for attached structures, or for any retaining wall over 4 ft. A quick call to your building department takes 10 minutes and saves a stop-work order later.
- Map drainage paths. Walk the yard during or right after heavy rain if you can. Know where water naturally flows and make sure your patio won't dam it. Identify where runoff from the patio surface will exit the property.
- Confirm access for equipment and material delivery. A plate compactor fits through a standard gate; a skid steer does not. Know your constraints before you order 8 tons of base gravel.
- Estimate materials. Calculate your excavation depth (base + bedding + surface layer), your gravel and sand quantities, and your surface materials. Add 10% waste factor for pavers and 5% for gravel.
- Build a timeline. A basic 200 sq ft paver patio typically takes two to three full weekends: one for excavation and base prep, one for laying pavers, and a third for finishing, jointing, and cleanup. Concrete pours require a single compressed push but need cure time before use.
- Notify neighbors if your work will affect shared drainage or require heavy equipment near a property line.
When to call a pro instead of DIYing
I'm a strong believer in DIY, but I'm also honest: some site conditions genuinely require professional help. Pushing through on the wrong site without expert input can mean structural failure, flooded basements, or retaining walls that fall over. Here are the specific triggers that should send you to a contractor or structural engineer.
- Retaining walls over 4 feet tall (measured from footing to top of wall). Most building codes treat these as structural elements requiring permits and engineered design. Even well-built DIY gravity walls struggle past this height under lateral soil pressure.
- Slopes greater than 10 to 15 percent across the patio footprint. That's a roughly 1.5-inch drop per foot or more. Terracing is possible DIY, but drainage engineering becomes critical.
- Soft, spongy, or organic soil that doesn't firm up when you jump on it. High-plasticity clay or soil with visible organic matter may require excavation and replacement or lime/cement stabilization before you can build reliably on it.
- Any patio within 5 feet of a building foundation, especially a basement wall. Improper drainage here can mean water infiltration into your home.
- High water tables or persistent wet spots in the footprint. If the area stays wet days after a rain, you have a subsurface drainage problem that needs to be solved before the patio goes in.
- Local code triggers: some municipalities require licensed contractors for poured concrete over certain areas, or for any project that includes a structural retaining wall. Check before you start.
Slope targets, heights, and measurable tolerances you need to hit
These are the numbers I keep on a notecard in my tool bag. They come from industry standards (ACI 302.1R, ICPI guidelines) and real-world contractor practice. Know them before you start setting any grade.
| Measurement | Minimum | Recommended / Typical | Notes |
|---|---|---|---|
| Surface slope for drainage | 1/8" per foot (1%) | 1/4" per foot (2%) | Away from house/structure in all cases |
| Surface flatness (pavers) | — | ±3/8" over 10 ft | Non-cumulative; ICPI standard |
| Lippage between adjacent paver units | — | 1/8" max | Height difference at joints |
| Concrete flatness (exterior) | — | ≤1/4" under 10-ft straightedge | ACI 117 reference for accessible surfaces |
| Step riser height | 4" min | 6"–7" typical | Consistent throughout a stairway |
| Step tread depth | 11" min | 12"–14" typical | Deeper is more comfortable outdoors |
| Terrace/retaining wall height (DIY limit) | — | ≤3–4 ft (gravity wall) | Engineered design above 4 ft |
| Paver base compaction | — | ~95% Standard Proctor (ASTM D698) | Verify by probe test or field observation |
To put the slope numbers into real practice: at 1/4 inch per foot, a 12-foot-wide patio drops exactly 3 inches from the house-side edge to the outer edge. A 16-foot patio drops 4 inches. These are the numbers you're targeting when you set your stringlines and check your screed rails. At the minimum 1/8 inch per foot, that same 12-foot patio drops only 1.5 inches, which is enough to drain but leaves little margin for base irregularities. I always aim for 1/4 inch per foot. It gives you buffer room when you're compacting and screeding.
Tools and materials you'll actually need
Hand tools and layout gear
- 50-ft or 100-ft tape measure (two is better)
- 4-ft spirit level and a 2-ft torpedo level
- Line level (cheap but useful as a backup check)
- Mason's line / braided stringline and line blocks or stakes
- Speed square and framing square
- Marking paint or chalk line
- Lumber for batter boards (2x4s, 1x4s) and 2x4 stakes
- Hammer, hand saw, drill/driver
- Shovel, spade, and a flat-blade spade for detail work
- Garden rake and a metal screed (or a straight 2x4 as a screed board)
- Rubber mallet for pavers
- Plate tamper (hand tamper) for small spots
Power tools and leveling equipment
- Plate compactor (rent for $60–$100/day; essential for base prep)
- Rotary laser level with tripod and grade rod/staff (rent for $40–$80/day or buy a mid-range unit for $150–$300)
- Crossline laser level (useful for smaller patios and interior layout checks)
- Angle grinder or wet saw for cutting pavers
- Circular saw with diamond blade (for scoring and cutting paver edge pieces)
- Reciprocating saw (for demolition of existing slabs or decking)
- Concrete saw / cut-off saw for existing concrete removal if applicable
Base, bedding, and surface materials
- Compactable aggregate base: 4–6" depth for pedestrian patios, 6–8" for heavier loads (hot tubs, occasional vehicle). Crushed stone (Class II base, 3/4" minus) is standard.
- Bedding layer: 1" of coarse concrete sand (ASTM C33) for traditional paver installs, or ASTM No. 8 stone for open-graded systems
- Geotextile/filter fabric: under base in soft or fine-grained soils to prevent base-subgrade mixing
- Edge restraints: plastic or aluminum paver edging with 10" spikes, continuous around the perimeter
- Joint sand: polymeric sand for long-term joint stability (follow manufacturer's application instructions carefully)
- For concrete patios: 4" slab on compacted base (5–6" for hot tubs or heavier loads), rebar or wire mesh per local specs
- For multi-level/retaining: segmental retaining wall (SRW) blocks, cap blocks, geogrid (for walls over 2–3 ft), drainage aggregate and perforated pipe behind wall
Safety gear
- Safety glasses (mandatory when cutting masonry)
- Hearing protection (plate compactors and cut-off saws are loud)
- Dust mask or N95 respirator when cutting concrete or pavers
- Work gloves (cut-resistant for masonry)
- Steel-toed boots
- Knee pads for paver laying
- High-visibility vest if working near a street or driveway
Establishing reference elevations and layout
This is the step most DIYers rush through and later regret. Your reference elevation is the single fixed point every other measurement traces back to. Get it wrong and every subsequent step compounds the error. I set mine at the house's finished floor elevation (FFE) or at the bottom of the door threshold that opens onto the patio, then work outward from there.
Setting a benchmark
Drive a stake or screw a nail into a fixed, stable object near the patio (a house ledger, a fence post set in concrete, or a dedicated hub stake driven to refusal in undisturbed soil). Mark this point clearly. Every batter board and stringline height you set will reference this elevation. Write the benchmark height on it in marker and protect it from getting knocked over during excavation.
Batter boards and stringlines
Set batter boards at least 2 feet outside each corner of the planned patio area so they don't get disturbed during digging. Each batter board is a horizontal board nailed between two stakes. Run mason's line between opposing batter boards to define each side of the patio at your target finished surface elevation. Use a line level or transfer your laser elevation to confirm each stringline is at the correct height. Pull the lines tight (sagging lines cause measurement errors) and check for square using the 3-4-5 triangle method or by comparing diagonals: on a rectangular patio, the two diagonals should be equal.
Grid layout for multi-level patios
For multi-level designs, you're essentially running this layout process for each terrace separately. Define each level's finished surface elevation before you dig, accounting for your step riser heights (typically 6 to 7 inches) between levels. Mark the front edge of each terrace and the back of each retaining wall on the ground in marking paint before any excavation starts. This is also the right time to confirm that your planned step heights are consistent throughout: inconsistent risers are a tripping hazard and a code issue.
Laser level setup and how to use it for grading
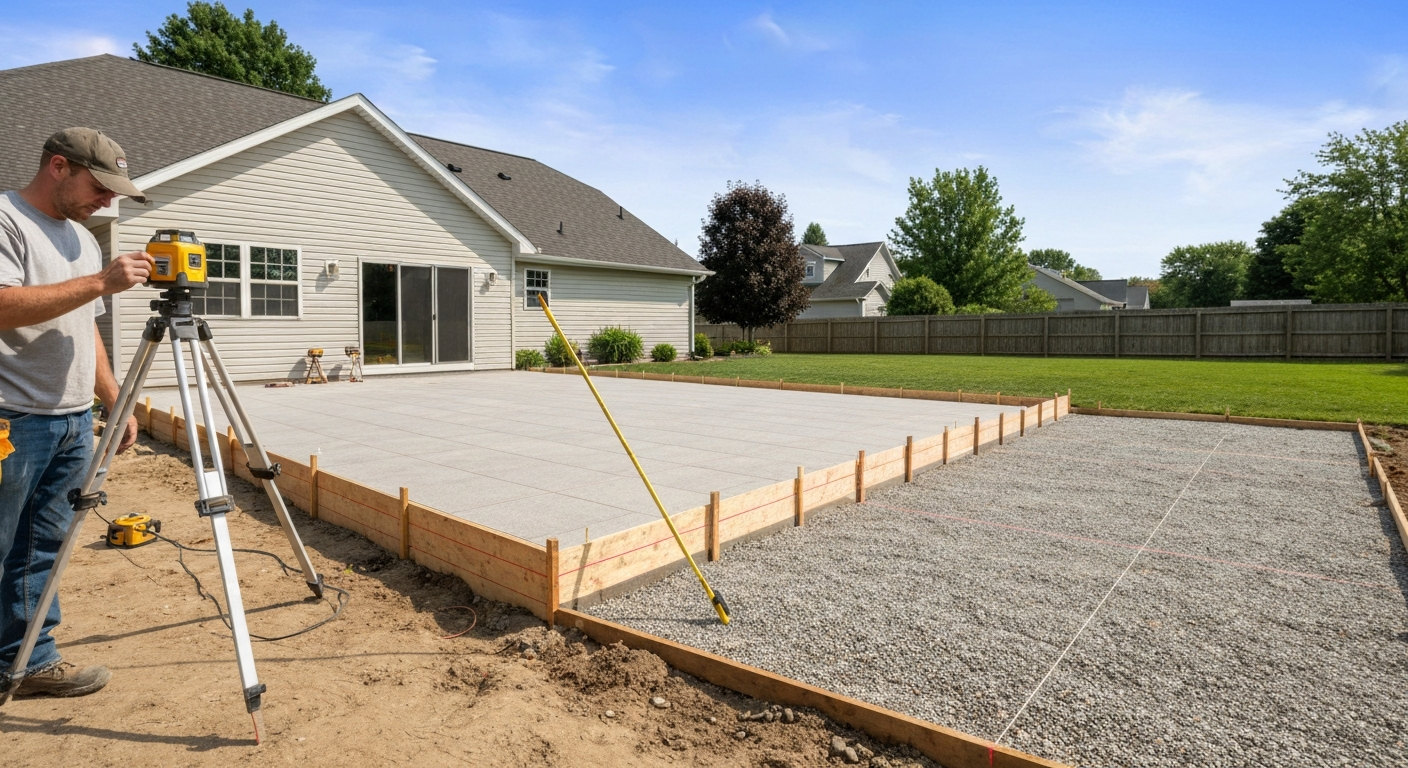
A rotary laser level is the single tool upgrade that makes setting accurate grades manageable for one person working alone. For step-by-step instructions on setting up and using a laser level for patio grading, see how to use a laser level for patio. See the blank" rel="noopener noreferrer">Topcon RL‑H5A Rotating Laser Instruction Manual – slope/grade functions and setup for details on using slope/grade mode and the typical workflow of setting instrument height over a benchmark, calculating offsets, and using a receiver on a grade rod to transfer slope across the site. You set the instrument once, and every grade rod reading across the entire patio area traces back to the same reference plane. I rent rather than buy for most projects, and I'd encourage first-timers to do the same until they know they'll use it regularly.
Setting up the rotary laser
- Mount the laser on a tripod set on stable, undisturbed ground just outside the work zone. Height doesn't matter much as long as the beam clears your work area. Set the instrument level using the built-in bubble vials or self-leveling feature.
- Set the instrument height (HI) by holding a grade rod on your benchmark and reading where the laser beam hits. Write this number down. This is your instrument height above your benchmark elevation.
- Calculate your target rod readings. If your benchmark is at your finished surface elevation and you want a 1/4"/ft slope over 12 feet, your target finished surface at the far edge is 3" lower. The grade rod reading at that far edge should be HI + 3" (because the surface is lower, the rod reads higher).
- Use slope/grade mode if your rotary laser supports it (models like the Topcon RL-H5A and similar units let you dial in a grade percentage). Set the grade axis to 2% sloping away from the house. The laser now projects a sloped plane rather than a flat horizontal plane, which means you can simply shoot for a consistent rod reading across the whole area.
- Walk the site with the grade rod and a helper (or use a self-reading receiver clipped to the rod). Check your existing grade, mark cut/fill areas with paint or stakes, and use these readings to guide your excavation and base compaction.
Worked measurement examples
Example 1: You set your laser HI at 54 inches above your benchmark (finished surface at the house). Your target slope is 1/4"/ft. At 12 feet from the house, the target surface is 3" lower than the benchmark. Your grade rod reading at that point should be 54 + 3 = 57 inches. At 16 feet out, it should be 54 + 4 = 58 inches. If your rod reads 56 inches at 12 feet, the base is 1 inch too high there and needs to come down.
Example 2: You're setting screed rails for a 1-inch bedding sand layer under pavers. Your base compaction is done and your base grade rod readings are correct. Drop your target rod readings by exactly 1 inch across the board (accounting for the 1" of sand bedding). Set screed pipes or rails to those heights. After screeding and before laying pavers, double-check three or four rod readings across the screeded sand surface to confirm you haven't drifted.
Marking, demo, and excavation
Clearing and saw-cutting existing slabs
If you're replacing an existing concrete patio, saw-cut it into manageable sections (roughly 2 x 2 feet to 3 x 3 feet) before breaking it up. A concrete saw or angle grinder with a diamond blade makes this much cleaner than just hammering away at it. Wear full PPE: the silica dust from cutting concrete is a serious lung hazard. Wet cutting dramatically reduces dust. Break sections with a sledge or pry bar, and haul pieces out in a rented dumpster or trailer. Do not try to use broken concrete as base material under pavers; it won't compact uniformly.
Excavation depth: how to calculate it
Your total excavation depth equals the sum of every layer that sits below your finished surface elevation. Here's how to think through it for common patio types.
| Patio Type | Base Layer | Bedding/Setting Layer | Surface Layer | Total Excavation Depth |
|---|---|---|---|---|
| Interlocking pavers (pedestrian) | 4–6" compacted aggregate | 1" screeded bedding sand | 2.375" standard paver (60mm) | 7.4–9.4" below finished surface |
| Concrete slab (standard pedestrian) | 4" compacted aggregate base | — | 4" poured concrete | 8" below finished surface |
| Concrete slab (heavy load: hot tub) | 4–6" compacted aggregate base | — | 5–6" reinforced concrete | 9–12" below finished surface |
| Natural stone (flagstone) | 4–6" compacted aggregate | 1" dry-laid setting bed | 1.5–2" flagstone | 6.5–10" below finished surface |
| Ground-level wood/composite deck | Compacted subgrade (varies) | — | Framing + decking (~5–6") | Varies; depends on footing depth |
For a typical 4-inch paver install (60mm pavers + 1" sand + 4" base), excavate down approximately 7.5 to 9.5 inches below your planned finished surface elevation. Mark the required excavation depth on your batter board stakes so you have a visual target as you dig. In native soil that hasn't been disturbed, 4 inches of compacted crushed stone base is generally sufficient for a pedestrian patio. If you're in a frost-prone climate or on clay soil, bump that base depth to 6 inches minimum.
Soil types and what they change
Sandy or well-draining native soil is the easiest subgrade to work with: compact it, lay filter fabric if there's any fine-particle concern, and proceed. Clay soil compacts well when slightly moist but becomes plastic when wet, meaning it can heave, shift, and pump under load. On heavy clay, I always add filter fabric and push toward the deeper end of the base thickness range. Organic soil (topsoil, decomposed material) must be fully removed from the footprint; you cannot compact organic material to a stable base. If you hit soft or wet spots after excavating, add a few inches of extra base aggregate and compact in multiple thin lifts (no more than 4 inches loose per lift) until the area stops deflecting under the plate compactor.
Grading and compacting the base
Once you've excavated, compact the exposed subgrade with the plate compactor before adding any base material. A quick field test: walk the subgrade surface firmly. If it feels spongy or leaves visible footprints, it needs more compaction or there's a soil problem to address. Add your crushed stone base in lifts of no more than 4 inches loose thickness. Compact each lift thoroughly with the plate compactor (typically two to four overlapping passes). The target is approximately 95% Standard Proctor density (ASTM D698). Typical construction specifications verify compacted lifts to about 95% Standard Proctor (ASTM D698) for subgrade/subbase under concrete pavements (see EB‑237/industry field reference – recommended compaction (≈95% Proctor)). For most DIYers this isn't something you'll formally test; instead, use the proof-roll check: if the compacted surface doesn't deflect visibly under the plate compactor on the final pass, you're in good shape.
As you compact each lift, take grade rod readings from your laser to verify you're staying at the right elevation. It's much easier to add or remove a half inch of stone before the next lift than to fix it after everything is compacted. Your final compacted base surface should sit at exactly your target elevation minus the bedding layer thickness (typically 1 inch for paver sand).
Setting the surface: pavers, concrete, and decking
Screeding bedding sand for pavers
Set 1-inch-diameter steel pipes or conduit on the compacted base as screed rails, checking their height with your laser and grade rod to confirm they're exactly 1 inch above your base and set at your target slope. Pull a screed board (a straight 2x4) across the pipes to create a consistent 1-inch sand bed. Remove the pipes as you go and fill the troughs they leave with sand. Do not compact the sand after screeding and before laying pavers: you want it undisturbed so the pavers seat uniformly. Lay pavers from a corner, using kneeboard pads to avoid disturbing the screeded surface. Check your work every few rows with a 4-foot level and your laser.
Concrete patio pour
For a concrete pour, your forms define both the perimeter and the finished surface slope. Set form boards so their top edge sits at your exact target finished elevation, with the required slope built in along the length of the form. Verify form height with the laser before the truck arrives. A 4-inch slab on 4 inches of compacted base is standard for pedestrian patios. Add rebar (1/2-inch rebar on 18-inch centers) or wire mesh for slabs supporting heavier loads or in areas with expansive clay. Cut control joints every 8 to 10 feet (roughly 2 to 2.5 times the slab thickness in feet for a 4-inch slab) to control cracking. Check flatness with a 10-foot straightedge before the concrete fully sets; the surface should not deviate more than 1/4 inch under the straightedge.
Ground-level decking
For composite or wood decking, the framing does the leveling work. Set your beam and joist heights using the laser in exactly the same way: establish your finished decking elevation, subtract the decking thickness and joist depth, and set post heights accordingly. Composite decking should still slope slightly (1/4"/ft minimum) for drainage, though most composite manufacturers specify a 1/8-inch gap between boards that handles much of the drainage. Ground-level decks (within 18 inches of grade) require pressure-treated lumber rated for ground contact at the lowest framing members.
Multi-level patios: terraces, steps, and retaining walls
When the natural grade drop across your patio footprint is more than a comfortable ramp can handle (roughly 4 to 6 inches for a short patio run), you're looking at a multi-level design. Each terrace is essentially its own mini-patio with its own finished surface elevation, connected by steps and separated by a retaining wall or a planted slope. If you're new to multi-level patios, the separate article on building a multi-level patio covers the structural design side in more depth.
Designing retaining walls
For gravity segmental retaining walls up to 3 to 4 feet tall, NCMA guidelines support DIY construction using standard SRW blocks. The key rules: bury the bottom course at least 1 inch per foot of wall height (so a 3-foot wall needs the base course buried at least 3 inches below grade), backfill with clean crushed stone (not native clay) behind the wall, and install a perforated drain pipe at the base of the backfill routed to daylight. Compact backfill in 8-inch lifts using a hand tamper near the wall (plate compactor can crack the face of the wall if used too close). Above 4 feet, stop and get an engineered design.
Step sizing and consistency
Outdoor steps should use risers between 6 and 7 inches tall and treads at least 12 inches deep (deeper treads, 14 to 16 inches, feel much more comfortable and natural on outdoor stairs). The relationship most often cited is that 2 × riser height + tread depth should equal around 26 inches. A 7-inch riser with a 12-inch tread satisfies this at 26 inches. More important than any formula: all risers in a stairway must be the same height within 3/8 inch. Variations in riser height cause trips. Set each step course with the laser to confirm consistent elevations before locking it in.
Pool deck drainage: what's different
Pool deck leveling follows the same core slope rules but with some added considerations. The surface should drain away from the pool coping and away from the house, typically toward a drain or planting bed. A common layout slopes the deck at 1/4"/ft away from the pool edge in all directions, with a trench drain or channel drain at the perimeter catching runoff before it reaches turf or structures. Avoid directing pool deck runoff toward a septic system or a neighbor's property. Non-slip surface texture is essential around pools; choose pavers or concrete with a brushed or tumbled finish rather than a smooth troweled surface. For more specifics on this layout, the article on leveling a patio for a pool goes into greater depth.
Leveling patio furniture (quick fixes)
If your patio surface is complete but furniture wobbles, the fix is almost never releveling the whole patio. Adjustable furniture feet (leveling glides) screw into most chair and table legs and can compensate for 1/2 to 1 inch of surface variation. For larger items like umbrellas stands and fire pits on slightly uneven surfaces, rubber wedge shims work well. A dedicated guide on leveling patio furniture covers the specific hardware options if wobbling furniture is your main problem.
Troubleshooting common leveling problems
Pavers that settled unevenly after a season
If individual pavers have settled or heaved, the cause is almost always base failure: either insufficient compaction, inadequate base depth for the load, or water infiltrating under the base and eroding it. Remove the affected pavers, pull the sand bedding, inspect the base, add and compact additional aggregate if needed, re-screed the sand, and relay the pavers. Polymeric joint sand that has never been applied or has failed (washed out) is usually the entry point for erosion: re-apply it properly after any repair.
Concrete patio cracking or heaving
Cracks that follow control joints are normal and doing their job. Cracks that run randomly across a slab panel usually indicate base failure, insufficient slab thickness, lack of reinforcement, or tree root intrusion. Hairline cracks can be filled with concrete caulk. Structural heaving (one side of a crack raised above the other) requires removing and replacing the affected slab section and investigating the base condition underneath.
Water pooling on the surface
If water pools on a completed patio, check the actual surface slope with a level and tape measure. If it measures under 1/8 inch per foot, you need more slope. On a paver patio you can sometimes fix a low spot by carefully removing pavers in that area, adding a thin layer of additional bedding sand, and re-laying. On a concrete patio, options include grinding down a high point, adding a thin concrete overlay with built-in slope, or installing a surface drain. Prevention (verifying slope at every stage before the next layer goes down) is always cheaper than remediation.
Cost-conscious options without cutting corners on accuracy
You don't need to own a $2,000 rotary laser to set accurate grades. Renting a rotary laser for a day or two costs $40 to $80 and covers everything you need. A basic digital level (under $50) or a quality 4-foot spirit level plus a long, straight 2x4 can substitute for many measurements. Batter boards and stringlines cost almost nothing. The plate compactor is non-negotiable to rent; skipping it and compacting by hand leads to base failure. On materials, compactable aggregate base is a commodity product: buy it from a local quarry or concrete supplier in bulk rather than from a home center in bags. The difference is dramatic: bulk crushed stone runs $25 to $45 per ton; bagged material at a home center costs 5 to 10 times more per equivalent weight. For a 200 sq ft patio at 4-inch base depth, you need roughly 2.5 to 3 tons of base material.
FAQ
What is the quick planning checklist before you set patio levels?
Site goals and constraints: note house openings, pool edges, utilities, and desired furniture/uses. Measure overall patio footprint and existing grades (high/low points). Drainage strategy: plan flow direction(s) to avoid directing water to the foundation or pool. Access/permits: check local setback, grading, and retaining‑wall permit triggers. Materials decision: pavers, poured concrete, or decking—each affects base thickness and slopes. Structural triggers: If grade change across the patio exceeds ~4–6 in, subgrade is organic/soft, or you plan heavy loads (hot tub/vehicle), plan terraces/retaining walls or consult a pro. Safety/underground checks: call your utility locate service before digging.
What slope and height guidelines should I use for patios near houses and pools?
Target slope: 2% (1/4 in per ft) away from structures is the preferred rule-of-thumb. Minimum acceptable slope: 1% (1/8 in per ft) — avoid less to reduce ponding risk. For concrete/pavers near house, slope away from foundation; for pool decks, slope typically 1–2% away from pool or toward designated drains. Tolerances: aim for ±3/8 in over 10 ft non‑cumulative surface flatness for pavers; limit adjacent-unit lippage to ≤1/8 in. For concrete flatness, many residential specs use ≤1/4 in under a 10‑ft straightedge.
What tools and materials will I need for accurate patio leveling (DIY)?
Essential tools: rotary/line/laser level with receiver, grade rod, 4–6 ft and 10 ft straightedges, string lines and line levels, transit/hand level (optional), measuring tape, shovel, wheelbarrow, plate compactor (80–120 lb), tamper, rake, screed rails, masonry saw (pavers), jointer/edger (concrete), level, carpenter’s square. Materials: geotextile fabric (if needed), crushed stone/aggregate base (4–8 in depending on surface), bedding sand (1 in for pavers), concrete (4 in slab typical), reinforcement (wire mesh/rebar as needed), edge restraints (paver edge), polymeric joint sand (for pavers), drainage pipe and catch basins, retaining wall blocks or timber, stakes/marking paint. Safety: gloves, eye protection, hearing protection, dust mask, steel‑toe boots.
How do I establish accurate reference elevations (benchmarks) across the site?
Pick a permanent reference—house foundation sill, porch step, or a temporary concrete benchmark. Use the laser/line level: set laser on tripod, level it, and record instrument height (HI) above the benchmark. Transfer the laser to a fixed benchmark rod position and record reading. Calculate target elevations by subtracting receiver readings from the HI (or use grade mode to set a slope plane). Mark multiple benchmarks around the site and run string lines at key edges to verify. Use a second measurement method (hand level or measuring tape) to cross‑check. Note measurements and keep a simple grade table (station, elevation, required depth).
Step‑by‑step: how to set grades and compact the base for pavers?
1) Remove vegetation/topsoil to design depth (base + bedding + paver thickness + desired finished elevation). 2) Proof‑roll subgrade and remove soft spots; replace/compact or add geotextile if needed. 3) Install geotextile where required. 4) Place aggregate base in lifts (loose thickness ≤4 in), compact each lift to ≈95% Proctor or until plate compactor shows even compaction; typical pedestrian base 4–6 in, heavier loads 6–8 in+. 5) Set screed rails at calculated elevations using laser or string lines to achieve target slope (e.g., 2%). 6) Spread 1 in bedding sand and screed to bedding elevation. 7) Lay pavers on the screeded bedding, maintain joint widths, and install edge restraints. 8) Compact pavers with plate compactor using protective matting, sweep polymeric sand into joints, and final compact/sweep per manufacturer. Maintain measurable tolerances: final surface ±3/8 in over 10 ft and lippage ≤1/8 in.
Step‑by‑step: how to set grades and pour a concrete patio?
1) Excavate to design depth for slab thickness + base + subgrade allowance. 2) Proof‑roll and correct soft areas; compact subgrade to ~95% when specified. 3) Place and compact crushed aggregate base (typically 4 in for pedestrian). 4) Set form boards on stable stakes at final top-of-slab elevations, using laser/grade rod or string and line level to set the forms to the required slope (2% typical). 5) Install reinforcement (wire mesh or rebar) and ensure proper cover. 6) Pour concrete, screed to forms, bullfloat, and finish per ACI practices. 7) Cut control/contraction joints spaced per rule (24–36× slab thickness in inches; e.g., 4 in slab → 8–12 ft; conservative ~8–10 ft). 8) Cure and seal per mix/ambient spec. Tolerances: aim for ≤1/4 in under a 10‑ft straightedge for accessible surfaces or follow local code/ACI requirements.
Next Article
How to Build a Multi Level Patio: DIY Guide
How to build a multi level patio: step-by-step DIY guide for planning, leveling, retaining walls, surfaces and costs