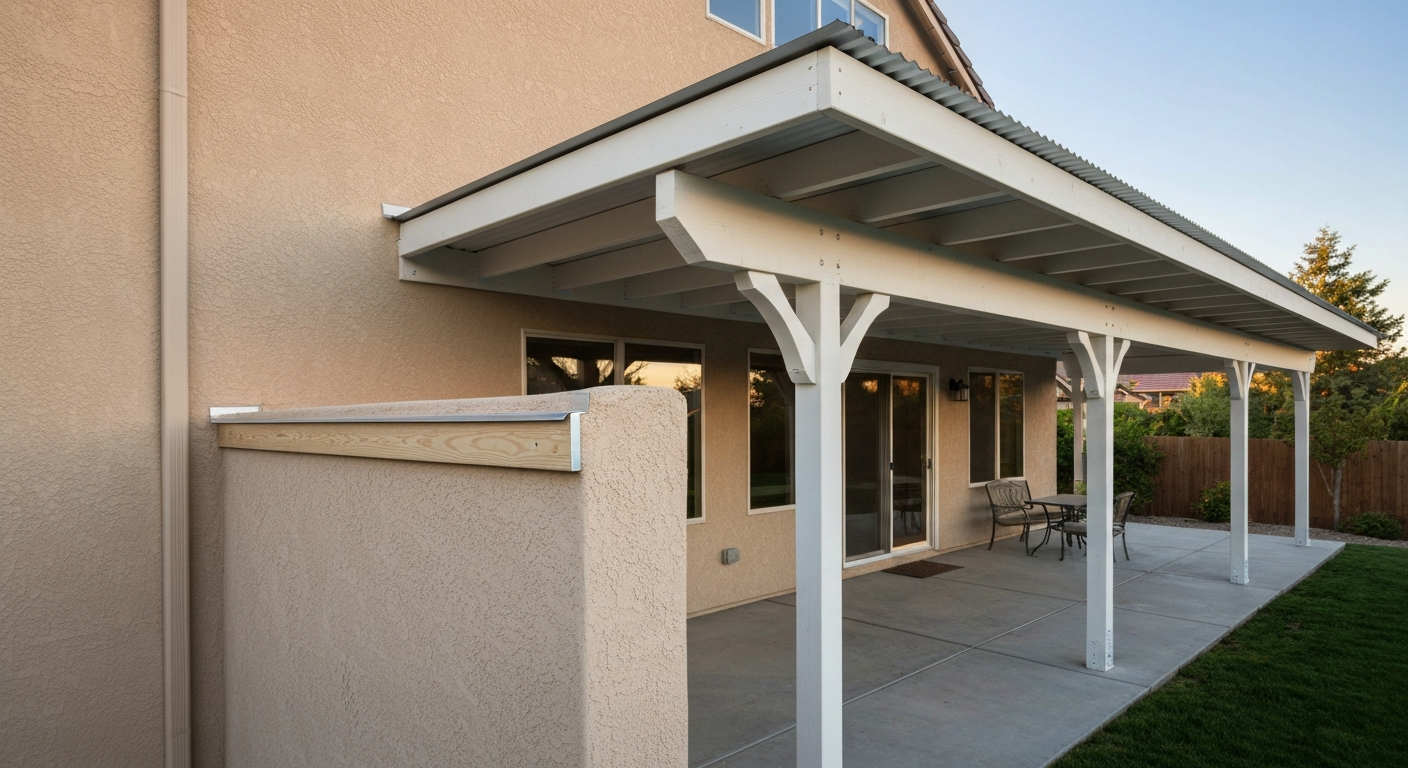
You can absolutely build a patio cover on a stucco house yourself, but stucco changes nearly every step of the process compared to a standard wood-sided home. The wall system is thicker, hides the framing you need to find, and cannot tolerate a sloppy ledger attachment or missed flashing detail without rotting quietly behind the finish coat for years. Get the attachment right, pull the permit, size your footings for your local frost depth, and the rest of the build follows a straightforward sequence that an intermediate DIYer can manage over two to three weekends.
How to Build a Patio Cover on a Stucco House: DIY Guide

Nolan Lennox
27 Jul 2026
What This Guide Covers (and Who It's For)
This guide walks you through the full project from the first decision you have to make (attach to the house or go freestanding?) all the way through flashing, footings, framing, and roofing. I've written it for homeowners at a range of experience levels. If you've built a simple pergola or deck, you already have most of the skills. If this is your first structural outdoor project, the guide flags where the learning curve is steepest and where you'd be smart to bring in a licensed contractor or structural engineer for an hour of paid advice. By the end, you'll have a permit checklist, a materials list, a tool list, cost ranges, and a step-by-step sequence you can actually use on a Saturday morning.
Attach to the House or Build Freestanding, Make This Call First
This is the single most important decision you'll make, and it shapes every other choice downstream. An attached cover shares a structural connection with your house through a ledger board bolted to the rim or band joist behind the stucco. A freestanding cover stands entirely on its own posts and footings and leans on nothing but the ground. Both are legitimate approaches, and each has a real place depending on your house, your lot, and your budget.
Attached: Pros and Cons
- Uses fewer posts and footings, which saves concrete, hardware, and labor
- Ties cleanly to the house roofline and typically looks more finished from the street
- Requires a structural rim or band joist to bolt into — not all house framing provides this
- Penetrating stucco creates a leak path if flashing is skipped or done poorly
- EIFS (synthetic stucco or Dryvit-style systems) often cannot support a direct ledger attachment without engineered details — sometimes freestanding is the only safe option on EIFS homes
- Most jurisdictions require a building permit for any attached patio cover
Freestanding: Pros and Cons
- No penetrations through the stucco and no risk of hidden water intrusion at the house
- Works on any wall system — traditional three-coat stucco, EIFS, or anything else
- Requires an extra row of posts and footings along the house side, adding cost and concrete work
- Can still require a permit depending on size and local rules — do not assume otherwise
- Slightly more material required, but total budget difference is often under $300–$500 on a typical 12x16 cover
House Condition Checklist Before You Commit
Before choosing attached, probe your wall carefully. Knock on the stucco to find hollow versus solid zones, and use a stud finder rated for multi-layer walls. Look for signs of prior water damage around windows and the base of the wall, soft stucco, efflorescence, or discolored paint inside are red flags. If you identify your stucco as an EIFS system (it feels slightly spongy, has a thin decorative finish layer over foam insulation), treat it as freestanding territory unless you have a manufacturer-approved ledger detail reviewed by an engineer. Traditional three-coat portland cement stucco over metal lath and a wood-framed wall is the system this guide primarily addresses.
| Situation | Best Choice | Reason |
|---|---|---|
| Solid three-coat stucco, clear framing found | Attached | Direct ledger connection is code-prescriptive and saves posts |
| EIFS / synthetic stucco | Freestanding | Ledger attachment requires engineered details; penetration risk is high |
| No rim/band joist accessible | Freestanding | IRC R507.9 requires fastening to structural rim — without it, attached isn't safe |
| Existing water damage at wall base | Freestanding | Attaching over compromised stucco hides the problem and accelerates rot |
| Detached garage or CMU block wall | Freestanding | Block walls need special anchors; freestanding is usually simpler |
| Cover extends well beyond house footprint | Freestanding or hybrid | Long spans push posts out anyway; freestanding performs better structurally |
Permits, Codes, and Structural Loads, Don't Skip This Part
I know permits feel like paperwork friction, but they're doing real work here. A patio cover is a roof structure. It carries wind uplift, sometimes snow, and if it's attached to your house, it's in a structural conversation with your home's framing. The City of Phoenix, for example, publishes a full Residential Patio Cover Guideline with prescriptive rafter spacing tables and beam size tables, and still requires a permit for all attached covers. City of Phoenix requires building permits for attached residential patio covers and publishes a blank" rel="noopener noreferrer">Residential Patio Covers (City of Phoenix Planning & Development) guideline with prescriptive rafter spacing, header/beam size tables, and notes allowing patio covers to be supported on slab‑on‑grade in frost‑free areas under specified load/column limits. Los Angeles LADBS has its own Information Bulletin (IB/P/BC 2023-006) with a plan-check checklist specifically for attached patio covers. Your jurisdiction will have its own version of this. Check before you break ground.
Permit Checklist
- Call or visit your local building department and confirm whether your project requires a permit (size thresholds vary — often any attached structure triggers a permit regardless of size)
- Ask whether a prescriptive path is available (like Phoenix's published guideline) or if a full set of engineered plans is required
- Determine if your jurisdiction uses IRC, IBC, or a local amendment — this affects ledger fastener tables and footing depth requirements
- Get the local frost depth requirement for footing sizing (this varies widely — from 0 inches in Phoenix to 48 inches or more in northern states)
- Request the setback requirements for your zoning district — patio covers count as structures for setback purposes in most jurisdictions
- Ask about HOA approval if applicable — some HOAs require separate review even after the city issues a permit
- Confirm whether a final inspection is required and what the inspector will look for (typically footings before pour, framing before roofing, and final)
Snow, Wind, and Load Considerations
The IRC references ASCE 7 for both ground snow loads and basic wind speeds, and these numbers directly control how you size your rafters, beams, and fasteners. You can look up your location's specific values using the ASCE 7 Hazard Tool online. Use the ASCE 7 Hazard Tool (ASCE) to obtain location‑specific basic wind speeds and ground snow loads referenced by the IRC/IBC. In practice, a patio cover in Phoenix or Phoenix-climate zones has near-zero ground snow load and a relatively modest design wind speed, which is why the Phoenix prescriptive guideline works well there. Build the same structure in Denver or upstate New York and you need heavier rafters, deeper footings, and uplift connectors rated for the actual wind speed at your site. Don't borrow a materials list from a southern climate guide if you live in a northern one.
Site Planning and Layout, Measure Twice, Dig Once
Good site planning prevents expensive corrections mid-build. Walk through each item below before you touch a shovel or order a single board.
- Call 811 (in the US) at least three business days before digging to have underground utilities marked — gas, electric, water, and irrigation lines are all common in patio zones
- Confirm your existing patio slab or ground surface drainage: water must slope away from the house at minimum 1/4 inch per foot; a patio cover that traps water against the foundation is a long-term problem
- Measure setbacks from property lines — typically 5 feet minimum but check your local zoning rules
- Check clearance above doors and windows: the ledger and beam assembly must clear door headers and window frames; you generally want at least 7 feet of clear height under the lowest beam
- Locate all exterior electrical outlets, hose bibs, and dryer vents on the wall — your ledger path must route around these or be adjusted
- Plan staging and material access before you start — where will an 18-foot beam or a stack of lumber be delivered and stored? Can a concrete truck reach your footing locations or will you mix by hand?
- Mark post locations with stakes before committing to any layout — stand in the space and confirm the structure won't block views you want to keep
Materials and Finishes, What Works and What I'd Skip
Lumber Species and Grades
For most DIY patio covers, pressure-treated (PT) lumber is the practical default for any member that's exposed to weather or within 6 inches of concrete. Use #2 or better Southern Yellow Pine (SYP) or Douglas Fir for structural members. For decorative exposed rafters where appearance matters, clear cedar or redwood give a cleaner look and resist decay naturally, though they cost two to three times more than PT. Don't mix untreated interior-grade lumber into an outdoor structural assembly, it deteriorates faster than you'd expect, especially behind stucco or roofing where moisture can linger.
Engineered Beams and Composite/Aluminum Options
LVL (laminated veneer lumber) beams let you span longer distances with a shallower beam depth than solid lumber, which helps when you're trying to maintain door clearance. They cost more but the dimensional consistency and strength are worth it for spans over 12 feet. Aluminum patio cover kits have become genuinely good over the past decade, they're light, don't rot, don't need painting, and some systems ship with integrated roofing channels. The tradeoff is a more industrial look and the need to use aluminum-compatible fasteners everywhere to avoid galvanic corrosion. Composite framing (PVC or fiberglass members) exists but is less common in structural applications and generally not a DIY-first choice for a load-bearing cover.
Roofing Options Compared
| Roofing Type | Approximate Cost (per sq ft installed) | Light Transmission | Durability | Best For |
|---|---|---|---|---|
| Twin-wall polycarbonate panels | $3–$6 | High (diffused light) | 15–25 years if UV-coated side up | Bright, airy feel; simple DIY install |
| Corrugated metal (steel or aluminum) | $4–$8 | None | 30–50+ years | High-durability, low-maintenance, sheds snow well |
| Asphalt shingles over sheathing | $3–$6 | None | 20–30 years | Matching existing house roof; most familiar to DIYers |
| Standing seam metal | $10–$18 | None | 40–70 years | Premium look; best long-term value but difficult DIY |
| Clear/tinted solid polycarbonate | $5–$10 | Very high | 10–15 years (yellows) | Skylight effect; requires UV-stable grade |
Fasteners and Flashing Materials
At a stucco house, every fastener and every piece of flashing you choose matters more than on a wood-sided house, because water that gets behind stucco has nowhere obvious to go. Use hot-dipped galvanized (HDG) or stainless steel hardware throughout, stucco environments are alkaline and will corrode zinc-plated or uncoated fasteners faster than you expect. For the ledger, the IRC prescriptive path calls for 1/2-inch lag screws or through-bolts at specified patterns, or ICC-ES-listed structural screws like FastenMaster LedgerLOK (ESR-1078) or Simpson SDWS screws used per their evaluation report spacing. For flashing, use lead-free aluminum step flashing combined with self-adhered butyl or rubberized asphalt membrane behind the ledger, peel-and-stick membranes are the best moisture insurance you can buy for about $0.50 per square foot.
Full Materials and Tools Checklist
Materials by Component
| Component | What to Buy | Notes |
|---|---|---|
| Footings | Concrete mix (80 lb bags or ready-mix), tube forms (12" or 16" dia), gravel for drainage bed | Diameter and depth set by local frost depth and post load — see footing section |
| Post bases | Simpson MPBZ or equivalent standoff post base, anchor bolts or Hilti epoxy anchor per base spec | Cast-in or post-installed; standoff bases keep end grain off concrete |
| Posts | 4x4 PT (light loads, under 8 ft) or 6x6 PT (heavier spans, over 8 ft) | Check local code — some jurisdictions require 6x6 minimum |
| Ledger board | 2x10 or 2x12 PT lumber matching rafter depth | Width matches your rafter size; length matches cover width |
| Ledger fasteners | LedgerLOK structural screws (ESR-1078) or 1/2" HDG lag screws with 1/2" washers | Follow IRC table or ESR spacing pattern exactly |
| Ledger flashing | Self-adhered rubberized asphalt membrane, aluminum step or z-flashing, butyl caulk | Membrane goes on first; flashing shingles over it |
| Beams | Doubled 2x10/2x12 PT or LVL sized per span table | LVL for spans over 12 ft; verify with local prescriptive table |
| Rafters | 2x6 or 2x8 PT or cedar at 16" or 24" OC depending on span and load | Size per local prescriptive span table or engineer |
| Roofing | Polycarbonate panels, corrugated metal, or sheathing + underlayment + shingles | Match to aesthetic and climate |
| Ridge/fascia boards | 2x cedar or PT to match rafter depth | Visible finish boards — use clear cedar if appearance matters |
| Post-to-beam connectors | Simpson BC post caps or equivalent | Rated for the post and beam size used |
| Rafter ties/hurricane clips | Simpson H2.5A or equivalent | Required in most wind zones; inexpensive insurance |
| Sealants | Paintable polyurethane caulk + foam backer rod for penetrations | All stucco penetrations need two lines of defense: flashing + sealant |
| Lateral load connectors | Simpson DTT or DTT2 deck tension ties (2 minimum per IRC for attached covers) | Resist horizontal racking loads at ledger connection |
Tools, Essential and Optional
- ESSENTIAL: Circular saw and miter saw (speed square cuts on rafters require a miter saw for accuracy)
- ESSENTIAL: Cordless drill/driver with impact driver (two batteries minimum for a full build day)
- ESSENTIAL: Level (4-foot and 2-foot), speed square, tape measure
- ESSENTIAL: Post hole digger or rented power auger (hand digging past 24 inches is brutal — rent the auger)
- ESSENTIAL: String lines and batter boards for layout
- ESSENTIAL: Reciprocating saw or oscillating multi-tool with a metal-cutting blade (for cutting stucco lath)
- ESSENTIAL: Hammer drill with SDS bits (for drilling through stucco and into framing for ledger anchors)
- ESSENTIAL: Chalk line, pencil, and marking knife
- ESSENTIAL: Safety glasses, hearing protection, N95 dust mask (stucco cutting creates silica dust — wear the mask)
- OPTIONAL: Laser level (speeds up layout significantly — worth the $80 rental)
- OPTIONAL: Concrete mixer rental (for more than 10 bags — saves your back)
- OPTIONAL: Scaffolding or pump jack system (safer than ladders for sustained ledger and roofing work)
- OPTIONAL: Pneumatic framing nailer (speeds up rafter installation; not required but nice to have)
Foundations, Posts, and Footings, Get This Right or Redo It All
Footings are the one part of this project you genuinely cannot fix later without tearing out the whole structure. I've seen beautiful patio covers ripped out because the builder guessed on footing size and the post sank or heaved in the first winter. Don't guess.
Sizing and Depth
The diameter and depth of your footings are set by two things: the load the footing carries (tributary area of roof, beam weight, post weight) and your local frost depth. The IRC (Chapter R403) requires footings to extend below the local frost depth, this is not optional and it's not one universal number. Frost depth is 0 inches in Phoenix and Tucson, about 12 inches in Atlanta, 36 inches in Chicago, and 48 inches or more in Minnesota. Look up your specific jurisdiction's required frost depth before you dig anything. In frost-free zones, a 12-inch-diameter tube form poured to a depth set by your building department's prescriptive table (often 18–24 inches minimum for soil bearing) is typical for a single post supporting a moderate-span cover. In freeze-thaw climates, increase depth to match frost depth and consider a bell-bottom flare at the bottom of the tube to resist uplift.
Post Bases and Concrete Anchors
Simpson Strong-Tie's MPBZ post base family (and equivalents from other manufacturers) are the cleanest way to anchor a post to a concrete footing. Cast-in bases go into wet concrete; standoff bases keep the post end grain elevated off the slab surface so moisture can't wick up into the end of the post. If you're drilling into an existing concrete slab or a poured footing, post-installed anchors (mechanical wedge anchors or epoxy adhesive anchors) are the alternative. Hilti publishes detailed guidance and a free PROFIS software tool for sizing post-installed anchors to your actual load and concrete strength, use it rather than guessing. Embedment depth, edge distance, and concrete strength all affect allowable capacity, and under-embedded anchors can pull out at surprisingly low loads.
Post Spacing and Load Distribution
For a typical residential patio cover with a solid roof panel, post spacing of 8–10 feet on center is a common starting point. Longer beam spans need either larger beams (LVL is your friend here) or closer post spacing. Don't space posts based on what looks good, work backwards from your beam span table. Most prescriptive tables are published by your local building department or follow the patterns in the Phoenix or similar municipal guidelines. When in doubt, tighter spacing with a smaller beam beats wide spacing with an undersized one.
Working With Stucco, Finding Studs, Cutting Lath, and Preparing the Wall
This is the part that trips up most DIYers, and honestly, it tripped me up the first time too. Traditional three-coat portland cement stucco is applied over corrosion-resistant metal lath (per ASTM C1063) which is stapled or nailed to the sheathing over a WRB (often two layers of Grade D building paper in higher-moisture climates). The finish coat is roughly 7/8 inches thick total. That assembly means your stud finder is working through a lot of layers, and stucco itself will give false positives on cheap stud finders.
How to Find Framing Behind Stucco
- Use a deep-scan stud finder (not a basic magnetic one) and move it slowly — expect the reading to lag behind where it would on drywall
- Cross-reference by probing with a long thin nail at the top of the wall above the stucco (where the wall framing meets the top plate, often accessible in the attic or soffit space)
- Look for rows of fastener dimples or slight ridges in the stucco surface — these often telegraph the lath staple rows, which run horizontally, not the stud locations
- Once you find one stud, measure 16 or 24 inches in both directions to confirm the stud layout before committing to your ledger location
- Drill a small exploratory 1/4-inch hole at your suspected stud location — if you hit wood after punching through the stucco and sheathing, you found it; if you drill through air, shift laterally and retry
Safely Cutting Lath and Stucco
Cutting stucco generates fine silica dust that is genuinely hazardous to your lungs, this is one area where I'll be direct: wear a properly fitted N95 respirator, not a paper dust mask. Use a diamond blade or fiber-cement cutting blade on an angle grinder or circular saw to score the stucco. Cut the outline of your ledger strip first with shallow passes, then knock the stucco panel free with a hammer and cold chisel. The metal lath underneath needs to be cut with tin snips or an oscillating tool with a metal blade. Work carefully around window and door flashings, cutting too close to existing flashings without understanding how they're integrated can open new leak paths that are hard to find later.
Protecting Stucco During the Build and Temporary Weatherproofing
Once you've cut and removed the stucco in the ledger zone, the exposed sheathing and framing need to be protected from rain the same day, not the next day. Tack a sheet of poly or roofing felt over the opening as soon as you're done cutting, and have your self-adhered membrane on hand before you start. Even a single overnight rain event into unprotected wall sheathing starts a moisture problem you'll be chasing for years. If you find deteriorated sheathing or soft framing once the stucco is off, stop and fix it before going any further. Sistering a new stud alongside a soft one and replacing a section of sheathing is an hour of work, covering it back up without fixing it is a future rotted wall.
Ledger Attachment, The Most Critical Connection on the Whole Project
The ledger board transfers every load from your patio cover roof back into your house framing, so this connection has to be done right. The IRC (R507.9) is clear: the ledger must be fastened directly to the structural rim or band joist, not to siding, not to stucco, and not to sheathing alone. That means you need to remove the stucco in the ledger zone, expose the sheathing and rim joist, apply your waterproofing membrane, then attach the ledger so it bears directly against the structural wood (with the membrane and possibly a small drainage gap behind it, depending on your assembly).
Flashing Sequence That Actually Works
- Cut stucco and lath back 1 inch above and 1 inch to each side of the planned ledger footprint
- Inspect and repair any deteriorated sheathing or framing found behind the stucco
- Apply self-adhered rubberized asphalt membrane (like Henry or Grace Ice & Water) to cover the exposed sheathing — extend it up behind the remaining stucco above by at least 3 inches
- Install aluminum or galvanized z-flashing tucked up behind the stucco above the ledger zone, lapped over the membrane in a shingle-style (water flows down and over, never under)
- Install the ledger board, pulling fasteners directly through the membrane and into the rim joist or band joist
- Apply butyl tape or sealant at the top edge of the ledger and at every fastener penetration
- At the sides of the ledger, use step flashing or wrap the membrane around to shed water away from the cut stucco edges
For fasteners, the prescriptive IRC path uses 1/2-inch hot-dipped galvanized lag screws or through-bolts at spacing specified in Table R507.9.1.3, or you can use ICC-ES-evaluated structural screws like FastenMaster LedgerLOK (ESR-1078) or Simpson SDWS screws per their published spacing tables. These structural screws have genuine engineering evaluation reports behind them and are code-accepted alternatives to lag screws, they install faster and don't require pre-drilling a shank hole, which reduces the chance of splitting the ledger. Don't use drywall screws, standard wood screws, or deck screws for ledger attachment, they don't have the shear capacity and aren't IRC-prescriptive for this application.
Lateral Load Connectors
The IRC also requires lateral load resistance at the ledger connection, typically two Simpson DTT or DTT2 deck tension ties (or equivalent) to resist the horizontal forces that try to pull the patio cover away from the house in high-wind events. These install as diagonal straps from the ledger into the house framing and are inexpensive compared to the cost of your structure coming loose in a windstorm.
Connecting Stairs and Steps From the House to the Patio
Most patio cover projects also involve some change in elevation between the house door threshold and the patio surface, even a single step down to the patio needs to be handled correctly to avoid a trip hazard and a water-pooling problem at the threshold. For layout, rise/run, and waterproofing details, see our guide on building steps from the house to the patio. If your patio is more than one step below the door, think through the stair layout before the cover goes up, because post placement can restrict where stairs naturally want to go. For step-by-step guidance on designing and building stairs from your house down to the patio, see our guide on how to build stairs from house to patio. The stair stringers typically land on the patio slab or on a small footing pad, and they notch against or attach to a rim joist at the top. For detailed guidance on planning and building the steps that connect your door to the patio, see our how to build patio steps against house guide. All of this is worth planning in the layout phase rather than retrofitting after the cover is built. For step-by-step guidance on designing and building the steps and stringers, see our guide on how to build patio stairs.
Build Sequence, High-Level Steps From Layout to Finish
- LAYOUT: Establish string lines for post locations and ledger height using batter boards; confirm setbacks and utility clearances; mark footing centers with stakes
- PERMITS: Submit plans and application to your building department and wait for approval before digging (some jurisdictions allow footings to proceed after application — confirm)
- FOOTINGS: Call 811, dig holes to required diameter and depth, set tube forms, place hardware (cast-in post bases or anchor bolts), pour concrete, and let cure a minimum of 3 days before loading
- LEDGER: Cut stucco, inspect framing, apply self-adhered membrane and flashing, attach ledger board to rim joist with prescriptive fasteners, install lateral ties, schedule framing inspection if required
- POSTS: Set posts on post bases, plumb and brace temporarily, cut to height
- BEAMS: Lift beams into post caps or notched post tops, fasten with rated connectors — get help for this step, large LVL beams are heavy and awkward
- RAFTERS: Cut birds-mouth notches where required (or use rafter hangers), install at specified spacing, add hurricane clips/rafter ties at each rafter-to-beam connection
- ROOFING: Install roofing substrate (sheathing + underlayment for shingles, or purlins for metal/polycarbonate); install panels or shingles working up from the low end; flash all transitions at the house wall
- FASCIA AND TRIM: Install fascia boards, trim out beam ends, caulk and paint or seal all exposed wood
- STUCCO PATCH: Patch and feather the stucco at the ledger perimeter; allow stucco to cure, then apply a compatible elastomeric caulk at the ledger-to-stucco interface — this is a maintenance joint, not a permanent seal, and should be re-checked annually
- FINAL INSPECTION: Request final inspection from your building department; address any correction items before closing the permit
Cost Ranges and Time Estimates
For a typical 12x16 foot attached patio cover with a corrugated metal or polycarbonate roof, DIY material costs generally run $2,500–$5,000 depending on lumber prices, roofing choice, and how many posts and footings you need. A comparable aluminum kit system runs $3,500–$6,500 in materials. Add $400–$800 for permit fees depending on your jurisdiction. If you hire a concrete contractor for footings only, add $600–$1,200. Labor to hire the whole project out typically runs $8,000–$18,000 depending on region and complexity. Time estimate for an experienced DIYer working with one helper: footings and ledger on weekend one (6–8 hours), posts and beams on weekend two (8–10 hours), rafters and roofing on weekend three (8–12 hours), trim and finish on weekend four (4–6 hours). Less experienced builders should add 30–50% to each phase.
Common Mistakes and How to Avoid Them
- Skipping the permit: attached patio covers almost always require a permit; getting caught mid-build means a stop-work order and possible teardown
- Attaching the ledger over the stucco (not through it): the ledger must fasten to structural framing, not float on the stucco surface
- No flashing or incomplete flashing: water behind stucco is invisible for years; by the time you see damage, the framing is often compromised
- Confusing EIFS with traditional stucco: EIFS cannot accept a standard ledger attachment — get it identified by a professional if you're not sure
- Undersized footings or wrong footing depth: footings poured above frost depth will heave; undersized footings will settle under load
- Using zinc-plated or standard hardware in an outdoor stucco environment: it rusts fast; use HDG or stainless throughout
- Cutting stucco without respiratory protection: silica dust is a real occupational health hazard — use an N95 minimum
- Overloading a single beam span to save on posts: a beam that deflects too much will cause roofing problems and look bad within a year
- Not accounting for door swing and window clearance in the design phase: fixing this after the cover is framed means cutting and reframing
Safety Notes and When to Call a Pro
Most of this project is manageable DIY territory for a capable homeowner who respects the structural and waterproofing requirements. That said, a few situations warrant paying for professional help. If your stucco is EIFS and you want an attached cover, hire a structural engineer to design the attachment detail, it's a few hundred dollars and it protects a significant investment. If your local wind or snow loads are high and your building department requires stamped structural drawings, an engineer's review is required anyway. For lifting heavy beams (anything over about 150 lbs), have at least three people or rent scaffolding and a beam lift, back injuries and falling beams are both real risks on this kind of project. And if you open up the wall during ledger prep and find rotten framing, mold, or pest damage that goes beyond the ledger zone, stop and get a contractor assessment before proceeding.
FAQ
What are the main choices for supporting a patio cover on a stucco house, and how do I decide between attaching a ledger to the house vs building freestanding supports?
Two primary options: (1) Attach to the house with a ledger (cheaper, tidier, transfers loads to house framing) or (2) Freestanding (posts and beams bearing to their own footings). Decision checklist: - Use a ledger if the house sheathing and band/rim joist are structural, accessible behind the stucco, and you can properly flash and waterproof the connection. - Pick freestanding if the cladding is EIFS/insulated stucco or you can’t locate/penetrate structural members, or if the house framing is unknown or compromised. - Consider local code, required loads (wind/snow), and permit requirements — some jurisdictions prefer or require freestanding for certain conditions. - Budget/time: ledger jobs usually use fewer materials and are faster; freestanding adds footings and posts (higher cost/time). - Long‑term maintenance: ledger requires impeccable flashing to avoid concealed rot; freestanding isolates the house from roof loads and water risk.
Do I need a permit, and what site information should I gather before applying?
Most jurisdictions require a building permit for an attached or structural patio cover — check your local building department (examples: Phoenix and Los Angeles have prescriptive guidance and permit checklists). Permit & site checklist: - Verify zoning setbacks and easements. - Obtain local wind/snow load values (ASCE 7/municipal). - Know frost depth for footing design. - Take site plan with property lines, house footprint, utility locations, and existing slab/grade. - Note roof/egress connections, existing grade, drainage, and nearby trees. - Take photos of exterior cladding and identify whether it’s three‑coat stucco, EIFS, or another system.
How do I determine whether the ledger can be attached to my stucco house (what to look for behind the stucco)?
You must confirm the ledger will fasten into the structural rim/band joist or blocking — not just stucco or lath. Steps: - Remove a small section of stucco (at one corner) to reveal lath and sheathing and locate the rim/band joist. - Identify cladding type: traditional 3‑coat portland cement stucco over lath vs EIFS/proprietary one‑coat. EIFS typically requires engineered details or avoidance. - Measure the thickness of stucco/lath/WRB/sheathing so you can ensure required fastener embedment into solid wood framing. If you can’t positively locate structural members or can’t get proper embedment, choose freestanding.
What are the correct flashing and waterproofing steps when attaching a ledger through stucco?
Flashing is critical to prevent moisture intrusion and rot. Key steps: - Remove stucco back to sheathing where ledger will sit so the ledger can be attached to structural sheathing or rim joist (not over the stucco face). - Install or confirm continuous WRB (housewrap) behind the lath. - Apply self‑adhered membrane flashing or metal flashing over the WRB and down behind the ledge area; install shingle‑style so upper layers overlap the ledger flashing. - Fasten the ledger over the flashing, then fit a counter‑flashing or drip edge over the top of the ledger to shed water outward. - Seal all fastener penetrations with compatible sealant and use corrosion‑resistant flashing materials. - Ensure weep screed/drip details at the base of stucco are not obstructed.
What fasteners and spacing are required for a ledger attached to house framing through stucco?
Follow IRC prescriptive guidance (or local code) and/or ICC‑ES‑listed products. Common accepted options: - 1/2" hot‑dip galvanized or stainless lag screws or through‑bolts installed into the band/rim joist per IRC patterns (spacing varies by ledger height, beam load, and load tables). - ICC‑ES‑listed structural ledger screws (e.g., LedgerLOK, Simpson SDWS/SDSS) installed per the manufacturer ESR pattern and embedment. - Typical spacing often 16" on center vertically for many ledger uses, but check the applicable table or engineered design for your span and loads. - Use washers and observe minimum edge distances and end distances. - Install tension ties or lateral connectors where required (e.g., DTT or hold‑downs) per manufacturer guidance for uplift/resistance to wind.
How do I handle stucco lath and wire when installing the ledger?
Cut and remove lath and stucco back to solid sheathing where the ledger will attach. Steps: - Score and remove stucco to expose lath edges; cut metal lath back so it doesn’t bridge the ledger and cause corrosion or gaps. - Remove or fold back lath to expose WRB and sheathing. - Replace or patch lath and stucco at termination points, install flashing and re‑mesh properly. - If the lath is attached to framing members that will be penetrated, ensure fasteners do not compromise lath stability; use corrosion‑resistant materials.
Next Article
How to Build a Patio Attached to the House: DIY Guide
Step-by-step DIY for a patio attached to your house, with drainage, code checks, safe house connection, and finishing.