You can build a pool patio yourself in a weekend or two using pavers, natural stone, or poured concrete, but only if you nail the planning, drainage slope, and sub-base first. Get those three things right and everything else follows. Skip any one of them and you'll be pulling up pavers or chasing puddles inside of a year. Here's the full walkthrough, from measuring your space to the finishing touches that keep the surface safe and looking good long-term. Follow this checklist in order, and you'll get your “6 steps to pool and patio success” right from measuring and layout through drainage, base, setting, and finishing.
How to Build a Pool Patio: DIY Steps, Materials, and Tips

Nolan Lennox
4 Jun 2026
Planning and measuring your pool patio layout
Start with a sketch on graph paper before you touch a shovel. Measure the pool perimeter first, then mark the full area you want paved, including any walkways connecting the patio to the house, a gate, or an outdoor shower. A good pool patio typically extends at least 4 to 6 feet out from the pool edge on the swimming sides and at least 8 to 10 feet on the entry/lounging side. That gives people enough room to walk, pull out a chair, and not crowd the water.
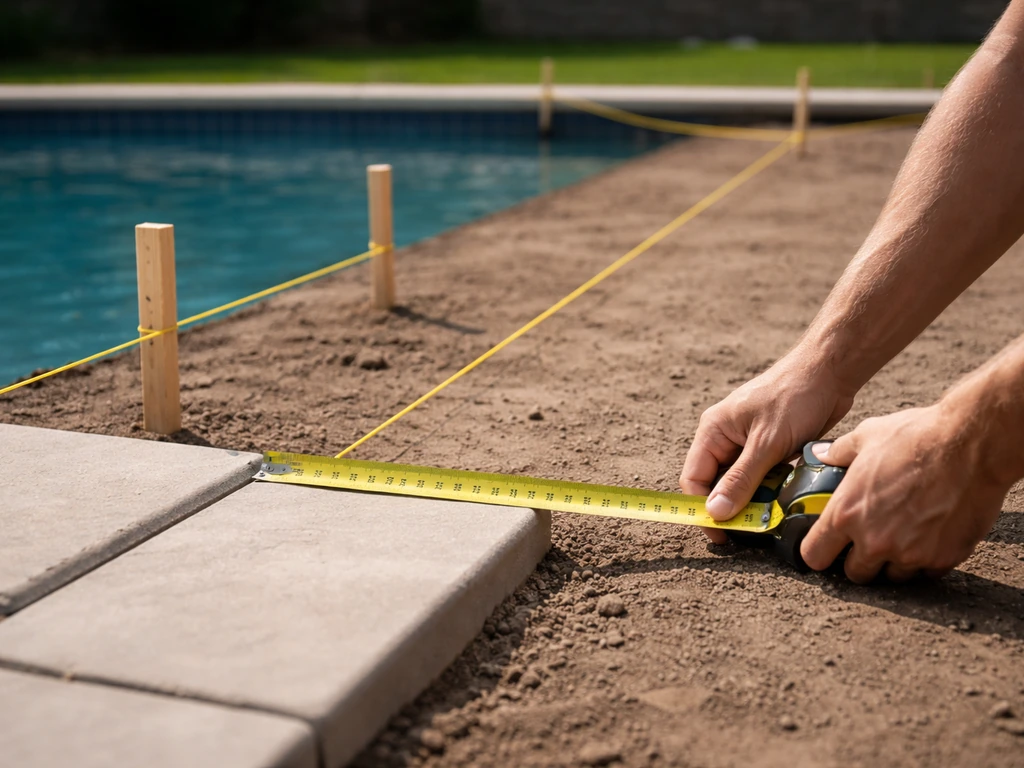
Mark your layout on the ground using stakes and mason's line. Pay close attention to elevation: note where the pool coping or bond beam sits, the height of any existing concrete deck, and the finished grade of your yard at the far edges of the patio. You need the patio to slope away from the pool and away from the house, not toward either. This is where a lot of DIYers get into trouble, so take the time to check your elevations with a line level or a laser level before you start digging.
Also think through how the patio connects to existing structures. If you're tying into existing concrete coping or a cantilever deck, you'll need your finished paver or slab surface to sit flush or just slightly below that edge, typically within 1/4 inch, so water doesn't pool at the joint and so there's no trip hazard. Note any in-ground utilities (gas, electric for pool equipment, irrigation lines) on your sketch. Call 811 before you dig; it's free, it's required, and it can save your life.
Choosing patio materials that work around pools
Poolside conditions are genuinely harsh: constant splashing, chemical exposure from chlorinated water, bare wet feet, and summer sun that can turn a dark surface into a burn hazard. Not every patio material holds up equally well. Here's how the most common DIY-friendly options stack up.
| Material | Slip Resistance | Heat (barefoot) | Durability | DIY Difficulty | Relative Cost |
|---|---|---|---|---|---|
| Concrete pavers | Good (textured finishes) | Moderate — choose light colors | Excellent | Beginner-friendly | $$ |
| Natural travertine | Excellent (porous texture) | Low — stays cool | Good (needs sealing) | Moderate | $$$ |
| Bluestone / flagstone | Good to excellent | Moderate | Very good | Moderate | $$$ |
| Broom-finish concrete | Good when fresh | High — gets very hot | Excellent | Harder (forming/finishing) | $$ |
| Exposed aggregate concrete | Excellent | Moderate | Excellent | Harder (timing critical) | $$–$$$ |
| Brick pavers | Good | Moderate | Very good | Beginner-friendly | $$ |
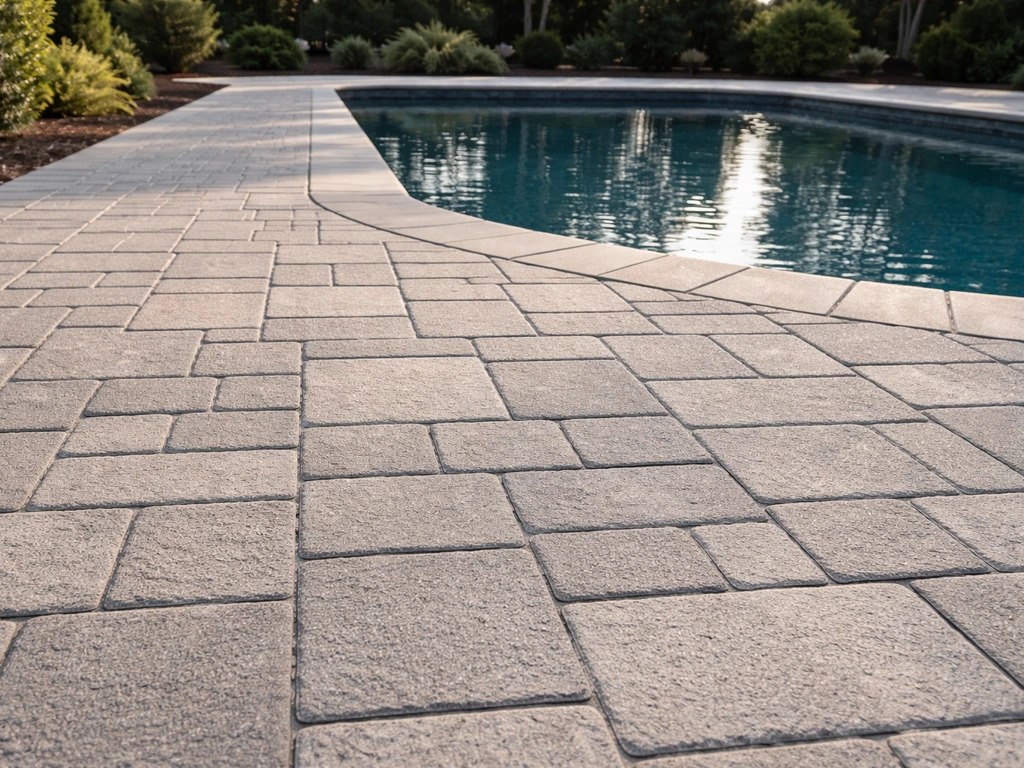
For most DIYers, concrete pavers or travertine pavers set on a compacted gravel base are the best starting point. They're forgiving to install, easy to replace if one cracks, stay cooler than dark stone in full sun, and give you a naturally textured surface that resists slipping when wet. Travertine is my personal favorite around pools, it's genuinely one of the coolest-feeling surfaces under bare feet, but it does need periodic sealing to keep pool chemicals from pitting the surface. Bluestone and flagstone look fantastic but require more skill to set level. Broom-finish concrete is durable and affordable but gets hot and can crack without proper control joints.
Whatever material you choose, stick with light or medium tones. Dark gray and charcoal pavers look sharp in the showroom but can hit 140°F or more in direct summer sun, which is genuinely uncomfortable on bare feet. Also confirm any pavers or stone you buy carry a slip-resistance rating suitable for wet areas. Most manufacturers will list a coefficient of friction (COF) value; you want a wet COF of at least 0.60 for pool decking.
Site prep: grades, base, drainage, and utilities
Good site prep is where the patio actually gets built. Everything above ground is just following through on what you set up below. Start by clearing the entire area: pull up grass, remove any roots larger than your thumb, and scrape off organic topsoil. Organic material compresses over time and causes settling, so it needs to go.
Establish your drainage slope before you do anything else. blank" rel="noopener noreferrer">The standard target for a pool patio is a slope of 1/8 to 1/4 inch per running foot away from the pool and away from the house, roughly 1% to 2% grade. QUIKRETE’s patio instructions specify a minimum slope of 1/8 inch per running foot away from the house blank" rel="noopener noreferrer">a slope of 1/8 to 1/4 inch per running foot away from the pool and away from the house. A common specification is 1/8 inch per foot minimum sloping away from the building, and many paver installation guides push that to 2% (about 1/4 inch per foot) to be safe. Run a string line from your high point (usually the pool coping edge or house foundation) to your low point and use a line level to verify the drop. Mark this slope in the ground with grade stakes so you're not guessing as you excavate and compact.
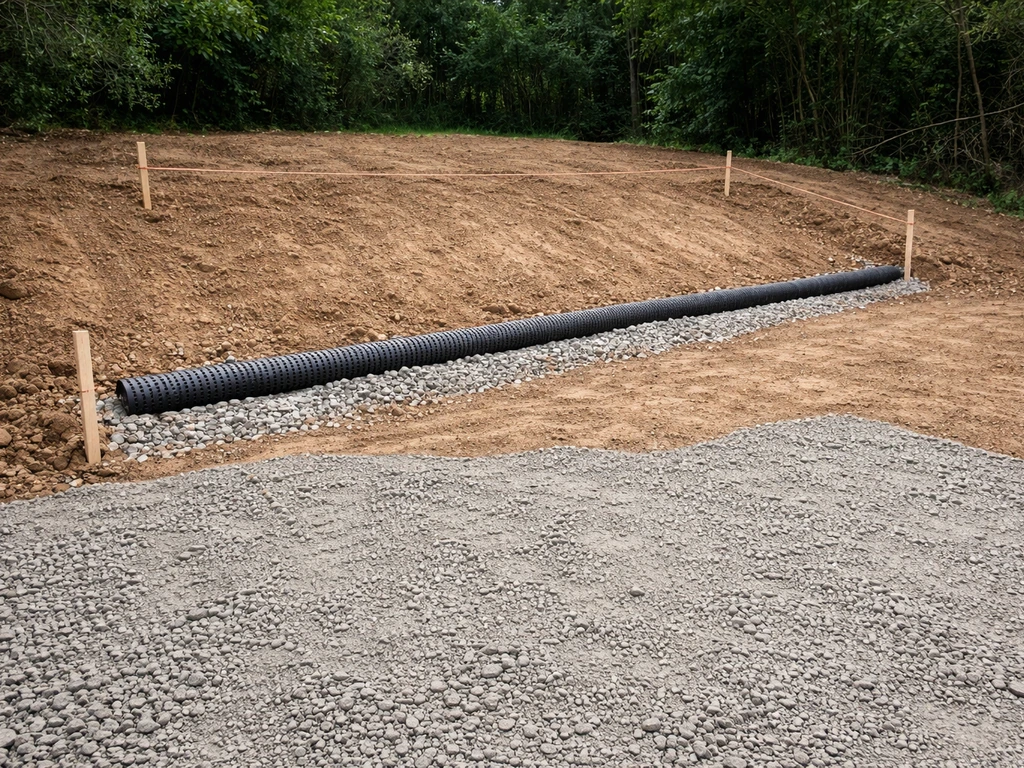
Check for water accumulation points in your yard. If your yard naturally drains toward the pool area, you may need to add a channel drain or French drain at the far edge of the patio to intercept that flow. Don't skip this step, a patio that floods from behind the deck is just as bad as one sloped the wrong way. Also locate your pool equipment pad, any conduit runs, and irrigation lines before you mark your dig depth.
Building the patio sub-base and foundation
This is the most labor-intensive part of the project, and it's the part most people want to rush. Don't. A proper sub-base is the entire reason a paver patio lasts 20-plus years instead of shifting and sinking inside of five.
- Excavate to the correct depth. For a paver patio, you typically need to dig down 7 to 9 inches below your desired finished surface — this accounts for 4 to 6 inches of compacted gravel base, 1 inch of bedding sand, and the paver thickness itself (usually 2 to 3 inches for standard 60mm pavers). In areas with hard freezes, go deeper: 8 to 10 inches of base is common in freeze-thaw climates.
- Compact the native soil. Once you've reached your dig depth, compact the exposed subgrade with a plate compactor. Make at least two passes. If the soil is soft or sandy, you may need to add a layer of geotextile fabric before your gravel goes in to prevent base migration.
- Install your gravel base. Spread crushed angular gravel (ASTM No. 57 crushed stone or processed gravel, not round river gravel) in 2- to 3-inch lifts, compacting each lift before adding the next. Compact until the plate compactor stops 'sinking' into the surface. This gravel base is what drains water away from below, which is especially critical around a pool.
- Set your edge restraints. Before adding bedding sand, install your plastic or aluminum edge restraints along the perimeter at the correct height. These keep pavers from spreading outward over time. Drive the spikes every 8 to 12 inches.
- Screed your bedding sand. Pour 1 inch of coarse bedding sand (concrete sand, not fine play sand) over the compacted gravel. Use two parallel pipes or conduit as screed rails set to your slope angle, then drag a straight board across them to create a flat, sloped sand bed. Pull the rails out and fill those grooves with sand once you're done screeding.
If you're pouring a concrete slab instead of setting pavers, the excavation depth is similar: dig down to accommodate 4 inches of compacted gravel base plus 4 inches of concrete (or 6 inches for a heavier-use slab). Wet conditions and freezing climates call for rebar or wire mesh reinforcement. Form the slab with 2x4 or 2x6 lumber staked at your slope angle, checking constantly with a level.
Setting pavers, stone, or concrete, and finishing the details
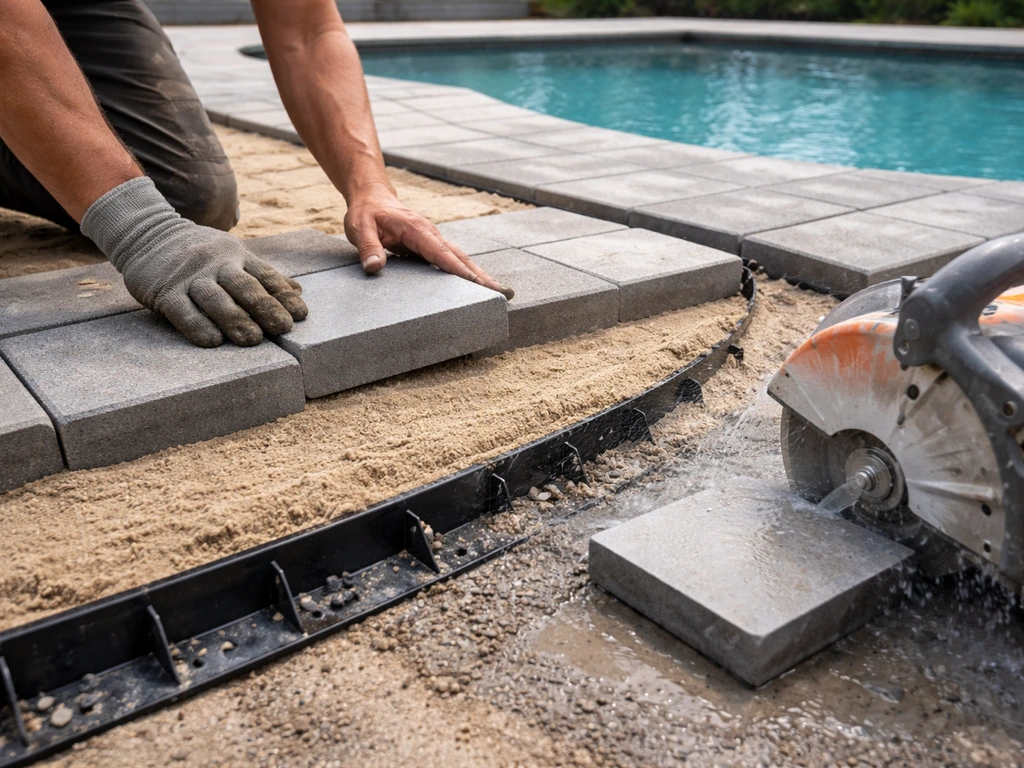
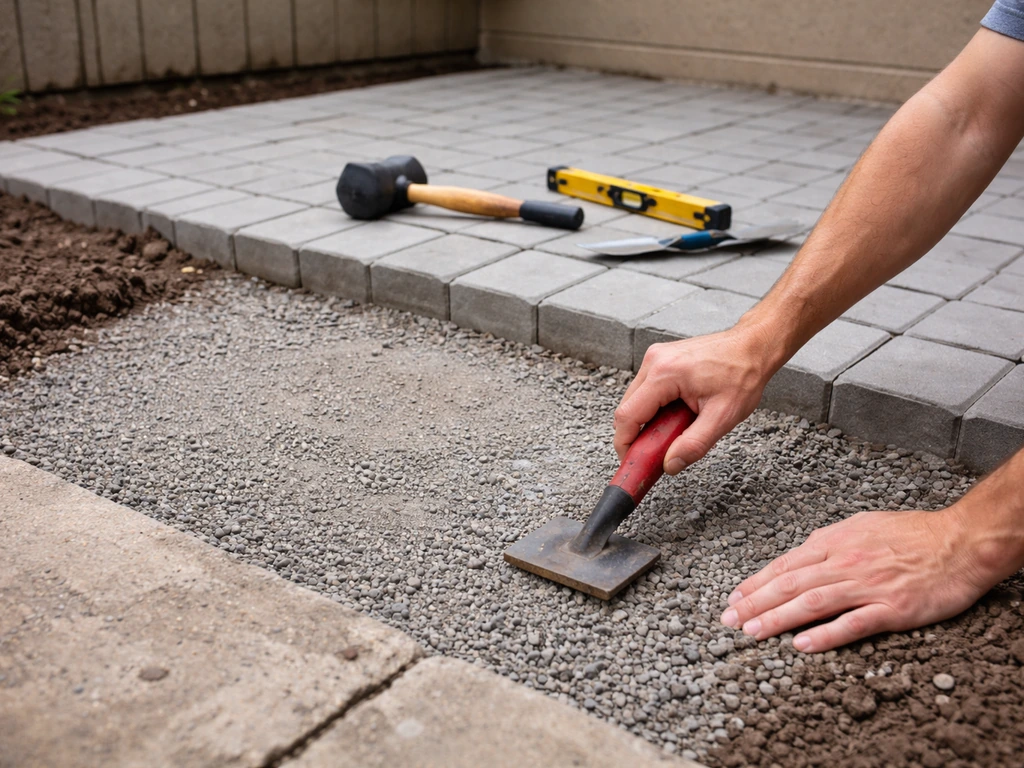
With your sand bed screeded and your edge restraints in, you're ready to set pavers. Start at the most visible corner, usually the corner closest to the pool or the house, and work outward in one direction. Lay pavers hand-tight against each other without hammering them into the sand; just set them down gently. Use a rubber mallet to tap any pavers that rock. Check your slope every few rows with a level. If a paver is high, pull it, remove a little sand, and reset. If it's low, add sand underneath.
Cut pavers for the edges and any curves using a diamond blade wet saw or an angle grinder with a diamond blade. A wet saw gives cleaner cuts and keeps dust down. Mark your cut line with a pencil or chalk, make the cut in a single steady pass, and test the fit before setting permanently. Wear eye protection and a dust mask regardless of which cutting method you use.
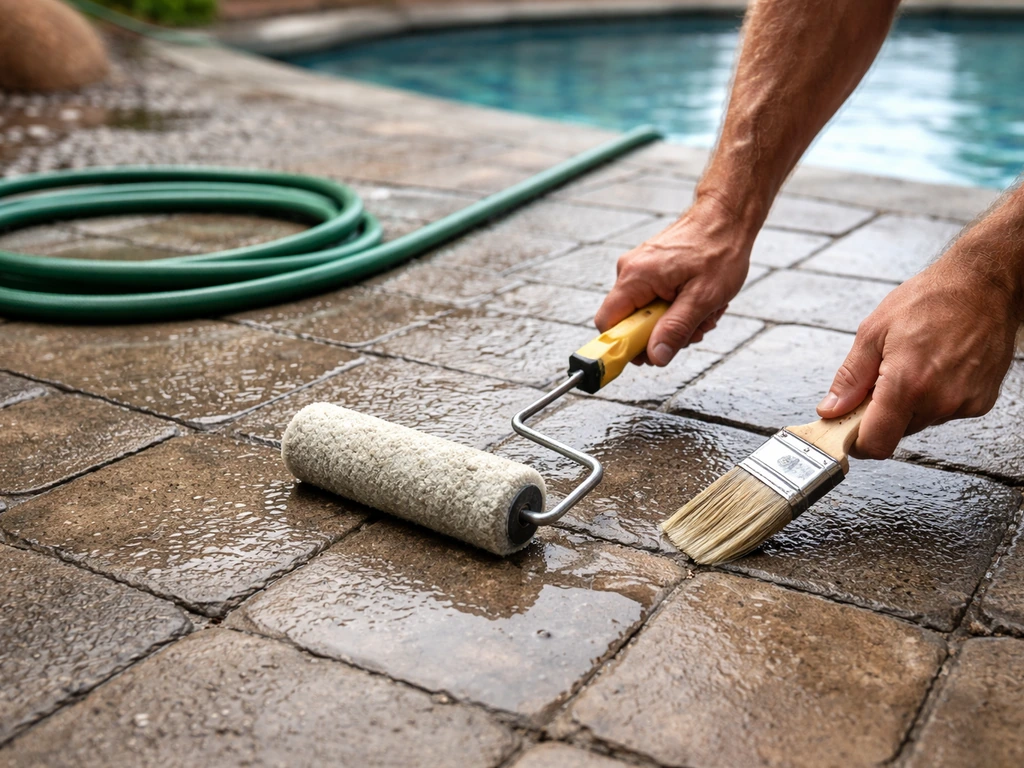
Once all pavers are set, run the plate compactor over the entire surface, use a rubber pad attachment so you don't chip the pavers, to seat them into the sand. Then spread polymeric jointing sand over the surface, sweep it into the joints, and run the plate compactor again. Blow or sweep off any excess from the paver faces, then lightly mist the surface with water to activate the binder in the polymeric sand. Polymeric sand is worth the extra cost around pools because regular sand washes out with every rainstorm and every splash.
For a concrete slab finish, pour concrete immediately after forming and reinforcing, then screed it level (at your slope angle), float it smooth, and apply a broom finish by dragging a stiff-bristle broom across the surface while it's still workable. This broom texture is what gives broom-finish concrete its slip resistance. Cut control joints every 8 to 10 feet with a grooving tool while the concrete is still green, or use a saw after it cures. Control joints are not optional around a pool, they give the slab somewhere to crack predictably instead of randomly.
Seal your finished surface. Pavers and natural stone benefit enormously from a penetrating sealer applied 30 days after installation (giving the polymeric sand time to fully cure). Around pools, look for a sealer rated for wet areas and chemical resistance. Travertine and porous limestone need sealing even sooner, within a few weeks, to protect against chlorine damage.
Safety, code, and keeping it all looking good
Permits, setbacks, and pool barrier rules
Check with your local building department before you break ground. Most municipalities require a permit for a pool patio, especially if it's attached to the house or involves any electrical work near the pool. Common requirements include setbacks from property lines (often 3 to 5 feet), specific drainage rules to prevent runoff onto neighboring properties, and in some jurisdictions, limitations on what materials or finishes can be used within the pool barrier zone. If your pool requires a barrier fence (which most residential pools in the U.S. do under local code or IRC 2021), the patio design cannot compromise the integrity of that barrier. Gates in any fence crossing the patio must be self-closing and self-latching.
The National Electrical Code (NEC) and most pool codes require specific clearances between patio lighting, outlets, and the pool water edge, typically no receptacles within 6 feet of the pool and no overhead wiring within 22.5 feet. If you're running any electrical to the patio area as part of this project, pull a permit and work with a licensed electrician. This is genuinely one area where DIY has real limits.
Slip resistance: don't skip this
Smooth surfaces get dangerously slippery when wet feet and pool water mix. Every material and finish you choose should be selected with this in mind. Broom-finish concrete, textured pavers, travertine, and exposed aggregate all provide adequate slip resistance when properly maintained. If you've already got a smooth concrete surface that's become slick, anti-slip coatings or an acid-etch treatment can restore traction without a full rebuild.
Ongoing maintenance to protect your investment
- Rinse the patio surface weekly to remove chlorine residue, sunscreen oils, and debris — these break down sealer and stain stone over time.
- Reapply penetrating sealer every 2 to 3 years for pavers and natural stone, or sooner if water stops beading on the surface.
- Check and refill polymeric sand joints each spring after freeze-thaw cycles. Ant activity and heavy rainfall can also erode joints over a single season.
- Inspect the drainage slope annually — use a hose to run water and watch where it goes. Settled areas can redirect flow toward the pool or house, which you want to catch early.
- Pressure wash carefully: use a fan tip (not a zero-degree tip) at moderate pressure to avoid blasting out joint sand or etching stone. Hold the wand at least 12 inches from the surface.
- For concrete slabs, fill any new cracks promptly with a flexible polyurethane caulk or concrete crack filler before water gets in and freezing cycles widen them.
A well-built pool patio is one of the highest-return projects you can tackle as a homeowner, it extends your usable outdoor space, adds real value to the property, and holds up for decades with minimal upkeep. If you're also thinking about adding a hot tub to the patio area, keep in mind that a spa on a paver surface needs specific structural considerations that go beyond a standard patio build. After you set your base and drainage slope, you can level a hot tub on a sloped patio by building the right sub-base and using proper shimming or a leveling pad so the spa sits evenly hot tub patio. The planning fundamentals here overlap with hot tub patio projects and other poolside installations, but the load requirements and connection details are worth addressing separately once the main deck is done. If you’re planning a hot tub on your patio, the same planning and base quality matter, but you also need to account for weight, electrical hookups, and weatherproofing at the connection points hot tub patio projects.
FAQ
How far should a pool patio extend from the pool to feel usable and not crowded?
A common guideline is 4 to 6 feet outward on the swimming sides and 8 to 10 feet on the entry and lounging side, but measure based on your layout. If you plan lounge chairs, allow extra space for chair backs and circulation space to pass people without stepping on the deck edge.
What if my yard slope naturally drains toward the pool instead of away?
Don’t rely on the patio slope alone. Plan a drainage interceptor at the point where water enters the patio area (often a French drain or channel drain at the far edge) and confirm the outlet direction so runoff doesn’t end up backing into the patio joints or toward the pool equipment pad.
Can I build a pool patio directly over existing concrete or pavers?
Usually no. To avoid future settling and cracked joints, you generally need to remove unstable materials and organic soil, then rebuild the sub-base to your required depth. If you’re trying to tie into an existing slab, keep the finished height within about 1/4 inch of the adjacent surface and still build the patio base properly beneath it.
How do I confirm the correct drainage slope before digging?
Use a reference string line from a verified high point to a verified low point, then check with a laser level or line level at multiple spots. Mark grade stakes so you can dig to the same slope consistently, and re-check after you compact the base to ensure the slope didn’t shift.
Is polymeric joint sand required for a pool patio?
It’s strongly recommended around pools because regular joint sand can wash out from splashes and frequent rain, leading to gaps and movement. If you use polymeric sand, keep the jointing sand application clean, compact it properly, and mist lightly to activate per the product instructions.
What’s the best slip-surface approach for wet pool areas?
Pick materials and finishes that are rated for wet traction, and avoid smooth finishes. For example, broom-finish concrete and textured pavers provide traction when properly maintained. After installation, keep the surface clean, avoid sealers that create a slick film, and consider a slip-resistant sealer rated for wet areas.
Do I need to seal travertine right away, and how soon can I seal after installation?
Yes. Travertine and other porous limestone typically need sealing within weeks to resist chemical etching from pool water. Pavers and natural stone are often sealed about 30 days after installation so the jointing material can cure fully, but porous stone may require earlier sealing.
How long should I wait before using the patio after polymeric sand and sealing?
Give polymeric joint sand time to cure before heavy rinsing or washdown, and avoid flooding the surface soon after activation. For sealing, wait long enough for the system to cure and dry, common practice is about 30 days for pavers and later timing depends on humidity and temperature. Follow your specific product cure timelines to prevent haze or bonding issues.
What’s the typical base thickness, and can I reduce it to save time or money?
For pavers, a common approach is compacted gravel base plus bedding sand, with the base depth designed to support long-term movement resistance. Don’t reduce base thickness to cut costs, it’s a primary reason patios fail early. If conditions are harsh, like soft soil or heavy freeze-thaw, follow thicker base guidance or consider engineering the subgrade.
How do control joints work for a broom-finish concrete pool patio?
Control joints create planned crack locations so cracking is predictable rather than random. Cut them every 8 to 10 feet while the concrete is still green, or saw after curing if your method requires it. If you skip them, you can get cracks that run unpredictably and affect drainage.
What’s the safe way to handle electrical and lighting near the pool patio?
Get permits and use a licensed electrician for any wiring changes near the pool area. Pool codes often restrict outlets and specify clearances from the water edge, and lighting needs correct mounting and weatherproofing. Planning conduit runs before sub-base and slab work prevents costly rework.
Do I need a permit even if I’m building the patio myself?
Often yes, especially if the patio is attached to the house, involves drainage changes, or includes any electrical work near the pool. Many jurisdictions also apply setbacks and barrier zone rules that can affect layout and materials, so check before ordering stone or pavers.
Can I build a hot tub on the same sloped patio surface?
You can, but you should not rely on the patio slope to “level” the hot tub. Hot tubs typically need a dedicated, properly prepared base or leveling pad with correct load support, so the tub sits evenly and connections remain protected. Plan weight, reinforcement needs, and weatherproofing at the connection points separately from the standard patio build.
What are common DIY mistakes that cause pavers to shift or heave?
Top issues include missing or incorrect drainage slope, insufficient sub-base compaction, leaving organic material in place, and skipping edge restraints. Another common error is not checking levels during installation and allowing rocking units, which forces later sand and joint failure. Address these early, not after compaction.
Next Article
How to Rebuild a Patio Step by Step DIY Guide
Step-by-step DIY guide to rebuild a cracked or uneven patio, including base prep, drainage, finishes, costs, and pro cal