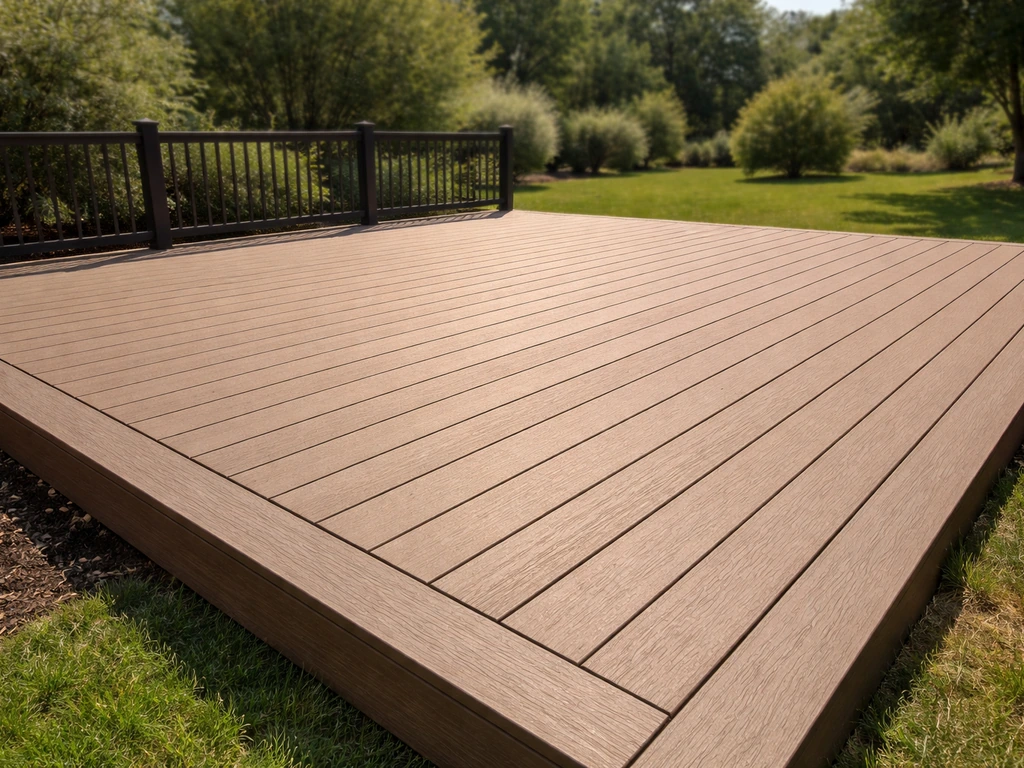
Building a Trex patio means constructing a composite decking platform using Trex boards on a properly framed substructure, and it follows a similar process to building a ground-level deck. You'll need pressure-treated framing lumber, concrete footings or a compacted gravel base depending on your terrain, Trex composite boards in your chosen product line, Trex Hideaway hidden fastener clips for clean spacing, and basic carpentry tools. The key steps are: choose your Trex product, plan layout and drainage slope, prep the site, build the frame, install the boards with correct gaps, finish the edges and stairs, then keep it clean twice a year. That's the whole picture. The sections below break each step down so you can actually do it.
How to Build a Trex Patio: Step-by-Step DIY Guide

Nolan Lennox
13 Jun 2026
What a 'Trex Patio' Actually Means and Which Product to Choose
Trex is a brand that makes composite decking boards, not a patio material in the traditional sense (no poured composite slabs exist). When people say 'Trex patio,' they mean a ground-level or low-rise composite board platform built exactly like a deck but flush with or close to the yard. The boards sit on a framed substructure and deliver the no-rot, low-maintenance benefits composite is known for.
Trex sells several product lines at different price points. Here's a practical comparison to help you choose before you order anything:
| Product Line | Shell Type | Best For | Relative Cost |
|---|---|---|---|
| Trex Enhance Basics | Single-sided capped composite | Budget-conscious builds, utility areas | Lowest |
| Trex Enhance Naturals | Four-sided capped with wood-grain texture | Standard residential patios, good durability | Mid-range |
| Trex Select | Four-sided capped, solid colors | Low-traffic areas, rentals, simple builds | Mid-range |
| Trex Transcend | Four-sided capped, premium textures | High-visibility patios, top-tier durability | Highest |
For most DIY patios, Trex Enhance Naturals hits the sweet spot: four-sided capping means all edges are protected against moisture, fading, and staining, and the price is reasonable. If budget is tight, Enhance Basics works fine as long as you don't plan to rip boards (which would expose uncapped edges). Go Transcend if this patio is the centerpiece of your backyard and you want the best warranty coverage and aesthetic. Check Trex's current catalog because product lines and colorways update regularly.
Plan Your Layout, Dimensions, and Drainage Before You Touch a Shovel
Skipping the planning phase is the single most common mistake I see on DIY composite builds. Spend an afternoon here and you'll save days of re-work later.
Measure the space and sketch a plan
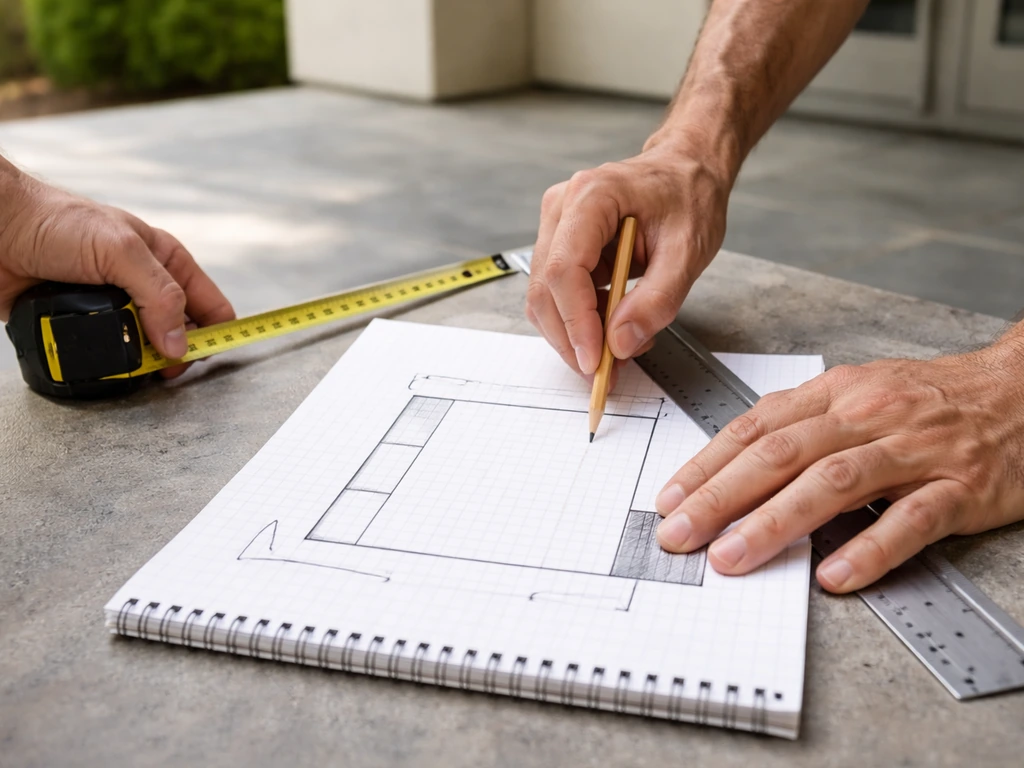
Measure your patio footprint and draw it to scale on graph paper or use a free tool like SketchUp. Mark the house wall, any doors, existing landscaping, and utility lines. Figure out which direction you want the boards to run: parallel to the house looks wider, perpendicular looks longer. Your board direction also determines your joist direction, since joists run perpendicular to boards, so decide this early. Standard Trex boards come in 12, 16, and 20-foot lengths, so plan your dimensions to minimize cuts and waste. A 12x16 or 16x20 foot footprint is a common starting size for a family patio.
Account for slope and drainage
Composite boards don't rot the way wood does, but standing water under the frame will degrade a wood substructure and encourage mold growth on the surface. The patio surface needs a slight slope of about 1/8 inch per foot away from the house to shed rain. If your yard already slopes away, great. If it slopes toward the house, you'll need to compensate when leveling your frame. For raised or semi-raised builds, Trex's RainEscape trough-and-downspout drainage system channels water from the underside of the deck away from the substructure, which is worth considering if your patio is elevated even a foot off the ground. For ground-level builds, a well-drained gravel sub-base handles most of this naturally.
Check local permit requirements
Many municipalities require a building permit for any permanent structure over a certain square footage (often 200 sq ft) or when footings are involved. Call your local building department before you start. Permit fees are usually modest and the inspection gives you a free second set of eyes on your framing, which is genuinely useful on your first build.
Site Prep and Sub-Base: What Goes Under the Frame
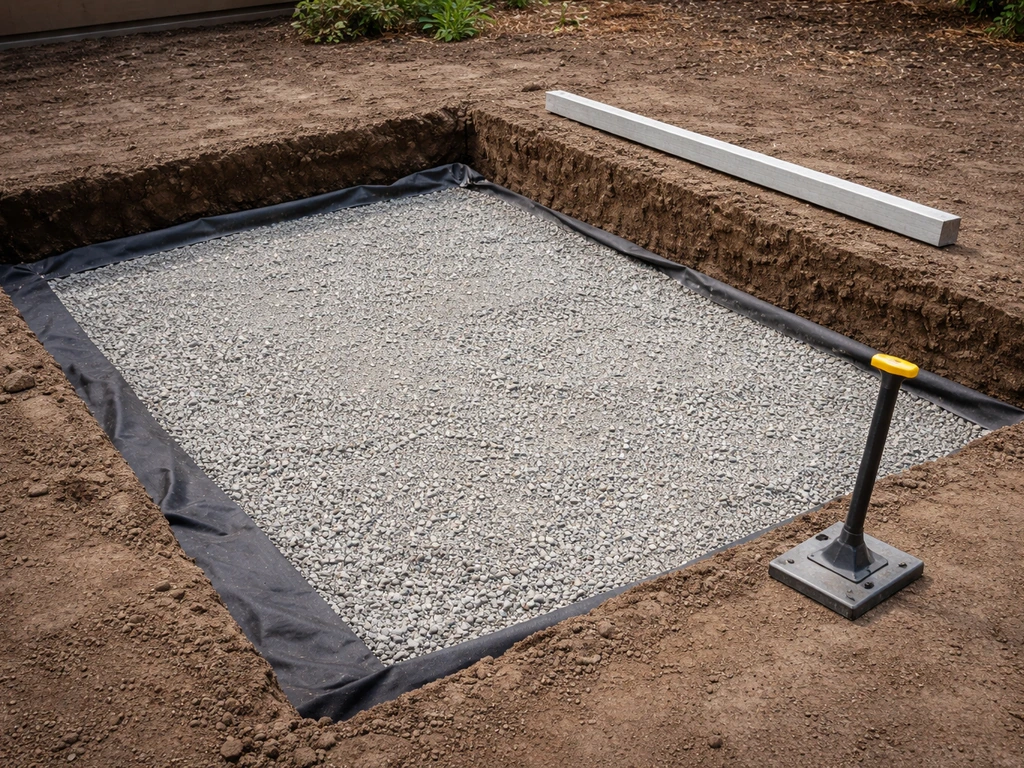
Your sub-base choice depends on whether the patio will be ground-level (floating) or slightly raised, and how stable your soil is. Here are the three most practical options for a DIY Trex patio:
Option 1: Compacted gravel base (best for flat or gently sloped yards)
This is the most DIY-friendly approach for a low, floating patio. Strip the sod and topsoil down 4 to 6 inches. Add a layer of landscape fabric to suppress weeds, then fill with 4 inches of compactable gravel (also called crushed stone or road base). Rent a plate compactor for a half-day and compact the gravel in two-inch lifts. This gives you a stable, free-draining surface to set your frame on. Concrete deck blocks or adjustable post bases sit on top of the compacted gravel and support your beams and joists.
Option 2: Concrete footings or piers (best for sloped yards or raised builds)
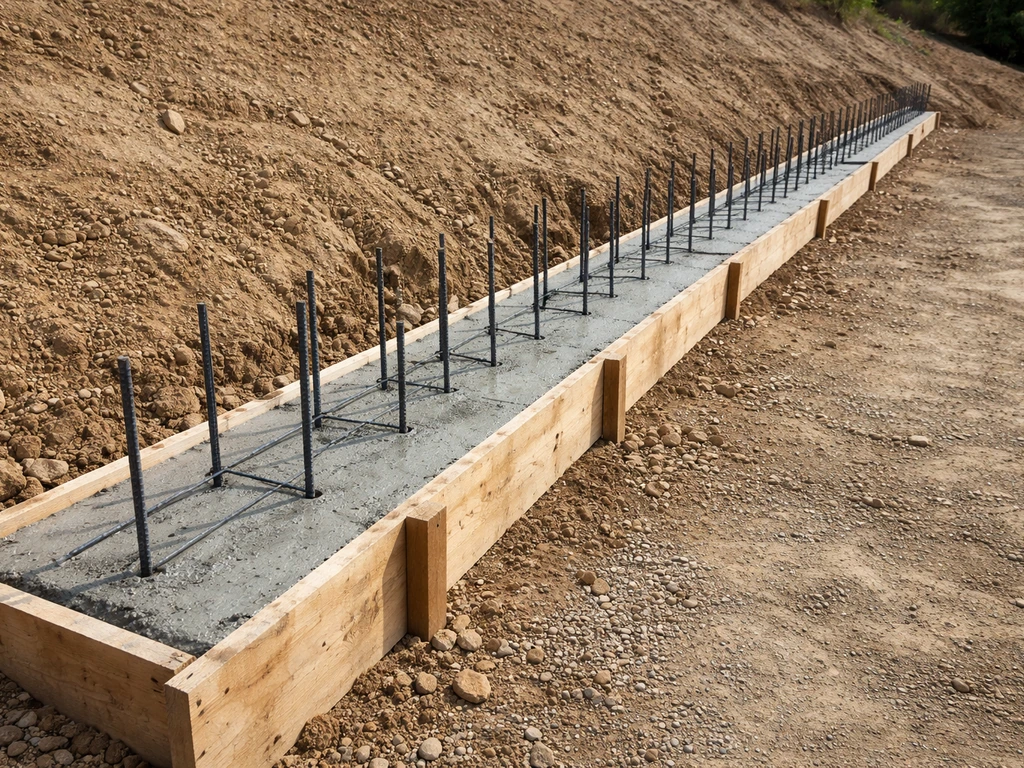
If your yard has significant slope or you're building a patio that sits more than 12 to 18 inches off the ground at any point, you need concrete footings. Dig below the frost line (check your local frost depth, commonly 12 to 42 inches depending on climate), pour tube-form footings, and set post bases in wet concrete. This is more work but gives you a fully code-compliant, rock-solid foundation. For modest slopes, you can use just a few footings at the corners and mid-spans rather than a full grid.
Option 3: Existing concrete or paver base
If you have an existing concrete slab or paver patio you want to upgrade with Trex boards, you can frame directly over it using sleepers (pressure-treated 2x4s or 2x6s laid flat on the slab). This works well when the slab is in decent shape and has a slight slope for drainage. Anchor the sleepers to the slab with concrete screws, shim as needed for level, and build your Trex surface on top. It's the fastest route to a composite patio if you already have hardscape in place.
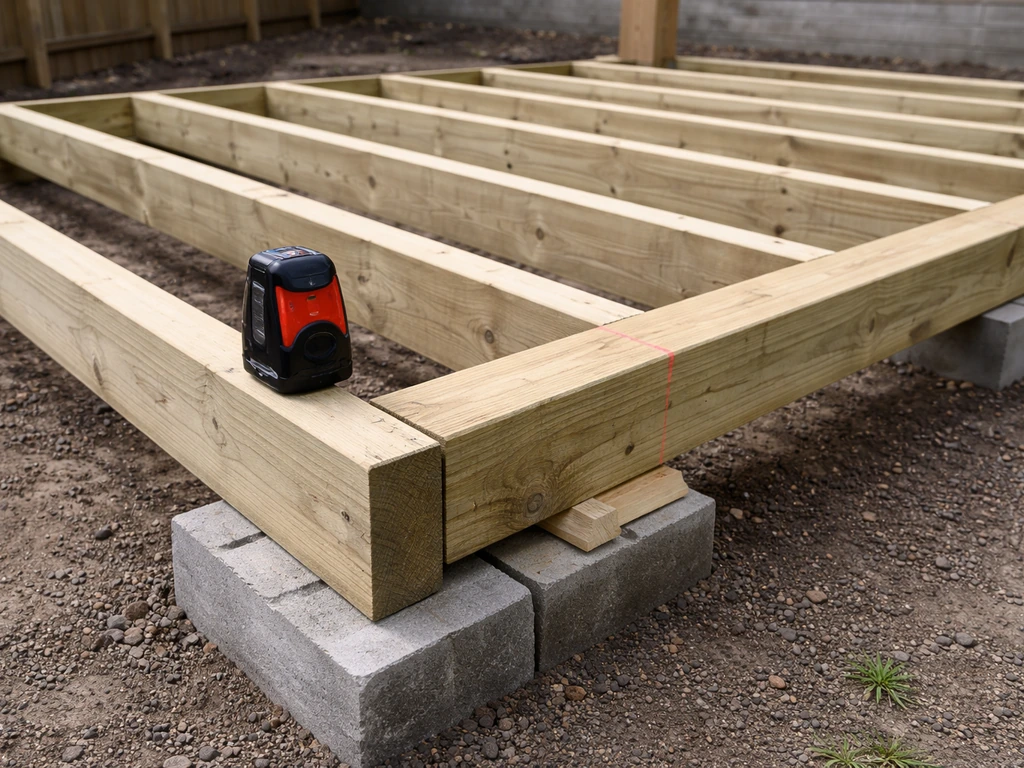
Build the Frame: Joists, Beams, Blocking, and Getting It Level
The substructure is what separates a patio that lasts 30 years from one that sags in five. Use pressure-treated lumber rated for ground contact (ground contact PT, also called UC4B rating) for any framing that's close to or touching the ground.
Joist sizing and spacing
For a standard ground-level Trex patio using 5/4 composite boards, space your joists at 16 inches on center maximum. If you're planning a 45-degree diagonal board pattern, drop to 12 inches on center because diagonal runs create longer spans between joist contacts. Trex's installation guidelines specify joist spacing requirements for each product, so always verify against the spec sheet for the exact product line you've chosen before you build. Undersizing joist spacing is never a mistake; over-spacing is.
Beam and post layout
For a simple rectangular floating patio, you typically need a perimeter frame (the rim joists forming the outer rectangle) plus interior joists spanning between two parallel beams. Beams are usually doubled 2x8 or 2x10 pressure-treated lumber, supported by posts or concrete blocks at intervals of 6 to 8 feet. Lay out all your post/block locations before you set any lumber using batter boards and string lines to keep everything square. The 3-4-5 triangle method (measure 3 feet on one side, 4 feet on the adjacent side, and confirm the diagonal is 5 feet) confirms your corners are square.
Leveling and blocking
Level every joist with a long level or laser level before you fasten anything permanently. Shim concrete blocks with composite shims, never wood, to avoid rot. When you add blocking (short pieces of lumber between joists for rigidity), keep the tops of the blocking flush with or very slightly below the top edge of the joists. Trex's guidance is explicit here: blocking that's even a tiny bit higher than the surrounding joists will create a bump you'll feel through the composite boards. Check blocking height carefully with a straightedge before moving on. Connect everything with joist hanger hardware and galvanized or stainless structural screws, not plain nails.
Materials list for a 16x20 foot patio frame (example)
- Pressure-treated 2x8 lumber for rim joists and interior joists (quantity based on your layout at 16" OC)
- Pressure-treated 2x10 or doubled 2x8 beams
- 4x4 or 6x6 pressure-treated posts (if raised) or concrete deck blocks (if floating)
- Joist hanger hardware (galvanized, one per joist end)
- Structural screws or joist hanger nails (galvanized or stainless, never zinc-plated)
- Concrete tube forms and post bases if using footings
- Compactable gravel (approx. 1 cubic yard per 50 sq ft at 4-inch depth)
- Landscape fabric
Installing Trex Boards: Fasteners, Gaps, and Getting It Right
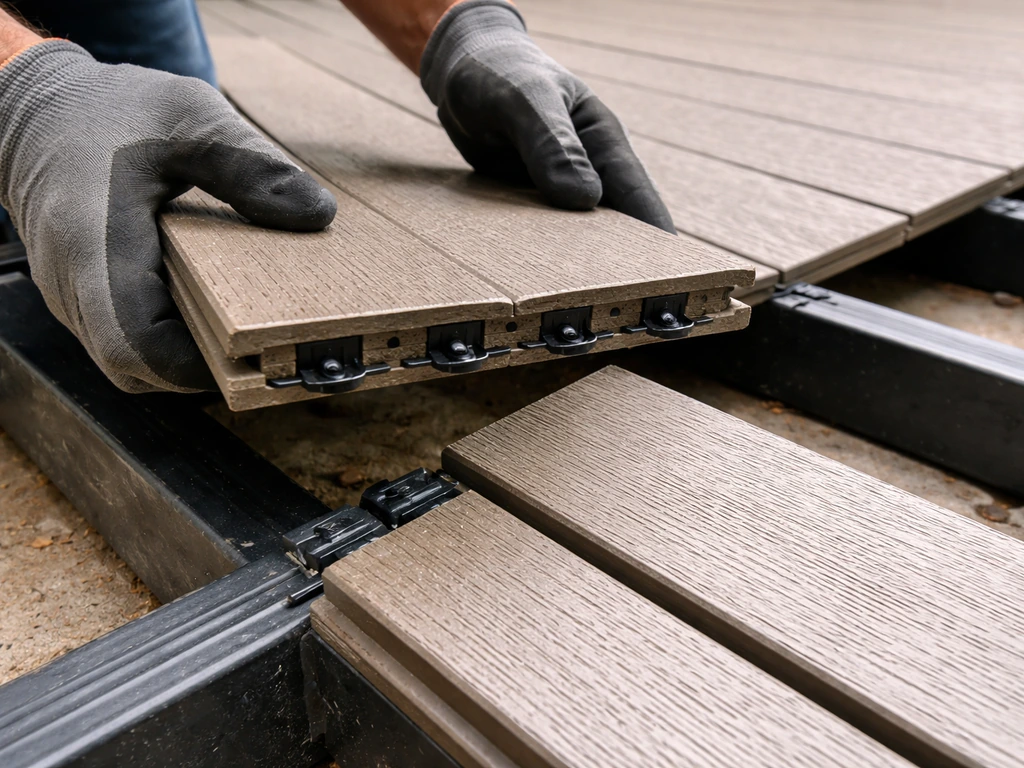
This is where composite installation diverges from wood, and where most mistakes happen. Composite boards expand and contract with temperature changes more than wood does. Proper gapping isn't optional.
Hidden fasteners vs. face screws
Trex Hideaway Universal Hidden Fastener Clips are the standard choice for most installs. They clip into the groove along the edge of grooved Trex boards and fasten to the joist below, automatically creating a consistent gap of approximately 1/4 inch between boards when installed correctly. The result is a clean, fastener-free surface with no visible screw heads. If you're using solid-edge (ungrooved) boards or budget Trex Enhance Basics boards, you'll face-screw with Trex-approved composite decking screws. Pre-drill pilot holes slightly larger than the screw shank to allow for expansion movement, and countersink so the head sits flush.
Gap requirements and temperature rules
The 1/4-inch board-to-board gap created by Hideaway clips handles both drainage and expansion. At board ends (where two boards butt up against each other over a joist), Trex requires a minimum 1/8-inch end gap, though many installers use 3/16 inch for safety. If you're installing in cold weather (boards contract in the cold), reduce the gap slightly; if it's hot, increase it. Trex's installation guide includes a temperature-adjustment table for gap sizing, and you should follow it precisely. Installing boards in summer heat with the minimum gap can cause buckling in winter when boards expand. The guide is available free on the Trex website and is worth printing out and keeping on site.
Starting the first board
Start with a Trex Start Clip at the first board (the one nearest the house or your straight edge). The start clip holds the first board in place without a hidden clip on one side. Run a chalk line the full length of the patio to keep the first board perfectly straight. If that first board goes in crooked, every subsequent board will follow it off course. Snap the line, check it twice, then fasten.
Overhang and trimming
Trex allows a maximum perpendicular overhang of 1/2 inch (13 mm) past the outer rim joist. Don't exceed this. For a cleaner edge, many builders run boards long and trim them all at once with a circular saw using a straight-edge guide after installation, then cap the rim with Trex fascia boards. This method gives you a perfectly flush, straight edge with one cut rather than fussing with individual board lengths.
Tools you'll need for board installation
- Circular saw with a fine-tooth blade (60-80 tooth carbide for clean composite cuts)
- Drill/driver with bit for Trex screws or hidden fastener clips
- Chalk line and tape measure
- Speed square and straight-edge guide
- Rubber mallet for seating boards into clips
- Safety glasses and hearing protection
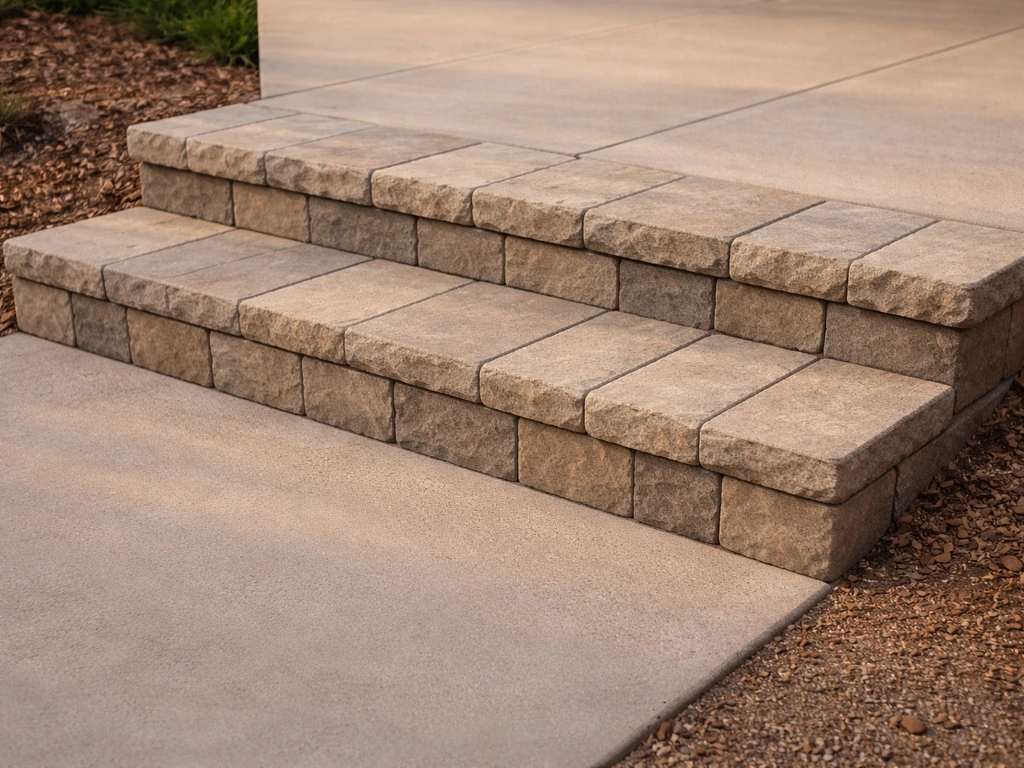
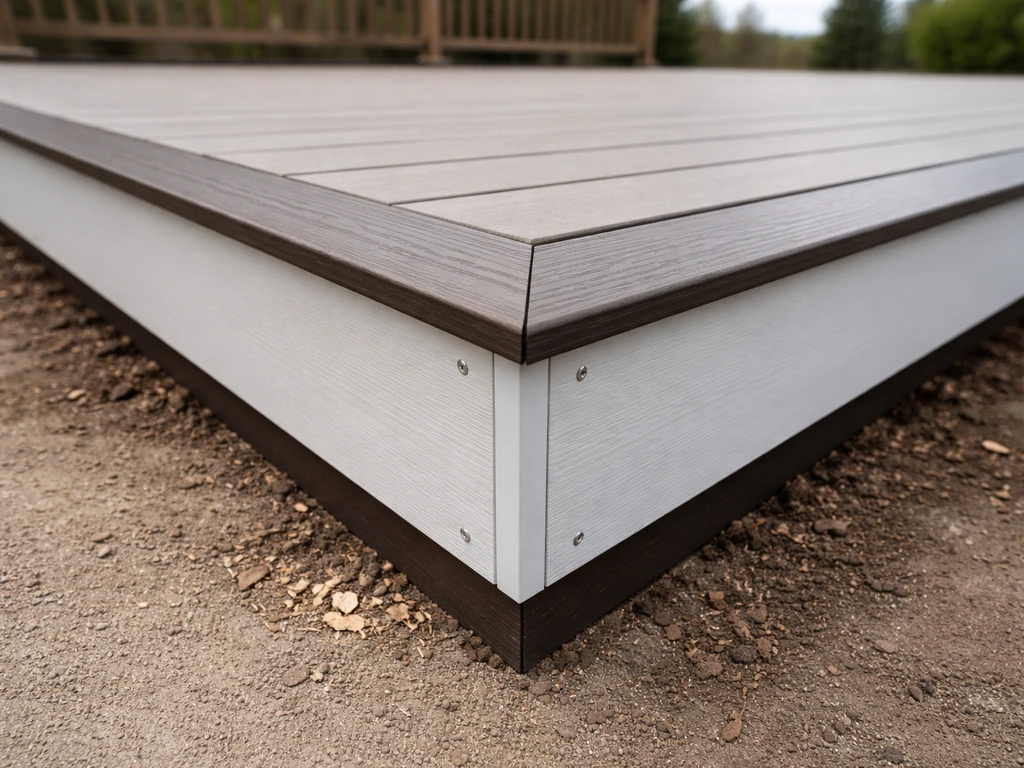
Finish Work: Borders, Fascia, Stairs, and Cleanup
The finish work is what transforms a functional platform into a patio that looks intentional and complete. Don't rush this phase. For DIY patio steps, you can build stair stringers and frame supports using the same treated lumber, leveling, and drainage principles used for the main Trex deck.
Fascia and border boards
Fascia boards are Trex boards (or Trex-specific fascia material) face-fastened to the rim joists to hide the framing and cut board ends. Use stainless steel or Trex-approved composite screws, pre-drill to avoid cracking, and leave a small gap at corners and butt joints to accommodate expansion. A contrasting color fascia in a darker shade than the field boards is a popular design choice that gives the patio a finished, built-in look. Trex sells color-coordinated fascia for each product line.
Stairs and steps
If your patio is elevated more than a few inches off grade, you need at least one set of steps. If you are installing premade patio steps, plan their height and tread layout to match your finished deck level before you lock in the framing and boards. If your patio height requires stairs, you can use wooden steps for patio access while still matching the Trex finish with properly built, well-supported treads and stringers.
Trex's own stair-building guidance specifies cutting stair stringers from 2x12 pressure-treated lumber, with rise and run dimensions calculated from your finished deck height. When you’re building brick patio steps alongside a composite deck, take the same care with leveling, rise and run, and drainage so the transition stays solid. For DIY patio steps on a Trex deck, start by calculating the stair rise and run from your finished deck height.
A common residential stair uses a 7-inch rise and 10 to 11-inch run. Trex composite boards work well as treads: use two boards per tread for a standard stair width, face-screw with approved fasteners at each stringer, and pre-drill every hole. If you are building or upgrading patio steps, use the same finished-deck height and spacing logic so the treads and risers line up cleanly with your Trex surface patio steps design.
Composite patio steps can use Trex boards as treads for a durable, low-maintenance landing that matches the rest of your deck. You can also look into Trex-compatible composite stair options as a complement to your patio, and if railing is required (typically for any platform over 30 inches high), Trex's Signature and Transcend railing systems integrate cleanly with the decking.
If you want brick patio steps, make sure the stair base and drainage are planned so the steps stay stable and don’t shift over time. For a complete walkthrough, follow the Trex steps to patio process from layout to installing and finishing the stairs and step treads Trex stairs and steps.
Post-installation cleanup
Composite sawdust and fine debris settle into the board grooves during installation. Before you call it done, blow out all the gaps with a leaf blower, then wash the surface with a garden hose and a soft-bristle brush. Remove any construction adhesive drips while they're still relatively fresh. Check underneath the patio and pull out any wood scraps or organic debris that got trapped in the framing cavity, as that material holds moisture and can promote mold over time.
Completion checklist
- All boards fastened with approved hidden clips or face screws with correct gap spacing
- No board-to-board gaps exceeding 1/4 inch or falling short due to installation temperature error
- Overhang at perimeter does not exceed 1/2 inch past rim joist
- Fascia boards installed with allowance for expansion at joints
- Stairs built with PT 2x12 stringers and Trex composite treads, properly fastened
- All framing hardware (joist hangers, structural screws) are galvanized or stainless
- Surface slopes 1/8 inch per foot away from house or toward drainage
- All debris cleared from between boards and under the frame
Keeping Your Trex Patio Looking Good for the Long Haul
One of the biggest selling points of composite decking is low maintenance, but low maintenance doesn't mean no maintenance. Trex recommends cleaning the surface at least twice a year, typically in spring and fall. A seasonal clean removes pollen, leaf tannins, and other organic debris that can feed mold and mildew if left to sit in the board gaps.
Routine cleaning
For routine cleaning, a garden hose and a soft-bristle brush with mild soap handles most dirt. Rinse in the direction of the board grain. For mold or mildew spots (usually appearing as dark streaks in shaded areas), Trex recommends specific composite deck cleaners rather than bleach, which can dull the board surface. Avoid pressure washing at high settings because it can raise the surface texture and drive water into the substructure. If you use a pressure washer, keep it below 1500 PSI and hold the nozzle at least 8 inches from the surface.
Seasonal and long-term checks
- Clear leaves and debris from board gaps every fall before they decompose over winter
- Check fascia board screws annually and re-tighten any that have worked loose from expansion cycling
- Inspect the substructure for rot every two to three years, especially around any post bases or areas where water pools
- After the first winter, walk the patio and look for any boards that shifted or cupped; early adjustment is easier than replacing boards later
- Keep planters and furniture with solid bottoms elevated on pads to prevent moisture trapping and surface staining
- Do not use metal shovels on the surface in winter; use a plastic shovel or roof rake to remove snow without scratching the board face
Trex composite boards carry a 25-year fade and stain warranty on most product lines as of 2026, but that warranty depends on installation following Trex's published guidelines. Trex also instructs installers to use approved or compatible fasteners and fastener systems, including Hideaway clips intended for consistent spacing and secure hidden attachment Trex installation guide specifies approved or compatible fasteners and fastener systems. Keep your installation guide, product purchase receipts, and any permit paperwork in a folder. If you ever have a warranty claim, that documentation is what gets it processed without hassle.
A well-built Trex patio done right the first time genuinely does require almost no work beyond those two seasonal cleanings for the first decade. If you want a quick start, focus on temporary steps for patio planning and layout, then finalize the build once everything fits and drains correctly. The up-front effort in the frame and fastener details is what earns you that low-maintenance payoff, and that's exactly the trade-off that makes composite worth the higher material cost over pressure-treated wood.
FAQ
What foundation should I use for a Trex patio on gravel, and should I use pressure-treated lumber everywhere?
If you are building on compacted gravel, you typically keep framing above the ground so water can’t pool under it. That means using concrete deck blocks or adjustable post bases on the base, and using ground-contact rated lumber (UC4B/ground contact PT) for any framing that could get damp. Also plan the underside for airflow and drainage, do not “cap” the sub-base with plastic sheeting.
Can I build a Trex patio directly over an existing concrete slab?
You can use a concrete slab overlay approach only if the slab is sound and has proper drainage. Before framing sleepers, clean the slab thoroughly, check for rocking or spalling, and confirm slope so water runs away from the house. If the slab holds water or you see widespread cracking or settlement, a floating frame with footings is usually the safer route.
How do I decide joist spacing if I want a diagonal board layout?
For composite decking, start with the manufacturer’s joist spacing chart for your exact product line, but also keep spans conservative if you expect heavy loads. Diagonal patterns reduce allowable joist spacing because each board run spans farther between supports. If you are unsure, choose the tighter spacing (smaller number) and verify with the spec sheet before ordering boards.
What end gap should I use at board butt joints, and does temperature change it?
End gaps are required at board butt joints, the minimum is generally 1/8 inch. If you live where summers get very hot and winters are cold, use the higher end gap (for expansion) and avoid “near zero” gaps in cold weather, which can lock boards in and cause winter buckling. If possible, follow Trex’s temperature gap adjustment table and stamp it on the checklist you keep on site.
If my yard already slopes, do I still need a drainage slope on the patio surface?
For ground-level patios, you can avoid building expensive drainage hardware by ensuring the frame sits level but the overall surface slopes about 1/8 inch per foot away from the house. For raised builds or if the yard drainage is poor, incorporate a routed underside drainage strategy like Trex’s RainEscape system so water is guided away from the substructure rather than soaking into it.
Can I use Trex Hideaway clips on any Trex board?
Hidden fastener clips work only with specific grooved board profiles. If you are using solid-edge (ungrooved) boards or budget lines that do not match the Hideaway clip system, you will need face-screwing with approved composite screws and pre-drilled, slightly oversized pilot holes. Mixing clips and the wrong board edge profile can cause inconsistent gaps and visible fasteners.
I built a covered patio, do I still need to clean composite decking twice a year?
Under-covering matters, but the “keep it shaded and dry” strategy is not enough by itself. Trex still recommends seasonal cleaning because pollen, tannins, and dirt collect in and around grooves and can support mildew in shaded areas. If you have heavy shade, you may need to clean more often than twice per year, especially after spring blossoms.
What’s the safest way to remove mold or stains from Trex decking?
Avoid pressure washing high-pressure settings because it can damage the surface texture and push water into the substructure. If you choose to pressure wash, keep the pressure modest (below 1500 PSI) and maintain a safe standoff distance (around 8 inches). For stubborn stains, use a composite deck cleaner instead of bleach to prevent dulling and uneven color.
What should I keep after installation in case I need a Trex warranty claim?
Warranty claims usually hinge on proper installation, especially gap sizing, joist spacing, and fastener type. Keep the installation guide you used, store your purchase receipts, and document your permit and inspection if you had one. If you ever repair boards, keep the replacement materials and notes so you can show the project matched the manufacturer’s requirements.
How do I calculate stairs so the treads line up correctly with the finished Trex surface?
With a raised patio, plan stair framing off the finished deck height, not the bare framing height. That means measuring rise and run from where the composite walking surface will actually sit, then locking stringers and treads so the last step lands correctly. If the elevation is off by even an inch, stair tread alignment and riser spacing can look uneven and create tripping hazards.
Next Article
DIY Patio Steps: Step-by-Step Stone Step Build Guide
Build diy patio steps with stone pavers: plan, measure rise and tread, prepare base, install, and avoid drainage mistake