Box steps are the most straightforward way to connect a patio to your yard, a door threshold, or an elevated deck surface. You build a series of stacked rectangular frames, each one set back from the one below, fill or frame each box solidly, then cap every frame with a tread. The result is structurally sound, visually clean, and something a determined homeowner can complete over a weekend with basic tools. This guide walks you through every stage: planning, measuring rise and run, choosing materials, pulling permits, pouring footings, framing, and finishing, with real cost numbers and a cut list you can print and take to the lumberyard. For a detailed patio how to step by step walkthrough that complements this guide, see the full patio how to step by step resource. For a full, photographed DIY patio step by step walkthrough you can follow alongside this guide, see the dedicated DIY patio step by step resource. If you want a focused, step-by-step tutorial on how to make a patio step, see our detailed guide for construction, materials, and measurements (reference: 4d36dc04-0b63-4cb3-897c-79e75e209f67). For step-by-step instructions specific to patio installations, see our guide on how to build a step on a patio.
How to Build Box Steps for Patio: DIY Plan, Materials & Cost

Box Steps vs. Other Step Types: Which One Should You Build?
Before you pick up a circular saw, it helps to understand why box steps exist alongside other options like cut-stringer stairs, poured concrete steps, or stacked paver risers. Each approach suits different situations, and choosing the wrong one adds cost and rework. I've built all of them at various points and box steps win on simplicity and repairability, but they're not always the best call.
What Makes Box Steps Different
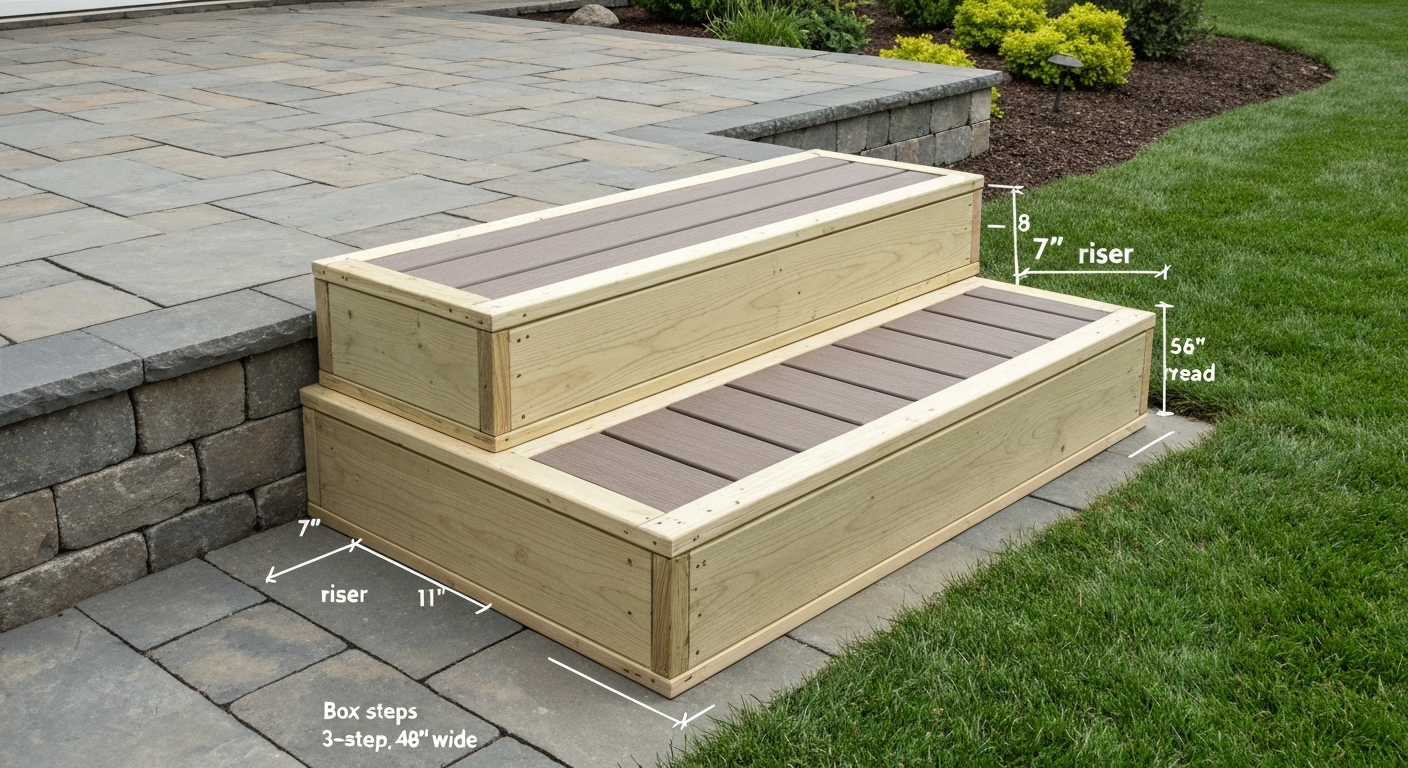
A box step is essentially a hollow or solid rectangular frame, usually pressure-treated lumber or composite framing, stacked in a descending staircase pattern. Unlike cut-stringer stairs, there are no angled notch cuts through structural lumber, which eliminates the risk of a weakened stringer throat. Every box is self-supporting on its own footprint. That makes them ideal for wide, low-rise entries (typically two to four steps) where you want something that looks substantial and anchors cleanly to a patio surface.
Pros, Cons, and the Decision Checklist
| Step Type | Best For | Pros | Cons |
|---|---|---|---|
| Box steps (framed) | 1–4 steps, wide entry, patio integration | No angled cuts, strong, repairable, matches deck framing | More lumber than stringers, heavier, needs solid footing |
| Cut-stringer stairs | Long stair runs, 4+ steps | Lighter, uses less material, familiar to most framers | Notch cuts weaken stringers if done wrong; minimum throat depth 5" |
| Poured concrete steps | Permanent, low-maintenance installs | Extremely durable, no rot, low upkeep | Requires forms, mixing/delivery, hard to modify |
| Stacked paver risers | Low 1–2 step transitions | Easy, no permits in many jurisdictions, removable | Not structural on their own; needs compacted base and edge restraint |
| Precast concrete steps | Fast installs, budget-conscious | Ready-made, durable, inexpensive | Fixed sizes, limited style, needs level pad and equipment to place |
Use this quick checklist to decide if box steps are right for your project. If you answer yes to most of these, you're in the right place.
- You need two to four steps to bridge a height difference of roughly 14 to 30 inches
- You want the steps to match or complement existing deck or patio framing
- You prefer not to make angled stringer cuts
- The step width is 36 inches or wider (box steps shine on wide, welcoming entries)
- You want the option to repair or replace individual treads without demolishing the whole structure
- You're working with wood or composite materials and have basic framing skills
Project Planning Before You Buy a Single Board
Site Assessment
Walk your site before anything else. Check the total rise, the vertical distance from the patio surface (or door threshold) down to the landing surface. Probe the ground at the base of where the steps will land: is it stable, compacted fill, or soft soil that will settle? Look for drainage patterns. Water pooling under a stair footing is one of the most common causes of premature wood rot and shifting. If the landing zone is a paver patio, note that pavers alone won't provide structural anchorage, you'll need to account for that in your footing plan.
Skill Level and Realistic Timeline
Box steps are genuinely beginner-friendly if you're comfortable with a circular saw, a drill, and basic framing layout. The cuts are all square, no compound angles, no router work. A first-timer building a two-step box should plan for one full weekend: Saturday for layout, footing, and framing; Sunday for treads, finishing, and cleanup. A three- or four-step box adds roughly half a day. If you're also tying the steps into a new patio build, budget time accordingly since the footing concrete needs at least 24 to 48 hours to cure before you load it.
Budget Considerations
Material costs for a basic two-step pressure-treated wood box run roughly $50 to $120 depending on width and local lumber prices. A composite version of the same steps climbs to $150 to $350. Masonry (concrete block core with paver or stone treads) sits in the $100 to $250 range for materials, though it demands more prep time. If you're hiring out any portion of the work, installed costs commonly run $100 to $300 per step including labor, based on industry estimating data. Estimator sources like RSMeans (Gordian), Construction cost data / 2026 products collect national and city‑level material and labor unit costs and are the industry standard for building a permit‑ready bill of materials and labor estimate RSMeans (Gordian) — Construction cost data / 2026 products. Pull your own permit and do all the labor yourself and you keep that money in your pocket.
How to Measure Rise and Run and Calculate Your Steps
Getting the rise and run right is the single most important measurement step in this entire project. Uneven steps are a trip hazard, the IRC limits variation between any two risers or treads in a flight to just 3/8 of an inch (9.5 mm). Here's how to nail it every time.
Measuring Total Rise
Set a long level or a straight board on the upper surface (your patio or threshold) and extend it out over the lower landing area. Measure straight down from the underside of the level to the ground. That measurement is your total rise. Write it down in inches. For example: 14 inches total rise.
Calculating Number of Steps and Riser Height
Divide your total rise by a target riser height. The IRC caps individual risers at 7.75 inches maximum. A comfortable target for outdoor patio steps is 6.5 to 7.5 inches, tall enough to feel substantial, short enough to climb easily. Divide and round to the nearest whole number of steps, then recalculate the exact riser height. Example: 21 inches total rise divided by 3 steps = exactly 7 inches per riser. That's a clean, code-compliant number. Always end up with equal-height risers, never fudge the bottom or top step to make the math work.
Tread Depth and the Blondel Rule
Tread depth (the horizontal distance you step onto) must be at least 10 inches per the IRC. For outdoor steps where you often approach at a relaxed pace or carry things, 11 to 12 inches feels more natural. Use the Blondel comfort check: 2 × riser + tread depth should equal 24 to 25 inches. A 7-inch riser plus an 11-inch tread gives you 25, right in the sweet spot.
| Total Rise (in) | # of Steps | Riser Height (in) | Tread Depth (in) | 2R+T Check | Code Compliant? |
|---|---|---|---|---|---|
| 7 | 1 | 7.0 | 11 | 25.0 | Yes |
| 14 | 2 | 7.0 | 11 | 25.0 | Yes |
| 21 | 3 | 7.0 | 11 | 25.0 | Yes |
| 21 | 3 | 7.0 | 10 | 24.0 | Yes |
| 28 | 4 | 7.0 | 11 | 25.0 | Yes |
| 28 | 4 | 7.0 | 10 | 24.0 | Yes |
| 30 | 4 | 7.5 | 10 | 25.0 | Yes |
| 30 | 4 | 7.5 | 11 | 26.0 | Yes (tread depth OK) |
Once you've locked in riser height and tread depth, calculate your total run: multiply tread depth by the number of steps. A three-step box with 11-inch treads projects 33 inches out from the patio edge. Mark that footprint on the ground before you order materials, it tells you exactly where your footing needs to go.
Local Codes, Permits, and Keeping the Build Safe
I'll be straight with you: most homeowners building a small set of patio steps skip the permit. For a freestanding two-step box that sits entirely at or near grade and isn't attached to the house, many U.S. jurisdictions don't technically require one, some municipalities exempt freestanding structures under 200 square feet or steps less than 30 inches above grade. But the moment your steps attach to a house wall, a ledger, or sit on a deck over 30 inches off grade, you almost certainly need a permit and inspection. Check with your local building department before you dig. A failed inspection after the fact is far more expensive than a $75 permit upfront.
Key IRC Dimensional Requirements
- Maximum riser height: 7 3/4 inches (7.75 in)
- Minimum tread depth: 10 inches
- Maximum riser-to-riser variation within one flight: 3/8 inch
- Minimum headroom above stair nosing: 6 feet 8 inches
- Handrail height (when required): 34 to 38 inches above nosing
- Handrails are typically required when a stair has 4 or more risers — confirm with your local authority
- Footing minimum width: 12 inches; minimum thickness: 6 inches
- Frost depth: varies by climate — some northern jurisdictions require 42 inches or deeper; always check local frost depth maps
On-Site Safety Checklist
- Call 811 (USA) before any digging to locate buried utilities
- Wear safety glasses when cutting and hearing protection for sustained saw use
- Use proper blade guards and never freehand cut pressure-treated lumber without a stable workpiece
- Keep a first aid kit on site — splinters and saw nicks are the most common DIY injuries
- Use a torque-rated impact driver, not a drill, when setting structural fasteners
- Never stand on an unbraced box frame — fully fasten each layer before loading it
- Keep children and pets away from the excavation and concrete mixing area
- Allow concrete footings to cure at least 24 hours (48 is better in cool weather) before framing begins
Materials, Tools, and What Things Actually Cost
You have three realistic material paths for DIY box steps: pressure-treated wood, composite decking and framing, and masonry (concrete block with paver or stone treads). Each has a different cost profile, maintenance demand, and longevity. Here's a side-by-side breakdown.
| Material | Approx. Material Cost (2-step, 4 ft wide) | Longevity | Maintenance | Skill Level | Best For |
|---|---|---|---|---|---|
| Pressure-treated lumber (ACQ/CA) | $50–$120 | 15–25 years with upkeep | Annual sealing recommended; inspect hardware yearly | Beginner | Budget builds, easily repairable, widely available |
| Composite decking + PT framing | $150–$350 | 25–30+ years | Minimal — wash annually, no sealing | Beginner–Intermediate | Low-maintenance, matches composite decks |
| Concrete block + paver/stone treads | $100–$250 | 30–50+ years | Very low — re-sand joints every few years | Intermediate | Permanent installs, high-traffic entries |
| Precast concrete steps (prefab) | $80–$180 (unit cost) | 30+ years | Very low | Beginner (placement only) | Fast, no framing, needs level pad and equipment |
Lumber prices fluctuate regionally. As a real-world data point, a 2x10x10 pressure-treated board was running around $26.88 at a major home center in mid-July 2026. For composite, premium brands like Trex Transcend range from roughly $6 to $12 per linear foot for decking material alone. Buy more than you think you need, a 10% overage on lumber and an extra composite board saves an extra trip to the store.
Tool List
- Circular saw (a miter saw speeds up square cuts significantly)
- Cordless drill and impact driver
- Framing square and speed square
- 4-foot level and line level
- Tape measure (25 ft minimum)
- Post-hole digger or clamshell digger (for footing holes)
- Mixing tub or wheelbarrow and margin trowel (for concrete)
- Rubber mallet
- Chalk line
- Pencil and construction crayon
- Joist hanger kit (Simpson LUS or equivalent, hot-dip galvanized)
- Galvanized or stainless-steel structural screws (3 in and 3.5 in) — ASTM A153 for ACQ-treated lumber
- Safety glasses, ear protection, work gloves
A quick note on fasteners: if you're using modern pressure-treated lumber (ACQ or CA treatment), standard zinc screws will corrode within a few years. Use hot-dip galvanized (ASTM A153) or stainless-steel fasteners throughout. Simpson Strong-Tie and other connector manufacturers publish specific guidance on which coatings are compatible with each preservative treatment. In coastal or high-humidity environments, Type 316 stainless is the right call.
Cut Lists, Layout Templates, and Diagrams
Before you make a single cut, build your cut list from your measurements. The templates below cover the two most common DIY patio box step configurations: a two-step box and a three-step box, each 48 inches (4 feet) wide. Adjust widths and riser heights to match your actual site measurements. All framing assumes 2x10 pressure-treated lumber with a 7-inch riser height and 11-inch tread depth.
Two-Step Box Cut List (48 in wide, 7 in risers, 11 in treads)
| Part | Material | Cut Length | Qty | Notes |
|---|---|---|---|---|
| Bottom box front/back | 2x10 PT | 48 in | 2 | Full-width face boards |
| Bottom box sides | 2x10 PT | 11 in | 2 | Tread depth = 11 in |
| Top box front/back | 2x10 PT | 48 in | 2 | Same width |
| Top box sides | 2x10 PT | 11 in | 2 | Set back 11 in from lower front |
| Interior blocking | 2x10 PT | 11 in | 4 | Every 16 in on center for tread support |
| Bottom tread boards | 5/4x6 PT or composite | 48 in | 2–3 | Span 11 in tread; number depends on board width |
| Top tread boards | 5/4x6 PT or composite | 48 in | 2–3 | Same |
| Ledger (if attaching to patio) | 2x10 PT | 48 in | 1 | Fastened to patio rim or structure |
Three-Step Box Cut List (48 in wide, 7 in risers, 11 in treads)
| Part | Material | Cut Length | Qty | Notes |
|---|---|---|---|---|
| Bottom box front/back | 2x10 PT | 48 in | 2 | |
| Bottom box sides | 2x10 PT | 11 in | 2 | |
| Mid box front/back | 2x10 PT | 48 in | 2 | |
| Mid box sides | 2x10 PT | 11 in | 2 | |
| Top box front/back | 2x10 PT | 48 in | 2 | |
| Top box sides | 2x10 PT | 11 in | 2 | |
| Interior blocking (all boxes) | 2x10 PT | 11 in | 8 | 2 per box, at 16 in centers |
| Tread boards (all 3 treads) | 5/4x6 PT or composite | 48 in | 6–9 | 2–3 boards per tread depending on width |
| Ledger | 2x10 PT | 48 in | 1 | If attaching to structure |
Print these lists and mark off each piece as you cut. Lay all cut pieces on a flat surface and dry-fit the entire assembly before driving a single fastener, you'll catch measurement errors before they matter. For a visual: imagine looking at the steps from the side. The bottom box is the largest, sitting directly on the footing. The mid box sits on top of and behind the bottom box by exactly one tread depth. The top box does the same relative to the mid box, and its top surface aligns flush with your patio surface or sits just below it to allow for tread thickness.
Foundation and Footings: Getting the Base Right
The footing is the part most DIYers rush, and it's the part that causes the most long-term problems. A shifting footing means shifting steps, and shifting steps become trip hazards. Spend the time here and the rest of the build is easy.
Step 1: Mark the Footprint and Excavate
Using your total run calculation and step width, mark the exact footprint of the steps on the ground with spray paint or stakes and string. For a 4-foot-wide, three-step box with 11-inch treads, that's a 48-inch by 33-inch rectangle at ground level. Excavate inside that rectangle to a depth that accounts for your local frost depth plus at least 6 inches of footing thickness. In frost-free climates, 12 inches below grade is often sufficient. In northern zones where frost depth reaches 36 to 42 inches (confirmed by local code), you'll need to either go deep with poured concrete or use adjustable post bases with deep tube footings at each corner. Call 811 before you dig.
Step 2: Install Base Material and Compact
Once excavated, lay 4 to 6 inches of compactable gravel (crushed stone or process gravel, not pea gravel) in the bottom of the excavation and compact it with a hand tamper or plate compactor. This base layer serves two purposes: it provides drainage so water doesn't pond under your footing, and it gives the concrete a stable, non-shifting surface to cure on. Skipping compaction is one of the most common DIY mistakes, even a small amount of settlement under a concrete footing translates to visible movement in your steps within a year or two.
Step 3: Form and Pour the Footing
For box steps, a continuous pad footing is simpler than individual tube footings. Set up your form boards (2x8 or 2x10 lumber works well as temporary forms) to create a pad that is at least 12 inches wide and covers the full footprint of the bottom step. Pour or mix concrete to fill the form to a minimum 6-inch thickness. Per the IRC, footing width should be at least 12 inches and thickness at least 6 inches for typical shallow residential footings. Screed the surface level and let it cure. If you're anchoring the box frame to the concrete (recommended), set J-bolts or Simpson post base hardware into the wet concrete at your planned anchor points, typically at the two front corners and the back edge, before it sets.
Step 4: Verify Level Before Framing
Once the footing has cured for at least 24 hours, place a level across the surface in multiple directions. The pad should be level side-to-side and have no more than 1/8 inch variation across the length. If there's a minor high spot, a belt sander or angle grinder with a cup wheel can knock it down. If there's a low spot, a thin bed of mortar or self-leveling concrete can bring it up. Don't frame on an unlevel footing hoping the frame will correct it, it won't.
Anchoring to an Existing Concrete Patio
If you're setting the steps against an existing concrete patio slab rather than building a new footing, you'll anchor into the existing concrete. Use ICC-evaluated expansion wedge anchors or epoxy adhesive anchors (Hilti, Simpson, or equivalent brands publish specific embedment depth and edge distance requirements in their technical data). Follow those numbers exactly, embedment depth and edge distance to the slab edge determine whether the anchor achieves its rated load. Do not anchor to paver patios structurally; if the base of your steps sits on a paver field, you need a compacted sub-base and either a concrete pad underneath the step footprint or heavy-duty edge restraint per ICPI guidance. For step-by-step instructions on how to put a step in a patio, see our detailed patio step guide.
FAQ
Which building codes and local regulations must I research before writing the how‑to article?
Identify the adopted residential code edition for the target audience (IRC 2018/2021/2024 or local amendment). Extract prescriptive stair limits (maximum riser, minimum tread, headroom, handrail heights, allowable variation) and foundation/frost rules. Check local municipality permit triggers for decks/steps, required inspections, and any special historic or coastal ordinances. Cite the exact local code sections or municipal permit guides so readers can confirm requirements for their jurisdiction.
What specific dimensional and layout measurements should the article explain and how should I verify them?
Explain how to measure total rise (vertical distance from patio surface to finished grade or landing), total run, and usable landing headroom. Include the riser calculation (divide total rise by a target riser height, adjust to an integer riser count), and use Blondel’s rule (2R + T ≈ 24–25 in) plus IRC bounds (max riser 7 3/4", min tread 10") to select riser/tread combos. Provide a rise/run chart and worked examples. Verify formulas against IRC and reputable design references.
What foundation and footing research is required?
Gather IRC footing minimums (width/depth/thickness) and frost‑depth requirements for common climate zones; note that jurisdictions may require deeper footings. Research soil bearing/compaction guidance and when to call for engineered footings. Include prescriptive minimums (e.g., 12" wide by 6" thick for shallow footings) and reference local frost depth maps and R403 in the IRC.
What anchoring and attachment information must be sourced?
Research ledger attachment best practices per AWC/IRC, and recommend ICC‑ES‑listed hardware where appropriate. For concrete anchorage, reference manufacturer tech data (expansion and epoxy anchors) for embedment, spacing and edge distance. For paver patios, cite ICPI or manufacturer guidance that pavers alone are not structural and explain options: attach to the structure via ledger or set concrete piers/edge restraints beneath pavers.
What materials and corrosion/fastener guidance do I need?
Compile fastener and connector corrosion guidance (hot‑dip galvanized ASTM A153, stainless steel, Type 316 for coastal). List suitable wood species and preservative treatments for exterior use (PT lumber, HDG connectors) and composite product bands. Cite Simpson Strong‑Tie, AWC, and manufacturer resources for allowed coatings, connector selection and span/throat recommendations for cut stringers.
What tools and shop/jobsite procedures should be researched and listed?
Document required tools (circular saw, speed square, framing nailer, drill, level, stringline, post hole digger, concrete tools, jigs for stringers), PPE, and safe lifting/ergonomics. Research recommended speeds, fastener spacing, hanger types, and sequence best practices from framing/deck guides. Include any special tools for composite installation and recommended drill/driver bits/coatings for treated wood.
How to Make a Patio Walkway: DIY Plan, Build, Steps & Costs
DIY patio walkway guide: site checks, material-by-material build steps, stairs, tools, costs, maintenance & safety.