You can build a solid, good-looking patio yourself in a weekend or two. The core process is the same regardless of material: plan the layout, excavate and compact a gravel base, add a bedding layer, set your surface material, lock everything in with edging and jointing, then clean up and let it settle. Do the groundwork right and the patio will drain properly and stay level for years. Rush that part and nothing else matters.
Patio How to Step by Step: DIY Build Guide from Plan

Nolan Lennox
22 Jun 2026
Planning your patio layout and design
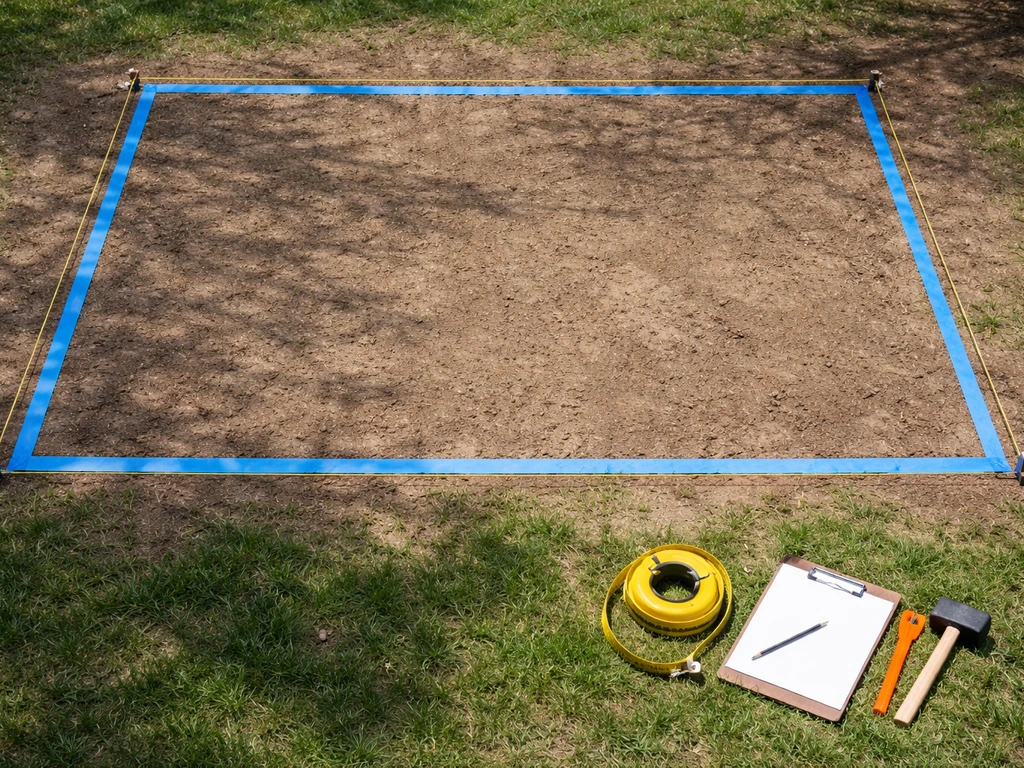
Before you touch a shovel, spend real time on the plan. Measure the space you actually want to use, not just what fits. A 12x16 foot patio is a comfortable starting point for a table and chairs. Sketch it out on graph paper or just stake it out with string lines in the yard and live with it for a day. You'll quickly notice if you're cutting into a garden bed you actually need or if the shape blocks a natural path.
Placement matters more than most beginners expect. You want the patio to slope away from the house so water doesn't pool against the foundation. The standard is 1/8 inch per running foot (about 3 mm per foot) for a concrete slab, and between 1/8 and 1/4 inch per foot for pavers. On a 20-foot-deep patio at 1/4 inch per foot, you're looking at 5 inches of total drop from the house to the far edge. That sounds like a lot, but spread over 20 feet it's barely noticeable and it keeps water moving. Mark your slope into the string lines from the start so you're not trying to fix it later.
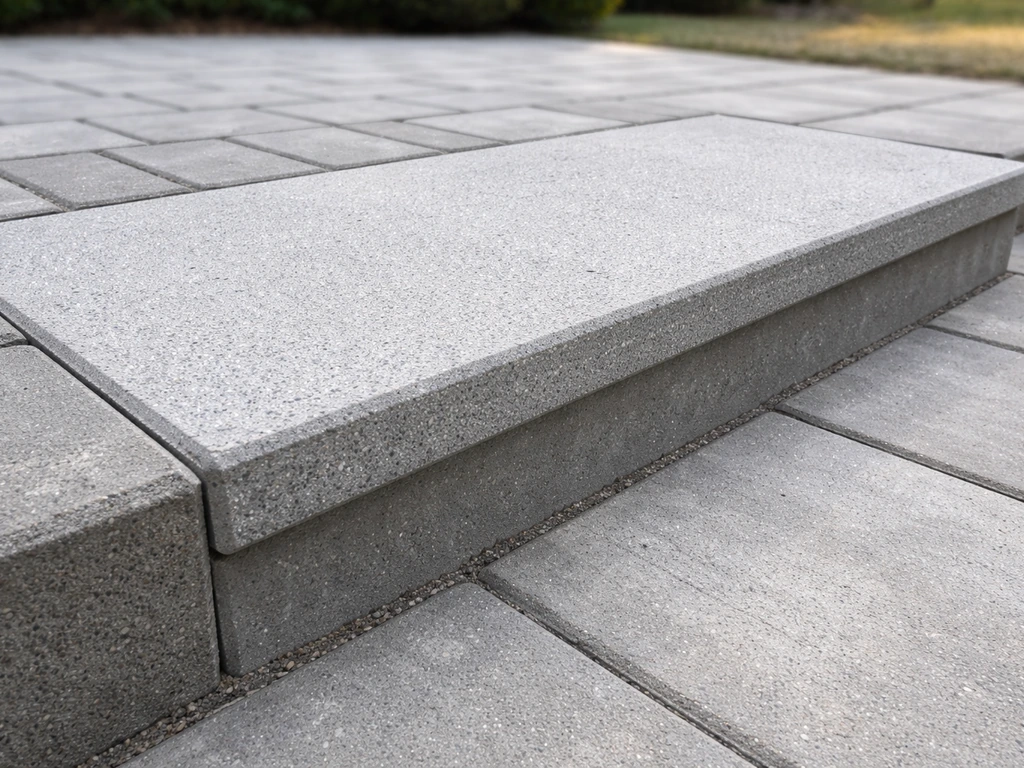
Think through access before you finalize the shape. If your patio sits below a door threshold, you'll need steps. Building a step (or box steps) is a separate task and a common add-on that affects how you set your final surface elevation. Plan that elevation early so the transition from door to patio feels natural and safe. Also check local permit requirements. Many municipalities don't require permits for a gravel or paver patio below a certain size, but a poured concrete slab sometimes does. A quick call to your local building department takes five minutes.
Choosing materials and building surface options
The material you choose changes the difficulty, cost, and long-term upkeep of your project. Here's an honest rundown of the most practical DIY options.
| Material | Approx. DIY Cost | Difficulty | Durability | Maintenance |
|---|---|---|---|---|
| Concrete pavers | $8–$20/sq ft installed | Moderate | Very high | Low (resand joints every few years) |
| Brick | $10–$25/sq ft installed | Moderate–High | High | Low–Moderate (repoint occasionally) |
| Poured concrete | $6–$12/sq ft DIY | High | Very high | Low (seal every 1–3 years) |
| Gravel/decomposed granite | $2–$5/sq ft | Low | Moderate | Moderate (top up and rake periodically) |
| Wood or composite decking | $15–$35/sq ft | Moderate | Moderate–High | Moderate (stain/seal wood annually; composite is lower) |
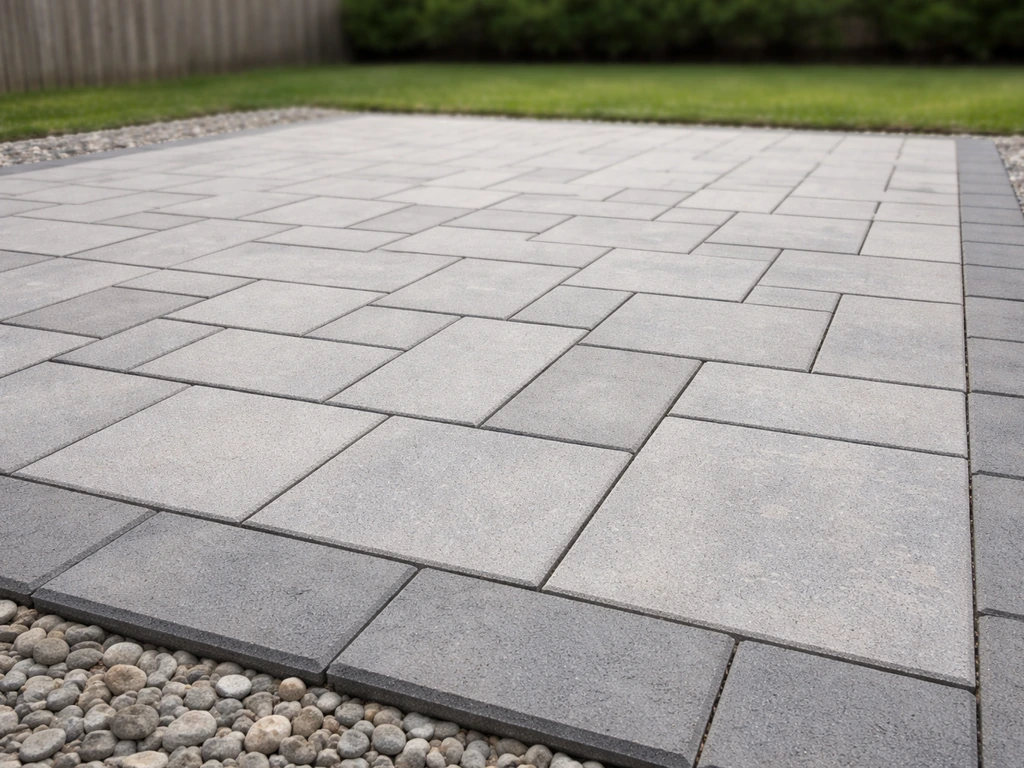
Concrete pavers are the most forgiving choice for a first-time DIYer. They're heavy enough to stay put, you can pull and reset individual units if something goes wrong, and the surface system is well-documented. Brick is similar but slightly more labor-intensive to cut cleanly. Poured concrete is the most permanent and lowest long-term cost, but you have one shot to get the pour, finish, and slope right before it sets. Gravel is the fastest and cheapest, great for casual spaces, but it shifts under furniture and needs periodic maintenance. Wood and composite patios are closer to deck-building and require a frame structure, so they're a different build process entirely.
For most first-time builders, concrete pavers on a compacted gravel base hit the sweet spot of cost, DIY-friendliness, and longevity. The rest of this guide uses that system as the primary walkthrough, but the base preparation steps apply to brick and even gravel patios almost identically.
Preparing the ground and base (excavation, grading, drainage)

This is where most DIY patios either succeed or quietly fail over time. A weak or poorly drained base causes pavers to heave, sink, and rock. If you want the same kind of stability for a walkway leading to your door, follow the same base prep and drainage steps shown for a patio walkway how to make a patio walkway. Do not rush this part.
Mark, measure, and excavate
Set your string lines at the finished surface height, accounting for the slope you planned. Your excavation depth needs to accommodate: the paver thickness (typically 2.375 inches for standard concrete pavers), 1 inch of bedding sand, and 4 inches of compacted gravel base. That puts you digging down roughly 7.5 to 8 inches from finished grade in most residential applications. Add an extra inch if your soil is soft or clay-heavy. Use a spade to cut clean edges along your string line perimeter.
Grade for drainage
Once you've excavated, grade the soil subbase to match your planned slope. Compact the native soil with a plate compactor (rent one from any equipment rental yard for around $60–$80 per day). This step gets skipped constantly and it's a huge mistake. Uncompacted soil settles unevenly and your patio moves with it. Run the compactor in two perpendicular passes.
Lay geotextile fabric and add the gravel base
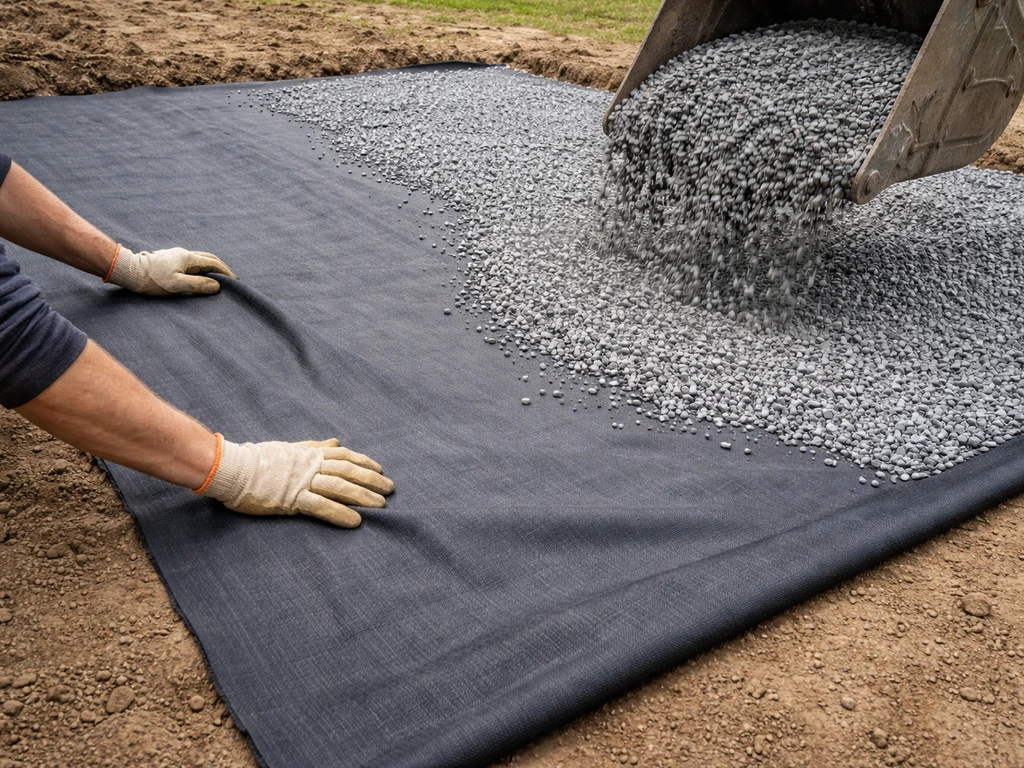
Lay a geotextile separation fabric over the compacted subgrade before adding gravel. This keeps the gravel and soil from mixing over time, which is one of the more overlooked causes of long-term settling. Overlap fabric seams by at least 12 inches. Then add your compactable gravel (sometimes called road base or crusher run) in two 2-inch lifts, compacting each lift before adding the next. Final compacted depth should be 4 inches. Check your slope again at the gravel surface with a level and a tape measure before moving on.
Add the bedding sand layer
Spread 1 inch of coarse bedding sand (blank" rel="noopener noreferrer">ASTM C33 concrete sand is the spec you want, not play sand or masonry sand) over the compacted gravel. Screed it flat and to slope using two parallel screed rails set at the right elevation. Pull a straight 2x4 across the rails to create a smooth, consistent surface. Do not compact the bedding sand beforehand. It needs to remain loose so pavers can be gently set and tapped into final position. Once screeded, avoid walking on it.
Step-by-step patio construction (common build sequence)

With your base prepped and bedding sand screeded, you're ready to set pavers. If you’re wondering how to put a step in a patio, plan your step height and width, then build the base and edging so everything drains and stays level set pavers. This goes faster than you'd expect once you get into a rhythm.
- Install edge restraints first along one corner (typically the house side and one perpendicular side). Plastic or aluminum edging spikes into the gravel base and keeps your field pavers from spreading outward over time. This is not optional—without restraints, the patio will slowly migrate outward.
- Start laying pavers from the house-side corner and work outward. Set each paver firmly but don't hammer it hard. The goal is consistent contact with the sand bed, not driving it in.
- Maintain joint spacing between 1/8 and 1/4 inch (3 to 6 mm) between pavers as you go. Consistent joints let polymeric sand lock everything together later and keep the pattern looking clean. Plastic paver spacers help if you're new to this.
- Check level and slope frequently—every 4 to 5 rows. A long straightedge (or a string line pulled tight across the surface) will show you high or low spots. Pull and re-set individual pavers as needed. This is much easier now than after compaction.
- Cut pavers to fit edges using a diamond blade on a circular saw, an angle grinder, or rent a paver splitter for cleaner cuts. Measure each cut paver individually rather than assuming they're all the same.
- Install the remaining edge restraints around the full perimeter once all field pavers are set. Spike them every 12 inches into the gravel base.
- Run a plate compactor over the entire paver surface (use a rubber pad attachment to protect the paver faces). Make at least two passes in perpendicular directions. This seats the pavers firmly into the bedding sand and levels out any minor inconsistencies.
- Spread joint sand across the surface and sweep it into the joints. For polymeric sand, follow the product instructions carefully: fill joints to within 1/8 inch (3 mm) of the paver surface, sweep off all excess from the paver faces, then activate with a gentle mist (shower setting, not a direct stream). Plan for at least 24 hours without rain after activation.
- Run the compactor one more time after the first pass of joint sand to help it settle deeper, then add more sand and repeat until joints are consistently filled to the right depth.
For a poured concrete patio, the sequence is different. Build wood forms to your planned shape and slope, add optional wire mesh or rebar reinforcement, pour and screed the concrete flat, then tool control joints every 10 feet in each direction using a grooving tool and straightedge (a 4-inch slab needs control joints at 10-foot intervals minimum). Finish the surface with a float and broom for texture, then cover with plastic sheeting to cure slowly. If you're specifically building box steps for a patio, you'll want to plan for the riser heights, tread depth, and proper base prep before you start stacking units.
Finishing details: edging, leveling, and installation patterns
The details you handle in the final stage are often what separate a patio that looks professionally done from one that looks like a first attempt. Take your time here.
Edging options
Plastic paver edging is affordable and works well when properly spiked into the base. Steel or aluminum edging is more rigid and holds corners crisper, worth the extra cost on visible edges. For a more finished look, some builders set a soldier course (pavers turned perpendicular to the field) along the border before installing restraints behind it. This uses more material but gives a clean, intentional-looking perimeter.
Pattern choices
Running bond (like basic brickwork) is the simplest pattern to lay and easiest to cut for. Herringbone at 45 degrees is stronger under load (it's what most driveways use) but requires more angled cuts at the border. Basketweave is easy and looks great but requires your pavers to be perfectly square. For a first patio, a simple running bond or a stack bond (grid pattern) is plenty and easier to keep aligned. Whatever pattern you choose, snap chalk lines across the screed to guide your rows before you start.
Final leveling check
After compaction and joint filling, walk every inch of the patio and rock each paver gently with your foot. Any that click, rock, or feel hollow underneath need to be reset. Pull them, add or remove sand as needed, and re-set. A rocking paver will crack over time and is much easier to fix now than in two years.
Cleanup, curing/settling, and maintenance tips
Right after the build
Sweep all excess sand off the paver surface before wetting polymeric sand. Even a small amount left on top will haze the pavers when activated. For concrete slabs, mist the surface and cover with plastic sheeting or a curing compound for at least 7 days. Don't let new concrete dry out fast in heat or wind. Walk-on traffic for pavers is fine after 24 hours, but hold off on heavy furniture or vehicles for a few days while the joint sand finishes curing.
Sealing
For concrete slabs, do not seal too soon. The concrete needs to cure fully before sealer can bond properly and before trapped moisture causes problems. Wait a minimum of 28 days before applying any penetrating or film-forming sealer. For pavers, sealing is optional but helps lock in polymeric sand and enhances color. Make sure the surface is completely dry before applying any sealer product. A dedicated concrete and paver sealer applies easily with a roller or pump sprayer.
What to watch for in the first season
Some minor settling in the first few months is normal, especially after the first heavy rain. Re-check a few pavers along edges and low spots after the first significant storm. In freeze-thaw climates, pay particular attention after the first winter. Water that gets into the base and freezes expands and can heave individual pavers. Good drainage (that slope you set early) and well-filled joints both reduce this risk significantly.
Long-term maintenance
- Top up joint sand every 2 to 3 years, or sooner if joints look shallow or weeds start taking hold.
- Pull weeds early. Once roots go deep under pavers they're much harder to remove without disturbing the surface.
- Re-seal concrete slabs every 2 to 3 years depending on traffic and weather exposure.
- Reset any rocking or sunken pavers before they crack under load. The fix takes 15 minutes while the patio is still intact.
- Keep the surface clear of standing water after storms. If puddles persist after 30 minutes, you may need to re-grade a low section.
- Pressure wash pavers annually to clear organic growth and refresh the appearance before resealing.
Building a patio yourself is one of the most satisfying outdoor projects you can take on. The material costs are manageable, the tools are mostly rentable, and the result is something you use every single day. Nail the base prep, keep your slope consistent, and fill those joints properly, everything else is just patience and time. Once you've got the main surface down, adding steps or a connecting walkway is a natural next project, and the skills carry over directly. If you are adding a patio step, plan the rise and tread depth carefully so the landing stays level and safe to climb steps.
FAQ
What should I do if my patio area is not perfectly level before I start excavation?
Don’t try to “level it” by scraping and hoping. Keep to your planned drainage slope away from the house, then excavate deeper in the high spots and less in the low spots so the finished surface elevation stays consistent. Re-check slope at three points (near house, mid-run, far edge) before you place gravel and again after gravel compaction.
How can I calculate the amount of drop I need without guessing?
Use the slope rate from the start. For pavers, the target is typically 1/8 to 1/4 inch per foot. Multiply your run length by your chosen slope (example: 20 feet at 1/4 inch per foot equals 5 inches total drop). Mark that height difference on your string lines so your excavation and bedding follow the same plan.
Can I skip geotextile fabric if my soil is fairly compact?
It’s not a good tradeoff to skip it. Geotextile reduces long-term mixing of fines into the gravel, which is a common cause of uneven settling and paver movement. If you’ve had drainage problems in the past, treat geotextile as non-optional.
How do I know my gravel base is compacted enough before adding bedding sand?
Your goal is a firm, non-moving base. After compacting, walk the area and look for visible depressions, pumping, or soft spots when you step. Also confirm thickness and slope with a level and tape before you screed bedding sand, since bedding sand is meant to be loose, not load-bearing.
What’s the correct way to set pavers so they don’t rock or develop humps?
Set only enough pavers to keep your alignment under control, then tap each unit gently into the sand using a rubber mallet. After laying, walk and rock every paver and reset anything that clicks, rocks, or feels hollow. When resetting, add or remove bedding sand under the problem paver, then re-check the slope and joint width.
Should I compact the bedding sand after screeding?
No. Bedding sand is intended to stay loose so pavers can be gently seated to final height. Compacting it can lock in unevenness and makes it harder to correct “almost level” areas without digging up and resetting sections.
How do I handle a patio step when the door threshold is higher or lower than my planned patio height?
Build the step around the transition height you need, not around the patio field alone. Plan riser heights and landing elevation first, then adjust edging and base heights so the step drains with the patio. If the threshold is close, dry-fit your pavers and check clearances so the top step does not feel too high or create a snag point.
Do I need a permit for a DIY patio, and what triggers permit requirements?
Permit rules vary by location and by material. Many areas waive small gravel or paver patios, but concrete slabs often draw more scrutiny, especially near property lines or when drainage changes. Call your local building department with your approximate dimensions and material plan to confirm what applies before you excavate.
What’s the most common mistake that causes pavers to sink or heave?
Weak base prep and poor drainage. If the subgrade isn’t compacted, gravel isn’t compacted in lifts, or joints aren’t filled, pavers are more likely to move after rain and freeze-thaw cycles. The fastest way to avoid this is to follow the base thickness targets, use geotextile, compact in lifts, and verify slope before sand and pavers.
How thick should my excavation be, and does it change with different paver thicknesses?
Yes, it changes. Start with finished surface height, then add up the layers: paver thickness plus bedding sand (commonly about 1 inch) plus compacted gravel base (commonly about 4 inches). If your pavers are not the standard thickness, replace “typical paver thickness” with your actual measurement and redo your total excavation depth.
What joint width should I aim for on concrete pavers?
Follow the manufacturer’s guidance, since it varies by product system. The key is consistency across the whole patio so polymeric sand can fully lock joints without leaving gaps. If your joint spacing is too tight in one area, you may not be able to fill properly; if it’s too wide, paver movement becomes more likely.
How soon can I move furniture onto a newly built paver patio, and what about after polymeric sand?
Light foot traffic is generally okay after about 24 hours, but avoid heavy loads for a few days so joint sand can finish locking. Also refrain from washing the surface or hosing it aggressively during the early period, since that can disrupt joint sand before it sets.
How do I prevent hazing when using polymeric sand?
Sweep off all excess sand before wetting polymeric sand. Even small leftovers on top can haze the paver surface when activated. Apply polymeric sand, sweep it into joints thoroughly, then wet according to the product instructions (not more water than recommended).
When should I seal concrete or pavers, and how do I avoid sealing too early?
Concrete usually needs full cure time before sealing, typically waiting at least 28 days. For pavers, sealing is optional but only works well when the surface is fully dry. Don’t seal trapped moisture, if you seal after rain or heavy irrigation, you can create discoloration and trapped dampness under the surface.
What should I inspect after heavy rain or after winter in freeze-thaw climates?
Re-check edges and any low spots for pavers that moved, rocking points, or joints that look washed out. Fixing small issues right away prevents bigger settlement later. In freeze-thaw areas, prioritize checking for water pathways that could let water into the base, since that’s what drives heave.
Can I use the same base prep steps if I’m building a gravel-only patio?
You can use the excavation, compacted subgrade, and geotextile concept, but understand the behavior difference. Gravel patios typically shift more under furniture and require periodic re-leveling and top-ups. If stability is the priority, consider using a deeper base and more frequent maintenance, or switch to pavers for lower long-term effort.
Next Article
How to Put a Step in a Patio: DIY Guide
DIY steps to add a patio riser and tread, from layout and base prep to drainage, materials, and anti-slip finishing.