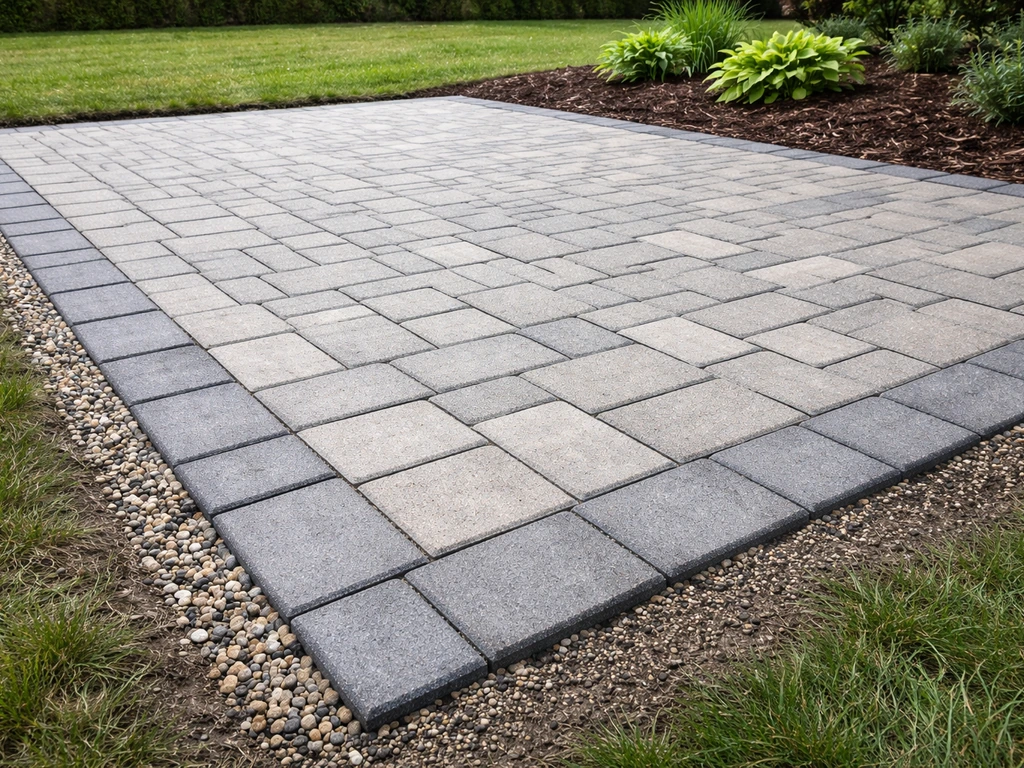
Digging out a patio comes down to three things: mark your area accurately, excavate to the right depth (paver thickness plus 1 inch of bedding sand plus 4 to 8 inches of compacted base), and grade the ground so water runs away from your house at a minimum slope of 1/8 inch per foot. Get those three right and everything else, laying base material, setting sand, placing pavers, falls into place. Get them wrong and you'll be dealing with sinking, pooling water, and shifting pavers within a season or two.
How to Dig Patio: Step-by-Step Excavation Guide

Nolan Lennox
3 Jun 2026

Planning and Measuring for Patio Excavation
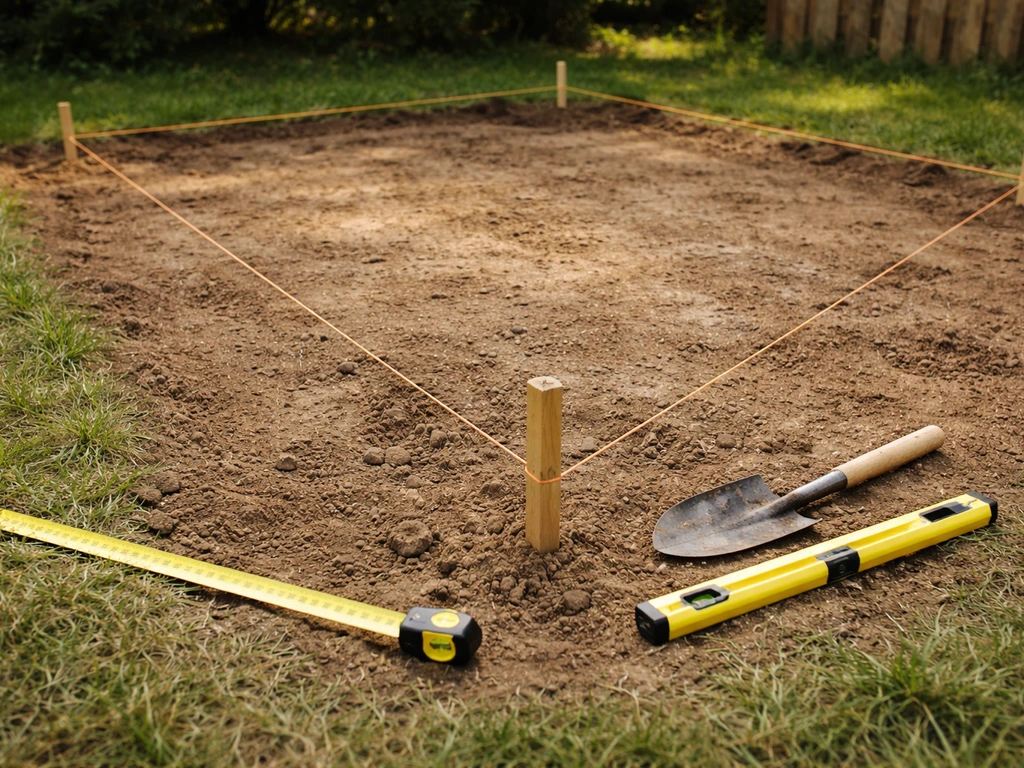
Before a single shovel goes in the ground, spend real time on layout. Rushing this step is how people end up with a patio that's six inches too short or drains toward the house instead of away from it. I've seen both, and fixing either after the fact is brutal.
Start by defining the perimeter of your patio with stakes and mason's line. For a rectangular patio, use the 3-4-5 triangle method to confirm square corners: measure 3 feet along one string, 4 feet along the adjacent string, and if the diagonal between those two points is exactly 5 feet, your corner is square. Check all four corners. Once your strings are set, measure the diagonal of the whole rectangle from corner to corner both ways. If both diagonals match, you're square. If they don't, adjust until they do.
Add about 6 inches of working space beyond your finished patio edge on all sides. That buffer lets you set edge restraints, adjust base material, and work without standing on freshly compacted areas. Mark this expanded perimeter with marking paint or flour so you know exactly where to dig.
Call 811 (the national dig-safe hotline in the US) at least a few business days before you start. They'll mark any buried utilities. This is not optional. Hitting a gas line or buried electrical conduit with a rented mini-excavator is a situation nobody wants to be in.
Also measure your slope at this stage. Run a level string line from the point closest to your house out to the far edge of the patio. For every foot of horizontal distance, you want the ground to drop at least 1/8 inch away from the structure. A 12-foot-deep patio needs at least 1.5 inches of total drop from house to outer edge. Knowing your existing ground slope tells you whether you'll be removing more material on one side, building up on another, or both.
Tools, Materials, and Setup for Digging Out a Patio
What you actually need depends on how big the patio is and what's already there. For a small 10x10 project in loose soil, a round-point shovel, a mattock, and a wheelbarrow will get you through it. For anything over 150 square feet or in clay-heavy ground, rent a plate compactor and seriously consider renting a mini-excavator or walk-behind trencher. Spending $200 to $400 on a one-day equipment rental beats spending a long weekend destroying your back.
- Round-point shovel: main soil removal tool
- Mattock or pick axe: breaking up compacted clay or rocky ground
- Wheelbarrow: moving excavated soil efficiently
- Tape measure and marking paint: layout and perimeter marking
- Mason's line and line level: establishing grade and checking slope
- 4-foot spirit level: checking flat surfaces as you go
- Plate compactor (rental): essential for compacting base material in lifts
- Mini-excavator (rental, optional): dramatically speeds up large or deep excavations
- Tamping bar: hand tamping in tight corners the plate compactor can't reach
- Safety glasses and work gloves: non-negotiable, especially near concrete
For materials, you'll need crushed stone or crusher run for the compacted base layer (the most common choice is 3/4-inch crushed angular stone or crusher run, not rounded pea gravel, because angular stone locks together under compaction), plus coarse bedding sand for the layer directly under your pavers. Have a rough calculation ready before you order: figure out your square footage, multiply by your base depth in feet, and you'll get cubic feet. Divide by 27 for cubic yards. Order about 10 to 15 percent extra to account for compaction losses.
How to Dig Out the Dirt for Your Patio
The excavation depth is the number most people guess at, and guessing low is the single biggest source of patio problems. Here's how to calculate it correctly for your specific build: This section gives you a practical overview of how to excavate for a patio before you start building the base.
| Layer | Typical Depth |
|---|---|
| Paver or slab thickness | Varies (commonly 2.375" for standard pavers, up to 3.5" for thick-cut slabs) |
| Bedding sand | 1 inch (do not exceed this) |
| Compacted crushed stone base (pedestrian patio) | 4 inches |
| Compacted crushed stone base (if frost depth is a concern) | 6–8 inches |
| Total excavation depth (typical pedestrian patio) | Approximately 7–8 inches below finished grade |
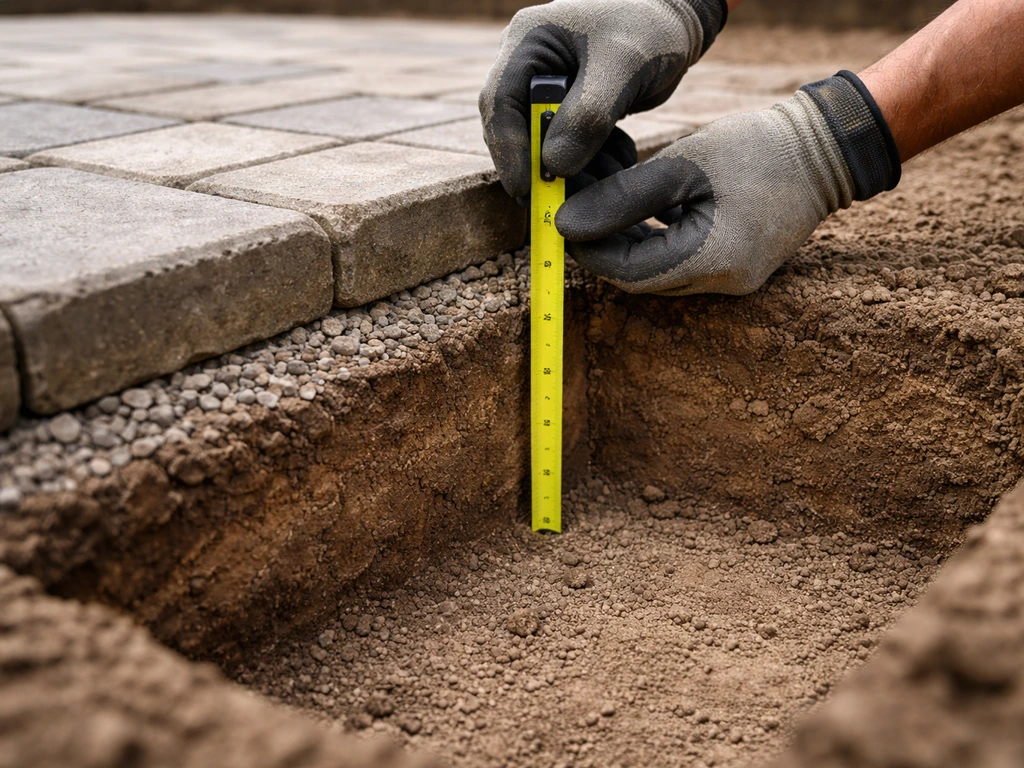
For most residential patios with standard concrete pavers, you're digging 7 to 8 inches below where you want the finished surface to sit. If you live somewhere with a deep frost line (36 inches or more), consult local guidelines because you may need more base depth or a drainage layer to prevent frost heave from destroying the surface over time.
Step-by-step excavation process
- Set your string lines at finished grade height so you always have a reference point to measure down from.
- Strip the sod first. Slice it into manageable sections with a flat spade and roll it up. You can compost it or use it to patch bare areas elsewhere in your yard.
- Begin removing soil in even layers rather than digging randomly. Working in passes keeps the bottom of your excavation level and makes it easier to check depth.
- Use a tape measure from your string line down to the excavation floor frequently. Check at least every 4 to 5 square feet to catch high and low spots early.
- Grade as you go. The floor of your excavation should already slope away from your house at that 1/8 inch per foot minimum. If you wait until the end, it's harder to correct.
- Remove all organic material, roots, and soft spots. If you find a soft, spongy area, dig deeper until you hit firm subgrade. Fill that void with compacted crushed stone, not soil.
- Pile excavated soil away from the work area or load it directly into a rental dump trailer. Plan ahead for disposal because a typical 12x16 patio excavated 7 inches deep produces roughly 2 to 2.5 cubic yards of soil, which is heavier and bulkier than most people expect.
Different soil types fight back in different ways. Sandy or loamy soil excavates easily but the walls can crumble, so work cleanly. Clay soil is dense and sticky, especially when wet, and it sticks to your shovel. Sprinkle the surface lightly with water if it's bone dry to make digging easier, but avoid working in saturated clay because it compacts poorly later. Rocky ground often means renting a demo hammer or jackhammer attachment for the mini-excavator to break up ledge rock.
Digging Up an Existing Patio (Removal First)

If there's already a patio where you want to build, you need to remove it before you can excavate properly. The approach depends heavily on what it's made of.
Removing an existing concrete slab
Concrete is the most labor-intensive to deal with. Start by hitting the slab with a 12-pound sledgehammer for several minutes to check for weak spots and initiate cracking before bringing in heavier equipment. Once you have cracks started, a rented electric demolition hammer (rotary hammer with a chisel bit) or a full jackhammer makes the work manageable. Work in small sections rather than trying to crack off large pieces at once. Large slabs under a jackhammer can trap the bit when they shift, which is both dangerous and annoying. Break concrete into pieces roughly 12 to 18 inches across for easier handling.
Seriously underestimate your hauling capacity and you'll regret it. Concrete is heavy: a 12x16 slab that's 4 inches thick weighs roughly 5,000 to 6,000 pounds. Rent a dump trailer or schedule a dumpster. Don't rely on your truck bed unless you know exactly what its payload rating is.
Removing brick pavers or flagstone
Sand-set brick pavers or flagstones are much easier to remove. Start at an edge and use a flat pry bar or wide masonry chisel to lift the first paver, then work inward. Once you have a gap, removal goes quickly. Stack pavers on pallets if they're in good shape, you may be able to reuse them. After the surface material is out, remove the old bedding sand and inspect the base layer below. If the crushed stone base is solid and at the right depth, you might be able to reuse it, but check the grade carefully before assuming it's good.
After any existing patio surface is removed, evaluate what's underneath before you start your new excavation. If you want a patio without digging much, plan to use a non-excavation or shallow-base approach based on your current surface. Sometimes the old base is adequate and correctly graded, saving you significant work. More often there are soft spots, root intrusions, or drainage issues that explain why the old patio failed in the first place. Don't cover problems up. Fix them now.
Base Prep After Excavation: Compaction, Drainage, and Leveling
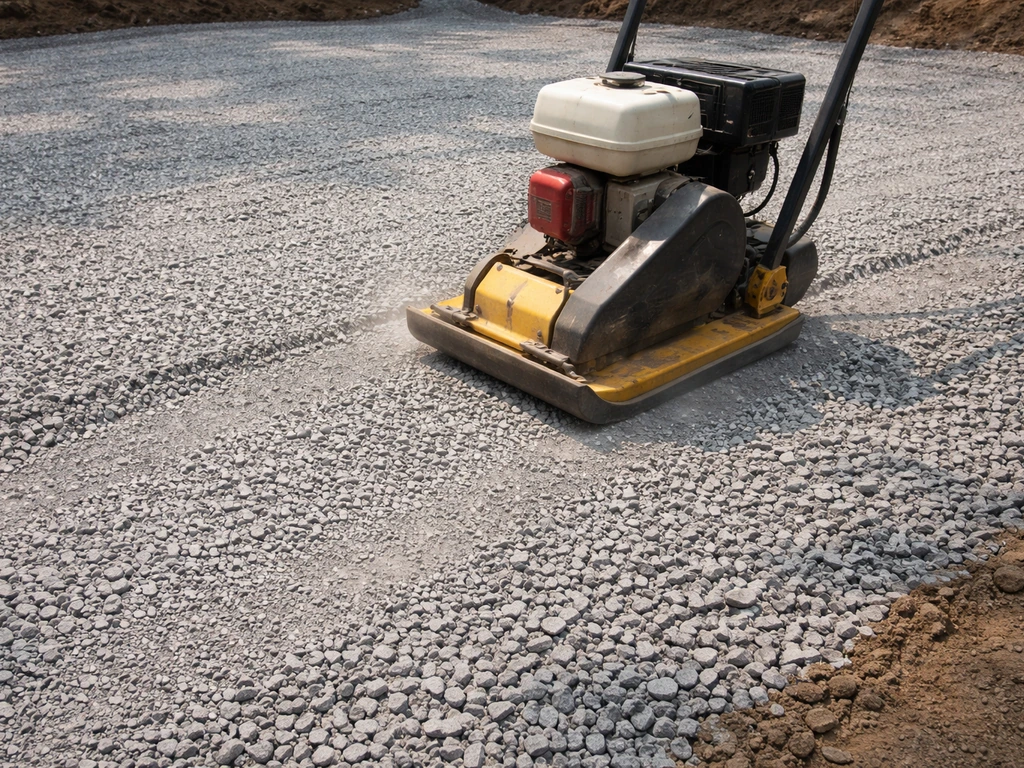
This is where most DIY patios succeed or fail. The base layer is doing almost all the structural work, and it only works if it's compacted properly. Dumping in 6 inches of crushed stone and making one pass with a plate compactor is not compaction. It's a pile of loose gravel with a slightly flattened top. If you want to build a patio without gravel, focus on using an appropriate base system and compaction method so the surface stays stable and drains correctly loose gravel.
The right way is to add base material in lifts. A plate compactor effectively compacts only about 3 to 4 inches of material per pass. Add a 2 to 3 inch layer of crushed stone, make multiple overlapping passes with the plate compactor (at least 3 to 4 passes over each area), then add another 2 to 3 inch layer and repeat. If you need a 4-inch final base, do it in two lifts. If you need 6 to 8 inches because of frost concerns or softer soil, plan on 3 or 4 lifts. Yes, it takes longer. But it's the difference between a patio that lasts 20 years and one that starts sinking in year two.
As you compact, check the grade constantly. Your compacted base surface should already reflect the finished slope of your patio: dropping at 1/8 to 1/4 inch per foot away from the house. Use a long straightedge or a level with a consistent shim to check. A 4-foot level with a 1/4-inch shim under one end gives you a rough 1/16-inch-per-foot slope check over that 4-foot span. Adjust the base material before moving to the bedding sand layer.
After your compacted base is set and sloped correctly, add 1 inch of coarse bedding sand. Screed it flat using a straight board pulled across screed rails set at the right height. Do not compact the sand before laying pavers because you need it to remain loose enough to bed each paver as you set it. Once pavers are laid, joint sand is swept in, and the whole surface gets a final compaction pass to lock everything into the bedding layer.
If drainage is a real concern, for example if your yard slopes toward the excavation or you're in a high-rainfall area, consider placing a layer of landscape fabric between the subgrade and your base material. It won't substitute for proper grading, but it prevents fine soil from migrating up into your base layer and compromising it over time. For serious drainage situations, a perforated pipe drain at the edge of the excavation leading to a daylight outlet can save your patio from chronic moisture problems.
Common Mistakes That Ruin Patio Excavations
Most patio failures trace back to the excavation and base prep phase, not the surface material. These are the mistakes I see come up over and over again.
- Not digging deep enough: Skimping on depth means skimping on base thickness, and a thin base compacts poorly and shifts. Measure your depth in multiple spots, not just one corner.
- Skipping the slope: Flat looks fine until the first rainstorm. Water pooling on a patio, or worse, running toward the house, is almost always a grade issue baked in during excavation. Set your slope before the base goes in.
- Compacting too thick a layer at once: A plate compactor cannot adequately compact 6 or 8 inches of material in one pass. The top looks firm but the bottom remains loose, and that's where settlement starts. Always work in 2 to 3 inch lifts.
- Leaving soft spots: Organic material, old tree roots, and saturated soil pockets will settle under load no matter how well you compact around them. Remove them and replace with compacted crushed stone.
- Ordering too little base material: Crushed stone compacts, meaning a 4-inch finished base started as closer to 5 inches of loose material. Order enough to account for this.
- Not calling 811 before digging: Underground utilities are present in most residential yards. Always call, always wait for marking.
- Underestimating soil and concrete disposal: Hauling excavated material is often the most expensive and time-consuming part of the whole project. Plan your disposal method and capacity before you start digging.
- Using rounded gravel instead of angular crushed stone: Pea gravel and smooth river rock don't lock together under compaction. They shift. Use angular crusher run or crushed stone for your base.
One thing worth noting: if the whole excavation and base prep process feels like too much for your site, there are situations where minimal or no-dig patio approaches make sense, particularly on already-flat, stable ground. Also, if you plan to build a patio without the required permits, check local rules first because enforcement can lead to costly delays or removal.
For those situations, you can explore how to build a patio without cement by using pavers on a properly prepared base. If you want how to make a patio without digging, look for no-dig or minimal-excavation methods designed for flat, stable ground. But for most permanent installations, especially with concrete pavers or natural stone, there's no shortcut to proper excavation depth and compacted base preparation. The digging is what makes the finished patio last.
FAQ
How do I match my patio height to existing steps, sidewalks, or a doorway?
Plan for the finished surface to end up about 1 inch above any low-lying edges like planting beds, garden walls, or door thresholds. If you build flush to an existing feature, sediment and minor settling can cause the patio to trap water against that feature.
Do I need to check the slope more than once during excavation?
Yes. You should not rely on a single “eyeball” check. After you compact the base, measure slope in at least two directions with stakes and a straightedge, because patios often settle unevenly when subgrade varies across the footprint.
What should I do if I excavate deeper than my target depth?
If you accidentally dig deeper than planned, you must replace the lost depth using properly compacted base lifts. Do not “make up” depth by only adding bedding sand, bedding sand is not structural and will lead to paver movement and uneven settling.
Can I reuse the disturbed soil at the bottom of the excavation?
In most cases, yes you can add crushed stone back, but you should avoid compacting over muddy, disturbed subgrade. If the bottom has been churned up, remove the soft layer to firm soil, then rebuild your base in lifts and recheck grade.
Is it okay to water clay before digging or compacting?
Wetting is mainly a soil work-aid. If you saturate clay to the point that it smears, it often compacts into a dense layer that can trap water below your base. Let the area dry back to workable consistency before you compact base material.
How do I handle drainage if my yard drains toward the excavation?
If you need a drain system, keep the bedding sand and paver layer consistent, and route drainage so it lowers water movement away from the house. A simple perforated pipe at the edge is often fine, but it must daylight (or connect to an appropriate outlet) and be placed below the base level to be effective.
Do I need a different excavation depth or base thickness for heavy traffic areas?
For hard use areas (fire pit seating, wheelchair access, heavy grills), prioritize a thicker or well-performing base and more compaction passes rather than thicker bedding sand. Bedding sand is meant to help set pavers, not carry loads.
What are the signs my subgrade is too unstable to proceed?
Stop and re-evaluate when you see pumping, voids, or roots with significant soft spots. You can’t “fix” those by adding more base on top, you need to remove the problem material and restore stable subgrade before rebuilding the base.
What’s wrong with using pea gravel instead of crusher run for the base?
Don’t use rounded pea gravel as the main base. Rounded stone compacts more poorly and can shift under load. Stick to angular crusher run or crushed stone for the compacted layer, then use coarse bedding sand only under the pavers.
Can I reuse the existing base from an old patio?
If your base is already correctly graded, you may be able to reuse it after removing the top contamination and verifying thickness and compaction. Test in a few spots, if the surface moves under foot pressure or the grade has changed, plan to re-excavate that area and rebuild.
If my patio starts sinking, what’s the correct way to repair it?
If pavers already show dips or rocking, the issue is usually the base or bedding layer not being uniformly supported, not the top surface itself. Remove enough pavers to reach the failing area, correct base density and grade, then reinstall with fresh bedding sand where needed.
What’s an efficient way to plan equipment and hauling routes before I start digging?
For safety and accuracy, don’t dig until you have your utility marks and also your intended access route for hauling. When you rent equipment, plan the direction of excavation so you are not repeatedly driving over soft, freshly exposed soil.
Next Article
How to Build a Patio Without Cement: DIY Steps
Step-by-step guide to build a no-cement patio using pavers or bricks over gravel with drainage, compaction, and leveling