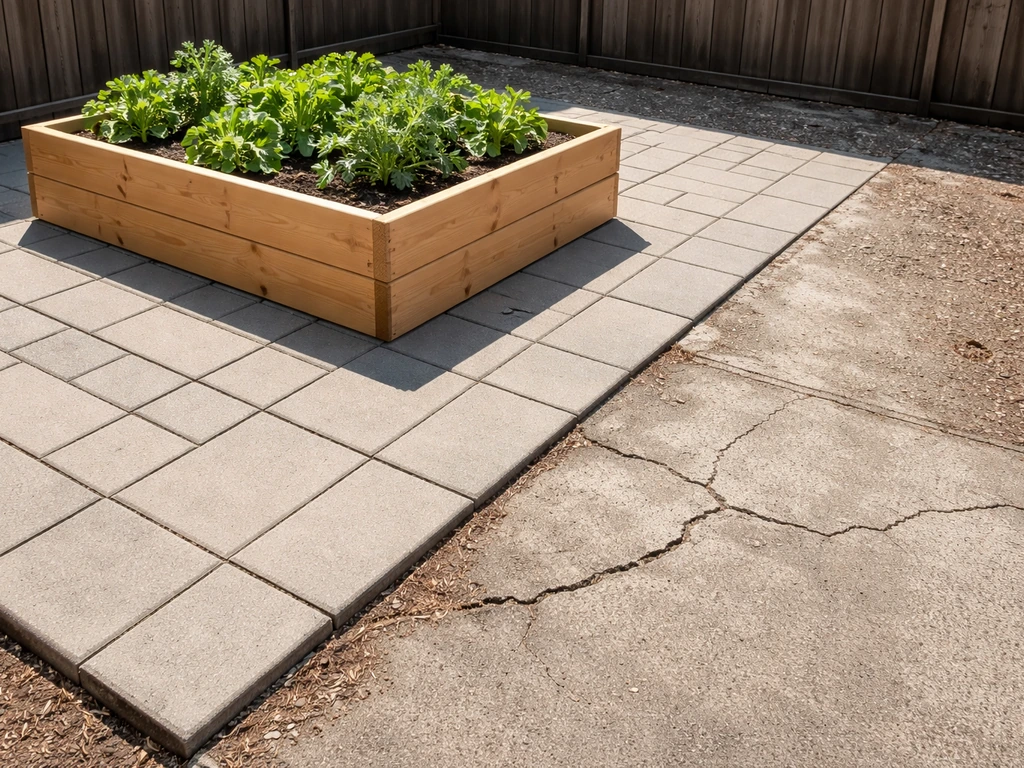
Yes, you can absolutely put a raised bed on a patio, and plenty of people do it successfully on concrete, pavers, and brick. The catch is that hardscape surfaces introduce a few real problems that ground placement doesn't: trapped moisture that damages both the patio and the bed, uneven surfaces that cause soil to shift and drain unevenly, and load weight that adds up faster than you'd think. Get those three things right, and a patio raised bed is one of the most rewarding projects you can tackle without breaking up a single square foot of your hardscape.
Can You Put a Raised Bed on a Patio? Setup Tips

Nolan Lennox
5 Jun 2026
When a raised bed on a patio makes sense (and when it doesn't)
A patio raised bed is a great idea if you have no ground to speak of, your yard soil is poor or compacted, you want to grow vegetables close to the kitchen, or you're working on a rental property where digging isn't an option. Patio placement also naturally improves drainage since you're building up rather than dealing with ground-level waterlogging. If your patio gets at least eight hours of sun a day and has reasonably good drainage (meaning rain doesn't puddle for hours), you're already in good shape.
Where it gets tricky: if your patio is already in poor condition, cracked, or has pavers that are settling unevenly, adding a heavy, water-laden bed on top accelerates the damage. If the surface has zero slope and water has nowhere to go, you'll create a standing water problem under the bed that stains or heaves the hardscape over time. And if you're in a freeze-thaw climate, trapped moisture under a bed that sits flush to the surface is a real problem because water expands when it freezes and can crack pavers or lift sections. In those cases, the fix is straightforward (more on that below), but you need to plan for it before you set the bed down.
Check your patio surface before you place anything
Before you buy materials or move a single bag of soil, spend ten minutes assessing the surface. Grab a 4-foot level and check the area in multiple directions. Pavers are typically installed with a slight pitch, around 1/2 inch per 4 feet, to direct runoff away from the house. That's fine and expected. What you're looking for is dramatic unevenness, rocking pavers, or sections that have settled significantly. An uneven base causes soil to shift inside the bed, creates inconsistent planting depth across the bed, and makes drainage pool in one corner. Suncast (a major raised bed manufacturer) flat-out tells buyers in their installation manuals not to place beds on concrete or decks for exactly this reason, but with the right prep work you can overcome what they're warning about.
For concrete slabs, check for cracks and confirm water drains off rather than pools. A smooth, sealed concrete surface traps more moisture under a bed than a textured or slightly porous one. For pavers and brick, press down on individual units to see if any rock or flex. Unstable pavers under a loaded bed will continue to settle and may crack. If you find a few loose pavers, re-seat them before you do anything else. It's much easier than pulling the bed back out later.
Load is the other thing people underestimate. A 4x8 foot raised bed filled to 12 inches with soil weighs roughly 800 to 1,000 pounds depending on the soil mix. Most residential concrete slabs and well-installed paver patios can handle that without issue, but if you're working on a deck or an older, poorly-supported patio, check first. If in doubt, go shallower (8 inches instead of 12) and use a lighter growing mix with a higher perlite and compost ratio.
Three ways to set the bed up on your patio
There's no single right approach here. It depends on how level your surface is, what material your patio is made of, and how permanent you want the setup to be.
Direct placement (minimal prep, works on flat surfaces)
If your patio is close to level and drains well, you can set the bed directly on the surface with a moisture barrier between them. A layer of non-woven landscape fabric or a purpose-cut piece of rubber mat under the bed protects the patio from constant contact with wet soil and wood. This is the simplest approach and works well for composite or metal beds that won't rot from contact with a surface. The downside is that if the bed shifts over time (and they do, especially when you're adding and removing soil seasonally), moisture can creep underneath and cause staining or surface damage.
Leveling with shims or a base board
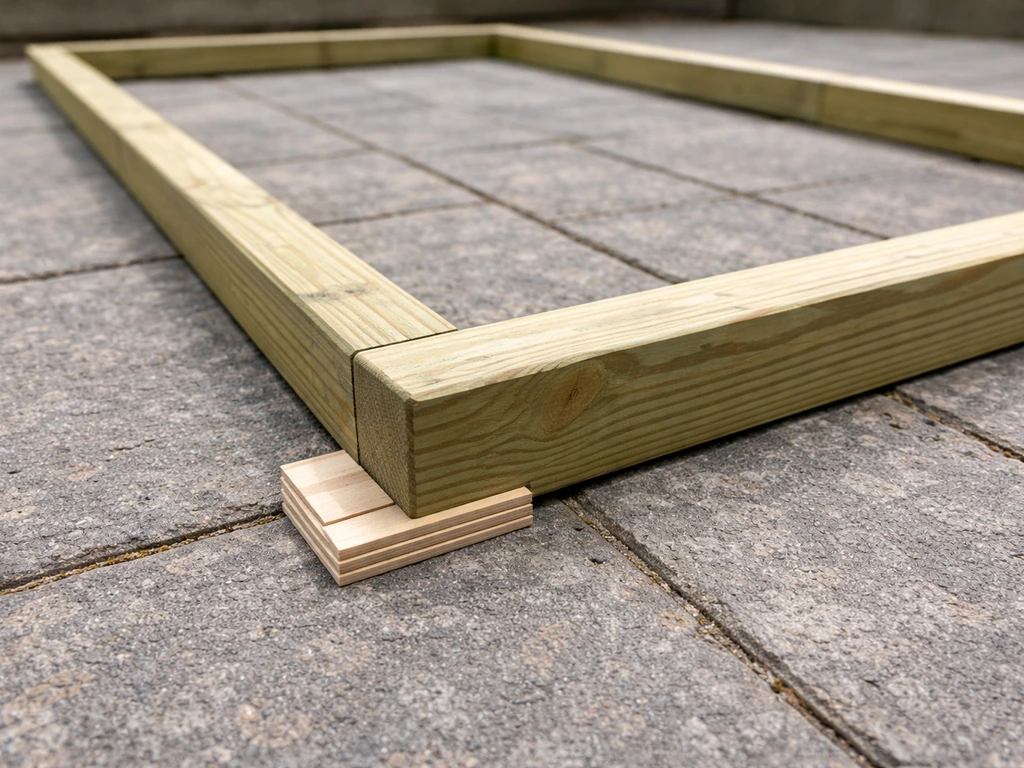
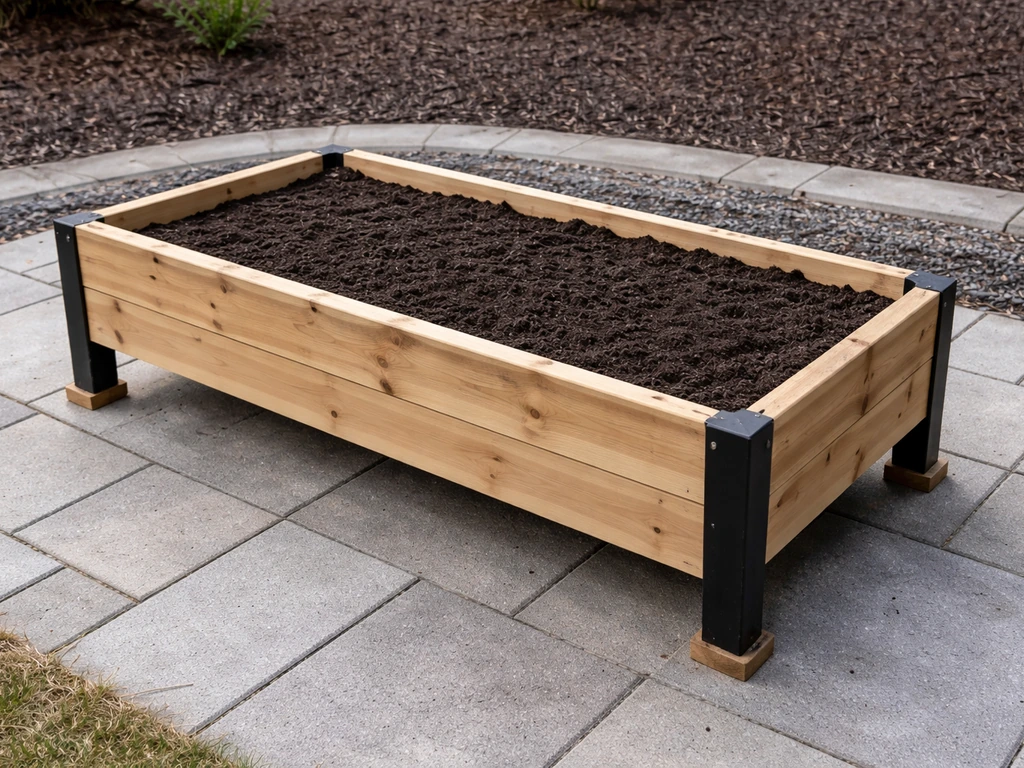
If the surface has a modest slope, set the bed on a simple pressure-treated 2x4 frame that you've shimmed level before placing the bed on top. This gets the bed perfectly level in all directions, creates a small air gap that lets moisture escape, and protects both the bed bottom and the patio surface. Use composite shims or pressure-treated scraps rather than regular wood, which will rot from ground contact. Check the level in multiple directions before you fill the bed with soil, because fixing it after the fact means emptying the whole thing.
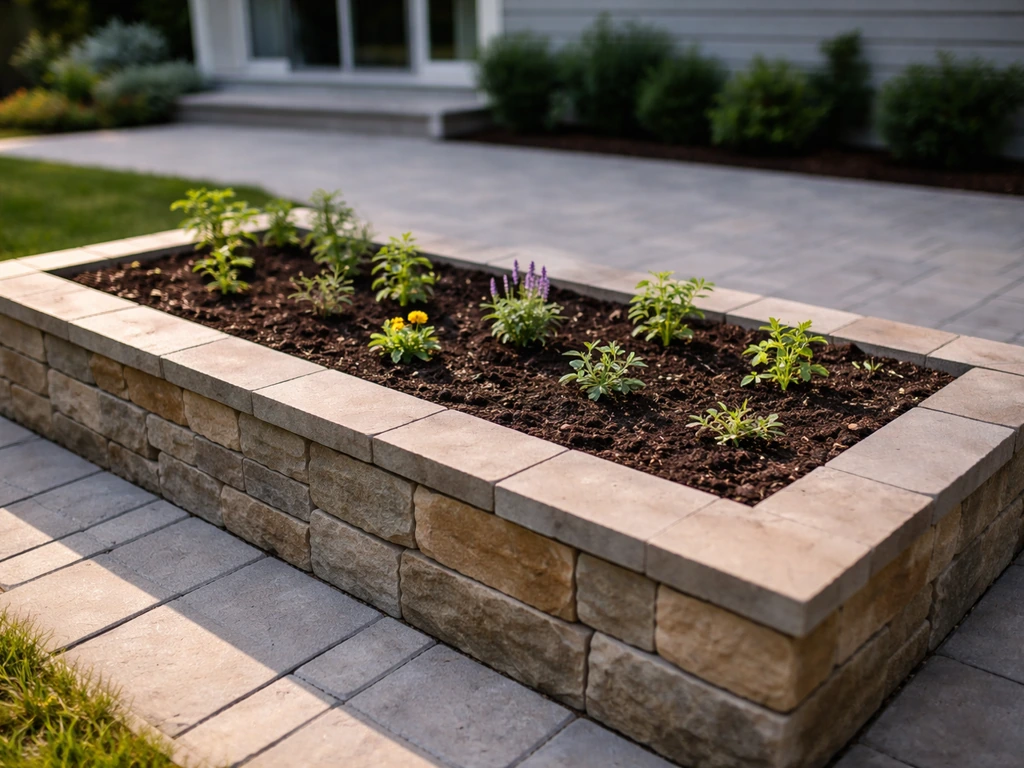
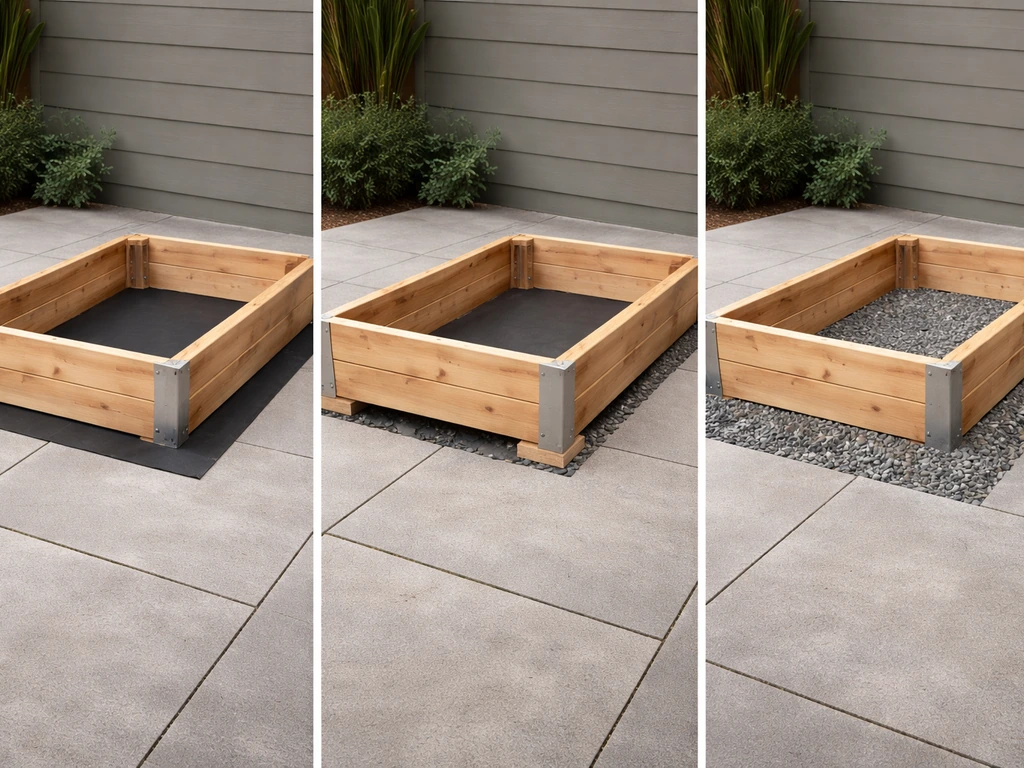
Gravel base with a barrier layer
For the most durable, drainage-friendly setup, lay down a 2 to 3 inch layer of gravel (pea gravel or coarse drainage gravel) inside a perimeter frame that matches the footprint of your bed. Top the gravel with non-woven geotextile fabric before setting the bed, which filters soil particles while letting water drain freely. This approach handles any residual moisture, keeps the bed from sitting in standing water after heavy rain, and stabilizes the base. It's worth the extra hour of work if you're building something you want to last five-plus years. One important note: use non-woven geotextile, not woven. Woven fabric can trap water and create hydrostatic pressure under the bed, which is the exact problem you're trying to prevent.
Drainage and water management: the make-or-break factor
Water management is the single biggest challenge with patio raised beds, and getting it right is what separates a thriving bed from a rotting, staining mess. The core principle is simple: water needs to be able to move through the soil, out of the bed, and away from the patio surface without pooling.
Every raised bed you place on a patio needs drainage holes at the bottom. This sounds obvious, but some decorative beds and kits are designed as closed containers. If the bed has a solid bottom, drill 1/2-inch holes every 6 to 8 inches across the base before filling it with soil. Without those holes, roots will eventually sit in standing water after any significant rain, and soil moisture problems follow quickly. Purdue University Extension puts it plainly: when excess water can't escape, soil moisture problems occur.
Inside the bed, a drainage layer helps. An inch or two of coarse gravel or perlite at the very bottom before you add growing mix gives water somewhere to collect briefly before it drains through the holes. For the patio surface itself, check that water exiting the bed has somewhere to go. If the bed is positioned so drainage water runs toward the house foundation, reposition it or build a small channel using the patio's natural slope. HGTV's drainage guidance is worth applying here: route excess water away from structures and don't let any area stay wet for extended periods.
One practical trick that works well: elevate the bed slightly so drainage water escapes freely. Composite or rubber feet, short sections of pressure-treated 4x4 cut to 2-inch blocks, or a simple slatted base frame all create the air gap you need. This also prevents the base of the bed from sitting in its own pooled water, which is the number-one cause of premature rot in wood raised beds on patios. Once you have the base and drainage plan figured out, you can use the same principles for a full how to build a floating patio style setup.
Soil depth, bed size, and what you can grow
The depth of your bed determines what you can grow, and this is one area where it pays to be intentional rather than just filling whatever container you happen to have. Here's a practical breakdown:
| Soil Depth | Best Plants | Notes |
|---|---|---|
| 6–8 inches | Lettuce, spinach, herbs, radishes, shallow-rooted greens | Minimum viable depth; avoid on patios with load concerns |
| 10–12 inches | Peas, carrots (short varieties), eggplant, peppers, beans | Works for most vegetables; UCANR cites 12–14 inches for moderate-depth crops |
| 12–18 inches | Tomatoes, cucumbers, squash, deeper-rooted vegetables | Almanac recommends 12–18 inches for most vegetables; increases bed weight significantly |
| 18+ inches | Deep-rooted crops, perennial herbs, small fruit shrubs | Requires structural reinforcement per Illinois Extension if walls exceed 18–24 inches |
For most DIY patio beds, I'd aim for 10 to 12 inches. It covers the widest range of vegetables, keeps the weight manageable, and doesn't require structural reinforcement. Illinois Extension recommends reinforcement for beds taller than 18 to 24 inches, so stay below that threshold unless you're building a proper planter with substantial framing.
For bed layout on a patio, think about access. A 4-foot wide bed is the practical maximum so you can reach the center from either side. On a smaller patio, a 2x4 or 2x6 bed placed against a wall or railing maximizes growing area while leaving walking space. Plan for at least 18 inches of clearance on the sides you'll work from. Also keep sun exposure in mind: place the bed where it won't be shaded by the house or fence for most of the day.
Use a light, well-drained growing mix rather than standard garden soil or topsoil. Dense soil compacts quickly in a contained bed, drains poorly, and adds unnecessary weight. A blend of compost, perlite, and a quality potting mix works well. Oregon State University Extension emphasizes that raised bed growing media should be light and well-drained by design, which matters even more on a hardscape where you can't rely on the ground below to absorb excess water.
Choosing your bed material: wood, metal, or composite
For patio placement specifically, material choice matters more than it does for in-ground beds because the bed will be in constant contact with a moisture-rich environment and can't dry out from the bottom the way a ground-level bed does.
| Material | Lifespan on Patio | Cost | Best For | Watch Out For |
|---|---|---|---|---|
| Cedar (untreated) | 5–10 years | Moderate | Traditional look, lightweight | Needs airflow underneath; sits in contact with wet surface faster |
| Pressure-treated lumber | 20+ years | Low to moderate | Budget builds, longevity | Modern ACQ-treated wood is food-safe; always elevate off surface |
| Corrugated metal (galvanized/Corten) | 15–20+ years | Moderate to high | Modern look, very durable on hardscape | Can get very hot in direct sun; check for sharp edges on corners |
| Composite/recycled plastic | 10–20+ years | Moderate to high | Patios where rot is a concern | Heavier than wood; check for drainage holes in kit designs |
| Plastic/resin kits | 5–10 years | Low | Renters, temporary setups | Manufacturers like Suncast often recommend ground placement, not hardscape |
For a patio specifically, I'd lean toward pressure-treated lumber or corrugated metal with a wood frame. Pressure-treated extends lifespan beyond 20 years and handles the constant moisture exposure better than untreated cedar, which looks great but degrades faster when moisture can't escape from the bottom. If you go with wood, always elevate it. Corrugated metal sides with a wood base frame look sharp on a modern patio, hold up extremely well, and are easy to build yourself with basic tools. Composite is another solid option if you want zero maintenance, though you'll pay more upfront.
One caution on liners: some builders line the inside of wood beds with plastic to protect the wood from soil contact. On a patio, this can trap moisture against the wood rather than letting it breathe, which actually shortens the bed's life. If you use a liner, make sure it's perforated and doesn't wrap around the exterior base where it would seal moisture in.
How to actually install it: step-by-step
Here's the sequence I'd follow for a straightforward patio raised bed install. Once you've decided on a placement approach and materials, the next step is to follow a step-by-step process for how to make a patio bed that drains and levels properly. This covers a standard wood or metal framed bed on a concrete or paver surface. If you want a more full-scope, built-in transformation than a standard patio raised bed, see how to build a sunken patio as the adjacent option for a permanently integrated look.
- Measure your patio and mark the footprint of the bed with painter's tape. Confirm you have at least 18 inches of clearance on the sides you'll access from.
- Check level across the marked area with a 4-foot level in multiple directions. Note the high and low points.
- Inspect the patio surface for loose pavers, cracks, or obvious drainage problems. Fix loose pavers and re-check level.
- Build or assemble your bed frame. For wood builds, use pressure-treated 2x10 or 2x12 boards for 10–12 inch depth. Assemble corners with 3-inch deck screws and corner brackets for strength.
- Create a leveling base: cut pressure-treated 2x4 sections to place under the bed perimeter. Shim these level on the patio surface, checking in all directions before proceeding.
- Place a layer of non-woven landscape fabric on the patio surface inside the bed footprint (not woven geotextile). This separates the gravel layer from the patio.
- Optional but recommended: add 1 to 2 inches of coarse drainage gravel inside the perimeter for a drainage buffer layer.
- Set the bed frame on the leveled base. Confirm it's still level after placement.
- Drill drainage holes in the base board or bottom frame every 6–8 inches if not already present.
- Add 1 inch of coarse perlite or gravel directly inside the bed at the bottom as a drainage layer before adding growing mix.
- Fill with a light growing mix: a blend of compost, perlite, and potting mix. Fill to within 2 inches of the top.
- Water thoroughly and check that drainage is exiting the bed and moving away from the house foundation. Adjust direction if needed.
Troubleshooting checklist
- Bed is rocking or uneven: recheck shims under the base frame; add composite shims where needed; do this before adding soil
- Water pooling inside the bed after rain: confirm drainage holes aren't blocked; dig a finger 2 inches into the soil 30 minutes after rain to check if water has moved through
- Water pooling under the bed on the patio: elevate the bed higher off the surface; reroute drainage using the patio's natural slope
- Patio staining or discoloration under the bed: improve airflow by raising the bed; add a rubber or composite mat under the base to protect patio surface
- Soil washing out from the bottom: add a layer of non-woven landscape fabric inside the bed, directly above the drainage layer, to hold soil while letting water through
- Plants wilting despite regular watering: check drainage holes aren't completely blocked; overwatering in a poorly-draining patio bed looks identical to underwatering
- Bed shifting after filling: add corner stakes driven into gravel layer if possible; for smoother surfaces, add rubber non-slip feet at corners
- Wood rotting prematurely at the base: elevate the bed; switch to pressure-treated lumber or metal for the bottom boards; avoid sealing moisture in with solid liners
Before you start: your quick pre-project checklist
If you're ready to move forward today, run through these before you buy anything. It'll save you from a frustrating redo later.
- Measure the patio area and confirm the bed footprint leaves enough working clearance
- Check daily sun hours at that spot (you want at least 8 hours for vegetables)
- Level-check the surface with a 4-foot level and note any spots more than 1/2 inch off level
- Press on individual pavers or bricks to find any that need re-seating before you load the area
- Decide on bed depth based on what you're growing (10–12 inches covers most vegetables)
- Choose your material: pressure-treated lumber is the most cost-effective durable option for most DIYers
- Confirm your patio drains away from the foundation and plan where bed drainage water will go
- Source non-woven landscape fabric, drainage gravel or perlite, and composite shims or 2x4 base boards
If you're interested in going a step further, there are related approaches worth knowing about. Building a raised patio section from scratch, working with railway sleepers to create a structured raised planting area, or building a full patio-level planting bed are all natural extensions of this project. If you want a more permanent option than a patio raised bed, see how to build a full patio-level planting bed and keep the drainage logic consistent building a full patio-level planting bed. If you want a raised patio made with sleepers, you can use the same moisture and drainage principles, but with more permanent framing support raised patio section from scratch, working with railway sleepers to create a structured raised planting area. These involve more groundwork and permanent construction, but if you love what a patio raised bed does for your outdoor space, those projects take the idea even further.
FAQ
Can you put a raised bed on a patio if the bed kit has a solid bottom?
Usually, yes, as long as the container is properly vented and supported. Confirm the bed has drainage holes (or that you can drill them), then elevate the bed on feet or a slatted base frame so the bottom does not sit in pooled water.
What happens if my raised bed doesn’t have drainage holes?
If the bed has no holes, plants will eventually suffer because water cannot escape, leading to chronically wet soil. For most kits, drill 1/2-inch holes across the base before filling, and keep the bed elevated so runoff drains away from the patio surface.
Can you put a raised bed on a patio with pavers that are slightly uneven?
Yes, but only when you can keep the base stable and water from pooling. Use composite or rubber feet, a level frame, and (ideally) a gravel and geotextile drainage layer, then verify the patio is already in good condition with minimal rocking pavers.
How do I prevent frost heave under a patio raised bed?
In freeze-thaw areas, keep the underside from staying saturated. Elevation plus a drainage layer and non-woven geotextile help prevent water from getting trapped under the bed where it can expand and heave hardscape.
Is 6 inches deep enough for a patio raised bed?
For most crops, 10 to 12 inches is the sweet spot, with 8 inches working better for shallow-rooted plants. If you go shallower to reduce weight, compensate by using a lighter, well-draining growing mix rather than standard topsoil.
Should I worry about the weight of a patio raised bed on a deck or weak patio?
Yes, but plan your soil volume so you do not overload the space. A typical 4x8 bed can weigh close to 800 to 1,000 pounds when filled, so if you are on a deck or weak patio, reduce bed depth and use a lighter growing mix with more perlite.
Do I need a liner to protect the wood from the patio surface?
Often, you should avoid solid plastic liners on a patio bed because they can trap moisture against the wood. If you use any barrier, make sure it is perforated and does not seal around the exterior base, then keep the bed elevated for airflow.
Can I place a raised bed on a patio that slopes toward the house?
Yes, but only if you can re-create stable drainage. A patio bed should still be level, and you should ensure water exits the bed toward the slope or a small channel away from the house, not toward foundation areas.
How level does the patio need to be before installing the bed?
If it rocks or shifts, you will see uneven soil depth and inconsistent drainage, which can stress plants. Re-seat and re-level pavers, and confirm with a long level before adding a drainage system and soil.
Will a patio raised bed damage concrete or pavers over time?
Yes, because moisture can creep underneath and stain the surface. Use a moisture barrier between the bed bottom and patio (non-woven fabric or rubber mat) plus elevation, and consider a gravel and geotextile layer for best long-term control.
Next Article
How to Make a Patio Bed: Step-by-Step DIY Guide
Step-by-step guide to build a patio planting bed, from planning and drainage to soil mix, edging, and first planting car