A sunken patio is built below the surrounding grade, excavated down so the finished surface sits anywhere from a few inches to several feet lower than your yard. Done right, it creates a sheltered, intimate outdoor space that feels completely separate from the rest of the garden. Done wrong, it becomes a pond every time it rains. The difference between those two outcomes comes down to three things: solid drainage planning, proper compaction, and adequate edge retention. Get those right and the rest of the project is very manageable for a motivated DIYer. If you're looking specifically for the patio-bed version of this project, you can use the same site prep, drainage, and edging approach project is very manageable for a motivated DIYer.
How to Build a Sunken Patio: DIY Steps, Drainage, Base

Nolan Lennox
19 Jun 2026
What a sunken patio is (and when it actually makes sense)
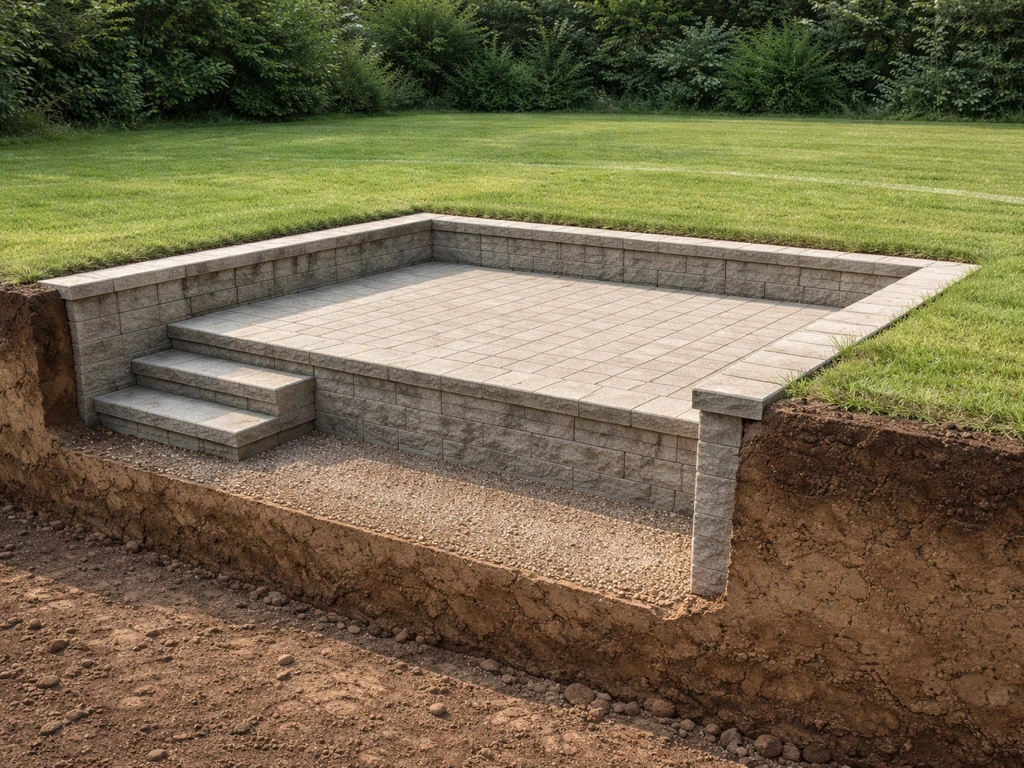
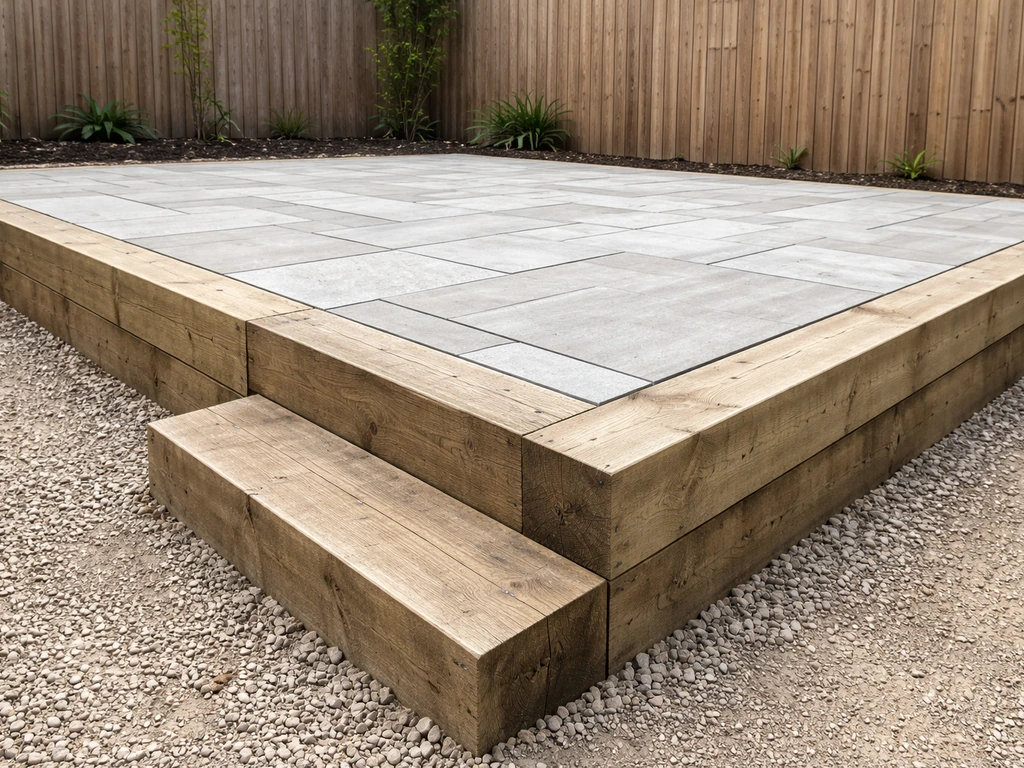
A sunken patio is essentially a recessed outdoor room. You excavate a defined area, retain the perimeter with walls, steps, or edging, and finish the floor with your chosen surface material. The walls that hold back the surrounding soil can be as simple as a single course of stacked stone or as substantial as a poured concrete retaining wall with footings. The visual effect is dramatic: you step down into the space, and the surrounding landscape frames you rather than the other way around.
It's a genuinely good idea when you have a sloped yard where one side is already lower, when you want wind protection without building a solid fence, or when you're trying to create separation between the patio and an active lawn. It's also useful on lots where you need to work with an existing grade change rather than fight it. It's a poor choice, though, if your yard already has drainage problems, if your water table is high, or if you're not prepared to build a proper sub-base and perimeter drainage system. Those are the scenarios where a sunken patio becomes a liability.
Compared to a raised patio, which sits above grade on a built-up platform or sleeper structure, a sunken patio requires more excavation upfront but less material to build the elevated structure. If you were instead planning a raised patio, you would focus on building a stable platform or sleeper structure above grade and managing water runoff away from the base. Each approach has tradeoffs around drainage, complexity, and cost. If you're weighing the two options for a sloped lot, it's worth looking at both before committing.
Planning and layout: sizing, grades, drainage, and the permit question
Start with your target size and work backward from there. If you want to adapt these fundamentals to a raised garden bed on a patio, start by matching the bed height to your available drainage and materials, then build a stable perimeter to hold the soil how to make a raised garden bed on patio. Most comfortable patio spaces start at around 10 x 12 feet for a small seating area, but 12 x 16 or larger is more practical once you add furniture. Sketch the outline on paper first, then mark it out on the ground with spray paint or string lines. Once you can see the footprint, measure the grade change around it.
The minimum drainage slope for a sunken patio surface is 1/8 inch per foot (roughly 1%), and the practical target is closer to 1/4 inch per foot (about 2%). That means a 12-foot-wide patio should drop at least 1.5 inches from the high side to the low side. You also need to decide where that water goes once it reaches the low edge, because unlike an above-grade patio where runoff just flows away, a sunken patio needs a designed outlet: a French drain, a channel drain at the perimeter, or a daylight point where the slope exits the retaining wall through a weep.
On permits: if your retaining walls are under 3 to 4 feet tall, you're often below the residential permit threshold in many jurisdictions, though that number varies. Fairfax County, VA, for example, requires a retaining wall permit for walls retaining more than 3 feet of earth. Other areas set that trigger at 4 feet. Some localities require a registered design professional if your wall exceeds those limits. Check with your local building department before breaking ground, especially if your drop is significant. You'll also want to confirm whether a guardrail is required: the IRC specifies that any open-sided walking surface more than 30 inches above the adjacent grade requires a guard, and while a sunken patio is technically going down rather than up, the surrounding yard edge can trigger that rule if someone could fall from grade level into the patio. Guardrail openings must not allow passage of a 4-inch sphere under IRC requirements.
Site prep: excavation, base materials, and compaction
This is where the project really starts, and it's also where most DIY mistakes happen. You can use the excavation and base steps below as a practical blueprint for how to build a floating patio project. The total excavation depth is your patio surface thickness plus your base layers plus your bedding, so plan accordingly. For a paver system, that typically means 4 to 6 inches of compacted gravel base plus 1 inch of bedding sand plus the paver thickness (usually 2 to 2.5 inches for standard pavers). Add those up and you're excavating 8 to 10 inches below your intended finished surface, plus however far you're dropping below the surrounding grade. For a patio that sits 12 inches below the yard, you could easily be digging 20 inches or more in spots.
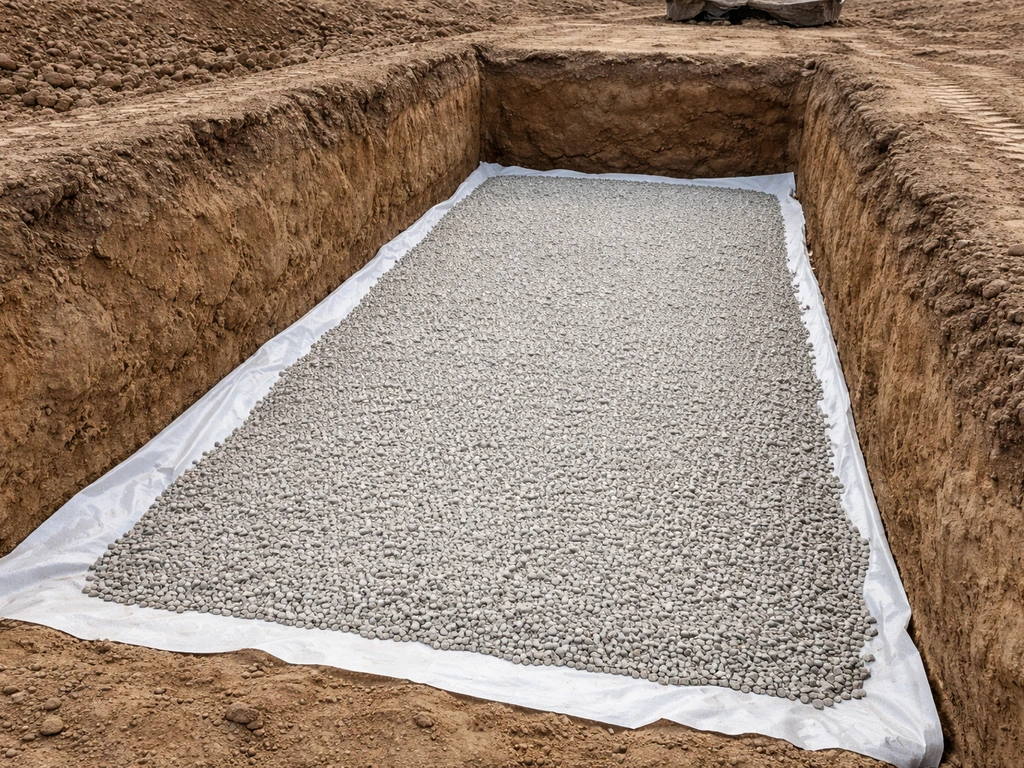
Remove all organic material from the excavation. Topsoil compresses and decomposes, and any left in the base will eventually cause settling and cracking. Once you're down to native subsoil, evaluate what you have. Clay is problematic because it holds water and shifts seasonally. If you hit heavy clay, add 2 extra inches of gravel base minimum, and seriously consider a geotextile fabric layer between the native soil and your base material to prevent migration. Sandy or gravelly native soil is much more cooperative.
For base material, use crushed angular gravel (often called crusher run or road base), not rounded river rock. Angular stone locks together when compacted; round stone doesn't. Add it in 3-inch lifts and compact each lift with a plate compactor before adding the next. ASTM D698 is a lab compaction test standard used to determine compaction characteristics, which is the baseline for field compaction targets expressed relative to maximum dry density compact each lift with a plate compactor before adding the next.. Renting a plate compactor for the weekend is one of the best investments you'll make on this project. Skipping proper compaction is the number-one reason DIY patios heave, crack, and shift within a couple of years.
Foundation and edging: keeping the walls where they belong
The perimeter of a sunken patio is under constant lateral pressure from the surrounding soil, especially after rain. Your edge retention system has to handle that load or the walls will lean and the patio surface will shift with them. The approach you choose depends on how deep you're going.
For shallow drops of 6 to 12 inches, a single-course or double-course retaining wall made from concrete segmental retaining blocks, natural stone, or even a treated timber frame can work. These don't typically require formal footings, but burying the base course at least 6 inches below finished patio grade gives you stability and frost protection in cold climates. For drops of 1 to 3 feet, you need a more engineered approach: multiple wall courses with proper batter (backward lean into the slope), geogrid reinforcement woven into the backfill, and a footing if you're using mortared masonry or poured concrete. Drops greater than 3 to 4 feet generally require a structural retaining wall designed by an engineer, and most municipalities will require a permit and inspections at those heights.
Even for simple dry-stack or block walls, set your base course on undisturbed or well-compacted soil, not on the loose backfill you just excavated. A common mistake is to build the wall first, then fill behind it without accounting for how that loose backfill will compress and pull the wall inward. Compact your backfill in layers the same way you compact your base.
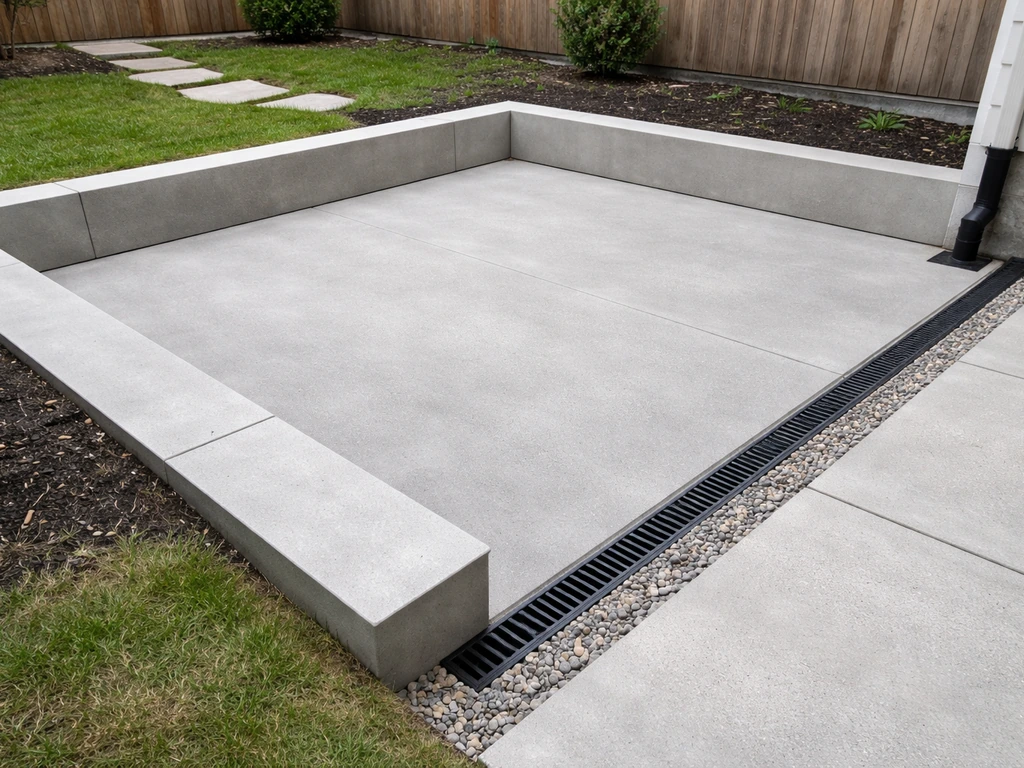
Water management: the part you cannot afford to skip
I'll say it plainly: poor drainage will destroy a sunken patio faster than anything else. Water that pools on the surface causes efflorescence (white salt deposits that appear when moisture carries dissolved salts to the surface and evaporates), freeze-thaw damage, and surface material failure. Water that infiltrates the base causes settling and heaving. Water that saturates the soil behind your walls causes wall failure. All three of these are common. None of them are acceptable if you plan correctly.
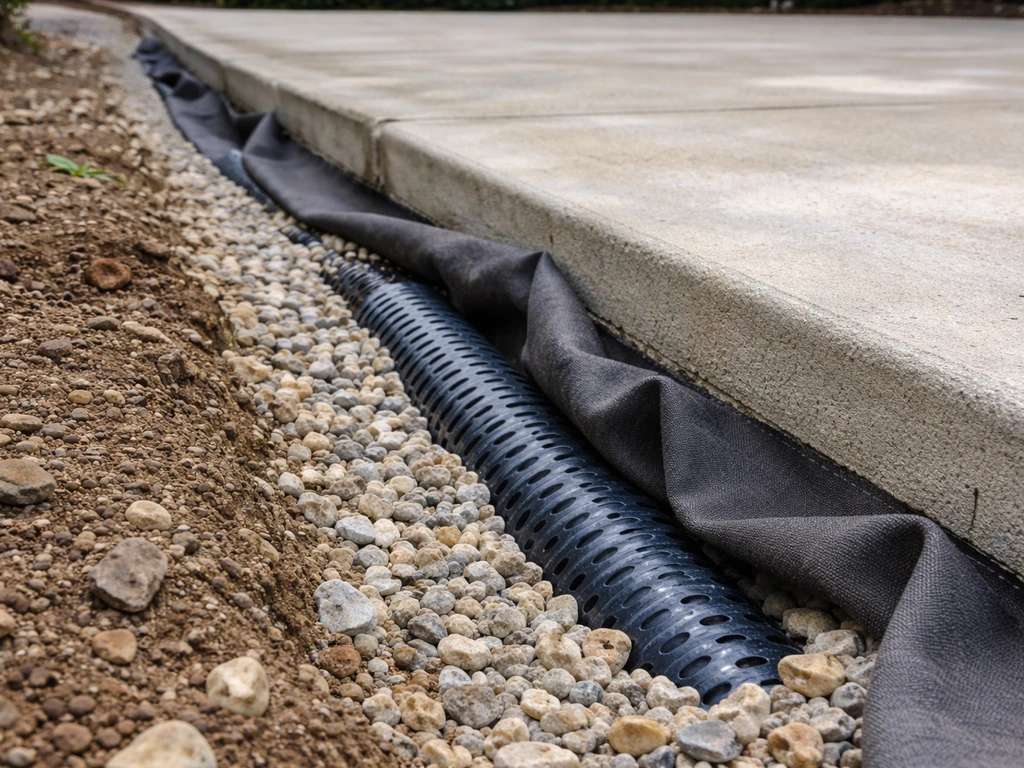
Start with surface slope. Your finished patio surface should pitch a minimum of 1:80 (about 1.25%) toward your drainage outlet, and 1 to 2% is a more comfortable target. That means picking a low point before you start construction and making sure your finished grade consistently falls toward it. The outlet itself should be a channel drain, a pop-up emitter connected to a French drain, or a weep hole through the base of the retaining wall that exits to daylight on a slope. Build the outlet before you build the patio, not after.
Under the surface, install perforated drain pipe in a gravel envelope around the inside perimeter of the retaining walls. This sub-base drainage layer intercepts water before it builds up as hydrostatic pressure behind your walls. Wrap the gravel envelope in geotextile fabric to keep soil from migrating into the pipe over time. Slope the pipe toward your outlet at a minimum 1% fall. In high-rainfall areas or anywhere with clay-heavy soil, this step is non-negotiable.
If you're building in a climate with hard freezes, pay attention to the frost line. Water trapped in an inadequately drained base will freeze, expand, and push your patio surface up. A properly drained, well-compacted base that doesn't hold water is your best frost protection, and it costs nothing extra beyond doing the work right the first time.
Choosing your surface material
The material you choose affects both the build process and the long-term maintenance picture. Here's how the main options stack up for a sunken patio specifically, where moisture exposure and drainage compatibility are extra important. If you plan to add a raised bed on top of or beside the patio, you’ll want to match the bed’s drainage and soil depth to the patio’s base and slope can you put a raised bed on a patio.
| Material | Best For | Moisture Risk | DIY Difficulty | Approx. Installed Cost (2026) |
|---|---|---|---|---|
| Concrete pavers | Most sunken patio builds, especially DIY | Low if drainage is correct | Moderate | $8–$25/sq ft |
| Brick | Traditional look, cold climates | Low to moderate (freeze-thaw matters) | Moderate | $10–$20/sq ft |
| Poured concrete | Low-maintenance, seamless finish | Low (if sloped and sealed) | High (forming, pour) | $6–$15/sq ft |
| Natural stone | Premium aesthetic, durable | Low to moderate | High (irregular sizing) | $15–$30/sq ft |
| Porcelain tile | Modern look, very low maintenance | Moderate (must seal grout) | High (cutting, leveling) | $12–$25/sq ft |
| Composite decking | Not recommended for sunken/in-grade use | High (ventilation issues) | Moderate | $15–$30/sq ft |
| Wood/pressure-treated | Occasional use, with proper drainage | High (rot risk below grade) | Moderate | $8–$18/sq ft |
Concrete pavers are the go-to choice for DIY sunken patios for good reason. They're forgiving during installation (individual units can be lifted and reset if drainage or leveling issues appear later), they handle freeze-thaw cycles well when installed on a proper base, and they don't require forming or mixing concrete. Brick is a close second with similar installation logic. Poured concrete works great if you're comfortable with forming and have a helper for the pour, but it's harder to fix if drainage proves to be an issue later. Natural stone and porcelain tile are beautiful but less forgiving of any base movement. Composite decking and wood are generally not recommended for below-grade sunken applications because the ventilation under the boards is compromised, which accelerates rot and warping.
Step-by-step construction sequence
- Mark the patio footprint with spray paint or string lines and confirm dimensions. Verify the planned low point for drainage before digging anything.
- Call 811 (in the US) to have underground utilities located. Do this at least 3 business days before you plan to dig.
- Excavate to the required depth, accounting for base layers plus surface material thickness plus your intended drop below grade. Remove all organic topsoil.
- Install perimeter drainage: dig a trench inside the base of your future retaining walls, lay perforated pipe in gravel wrapped in filter fabric, and run it to your outlet point.
- Spread and compact your gravel base in 3-inch lifts, checking slope as you go. Use a long level or a laser level to confirm consistent pitch toward the outlet.
- Build your retaining walls from the base course up, burying the first course below finished patio grade. Compact backfill behind each course before adding the next.
- Add your 1-inch bedding sand layer (for pavers or brick) or form and pour your concrete slab. For pavers, screed the sand to your finished slope.
- Lay your surface material working from the interior outward toward the walls. For pavers, use a rubber mallet and spacers. Cut edge pieces as needed.
- Install edge restraints where the surface material meets the retaining wall base. This prevents lateral creep of the surface layer.
- Compact the finished paver surface with the plate compactor (run a piece of carpet under it to protect the paver faces). Sweep polymeric sand into joints and compact again.
- Test drainage by running a hose at the high point of the patio and watching where water moves. It should flow steadily toward the outlet, not pool anywhere.
Common DIY mistakes to avoid
- Skipping the perimeter drain and relying on surface slope alone. Surface slope handles normal rain, but a drain handles the heavy events that matter most.
- Using rounded gravel or pea gravel for the base. It won't compact properly and will shift under load.
- Compacting base material in one thick lift instead of multiple 3-inch lifts. Deep lifts don't compact evenly and leave soft spots.
- Building the retaining wall on loose, uncompacted soil. Always set the first course on undisturbed or thoroughly compacted native material.
- Not accounting for freeze-thaw in the footing depth. In cold climates, wall footings should go below the local frost line.
- Forgetting to slope the bedding sand layer. Screed it to the same pitch as your intended finished surface, not flat.
- Ignoring permit and guardrail requirements. A wall over 3 to 4 feet or a drop that creates a fall hazard can require permits, inspections, and safety railings.
- Installing wood or composite decking in a below-grade sunken area without adequate airflow. Trapped moisture will cause rapid deterioration.
Realistic costs, timelines, and when to call a pro
For a mid-size sunken patio of around 200 square feet with a modest 12-inch drop and simple block retaining walls, budget roughly $1,500 to $4,000 in materials if you're doing the work yourself. That range covers gravel base, drainage pipe, retaining block, pavers, bedding sand, and polymeric joint sand. Tool rental (plate compactor, laser level, wet saw for cuts) adds another $150 to $400 depending on your weekend schedule. Installed by a professional, the same patio typically runs $8 to $25 per square foot or more depending on your region, material choices, and wall complexity, putting professional quotes in the $4,000 to $10,000+ range for a project at this scale. For reference, calculators like CalcSummit estimate installed paver patio costs around $12, $30 per square foot (with regional sourcing such as Angi, HomeWyse, and RSMeans-style data aggregation) $8 to $25 per square foot.
On timeline, a 200-square-foot sunken patio with simple block walls is realistically a 3 to 5 weekend project for one or two people who are working methodically. The excavation and base work take the most time. If you're renting a mini excavator (often worth it for anything deeper than 12 inches), the dig goes much faster but requires scheduling, delivery, and a learning curve.
Here's when you should hire help or at minimum bring in a structural engineer for a consultation: if your drop exceeds 4 feet, if you have subsurface water issues (high water table, seasonal seeping), if your soil is expansive clay and you're in a freeze-thaw climate, or if your retaining walls will exceed the local permit-free height threshold. Those conditions require engineering that goes beyond what a standard DIY approach can reliably handle. There's no shame in bringing a pro in for the structural wall design and doing the surface work yourself. That hybrid approach can save significant money while keeping the tricky structural decisions in expert hands.
A well-built sunken patio adds genuine value to your yard and holds up for decades. A poorly drained one becomes a recurring problem you'll be regrading, releveling, and patching every few years. The time you spend on planning, drainage, and compaction at the start is the most important time you'll spend on the whole project. If you prefer a raised patio, you can adapt the same layout and base principles, then plan proper sleeper spacing and retaining height raised patio with sleepers.
FAQ
How deep can I make a sunken patio before it stops being a DIY-friendly project?
A practical DIY cutoff is usually the point where retaining walls exceed common permit-free heights or where the drop is more than about 4 feet. Even if permits are not required, that depth typically means footing design, more complex reinforcement, and higher risk if drainage is off by even a small amount.
Where should the low outlet for a sunken patio discharge, and what if I do not have a convenient spot to daylight?
Ideally, the outlet should daylight at a downhill point that is far enough from the retaining wall so discharged water does not re-enter the system. If there is no safe slope to daylight, plan an alternative collection route, such as connecting to an existing storm drain or routing to a designated dry well area, and keep the discharge away from foundation walls.
Can I rely on surface grading alone without installing a perimeter drain pipe or French drain?
In most cases, no. Surface slope helps water leave the patio, but without a sub-base perimeter drain, water that infiltrates can build hydrostatic pressure behind the walls and under the base. The French drain or equivalent perimeter drainage is what controls the water beneath the pavers, not just on top.
What should I do if my patio area has heavy clay or springy soil?
If you find expansive or water-holding clay, increase base thickness beyond the basic plan, keep geotextile separation between native soil and base, and ensure the perimeter drainage pipe is in a gravel envelope that can actually carry water away. Also consider reducing the overall depth drop if you cannot lower the water table with drainage.
How can I tell if my compaction is good enough before I lay bedding sand and pavers?
Stop and validate each layer before moving on. Base should be placed in thin lifts, compacted until it is firm and does not push under foot pressure, and ideally tested with a simple density method or at least consistent compactor pass counts. If you see rutting or pumping when you compact, you need to adjust layer thickness or moisture content.
Do I need geotextile fabric under the gravel base, and where exactly should it go?
Geotextile is most valuable between problematic native soil and the base to prevent migration, especially in clay or fine soils. Use it under and around the gravel drainage envelope, not just as a thin strip. Avoid trapping water against the surface by keeping the drainage path connected to the outlet.
What is the correct way to slope the patio when the yard grade is irregular?
Pick the overall low point first, then shape the excavation and finished grade to create consistent fall across the entire footprint. Use a laser level (or line level system) to confirm that the highest points still drain toward the outlet, and do not assume the slope will “average out” in the field.
How do I prevent efflorescence and prevent it from coming back?
Efflorescence typically comes from moisture movement through the paver joints or base, followed by evaporation. The fix is not only cleaning, it is ensuring the sub-base is drained, the outlet is built first, and joint sand is appropriate. After correcting drainage, let the patio fully dry before addressing surface haze or re-sanding.
What polymeric joint sand should I use, and do I need to seal the pavers?
Use polymeric sand designed for exterior paver joints and match the grain size to your joint width. Sealing is optional and sometimes counterproductive in below-grade areas because it can reduce joint permeability. If you choose to seal, do it only after the patio has fully cured and verify the manufacturer allows sealing over polymeric joints.
How do I handle steps and transitions so water does not run into the patio from above?
Treat transitions like part of the drainage system, not a separate finish detail. Build step edges and landings so runoff from the yard goes around or is captured by the drainage outlet path. Also confirm that any landing just above the retaining wall is pitched away from the wall face.
Do I need guardrails for a sunken patio, and when does that apply?
Guardrail requirements depend on how high the adjacent walking surface is above the patio area edge and local code interpretations. If the patio edge forms a drop-off from normal grade to the recessed surface, plan for guardrails or other barrier solutions to avoid falling hazards, especially if family access includes children.
What are common signs my drainage design is failing before major damage occurs?
Watch for recurring wet spots in the base area, persistently damp soil behind the walls, paver joint staining that returns after cleaning, or visible settlement lines that widen after rain. Early settlement often points to blocked outlets, insufficient fall to the outlet, or inadequate compaction of the base under specific zones.
Can I build a sunken patio next to a raised bed, and how do I prevent water conflicts between the two?
Yes, but align the bed and patio so the bed does not become a water source that overwhelms patio drainage. Ensure the raised bed has its own drainage strategy, maintain separation from the patio sub-base, and keep the bed soil depth and irrigation practices consistent with what the patio drainage can handle.
Next Article
How to Build a Raised Patio With Sleepers Step by Step
Step-by-step DIY guide to build a raised patio with sleepers, covering base prep, leveling, drainage, and finishing.