You can build a flat rock patio yourself in a weekend or two. The key steps are: mark and excavate your site to the right depth, compact a gravel base with a proper drainage slope (1/4 inch per foot away from the house), screed a 1-inch bedding sand layer, set your flat stones with consistent spacing, lock in the edges, and fill the joints. Do it right and you get a surface that stays level for years without rocking, sinking, or pooling water.
How to Build a Flat Rock Patio Step by Step DIY Guide

Nolan Lennox
12 Jun 2026
Planning and measuring your patio site
Before you touch a shovel, spend 20 minutes walking your site. Look for low spots where water already collects after rain, check how the ground slopes relative to your house, and note any tree roots, downspouts, or utility lines in the area. Call 811 to get underground lines marked before you dig. These details shape every decision after this.
For size, a comfortable dining patio starts around 12x12 feet. A modest seating area works at 10x10. Measure and mark your perimeter with stakes and mason's line, then add about 6 inches on each side to give yourself wiggle room during installation. Once you have those lines set, measure the diagonal corners to check for square: if both diagonals match, you're good.
Calculate your excavation depth before you order anything. Add up: your flat rock thickness (typically 1.5 to 2.5 inches for most natural flagstone), plus 1 inch of bedding sand, plus at least 6 inches of compacted gravel base. That puts most patios at 9 to 10 inches of total excavation below your finished surface grade. Write that number down and keep it handy.
Choosing flat-rock materials and design style
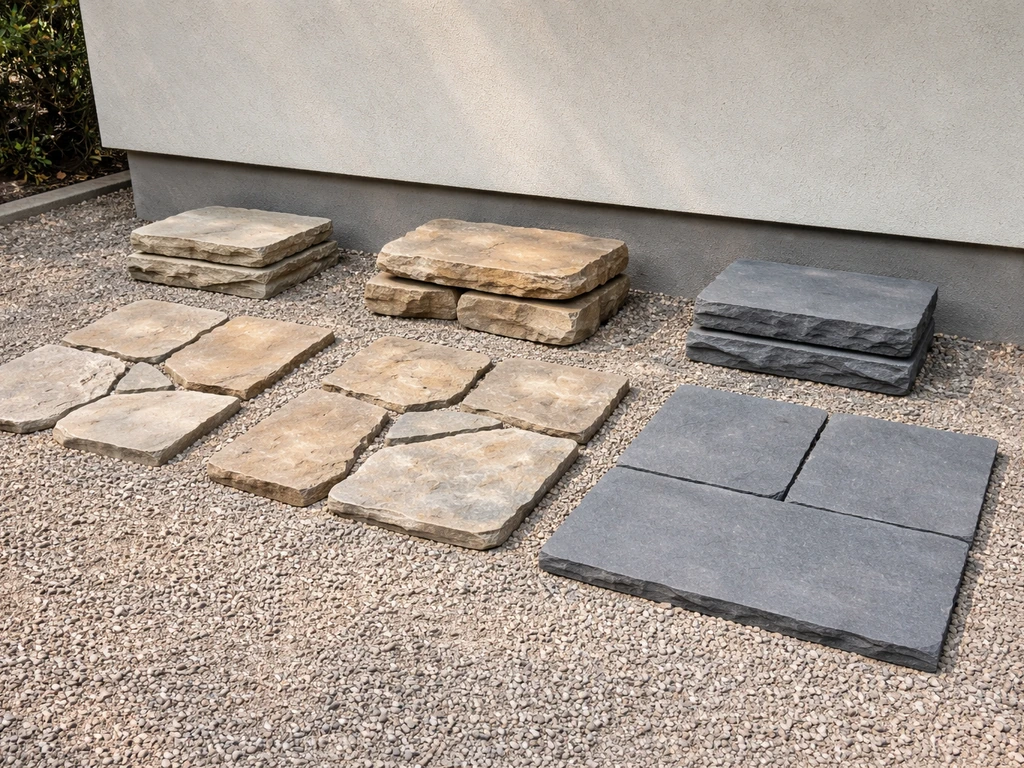
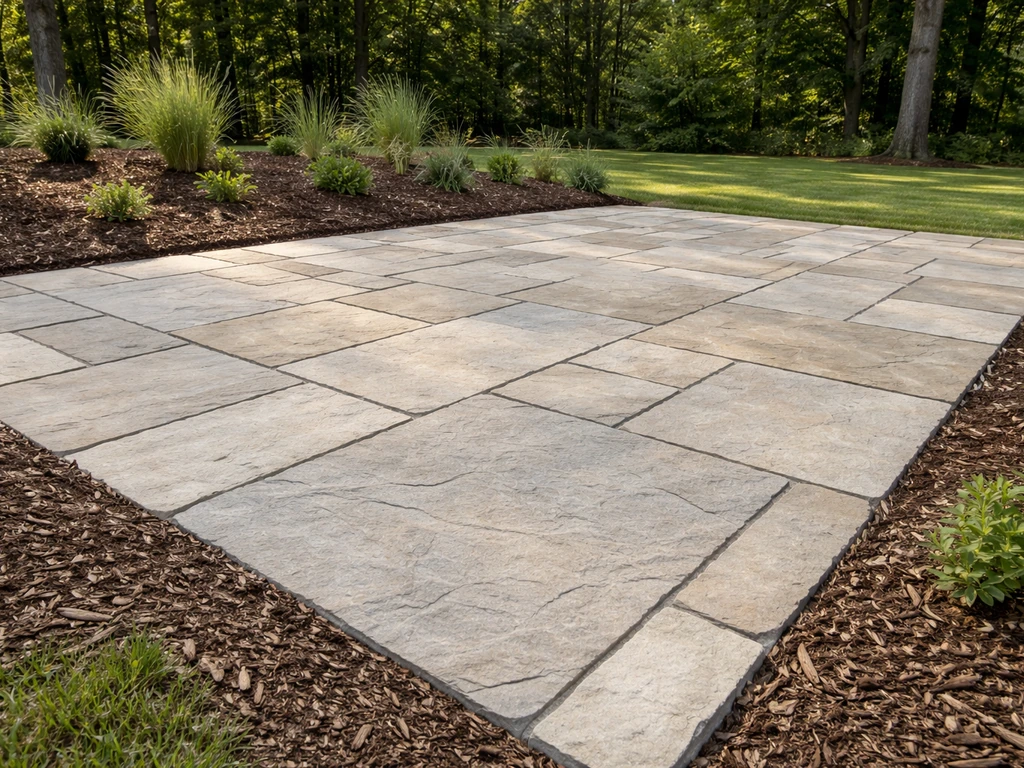
The phrase 'flat rock patio' covers a range of materials, and which one you choose affects your cost, the look, and how much fitting work you'll do. Natural flagstone gives you an organic, irregular look that most people picture when they imagine a flat rock patio. Cut stone pavers give you cleaner lines and faster installation because the edges are already square. Fieldstone slabs sit somewhere in between: thick and durable, but irregular enough to need some shaping.
| Material | Avg Cost per Sq Ft | Thickness | DIY Difficulty | Best For |
|---|---|---|---|---|
| Natural flagstone (bluestone, slate, sandstone) | $3–$8 | 1–2.5 in | Moderate | Organic, natural look |
| Irregular fieldstone/flat quarried stone | $2–$5 | 1.5–3 in | Moderate–Hard | Rustic, budget-friendly look |
| Cut natural stone pavers | $5–$12 | 1.5–2 in | Easy–Moderate | Clean, uniform layout |
| Concrete flagstone (cast pavers) | $1.50–$4 | 1.5–2 in | Easy | Budget builds, consistent shape |
For most first-time builders, I'd recommend cut natural stone pavers or a consistent-thickness flagstone like bluestone. You'll spend less time grinding and fitting odd pieces and more time actually building. If budget is the main driver, cast concrete flagstone or local quarried fieldstone can cut your material cost nearly in half, and a properly built base makes either one look great long-term.
For design, keep it simple: a basic running bond or random pattern both work well. What matters more than the pattern is that every stone is the same thickness, or close to it. Big thickness variation is what causes rocking and uneven surfaces. If you're buying irregular natural stone, sort it by thickness before you start and plan to use similar-thickness pieces in the same zones.
What you'll need: tools and materials
- Spade, flat-nosed shovel, and mattock for excavation
- Plate compactor (rent one for about $60–$80/day — worth every cent)
- Screed rails or lengths of 1-inch conduit pipe
- Long level and a 6- to 10-foot straightedge
- Rubber mallet
- Mason's string and stakes
- Tape measure and marking chalk
- Landscape fabric or geotextile (optional but recommended in clay-heavy or wet soils)
- Crushed gravel or compactible gravel base material (often called road base or Class II base)
- Coarse bedding sand (not play sand)
- Polymeric sand or regular coarse sand for joints
- Plastic or metal patio edging with spikes
- Stone sealer (optional, for porous natural stone)
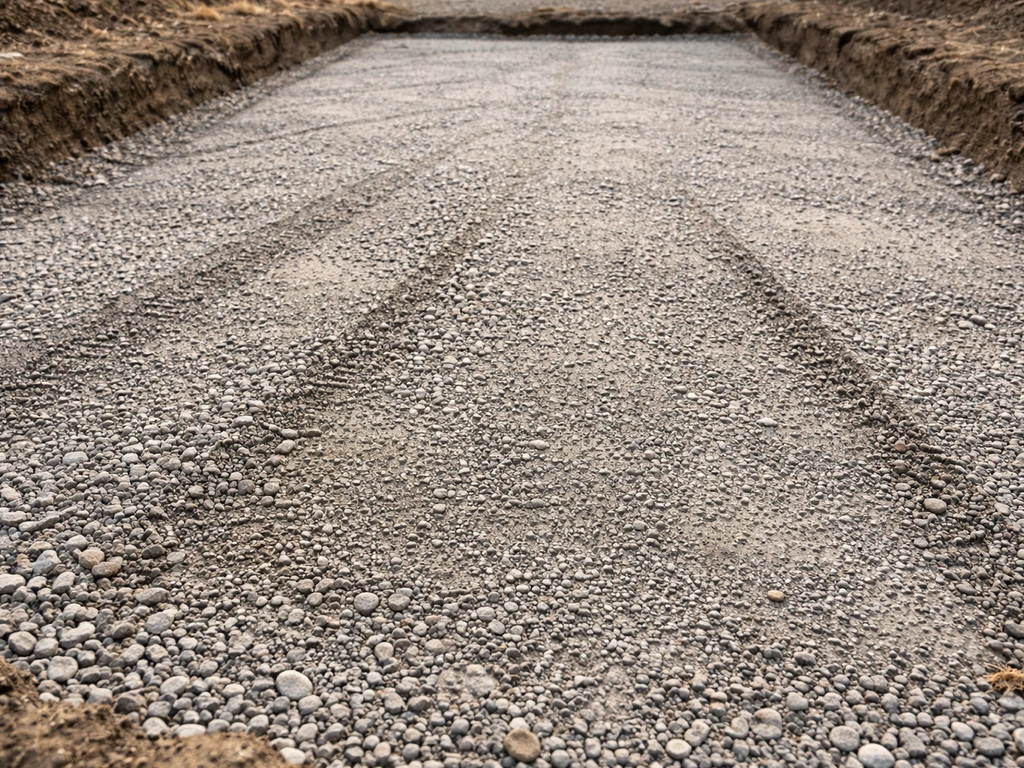
Preparing the base: excavation, grading, and drainage
This is the step that separates a patio that lasts 20 years from one that needs a redo in three. Nail the base and everything else is forgiving. Rush it and you'll be pulling up stones to fix drainage problems by year two.
Excavate to your calculated depth, removing all grass, roots, and organic material. Organic material compresses over time, which is a primary cause of sinking and heaving. Once you're at depth, rake the subgrade roughly flat and establish your drainage slope. Every surface you build, including the compacted subgrade, the gravel base, and the finished stone surface, should slope away from your house at 1/4 inch per foot. On a 12-foot-deep patio, that's a 3-inch total drop from the house side to the far edge. Use your string lines and a level to check this as you go.
If your soil is clay-heavy, drains poorly, or you get consistent rainfall, lay a geotextile separation fabric over the subgrade before adding gravel. This keeps your base gravel from mixing down into the soil and losing its compaction over time. It's a $20–$40 addition that genuinely extends the life of the whole project.
Add your gravel base in two or three layers, compacting each one with the plate compactor before adding the next. A minimum of 6 inches of compacted base is the standard, but in cold climates or soft soils, 8 inches is better insurance. Target at least 98% compaction density on your final base layer: in practical terms, run the plate compactor over each layer twice in perpendicular directions, and the surface should feel solid with no give underfoot. The finished gravel surface should mirror your 1/4-inch-per-foot drainage slope.
Setting the flat rocks: layout, bedding, and leveling
With a solid, sloped base under you, the stone-setting process is actually satisfying. Start by doing a dry run: lay your stones across the compacted base without any bedding sand to work out your pattern, fit odd-shaped pieces, and identify which stones need trimming. Mark or organize them so you know the order before you commit.
Now add your bedding sand. Spread coarse sand over a workable section of the base, roughly 3 to 4 feet wide at a time. Use screed rails (lengths of 1-inch conduit pipe work perfectly) set at the correct depth to pull your sand into a smooth, even 1-inch layer. One critical rule here: do not compact the bedding sand before setting the stones. Polycor’s pavers installation guide explicitly says not to compact the bedding sand before the pavers are set do not compact the bedding sand before setting the stones. The sand needs to stay loose so the stone can be pressed and adjusted into it. Compacting it first defeats the whole purpose.
Set each flat stone onto the screeded sand by placing it straight down, not dragging or sliding it, which disturbs the even bed. Press it firmly and tap it with a rubber mallet to seat it. Use your level constantly: check each stone individually and then use your 6-foot straightedge to check it against its neighbors. The target is a surface flatness of within 3/8 inch over 10 feet, and no more than 1/8-inch lippage (height difference) between adjacent stones.
If a stone rocks, pull it up, add a small scoop of sand to the low point, re-screed, and reset. If you want the finished result to stay flat and never turn into a rocking patio, build the base and bedding with the right drainage and thickness rocks.
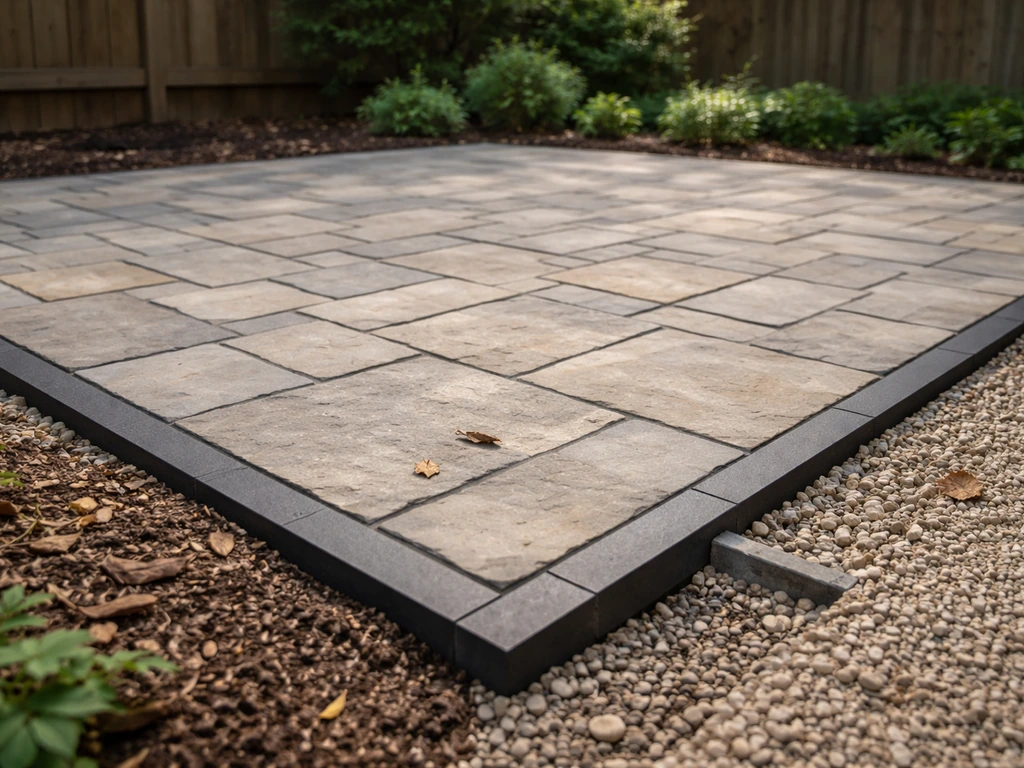
Work from a fixed corner outward, and always kneel or stand on a piece of plywood rather than on already-set stones. This keeps you from disturbing the bed and shifting stones you've already leveled. Leave consistent joint gaps between stones, usually 1/2 to 1 inch for a natural look, or 1/4 to 3/8 inch for a tighter, more formal fit.
Edging and stabilizing for a truly flat, durable finish
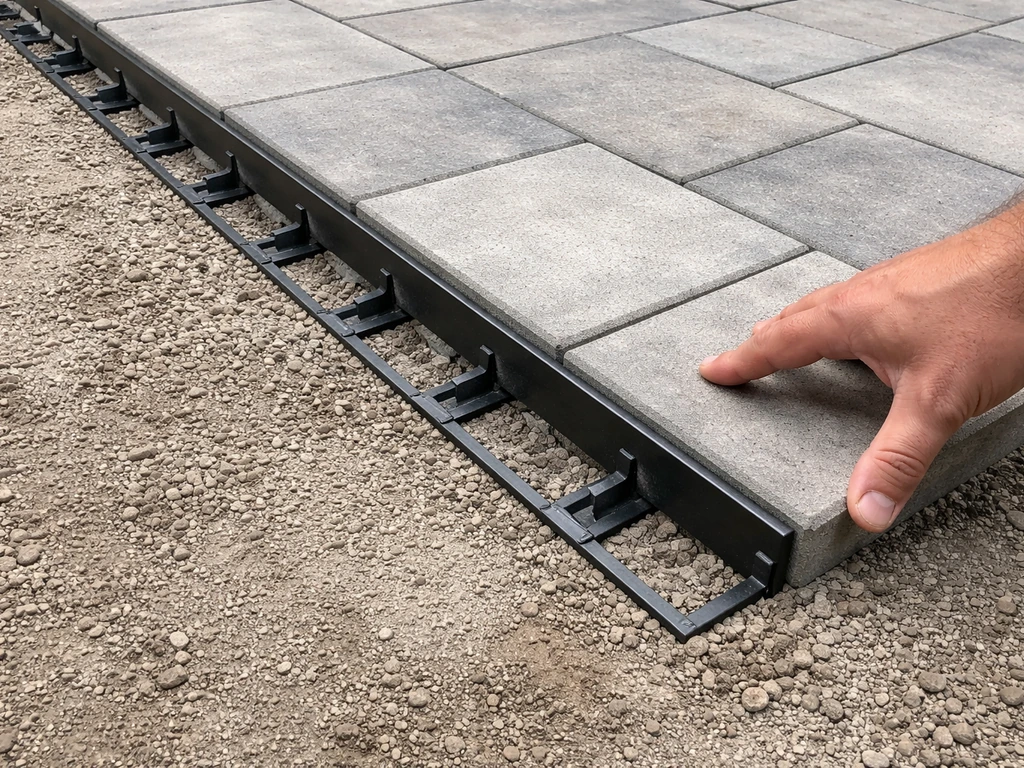
Edging is non-negotiable if you want the patio to hold its shape. Without a solid border restraint, the perimeter stones gradually shift outward under foot traffic, the bedding sand migrates, and the whole surface slowly comes apart at the edges. This is an easy step to skip when you're tired at the end of the project, and it's always a mistake.
Install plastic or metal paver edging along the entire perimeter of the patio, right up against the outer edge of your border stones. Drive the spikes (usually included) straight down into the base gravel at 12-inch intervals. For a natural stone patio with heavy or irregular slabs, metal edging with longer spikes holds better than plastic. If you prefer a more finished look, a single row of soldier-course pavers set in a concrete bed along the perimeter does the same job and looks intentional.
Once the edging is in, do a final pass with the plate compactor over the entire surface. Use a rubber pad attachment or a layer of rubber mat between the compactor and the stone to avoid chipping. This final compaction pass seats all the stones firmly into the bedding sand and locks everything into place. After running the compactor, walk every inch of the surface pressing with your foot. Any stone that still rocks or moves needs to come up for a bedding correction.
Finishing details: joints, cleanup, and maintenance
Joint filling is the last structural step and it matters more than it looks. Open joints let water infiltrate, sand migrate, and weeds establish. You have two main options: regular coarse sand or polymeric sand. Regular sand is cheaper and easier to re-do, but it washes out over time and needs occasional topping up. Polymeric sand contains a binder that hardens when wet, effectively locking joints semi-permanently and greatly reducing weed growth. For a flat rock patio, I'd spend the extra $15–$20 per bag on polymeric sand, especially in the perimeter joints.
Pour sand over the surface and sweep it into the joints with a stiff broom, working it in all directions. If you're aiming for a sand patio finish instead of stone, the process still starts with a well-compacted base and proper drainage how to make a sand patio. Fill joints to just below the top surface of the stone, not flush or overfilled. For polymeric sand, follow the product instructions: usually a light misting to activate the binder, then keep it dry for 24 hours. For regular sand, just sweep it in and compact one more time lightly. After filling, sweep all excess sand off the stone surface to prevent staining.
Natural stone sealing is optional but worth considering for porous stones like sandstone or limestone. A penetrating stone sealer repels water and staining, reduces freeze-thaw damage in cold climates, and makes the surface easier to clean. Apply it once the patio is fully set and dry, typically 24 to 48 hours after completion in warm weather. Slate and dense bluestone are lower priority for sealing; softer, more porous stones benefit most. Reapply every 2 to 3 years depending on the product.
Ongoing maintenance: keeping it flat and clean
- Check joints every spring and top up any sand that has washed or settled out
- Pull weeds as soon as they appear — they're much easier to remove before roots establish between stones
- Re-level any rocking stones immediately: pull the stone, adjust the bedding sand, reset, and re-level
- Rinse the surface with a garden hose periodically; avoid high-pressure washing which dislodges joint sand
- Reapply sealer every 2–3 years on porous natural stone
- In freeze-thaw climates, inspect for heaved stones each spring and reset as needed before the season starts
A well-built flat rock patio is genuinely low-maintenance once the base and joints are done right. Most problems, rocking, sinking, weeds, and drainage issues, trace back to either a skimped base or neglected joint filling. Get those two things right and you'll be enjoying the patio for 15 to 20 years with nothing more than seasonal sweeping and the occasional sand top-up.
If you're weighing this project against other natural-surface options, the construction process shares a lot of DNA with gravel and pebble patio builds, though flat rock's solid surface gives you more stability underfoot and a finished look that works in more settings. The same careful base prep and drainage planning used in a pea gravel patio how to guide can help your flat rock surface stay level and prevent pooling water.
Once the base and bedding sand are dialed in, you can follow the same approach to build a gravel patio with solid drainage and a level surface. If you are specifically aiming to build gravel patio, focus on the base depth and drainage slope since those drive long-term stability.
FAQ
How do I choose the right stone thickness for a flat rock patio?
Match your excavation depth to the thickest stones you plan to install, then sort and group pieces by thickness. Even small thickness differences become visible as rocking, so aim for near-uniform thickness within each section, especially near the edges and along stairs or walk paths.
What if my yard slopes the opposite direction from the way I want the patio to drain?
You still keep the patio sloped away from the house, but you may need to re-profile the base so the far edge ends lower overall. If the grade change is large, plan on a stepped design or a retention approach rather than forcing a steep slope that makes seating uncomfortable and increases stone trimming.
Can I skip the bedding sand and set stones directly on gravel?
It usually leads to rocking and unevenness because stones need a flexible adjustment layer to seat into. Bedding sand, used at the correct depth and left un-compacted before setting, acts like the “leveling interface” that you can fine-tune one stone at a time.
How do I prevent stones from rocking during installation?
Do a dry layout, then pay extra attention to low spots while setting. When a stone rocks, lift it and add a small sand scoop to the low point, re-screed that spot, and reset without trying to “force” it by pushing harder. Also recheck flatness with a straightedge across neighboring stones.
How much joint spacing is best for a natural-looking patio versus a tight, formal look?
A common target is about 1/2 to 1 inch for a looser natural look, or roughly 1/4 to 3/8 inch for a tighter pattern. However, narrower joints make trimming and matching thickness more important, since any mismatch shows up faster.
What’s the best way to handle uneven or clay-heavy soil without losing the base to mixing?
Use separation fabric under the gravel base when soils drain poorly or are clay-heavy. The fabric prevents fine soil from migrating into the base, so your compacted gravel stays dense and your patio is less likely to sink over seasons.
Is polymeric sand always better than regular sand for patio joints?
It’s often better for reducing weeds and locking joints, but it requires following the product’s moisture and activation instructions closely. If you live where joint washing or heavy rainfall right after application is common, regular coarse sand can be easier to maintain because it’s more forgiving to re-level and re-fill.
How long should I wait before driving water over the joints or using the patio after filling?
After joint filling, polymeric sand typically needs a controlled activation (light misting) and then must stay dry for about a day, so plan your schedule accordingly. With regular sand, you can usually move more quickly, but you still want to avoid heavy wash-off until it settles and you’ve done the light re-compaction.
Do I need to seal the patio even if my stone is not porous?
Dense stones like slate and bluestone are lower priority for sealing, so you can skip it if staining is not a concern. Consider sealing if you have soft or porous stones, or if you want easier cleaning and better resistance to freeze-thaw and water spotting.
What mistakes most often cause water pooling on a flat rock patio?
Pooling usually comes from an incorrect drainage slope, an uncorrected low spot in the base, or skipping proper compaction so the base settles unevenly. Use string-line checks and a level as you build, then confirm the slope continues across the whole footprint before you set stones.
How do I fix a single area that starts to sink or rock later?
Lift only the affected stones, remove and loosen the bedding sand where the movement occurred, then rebuild that small section with correct drainage and a fresh bedding bed. Reuse the stones if they are still sound, but replace any cracked or excessively worn pieces, and refinish jointing so water can’t infiltrate underneath.
Next Article
How to Rock Patio: DIY Plan, Materials, Steps, Tips
DIY guide to build a rock patio: stone choices, drainage design, tools, step-by-step prep, base, laying, edging, and fix