The most effective way to cover and manage a patio drain is to install a surface channel (linear) drain along the low point of your patio, connect it to a safe outlet like a soakaway, a daylight pipe, or an existing storm drain, and finish the patio surface so it pitches gently toward the channel. If you already have a drain but water still pools, the fix is usually a grading problem rather than a missing drain altogether. Either way, this is very achievable as a weekend DIY project, as long as you plan the outlet before you dig.
How to Cover a Drain on a Patio: DIY Step by Step

Nolan Lennox
7 Jun 2026
How to identify the drainage problem on your patio

Before you buy anything or start digging, spend ten minutes outside during or just after heavy rain and watch where the water goes. This one step saves you from installing a drain in the wrong spot. You're looking for a few specific things.
- Standing pools: where does water sit longest after rain stops? Mark those low spots with chalk or a stake.
- Direction of flow: does water track toward the house, a door threshold, a retaining wall, or a fence? That's your problem direction.
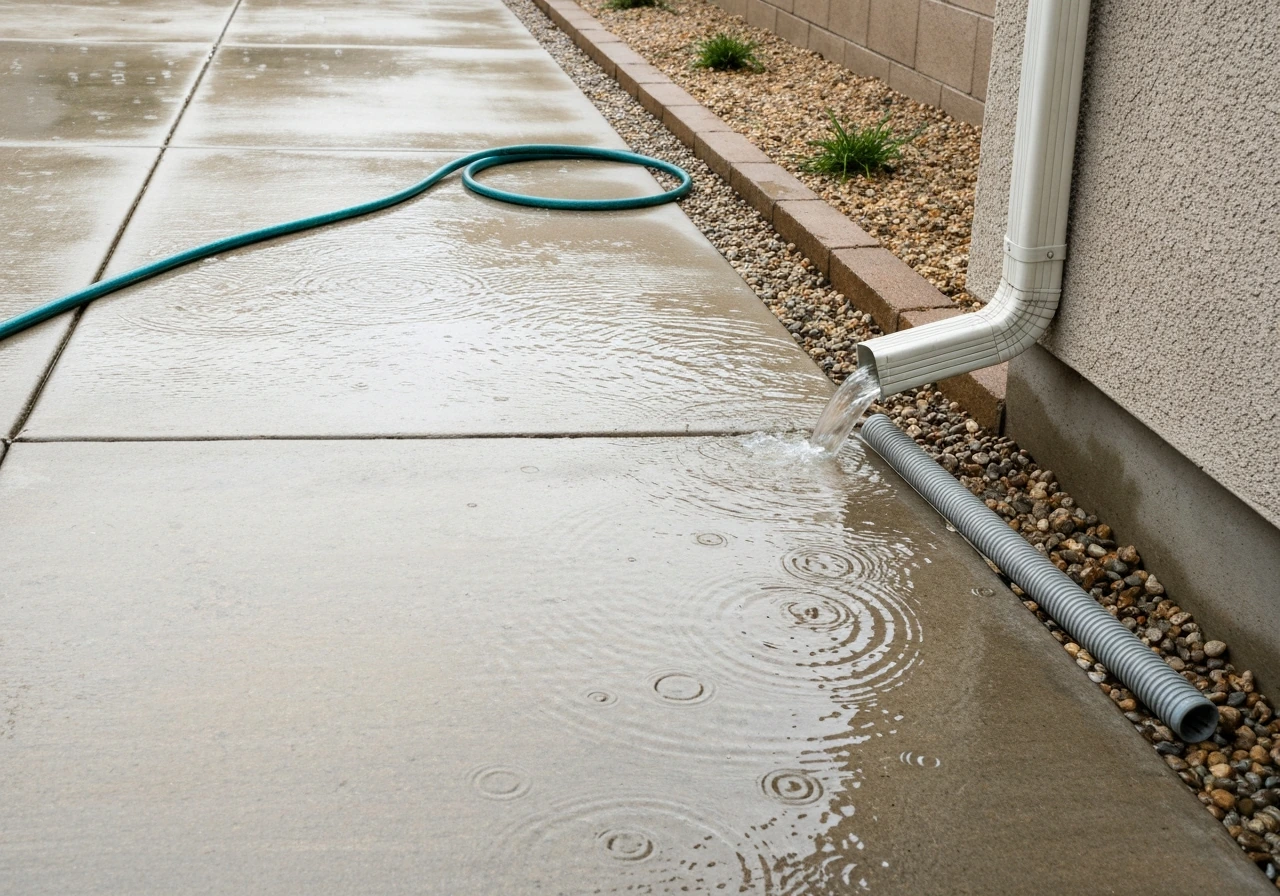
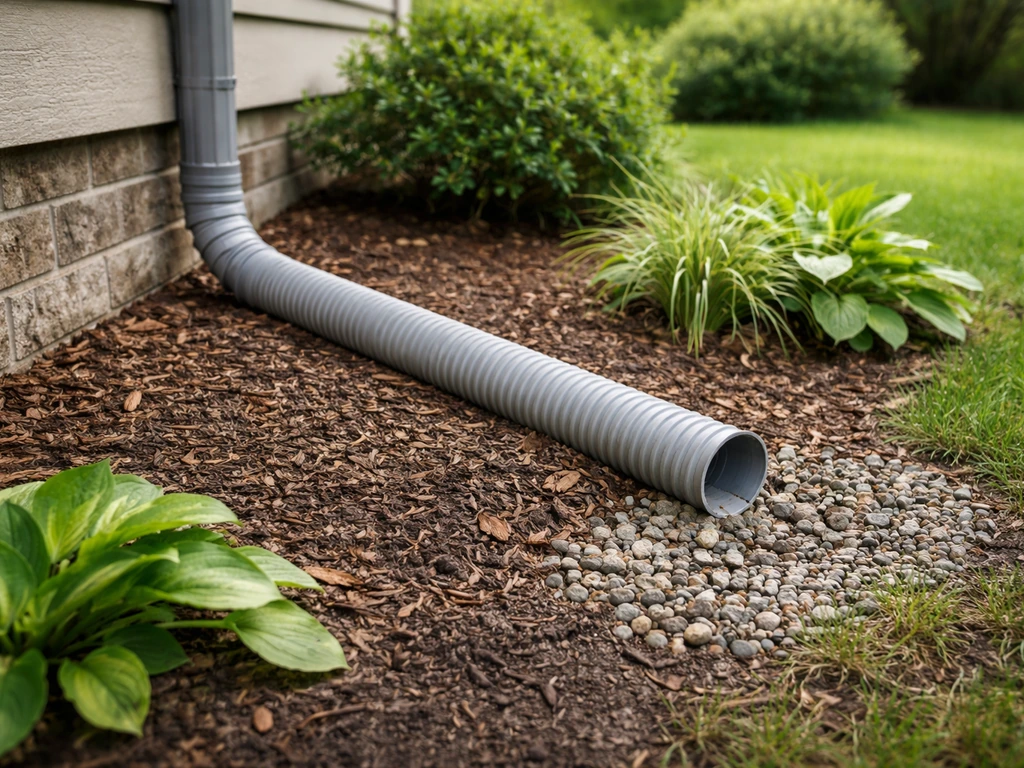
- Downspout discharge points: check whether your gutters are dumping water directly onto the patio. Look for streaks, staining, and erosion right at the downspout outlet.
- Existing drains: does your patio already have a drain that's blocked, sitting too high, or simply in the wrong place? Lift the grate and check for sediment buildup.
- Ground slope: lay a long level or a straight plank on the patio surface. A properly drained patio should fall at least 1 in 80 (roughly 12 mm per metre) away from any building. If it's flat or tilting toward the house, that's the root cause.
Also check along the base of your house wall for watermarks, damp patches, or efflorescence (white salt deposits). These tell you water is sitting against the foundation. A properly graded yard should drop roughly 150 mm (6 in) over the first 3 m (10 ft) away from the foundation. If your patio is set flat right up to the wall, you've got a grading problem that no drain alone will fully solve without also addressing the slope.
Your main drainage options explained
There's no single right answer here. The best solution depends on your patio size, the volume of water you're dealing with, your soil type, and what's practical to connect to. Here are the four main approaches, from simplest to most involved.
Regrading the surface slope
If your patio is block paving, gravel, or pavers on a sand bed, sometimes the fix is simply lifting sections and re-laying them with the correct fall. Target a slope of at least 1:80 (1.25%) away from the house. This is the cheapest fix when it's feasible, but it's only an option if you haven't got a concrete slab that's already set flat. If the slab itself is the problem, you'll need one of the options below on top of it.
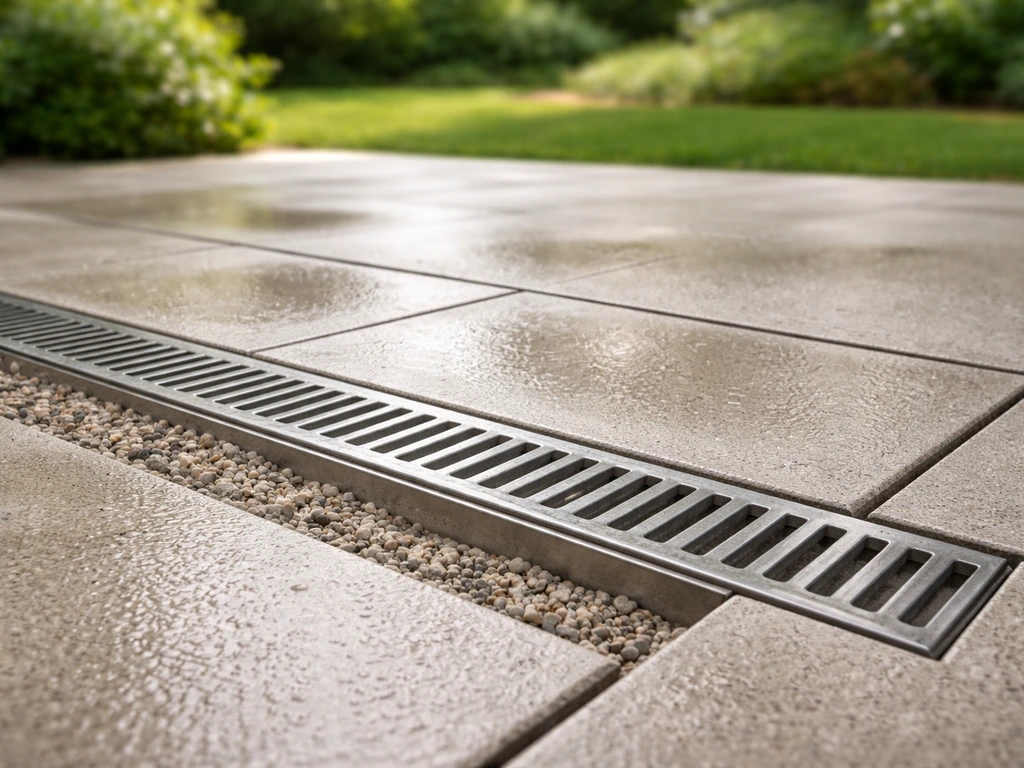
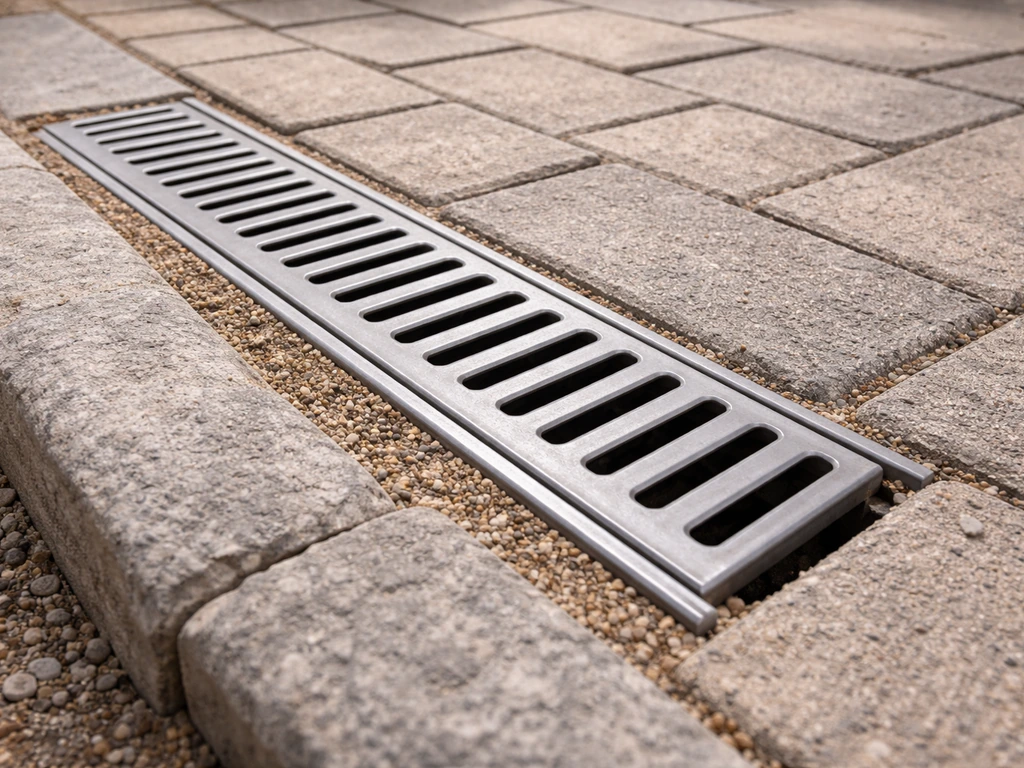
Channel or linear trench drains
This is the most popular DIY solution for existing patios. A channel drain (also called a linear drain or trench drain) is a narrow gutter set flush with your patio surface and covered with a grate. Water flows across the patio, drops into the channel, and is piped away. For a standard domestic patio, [100 mm or 150 mm wide channel sections](https://www.
aco. co. uk/multidrain-ppd) are the most common choice. Systems like ACO's MultiDrain are available in different load classes to BS EN 1433: for a pedestrian-only patio, load class A15 or B125 is fine.
If vehicles might roll over it, step up to C250 or D400. You connect the channel sections together, add an end cap at one end and an outlet at the other, and pipe the outlet away to a safe discharge point.
Trench (French) drains
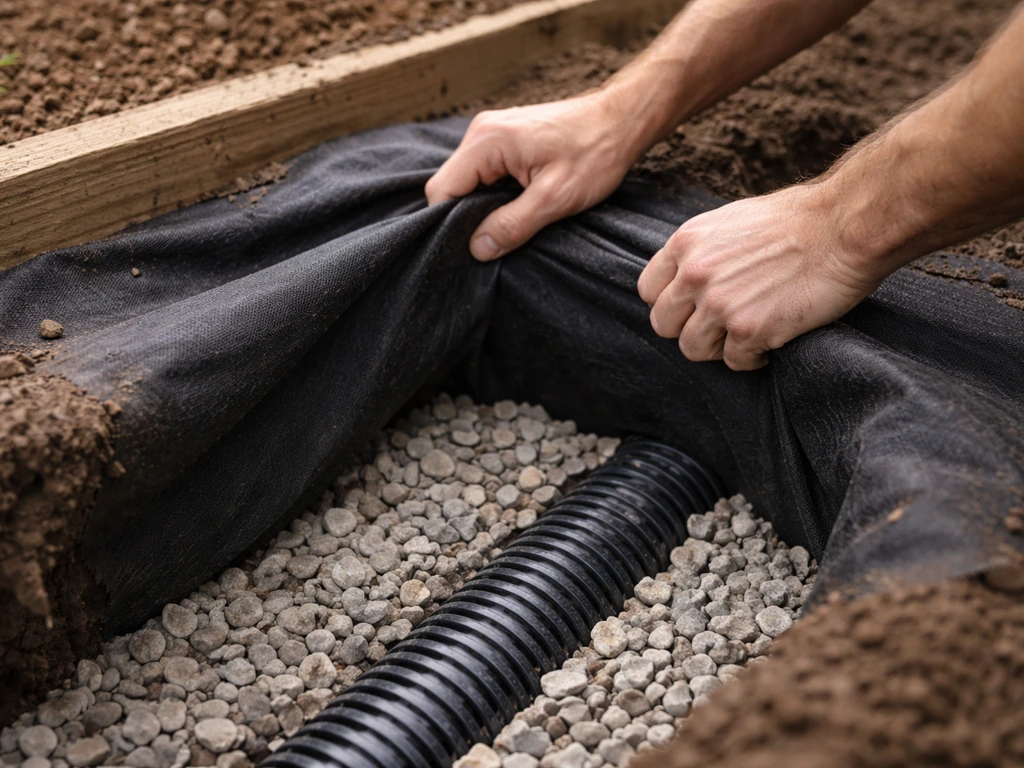
A French drain is a gravel-filled trench with a perforated pipe at the bottom, wrapped in geotextile to stop it silting up. It collects water over its entire length and moves it to an outlet. It's particularly useful along the edge of a patio where you can't easily set a visible surface channel, or where you need to intercept water before it reaches the patio from an uphill direction. The pipe connects to the same outlet options as a channel drain.
Soakaways and dry wells
If you can't connect to an existing drain or run a pipe to daylight, a soakaway (called a dry well in the US) is often the answer. It's essentially a gravel-filled pit or a purpose-built crate system buried in the ground that lets water percolate slowly into the surrounding soil. UK guidance recommends siting soakaways at least 5 m from any building or boundary. A typical domestic soakaway is around 1.
2 m in diameter and 1 m deep below the drain invert, though the right size depends on your drainage area and how permeable your soil is. Sandy or loamy soils work well. Heavy clay soils don't drain fast enough, so a soakaway in clay can just become an underground pond. If your soil is clay-heavy, a daylight outlet or storm connection will serve you better.
Choosing the right drain type and where to put it
The right drain depends on three things: where water collects, where you can route the outlet, and what your patio surface is made of. Here's how I think through the decision.
| Situation | Best solution | Notes |
|---|---|---|
| Water pools in the middle of a concrete slab | Channel drain across the low point | Needs a saw cut through the slab; hire a concrete saw or angle grinder with diamond blade |
| Water runs toward the house from outside the patio | French drain at the uphill edge | Intercepts water before it reaches the patio |
| Block paving that pitches wrong way | Regrade the surface + edge channel drain | Lift and relay pavers with correct fall; add channel at lowest edge |
| Large patio with no existing drain outlet nearby | Channel drain feeding a soakaway | Check soil permeability first; clay soil needs a different outlet |
| Downspout dumping onto patio | Downspout extension + channel drain | Extend discharge at least 1.8 m (6 ft) from foundation first |
| Patio floods from garden runoff | French drain at garden edge | Route perforated pipe to daylight or soakaway |
Position the channel drain at the lowest natural point of your patio, running parallel to the house or across the path water already takes. Once you've chosen the route, plan how you'll connect the channel so you know how to raise a drain for patio and get a safe outlet. If you're installing along the house wall, keep the drain just far enough from the wall that the channel grate isn't butting up against it (about 100 to 150 mm clearance is ideal). Make sure the patio surface slopes toward the channel at the correct fall, and never position a channel so water has to run uphill to reach it. Sounds obvious, but I've seen it done.
Materials and tools you'll need
Getting everything together before you start makes this job go smoothly. Here's a practical checklist for a standard channel drain installation on a patio.
Drain components
- Channel drain sections (100 mm or 150 mm width; measure your run and add 10% for waste)
- End caps (one per run)
- Outlet connector (matches your pipe size, typically 110 mm diameter)
- Grate covers (included with most systems; check load class matches your use: A15/B125 for pedestrian, C250/D400 for vehicles)
- Silt trap or basket (fits inside the channel at the outlet end; catches debris before the pipe)
Pipe and fittings
- 110 mm diameter underground drainage pipe (uPVC, perforated or solid depending on your outlet type)
- 90-degree and 45-degree bends as needed for routing
- Pipe couplers and solvent weld cement (or push-fit connectors)
- Rodding eye or inspection chamber if the run is over 6 m or has more than one bend
Base and backfill materials
- Concrete mix (C20 or equivalent ready-mix bags) for bedding and haunching the channel
- Coarse gravel or MOT Type 1 for pipe bedding
- Geotextile membrane (non-woven, 100 to 150 g/m2) to wrap any gravel-filled sections or soakaway
- Sharp sand for re-bedding any disturbed block paving
Tools
- Angle grinder with a diamond blade (for cutting concrete or block paving) or hire a concrete saw for a slab
- Spade and mattock for excavation
- Spirit level and long straight edge
- Tape measure and string line
- Rubber mallet
- Mixing bucket or cement mixer
- Float for finishing concrete surrounds
- Pipe cutters or hacksaw for trimming pipe
Step-by-step: installing a channel drain on your patio
This process works for most domestic patios, whether you're cutting into an existing slab or working with block paving. Take your time on the fall and level checks; getting those right is what separates a drain that works from one that just sits there looking tidy while water still pools.
- Mark the route: Use string line and pegs to mark the channel run along the lowest point of the patio. The channel should run perpendicular to the direction water flows, so it intercepts runoff across its full width. Mark the outlet end where the pipe will leave the patio toward its discharge point.
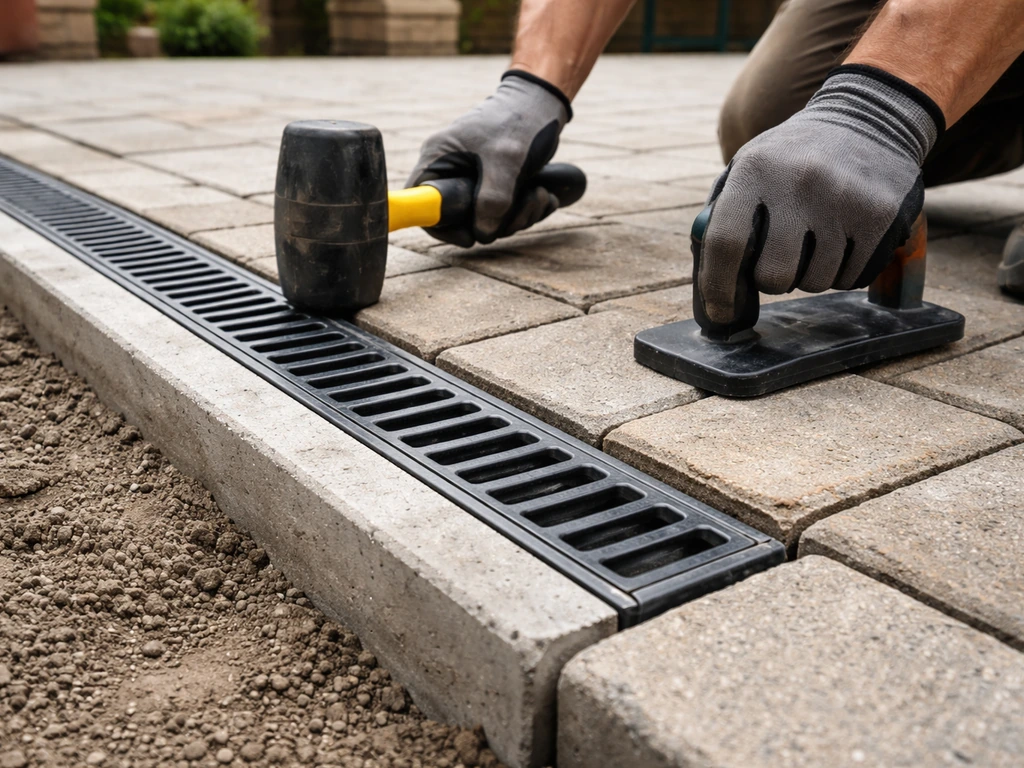
- Excavate the trench: Cut along your marked lines with the angle grinder or concrete saw first, then break out the material with a chisel and hammer or a breaker tool. For block paving, lift the blocks carefully and set them aside. Dig the trench wide enough for the channel body plus 100 mm either side for concrete haunching, and deep enough so the top of the channel grate will sit flush with (or 3 mm below) the finished patio surface when the bedding layer is in place.
- Prepare the base: Lay 75 to 100 mm of compacted hardcore or MOT Type 1 at the bottom of the trench. Then pour a 50 mm concrete bedding layer on top. While the concrete is still workable, set the fall: the channel should drop 5 mm per 1 m of run toward the outlet end. Use a long level and measure from the finished patio surface down to the top of the channel at each end to confirm the fall.
- Set the channel: Starting at the lowest point (the outlet end), press the first channel section into the wet concrete bed. Work back along the trench, clipping or joining sections together, adjusting the concrete bed height to maintain the 5 mm/m fall. Fit the end cap at the high end. Double-check with your level as you go. The top edge of the channel should sit 3 mm below the adjacent patio surface so water naturally flows in rather than over.
- Haunch with concrete: Mix and pour concrete around both sides of the channel body, filling the space between the channel and the trench walls. This is called haunching and it locks the channel in place and prevents settlement. Keep the concrete off the inside of the channel and don't overfill past the top edge. Leave the grates off until the concrete has cured (at least 24 hours, ideally 48).
- Connect the outlet pipe: At the outlet end of the channel, connect the outlet fitting and glue or push-fit your underground drainage pipe. Run the pipe at a minimum 1:40 fall (25 mm per 1 m) toward your discharge point. Bed the pipe in 100 mm of gravel and wrap the gravel in geotextile before backfilling with compacted soil or granular fill. Never backfill directly over the pipe with uncompacted clay or topsoil.
- Test before finishing: Before you replace any paving or finish the surface, pour a bucket of water into the channel at the high end and watch it run to the outlet. Confirm it flows freely with no blockage at joints or the outlet connection. If it pools inside the channel, your fall isn't right and you'll need to adjust the bed.
Where the water actually goes: outlet options
This is the part most DIY guides skip over, and it's the most important. A drain that doesn't have a safe, legal outlet is worse than no drain at all because it just moves the problem somewhere less visible.
Daylight outlet
If your garden slopes away from the house and you have a boundary or a low point at least a few metres from the patio, you can run the pipe to daylight: the pipe simply exits above ground at the garden edge, and water flows out onto planted ground or a gravel splash zone. This is the simplest and most reliable outlet, and it needs no council approval in most cases. Make sure the exit point doesn't cause erosion or flood a neighbour's property.
Soakaway
If you can't run to daylight, a soakaway is the next best thing. Dig the pit at least 5 m from any building or boundary. Fill it with 20 to 40 mm clean angular gravel, wrapped in geotextile, or use purpose-made plastic soakaway crates (these give you more void space in a smaller footprint). Your drain pipe enters from the top or side.
The water percolates slowly into the surrounding soil. UK national guidance for sustainable drainage systems includes managing both water quantity and water quality and supports discharging surface water to infiltration features such as soakaways where appropriate water percolates slowly into the surrounding soil.
Do a basic percolation test before you build it: dig a small test hole 300 mm deep, fill it with water, and see how long it takes to drain. If it's empty in under 30 minutes, your soil drains well enough for a soakaway.
Connecting to an existing surface water drain
If your property already has a surface water (rainwater) drain, you can often connect your patio channel outlet to it. This is a clean, reliable solution. However, it's critical that you connect to a surface water drain and not a foul (sewage) drain. In the UK, this is a requirement under Approved Document H.
If you are planning building regulations patio drainage, double-check that your outlet connection and any infiltration plans meet the relevant local requirements Approved Document H. In the US, the EPA is equally clear that stormwater must not enter the sanitary sewer system. If you're not sure which pipe is which, ask your local authority or a drainage specialist before you connect. In some areas, connecting to the public storm drain also requires a permit.
When to call a pro
Stop and get professional advice if: you need to tap into a public sewer or storm drain (permits almost always required), your soil is heavy clay and a soakaway won't work, you're dealing with large volumes of water from a big roof area, or there's any sign the water is undermining your foundation. In the US, subsurface infiltration systems that handle stormwater can fall under EPA's Underground Injection Control (UIC) program for Class V stormwater drainage wells, which may trigger compliance requirements depending on your state. It's worth a quick call to your local authority before you build anything subsurface at scale.
Finishing the patio and keeping the drain working long-term
Once your drain is set and cured, it's time to put the patio back together properly. This is where you lock in the drainage performance and make sure it stays effective for years.
Reinstating the patio surface
For block paving, re-bed the blocks on fresh sharp sand and tamp them down so the surface sits 3 mm above the top edge of the channel grate. That slight height difference creates a positive fall into the drain. Compact the sand bed, re-point with kiln-dried sand, and compact again. For a concrete slab, patch any cut edges with a C20 concrete mix, feathered to match the existing surface level.
Make sure the finished slab surface slopes toward the channel, not away from it. When you finish, also make sure the finished patio slopes to move water away from the patio surface and toward the drain outlet. If you've had to regrade part of the patio, check the new fall with a level before the concrete goes off.
Keeping access to the drain
Never permanently seal or mortar down the channel grates. They need to come off for cleaning. Most systems use clips or sit in a rebate that lets you lift them with a screwdriver. If you've installed a long run, consider adding a silt trap basket at the outlet end. These catch leaves, grit, and debris before it enters the pipe and are far easier to clean than rodding out a blocked underground pipe.
Preventing future problems
- Lift and clear the channel grates at least twice a year (autumn after leaf fall and spring after winter grit). A quick rinse with a hose keeps them clear.
- Check the channel for settlement after the first winter. Freeze-thaw cycles can shift concrete haunching. If a section has dropped, the grate will no longer be flush and the fall may be compromised.
- Keep downspouts extended well clear of the patio. US guidance recommends at least 1.8 m (6 ft) from the foundation. If a downspout dumps onto the patio surface, even a perfect channel drain will be overwhelmed by concentrated roof runoff during heavy rain.
- Check the outlet pipe annually. Push a hose into the channel and watch the outlet. If flow is slow, the pipe may be silting up or partially blocked. A drain rod or a pressure flush usually clears it.
- Watch for new low spots appearing on the patio surface. These often indicate sub-base settlement, particularly near the trench you excavated. Lift and relay any sunken pavers promptly before they start directing water the wrong way.
If you're also dealing with water coming off the garden and onto the patio, a French drain at the uphill edge of the patio is the companion fix to the channel drain along the low point. And if your overall yard grading is sending water toward the house rather than away, that's a bigger regrading project worth tackling separately. Getting the patio slope right from the start avoids all of this, which is why creating the correct fall during the original build is worth every bit of the effort.
FAQ
If I install a channel drain, do I need to change the patio slope or is the grate enough to stop pooling?
No, a drain grate is not a waterproof cover. You still need the patio surface to slope into the channel and you must ensure the outlet is sized and routed to a safe discharge point, otherwise the water will back up or flow around the channel edges.
How do I choose between 100 mm and 150 mm channel drain for my patio?
For most domestic patios, use a channel width that matches the expected flow and debris. Smaller runs (100 mm) can work for light patio runoff, while 150 mm is common for higher volumes. If you see sand, leaves, or lots of debris, consider a larger channel and plan for more frequent cleaning access.
What if my patio is a flat concrete slab, can I still use a drain to fix pooling?
Yes. If your patio is on a concrete slab that slopes the wrong way, lifting pavers or relaying block paving is not an option. You either regrade the slab by removing and relaying/patching with proper fall, or you install a surface channel and accept that you still must correct the direction of slope so water reaches the drain.
Where exactly should the drain go if I am not sure where the water collects on my patio?
Add the drain at the lowest natural point, then confirm the water path during and after a heavy rainfall. If the channel is placed so water would have to run uphill to reach it, the drain will look correct but performance will fail, even if everything is plumb and level.
Can I permanently seal the channel grates so they do not move?
Do not fully glue, mortar, or permanently seal grates. Keep them removable for cleaning, and make sure the frame sits flush so the patio surface height above the grate edge is correct (for block paving, the finish is typically slightly above the grate edge, about a few millimetres) to create a reliable catchment fall.
What can cause a new patio channel drain to block quickly, and how do I prevent it?
Use a silt trap basket or leaf guard at the outlet end, and make sure the outlet routing avoids tight bends. Leaf and grit buildup is a common cause of repeated “still pooling” complaints after a drain install.
Why might water still pool after installing the drain, even if the channel is positioned correctly?
If the outlet is not adequate, you can overflow even when the channel itself is working. Make sure the pipe run has a proper grade, that the discharge point does not erode the ground, and that your outlet option (daylight, soakaway, or connection) matches your soil and local constraints.
Can I connect my patio drain to any existing underground drain on my property?
You can connect to a soakaway or daylight to keep water from loading the sewer system, but if you connect to any existing drains you must confirm it is a surface water (stormwater) line, not a foul (sewage) line. When you are unsure, ask before connecting.
How do I know whether a soakaway will work in my soil?
For a soakaway, soil permeability is the deciding factor. A quick percolation test tells you whether the water drains within a reasonable timeframe. Heavy clay often becomes an underground pond, so you may need a different outlet method, such as daylight or a storm drain connection.
When should I stop DIY and call a drainage specialist?
If you have water undermining the foundation, signs of persistent damp against the wall, or you need to tie into public infrastructure, that is the point where DIY becomes risky. Get professional input before building infiltration systems, and especially before modifying any public storm or sewer connections.
Next Article
How to Divert Water Away From a Patio: DIY Fixes
Diagnose pooling water on a patio and use DIY grading, downspout reroutes, and drainage drains to stop runoff damage.