To raise or re-grade a patio drain, you need to set the drain body or grate at the correct finished height so the surrounding patio surface slopes toward it at roughly 15 mm per meter (about 1:60 to 1:80), then rebuild the base and surface to match. Whether you're lifting an existing gully that got buried when you relaid slabs, or you're adding a channel drain to a patio that currently just pools water in the corner, the fix is the same in principle: get the elevations right first, build the base correctly around the drain, and make sure the outlet actually connects to somewhere water can go.
How to Raise a Drain for a Patio: Step-by-Step DIY Guide

Nolan Lennox
16 Jun 2026
Why drainage matters and what 'raising the drain' actually means
Standing water on a patio isn't just annoying. It breeds algae, stains slabs, creates slip hazards in winter when it freezes, and over time it works its way into your base and causes settlement. If the water is pooling against the house, you're also risking damp ingress into walls and foundations. So getting the drainage right isn't a finishing touch, it's foundational.
When someone searches for 'how to raise a drain for a patio,' they usually mean one of two things. Once you know your target fall and where the outfall goes, this guide shows how to make a patio drain work properly without guesswork how to raise a drain for a patio. Either the drain is sitting too low because slabs were relaid on top of an old surface and the drain got buried or is no longer flush with the new surface level, or the patio doesn't drain toward any point at all and they want to re-grade the whole thing so water moves to a drain. Both problems are fixable without pulling the whole patio up, though the second one is more involved. This guide covers both.
It's also worth knowing what kind of drain you're dealing with. A point drain (also called a gully) collects water at a single low point. A linear or channel drain collects water along its full length, which makes it better for long edges or areas where a single low point is hard to create. If your patio doesn't have a drain at all and you're adding one, your choice between these two types will shape everything else in the project.
Start here: diagnose what's actually wrong
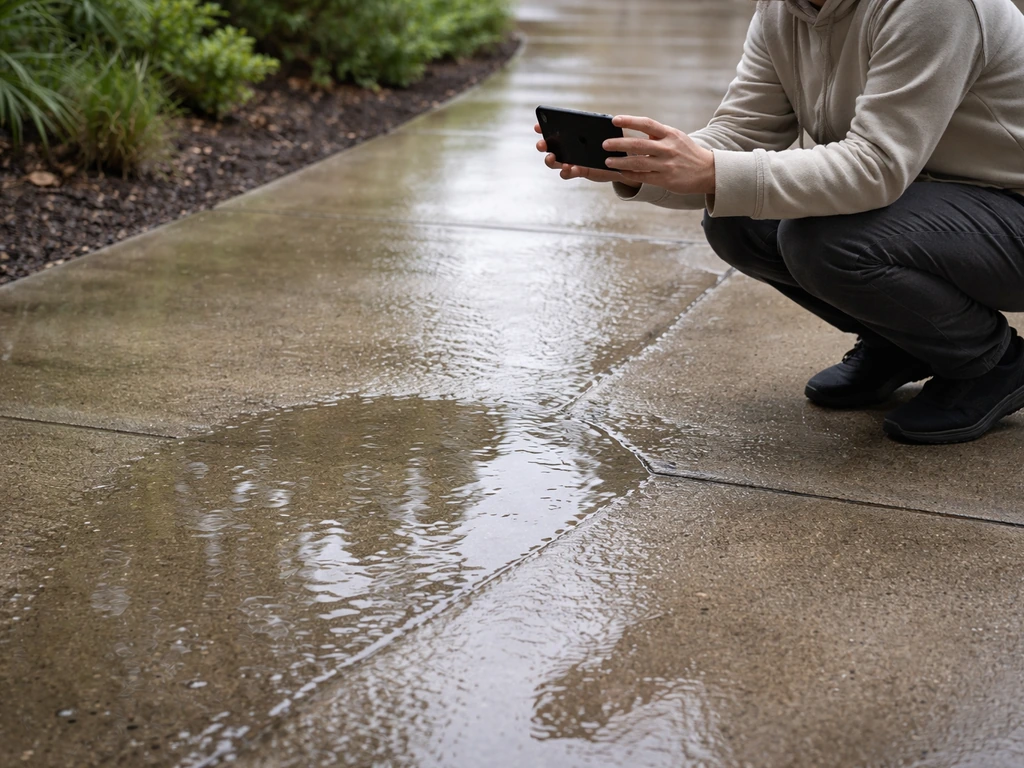
Before you move a single slab, go outside after heavy rain and just look. Watch where the water goes. Take your phone and film it. Note the exact low spots, whether water flows at all or just sits flat, and how far the nearest drain or outfall is. This 10-minute exercise will save you hours of rework later.
Check the slope with a spirit level and tape measure
You want a fall of at least 15 mm per meter (1.5%) away from the house and toward your drain. Lay a 1-meter spirit level on the surface and measure the gap under the low end. If it's less than 10 mm or the bubble shows the surface running back toward the house, you've found your problem. Do this in a grid pattern across the whole patio, not just one line, so you can see where the high and low points actually are. Mark them with chalk or tape.
Find the drain and trace where it goes
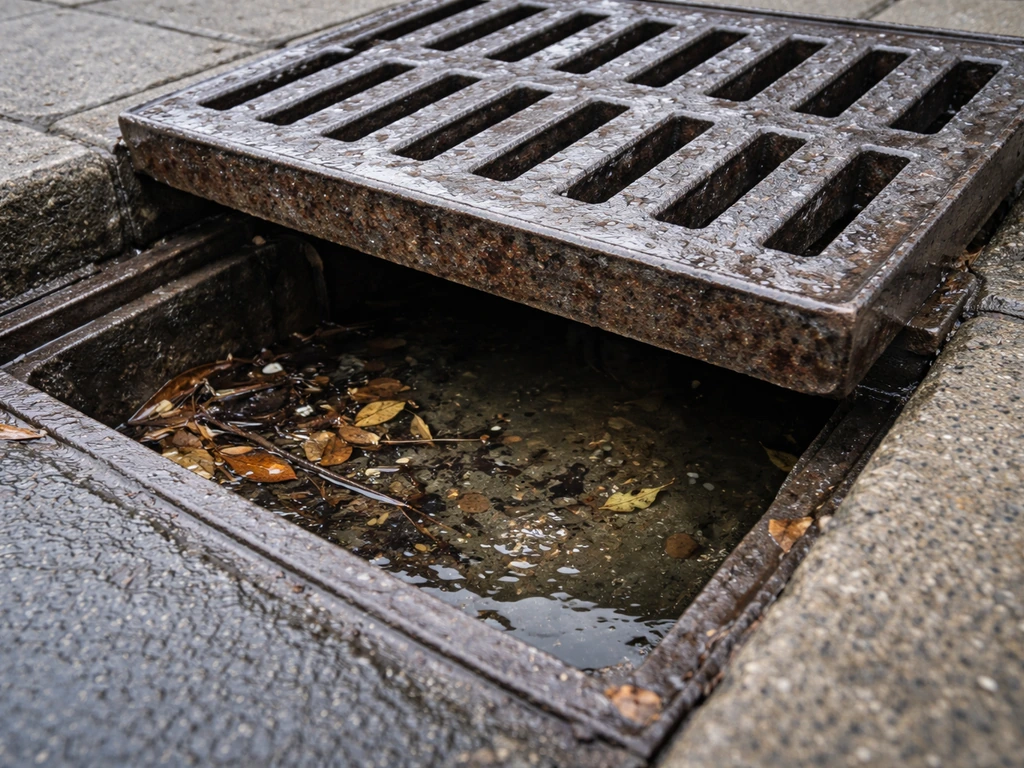
Locate the existing drain grate or gully. Lift the grate and look inside. Is it full of debris? Does water in it drain away, or does it just sit there? If the drain holds water even when it hasn't rained, you may have a blockage or a connection problem downstream, not just a height issue. Run a hose into it and watch what happens. If water backs up instead of flowing away, sort the blockage first before raising anything. You also need to know where the drain connects to: a soakaway, a surface-water sewer, or a watercourse. That outfall point determines your invert level (the bottom of the pipe), which sets a hard limit on how high the drain body can sit.
Plan the fix: regrade only, raise/rebuild the drain, or add a new drain
Once you know where the water pools and what the drain is doing, you can pick your approach. There are three main routes, and the right one depends on how much of the patio you're willing to take up.
| Approach | Best for | Disruption level | Cost range (rough guide) |
|---|---|---|---|
| Re-grade only (relay slabs on adjusted bed) | Slope is just slightly off, drain is at correct height | Medium: lift and relay affected area | Low to medium |
| Raise/rebuild existing drain body | Drain is buried or too low after resurfacing | Low to medium: focused around drain area | Low |
| Add a new channel or point drain | No existing drain, large pooling area, edge of patio problem | High: excavate new trench/pit | Medium to high |
If the slope is slightly wrong but the drain is at the right height, you can sometimes fix it just by adjusting the bedding under the slabs in the problem area. If the drain body itself is too low, you need to raise it physically, which means lifting the surrounding slabs, adjusting the drain assembly, and repointing or rebedding everything around it. If there's no drain at all, you're installing one from scratch, and that means a trench, a connection to an outfall, and relaying much of the surface. Be honest with yourself about which situation you're in before buying anything.
It's also worth thinking about where runoff will go once it reaches the drain. Building regulations in England and Wales (Approved Document H) set a hierarchy for surface-water disposal: infiltration first (soakaways), then a watercourse, then a surface-water sewer. Connecting to a foul sewer is generally not permitted for surface water. If you're in a new-build area or making significant drainage changes, check whether your local authority requires SuDS compliance, which can affect outfall options.
What you'll need: tools, materials, and permit check
Tools
- Spade and mattock for excavation
- Pry bar and bolster chisel for lifting slabs
- Long spirit level (1 m minimum) and a shorter one
- Tape measure and string lines with line pins
- Rubber mallet
- Mixing tub or cement mixer for mortar/concrete
- Angle grinder with a diamond blade (for cutting slabs to fit around drain)
- Pointing trowel
- Plate compactor or hand tamper (for base preparation)
Materials
- Replacement or raised-height drain gully body or channel drain system (with end caps and outlet)
- Concrete mix (for bedding the drain body, minimum 50 mm haunching on each side)
- Sharp sand and cement for mortar bedding (if relaying slabs on mortar)
- Grit or sharp sand for flexible/permeable paving bedding
- MOT Type 1 or compacted hardcore for sub-base if you're re-excavating
- Geotextile membrane if installing a soakaway or gravel trench
- Pipe connectors, couplings, and any adapters needed to connect to existing underground pipe
- Jointing compound or mortar for pointing around the drain frame
- Replacement slabs or edging if existing ones are damaged during lifting
Permits and regulations: know before you dig
For most straightforward drain-raising jobs on an existing patio, you won't need a formal building regulations application. But if you're connecting a new drain to the surface-water sewer for the first time, or if your project involves a soakaway within 5 metres of a building or road, you should check with your local authority. In England and Wales, any new connection to a public sewer technically requires consent from the water authority. Don't skip this if you're adding a new outfall, it can cause serious problems at the point of sale if discovered later. Also check whether your street is in a drainage map area requiring SuDS compliance.
Step-by-step: setting elevations, prepping the base, and installing or raising the drain
Step 1: Set your target elevations
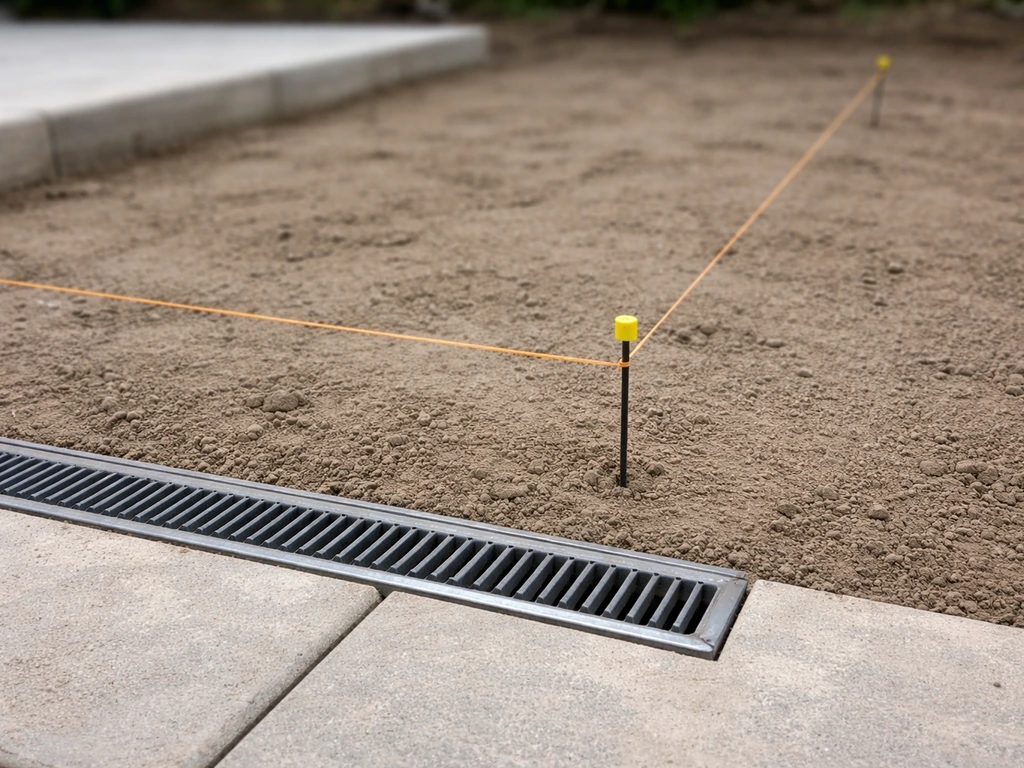
Before anything else, establish your datum: the highest fixed point on the patio, usually the threshold of the house door or the damp proof course level (the drain must finish well below the DPC, typically at least 150 mm). From that point, calculate the required finished surface level at the drain location using your 15 mm/m fall. For example, if the drain is 3 m from the house, the surface at the drain should be 45 mm lower than the surface at the house. Write these numbers down and transfer them to string lines set at the correct heights across the patio. These string lines become your guide for everything that follows.
The drain grate needs to sit 2 to 3 mm below the surrounding finished surface level. This tiny step is what makes water actually fall into the drain rather than flow past it. ACO and similar manufacturers specify around 3 mm (roughly 1/8 inch) as the target step-down from pavement to grate. Mark this on your string lines too.
Step 2: Lift the slabs around the drain
Remove slabs carefully using a bolster and pry bar, starting from the drain outward. Stack them face-up so you can reuse them. Once slabs are lifted, use a spade and mattock to excavate back to the sub-base or beyond if the base is compromised. If you find soft, wet, or disturbed ground around the drain, that's often a sign the drain has been leaking or wasn't sealed properly at the connection point.
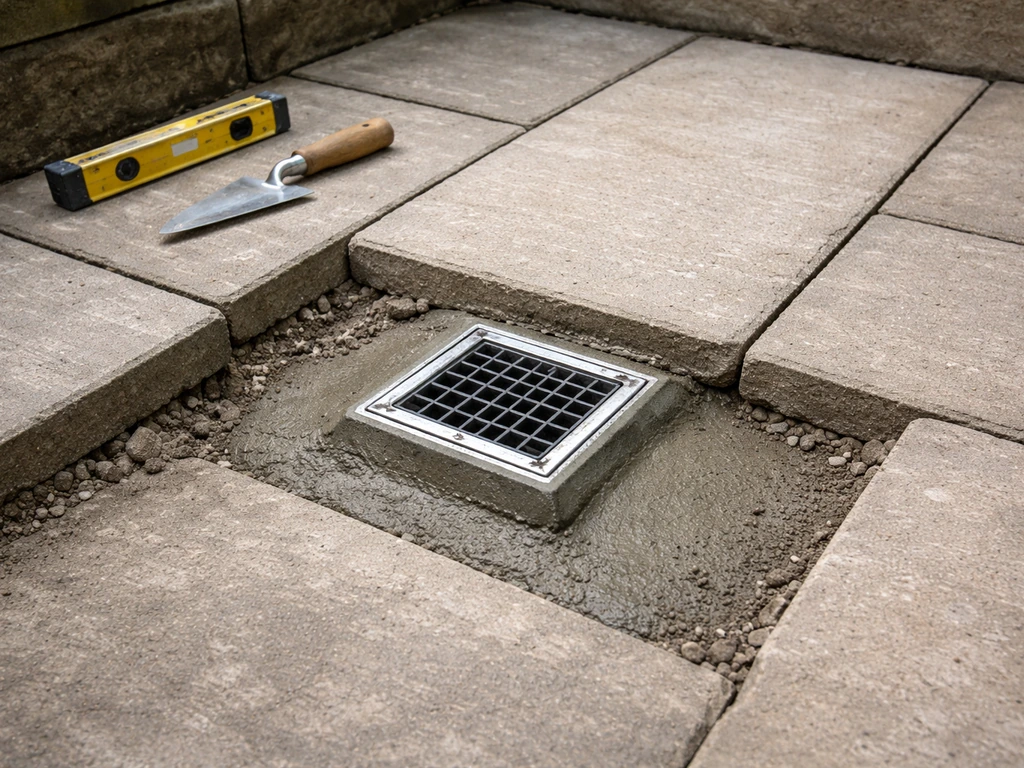
Step 3: Raise or install the drain body
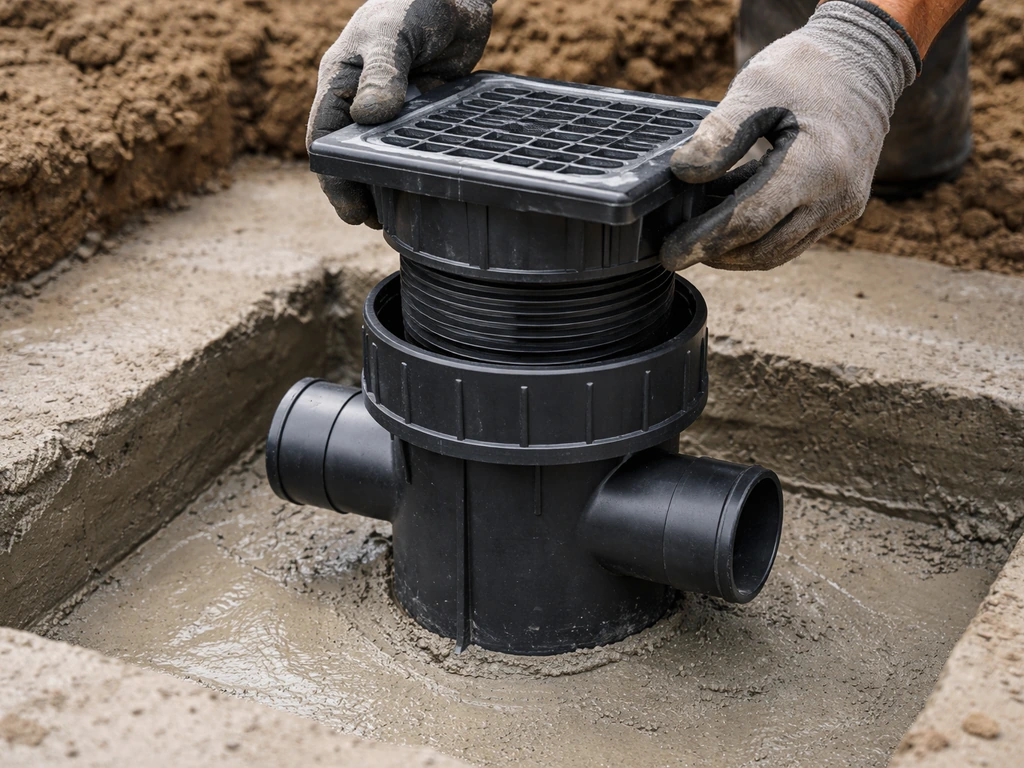
For a point gully being raised: the gully body usually has a riser section or adjustment collar that lets you extend the height. Some plastic gully bodies have a socket at the top that accepts a riser ring. Dry-fit everything first to check the height before you mix any concrete. The outlet at the bottom of the gully connects to the underground pipe, so you can only raise the top of the gully if the pipe invert allows it. If raising the gully top brings the outlet too high for the pipe gradient, you'll need to re-route the pipe, which is a bigger job.
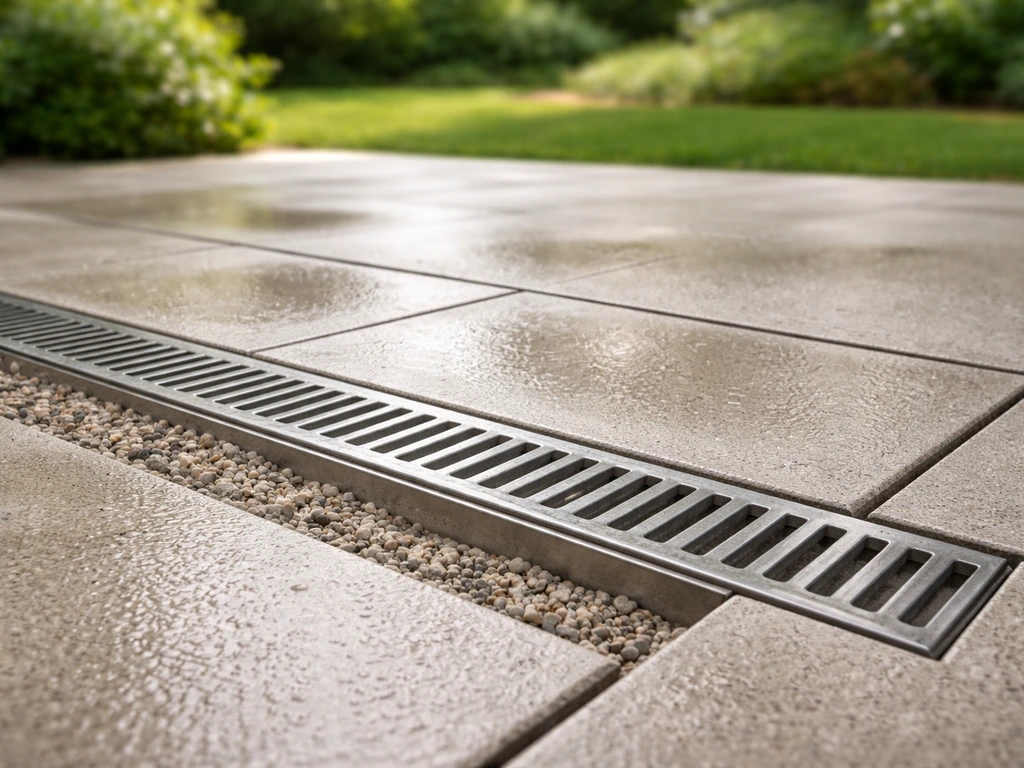
For a channel drain being installed new or adjusted: the channel body sits in a concrete bed. Lay a concrete haunch on each side (minimum 50 mm thick), set the channel at the right invert using your string lines as a guide, and make sure the channel is level side-to-side but falls longitudinally toward the outlet end if it's a long run. Most channel drain systems come with end caps; fit these before you pour concrete so you don't get concrete inside the channel. Once the concrete has gone off (usually 24 hours), connect the outlet to the underground pipe using the appropriate adapter, and make sure the joint is watertight.
Step 4: Connect to the outfall
The connection between the drain body and the underground pipe is where a lot of DIY jobs go wrong. The joint needs to be sealed but not rigid, because ground movement will crack a solid mortar connection. Use a flexible rubber coupler or a push-fit fitting rather than cementing the pipe directly to the drain outlet. If your system connects to a surface-water gully or sewer, it must include a trap (a water seal) to prevent sewer gas escaping back up through the drain. Most gully pots include an integral trap, but if you're connecting a channel drain directly into a pipe, you need a separate trap in line.
Rebuild the patio correctly so it stays drained
Sub-base and base
A good sub-base is what stops settlement from undoing all your careful elevation work. For a standard residential patio, lay at least 100 mm of compacted MOT Type 1 hardcore. If you're working on clay soil or an area that had soft spots, go to 150 mm. Compact in layers of no more than 75 mm, and make sure the sub-base itself is graded to roughly the right fall so you're not making up excessive height in the bedding layer above.
Bedding layer and getting the slope right
For slabs laid on a mortar bed, use a semi-dry mix (5:1 sand to cement) at 30 to 50 mm thickness. Adjust the depth of the bed as you go to maintain your target fall of 15 mm per meter back to the drain. Use your string lines constantly. It sounds tedious but this is the only way to get a consistent slope across a large area. For flexible paving (block paving, setts), the bedding is typically 25 to 40 mm of compacted grit sand, again graded to fall. For blank" rel="noopener noreferrer">bedding paving adjacent to linear or point drainage, follow the sand/grit/gravel bedding and joint-filling guidance in ACO’s Installation advice, taking account of local regulations and the critical interfaces.
Laying slabs and detailing around the drain
Work from the house outward toward the drain, checking your fall every few slabs with a spirit level. Where slabs meet the drain frame, you'll almost certainly need to cut them. Use an angle grinder with a diamond blade and cut slowly for a clean edge. Aim for a joint of around 10 to 15 mm between the slab and the drain frame, filled with mortar or a flexible pointing compound. Do not bridge the joint with a rigid mortar fillet that crosses from slab to drain frame, because differential movement will crack it.
Edging and preventing water escape
Make sure the edges of the patio are contained with kerbing or edging that sits slightly above the surface, or that the surface drains inward to the point/channel drain rather than running off the edges uncontrolled. If water can escape over the edge and pool against a fence or boundary wall, you'll have moved the problem, not fixed it. Where water needs to flow off an edge intentionally, direct it onto a gravel border or planted bed rather than against a structure.
Common problems after the job is done (and how to fix them)
Water still pools in one spot
This almost always means the slope isn't consistent. One or two slabs in the middle of the patio are sitting slightly high, creating a ridge that water backs up behind. Go back with your level and find the high slab, lift it, reduce the bed depth slightly, and relay it. It's frustrating but usually a 30-minute fix once you've identified the culprit.
Drain fills with water but doesn't drain away
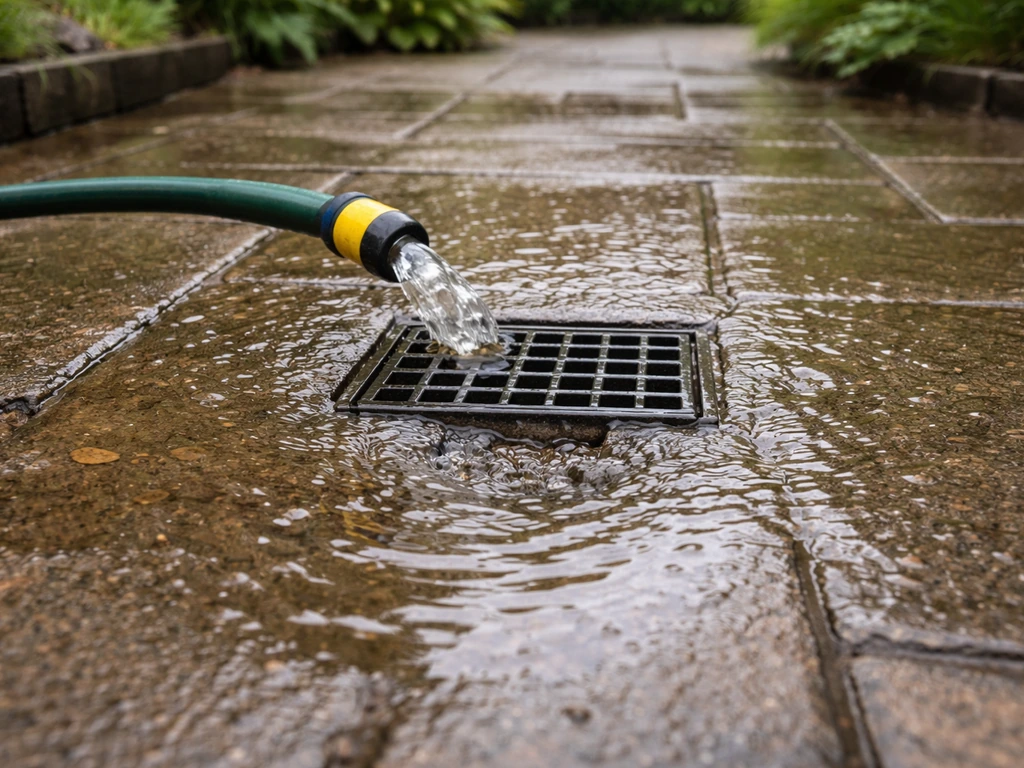
Either the outlet pipe is blocked, the connection joint has failed and soil has entered the pipe, or the downstream system is overwhelmed. Run a hose into the drain and watch how quickly it clears. If it's slow rather than stopped, a pipe snake or pressure flush might sort a partial blockage. If it doesn't move at all, check the outlet connection is intact and the pipe is clear all the way to the outfall.
Slabs sinking around the drain
Settlement around drains is common when the drain was haunched with concrete but the surrounding area wasn't compacted properly before relaying. If the concrete haunch is solid but the slabs adjacent to it are dropping, the sub-base under those slabs wasn't adequately compacted. Lift the affected slabs, check whether the sub-base is soft or loose, add material and compact it, then relay on a fresh mortar bed.
Water backing up toward the house after heavy rain
If the drain can't handle the volume during intense rainfall, the surface may flood toward the house before draining away. This is a capacity issue. Consider whether you need a larger gully pot, a longer channel drain, or a secondary drain. Also check whether the grate is partially blocked with debris, since a grate that's half-clogged with leaves dramatically reduces capacity. Channel drains with a 100 mm internal width are generally sufficient for a standard residential patio, but if you have a very large area or a roof draining onto the patio, you may need a larger bore.
Grate rattling or sitting proud of the frame
This happens when the frame has moved slightly relative to the grate. Check whether the haunching concrete is still solid or has cracked. If the drain body has shifted, you may need to lift the surrounding slabs again and re-haunch it properly. A grate sitting proud of the surrounding surface is also a trip hazard, so don't leave it.
What to do today: your next-step checklist
Use this to work out where you actually are and what to do first.
- Go outside after rain (or run a hose) and mark exactly where water pools on your patio.
- Measure the slope in multiple directions with a 1 m spirit level. Note where the fall is less than 10 mm/m or runs the wrong way.
- Locate the existing drain, lift the grate, and check whether water in the drain flows away freely or sits static.
- Trace where the drain connects: soakaway, surface-water sewer, or watercourse. If you don't know, call your local authority or use a drainage survey camera.
- Decide which fix applies: adjust slab bedding to change slope, raise existing drain body, or install a new drain entirely.
- If adding a new connection to a sewer, contact your water authority before you start.
- Set your string lines at the correct elevations before lifting a single slab.
- If the sub-base is soft, wet, or disturbed, replace it before relaying, not after.
- If any part of this is unclear, a one-hour consultation with a drainage contractor before you start can save a full weekend of rework.
Most of this job is within reach of a confident DIYer who's comfortable with basic masonry. The elevation setting and sub-base compaction are the parts where mistakes cost the most time to undo, so slow down there. If you're also thinking about the broader picture of where surface water goes once it leaves the patio, it's worth looking into how to divert water away from the patio as a complementary step, since a well-drained patio surface paired with a poorly managed outfall can just move the pooling problem to a different spot. How to divert water away from the patio helps you manage the outfall so runoff doesn't simply pool somewhere else after your drain fix.
FAQ
Can I raise the drain just by adding a riser, without lifting any slabs?
Yes, but only if the existing drain outlet and pipe invert still allow the drain top to sit at the right finished level. If the riser extension raises the inlet too much, it can force the underground pipe to fall the wrong way, which leads to standing water and repeated blockages.
Why do my slopes look right when I lay the slabs, but water still pools later?
A common mistake is chasing the fall on the paving while ignoring the sub-base level. If the sub-base is not compacted and graded, you may re-lay slabs that look level during the job but settle into a new ridge later, undoing the slope you set with string lines.
What if the drain is full of water, even when it hasn't rained recently?
If water sits in the gully even after heavy rain, treat it as a downstream problem before changing heights. Debris, a joint that has let soil into the pipe, or an overwhelmed outfall can stop flow, so raising the grate will not fix the underlying cause.
Will a slightly blocked grate still drain properly if I raise the drain height?
Replace the half-clogged grate rather than just brushing the top if debris is packed inside the channel. Even a partial blockage reduces capacity, especially in winter when leaves and seed pods mat together, making the patio flood before the raised drain can work.
For a gully (point drain), do I slope the whole patio toward it in every direction?
For a point gully, you generally need to ensure the low spot actually sits at the gully and that surrounding slabs fall toward it from all directions. If you only create a one-direction slope, water can bypass the gully and run into corners or along slab joints.
How much below the paving should the grate sit, and how do I avoid a cracked joint?
Aim for 2 to 3 mm step-down as you set the grate, then avoid rigid mortar fillets that bridge the moving interface. If the grate is flush or slightly high, water can track past it, and if it is bonded rigidly to paving it may crack as the patio moves.
How do I confirm where the underground drain actually discharges before raising it?
If you can't find the true outfall route, assume the worst and verify before you lift anything. Use a hose test, then locate where the pipe leads (soakaway, surface-water sewer, or watercourse) so you know the available invert depth and the required permissions.
What if the patio still floods during heavy rain after I raise the drain?
Yes, but capacity is not only about fall. If intense rainfall overwhelms the system, water can flood toward the house even with correct slope. In that case you may need a larger channel, a larger bore gully, a longer run, or adding a second drain rather than raising the existing one.
My raised grate now rocks or sits higher than the slabs, what causes this and what should I do?
Check the frame movement and haunch integrity. A grate that sits proud usually means the surrounding concrete bed has cracked or shifted, or the drain body has moved relative to the slabs. You may need to lift, re-haunch, and re-set to restore the correct step-down and eliminate trip risk.
Can I fill the gap between the slab and drain frame with rigid mortar to make it stronger?
Cut slabs only to create the correct gap, then fill the joint with a suitable flexible pointing or mortar. If you try to force slabs tight to the frame with rigid packing, differential movement can push the joint open or crack adjacent slabs.
What’s the risk if my patio edges are not kerbed, or if water can run off the boundary?
You can, but only if it doesn't create an artificial “water dam.” Water pooling along fence lines often happens when edging is too high or when the patio can escape over the boundary instead of draining inward, so keep containment slightly above the surface and direct overflow onto gravel or planting away from structures.
Does adding roof runoff (downpipes) change how I should raise or design the patio drain?
Make sure the drain can handle the local runoff source. If the patio receives roof water through downpipes, the drain size and length may need to increase, and the slope should be planned so runoff reaches the drain quickly rather than traveling along slab joints.
If water backs up behind a single section, is it always a drain height problem?
Sometimes the issue is inconsistent slope from one slab, not the whole patio. Identify the ridge by re-checking with a straight edge or level, then lift only the high slabs, reduce bedding depth slightly, and relay, while keeping the grate step-down consistent.
Do I need permission if I’m only raising an existing patio drain versus adding a new outfall?
In most DIY scenarios, small changes to existing surface drainage do not require a full application, but new connections, new soakaways, and certain proximity situations can require consent. If you are adding an outfall to a sewer for the first time, confirm the requirements with your local authority before you connect.
Next Article
How to Cover a Drain on a Patio: DIY Step by Step
Step-by-step DIY on how to cover a patio drain, stop standing water, choose trench vs soakaway, and install safely.